

Before you begin
- Labs create a Google Cloud project and resources for a fixed time
- Labs have a time limit and no pause feature. If you end the lab, you'll have to restart from the beginning.
- On the top left of your screen, click Start lab to begin
Create the API proxy
/ 20
Add policies to verify tokens
/ 10
Add policies to generate tokens
/ 10
Deploy the API proxy
/ 10
Add the API product and create an app
/ 20
Add the SpikeArrest policy
/ 10
Add error handling
/ 20
Apigee is a platform for developing and managing APIs. Apigee can help you secure access to your APIs and rate limit access to them. Apigee also provides features used to secure internal access to API data.
In this lab, you create an API that requires OAuth tokens for access. You use the SpikeArrest policy to limit the rate of API calls by application, and you use private variables and data masking to hide sensitive data from users who debug API traffic.
In this lab, you learn how to perform the following tasks:
Read these instructions. Labs are timed and you cannot pause them. The timer, which starts when you click Start Lab, shows how long Google Cloud resources are made available to you.
This hands-on lab lets you do the lab activities in a real cloud environment, not in a simulation or demo environment. It does so by giving you new, temporary credentials you use to sign in and access Google Cloud for the duration of the lab.
To complete this lab, you need:
Click the Start Lab button. If you need to pay for the lab, a dialog opens for you to select your payment method. On the left is the Lab Details pane with the following:
Click Open Google Cloud console (or right-click and select Open Link in Incognito Window if you are running the Chrome browser).
The lab spins up resources, and then opens another tab that shows the Sign in page.
Tip: Arrange the tabs in separate windows, side-by-side.
If necessary, copy the Username below and paste it into the Sign in dialog.
You can also find the Username in the Lab Details pane.
Click Next.
Copy the Password below and paste it into the Welcome dialog.
You can also find the Password in the Lab Details pane.
Click Next.
Click through the subsequent pages:
After a few moments, the Google Cloud console opens in this tab.

Cloud Shell is a virtual machine that is loaded with development tools. It offers a persistent 5GB home directory and runs on the Google Cloud. Cloud Shell provides command-line access to your Google Cloud resources.
Click Activate Cloud Shell 
Click through the following windows:
When you are connected, you are already authenticated, and the project is set to your Project_ID,
gcloud is the command-line tool for Google Cloud. It comes pre-installed on Cloud Shell and supports tab-completion.
Output:
Output:
gcloud, in Google Cloud, refer to the gcloud CLI overview guide.
To open the Apigee console:
Apigee, and then click Apigee API Management in the search results.The Apigee console opens, and the landing page shows quick links to commonly used locations.
 ), next to Apigee, click Pin (
 ).
).Apigee is now pinned to the Navigation menu.
In this task, you create an Apigee API proxy that acts as a facade for a backend service. The API proxy will use a service account to allow it to present OpenID Connect identity tokens to the Cloud Run service.
A backend service named simplebank-rest has already been created and deployed to Cloud Run. A service account has also been created for you.
In Cloud Shell, to retrieve the URL for the backend service, use the following command:
Save this URL, as it will be used when creating the API proxy.
Navigate to Apigee UI in the Cloud console.
On the left navigation menu, select Proxy development > API proxies.
To create a new proxy using the proxy wizard, click + Create.
You will create a reverse proxy for your backend service. This API proxy will use an OpenAPI specification to create a skeleton for the API.
For Proxy template box, in OpenAPI spec template select Reverse proxy (Most common) .
For OpenAPI File, open the URL in a browser and the OpenAPI specification YAML file will be downloaded to your computer:
Click Browse and select the file from the computer for OpenAPI file and click Next.
Specify the following for the Proxy details:
| Property | Value |
|---|---|
| Proxy name | bank-v1 |
| Base path | /bank/v1 |
| Description | SimpleBank read-only API |
| Target (Existing API) | backend URL |
The target should be the backend URL you retrieved earlier in the task. The target should look something like this:
Click Next.
Leave the other settings at defaults, and click Create.
Click the Develop tab.
The backend service is deployed to require authenticated access, so you cannot call the service without a valid OpenID Connect identity token.
The HTTPTargetConnection specifies the backend target for the service.
In the Navigator menu for the proxy, in the Target endpoints section, click PreFlow.
Find the following code (your URL will be different):
Below the URL, add an Authentication section that looks like this:
Replace AUDIENCE with the URL value already in the HTTPTargetConnection section. Your code should now look similar to this, except with your specific URL in the URL and Audience elements:
Click Save.
Click Check my progress to verify the objective.
In this task, you add an OAuthV2 policy to the API proxy. An OAuthV2 policy using the VerifyJWTAccessToken operation enforces verification of access tokens at runtime, allowing only applications with a valid OAuth access token to access the API.
The OAuthV2 policy can create and verify both opaque tokens and JSON Web Tokens (JWTs). This API proxy will use JWTs for the access tokens.
A property set will be used to store the signing secret used in the creation and verification of the JWT.
The JWT will be signed using a hash-based message authentication code (HMAC). This type of cryptographic signing requires a secret.
In the Navigator menu for the proxy, next to Resources, click +.
In the Resource Type dropdown, select Property Set.
Specify oauth.properties for the Resource Name, and then click Add.
In the oauth.properties code pane, add the following property:
This value can be accessed in the code by using the flow variable propertyset.oauth.secret.
The signing secret must be provided to the OAuth policy in a private variable, but the propertyset.oauth.secret variable is not private. This AssignMessage policy will create a private variable from the property set variable.
In the Navigator menu for the proxy, in the Proxy endpoints section, under default, click PreFlow.
The request PreFlow in the default proxy endpoint is the first flow that is executed when a request comes into the API proxy.
The OAuthV2 policy requires the secret, and will be executed very early on in the API proxy.
In the Flow pane, click the + button right next to PreFlow in the request flow.
Select Create new Policy and for Select policy dropdown, select Assign Message from the Mediation section, and then set the Display Name and Name to AM-GetSecret.
Click Add. Click on AM-GetSecret under Policies in the navigator menu.
The AssignMessage policy configuration is shown in the Code pane.
Change the policy configuration to:
The AssignVariable setting copies the propertyset.oauth.secret variable into the private.secretkey variable.
The IgnoreUnresolvedVariables setting causes the AssignMessage policy to raise a fault if propertyset.oauth.secret cannot be resolved.
In the Navigator menu for the proxy, in the Proxy endpoints section, under default, click PreFlow.
The OAuthV2 policy should execute after the AssignMessage policy.
In the Flow pane, click the + button right next to PreFlow in the request flow.
Select Create new policy and for Select policy dropdown, select OAuth v2.0 from the Security section, and then set the Display Name and Name to OA-VerifyToken.
Click Add, and then click on the OA-VerifyToken from the Policies in the navigator menu.
The OAuthV2 policy configuration is shown in the Code pane.
Change the OAuthV2 policy configuration to:
The configuration specifies that the JWT access token will use the HS256 (HMAC-SHA256) algorithm, using the private variable created in the AssignMessage policy as the secret key.
Click Save.
Click Check my progress to verify the objective.
A separate proxy endpoint will also be added to the API proxy to allow creation of the JWT tokens.
In a production environment, a separate proxy is typically created for generating tokens. For this lab, you will create the token generation flow in a separate proxy endpoint within the same API proxy.
In the Navigator menu for the proxy, on the Proxy endpoints row, click the + button.
This will create a new proxy endpoint to be used when creating a new JWT.
For Name, specify token, and then click Add.
The new proxy endpoint named token will be shown in the Code pane.
Change the entire token flow configuration from:
to:
Click Save.
This updated configuration results in 2 specific changes:
/token. This is the base path that will be used when creating a token.In the Flow for the proxy, in the Proxy Endpoints: token section, right next to /token, click +.
For the new conditional flow, specify the following values:
| Property | Value |
|---|---|
| Flow Name | generateToken |
| Condition Type | select Custom |
For Condition, specify this value:
Only valid client credentials token requests will be allowed.
Click Add.
The OAuthV2 policy that will generate tokens will also need access to the private.secretkey variable.
In the Navigator menu for the proxy, in the Proxy endpoints section, under token, click generateToken.
In the Flow pane, click the + button in the right next to generateToken in the request flow.
For Select Policy, select Select Existing policy, and then click AM-GetSecret.
Click Add.
The same AssignMessage policy is attached to the token proxy endpoint PreFlow.
In the Navigator menu for the proxy, in the Proxy endpoints section, under token, click generateToken.
In the Flow pane, click the + button in the right next to generateToken in the request flow.
For Select Policy, select Create new policy and select OAuth v2.0 from the Security section, and then set the Display Name and Name to OA-GenerateToken.
Click Add, and then click on the OA-GenerateToken from the Policies.
The OAuthV2 policy configuration is shown in the Code pane.
Change the OAuthV2 policy configuration to:
This configuration will allow creation of a JWT OAuth token which expires in 30 minutes.
In the Flow for the proxy, in the Proxy Endpoints: token section, right next to /token, click +.
For the new conditional flow, specify the following values:
| Property | Value |
|---|---|
| Flow Name | invalidRequest |
| Condition Type | select Custom |
| Condition | DELETETHIS |
The condition will be deleted once the flow has been added, because any invalid generateToken request should go through this flow.
Click Add.
In the invalidRequest flow, remove the following line:
In the Navigator menu for the proxy, in the Proxy endpoints section, under token, click invalidRequest.
In the Flow pane, click the + button right next to invalidRequest for the request flow.
Select Create new policy and select Raise Fault from the Mediation section, and then set the Display Name and Name to RF-InvalidTokenRequest.
Click Add, and then click on the RF-InvalidTokenRequest from the Policies.
The RaiseFault policy configuration is shown in the Code pane.
Change the RaiseFault policy configuration to:
This will create a 400 Bad Request response if the request was invalid.
Click Save.
Click Check my progress to verify the objective.
In this task, you deploy the API proxy and confirm that access requires an OAuth token.
In Cloud Shell, paste and run the following set of commands:
This series of commands uses the Apigee API to determine when the Apigee runtime instance has been created and the eval environment has been attached.
Wait until the instance is ready.
When the text ***ORG IS READY TO USE*** is displayed, the instance is ready. The Apigee organization (org) may have been created before you started the lab, so you might not have to wait for the instance to be created.
If you are waiting for the org to be ready, you can learn about OAuth, the SpikeArrest policy, masking and hiding data, and opaque tokens and JWTs.
Navigate to Apigee in the cloud console.
On the left navigation menu, select Proxy development > API Proxies, and then click bank-v1.
Click the Develop tab.
Click Deploy, for Environment select eval.
A dialog asks you to confirm the deployment.
For Service Account, specify the service account's email address:
Click Deploy and Confirm.
Click the Overview tab, and wait for the eval deployment status to show that the proxy has been deployed.
Click Check my progress to verify the objective.
The eval environment in the Apigee organization can be called using the hostname eval.example.com. The DNS entry for this hostname has been created within your project, and it resolves to the IP address of the Apigee runtime instance. This DNS entry has been created in a private zone, which means it is only visible on the internal network.
Cloud Shell does not reside on the internal network, so Cloud Shell commands cannot resolve this DNS entry. A virtual machine (VM) within your organization can access the private zone DNS. A virtual machine named apigeex-test-vm was automatically created. You can use this machine to call the API proxy.
In Cloud Shell, open an SSH connection to your test VM:
If asked to authorize, click Authorize.
For each question asked in the Cloud Shell, click Enter or Return to specify the default input.
Your logged in identity is the owner of the project, so SSH to this machine is allowed.
Your Cloud Shell session is now running inside the VM.
Call the deployed bank-v1 API proxy in the eval environment:
The -k option tells curl to skip verification of the TLS certificate. For this lab, the Apigee runtime is using a self-signed certificate instead of a certificate that has been created by a trusted certificate authority (CA).
-k option to bypass certificate verification for production use cases.
This API attempts to retrieve a list of customers. You should now see a 401 Unauthorized response similar to this:
This response indicates that the API proxy has blocked access to the backend service because the access token was not provided.
Enter the command exit to leave the SSH session and return to Cloud Shell.
In this task, you add an API product that will provide access to your API. You will also create a developer, and then an application which will be associated with your API product.
Navigate to Apigee in the cloud console.
On the left navigation menu, select Distribution > API Products.
To create a new API product, click +Create.
In the Product details pane, specify the following:
| Property | Value |
|---|---|
| Name | bank-readonly |
| Display Name | bank (read access) |
| Environment | select eval |
| Access | select Public |
Leave Automatically approve access requests selected.
In the Operations section, click +Add an Operation.
Operations are used to specify which requests in which API proxies are allowed for an application associated with the API product.
Specify the following:
| Property | Value |
|---|---|
| API Proxy | select the bank-v1 API proxy |
| Path | /** |
| Methods | select GET |
The path expression /\*\* indicates that any request matching the base path will be allowed.
In a production environment, you might choose to add each operation that is allowed separately, rather than using this wildcard path expression.
Click Save to save the operation.
To save the API product, at the top of the Products Detail page, click Save.
Return to the Distribution > API Products page.
The API product will be listed.
Before creating an app, you must create an app developer.
On the left navigation menu, click Distribution > Developers.
To create a new app developer, click +Create.
Specify the following:
| Property | Value |
|---|---|
| First Name | Joe |
| Last Name | Developer |
| Username | joe |
| joe@example.com |
Click Add to create the app developer.
On the left navigation menu, click Distribution > Apps.
To create a new app, click +Create.
In the App details pane, specify the following:
| Property | Value |
|---|---|
| Name | readonly-app |
| Developer | select joe@example.com |
In the Credentials pane, click Add credentials > Add products, select bank (read access) from the drop-down, and then click Add to add.
Click Create in the upper right corner to create the app.
The Key and Secret are now configured for the app.
Click the Show icons next to Key and Secret.
For this API, an OAuth access token is required. The key and secret will be used as the credentials for the app, allowing the app to create an OAuth access token.
Click Check my progress to verify the objective.
In Cloud Shell, open an SSH connection to your test VM:
If asked to authorize, click Authorize.
Your Cloud Shell session is now running inside the VM.
To get the consumer key and secret for the application, run the following commands:
The first command reads the gcloud configuration to get the current project. The second and third commands retrieve the consumer key and secret by using the Apigee API. The request is authorized because you send an access token that has the permissions of the logged in user.
For the OAuth client credentials grant type, the client application needs to send the consumer key and secret in an Authorization header in order to generate an access token.
To generate a JWT access token, run the following command:
The first command calls the token endpoint, and saves the response. The token is then extracted from the JSON response and stored in JWT_TOKEN.
To test a request using the JWT token, use the following command:
The API call should now return a list of customers.
Enter the command exit to leave the SSH session and return to Cloud Shell.
In this task, you add a SpikeArrest policy that will use the API product quota configuration to limit the rate of calls to the API.
The SpikeArrest policy protects your APIs and backends against traffic surges by allowing you to specify a maximum rate of traffic that will be allowed. This policy can be used to ensure that your backend is not overwhelmed by traffic that it is unable to handle.
This SpikeArrest policy will specify an overall rate limit for traffic for calls to the /token API.
Navigate to Apigee in the cloud console.
On the left navigation menu, select Proxy development > API Proxies, and then click bank-v1.
Click the Develop tab.
In the Navigator menu for the proxy, in the Proxy endpoints section, under token, click PreFlow.
The SpikeArrest policy should execute before the conditional flow policies.
In the Flow pane, click the + button right next to PreFlow from the request flow.
Select Create new policy and select Spike Arrest from the Traffic Management section, and then set the Display Name and Name to SA-LimitTokenRate.
Click Add, and then click on the SA-LimitTokenRate in the Policies section.
The SpikeArrest policy configuration is shown in the Code pane.
Change the SpikeArrest policy configuration to:
The configuration specifies that the maximum allowed rate of requests is 5 per minute. All traffic will be limited by this SpikeArrest policy.
UseEffectiveCount set to false specifies that the SpikeArrest policy is using the Token Bucket algorithm. The traffic is smoothed by dividing the rate into smaller intervals. 5 requests per minute means 1 request per one-fifth of a minute, or 1 request every 12 seconds. When a second request comes into a message processor less than 12 seconds after the previous one, it may be rejected.
This SpikeArrest policy will specify a rate limit for traffic for calls to the /bank/v1 API. The rate will be applied per application.
In the Navigator menu for the proxy, in the Proxy endpoints section, under default, click PreFlow.
The SpikeArrest policy should execute early in the call, but it must execute after the OAuthV2 VerifyJWTAccessToken policy to limit the rate based upon the application.
In the Flow pane, click the + button right next to PreFlow from the request flow.
Select Create new policy and select Spike Arrest from the Traffic Management section, and then set the Display Name and Name to SA-LimitRateByApp.
Click Add, and then click on the SA-LimitRateByApp in the Policies section.
The SpikeArrest policy configuration is shown in the Code pane.
Change the SpikeArrest policy configuration to:
Like the previous policy, the configuration specifies that the maximum allowed rate of requests is 5 per minute. However, this policy specifies an Identifier, which maintains the SpikeArrest rate separately for each client_id. The client ID is populated by the OA-VerifyToken policy, and it is unique per developer application.
UseEffectiveCount set to true specifies that the rate count is maintained for all traffic within the region. The policy maintains a counter of requests received per period, which is a minute long when using a rate of requests per minute. The rate calculation is based on a sliding window.
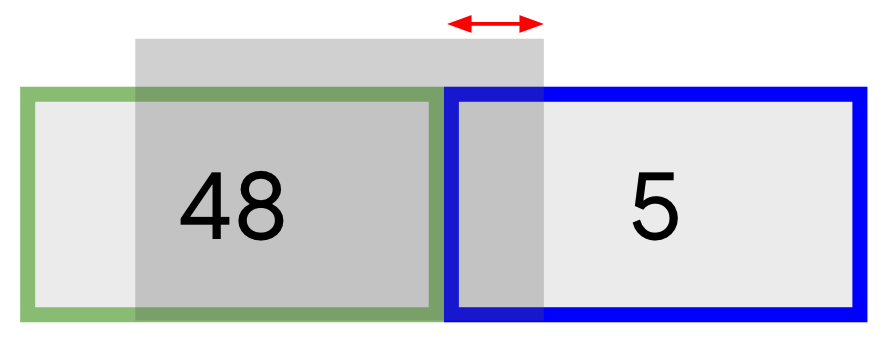
For this example shown above, assume we are using a rate of 50 requests per minute. The counters use a period of one minute, although the counter period would be one second if the rate had been specified per second. Assume that we are 10 seconds into the current minute, represented by the arrow. The previous minute had 48 requests, and the current period had 5 requests so far.
To allow another request, the rate would need to be less than 50 requests per minute. The calculated rate is:
request_rate = (48 * (60-10)/60) + 6 = 46
Since only 10 seconds out of 60 have elapsed in the current period, the other 50 seconds are calculated using the previous period's rate. 5/6 of 48 is 40. If a request were allowed, the count for the current period would be 5 + 1, or 6. The request rate calculation of 46 indicates that the request is allowed, because the request rate is less than 50 requests per minute.
Click Save > Save as new revision.
Click Deploy then select eval for Environment
For Service Account, specify the service account's email address:
Click Check my progress to verify the objective.
In Cloud Shell, open an SSH connection to your test VM:
If asked to authorize, click Authorize.
Your Cloud Shell session is now running inside the VM.
To get the consumer key and secret for the application, run the following commands:
Generate multiple access tokens, by repeatedly running the following command:
You should quickly receive a 429 Too Many Requests response, indicating that the rate has been exceeded. Because UseEffectiveCount is false for this policy, this smooths the traffic using the Token Bucket algorithm. You will probably get the spike arrest violation before your 5th request.
To save a JWT access token, run the following command:
To test the SpikeArrest policy for API calls, repeatedly send the following command:
UseEffectiveCount is true, so this policy uses the sliding window algorithm. You should be able to get 5 successful requests before a request is blocked.
Enter the command exit to leave the SSH session and return to Cloud Shell.
In this task, you create a data mask to hide specific fields in a Debug session.
Debug is a tool for troubleshooting and monitoring API proxies running on Apigee. The Debug tool lets you examine the details of each step during an API call.
On the left navigation menu, select Proxy development > API Proxies, and then click bank-v1.
Click the Debug tab.
In the Start debug session pane click Start debug session, for the environment dropdown, select the eval environment.
Click Start.
It may take a short period of time before the debug session starts capturing requests.
You will make API requests and then examine the debug session.
In Cloud Shell, open an SSH connection to your test VM:
If asked to authorize, click Authorize.
Your Cloud Shell session is now running inside the VM.
To get the token for the application, run the following commands:
Make this request to the API:
Return to the Apigee UI page.
The Debug page should show 2 requests: a POST (generating the token) and a GET (retrieving the accounts for a user).
Click on the GET request.
The GET request details are shown.
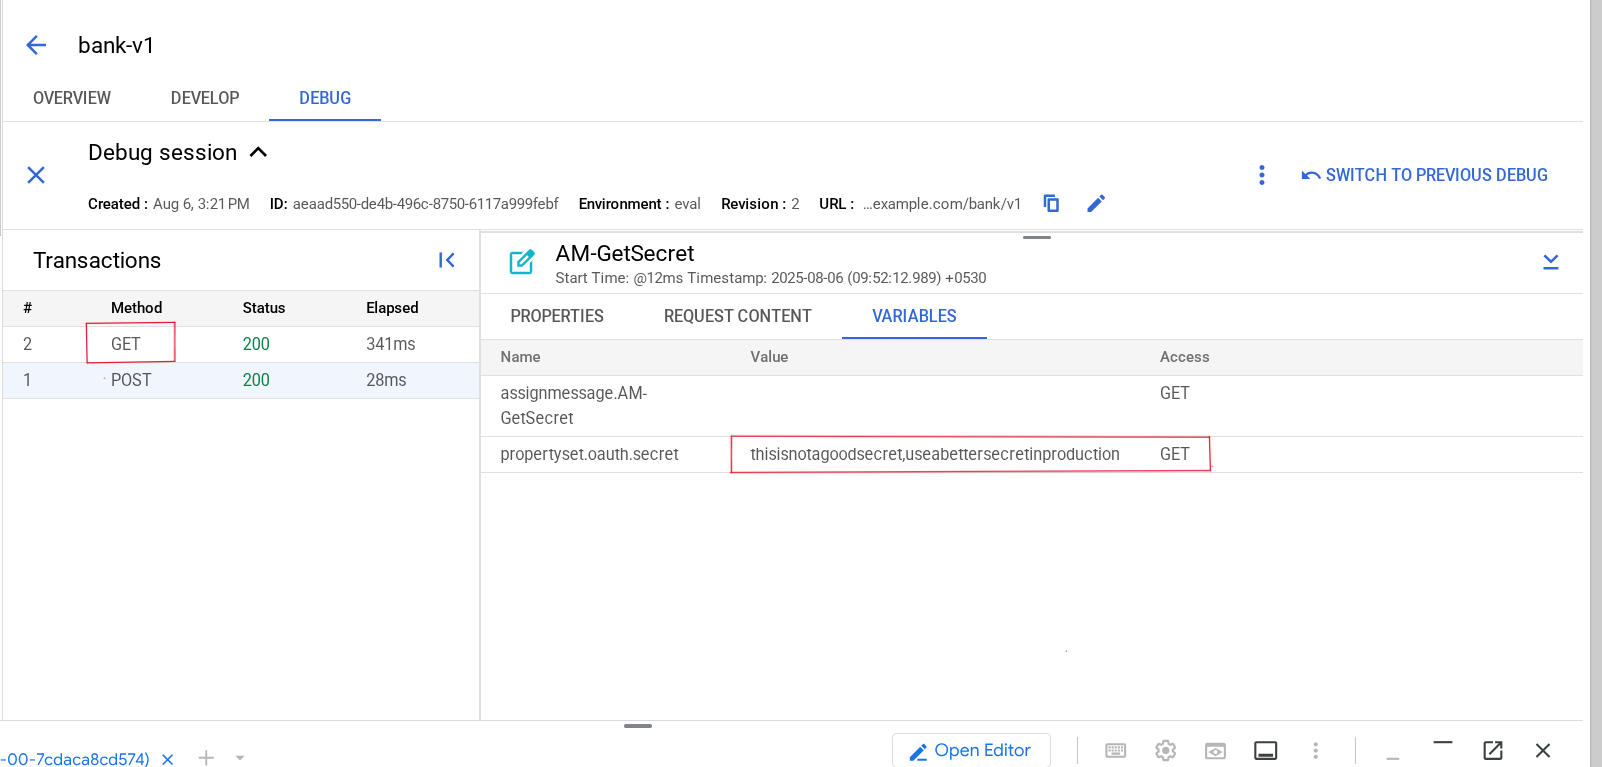
Click on the first policy, which is the AM-GetSecret policy that copies the variable propertyset.oauth.secret into the variable private.secretkey.
The Phase Details do not show the private variable, because variables prefixed with "private." are hidden from the Debug session. However, the property set variable holds the same sensitive data, and it might be smart to hide it from users who are debugging traffic.
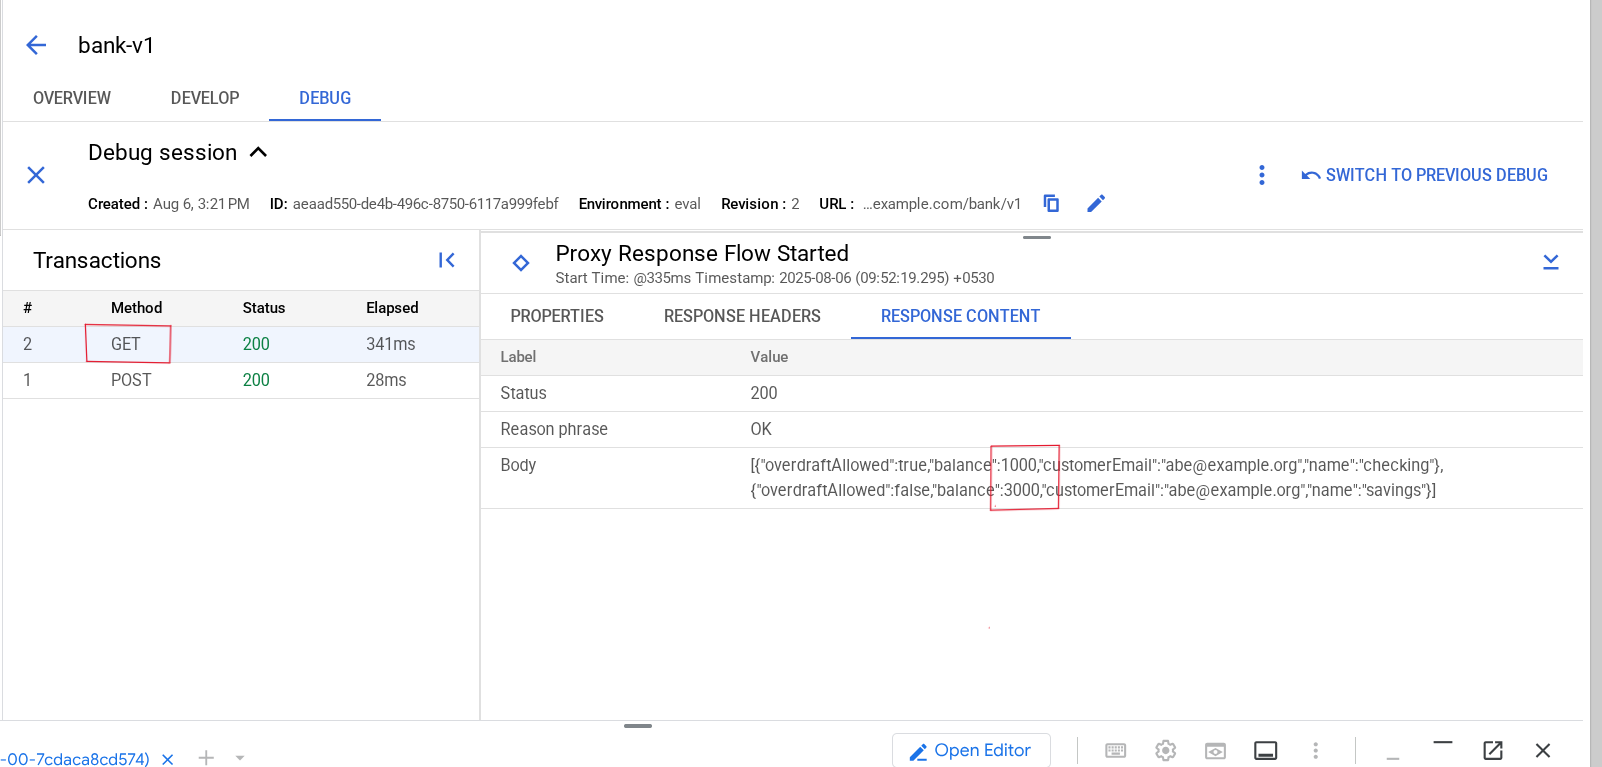
Click on the response from the backend, which is indicated by the circle to the left of the factory icon.
The response contains the accounts for the user, including the account balances.
Open a new tab in the same browser window, and navigate to the Apigee API reference.
The Apigee API reference provides details for the various API calls that can be used to manage Apigee, and can also be used to make calls to the Apigee API. This page shows the organization.environments API calls.
Scroll to the bottom of the page, and click updateDebugmask.
This API call will update the debug mask for the environment.
In the Try this API pane, for the name request parameter, use the following:
For the request body, enter the following body:
This payload will cause the propertyset.oauth.secret variable to be masked, and also mask each balance field in the array of objects in the response payload.
Click Execute.
If a pop-up box asks you to choose your account, select the student account.
Click Allow to allow the page to use the student credentials.
In the Apigee UI, on the left navigation menu, select Proxy development > API Proxies, and then click bank-v1.
Click the Debug tab.
In the Start debug session pane, on the environment dropdown, select the eval.
Click Start.
In Cloud Shell, if the SSH connection has closed, open an SSH connection to your test VM:
Get a token and make the API request again:
Return to the Debug page in the Apigee UI, and click the GET request.
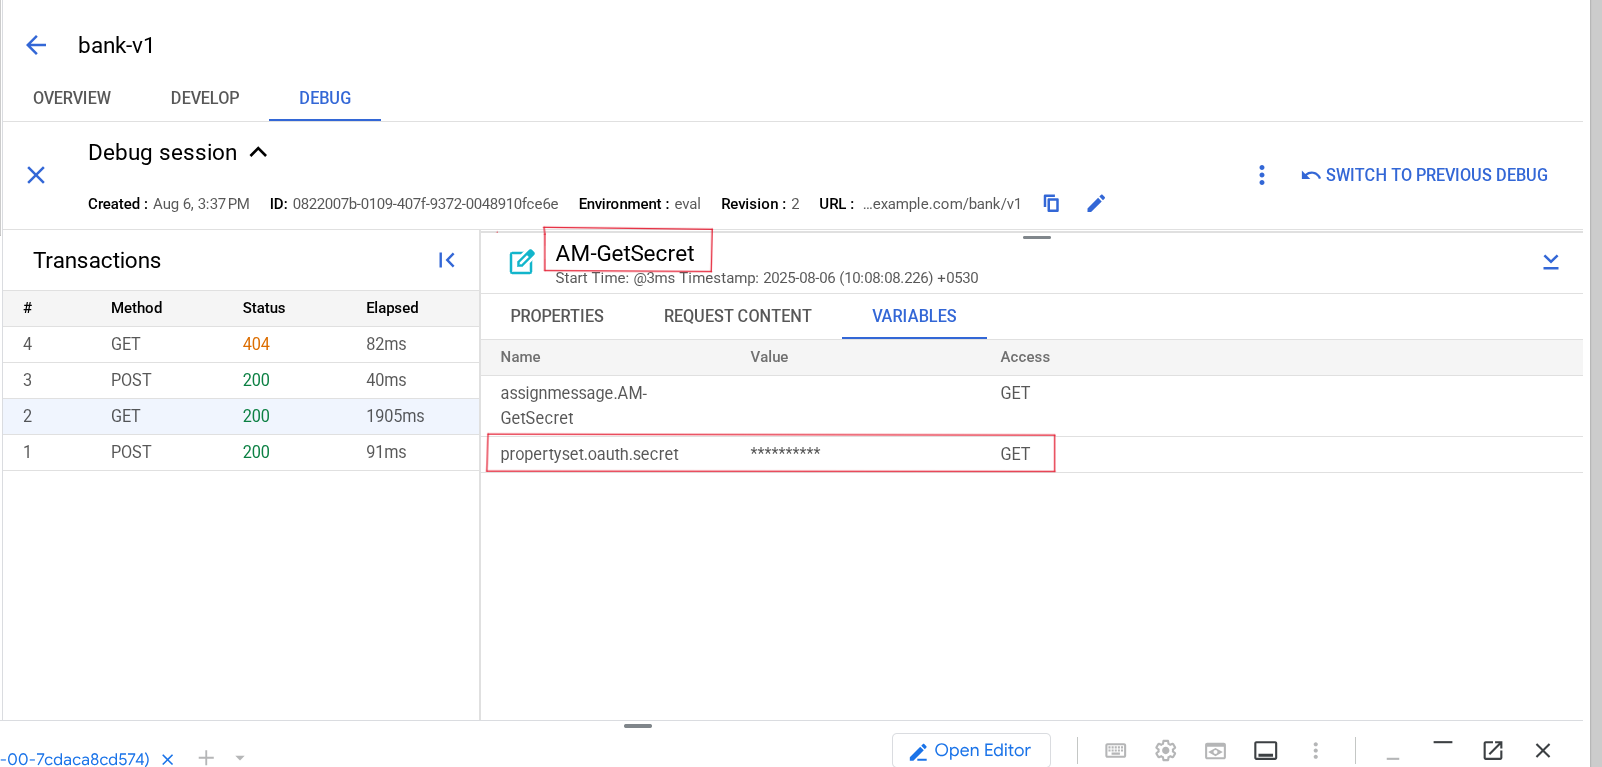
Click on the AM-GetSecret policy.
The propertyset.oauth.secret variable is masked.
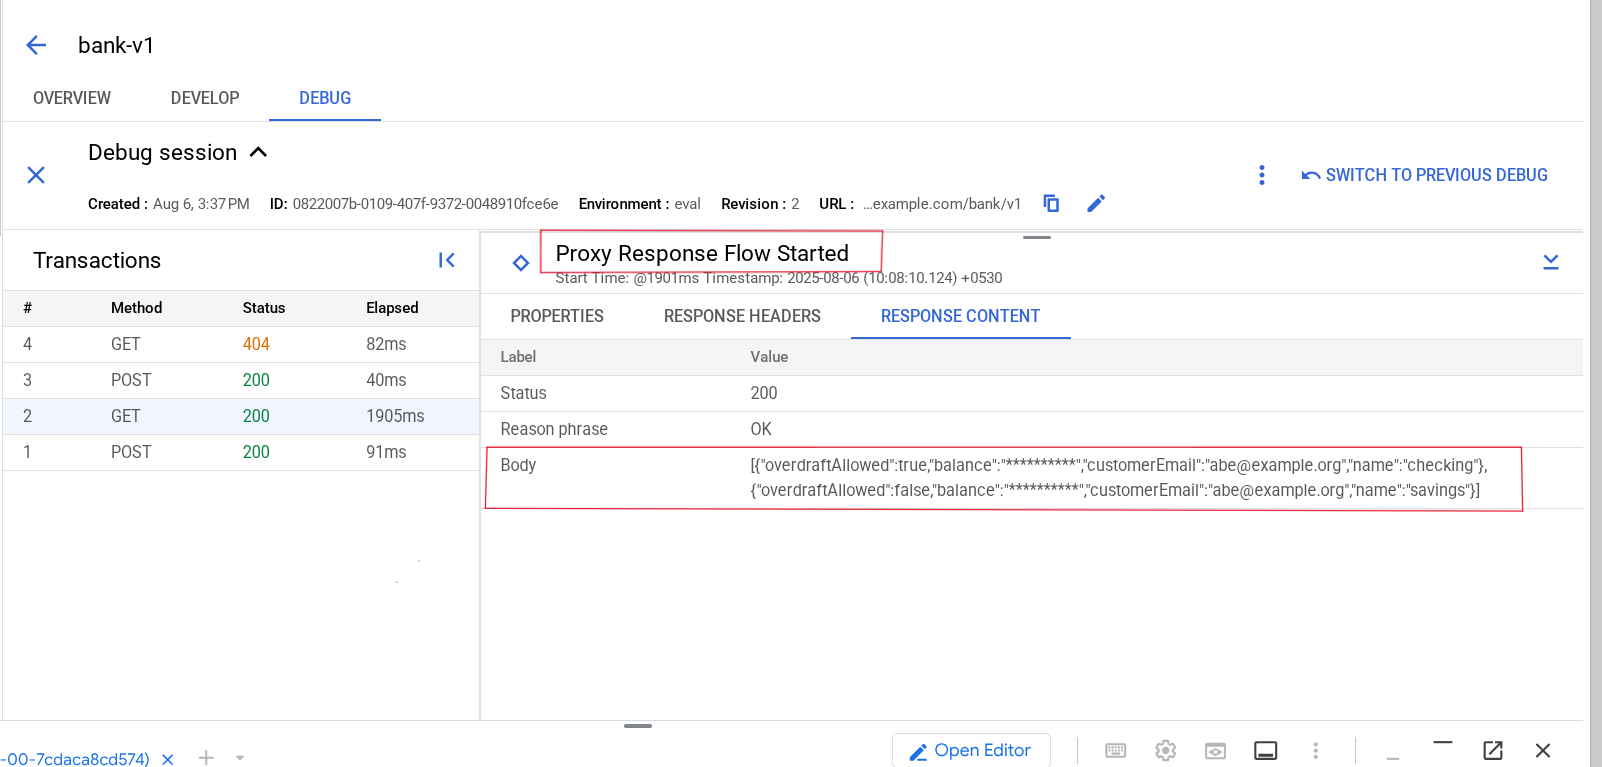
Click on the Proxy Response Flow Started for the backend response.
Each balance field is masked.
In this task, you create a default conditional flow to restrict calls to specific backend resources, and you rewrite a backend error message.
In Cloud Shell, if the SSH connection has closed, open an SSH connection to your test VM:
Enter Y to continue and press ENTER twice to leave the passphrase empty.
Get a token and make a GET request to /users:
The backend service does not recognize the GET /users request, so it returns a 404 response which looks similar to this:
The response returns an HTML payload, which does not match the format of the RF-InvalidTokenRequest payload. In addition, a backend response may contain sensitive data. For these reasons, it is a best practice to rewrite error responses from backend services.
Fault rules can be used to detect errors and rewrite error messages.
A RaiseFault policy will be used to set the new response.
Navigate to Apigee in the cloud console.
On the left navigation menu, select Proxy development > API Proxies, and then click bank-v1.
Click the Develop tab.
In the Navigator menu for the proxy, next to Policies, click +.
Select Raise Fault from the Mediation section, and then set the Display Name and Name to RF-404NotFound.
Click Create. Click RF-404NotFound in the Policies section.
Change the RaiseFault policy configuration to:
The Remove section first removes all headers that might have come from the backend service, then the Set section creates the response. The FaultName header has been added to show the value of the fault.name variable when the fault is raised. The fault.name variable specifies the name of the fault.
In the Navigator menu for the proxy, in the Target endpoints section, click default.
The default target endpoint contains the backend target call that is returning the 404 response. A 404 is treated as a failure code. The endpoint will raise a fault, and FaultRules specified in the target endpoint can be used to rewrite the API response.
In the TargetEndpoint configuration, directly under the TargetEndpoint tag, add the following FaultRules section:
The beginning of the TargetEndpoint will now look similar to this:
Click Save > Save as new revision.
Click Deploy and select eval for Environment,
For Service Account, specify the service account's email address:
lick Deploy then Confirm.
Click the Overview tab, and wait for the eval deployment status to show that the proxy has been deployed.
In Cloud Shell, if the SSH connection has closed, open an SSH connection to your test VM:
Get a token and make a GET request to /users:
The response has been rewritten, and now looks similar to this:
The response is now using JSON. Note that the faultname header has the value ErrorResponseCode, which is the value of the fault.name variable specified when the target returns a failure code. As soon as the 404 response came back from the backend service, a fault was raised and the target endpoint fault rules were evaluated. The 404 fault rule then rewrote the response.
Instead of counting on the backend to return a response when an unexpected request is sent, a new conditional flow can be added at the end of the proxy endpoint conditional flows to raise a fault when none of the other conditional flows match their conditions. This guarantees that only the operations listed in the conditional flows will pass through to the backend. This pattern allows you to allow access to only a subset of the backend service resources.
In the Navigator menu for the proxy, navigate to Proxy Endpoint: default, then in flow section and click + next to /bank/v1.
For the new conditional flow, specify the following values:
| Property | Value |
|---|---|
| Flow name | 404NotFound |
| Condition type | select Custom |
| Condition | DELETETHIS |
Click Add.
In the 404NotFound flow, remove the following line:
If all of the previous conditional flow conditions do not match, the 404NotFound flow will execute.
In the Navigator menu for the proxy, in the Proxy endpoints section, under default, click 404NotFound.
In the Flow pane, click the + button right next to 404NotFound request flow.
For Select Policy, select Select existing policy, and then click RF-404NotFound.
Click Add.
Click Save> Save as new revision.
Click Deploy, and then select eval for Environment
For Service Account, specify the service account's email address:
click Deploy then Confirm.
Click the Overview tab, and wait for the eval deployment status to show that the proxy has been deployed.
Click Check my progress to verify the objective.
In Cloud Shell, if the SSH connection has closed, open an SSH connection to your test VM:
Get a token and make a GET request to /users:
The response has been rewritten, and now looks similar to this:
The faultname header now has the value RaiseFault, which is the fault.name value used when a RaiseFault policy caused the fault to be raised. The RaiseFault policy in the 404NotFound conditional flow generated the response.
In this lab, you secured an API by requiring a JWT OAuth token. You limited traffic by adding SpikeArrest policies. You used private variables and data masking to hide sensitive data in Debug sessions. You also rewrote a backend error message and used a 404 conditional flow to restrict calls to the backend to specific resources.
Manual last updated August 06, 2025
Lab last tested August 06, 2025
Copyright 2025 Google LLC. All rights reserved. Google and the Google logo are trademarks of Google LLC. All other company and product names may be trademarks of the respective companies with which they are associated.


This content is not currently available
We will notify you via email when it becomes available

Great!
We will contact you via email if it becomes available

One lab at a time
Confirm to end all existing labs and start this one