개요
이 실습에서는 Vertex AI를 사용하여 ML 모델을 학습시키고 배포합니다. 실습용 머신러닝 코드가 제공되지만 기본적으로 사용자가 머신러닝에 익숙하다는 가정 하에 실습이 진행됩니다. 실습 과정에서 데이터 세트 생성 및 관리에는 데이터 세트를, scikit-learn 모델 학습에는 커스텀 모델을 사용합니다. 마지막으로 학습된 모델을 배포하고 온라인 예측을 수행합니다. 이 데모에 사용할 데이터 세트는 Titanic 데이터 세트입니다.
목표
- 테이블 형식의 데이터에 대한 데이터 세트 만들기
- Notebooks를 사용하여 커스텀 코드로 학습 패키지 만들기
- 학습된 모델 배포 및 온라인 예측 수행하기
설정
각 실습에서는 정해진 기간 동안 새 Google Cloud 프로젝트와 리소스 집합이 무료로 제공됩니다.
-
시크릿 창을 사용하여 Qwiklabs에 로그인합니다.
-
실습 사용 가능 시간(예: 1:15:00)을 참고하여 해당 시간 내에 완료합니다.
일시중지 기능은 없습니다. 필요한 경우 다시 시작할 수 있지만 처음부터 시작해야 합니다.
-
준비가 되면 실습 시작을 클릭합니다.
-
실습 사용자 인증 정보(사용자 이름 및 비밀번호)를 기록해 두세요. Google Cloud Console에 로그인합니다.
-
Google Console 열기를 클릭합니다.
-
다른 계정 사용을 클릭한 다음, 안내 메시지에 이 실습에 대한 사용자 인증 정보를 복사하여 붙여넣습니다.
다른 사용자 인증 정보를 사용하는 경우 오류가 발생하거나 요금이 부과됩니다.
-
약관에 동의하고 리소스 복구 페이지를 건너뜁니다.
작업 1. 환경 설정하기
Vertex AI API 사용 설정하기
데이터 세트 만들기
-
BigQuery 데이터 세트를 만들려면 Google Cloud 콘솔의 BigQuery로 이동하세요.
-
콘솔 페이지 상단에서 올바른 프로젝트를 선택했는지 확인합니다.
-
탐색기 패널에서 프로젝트 ID 옆의 작업 보기( )를 클릭하고 데이터 세트 만들기를 선택합니다.
팝업이 나타납니다.
-
데이터 세트 ID: titanic, 데이터 위치 > 리전: 을(를) 입력한 다음 데이터 세트 만들기를 클릭합니다.
이제 데이터 세트가 생성되었습니다.
테이블 만들기
데이터를 로드하려면 테이블이 필요합니다.
- 먼저 Titanic 데이터 세트를 로컬로 다운로드합니다.
참고: 시크릿 모드에서 데이터 세트를 다운로드하는 데 문제가 있는 경우 일반 창을 사용하여 Titanic 데이터 세트를 다운로드하세요.
- 다운로드한 데이터 세트의 이름을 titanic_toy.csv로 변경합니다.
그런 다음 UI에서 다음 작업을 수행합니다.
-
이전 단계에서 생성한 titanic 데이터 세트를 엽니다. (데이터 세트 옆의 작업 보기()를 클릭하고 열기를 선택합니다.)
-
테이블 만들기를 클릭하고 다음과 같이 지정합니다.
- 다음 항목으로 테이블 만들기: 업로드
- 파일 선택: 다운로드한 Titanic 데이터 세트 사용
- 파일 형식: CSV
- 테이블 이름: survivors
- 자동 감지: 자동 감지 체크박스에서 스키마 선택
-
테이블 만들기를 클릭합니다.
-
survivors 옆의 작업 보기 아이콘을 클릭하고 ID 복사를 선택합니다. 실습의 후반부에서 사용할 수 있도록 복사한 테이블 ID를 저장합니다.
이제 Titanic 데이터 세트로 테이블을 만들고 채웠습니다. 테이블의 콘텐츠를 탐색하고 쿼리를 실행하고 데이터를 분석할 수 있습니다.
작업 2. 데이터 세트 만들기
Vertex AI의 데이터 세트를 사용하면 머신러닝 워크로드에 사용할 데이터 세트를 생성할 수 있습니다. 정형 데이터(CSV 파일 또는 BigQuery 테이블) 또는 이미지 및 텍스트와 같은 비정형 데이터용 데이터 세트를 만들 수 있습니다. Vertex AI 데이터 세트는 원본 데이터만 참조하며 중복은 없다는 점에 유의해야 합니다.
ML 데이터 세트 만들기
- Google Cloud 콘솔의 탐색 메뉴에서 Vertex AI > 데이터 세트를 선택합니다.
-
을(를) 선택하고 만들기를 클릭합니다.
-
데이터 세트 이름을 지정합니다. 여기서는 titanic이라고 하겠습니다.
이미지, 텍스트 또는 동영상은 물론 테이블 형식의 데이터를 사용하여 데이터 세트를 만들 수 있습니다.
-
이 Titanic 데이터 세트는 테이블 형식이므로 테이블 형식 탭을 클릭해야 합니다.
-
리전으로는 을(를) 선택하고 만들기를 클릭합니다.
이제 자리표시자가 생성되었습니다. 다음 단계를 수행하면 자리표시자가 데이터 소스에 연결됩니다.
데이터 소스 선택
BigQuery에 Titanic 데이터 세트를 이미 로드했으므로 ML 데이터 세트를 BigQuery 테이블에 연결할 수 있습니다.
-
BigQuery에서 테이블 또는 뷰 선택을 고릅니다.
- 이전에 복사한 테이블 ID를 '둘러보기' 필드에 붙여넣습니다.
- 데이터 세트를 선택했으면 계속을 클릭합니다.
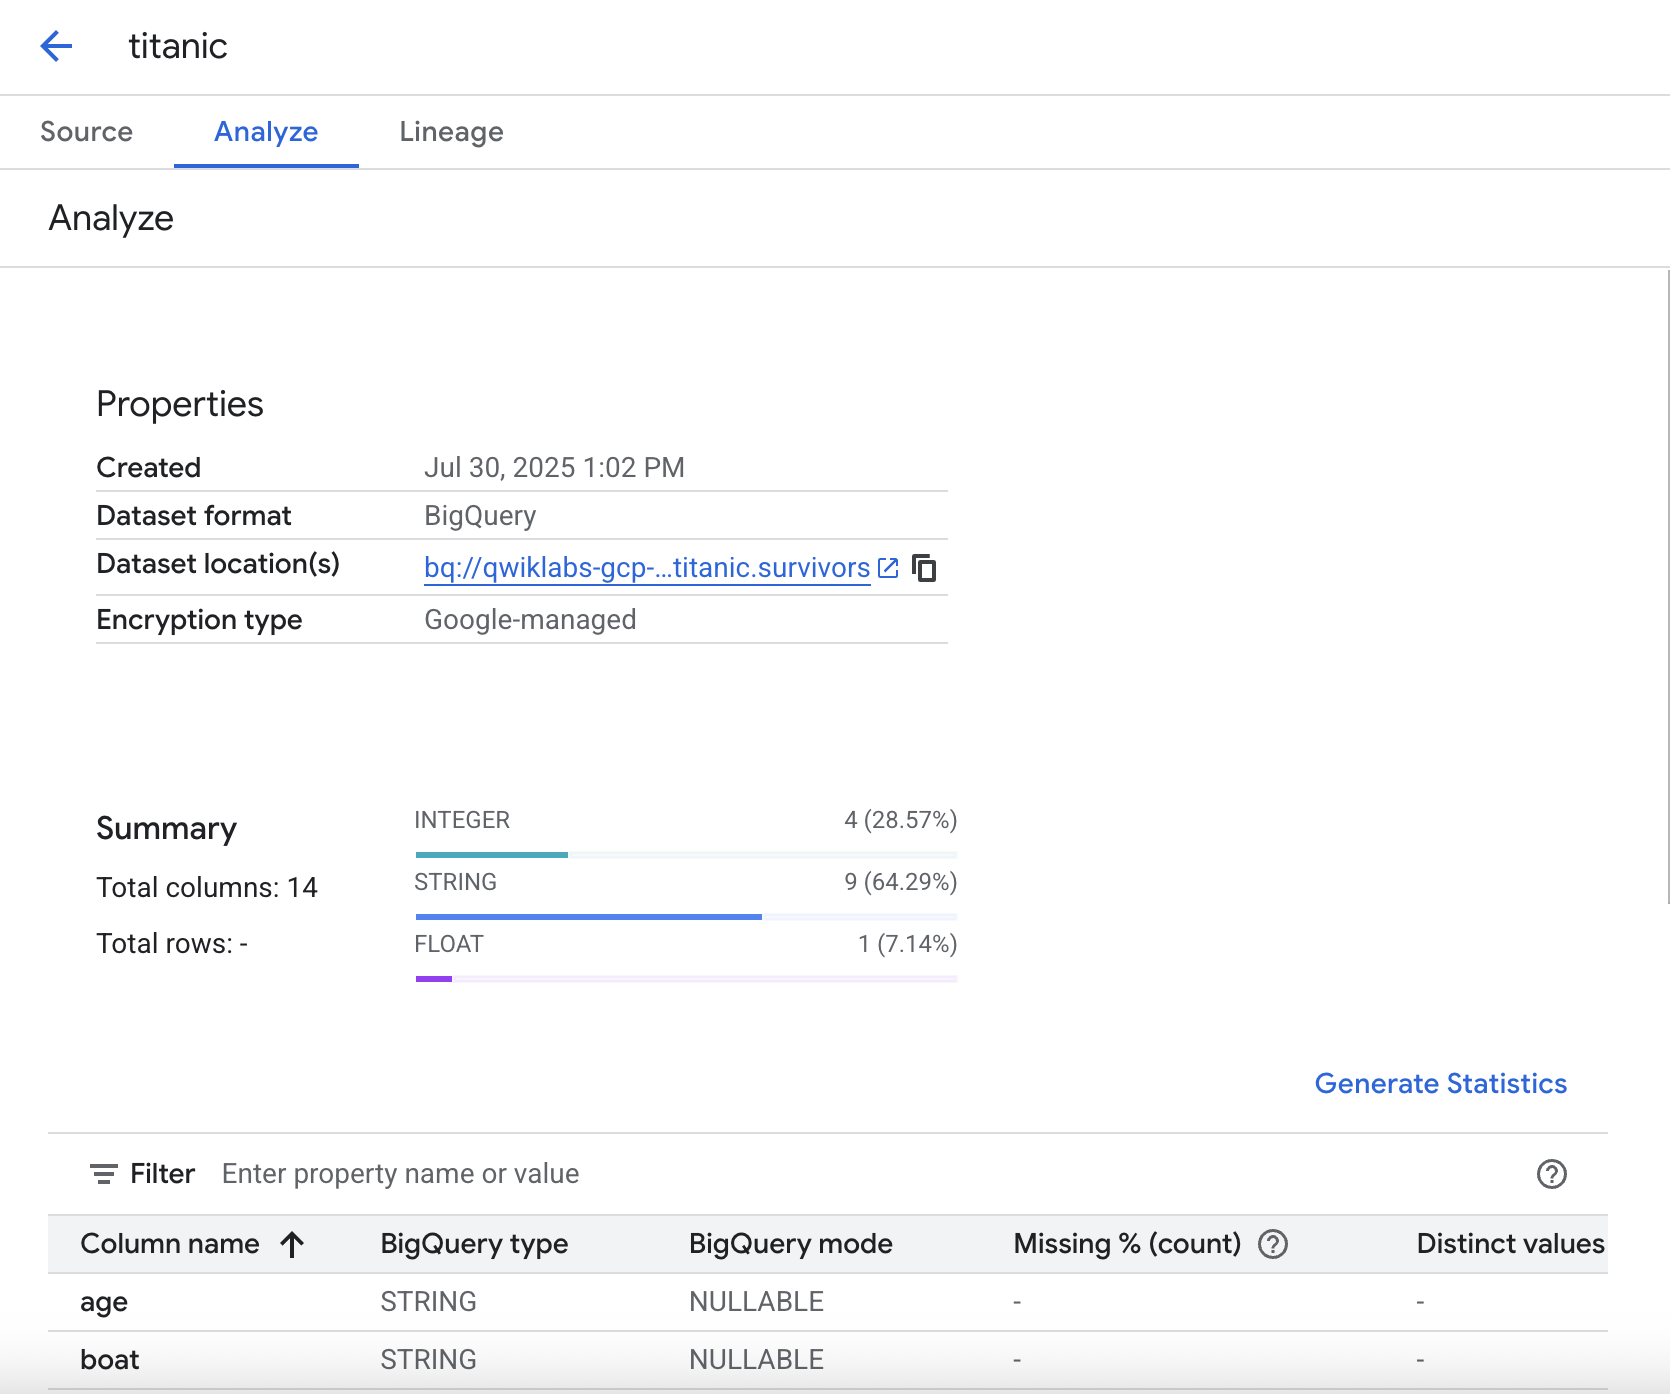
통계 생성
분석 탭에서 데이터와 관련된 통계를 생성할 수 있습니다. 이를 통해 데이터를 미리 살펴보고 분포, 결측 값 등을 확인할 수 있습니다.
- 통계적 분석을 실행하려면 통계 생성을 클릭하세요. 생성에는 몇 분이 소요되므로 실습 과정을 이어서 계속 진행하다가 추후에 결과를 확인해도 됩니다.
작업 3. Workbench를 사용한 커스텀 학습 패키지
코드를 패키징하고 매개변수화하여 이식 가능한 애셋으로 만드는 것이 좋습니다.
이 섹션에서는 Vertex AI Workbench를 사용하여 커스텀 코드로 학습 패키지를 만듭니다. 이 서비스를 사용하려면 기본적으로 Python 소스 배포(일명 배포 패키지)를 생성할 수 있어야 합니다. 배포 패키지에 폴더와 파일만 만들면 되는 간단한 작업입니다. 다음 섹션에서는 패키지가 어떻게 구성되어 있는지 설명합니다.
애플리케이션 구조
Python 패키지의 기본 구조는 아래 이미지에서 볼 수 있습니다.
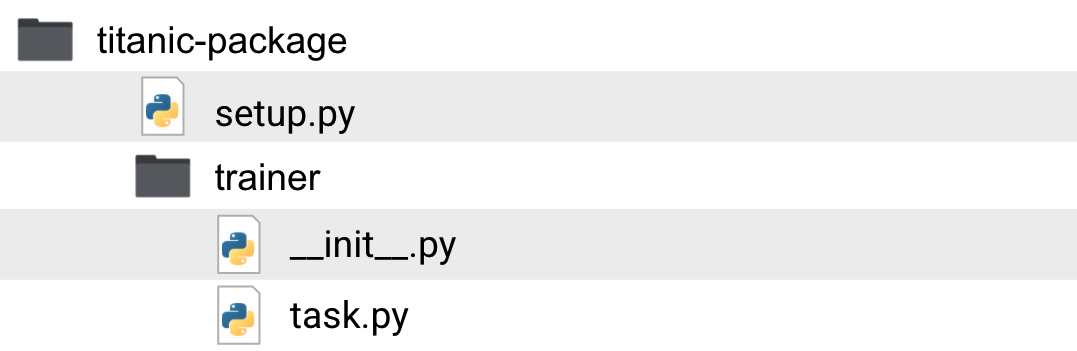
해당 폴더와 파일의 용도를 살펴보겠습니다.
-
titanic-package: 작업 디렉터리입니다. 이 폴더 안에는 타이타닉 생존자 분류기와 관련된 패키지와 코드가 있습니다.
-
setup.py: setup 파일은 배포 패키지를 빌드하는 방법을 지정합니다. 여기에는 패키지 이름, 버전, 학습 작업에 필요할 수 있지만 GCP의 사전 빌드된 학습 컨테이너에 기본적으로 포함되지 않은 기타 패키지와 같은 정보가 포함됩니다.
-
trainer: 학습 코드가 포함된 폴더입니다. Python 패키지이기도 합니다. 폴더 안에 있는 빈
__init__.py 파일로 인해 패키지가 됩니다.
-
__init__.py: __init__.py라는 빈 파일입니다. 이 파일이 속한 폴더가 패키지임을 나타냅니다.
-
task.py: task.py는 패키지 모듈입니다. 이 모듈은 코드의 진입점이며 모델 학습에 사용할 CLI 매개변수도 허용합니다. 이 모듈에도 학습 코드를 포함하거나 패키지 내부에 추가 모듈을 만들 수 있습니다. 이는 전적으로 사용자가 선호하는 코드 구조화 방식에 달려 있습니다.
지금까지의 학습을 바탕으로 패키지 및 모듈 이름이 꼭 'trainer' 및 'task.py'일 필요는 없다는 점을 이해하셨을 겁니다. Google 온라인 문서상 일관성을 위해 이러한 이름을 사용한 것이므로 사용자의 상황에 맞게 각각의 이름을 정하면 됩니다.
노트북 인스턴스 만들기
이제 노트북 인스턴스를 만들고 커스텀 모델을 학습시켜 보겠습니다.
-
Google Cloud 콘솔의 탐색 메뉴에서 Vertex AI > Workbench를 클릭합니다.
-
노트북 인스턴스 페이지에서 새로 만들기를 클릭하고 scikit-learn이 포함된 Python 3로 인스턴스를 시작합니다. 분류기에 scikit-learn 모델을 사용하겠습니다.
팝업이 나타납니다. 여기에서 노트북 인스턴스를 생성할 리전 및 필요한 컴퓨팅 성능과 같은 설정을 변경할 수 있습니다.
- 많은 데이터를 다루지 않고 개발 목적으로만 인스턴스가 필요하므로 설정을 변경하지 말고 만들기를 클릭하면 됩니다.
몇 분 안에 인스턴스가 시작되고 실행됩니다.
-
인스턴스가 준비되면 JupyterLab을 엽니다.
-
'빌드 권장' 팝업이 표시되면 빌드를 클릭합니다. 빌드 실패가 표시되면 무시합니다.
패키지 만들기
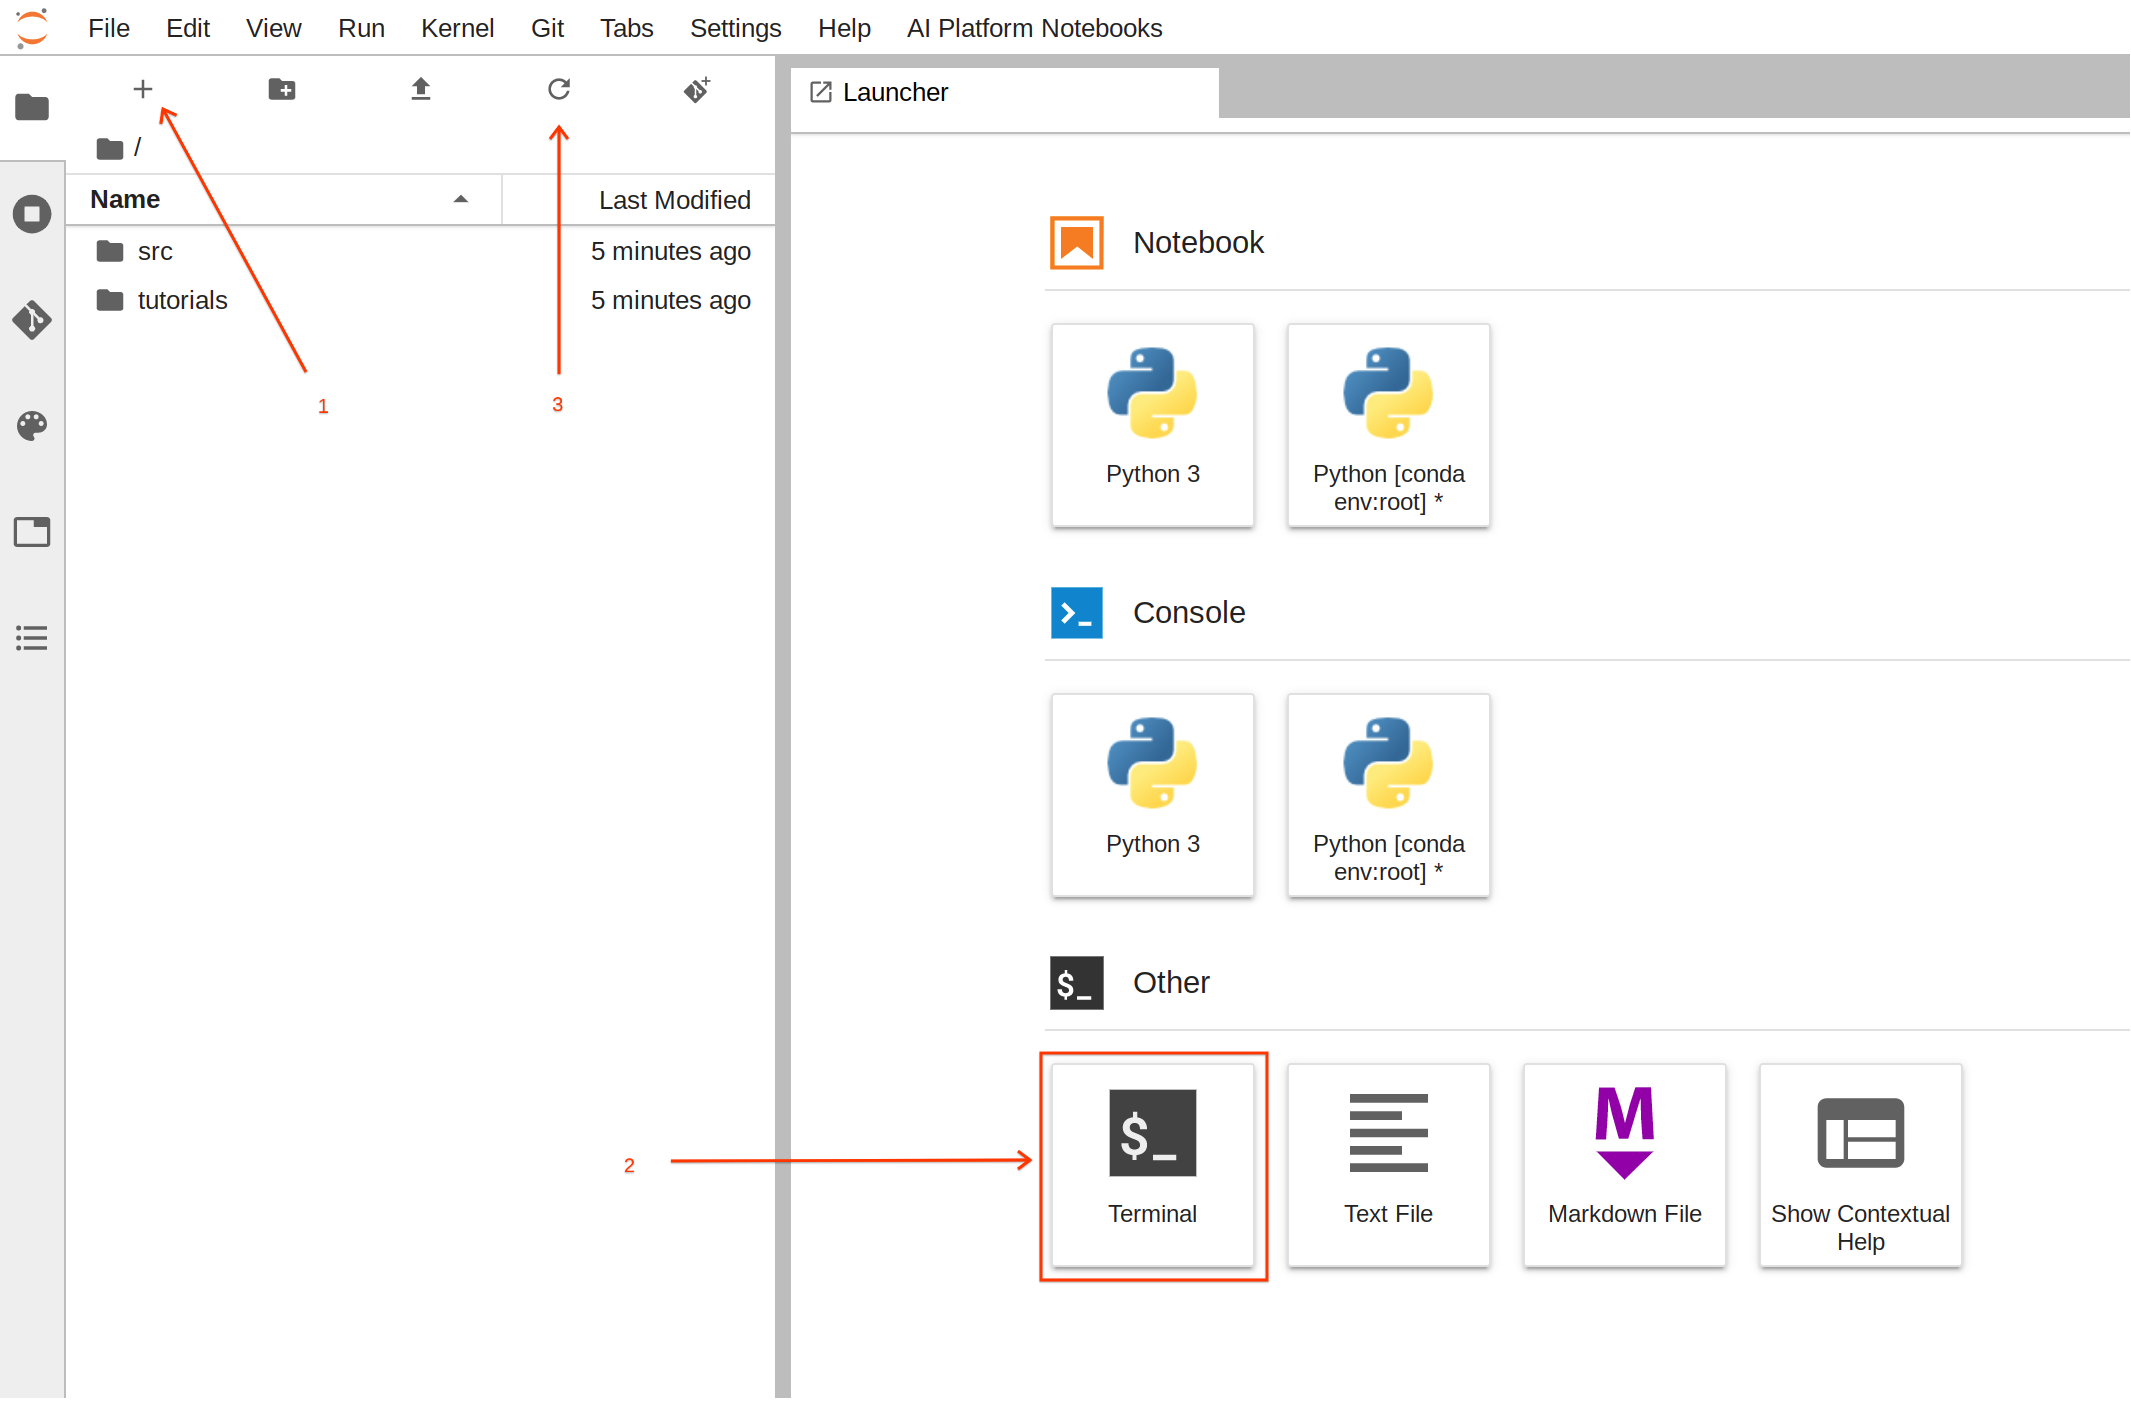
이제 노트북이 실행되고 있으므로 학습 애셋 빌드를 시작할 수 있습니다.
이 작업의 경우 터미널을 사용하는 것이 더 쉽습니다.
-
런처에서 터미널을 클릭하여 새 터미널 세션을 만듭니다.
-
이제 터미널에서 다음 명령어를 실행하여 필요한 파일로 폴더 구조를 만듭니다.
mkdir -p /home/jupyter/titanic/trainer
touch /home/jupyter/titanic/setup.py /home/jupyter/titanic/trainer/__init__.py /home/jupyter/titanic/trainer/task.py
-
명령어를 실행한 후 새로 생성된 폴더와 파일을 보려면 새로고침 버튼을 클릭합니다.
-
titanic/trainer/task.py에 다음 코드를 복사하여 붙여넣습니다. 코드에는 주석이 포함되어 있으므로, 시간을 들여 파일을 살펴보면 파일을 더 잘 이해하는 데 도움이 됩니다.
from google.cloud import bigquery, bigquery_storage, storage
from sklearn.pipeline import make_pipeline, Pipeline
from sklearn.compose import ColumnTransformer
from sklearn.preprocessing import StandardScaler, OneHotEncoder, OrdinalEncoder
from sklearn.model_selection import cross_val_score
from sklearn.svm import SVC
from sklearn.metrics import classification_report, f1_score
from typing import Union, List
import os, logging, json, pickle, argparse
import dask.dataframe as dd
import pandas as pd
import numpy as np
# feature selection. The FEATURE list defines what features are needed from the training data
# as well as the types of those features. We will perform different feature engineering depending on the type.
# List all column names for binary features: 0,1 or True,False or Male,Female etc
BINARY_FEATURES = [
'sex']
# List all column names for numeric features
NUMERIC_FEATURES = [
'age',
'fare']
# List all column names for categorical features
CATEGORICAL_FEATURES = [
'pclass',
'embarked',
'home_dest',
'parch',
'sibsp']
ALL_COLUMNS = BINARY_FEATURES+NUMERIC_FEATURES+CATEGORICAL_FEATURES
# define the column name for label
LABEL = 'survived'
# Define the index position of each feature. This is needed for processing a
# numpy array (instead of pandas) which has no column names.
BINARY_FEATURES_IDX = list(range(0,len(BINARY_FEATURES)))
NUMERIC_FEATURES_IDX = list(range(len(BINARY_FEATURES), len(BINARY_FEATURES)+len(NUMERIC_FEATURES)))
CATEGORICAL_FEATURES_IDX = list(range(len(BINARY_FEATURES+NUMERIC_FEATURES), len(ALL_COLUMNS)))
def load_data_from_gcs(data_gcs_path: str) -> pd.DataFrame:
'''
Loads data from Google Cloud Storage (GCS) to a dataframe
Parameters:
data_gcs_path (str): gs path for the location of the data. Wildcards are also supported. i.e gs://example_bucket/data/training-*.csv
Returns:
pandas.DataFrame: a dataframe with the data from GCP loaded
'''
# using dask that supports wildcards to read multiple files. Then with dd.read_csv().compute we create a pandas dataframe
# Additionally I have noticed that some values for TotalCharges are missing and this creates confusion regarding TotalCharges as the data type.
# to overcome this we manually define TotalCharges as object.
# We will later fix this abnormality
logging.info("reading gs data: {}".format(data_gcs_path))
return dd.read_csv(data_gcs_path, dtype={'TotalCharges': 'object'}).compute()
def load_data_from_bq(bq_uri: str) -> pd.DataFrame:
'''
Loads data from BigQuery table (BQ) to a dataframe
Parameters:
bq_uri (str): bq table uri. i.e: example_project.example_dataset.example_table
Returns:
pandas.DataFrame: a dataframe with the data from GCP loaded
'''
if not bq_uri.startswith('bq://'):
raise Exception("uri is not a BQ uri. It should be bq://project_id.dataset.table")
logging.info("reading bq data: {}".format(bq_uri))
project,dataset,table = bq_uri.split(".")
bqclient = bigquery.Client(project=project[5:])
bqstorageclient = bigquery_storage.BigQueryReadClient()
query_string = """
SELECT * from {ds}.{tbl}
""".format(ds=dataset, tbl=table)
return (
bqclient.query(query_string)
.result()
.to_dataframe(bqstorage_client=bqstorageclient)
)
def clean_missing_numerics(df: pd.DataFrame, numeric_columns):
'''
removes invalid values in the numeric columns
Parameters:
df (pandas.DataFrame): The Pandas Dataframe to alter
numeric_columns (List[str]): List of column names that are numeric from the DataFrame
Returns:
pandas.DataFrame: a dataframe with the numeric columns fixed
'''
for n in numeric_columns:
df[n] = pd.to_numeric(df[n], errors='coerce')
df = df.fillna(df.mean())
return df
def data_selection(df: pd.DataFrame, selected_columns: List[str], label_column: str) -> (pd.DataFrame, pd.Series):
'''
From a dataframe it creates a new dataframe with only selected columns and returns it.
Additionally it splits the label column into a pandas Series.
Parameters:
df (pandas.DataFrame): The Pandas Dataframe to drop columns and extract label
selected_columns (List[str]): List of strings with the selected columns. i,e ['col_1', 'col_2', ..., 'col_n' ]
label_column (str): The name of the label column
Returns:
tuple(pandas.DataFrame, pandas.Series): Tuble with the new pandas DataFrame containing only selected columns and lablel pandas Series
'''
# We create a series with the prediciton label
labels = df[label_column].astype(int)
data = df.loc[:, selected_columns]
return data, labels
def pipeline_builder(params_svm: dict, bin_ftr_idx: List[int], num_ftr_idx: List[int], cat_ftr_idx: List[int]) -> Pipeline:
'''
Builds a sklearn pipeline with preprocessing and model configuration.
Preprocessing steps are:
* OrdinalEncoder - used for binary features
* StandardScaler - used for numerical features
* OneHotEncoder - used for categorical features
Model used is SVC
Parameters:
params_svm (dict): List of parameters for the sklearn.svm.SVC classifier
bin_ftr_idx (List[str]): List of ints that mark the column indexes with binary columns. i.e [0, 2, ... , X ]
num_ftr_idx (List[str]): List of ints that mark the column indexes with numerical columns. i.e [6, 3, ... , X ]
cat_ftr_idx (List[str]): List of ints that mark the column indexes with categorical columns. i.e [5, 10, ... , X ]
label_column (str): The name of the label column
Returns:
Pipeline: sklearn.pipelines.Pipeline with preprocessing and model training
'''
# Defining a preprocessing step for our pipeline.
# it specifies how the features are going to be transformed
preprocessor = ColumnTransformer(
transformers=[
('bin', OrdinalEncoder(), bin_ftr_idx),
('num', StandardScaler(), num_ftr_idx),
('cat', OneHotEncoder(handle_unknown='ignore'), cat_ftr_idx)], n_jobs=-1)
# We now create a full pipeline, for preprocessing and training.
# for training we selected a linear SVM classifier
clf = SVC()
clf.set_params(**params_svm)
return Pipeline(steps=[ ('preprocessor', preprocessor),
('classifier', clf)])
def train_pipeline(clf: Pipeline, X: Union[pd.DataFrame, np.ndarray], y: Union[pd.DataFrame, np.ndarray]) -> float:
'''
Trains a sklearn pipeline by fiting training data and labels and returns the accuracy f1 score
Parameters:
clf (sklearn.pipelines.Pipeline): the Pipeline object to fit the data
X: (pd.DataFrame OR np.ndarray): Training vectors of shape n_samples x n_features, where n_samples is the number of samples and n_features is the number of features.
y: (pd.DataFrame OR np.ndarray): Labels of shape n_samples. Order should mathc Training Vectors X
Returns:
score (float): Average F1 score from all cross validations
'''
# run cross validation to get training score. we can use this score to optimize training
score = cross_val_score(clf, X, y, cv=10, n_jobs=-1).mean()
# Now we fit all our data to the classifier.
clf.fit(X, y)
return score
def process_gcs_uri(uri: str) -> (str, str, str, str):
'''
Receives a Google Cloud Storage (GCS) uri and breaks it down to the scheme, bucket, path and file
Parameters:
uri (str): GCS uri
Returns:
scheme (str): uri scheme
bucket (str): uri bucket
path (str): uri path
file (str): uri file
'''
url_arr = uri.split("/")
if "." not in url_arr[-1]:
file = ""
else:
file = url_arr.pop()
scheme = url_arr[0]
bucket = url_arr[2]
path = "/".join(url_arr[3:])
path = path[:-1] if path.endswith("/") else path
return scheme, bucket, path, file
def pipeline_export_gcs(fitted_pipeline: Pipeline, model_dir: str) -> str:
'''
Exports trained pipeline to GCS
Parameters:
fitted_pipeline (sklearn.pipelines.Pipeline): the Pipeline object with data already fitted (trained pipeline object)
model_dir (str): GCS path to store the trained pipeline. i.e gs://example_bucket/training-job
Returns:
export_path (str): Model GCS location
'''
scheme, bucket, path, file = process_gcs_uri(model_dir)
if scheme != "gs:":
raise ValueError("URI scheme must be gs")
# Upload the model to GCS
b = storage.Client().bucket(bucket)
export_path = os.path.join(path, 'model.pkl')
blob = b.blob(export_path)
blob.upload_from_string(pickle.dumps(fitted_pipeline))
return scheme + "//" + os.path.join(bucket, export_path)
def prepare_report(cv_score: float, model_params: dict, classification_report: str, columns: List[str], example_data: np.ndarray) -> str:
'''
Prepares a training report in Text
Parameters:
cv_score (float): score of the training job during cross validation of training data
model_params (dict): dictonary containing the parameters the model was trained with
classification_report (str): Model classification report with test data
columns (List[str]): List of columns that where used in training.
example_data (np.array): Sample of data (2-3 rows are enough). This is used to include what the prediciton payload should look like for the model
Returns:
report (str): Full report in text
'''
buffer_example_data = '['
for r in example_data:
buffer_example_data+='['
for c in r:
if(isinstance(c,str)):
buffer_example_data+="'"+c+"', "
else:
buffer_example_data+=str(c)+", "
buffer_example_data= buffer_example_data[:-2]+"], \n"
buffer_example_data= buffer_example_data[:-3]+"]"
report = """
Training Job Report
Cross Validation Score: {cv_score}
Training Model Parameters: {model_params}
Test Data Classification Report:
{classification_report}
Example of data array for prediciton:
Order of columns:
{columns}
Example for clf.predict()
{predict_example}
Example of GCP API request body:
{{
"instances": {json_example}
}}
""".format(
cv_score=cv_score,
model_params=json.dumps(model_params),
classification_report=classification_report,
columns = columns,
predict_example = buffer_example_data,
json_example = json.dumps(example_data.tolist()))
return report
def report_export_gcs(report: str, report_dir: str) -> None:
'''
Exports training job report to GCS
Parameters:
report (str): Full report in text to sent to GCS
report_dir (str): GCS path to store the report model. i.e gs://example_bucket/training-job
Returns:
export_path (str): Report GCS location
'''
scheme, bucket, path, file = process_gcs_uri(report_dir)
if scheme != "gs:":
raise ValueError("URI scheme must be gs")
# Upload the model to GCS
b = storage.Client().bucket(bucket)
export_path = os.path.join(path, 'report.txt')
blob = b.blob(export_path)
blob.upload_from_string(report)
return scheme + "//" + os.path.join(bucket, export_path)
# Define all the command-line arguments your model can accept for training
if __name__ == '__main__':
parser = argparse.ArgumentParser()
# Input Arguments
parser.add_argument(
'--model_param_kernel',
help = 'SVC model parameter- kernel',
choices=['linear', 'poly', 'rbf', 'sigmoid', 'precomputed'],
type = str,
default = 'linear'
)
parser.add_argument(
'--model_param_degree',
help = 'SVC model parameter- Degree. Only applies for poly kernel',
type = int,
default = 3
)
parser.add_argument(
'--model_param_C',
help = 'SVC model parameter- C (regularization)',
type = float,
default = 1.0
)
parser.add_argument(
'--model_param_probability',
help = 'Whether to enable probability estimates',
type = bool,
default = True
)
'''
Vertex AI automatically populates a set of environment variables in the container that executes
your training job. Those variables include:
* AIP_MODEL_DIR - Directory selected as model dir
* AIP_DATA_FORMAT - Type of dataset selected for training (can be csv or bigquery)
Vertex AI will automatically split selected dataset into training, validation and testing
and 3 more environment variables will reflect the location of the data:
* AIP_TRAINING_DATA_URI - URI of Training data
* AIP_VALIDATION_DATA_URI - URI of Validation data
* AIP_TEST_DATA_URI - URI of Test data
Notice that those environment variables are default. If the user provides a value using CLI argument,
the environment variable will be ignored. If the user does not provide anything as CLI argument
the program will try and use the environment variables if those exist. Otherwise will leave empty.
'''
parser.add_argument(
'--model_dir',
help = 'Directory to output model and artifacts',
type = str,
default = os.environ['AIP_MODEL_DIR'] if 'AIP_MODEL_DIR' in os.environ else ""
)
parser.add_argument(
'--data_format',
choices=['csv', 'bigquery'],
help = 'format of data uri csv for gs:// paths and bigquery for project.dataset.table formats',
type = str,
default = os.environ['AIP_DATA_FORMAT'] if 'AIP_DATA_FORMAT' in os.environ else "csv"
)
parser.add_argument(
'--training_data_uri',
help = 'location of training data in either gs:// uri or bigquery uri',
type = str,
default = os.environ['AIP_TRAINING_DATA_URI'] if 'AIP_TRAINING_DATA_URI' in os.environ else ""
)
parser.add_argument(
'--validation_data_uri',
help = 'location of validation data in either gs:// uri or bigquery uri',
type = str,
default = os.environ['AIP_VALIDATION_DATA_URI'] if 'AIP_VALIDATION_DATA_URI' in os.environ else ""
)
parser.add_argument(
'--test_data_uri',
help = 'location of test data in either gs:// uri or bigquery uri',
type = str,
default = os.environ['AIP_TEST_DATA_URI'] if 'AIP_TEST_DATA_URI' in os.environ else ""
)
parser.add_argument("-v", "--verbose", help="increase output verbosity",
action="store_true")
args = parser.parse_args()
arguments = args.__dict__
if args.verbose:
logging.basicConfig(level=logging.INFO)
logging.info('Model artifacts will be exported here: {}'.format(arguments['model_dir']))
logging.info('Data format: {}'.format(arguments["data_format"]))
logging.info('Training data uri: {}'.format(arguments['training_data_uri']) )
logging.info('Validation data uri: {}'.format(arguments['validation_data_uri']))
logging.info('Test data uri: {}'.format(arguments['test_data_uri']))
'''
We have 2 different ways to load our data to pandas. One is from Cloud Storage by loading csv files and
the other is by connecting to BigQuery. Vertex AI supports both and
here we created a code that depending on the dataset provided. We will select the appropriate loading method.
'''
logging.info('Loading {} data'.format(arguments["data_format"]))
if(arguments['data_format']=='csv'):
df_train = load_data_from_gcs(arguments['training_data_uri'])
df_test = load_data_from_bq(arguments['test_data_uri'])
df_valid = load_data_from_gcs(arguments['validation_data_uri'])
elif(arguments['data_format']=='bigquery'):
print(arguments['training_data_uri'])
df_train = load_data_from_bq(arguments['training_data_uri'])
df_test = load_data_from_bq(arguments['test_data_uri'])
df_valid = load_data_from_bq(arguments['validation_data_uri'])
else:
raise ValueError("Invalid data type ")
#as we will be using cross validation, we will have just a training set and a single test set.
# we will merge the test and validation to achieve an 80%-20% split
df_test = pd.concat([df_test,df_valid])
logging.info('Defining model parameters')
model_params = dict()
model_params['kernel'] = arguments['model_param_kernel']
model_params['degree'] = arguments['model_param_degree']
model_params['C'] = arguments['model_param_C']
model_params['probability'] = arguments['model_param_probability']
df_train = clean_missing_numerics(df_train, NUMERIC_FEATURES)
df_test = clean_missing_numerics(df_test, NUMERIC_FEATURES)
logging.info('Running feature selection')
X_train, y_train = data_selection(df_train, ALL_COLUMNS, LABEL)
X_test, y_test = data_selection(df_test, ALL_COLUMNS, LABEL)
logging.info('Training pipelines in CV')
y_train = y_train.astype('int')
y_test = y_test.astype('int')
clf = pipeline_builder(model_params, BINARY_FEATURES_IDX, NUMERIC_FEATURES_IDX, CATEGORICAL_FEATURES_IDX)
cv_score = train_pipeline(clf, X_train, y_train)
logging.info('Export trained pipeline and report')
pipeline_export_gcs(clf, arguments['model_dir'])
y_pred = clf.predict(X_test)
test_score = f1_score(y_test, y_pred, average='weighted')
logging.info('f1score: '+ str(test_score))
report = prepare_report(cv_score,
model_params,
classification_report(y_test,y_pred),
ALL_COLUMNS,
X_test.to_numpy()[0:2])
report_export_gcs(report, arguments['model_dir'])
logging.info('Training job completed. Exiting...')
-
Ctrl+S를 눌러 파일을 저장합니다.
패키지 빌드하기
이제 학습 서비스와 함께 사용할 패키지를 빌드해야 합니다.
-
titanic/setup.py에 다음 코드를 복사하여 붙여넣습니다.
from setuptools import find_packages
from setuptools import setup
REQUIRED_PACKAGES = [
'gcsfs==0.7.1',
'dask[dataframe]==2021.2.0',
'google-cloud-bigquery-storage==1.0.0',
'six==1.15.0'
]
setup(
name='trainer',
version='0.1',
install_requires=REQUIRED_PACKAGES,
packages=find_packages(), # Automatically find packages within this directory or below.
include_package_data=True, # if packages include any data files, those will be packed together.
description='Classification training titanic survivors prediction model'
)
-
Ctrl+S를 눌러 파일을 저장합니다.
-
터미널로 돌아가 task.py를 사용하여 모델을 학습시킬 수 있는지 테스트합니다.
-
먼저 다음 환경 변수를 생성하되 콘솔에서 올바른 GCP 프로젝트를 선택했는지 확인하세요.
-
PROJECT_ID 선택한 프로젝트 ID로 설정됩니다.
-
BUCKET_NAME PROJECT_ID에 '-bucket'이 붙은 형식입니다.
export REGION="{{{project_0.default_region|Region}}}"
export PROJECT_ID=$(gcloud config list --format 'value(core.project)')
export BUCKET_NAME=$PROJECT_ID"-bucket"
-
학습된 모델을 내보낼 버킷을 만듭니다.
gsutil mb -l $REGION "gs://"$BUCKET_NAME
이제 다음 명령어를 실행합니다. 지금은 모든 학습 데이터를 테스트에 사용하고 있습니다. 동일한 데이터 세트가 테스트, 검증, 학습에 사용됩니다. 여기에서는 코드가 실행되고 버그가 없는지 확인하고자 합니다. 실제 상황에서는 다른 테스트 및 검증 데이터를 사용하는 것이 좋습니다. 이 부분은 Vertex AI 학습 서비스에서 처리하도록 맡깁니다.
-
먼저 필요한 라이브러리를 설치합니다.
cd /home/jupyter/titanic
pip install setuptools
python setup.py install
참고: error: google-auth 2.3.3 is installed but google-auth<2.0dev,>=1.25.0 is required by {'google-api-core'} 오류는 실습 기능에 영향을 미치지 않으므로 무시해도 됩니다.
-
이제 학습 코드를 실행하여 문제 없이 실행되는지 확인합니다.
python -m trainer.task -v \
--model_param_kernel=linear \
--model_dir="gs://"$BUCKET_NAME"/titanic/trial" \
--data_format=bigquery \
--training_data_uri="bq://"$PROJECT_ID".titanic.survivors" \
--test_data_uri="bq://"$PROJECT_ID".titanic.survivors" \
--validation_data_uri="bq://"$PROJECT_ID".titanic.survivors"
코드가 성공적으로 실행되면 INFO 로그가 출력됩니다. 두 줄이 출력되며 첫 번째 줄은 F1 점수(약 0.85)를 나타냅니다. 마지막 줄은 학습 작업이 성공적으로 완료되었음을 나타냅니다.
INFO:root:f1score: 0.85
INFO:root:Training job completed. Exiting...
수고하셨습니다. 학습 Python 패키지를 만들 준비가 되었습니다.
-
다음 명령어를 실행하면 학습 Python 패키지가 생성됩니다.
cd /home/jupyter/titanic
python setup.py sdist
명령어가 실행되면 tar.gz 파일이 포함된 dist라는 새 폴더가 표시됩니다. 이 폴더가 바로 Python 패키지입니다.
-
필요 시 학습 서비스에서 새 모델을 학습시키는 데 사용할 수 있도록 패키지를 GCS에 복사해야 합니다.
gsutil cp dist/trainer-0.1.tar.gz "gs://"$BUCKET_NAME"/titanic/dist/trainer-0.1.tar.gz"
작업 4. 모델 학습
이 섹션에서는 Vertex AI에서 모델을 학습시킵니다. 이를 위해 GUI를 사용할 것입니다. Python SDK를 사용하여 프로그래매틱 방식으로 모델을 학습시킬 수도 있지만 GUI를 사용하면 프로세스를 더 잘 이해할 수 있습니다.
-
Google Cloud 콘솔에서 Vertex AI > 학습으로 이동합니다.
-
리전으로 을(를) 선택합니다.
-
새 모델 학습을 클릭합니다.
학습 방법
이 단계에서는 데이터 세트를 선택하고 학습 작업의 목표를 정의합니다.
-
데이터 세트: 몇 단계 전에 생성한 데이터 세트입니다. 이름은 titanic일 것입니다.
-
목표: 개인이 타이타닉 사고에서 살아남을 가능성이 있는지 여부를 예측하는 모델입니다. 이는 분류 문제입니다.
-
커스텀 학습: 커스텀 학습 패키지를 사용하려고 합니다.
-
계속을 클릭합니다.
모델 세부정보
이제 모델 이름을 정의합니다.
기본 이름은 데이터 세트의 이름과 타임스탬프입니다. 그대로 두어도 됩니다.
-
고급 옵션을 클릭하면 데이터를 학습, 테스트, 검증 세트로 어떻게 분할할지 정의하는 옵션이 표시됩니다. 무작위 할당은 데이터를 학습, 테스트, 검증으로 무작위로 분할합니다. 실습에 사용하기에 좋은 옵션입니다.
-
계속을 클릭합니다.
학습 컨테이너
학습 환경을 정의합니다.
-
사전 빌드된 컨테이너: Google Cloud는 모델을 쉽게 학습시킬 수 있도록 일련의 사전 빌드된 컨테이너를 제공합니다. scikit-learn, TensorFlow, XGBoost와 같은 프레임워크를 지원하는 컨테이너입니다. 학습 작업에 생소한 프레임워크를 사용하는 경우 학습용 컨테이너(커스텀 컨테이너)를 마련해 제공해야 합니다. 이 실습의 모델은 scikit-learn을 기반으로 하며 사전 빌드된 컨테이너가 이미 존재합니다.
-
모델 프레임워크:
scikit-learn입니다. 모델 학습에 사용한 라이브러리입니다.
-
모델 프레임워크 버전: 코드는
0.23과 호환됩니다.
-
패키지 위치: 학습 패키지의 위치로 찾아갑니다. training-0.1.tar.gz를 업로드한 위치입니다. 이전 단계를 올바르게 진행했다면 위치는
gs://YOUR-BUCKET-NAME/titanic/dist/trainer-0.1.tar.gz이며 YOUR-BUCKET-NAME은 패키지 빌드하기 섹션에서 사용한 버킷의 이름일 것입니다.
-
Python 모듈: Notebooks에서 만든 Python 모듈입니다. 학습 코드/모듈과 항목 파일의 이름이 있는 폴더에 해당합니다.
trainer.task일 것입니다.
-
데이터 내보내기를 위한 BigQuery 프로젝트: 1단계에서 데이터 세트를 선택하고 자동 분할을 정의했습니다. 학습/테스트/검증 세트용 새 데이터 세트 및 테이블이 선택한 프로젝트 아래에 생성됩니다.
-
실습에서 실행하는 것과 동일한 프로젝트 ID를 입력합니다.
또한 학습/테스트/검증 데이터 세트 URI는 학습 컨테이너에서 환경 변수로 설정되므로 해당 변수를 사용하여 데이터를 자동으로 로드할 수 있습니다. 데이터 세트의 환경 변수 이름은
AIP_TRAINING_DATA_URI, AIP_TEST_DATA_URI, AIP_VALIDATION_DATA_URI입니다. 추가 변수는 AIP_DATA_FORMAT이며 1단계에서 선택한 데이터 세트의 유형에 따라 csv 또는 bigquery가 됩니다.
task.py에 이미 이 로직을 빌드했습니다. 다음 예제 코드(task.py에서 가져옴)를 확인합니다.
...
parser.add_argument( '--training_data_uri ',
help = 'Directory to output model and artifacts',
type = str,
default = os.environ['AIP_TRAINING_DATA_URI'] if 'AIP_TRAINING_DATA_URI' in os.environ else "" )
...
-
모델 출력 디렉터리: 모델을 내보낼 위치입니다.
AIP_MODEL_DIR이라는 학습 컨테이너의 환경 변수로 사용됩니다. task.py에는 이를 캡처하기 위한 입력 매개변수가 있습니다.
...
parser.add_argument( '--model_dir',
help = 'Directory to output model and artifacts',
type = str,
default = os.environ['AIP_MODEL_DIR'] if 'AIP_MODEL_DIR' in os.environ else "" )
...
-
환경 변수를 사용하여 학습 작업 아티팩트를 내보낼 위치를 알 수 있습니다. 다음을 선택합니다. gs://YOUR-BUCKET-NAME/titanic/
-
계속을 클릭합니다.
하이퍼파라미터 조정
하이퍼파라미터 조정 섹션을 사용하면 모델을 조정할 일련의 모델 파라미터를 정의할 수 있습니다. 최상의 매개변수로 모델을 생성하기 위해 다양한 값을 탐색합니다. 실습 코드에서는 하이퍼파라미터 조정 기능을 구현하지 않았습니다. 코드는 약 5줄에 불과하지만, 현재로서는 초매개변수를 조정하는 복잡성을 더하지 않는 것이 바람직할 수 있습니다.
컴퓨팅 및 가격 책정
학습 작업을 실행할 위치는 어디이며, 사용할 서버의 유형은 무엇인가요? 모델 학습 프로세스에는 많은 리소스가 필요하지 않습니다. 비교적 작은 노트북 인스턴스 내에서 학습 작업을 실행할 수 있었고 실행이 상당히 빠르게 완료되었습니다.
- 이를 염두에 두고 다음을 선택합니다.
-
계속을 클릭합니다.
예측 컨테이너
이 단계에서는 단순히 모델을 학습시키기만 할지 아니면 모델을 프로덕션화하는 데 사용되는 예측 서비스 설정도 추가할지 결정할 수 있습니다.
이 실습에서는 사전 빌드된 컨테이너를 사용합니다. 그러나 Vertex AI는 모델 서빙을 위한 몇 가지 옵션을 제공합니다.
-
예측 컨테이너 없음: 모델을 일단 학습시키고 프로덕션화는 나중에 결정합니다.
-
사전 빌드된 컨테이너: 모델을 학습시키고 배포에 사용할 사전 빌드된 컨테이너를 정의합니다.
-
커스텀 컨테이너: 모델을 학습시키고 배포에 사용할 커스텀 컨테이너를 정의합니다.
- Google Cloud는 이미 scikit-learn 컨테이너를 제공하므로 사전 빌드된 컨테이너를 선택해야 합니다. 학습 작업이 완료된 후 모델을 배포합니다.
-
모델 프레임워크:
scikit-learn
-
모델 프레임워크 버전:
0.23
-
모델 디렉터리:
gs://YOUR-BUCKET-NAME/titanic/. 3단계에서 정의한 모델 출력 디렉터리와 동일해야 합니다.
-
학습 시작을 클릭합니다.
새 학습 작업이 학습 파이프라인 탭 아래에 표시됩니다. 학습을 완료하는 데 약 15분 정도 걸립니다.
작업 5. 모델 평가
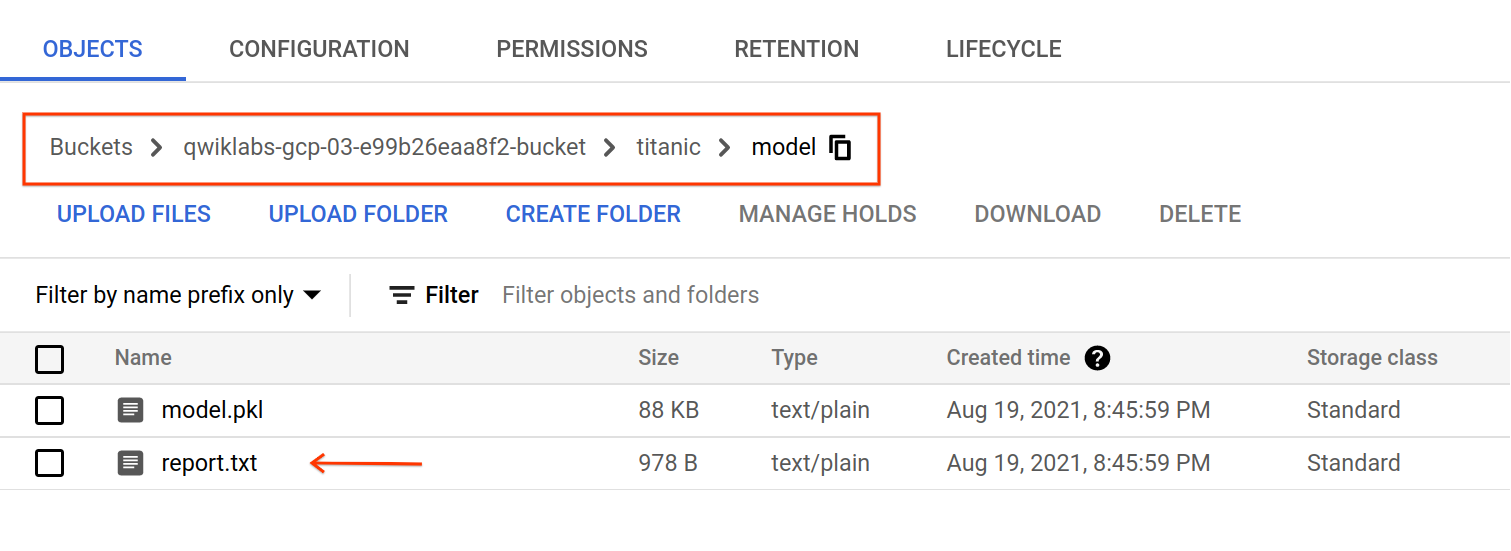
학습 작업이 완료되면 아티팩트가 gs://YOUR-BUCKET-NAME/titanic/model/로 내보내집니다. 모델의 평가 측정항목 및 분류 보고서가 포함된 report.txt 파일을 확인할 수 있습니다.
작업 6. 모델 배포
-
Cloud 콘솔의 탐색 메뉴에서 Vertex AI > 학습을 클릭합니다.
-
모델 학습 작업이 완료된 후 학습된 모델을 선택하고 엔드포인트에 배포합니다.
-
배포 및 테스트 탭으로 이동한 다음 엔드포인트에 배포를 클릭합니다.
팝업에서 모델 배포에 필요한 리소스를 정의할 수 있습니다.
-
엔드포인트 이름: 모델이 서빙되는 엔드포인트 URL입니다. 이름으로
titanic-endpoint가 적절할 수 있습니다. 계속을 클릭합니다.
-
트래픽 분할: 이 모델로 보낼 트래픽의 비율을 정의합니다. 엔드포인트에는 여러 모델이 있을 수 있으며 모델 간에 트래픽을 분할하는 방법을 결정할 수 있습니다. 이 경우 단일 모델을 배포하기 때문에 트래픽이
100%여야 합니다.
-
최소 컴퓨팅 노드 수: 모델 예측을 제공하는 데 필요한 최소 노드 수입니다.
1부터 시작합니다. 또한 트래픽이 있는 경우 예측 서비스가 자동 확장됩니다.
-
최대 컴퓨팅 노드 수: 자동 확장의 경우 이 변수는 노드의 상한을 정의합니다. 자동 확장으로 인해 발생할 수 있는 원치 않는 비용을 방지하는 데 도움이 됩니다. 이 변수를
2로 설정합니다.
-
머신 유형: Google Cloud는 모델을 배포할 수 있는 일련의 머신 유형을 제공합니다. 각 머신에는 고유한 메모리 및 vCPU 사양이 있습니다. 실습에서는 모델을 단순하게 구현했으므로
n1-standard-4 인스턴스만으로도 작업을 수행할 수 있습니다.
-
완료를 클릭한 다음 배포를 클릭합니다.
작업 7. 모델 예측
-
모델 배포에서 모델 예측 엔드포인트를 테스트합니다. GUI는 JSON 요청 페이로드를 전송하는 양식을 제공하고 예측에 사용된 모델 ID와 예측을 반환합니다. 엔드포인트에 둘 이상의 모델을 배포하고 트래픽을 분할할 수 있기 때문입니다.
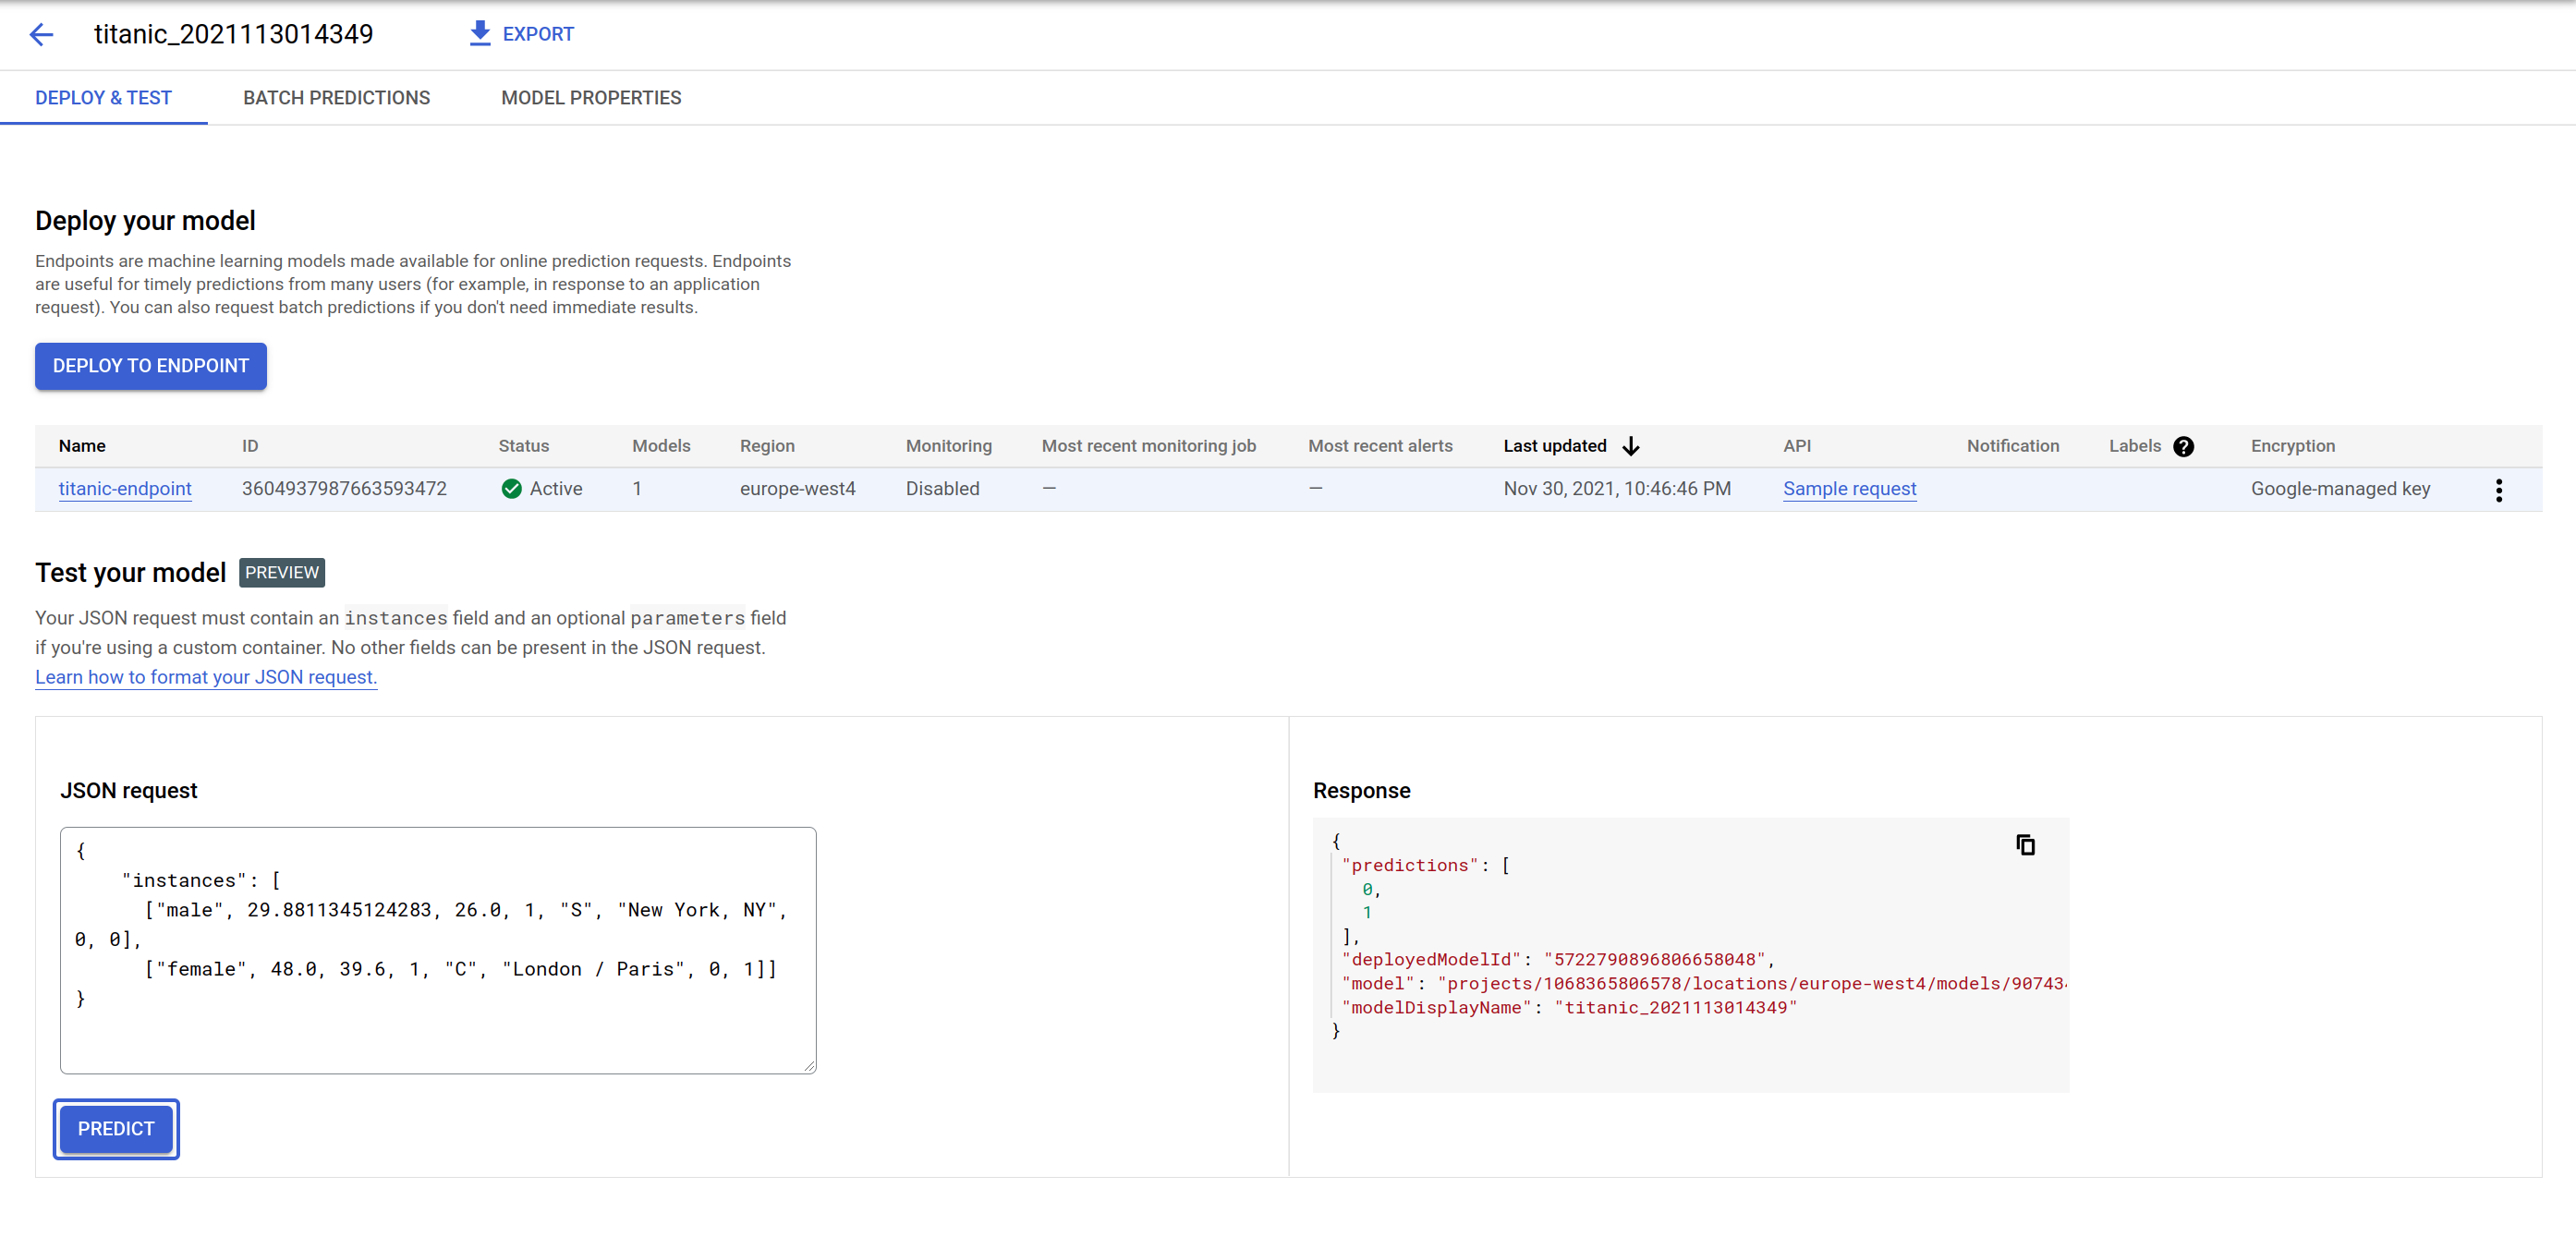
- 다음 페이로드를 시도하고 일부 값을 변경하여 예측이 어떻게 변경되는지 확인합니다. 입력 특성의 시퀀스는 [‘sex', ‘age', ‘fare', ‘pclass', ‘embarked', ‘home_dest', ‘parch', ‘sibsp']입니다.
{
"instances": [
["male", 29.8811345124283, 26.0, 1, "S", "New York, NY", 0, 0],
["female", 48.0, 39.6, 1, "C", "London / Paris", 0, 1]]
}
-
예측을 클릭합니다.
엔드포인트는 입력과 동일한 순서로 0 또는 1의 목록으로 응답합니다. 0은 개인이 타이타닉 사고에서 생존하지 못할 가능성이 더 높음을, 1은 생존할 가능성이 높음을 의미합니다.
작업 8. 삭제
수고하셨습니다. 데이터 세트를 만들고 학습 코드를 패키징하고 Vertex AI를 사용하여 커스텀 학습 작업을 실행했습니다. 또한 학습된 모델을 배포하고 예측을 위해 일부 데이터를 보냈습니다.
생성된 리소스가 필요하지 않다는 점을 감안할 때 원치 않는 요금 청구를 방지하려면 리소스를 삭제하는 것이 좋습니다.
-
콘솔의 데이터 세트 페이지로 이동하여 삭제할 데이터 세트의 점 3개를 클릭하고 데이터 세트 삭제를 클릭합니다. 그런 다음 삭제를 클릭하여 삭제를 확인합니다.
-
콘솔에서 Workbench 페이지로 이동하여 삭제할 노트북만 선택한 후 상단 메뉴에서 삭제를 클릭합니다. 그런 다음 삭제를 클릭하여 삭제를 확인합니다.
-
배포한 엔드포인트를 삭제하려면 Vertex AI 콘솔의 엔드포인트 섹션에서 엔드포인트와 더보기 메뉴()를 차례로 클릭하고 엔드포인트에서 모델 배포 취소를 선택한 다음 배포 취소를 클릭합니다.
-
엔드포인트를 삭제하려면 더보기 메뉴()를 클릭한 다음 엔드포인트 삭제를 클릭합니다. 그런 다음 확인을 클릭합니다.
-
모델 콘솔 페이지로 이동하여 삭제하려는 모델의 점 3개 아이콘()과 모델 삭제를 차례로 클릭합니다. 그런 다음 삭제를 클릭합니다.
-
Cloud Storage 버킷을 삭제하려면 Cloud Storage 페이지에서 버킷을 선택한 다음 삭제를 클릭합니다. DELETE를 입력하여 삭제를 확인한 후 삭제를 클릭합니다.
-
BigQuery 데이터 세트를 삭제하려면 다음 단계를 따르세요.
- BigQuery 콘솔로 이동합니다.
-
탐색기 패널에서 데이터 세트 옆의 작업 보기 아이콘을 클릭합니다. 삭제를 클릭합니다.
- 데이터 세트 삭제 대화상자에서
delete를 입력하여 삭제 명령어를 확인한 후 삭제를 클릭합니다.
실습 종료
실습을 완료하면 실습 종료를 클릭합니다. Qwiklabs에서 사용된 리소스를 자동으로 삭제하고 계정을 지웁니다.
실습 경험을 평가할 수 있습니다. 해당하는 별표 수를 선택하고 의견을 입력한 후 제출을 클릭합니다.
별점의 의미는 다음과 같습니다.
- 별표 1개 = 매우 불만족
- 별표 2개 = 불만족
- 별표 3개 = 중간
- 별표 4개 = 만족
- 별표 5개 = 매우 만족
의견을 제공하고 싶지 않다면 대화상자를 닫으면 됩니다.
의견이나 제안 또는 수정할 사항이 있다면 지원 탭을 사용하세요.
Copyright 2020 Google LLC All rights reserved. Google 및 Google 로고는 Google LLC의 상표입니다. 기타 모든 회사명 및 제품명은 해당 업체의 상표일 수 있습니다.


