In this lab, you can use Vertex AI to train and deploy a ML model. It assumes that you are familiar with machine learning, even though the machine learning code for this training is provided to you. You will use datasets for dataset creation and management, and a custom model for training a Scikit Learn model. Finally, you will deploy the trained model and get online predictions. The dataset you will use for this demo is the Titanic Dataset.
Objectives
Create a dataset for tabular data.
Create a training package with custom code using Notebooks.
Deploy the trained model and get online predictions.
Setup
For each lab, you get a new Google Cloud project and set of resources for a fixed time at no cost.
Sign in to Qwiklabs using an incognito window.
Note the lab's access time (for example, 1:15:00), and make sure you can finish within that time.
There is no pause feature. You can restart if needed, but you have to start at the beginning.
When ready, click Start lab.
Note your lab credentials (Username and Password). You will use them to sign in to the Google Cloud Console.
Click Open Google Console.
Click Use another account and copy/paste credentials for this lab into the prompts.
If you use other credentials, you'll receive errors or incur charges.
Accept the terms and skip the recovery resource page.
In the Google Cloud Console, on the Navigation menu , click BigQuery.
The Welcome to BigQuery in the Cloud Console dialog opens. This dialog provides a link to the quickstart guide and lists UI updates.
Click Done to close the dialog.
Create dataset
In the Explorer pane, click on View actions () next to your project ID and select Create dataset.
A pop-up will appear.
Enter the Dataset ID: titanic, Location type > Region : and then click Create dataset.
Note: In case of any difficulty with downloading the dataset in Incognito mode, use the normal window to download the Titanic dataset.
Rename your downloded dataset as titanic_toy.csv.
Then, from the UI:
Open the titanic dataset that you created in the previous step. (Click on View actions () next to your dataset and select Open).
Click Create table and specify the following:
Create table from: Upload
Select file: Use the downloaded Titanic dataset
File format: CSV
Table name: survivors
Auto-detect: Select auto-detect checkbox - Schema
Click Create table.
Click View actions icon next to survivors and select Copy ID. Save the copied table ID to use later in the lab.
You have now created and populated the table with the Titanic dataset! You can explore its contents, run queries, and analyze your data.
Task 2. Create a dataset
Datasets in Vertex AI allow you to create datasets for your machine learning workloads. You can create datasets for structured data (CSV files or BigQuery tables) or unstructured data such as images and text. It is important to notice that Vertex AI datasets just reference your original data and there is no duplication.
Create ML dataset
In the Google Cloud Console, on the Navigation Menu, select Vertex AI > Datasets.
Select and click Create.
Give your dataset a name, like titanic.
You can create datasets for images, text, or videos, as well as tabular data.
The Titanic dataset is tabular, so you should click the Tabular tab.
For region selection, select and click Create.
At this stage, you have just created a placeholder. You have not yet connected to the datasource; you will do so on the following step.
Select datasource
As you have already loaded the Titanic dataset in BigQuery, you can connect your ML dataset to your BigQuery table.
Choose Select a table or view from BigQuery.
Paste the already copied table ID in the BROWSE field.
Once you select the dataset, click Continue.
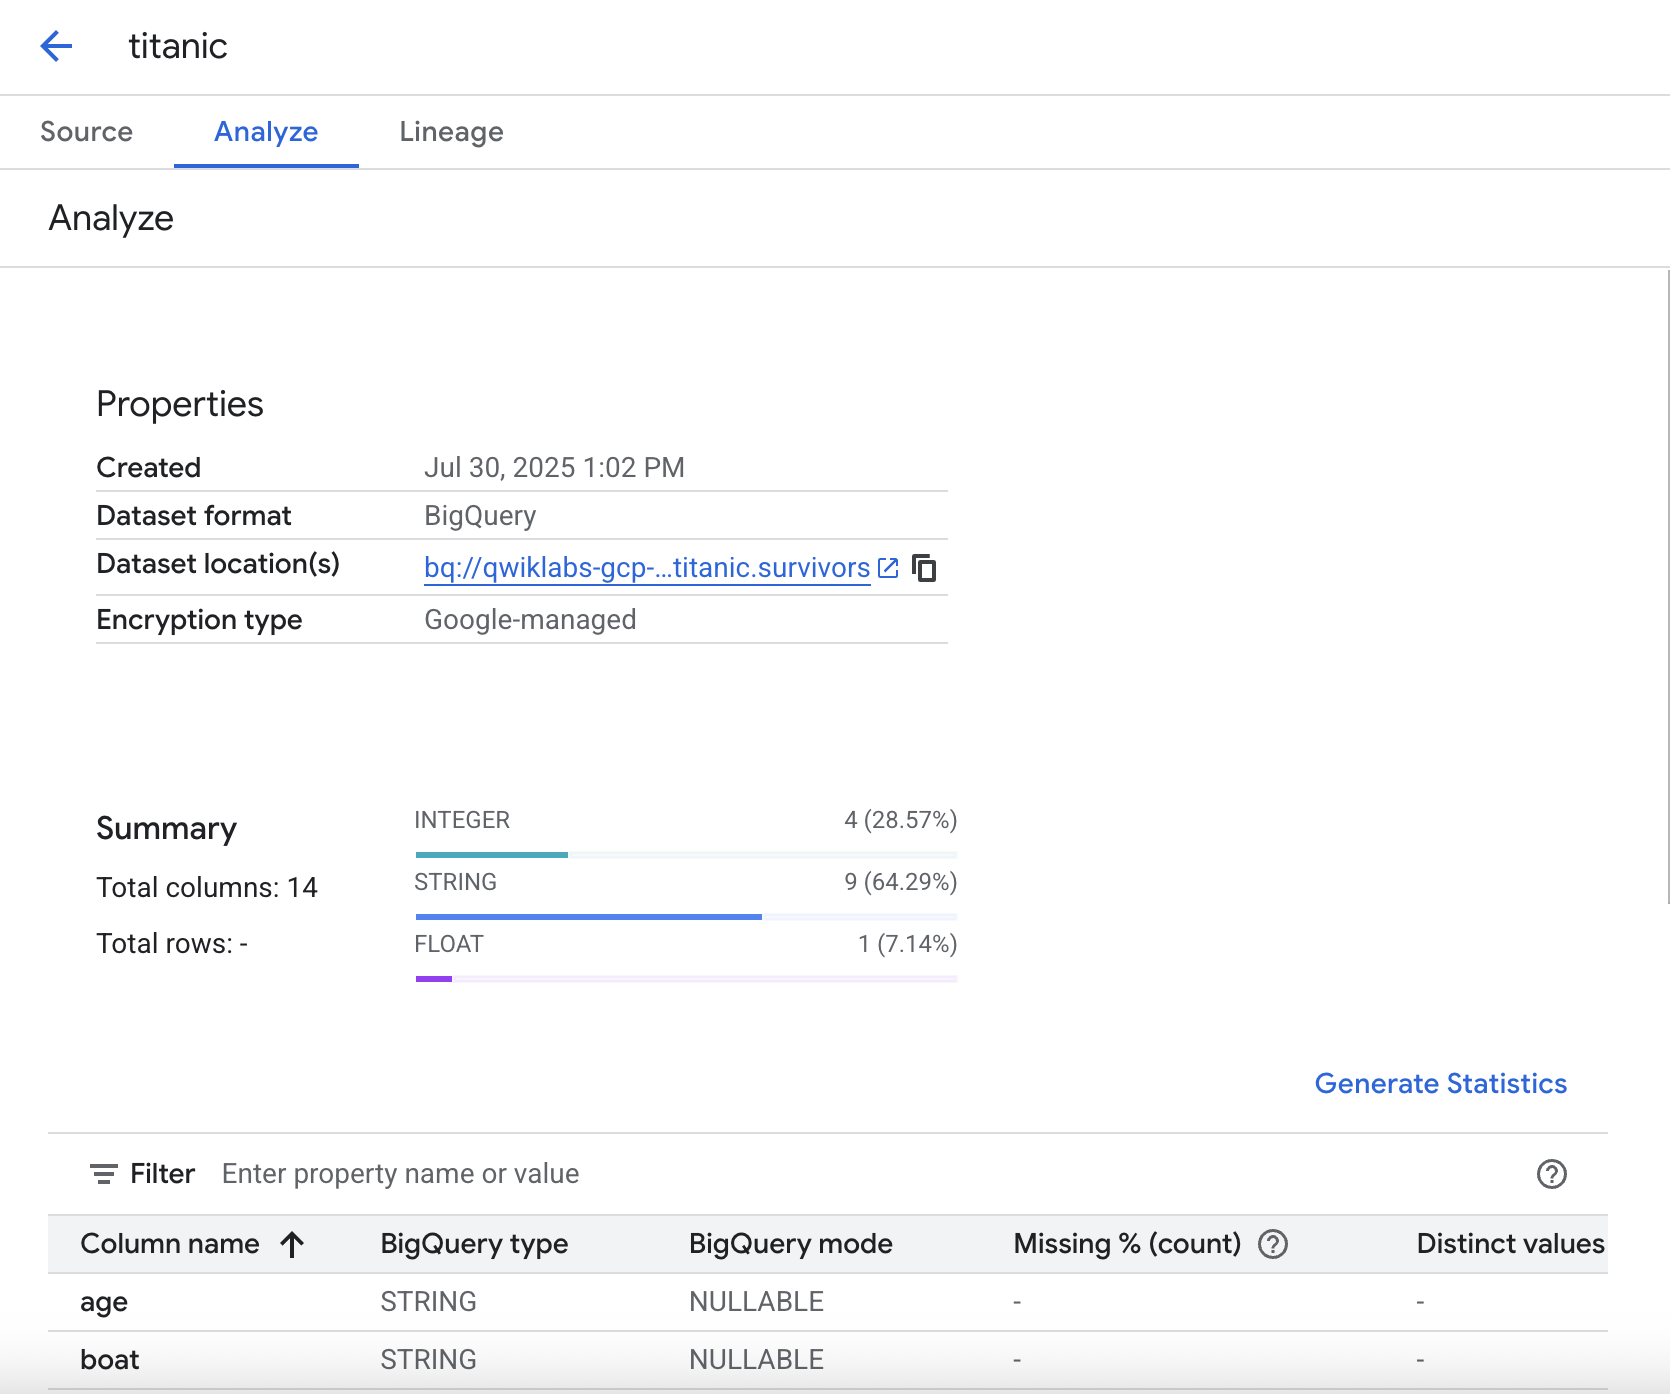
Generate statistics
Under the Analyze tab you can generate statistics regarding your data. This gives you the ability to quickly peek at the data and check for distributions, missing values, etc.
In order to run the statistical analysis, click Generate statistics. It can take a couple of minutes to execute, so if you'd like you can continue with the lab and come back later to see the results.
Task 3. Custom training package using Workbench
It is a good practice to package and parameterize your code so that it becomes a portable asset.
In this section, you will create a training package with custom code using Vertex AI Workbench. A fundamental step in using the service is to be able to create a Python source distribution, AKA a distribution package. This is not much more than creating folders and files within the distribution package. The next section will explain how a package is structured.
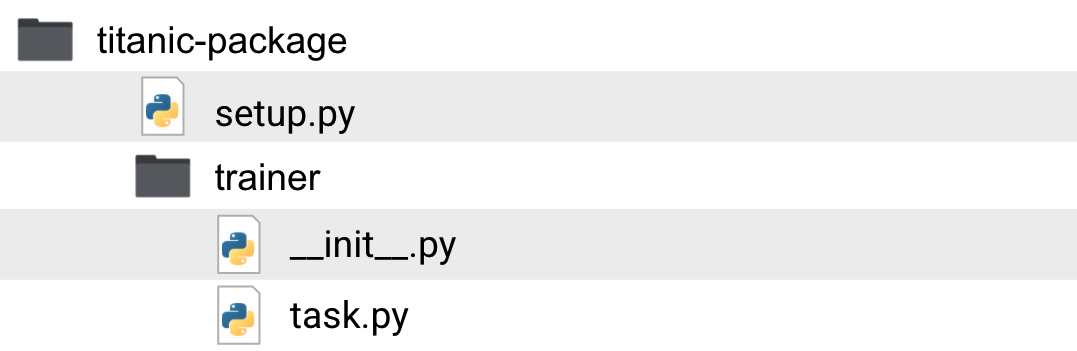
Application structure
The basic structure of a Python package can be seen in the image below.
Let's see what those folders and files are for:
titanic-package: This is your working directory. Inside this folder you will have your package and code related to the Titanic survivor classifier.
setup.py: The setup file specifies how to build your distribution package. It includes information such as the package name, version, and any other packages that you might need for your training job and which are not included by default in GCP's pre-built training containers.
trainer: The folder that contains the training code. This is also a Python package. What makes it a package is the empty __init__.py file that is inside the folder.
__init__.py: Empty file called __init__.py. It signifies that the folder that it belongs to is a package.
task.py: The task.py is a package module. Here is the entry point of your code and it also accepts CLI parameters for model training. You can include your training code in this module as well or you can create additional modules inside your package. This is entirely up to you and how you want to structure your code.
Now that you have an understanding of the structure, we can clarify that the names used for the package and module do not have to be "trainer" and "task.py". We are using this naming convention in this lab so that it aligns with our online documentation, but you can in fact pick the names that suit you.
Create your notebook instance
Now let's create a notebook instance and try training a custom model.
In the Google Cloud Console, on the Navigation Menu, click Vertex AI > Workbench.
On the Notebook instances page, click Create New and start an instance with Python 3, which includes Scikit-learn. You will use a Scikit-learn model for your classifier.
A pop-up will appear. Here you can change settings like the region in which your notebook instance will be created and the compute power you require.
As you are not dealing with a lot of data and you only need the instance for development purposes, please do not change any of the settings; simply click Create.
The instance will be up and running in no more than a couple of minutes.
Once the instance is ready, go ahead and Open Jupyterlab.
You will see “Build recommended” pop up, click Build. If you see the build failed, ignore it.
Create your package
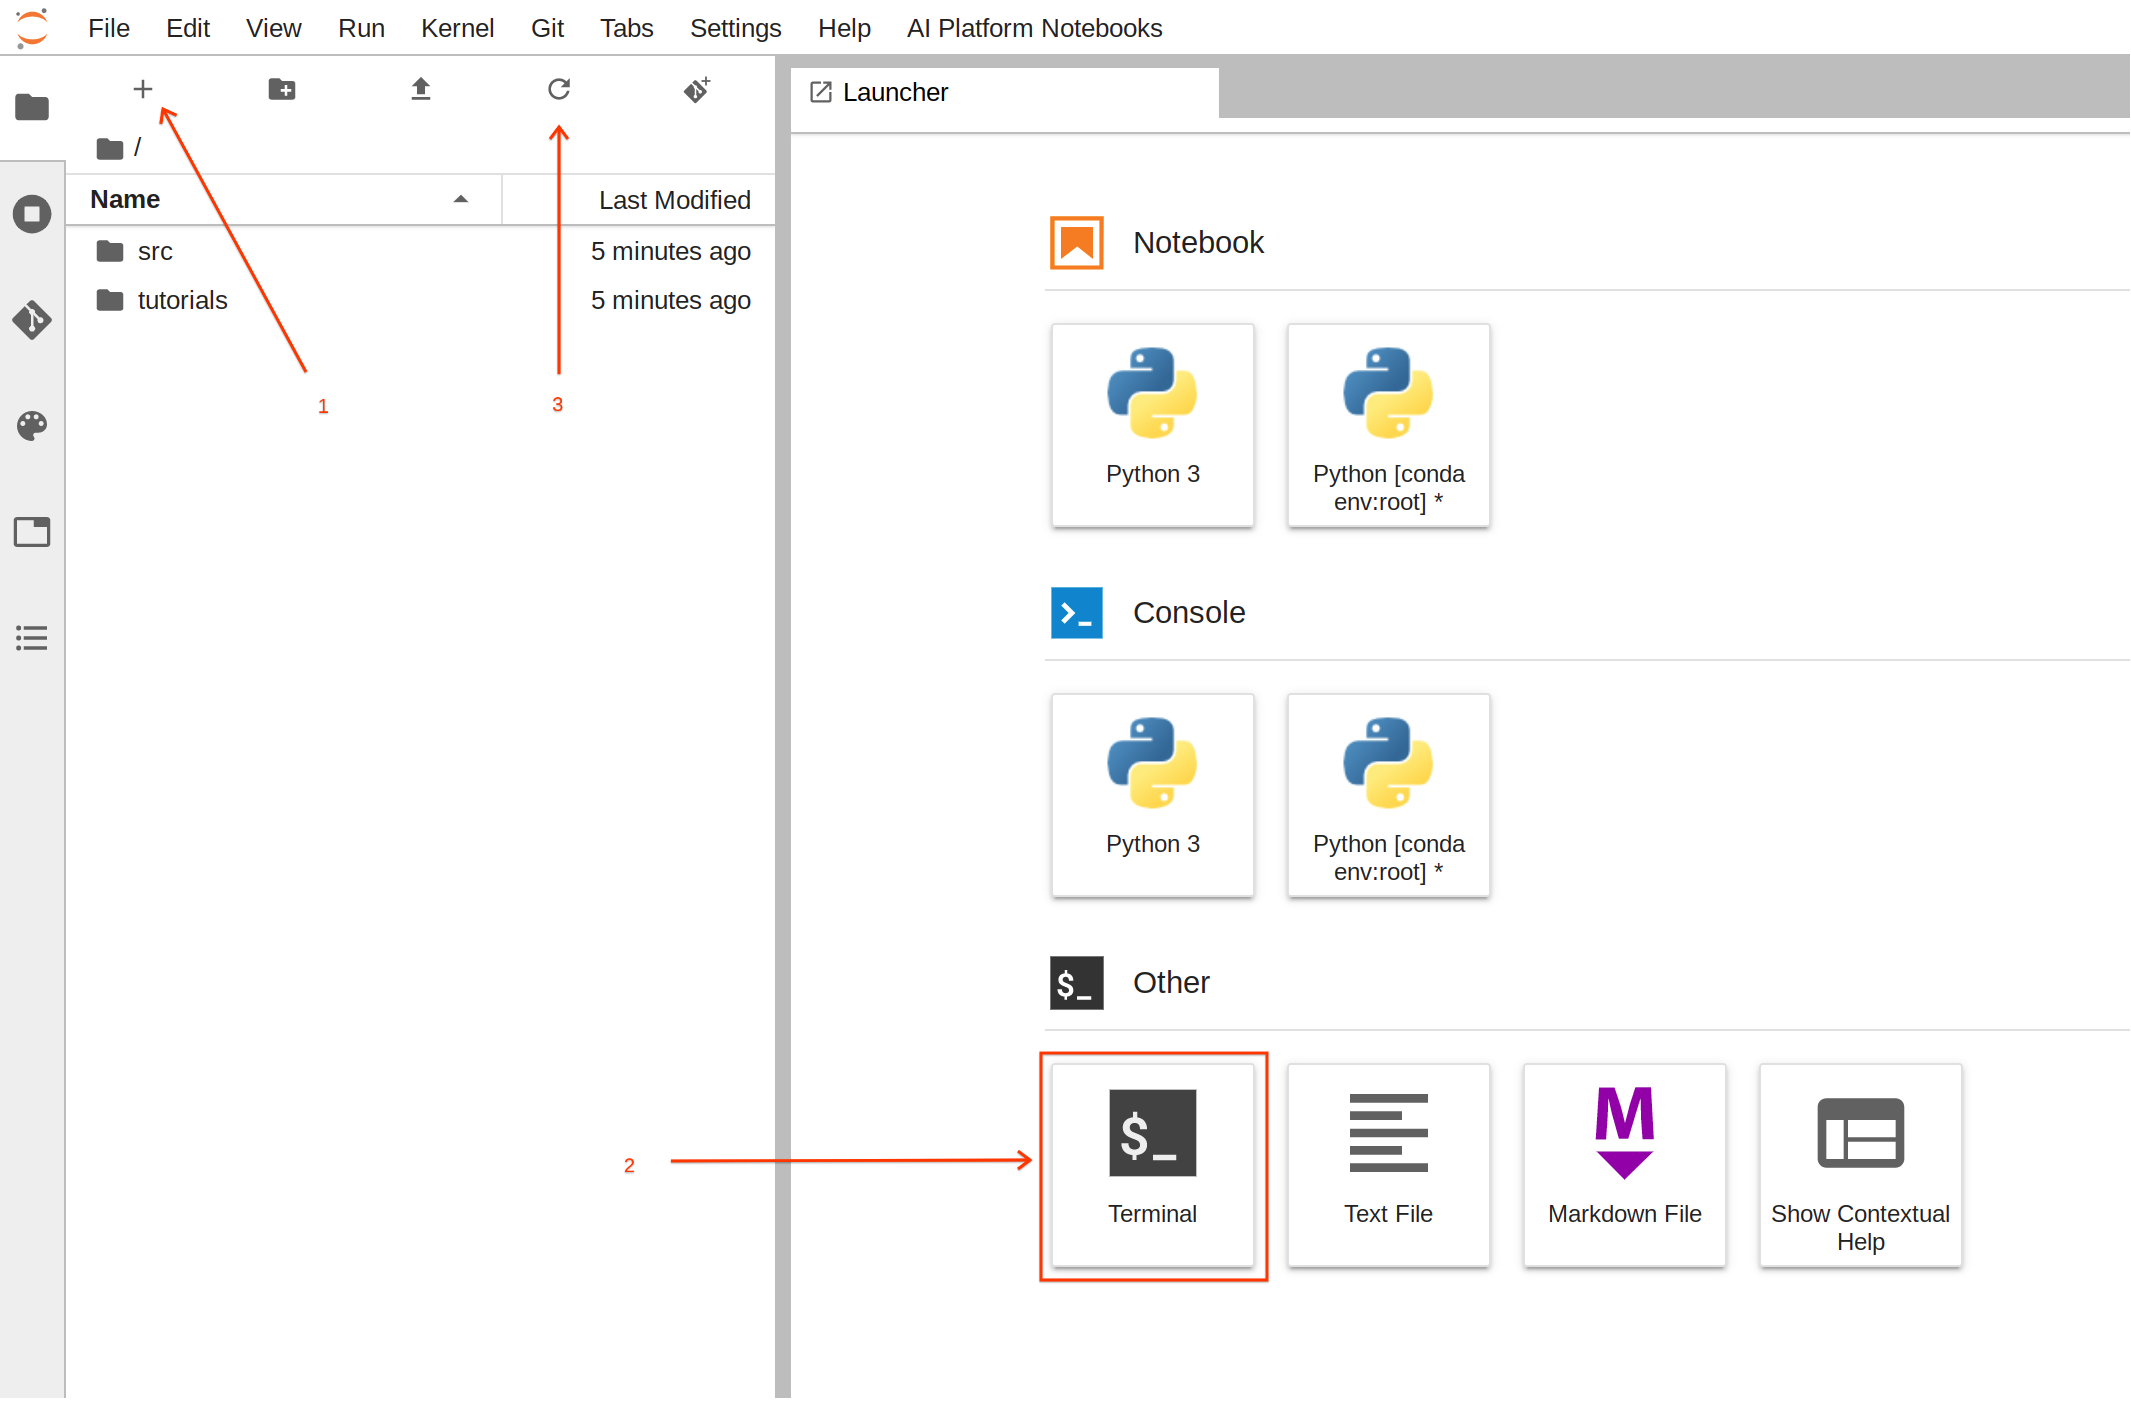
Now that the notebook is up and running, you can start building your training assets.
For this task it is easier to use the terminal.
From the Launcher, click on Terminal to create a new terminal session.
Now, in the terminal, execute the following commands to create the folder structure with the required files:
Once you run the commands, click the refresh button to see the newly created folder and files.
Copy-paste the following code in titanic/trainer/task.py. The code contains comments, so it will help to spend a few minutes going through the file to better understand it:
from google.cloud import bigquery, bigquery_storage, storage
from sklearn.pipeline import make_pipeline, Pipeline
from sklearn.compose import ColumnTransformer
from sklearn.preprocessing import StandardScaler, OneHotEncoder, OrdinalEncoder
from sklearn.model_selection import cross_val_score
from sklearn.svm import SVC
from sklearn.metrics import classification_report, f1_score
from typing import Union, List
import os, logging, json, pickle, argparse
import dask.dataframe as dd
import pandas as pd
import numpy as np
# feature selection. The FEATURE list defines what features are needed from the training data
# as well as the types of those features. We will perform different feature engineering depending on the type.
# List all column names for binary features: 0,1 or True,False or Male,Female etc
BINARY_FEATURES = [
'sex']
# List all column names for numeric features
NUMERIC_FEATURES = [
'age',
'fare']
# List all column names for categorical features
CATEGORICAL_FEATURES = [
'pclass',
'embarked',
'home_dest',
'parch',
'sibsp']
ALL_COLUMNS = BINARY_FEATURES+NUMERIC_FEATURES+CATEGORICAL_FEATURES
# define the column name for label
LABEL = 'survived'
# Define the index position of each feature. This is needed for processing a
# numpy array (instead of pandas) which has no column names.
BINARY_FEATURES_IDX = list(range(0,len(BINARY_FEATURES)))
NUMERIC_FEATURES_IDX = list(range(len(BINARY_FEATURES), len(BINARY_FEATURES)+len(NUMERIC_FEATURES)))
CATEGORICAL_FEATURES_IDX = list(range(len(BINARY_FEATURES+NUMERIC_FEATURES), len(ALL_COLUMNS)))
def load_data_from_gcs(data_gcs_path: str) -> pd.DataFrame:
'''
Loads data from Google Cloud Storage (GCS) to a dataframe
Parameters:
data_gcs_path (str): gs path for the location of the data. Wildcards are also supported. i.e gs://example_bucket/data/training-*.csv
Returns:
pandas.DataFrame: a dataframe with the data from GCP loaded
'''
# using dask that supports wildcards to read multiple files. Then with dd.read_csv().compute we create a pandas dataframe
# Additionally I have noticed that some values for TotalCharges are missing and this creates confusion regarding TotalCharges as the data type.
# to overcome this we manually define TotalCharges as object.
# We will later fix this abnormality
logging.info("reading gs data: {}".format(data_gcs_path))
return dd.read_csv(data_gcs_path, dtype={'TotalCharges': 'object'}).compute()
def load_data_from_bq(bq_uri: str) -> pd.DataFrame:
'''
Loads data from BigQuery table (BQ) to a dataframe
Parameters:
bq_uri (str): bq table uri. i.e: example_project.example_dataset.example_table
Returns:
pandas.DataFrame: a dataframe with the data from GCP loaded
'''
if not bq_uri.startswith('bq://'):
raise Exception("uri is not a BQ uri. It should be bq://project_id.dataset.table")
logging.info("reading bq data: {}".format(bq_uri))
project,dataset,table = bq_uri.split(".")
bqclient = bigquery.Client(project=project[5:])
bqstorageclient = bigquery_storage.BigQueryReadClient()
query_string = """
SELECT * from {ds}.{tbl}
""".format(ds=dataset, tbl=table)
return (
bqclient.query(query_string)
.result()
.to_dataframe(bqstorage_client=bqstorageclient)
)
def clean_missing_numerics(df: pd.DataFrame, numeric_columns):
'''
removes invalid values in the numeric columns
Parameters:
df (pandas.DataFrame): The Pandas Dataframe to alter
numeric_columns (List[str]): List of column names that are numeric from the DataFrame
Returns:
pandas.DataFrame: a dataframe with the numeric columns fixed
'''
for n in numeric_columns:
df[n] = pd.to_numeric(df[n], errors='coerce')
df = df.fillna(df.mean())
return df
def data_selection(df: pd.DataFrame, selected_columns: List[str], label_column: str) -> (pd.DataFrame, pd.Series):
'''
From a dataframe it creates a new dataframe with only selected columns and returns it.
Additionally it splits the label column into a pandas Series.
Parameters:
df (pandas.DataFrame): The Pandas Dataframe to drop columns and extract label
selected_columns (List[str]): List of strings with the selected columns. i,e ['col_1', 'col_2', ..., 'col_n' ]
label_column (str): The name of the label column
Returns:
tuple(pandas.DataFrame, pandas.Series): Tuble with the new pandas DataFrame containing only selected columns and lablel pandas Series
'''
# We create a series with the prediciton label
labels = df[label_column].astype(int)
data = df.loc[:, selected_columns]
return data, labels
def pipeline_builder(params_svm: dict, bin_ftr_idx: List[int], num_ftr_idx: List[int], cat_ftr_idx: List[int]) -> Pipeline:
'''
Builds a sklearn pipeline with preprocessing and model configuration.
Preprocessing steps are:
* OrdinalEncoder - used for binary features
* StandardScaler - used for numerical features
* OneHotEncoder - used for categorical features
Model used is SVC
Parameters:
params_svm (dict): List of parameters for the sklearn.svm.SVC classifier
bin_ftr_idx (List[str]): List of ints that mark the column indexes with binary columns. i.e [0, 2, ... , X ]
num_ftr_idx (List[str]): List of ints that mark the column indexes with numerical columns. i.e [6, 3, ... , X ]
cat_ftr_idx (List[str]): List of ints that mark the column indexes with categorical columns. i.e [5, 10, ... , X ]
label_column (str): The name of the label column
Returns:
Pipeline: sklearn.pipelines.Pipeline with preprocessing and model training
'''
# Defining a preprocessing step for our pipeline.
# it specifies how the features are going to be transformed
preprocessor = ColumnTransformer(
transformers=[
('bin', OrdinalEncoder(), bin_ftr_idx),
('num', StandardScaler(), num_ftr_idx),
('cat', OneHotEncoder(handle_unknown='ignore'), cat_ftr_idx)], n_jobs=-1)
# We now create a full pipeline, for preprocessing and training.
# for training we selected a linear SVM classifier
clf = SVC()
clf.set_params(**params_svm)
return Pipeline(steps=[ ('preprocessor', preprocessor),
('classifier', clf)])
def train_pipeline(clf: Pipeline, X: Union[pd.DataFrame, np.ndarray], y: Union[pd.DataFrame, np.ndarray]) -> float:
'''
Trains a sklearn pipeline by fiting training data and labels and returns the accuracy f1 score
Parameters:
clf (sklearn.pipelines.Pipeline): the Pipeline object to fit the data
X: (pd.DataFrame OR np.ndarray): Training vectors of shape n_samples x n_features, where n_samples is the number of samples and n_features is the number of features.
y: (pd.DataFrame OR np.ndarray): Labels of shape n_samples. Order should mathc Training Vectors X
Returns:
score (float): Average F1 score from all cross validations
'''
# run cross validation to get training score. we can use this score to optimize training
score = cross_val_score(clf, X, y, cv=10, n_jobs=-1).mean()
# Now we fit all our data to the classifier.
clf.fit(X, y)
return score
def process_gcs_uri(uri: str) -> (str, str, str, str):
'''
Receives a Google Cloud Storage (GCS) uri and breaks it down to the scheme, bucket, path and file
Parameters:
uri (str): GCS uri
Returns:
scheme (str): uri scheme
bucket (str): uri bucket
path (str): uri path
file (str): uri file
'''
url_arr = uri.split("/")
if "." not in url_arr[-1]:
file = ""
else:
file = url_arr.pop()
scheme = url_arr[0]
bucket = url_arr[2]
path = "/".join(url_arr[3:])
path = path[:-1] if path.endswith("/") else path
return scheme, bucket, path, file
def pipeline_export_gcs(fitted_pipeline: Pipeline, model_dir: str) -> str:
'''
Exports trained pipeline to GCS
Parameters:
fitted_pipeline (sklearn.pipelines.Pipeline): the Pipeline object with data already fitted (trained pipeline object)
model_dir (str): GCS path to store the trained pipeline. i.e gs://example_bucket/training-job
Returns:
export_path (str): Model GCS location
'''
scheme, bucket, path, file = process_gcs_uri(model_dir)
if scheme != "gs:":
raise ValueError("URI scheme must be gs")
# Upload the model to GCS
b = storage.Client().bucket(bucket)
export_path = os.path.join(path, 'model.pkl')
blob = b.blob(export_path)
blob.upload_from_string(pickle.dumps(fitted_pipeline))
return scheme + "//" + os.path.join(bucket, export_path)
def prepare_report(cv_score: float, model_params: dict, classification_report: str, columns: List[str], example_data: np.ndarray) -> str:
'''
Prepares a training report in Text
Parameters:
cv_score (float): score of the training job during cross validation of training data
model_params (dict): dictonary containing the parameters the model was trained with
classification_report (str): Model classification report with test data
columns (List[str]): List of columns that where used in training.
example_data (np.array): Sample of data (2-3 rows are enough). This is used to include what the prediciton payload should look like for the model
Returns:
report (str): Full report in text
'''
buffer_example_data = '['
for r in example_data:
buffer_example_data+='['
for c in r:
if(isinstance(c,str)):
buffer_example_data+="'"+c+"', "
else:
buffer_example_data+=str(c)+", "
buffer_example_data= buffer_example_data[:-2]+"], \n"
buffer_example_data= buffer_example_data[:-3]+"]"
report = """
Training Job Report
Cross Validation Score: {cv_score}
Training Model Parameters: {model_params}
Test Data Classification Report:
{classification_report}
Example of data array for prediciton:
Order of columns:
{columns}
Example for clf.predict()
{predict_example}
Example of GCP API request body:
{{
"instances": {json_example}
}}
""".format(
cv_score=cv_score,
model_params=json.dumps(model_params),
classification_report=classification_report,
columns = columns,
predict_example = buffer_example_data,
json_example = json.dumps(example_data.tolist()))
return report
def report_export_gcs(report: str, report_dir: str) -> None:
'''
Exports training job report to GCS
Parameters:
report (str): Full report in text to sent to GCS
report_dir (str): GCS path to store the report model. i.e gs://example_bucket/training-job
Returns:
export_path (str): Report GCS location
'''
scheme, bucket, path, file = process_gcs_uri(report_dir)
if scheme != "gs:":
raise ValueError("URI scheme must be gs")
# Upload the model to GCS
b = storage.Client().bucket(bucket)
export_path = os.path.join(path, 'report.txt')
blob = b.blob(export_path)
blob.upload_from_string(report)
return scheme + "//" + os.path.join(bucket, export_path)
# Define all the command-line arguments your model can accept for training
if __name__ == '__main__':
parser = argparse.ArgumentParser()
# Input Arguments
parser.add_argument(
'--model_param_kernel',
help = 'SVC model parameter- kernel',
choices=['linear', 'poly', 'rbf', 'sigmoid', 'precomputed'],
type = str,
default = 'linear'
)
parser.add_argument(
'--model_param_degree',
help = 'SVC model parameter- Degree. Only applies for poly kernel',
type = int,
default = 3
)
parser.add_argument(
'--model_param_C',
help = 'SVC model parameter- C (regularization)',
type = float,
default = 1.0
)
parser.add_argument(
'--model_param_probability',
help = 'Whether to enable probability estimates',
type = bool,
default = True
)
'''
Vertex AI automatically populates a set of environment variables in the container that executes
your training job. Those variables include:
* AIP_MODEL_DIR - Directory selected as model dir
* AIP_DATA_FORMAT - Type of dataset selected for training (can be csv or bigquery)
Vertex AI will automatically split selected dataset into training, validation and testing
and 3 more environment variables will reflect the location of the data:
* AIP_TRAINING_DATA_URI - URI of Training data
* AIP_VALIDATION_DATA_URI - URI of Validation data
* AIP_TEST_DATA_URI - URI of Test data
Notice that those environment variables are default. If the user provides a value using CLI argument,
the environment variable will be ignored. If the user does not provide anything as CLI argument
the program will try and use the environment variables if those exist. Otherwise will leave empty.
'''
parser.add_argument(
'--model_dir',
help = 'Directory to output model and artifacts',
type = str,
default = os.environ['AIP_MODEL_DIR'] if 'AIP_MODEL_DIR' in os.environ else ""
)
parser.add_argument(
'--data_format',
choices=['csv', 'bigquery'],
help = 'format of data uri csv for gs:// paths and bigquery for project.dataset.table formats',
type = str,
default = os.environ['AIP_DATA_FORMAT'] if 'AIP_DATA_FORMAT' in os.environ else "csv"
)
parser.add_argument(
'--training_data_uri',
help = 'location of training data in either gs:// uri or bigquery uri',
type = str,
default = os.environ['AIP_TRAINING_DATA_URI'] if 'AIP_TRAINING_DATA_URI' in os.environ else ""
)
parser.add_argument(
'--validation_data_uri',
help = 'location of validation data in either gs:// uri or bigquery uri',
type = str,
default = os.environ['AIP_VALIDATION_DATA_URI'] if 'AIP_VALIDATION_DATA_URI' in os.environ else ""
)
parser.add_argument(
'--test_data_uri',
help = 'location of test data in either gs:// uri or bigquery uri',
type = str,
default = os.environ['AIP_TEST_DATA_URI'] if 'AIP_TEST_DATA_URI' in os.environ else ""
)
parser.add_argument("-v", "--verbose", help="increase output verbosity",
action="store_true")
args = parser.parse_args()
arguments = args.__dict__
if args.verbose:
logging.basicConfig(level=logging.INFO)
logging.info('Model artifacts will be exported here: {}'.format(arguments['model_dir']))
logging.info('Data format: {}'.format(arguments["data_format"]))
logging.info('Training data uri: {}'.format(arguments['training_data_uri']) )
logging.info('Validation data uri: {}'.format(arguments['validation_data_uri']))
logging.info('Test data uri: {}'.format(arguments['test_data_uri']))
'''
We have 2 different ways to load our data to pandas. One is from Cloud Storage by loading csv files and
the other is by connecting to BigQuery. Vertex AI supports both and
here we created a code that depending on the dataset provided. We will select the appropriate loading method.
'''
logging.info('Loading {} data'.format(arguments["data_format"]))
if(arguments['data_format']=='csv'):
df_train = load_data_from_gcs(arguments['training_data_uri'])
df_test = load_data_from_bq(arguments['test_data_uri'])
df_valid = load_data_from_gcs(arguments['validation_data_uri'])
elif(arguments['data_format']=='bigquery'):
print(arguments['training_data_uri'])
df_train = load_data_from_bq(arguments['training_data_uri'])
df_test = load_data_from_bq(arguments['test_data_uri'])
df_valid = load_data_from_bq(arguments['validation_data_uri'])
else:
raise ValueError("Invalid data type ")
#as we will be using cross validation, we will have just a training set and a single test set.
# we will merge the test and validation to achieve an 80%-20% split
df_test = pd.concat([df_test,df_valid])
logging.info('Defining model parameters')
model_params = dict()
model_params['kernel'] = arguments['model_param_kernel']
model_params['degree'] = arguments['model_param_degree']
model_params['C'] = arguments['model_param_C']
model_params['probability'] = arguments['model_param_probability']
df_train = clean_missing_numerics(df_train, NUMERIC_FEATURES)
df_test = clean_missing_numerics(df_test, NUMERIC_FEATURES)
logging.info('Running feature selection')
X_train, y_train = data_selection(df_train, ALL_COLUMNS, LABEL)
X_test, y_test = data_selection(df_test, ALL_COLUMNS, LABEL)
logging.info('Training pipelines in CV')
y_train = y_train.astype('int')
y_test = y_test.astype('int')
clf = pipeline_builder(model_params, BINARY_FEATURES_IDX, NUMERIC_FEATURES_IDX, CATEGORICAL_FEATURES_IDX)
cv_score = train_pipeline(clf, X_train, y_train)
logging.info('Export trained pipeline and report')
pipeline_export_gcs(clf, arguments['model_dir'])
y_pred = clf.predict(X_test)
test_score = f1_score(y_test, y_pred, average='weighted')
logging.info('f1score: '+ str(test_score))
report = prepare_report(cv_score,
model_params,
classification_report(y_test,y_pred),
ALL_COLUMNS,
X_test.to_numpy()[0:2])
report_export_gcs(report, arguments['model_dir'])
logging.info('Training job completed. Exiting...')
Press Ctrl+S to save the file.
Build your package
Now it is time to build your package so that you can use it with the training service.
Copy-paste the following code in titanic/setup.py:
from setuptools import find_packages
from setuptools import setup
REQUIRED_PACKAGES = [
'gcsfs==0.7.1',
'dask[dataframe]==2021.2.0',
'google-cloud-bigquery-storage==1.0.0',
'six==1.15.0'
]
setup(
name='trainer',
version='0.1',
install_requires=REQUIRED_PACKAGES,
packages=find_packages(), # Automatically find packages within this directory or below.
include_package_data=True, # if packages include any data files, those will be packed together.
description='Classification training titanic survivors prediction model'
)
Press Ctrl+S to save the file.
Return to your terminal and test whether you can train a model using task.py.
First, create the following environment variables, but remember to ensure that you have selected the right GCP project from the console:
PROJECT_ID Will be set to the selected project ID
BUCKET_NAME Will be the PROJECT_ID and "-bucket" attached to it
export REGION="{{{project_0.default_region|Region}}}"
export PROJECT_ID=$(gcloud config list --format 'value(core.project)')
export BUCKET_NAME=$PROJECT_ID"-bucket"
Create a bucket where you want to export your trained model:
gsutil mb -l $REGION "gs://"$BUCKET_NAME
Now run the following commands. You are using all of your training data to test. The same dataset is used for testing, validation, and training. Here you want to ensure that the code executes and that it is free of bugs. In reality you will want to use different test and validation data. You will leave that for Vertex AI training service to handle.
First, install the required libraries.
cd /home/jupyter/titanic
pip install setuptools
python setup.py install
Note: You can ignore the error: google-auth 2.3.3 is installed but google-auth<2.0dev,>=1.25.0 is required by {'google-api-core'}, as it does not affect the lab functionality.
Now run your training code to verify that it executes without issues:
If the code executed successfully, you will be able to see INFO logs printed. The two lines indicate the f1 score, which should be around 0.85, and the last line indicating that the training job completed successfully:
In this section you will train a model on Vertex AI. You are going to use the GUI for that. There is also a programmatic way to do this using a Python SDK; however, using the GUI will help you to better understand the process.
From the Google Cloud Console, navigate to Vertex AI > Training.
Select the region as .
Click Train new model.
Training method
In this step, select the dataset and define the objective for the training job.
Dataset: The dataset you created a few steps back. The name should be titanic.
Objective: The model predicts whether an individual was likely to survive the Titanic tragedy. This is a Classification problem.
Custom Training: You want to use your custom training package.
Click Continue.
Model details
Now define the model name.
The default name should be the name of the dataset and a timestamp. You can leave it as is.
If you click Advanced Options, you will see the option to define the split of data into training, testing, and validation sets. Random assignment will randomly split the data into training, testing, and validation. This seems like a good option.
Click Continue.
Training container
Define your training environment.
Pre-built container: Google Cloud offers a set of pre-built containers that make it easy to train your models. Those containers support frameworks such as Scikit-learn, TensorFlow and XGBoost. If your training job is using something exotic you will need to prepare and provide a container for training(custom container). Your model is based on Scikit-learn and a pre-built container already exists.
Model framework: Scikit-learn. This is the library you used for model training.
Model framework version: Your code is compatible with 0.23.
Package location: You can browse to the location of your training package. This is the location where you uploaded training-0.1.tar.gz. If you followed the previous steps correctly, the location should be gs://YOUR-BUCKET-NAME/titanic/dist/trainer-0.1.tar.gz and YOUR-BUCKET-NAME is the name of the bucket you used under the Build your package section.
Python module: The Python module you created in Notebooks. It will correspond to the folder that has your training code/module and the name of the entry file. This should be trainer.task
BigQuery project for exporting data: In Step 1 you selected the dataset and defined an automatic split. A new dataset and tables for train/test/validate sets will be created under the selected project.
Enter the same project ID you are running for the lab.
Additionally, training/test/validation datasets URIs will be set as environment variables in the training container, so you can automatically use those variables to load your data. The environment variable names for the datasets will be AIP_TRAINING_DATA_URI, AIP_TEST_DATA_URI, AIP_VALIDATION_DATA_URI. An additional variable will be AIP_DATA_FORMAT which will be either csv or bigquery, depending on the type of the selected dataset in Step 1.
You have already built this logic in task.py. Observe this example code (taken from task.py):
...
parser.add_argument( '--training_data_uri ',
help = 'Directory to output model and artifacts',
type = str,
default = os.environ['AIP_TRAINING_DATA_URI'] if 'AIP_TRAINING_DATA_URI' in os.environ else "" )
...
Model output directory: The location the model will be exported to. This is going to be an environment variable in the training container called AIP_MODEL_DIR. In our task.py there is an input parameters to capture this:
...
parser.add_argument( '--model_dir',
help = 'Directory to output model and artifacts',
type = str,
default = os.environ['AIP_MODEL_DIR'] if 'AIP_MODEL_DIR' in os.environ else "" )
...
You can use the environment variable to know where to export the training job artifacts. Let's select: gs://YOUR-BUCKET-NAME/titanic/
Click Continue.
Hyperparameter tuning
The hyperparameter tuning section allows you to define a set of model parameters that you would like to tune your model with. Different values will be explored in order to produce the model with the best parameters. In your code, you did not implement the hyperparameter tuner functionality. It's only a few lines of code (about five lines) but you did not want to add this complexity now.
Let's skip this step by selecting Continue.
Compute and pricing
Where do you want your training job to run and what type of server do you want to use? Your model training process is not hungry for resources. You were able to run the training job inside a relatively small notebook instance and the execution finishes quite fast.
With that in mind, you choose:
Region:
Machine type: n1-standard-4
Click Continue.
Prediction container
In this step you can decide if you want to just train the model, or also add settings for the prediction service used to productionize your model.
You will be using a pre-built container in this lab. However, keep in mind that Vertex AI gives you a few options for model serving:
No prediction container: Just train the model, and worry about productionizing the model later.
Pre-built container: Train the model and define the pre-built container to be used for deployment.
Custom container: Train the model and define a custom container to be used for deployment.
You should choose a pre-built container, since Google Cloud already offers a Scikit-Learn container. You will deploy the model after the training job is completed.
Model framework: scikit-learn
Model framework version: 0.23
Model directory: gs://YOUR-BUCKET-NAME/titanic/. This should be the same as the model output directory you defined in Step 3.
Click Start training.
The new training job will show under the Training pipeline tab. The training will take around 15 minutes to complete.
Task 5. Model evaluation
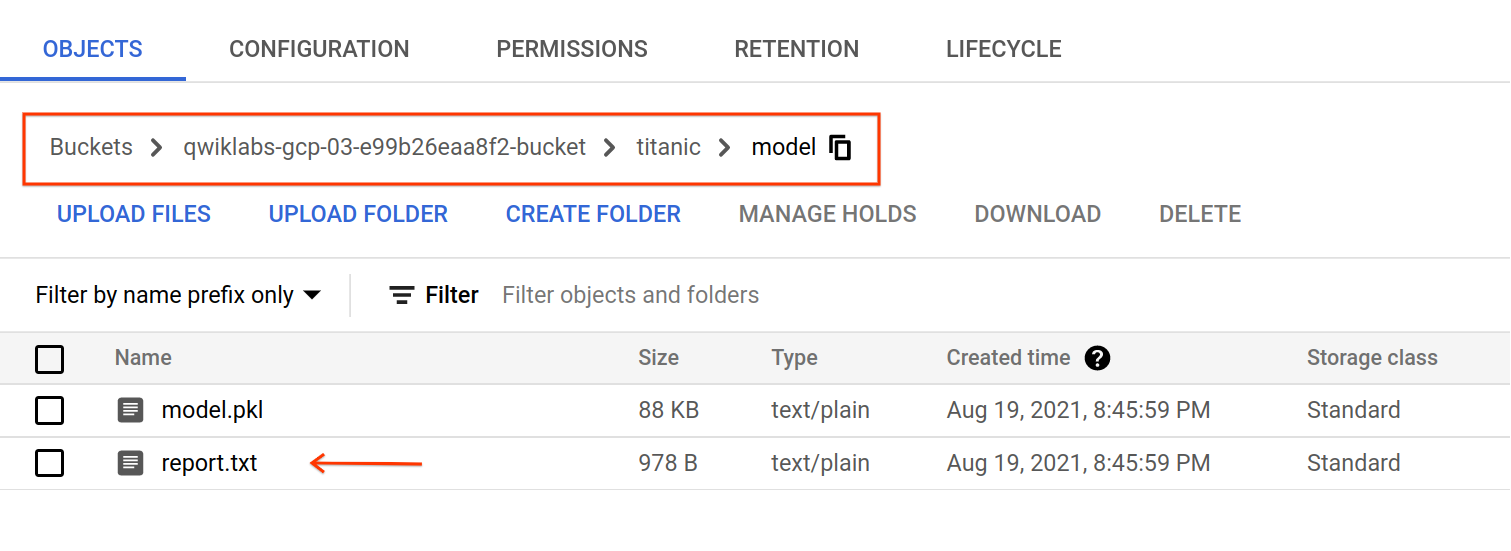
After the training job completes, artifacts will be exported under gs://YOUR-BUCKET-NAME/titanic/model/. You can inspect the report.txt file which contains evaluation metrics and classification report of the model.
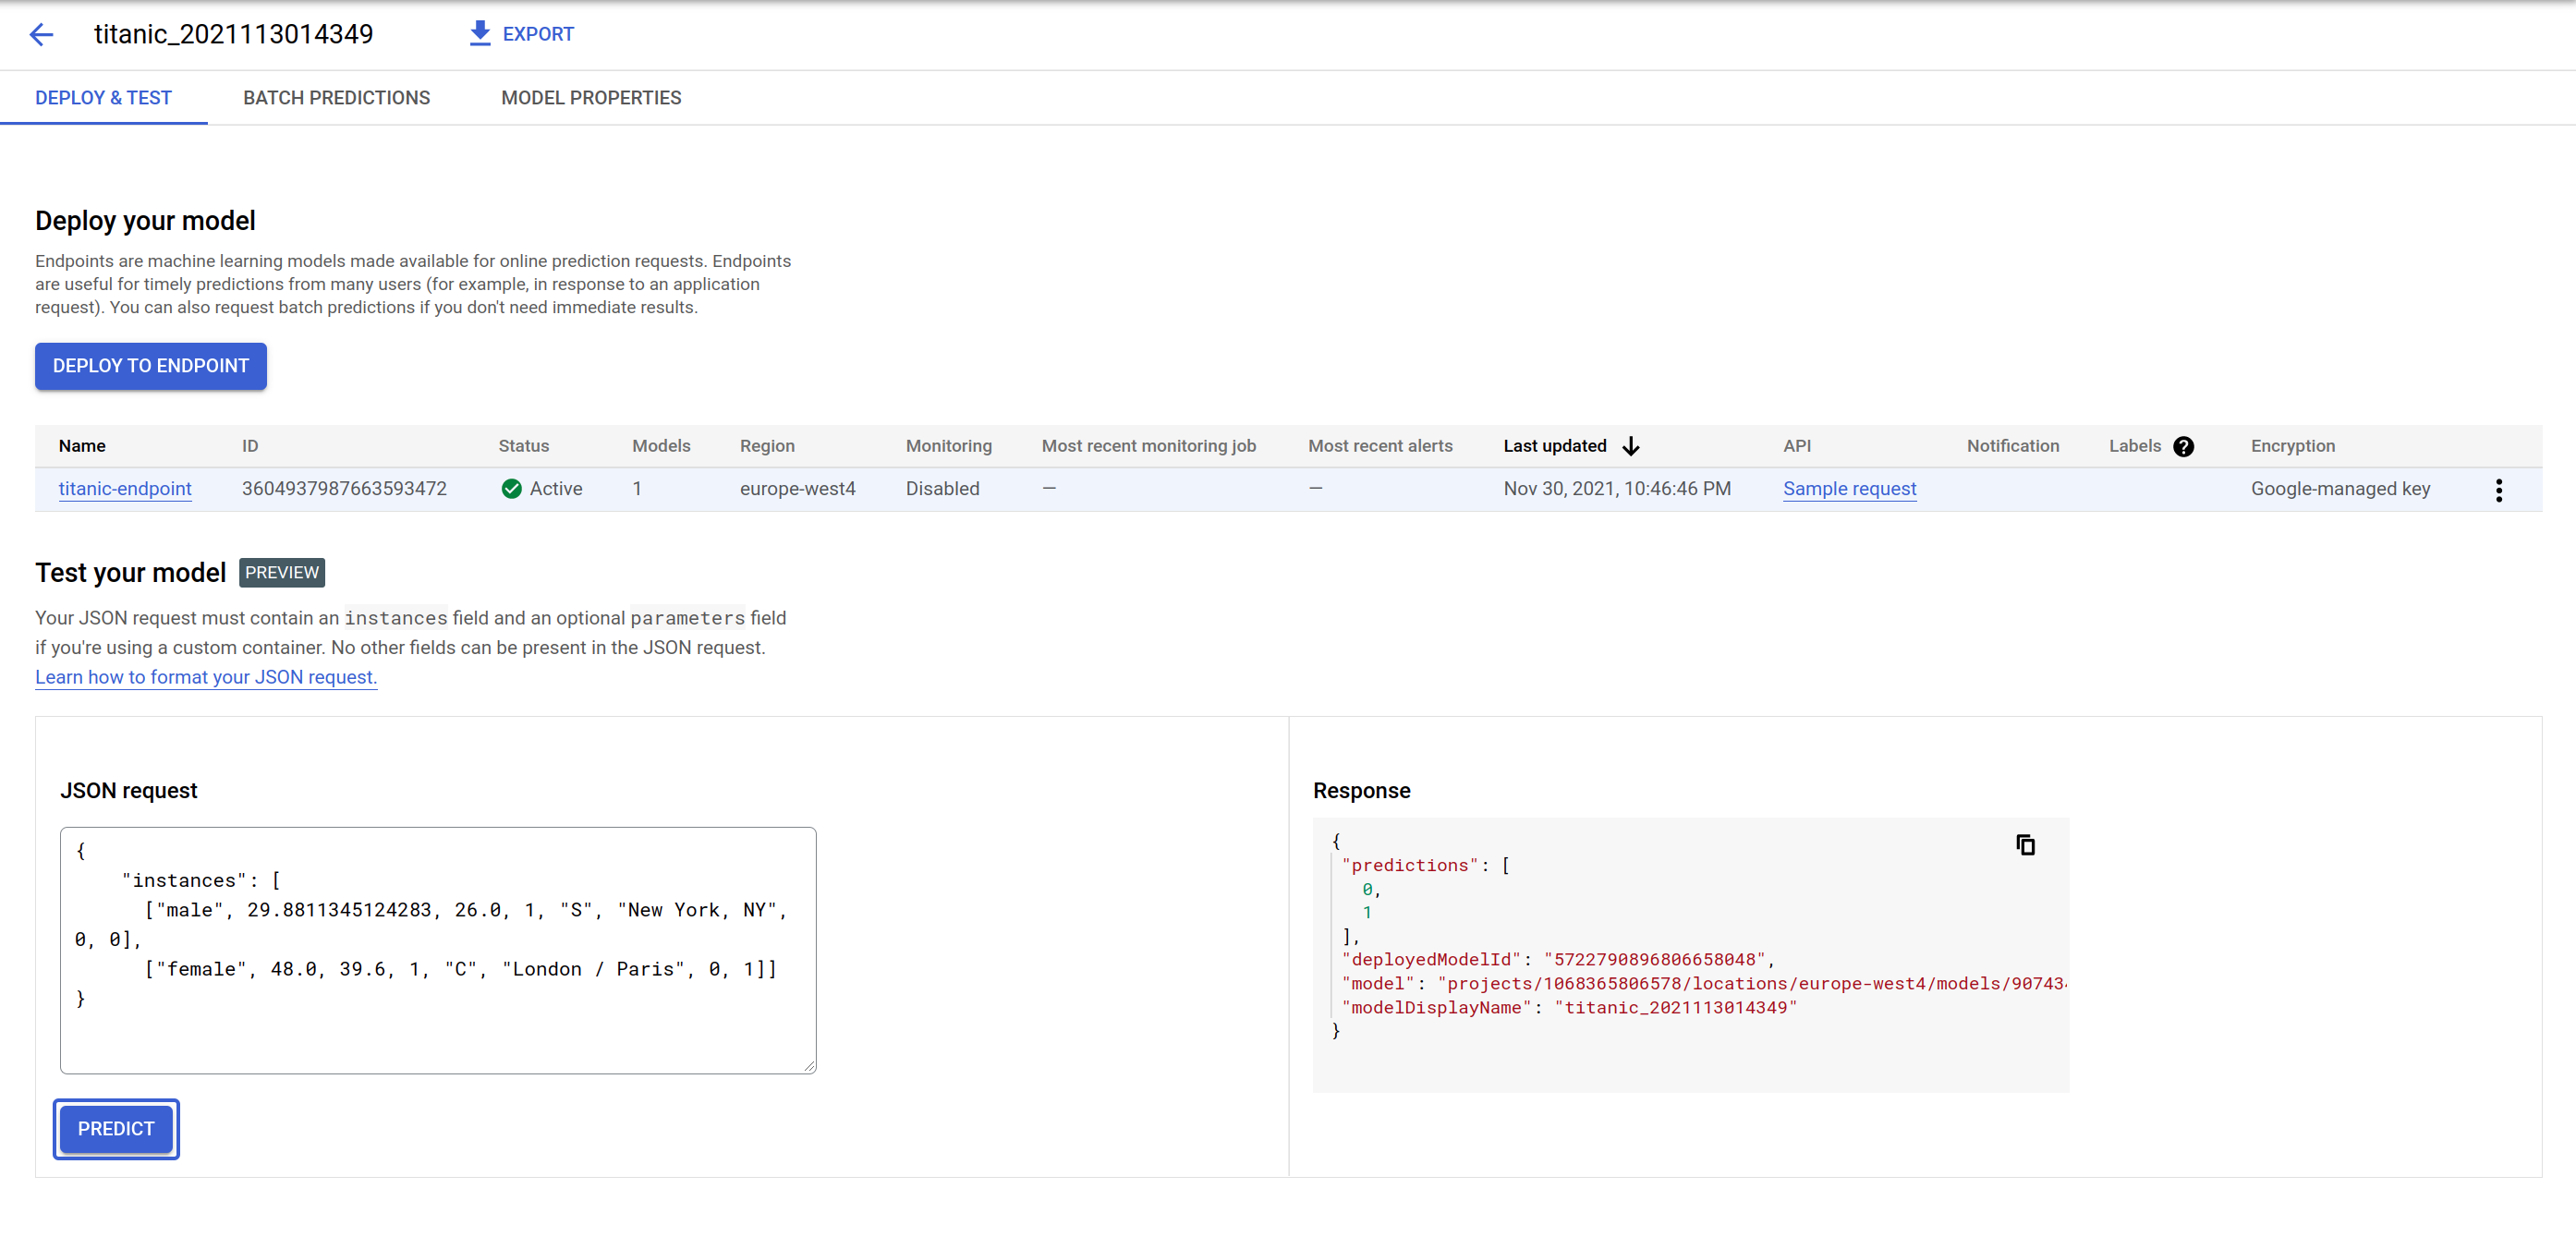
Task 6. Model deployment
In Cloud Console, on the Navigation menu, click Vertex AI > Training.
After the model training job is completed, select the trained model and deploy it to an endpoint.
Navigate to Deploy & test tab and then click Deploy to endpoint.
On the pop-up, you can define the required resources for model deployment:
Endpoint name: Endpoint URL where the model is served. A reasonable name for that would be titanic-endpoint. Click Continue.
Traffic split: Defines the percentage of traffic that you want to direct to this model. An endpoint can have multiple models and you can decide how to split the traffic among them. In this case you are deploying a single model so the traffic has to be 100 percent.
Minimum number of compute nodes: The minimum number of nodes required to serve model predictions. Start with 1. Additionally the prediction service will autoscale in case there is traffic
Maximum number of compute nodes: In case of autoscaling, this variable defines the upper limit of nodes. It helps protect against unwanted costs that autoscaling might result in. Set this variable to 2.
Machine type: Google Cloud offers a set of machine types you can deploy your model to. Each machine has its own memory and vCPU specs. Your model is simple, so serving on an n1-standard-4 instance will do the job.
Click Done and then click Deploy.
Task 7. Model prediction
Under Deploy your model, test the model prediction endpoint. The GUI provides a form to send a JSON request payload and responds back with the predictions as well as the model ID used for the prediction. That is because you can deploy more than one model to an endpoint and split the traffic.
Try the following payload and perhaps change some of the values to see how the predictions change: The sequence of the input features is [‘sex', ‘age', ‘fare', ‘pclass', ‘embarked', ‘home_dest', ‘parch', ‘sibsp'].
The endpoint responds with a list of zeros or ones in the same order as your input. 0 means it is more likely that the individual will not survive the Titanic accident and 1 means the individual is likely to survive it.
Task 8. Cleaning up
Congratulations! You have created a dataset, packaged your training code, and run a custom training job using Vertex AI. Furthermore, you deployed the trained model and sent some data for predictions.
Given that you do not need the created resources, it is a good idea to delete them in order to avoid unwanted charges.
Navigate to the Datasets page in the console, click the three dots on the dataset you want to delete, and click Delete dataset. Then click Delete to confirm the deletion.
Navigate to the Workbench page in the console, select only the notebook you want to delete, and click Delete from the top menu. Then click Delete to confirm the deletion.
To delete the endpoint you deployed, in the Endpoints section of your Vertex AI console, click on the endpoint, then click the overflow menu () and select Undeploy model from endpoint, and then click Undeploy.
To remove the endpoint, click the overflow menu (), and then click Delete endpoint. Then click Confirm.
Navigate to Models console page, click the three dots () on the model you want to delete, and click Delete model. Then click Delete.
To delete the Cloud Storage bucket, on the Cloud Storage page, select your bucket, and then click Delete. Confirm deletion by typing DELETE and then click Delete.
To delete the BigQuery dataset, perform the following steps:
Navigate to the BigQuery console.
In the Explorer panel, click on the View actions icon next to your dataset. Click Delete.
In the Delete dataset dialog box, confirm the delete command by typing delete and then click Delete.
End your lab
When you have completed your lab, click End Lab. Qwiklabs removes the resources you’ve used and cleans the account for you.
You will be given an opportunity to rate the lab experience. Select the applicable number of stars, type a comment, and then click Submit.
The number of stars indicates the following:
1 star = Very dissatisfied
2 stars = Dissatisfied
3 stars = Neutral
4 stars = Satisfied
5 stars = Very satisfied
You can close the dialog box if you don't want to provide feedback.
For feedback, suggestions, or corrections, please use the Support tab.
Copyright 2022 Google LLC All rights reserved. Google and the Google logo are trademarks of Google LLC. All other company and product names may be trademarks of the respective companies with which they are associated.
Labs create a Google Cloud project and resources for a fixed time
Labs have a time limit and no pause feature. If you end the lab, you'll have to restart from the beginning.
On the top left of your screen, click Start lab to begin
Use private browsing
Copy the provided Username and Password for the lab
Click Open console in private mode
Sign in to the Console
Sign in using your lab credentials. Using other credentials might cause errors or incur charges.
Accept the terms, and skip the recovery resource page
Don't click End lab unless you've finished the lab or want to restart it, as it will clear your work and remove the project
This content is not currently available
We will notify you via email when it becomes available
Great!
We will contact you via email if it becomes available
One lab at a time
Confirm to end all existing labs and start this one
Use private browsing to run the lab
Use an Incognito or private browser window to run this lab. This
prevents any conflicts between your personal account and the Student
account, which may cause extra charges incurred to your personal account.
In this lab, you can use Vertex AI to train and deploy a ML model.

 ) next to your project ID and select Create dataset.


