arrow_back

Introduction to Dart

登录 加入
访问 700 多个实验和课程

Introduction to Dart

实验 1 小时 30 分钟 universal_currency_alt 1 个积分 show_chart 入门级
info 此实验可能会提供 AI 工具来支持您学习。
访问 700 多个实验和课程

GSP1013

Google Cloud self-paced labs logo

Overview

Dart is a client-optimized language for developing fast apps on any platform. Its goal is to offer the most productive programming language for multi-platform development, paired with a flexible execution runtime platform for app frameworks.

Languages are defined by their technical envelope — the choices made during development that shape the capabilities and strengths of a language. Dart is designed for a technical envelope that is particularly suited to client development, prioritizing both development (sub-second stateful hot reload) and high-quality production experiences across a wide variety of compilation targets (web, mobile, and desktop).

Dart also forms the foundation of Flutter. Dart provides the language and runtimes that power Flutter apps, but Dart also supports many core developer tasks like formatting, analyzing, and testing code.

In this lab, you will learn the basics of Dart in a prepared development environment.

What you'll learn

  • Variables
  • Flow Control
  • Functions

Prerequisites

Based on the content, it is recommended to have some familiarity with:

General programming principles

Setup and requirements

Before you click the Start Lab button

Read these instructions. Labs are timed and you cannot pause them. The timer, which starts when you click Start Lab, shows how long Google Cloud resources are made available to you.

This hands-on lab lets you do the lab activities in a real cloud environment, not in a simulation or demo environment. It does so by giving you new, temporary credentials you use to sign in and access Google Cloud for the duration of the lab.

To complete this lab, you need:

  • Access to a standard internet browser (Chrome browser recommended).
Note: Use an Incognito (recommended) or private browser window to run this lab. This prevents conflicts between your personal account and the student account, which may cause extra charges incurred to your personal account.
  • Time to complete the lab—remember, once you start, you cannot pause a lab.
Note: Use only the student account for this lab. If you use a different Google Cloud account, you may incur charges to that account.

Task 1. Getting started

The lab environment includes an Editor and Browser pre-configured for Dart. Access these resources using the lab credentials panel.

  • Copy the 
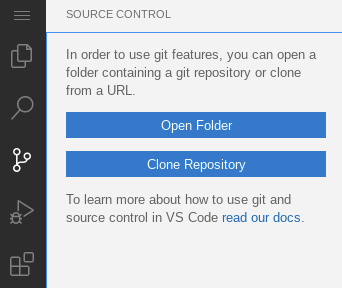
IDE link and paste it into a new browser.

Task 2. Flutter repository

In the code editor clone the flutter repository and then access the relevant code sample.

  1. In the editor select Source Control.

The Source Control page displaying buttons for Open Folder and Clone Repository

  1. Select Clone Repository.

  2. Enter the following repository:

https://github.com/rosera/flutter_workshop.git
  1. Clone to the default directory.
Note: As the repository is cloned, the editor will raise helpful notifications. These are not required for this lab. Alternatively you may use the editor available at dart.dev.

With the Repository now cloned onto your environment, the Flutter Workshop repository is now available.

For this lab use the dart folder to complete the exercises.

  1. Select the dart folder.

A solution folder containing working examples is also available in the same repository.

Solution Directory Contents
dart/lab01/solutions Variables
dart/lab02/solutions Flow control
dart/lab03/solutions Functions
Note: Please refer to the correct directory if you need assistance with a solution.

Task 3. Introduction to Dart

In addition, the following guidelines on Effective Dart will be useful.

  • Style Guide – This defines the rules for laying out and organizing code, or at least the parts that dart format doesn’t handle for you. The style guide also specifies how identifiers are formatted: camelCase, using_underscores, etc.
  • Documentation Guide – This tells you everything you need to know about what goes inside comments. Both doc comments and regular, run-of-the-mill code comments.
  • Usage Guide – This teaches you how to make the best use of language features to implement behavior. If it’s in a statement or expression, it’s covered here.
  • Design Guide – This is the softest guide, but the one with the widest scope. It covers what you’ve learned about designing consistent, usable APIs for libraries. If it’s in a type signature or declaration, this goes over it.

Dart: Hello World

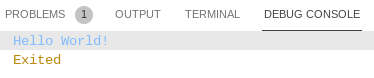
To get started with Dart, write a traditional Hello World program and create an application based on the traditional Hello World code.

  1. Create new file hello-world.dart.

  2. Add the following code:

void main(){ print('Hello World!'); }
  1. Save the code.
Note: Once the code is saved, a Run|Debug menu option will appear.
  1. Select the Run option to execute the code.

The program output will be displayed in the debug console.

The debug console displaying the output: Hello World!

Task 4. Variables

In this section learn how to declare different types of variables with Dart.

Learn about the following variables types and their use in Dart:

  • Integer
  • Double
  • Strings
  • Boolean

Dart: Hello Integer

Create an application to use Integers.

  1. Create new file hello-integer.dart.
  2. Add the following code:
void main(){ int maxNumberOfPeople = 35; print ('Hello $maxNumberOfPeople'); }
  1. Save the code.
Note: Once the code is saved, a Run|Debug menu option will appear.
  1. Select the Run option to execute the code.

The program output will be displayed in the debug console.

Dart: Hello Double

Create an application to use Doubles.

  1. Create new file hello-double.dart.
  2. Add the following code:
void main(){ double pieceOfPie = 3.142; print ('Hello $pieceOfPie'); }
  1. Save the code.
Note: Once the code is saved, a Run|Debug menu option will appear.
  1. Select the Run option to execute the code.

The program output will be displayed in the debug console.

Dart: Hello String

Create an application to use Strings.

  1. Create new file hello-string.dart.
  2. Add the following code:
void main(){ String getCourseName = "flutter bootcamp 21"; print ('Hello $getCourseName'); }
  1. Save the code.
Note: Once the code is saved, a Run|Debug menu option will appear.
  1. Select the Run option to execute the code.

The program output will be displayed in the debug console.

Dart: Hello Booleans

Create an application to use Booleans.

  1. Create new file hello-bool.dart.
  2. Add the following code:
void main(){ bool isDartCool = true; print ('Hello $isDartCool'); }
  1. Save the code.
Note: Once the code is saved, a Run|Debug menu option will appear.
  1. Select the Run option to execute the code.

The program output will be displayed in the debug console.

Task 5. Flow control

In this section learn how to apply conditional logic in Dart.

IF statement

Create an IF statement.

  1. Create new file hello-if.dart.
  2. Add the following code:
void main() { bool isDartCool = false; if (isDartCool) { print('Hello $isDartCool'); } }
  1. Save the code.
Note: Once the code is saved, a Run|Debug menu option will appear.
  1. Select the Run option to execute the code.

The program output will be displayed in the debug console.

IF/ELSE statement

Create an IF/ELSE statement.

  1. Create new file hello-else.dart.
  2. Add the following code:
void main() { bool isDartCool = false; if (isDartCool) { print('Hello $isDartCool'); } else { print('Hmm I think Dart is pretty cool!'); } }
  1. Save the code.
Note: Once the code is saved, a Run|Debug menu option will appear.
  1. Select the Run option to execute the code.

The program output will be displayed in the debug console.

Task 6. Functions

In this section learn how to declare functions and use them in Dart.

At a high level ypu need to know about the following:

  • Declare a function return type
  • Add function parameters
  • Set a return statement

Function without parameters

Create an application to use functions without parameters.

  1. Create new file hello-function.dart.
  2. Add the following code:
void main() { bool isDartCool = isDartCoolFunc(); if (isDartCool) { print('Hello $isDartCool'); } else { print('Hmm I think Dart is pretty cool!'); } } bool isDartCoolFunc() { bool isDartCool = true; return isDartCool; }
  1. Save the code.
Note: Once the code is saved, a Run|Debug menu option will appear.
  1. Select the Run option to execute the code.

The program output will be displayed in the debug console.

Function with parameters

Create an application to use functions with parameters.

  1. Create new file hello-function2.dart.
  2. Add the following code:
void main() { bool isDartCool = isDartCoolFunc(true); if (isDartCool) { print('Hello $isDartCool'); } else { print('Hmm I think Dart is pretty cool!'); } } bool isDartCoolFunc(bool myParameter) { bool isDartCool = myParameter; return isDartCool; }
  1. Save the code.
Note: Once the code is saved, a Run|Debug menu option will appear.
  1. Select the Run option to execute the code.

The program output will be displayed in the debug console.

Awesome work getting started with Dart.

Click Check my progress to verify the objective. Assess my progress

Congratulations!

You have successfully completed the lab and demonstrated your knowledge of Dart. Over the course of this lab, you have been introduced to the following Dart fundamentals:

  • Variables
  • Flow Control
  • Functions

Manual Last Updated October 11, 2023

Lab Last Tested October 12, 2023

Copyright 2025 Google LLC. All rights reserved. Google and the Google logo are trademarks of Google LLC. All other company and product names may be trademarks of the respective companies with which they are associated.

准备工作

  1. 实验会创建一个 Google Cloud 项目和一些资源,供您使用限定的一段时间
  2. 实验有时间限制,并且没有暂停功能。如果您中途结束实验,则必须重新开始。
  3. 在屏幕左上角,点击开始实验即可开始

使用无痕浏览模式

  1. 复制系统为实验提供的用户名密码
  2. 在无痕浏览模式下,点击打开控制台

登录控制台

  1. 使用您的实验凭证登录。使用其他凭证可能会导致错误或产生费用。
  2. 接受条款,并跳过恢复资源页面
  3. 除非您已完成此实验或想要重新开始,否则请勿点击结束实验,因为点击后系统会清除您的工作并移除该项目

此内容目前不可用

一旦可用,我们会通过电子邮件告知您

太好了!

一旦可用,我们会通过电子邮件告知您

一次一个实验

确认结束所有现有实验并开始此实验

使用无痕浏览模式运行实验

请使用无痕模式或无痕式浏览器窗口运行此实验。这可以避免您的个人账号与学生账号之间发生冲突,这种冲突可能导致您的个人账号产生额外费用。