


Before you begin
- Labs create a Google Cloud project and resources for a fixed time
- Labs have a time limit and no pause feature. If you end the lab, you'll have to restart from the beginning.
- On the top left of your screen, click Start lab to begin
Enable API
/ 20
Create an Agent
/ 30
Test the agent
/ 50
Conversational Agents provides a simple, visual bot building approach to Conversational Agent design. Bot designers now have a much clearer picture of the overall bot building process and multiple designers are able to easily collaborate on the same agent build. Conversational Agents supports many languages for your agent to use and understand, but this lab will be using only English.
In this lab, you will build a conversational agent using Conversational Agents.
You should be generally familiar with the basic concepts of conversational AI. Read through these Sample Transcripts to get an idea of what client transcripts might look like. Often the first step in creating an agent is to read through client transcripts and/or other contextual data to understand the use case and specific business requirements.
Read these instructions. Labs are timed and you cannot pause them. The timer, which starts when you click Start Lab, shows how long Google Cloud resources are made available to you.
This hands-on lab lets you do the lab activities in a real cloud environment, not in a simulation or demo environment. It does so by giving you new, temporary credentials you use to sign in and access Google Cloud for the duration of the lab.
To complete this lab, you need:
Click the Start Lab button. If you need to pay for the lab, a dialog opens for you to select your payment method. On the left is the Lab Details pane with the following:
Click Open Google Cloud console (or right-click and select Open Link in Incognito Window if you are running the Chrome browser).
The lab spins up resources, and then opens another tab that shows the Sign in page.
Tip: Arrange the tabs in separate windows, side-by-side.
If necessary, copy the Username below and paste it into the Sign in dialog.
You can also find the Username in the Lab Details pane.
Click Next.
Copy the Password below and paste it into the Welcome dialog.
You can also find the Password in the Lab Details pane.
Click Next.
Click through the subsequent pages:
After a few moments, the Google Cloud console opens in this tab.

Visit the Conversational Agents console, then select your Cloud Project named
Click Check my progress to verify the objective.
Click Create agent > Build your own If you do not see this page, refresh your browser.
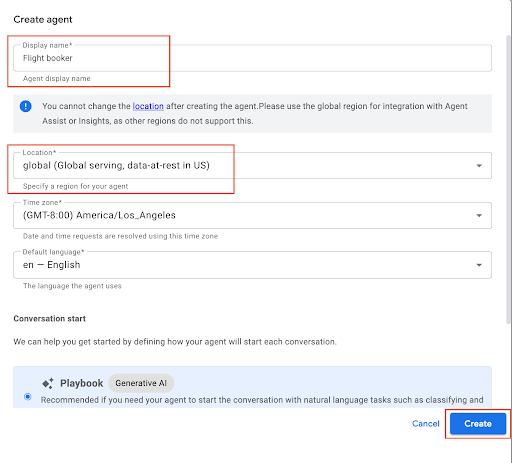
Name your agent Flight booker.
Pick global from the Location drop-down.
Click Create.
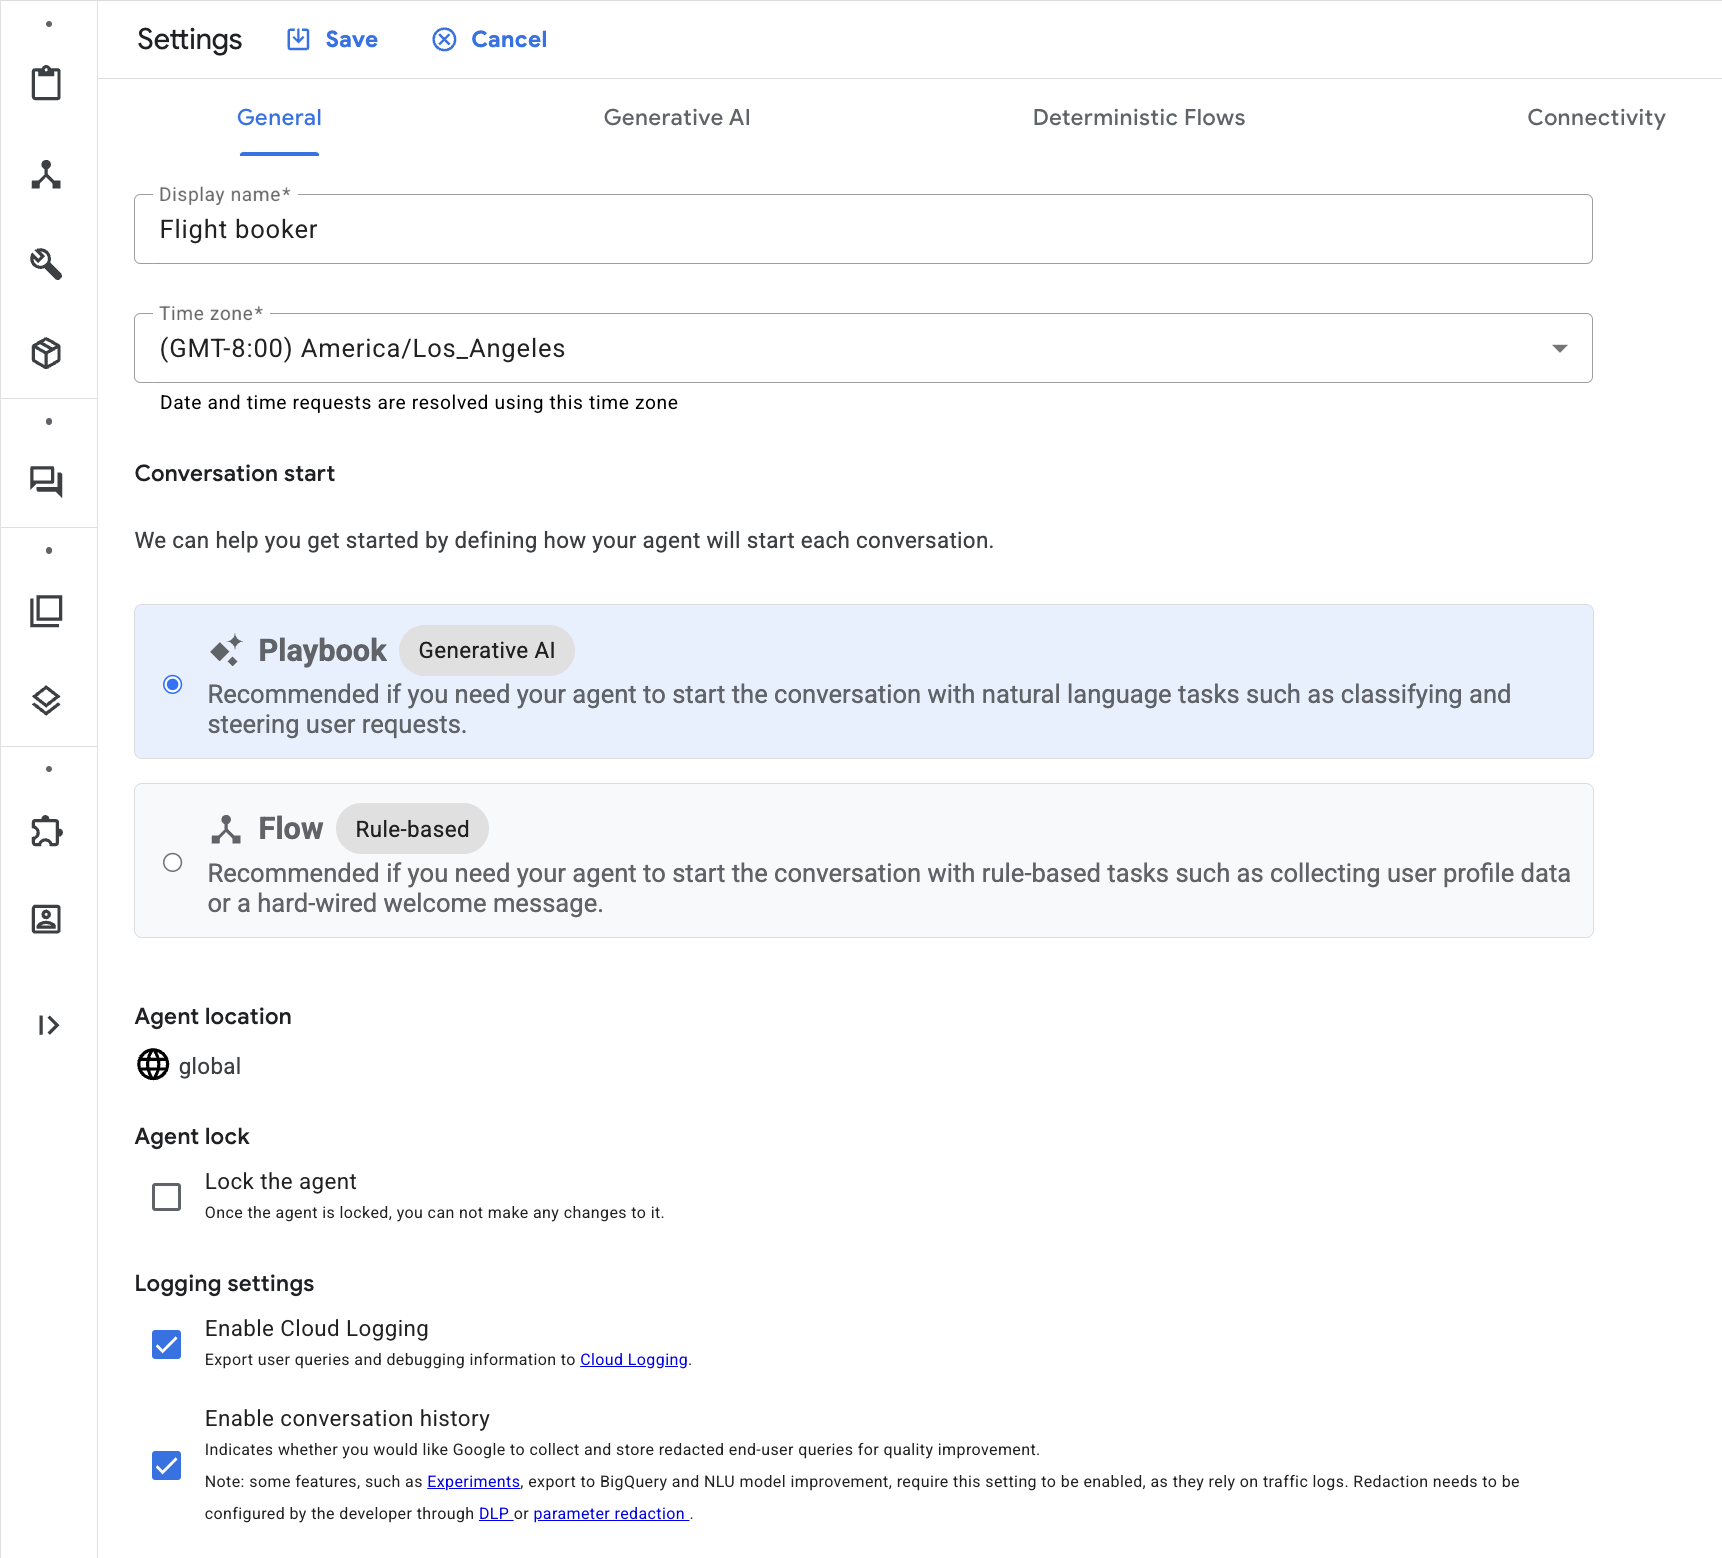
After creating the agent, navigate to Settings > (Agent)Settings > General > Logging settings and check the boxes next to Enable Cloud Logging and Enable Conversation History option. It will generate logs for this agent.
Click Save.
Click Check my progress to verify the objective.
Knowledge check
Intents are the reasons an end-user has for interacting with the agent, for example, ordering something. You can create an intent for every topic they may want to navigate.
Intents can be reused across Pages and Flows. Each intent is defined by training phrases end-users typically ask. These can be annotated or "labeled" to collect specific parameters, such as arrival city or departure date.
Conversational Agents will suggest annotations as you include training phrases for the intent; they can also be manually annotated to collect the parameter values you want to extract from the end-user's interaction with your agent.
Recommended: in order to reuse intents as well as make maintenance easier, name your intents with clear and explicit names.
Format of intent: category.some_description
Example of formatting:
main.book_a_flight
supplemental.flight_emissions
confirmation.yes, confirmation_no, redirect.live_agent.From the left navigation pane, click Flows.
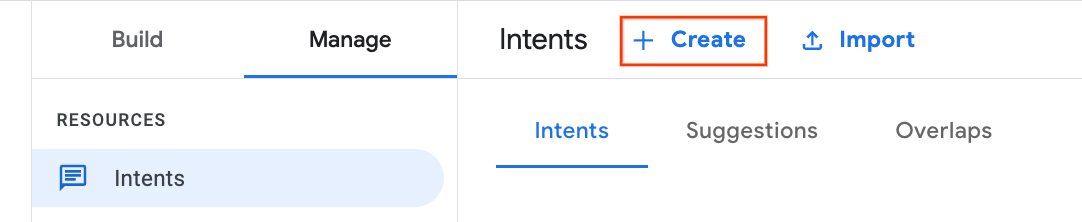
Click Manage > Intents > + Create :
Display Name: main.book_a_flight
Under the Training Phrases header, add each of the following phrases into Conversational Agents, click Enter after each phrase:
Click Save.

Flows are used to define topics and the associated conversational paths. Every agent has one flow called the Default Start Flow. This single flow may be all you need for a simple agent.
More complicated agents may require additional flows, and different development team members can be responsible for building and maintaining these flows.

Every flow starts with a Page, and is made of one or multiple different pages thereafter to handle the conversation within a particular flow. The current page an end-user is on is considered the "active page". Each page can be configured to collect any required information from the end-user.
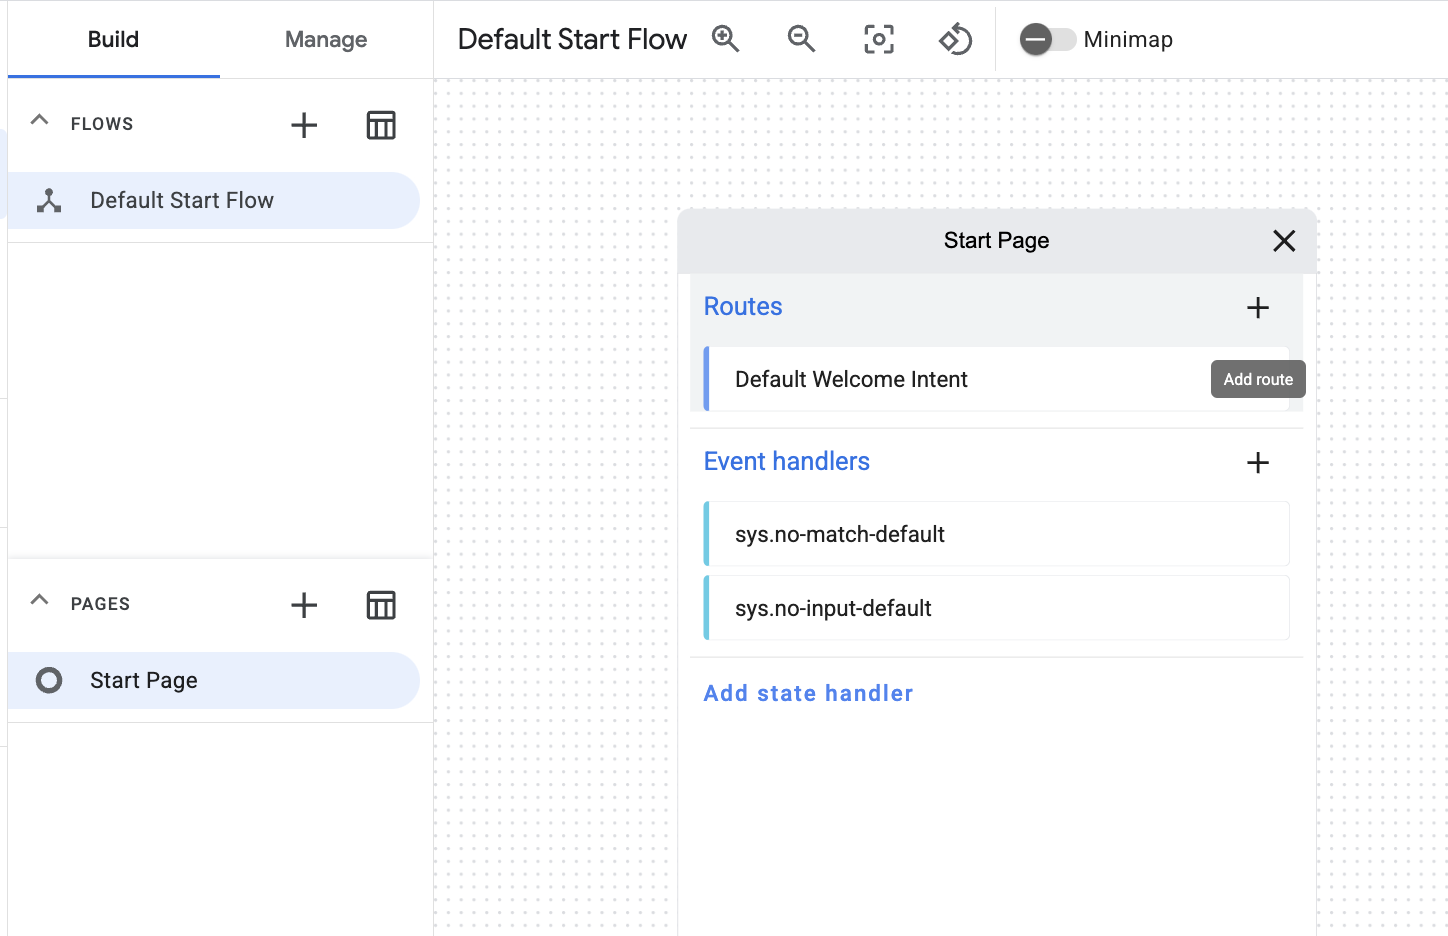
The page your agent starts from is called the Default Start Flow. Pages store routing logic, responses (known as Fulfillment), specific actions to take if an intent cannot be matched (known as no-match) or receives no-input (which is when the agent does not receive a response in time).
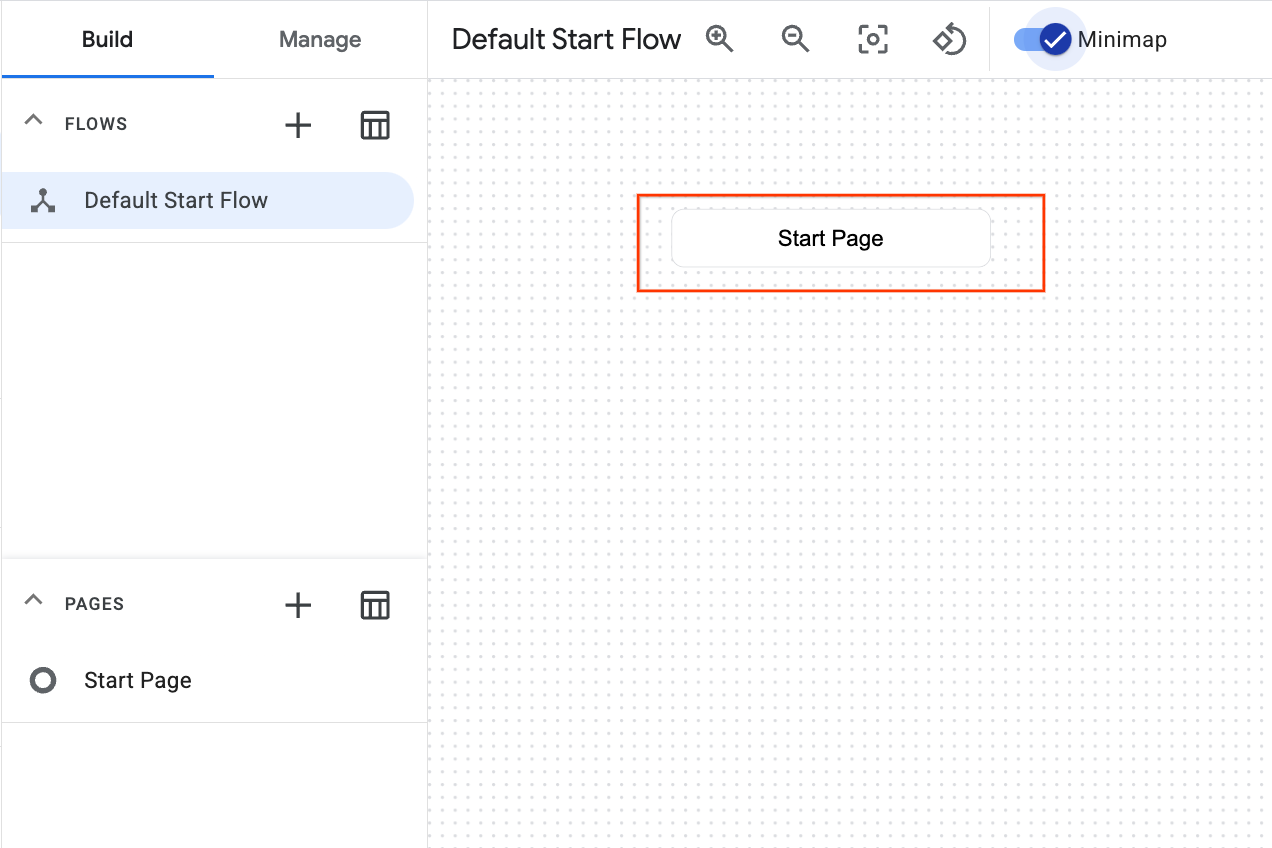
Click Build.
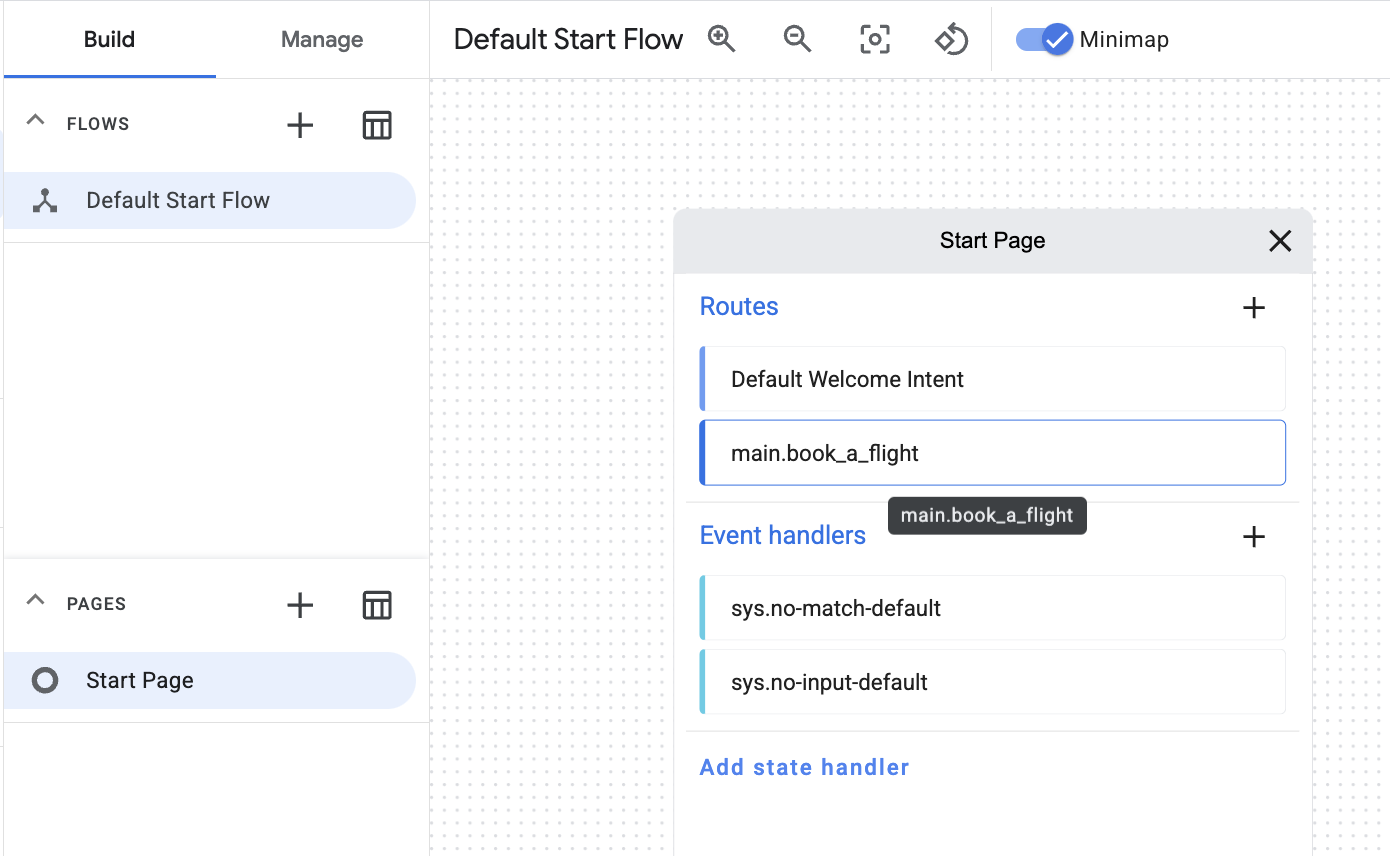
Click Start Page to open the page.
From the expanded options on the Start page, select the + icon next to Routes.
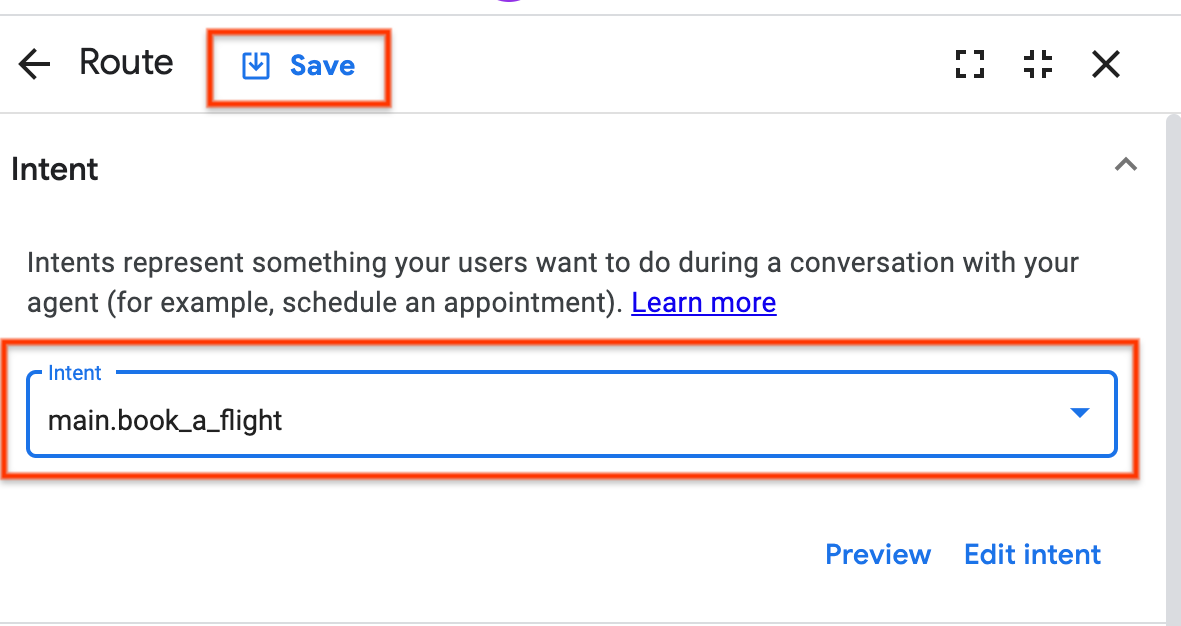
Select the intent main.book_a_flight from the drop-down, then click Save.
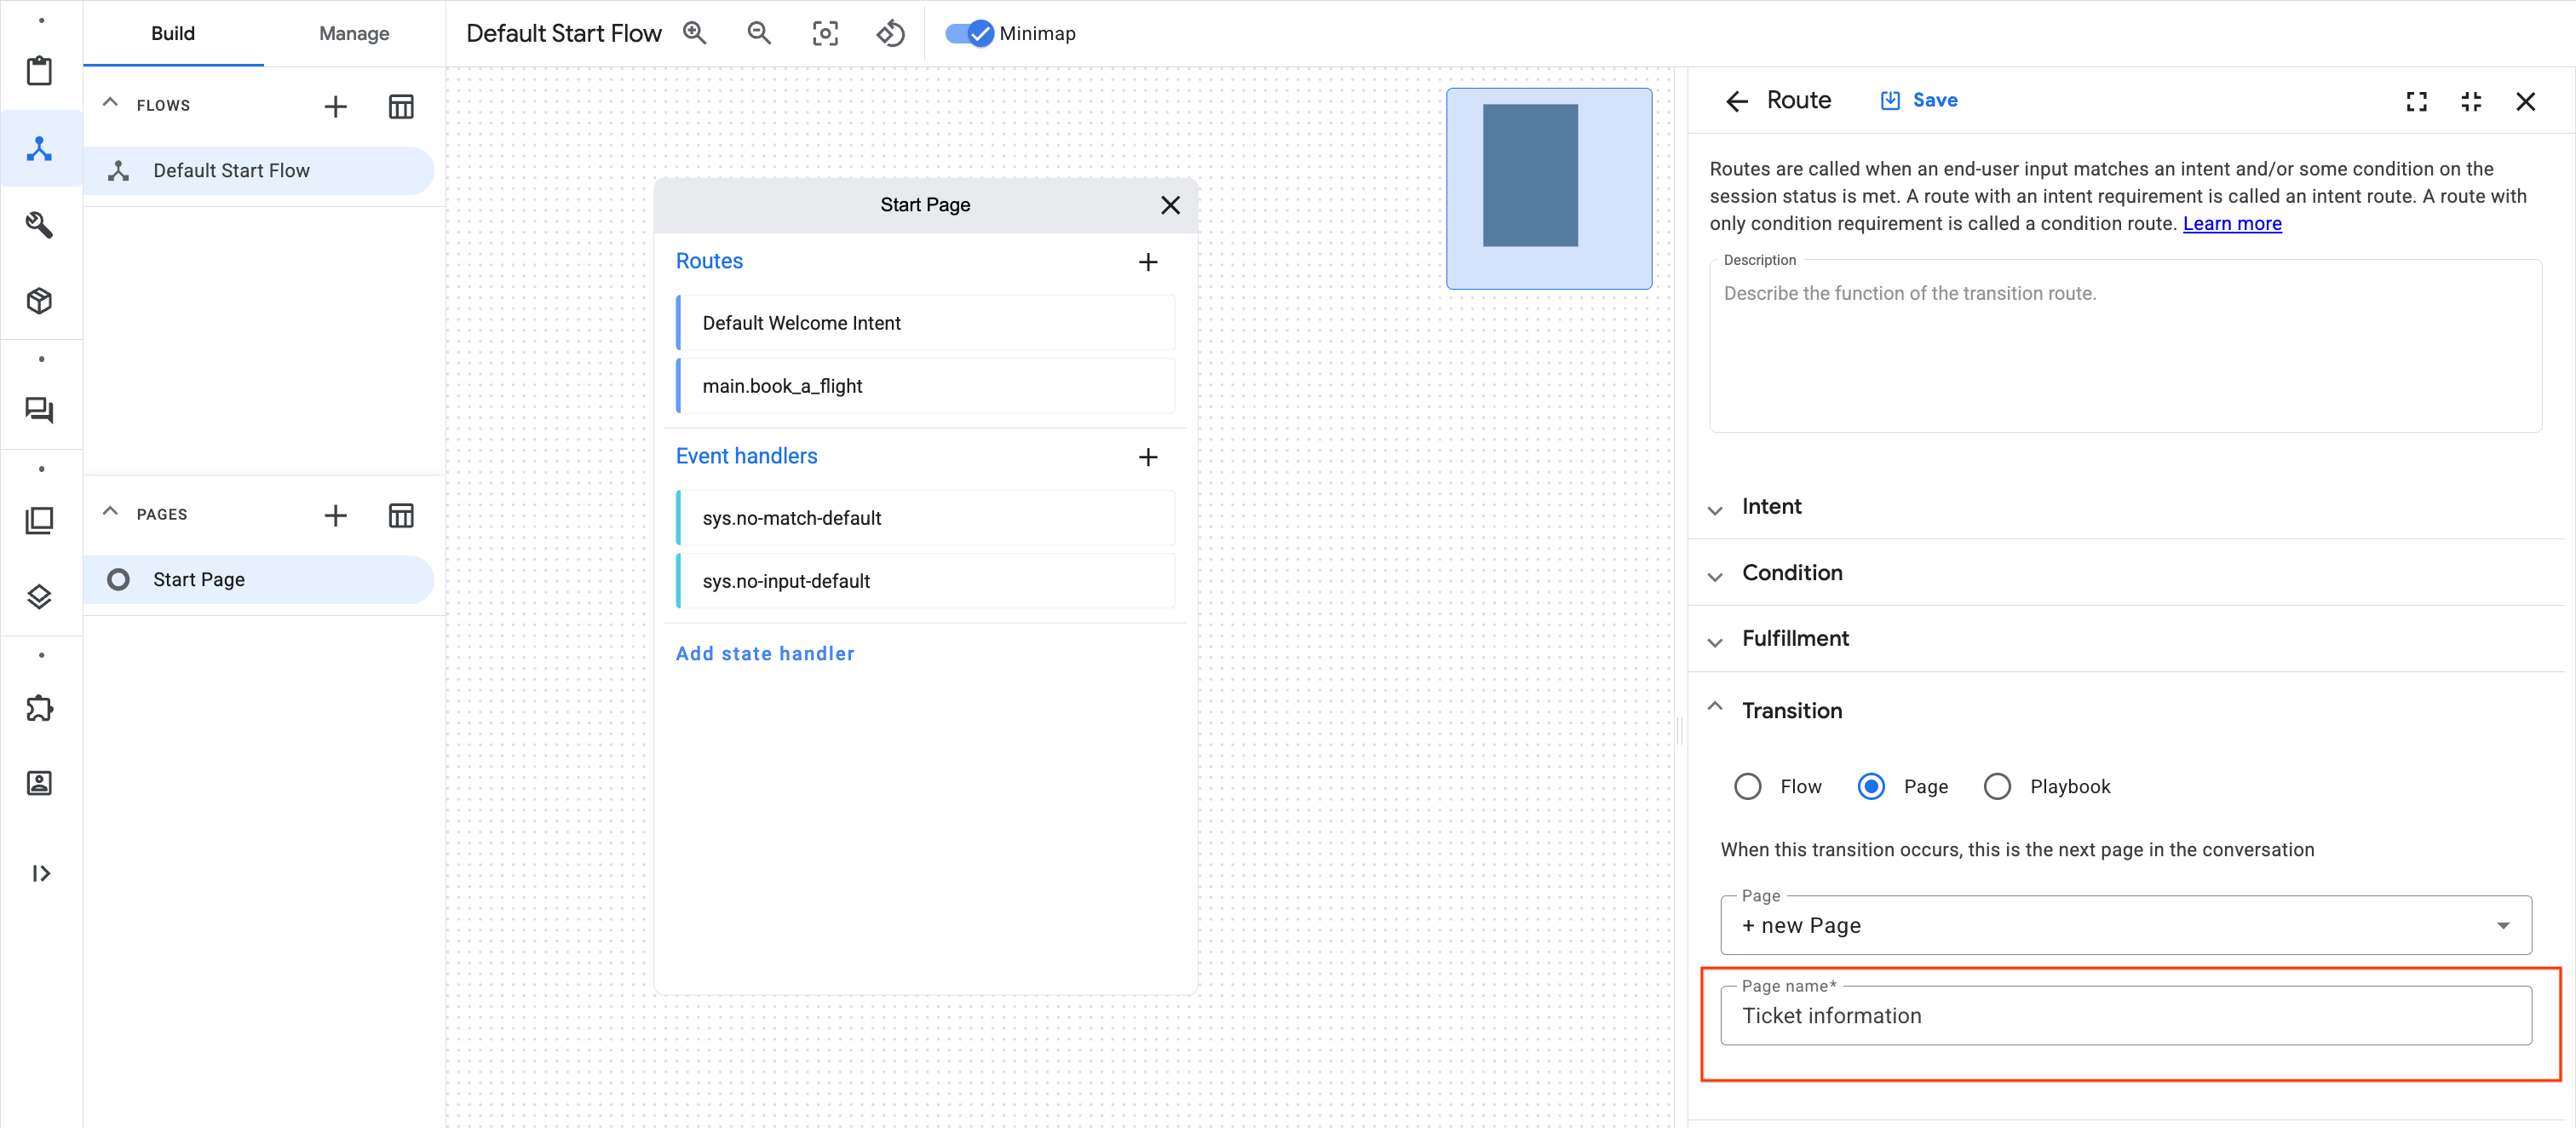
Next, in the Routes section, click the main.book_a_flight route.
Scroll down to Transition and choose + new Page from the drop-down.
Name the page Ticket information and click Save.
Exit out of the windows to return to the main display of flows to see your new Ticket information page connected to the Start page.
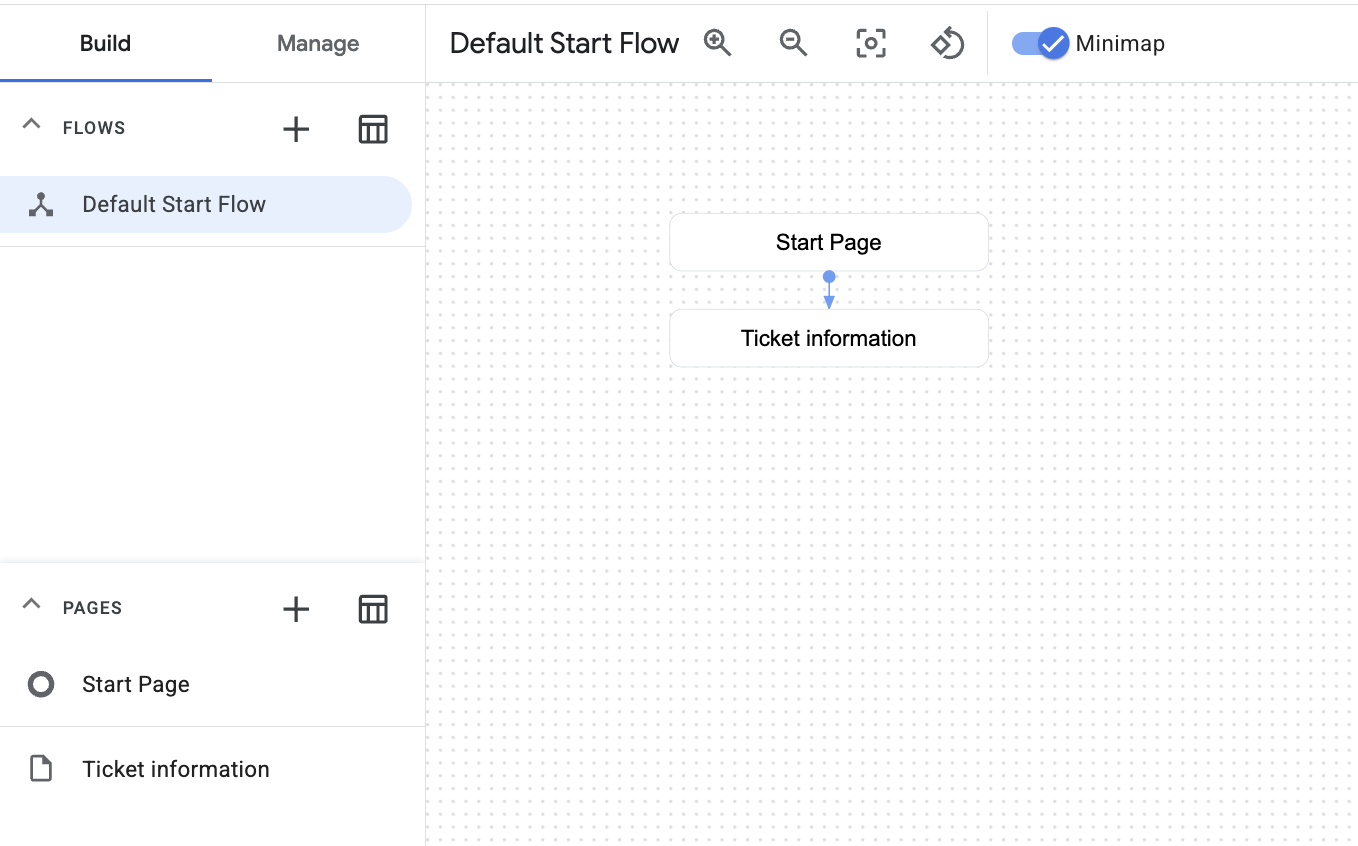
The beginning of the flow now includes a greeting, and will then proceed to the Ticket information page when the main.book_a_flight intent is matched. On the Ticket Information page you will collect parameters from the end-user so they can book their flight.
Entities define the type of information you wish to extract from an end-user, ex: city you want to fly to. Use Conversational Agent's built-in " system entities'' for matching dates, times, colors, email addresses, and so on.
System entities can also be “extended” to include values that are not part of the default system values. If you need to create a fully customized entity, you can do so by creating a Custom Entity type for matching data that is custom to your business and not found as a system entity.
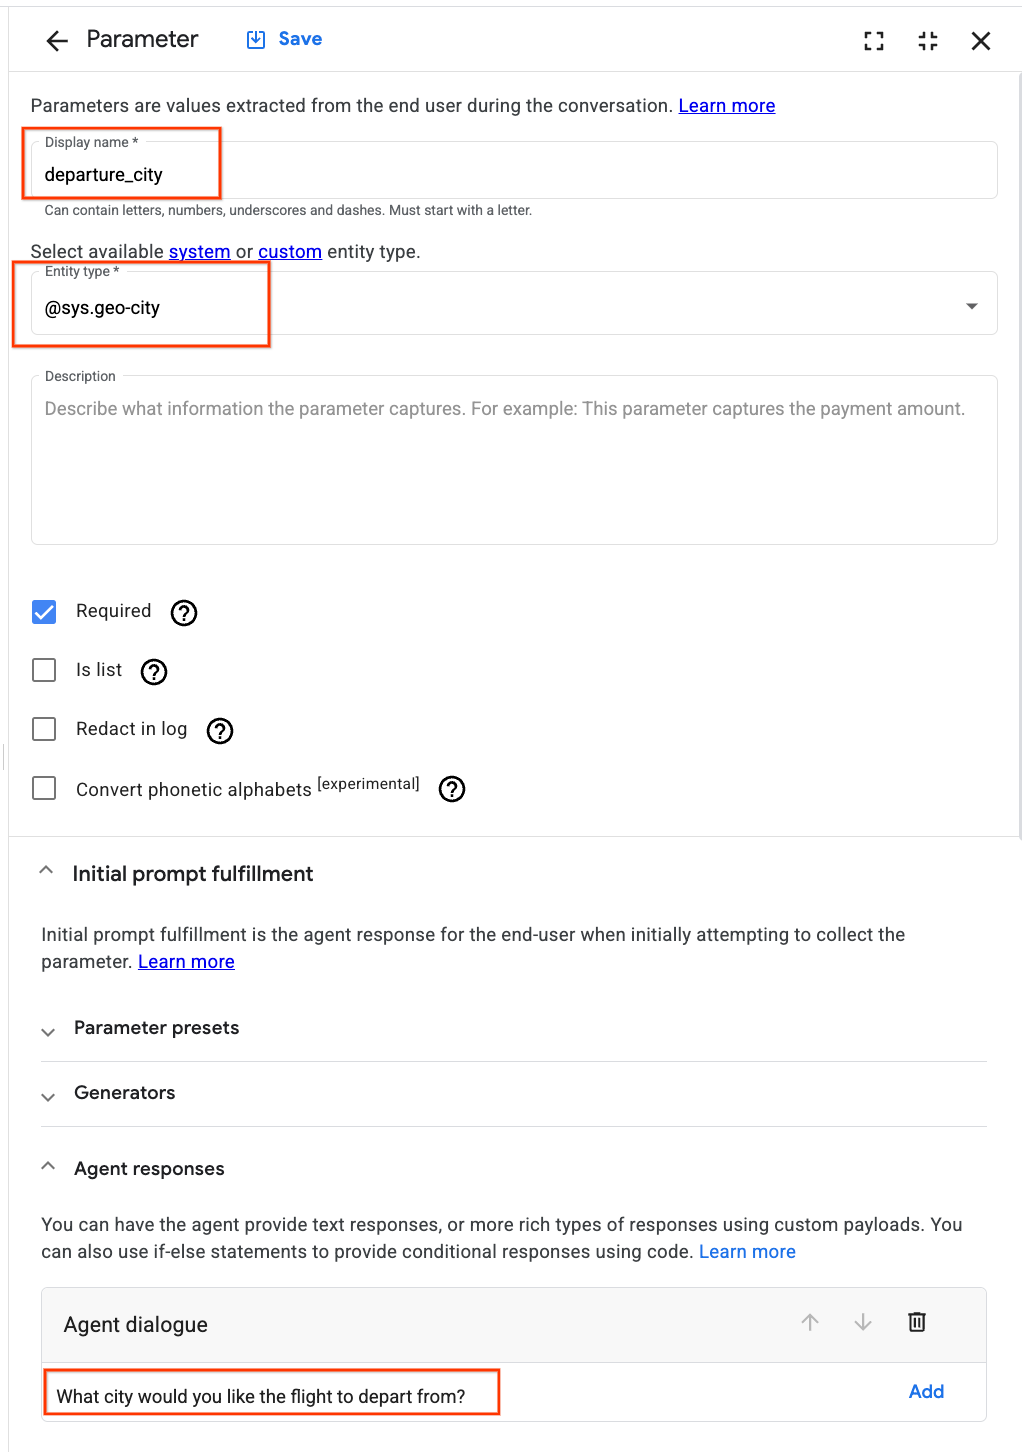
Parameters are information supplied by the end-user during a session, such as date, time, and destination city. Each parameter has a name and an entity type. They are written in snake_case (lowercase with underscores between words)
Next you will use an entity to extract a required parameter from the end-user.
Click on the page Ticket Information, then the + by Parameters to collect flight data.
Enter departure_city in the Display name field.
Choose @sys.geo-city from the Entity type drop-down.
Scroll down to Initial prompt fulfillment > Agent responses > + Add dialogue response > Agent dialogue and add What city would you like the flight to depart from?
Click Save.
Exit out of this window to make another parameter.
Click the + by Parameters again to create 4 additional parameters one by one with the following name, entity type, and how the agent will prompt the end-user.
| Display name | Entity type | Agent dialogue |
|---|---|---|
| departure_date | @sys.date | What is the month and day of the departure? |
| destination_city | @sys.geo-city | What is your destination city? |
| return_date | @sys.date | What is the month and day for the returning flight? |
| passenger_name | @sys.any | What is the passenger's name? |
When finished they are listed like this:
Knowledge check
Once the agent has collected the necessary 5 flight booking parameters, you want to route the end user to another page using a routing condition, which you will create next.
Exit out of the parameter window to return to the Ticket information page again.
Scroll down to locate Routes and click the + sign next to it.
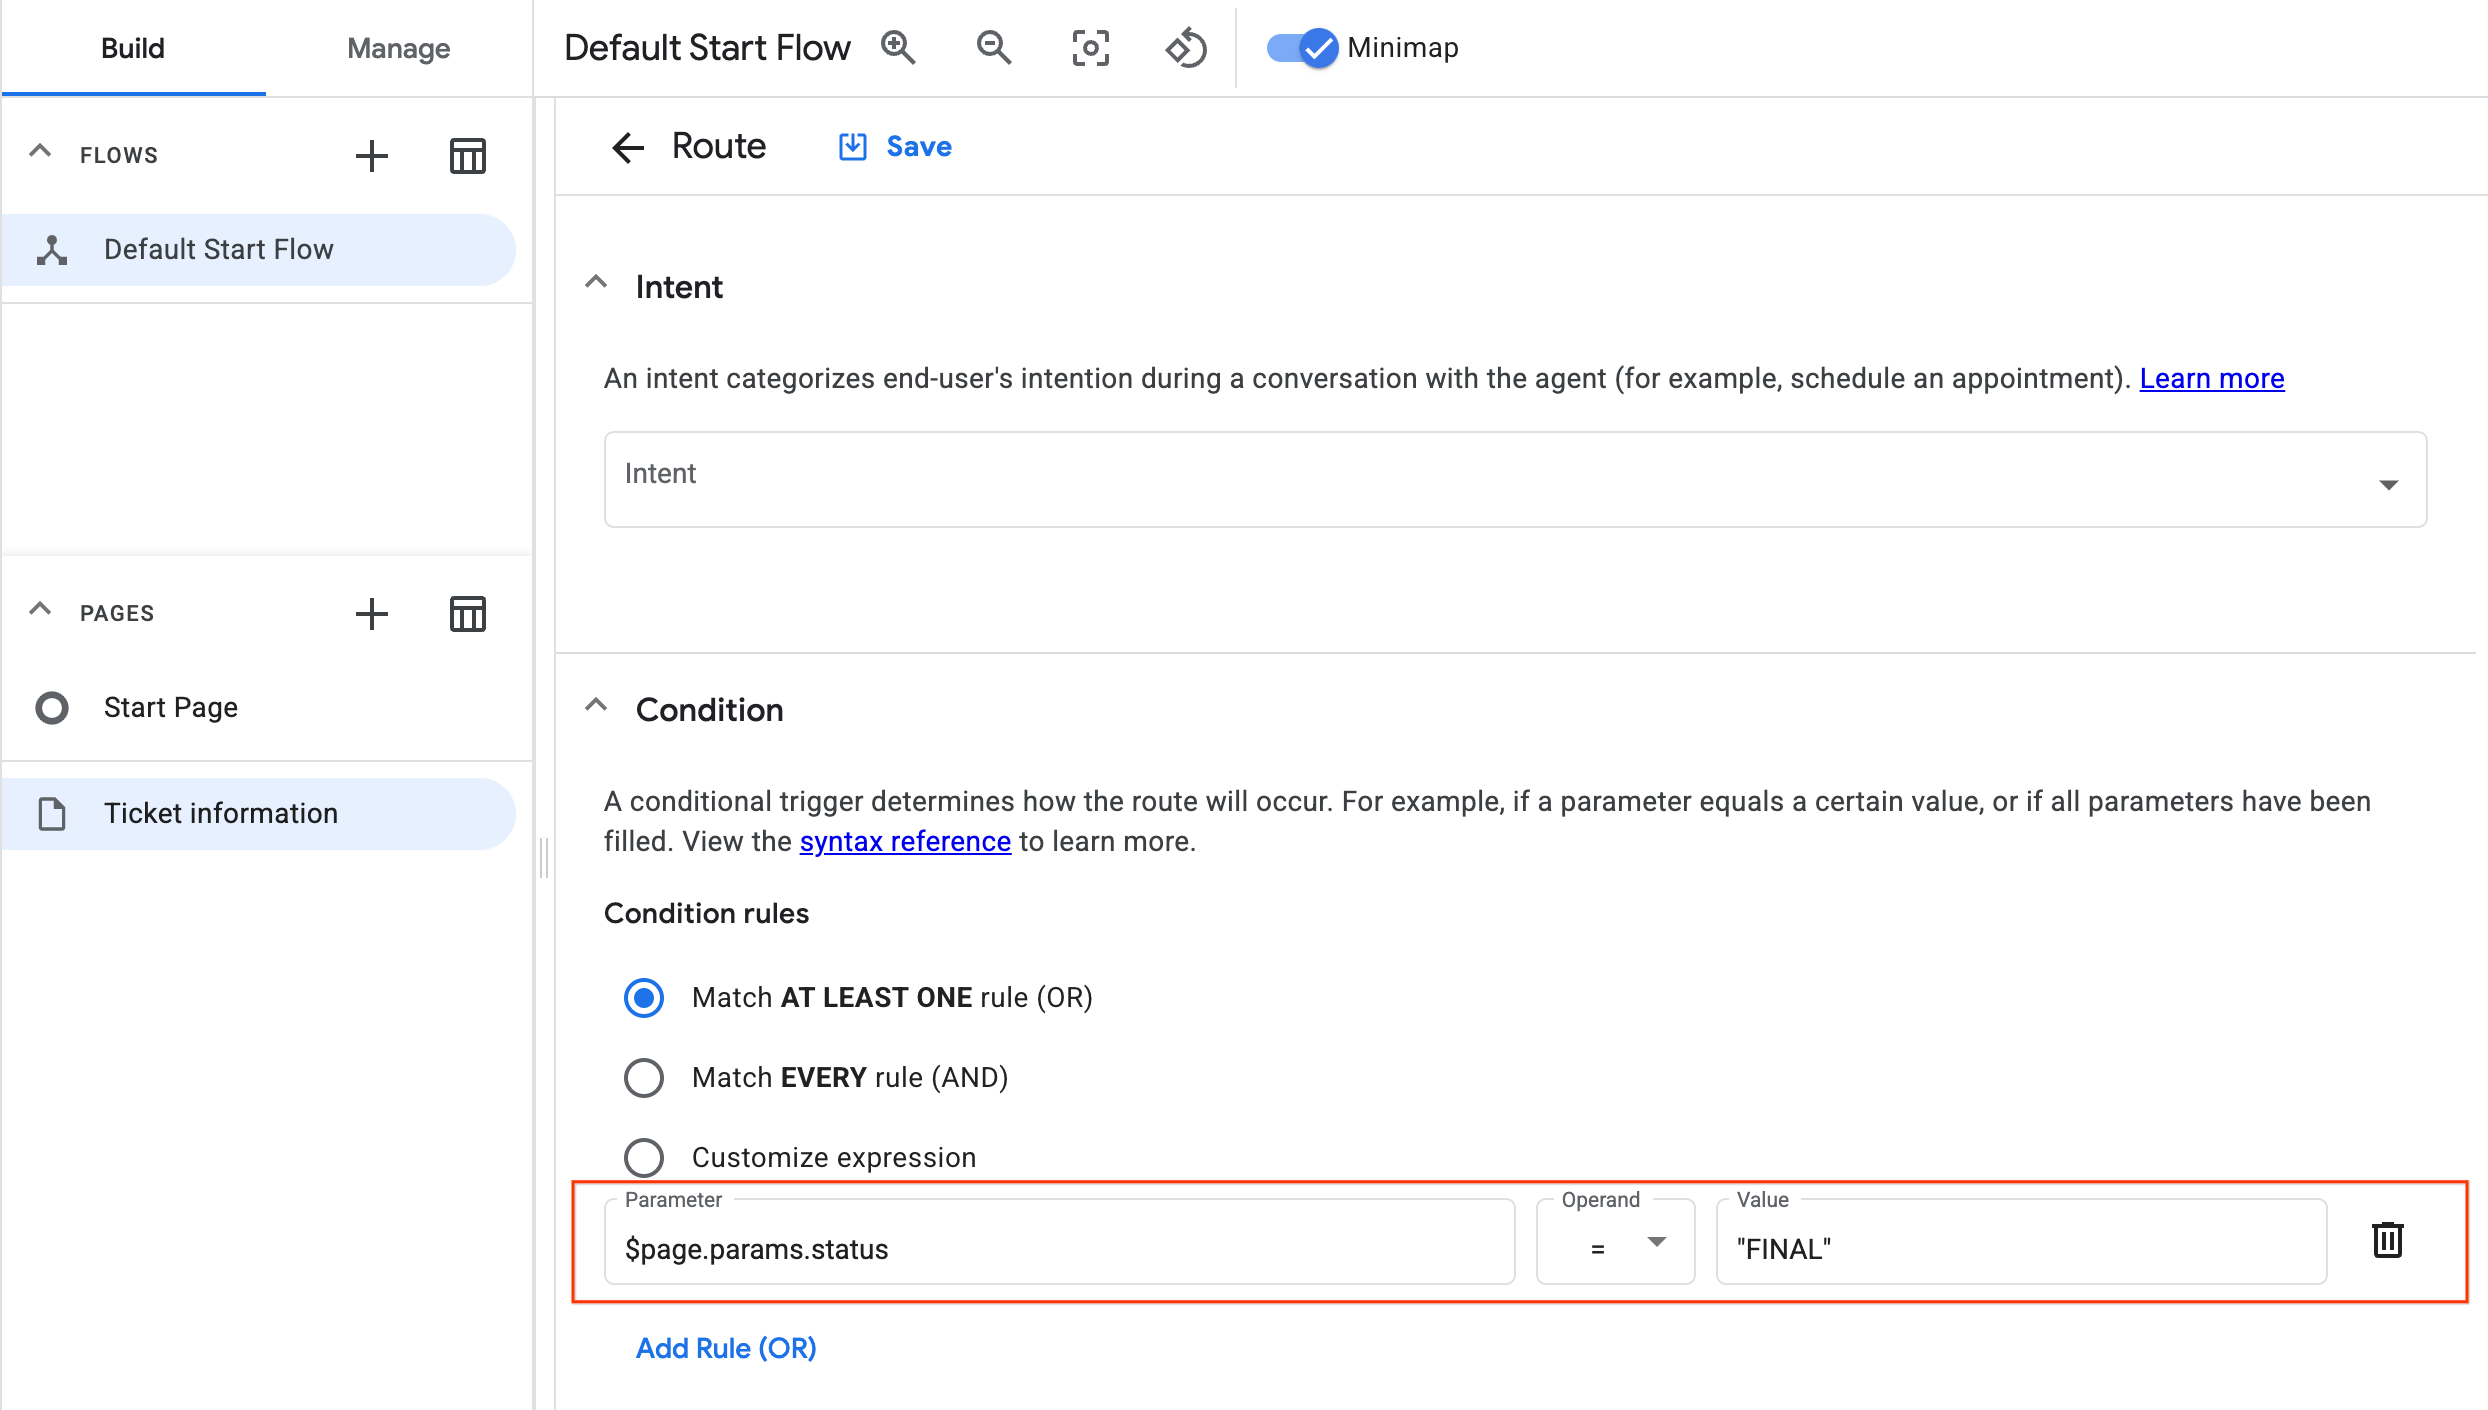
Scroll down to Condition > Condition rules > select "Match AT LEAST ONE rule (OR)"
In the Parameter field enter $page.params.status.
Choose the = sign in the Operand drop-down.
In the Value field enter: "FINAL" (ensure you include the double quotes).
Click Save.
Knowledge check
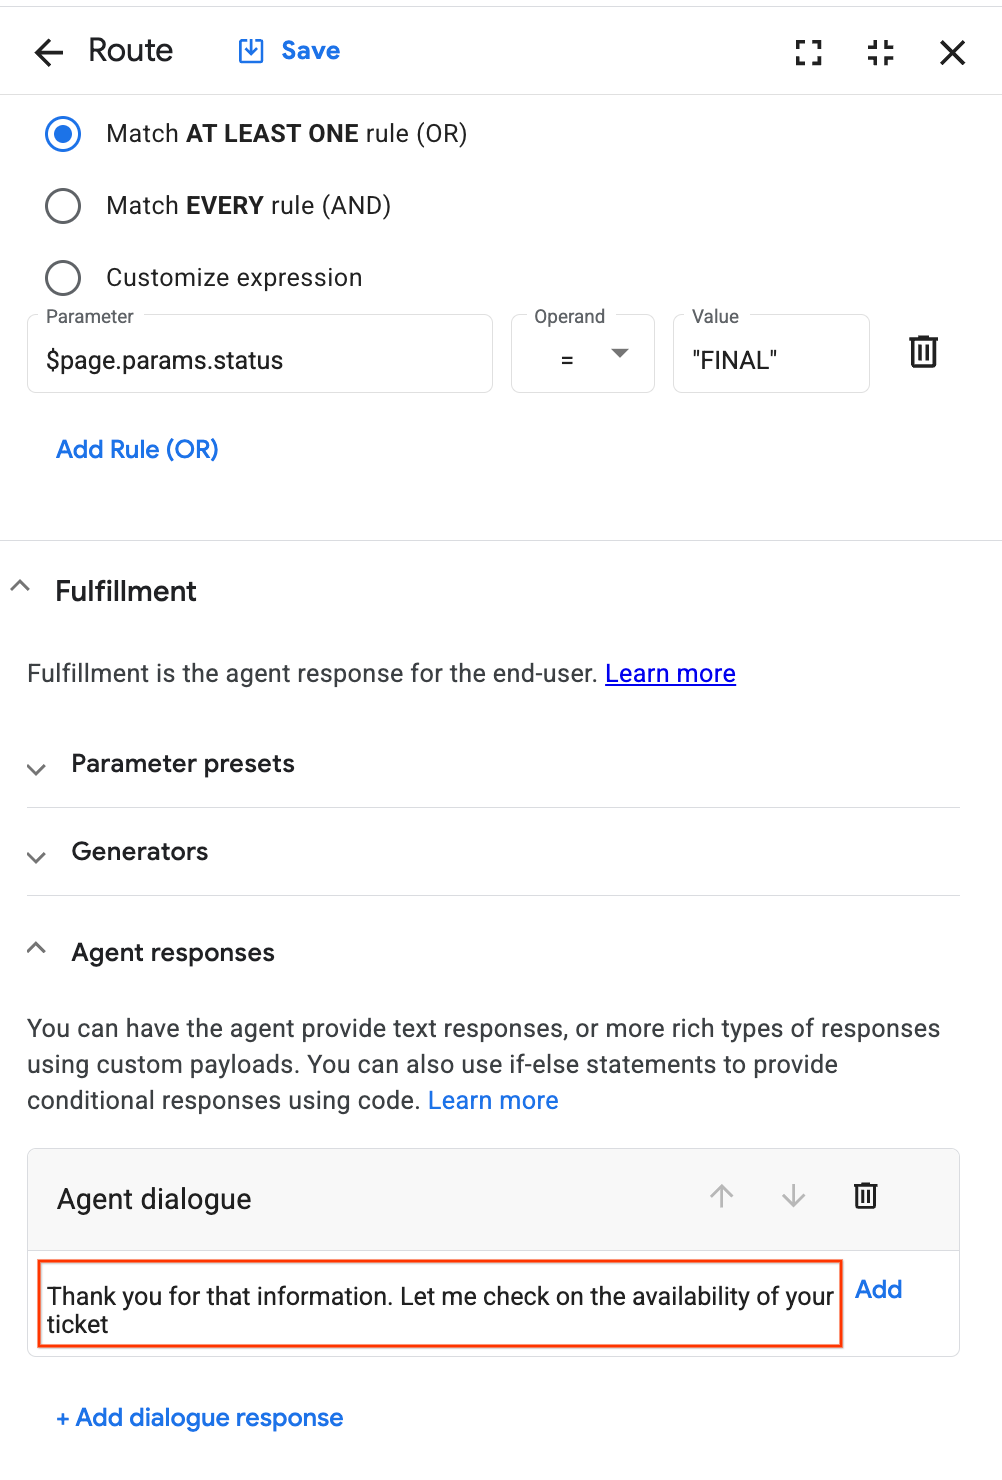
Now add a response to say to the end-user when all 5 of their booking parameters are collected. These responses are called Fulfillment.
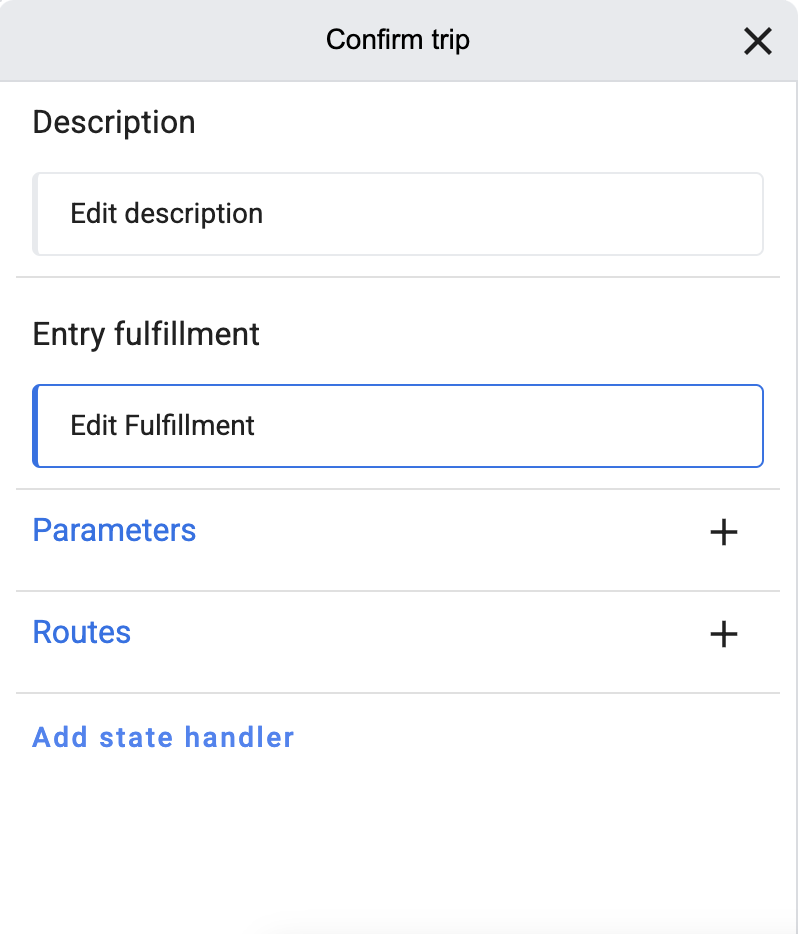
From the condition you just made, scroll down a bit and locate the section called Fulfillment.
Under Agent responses click Add dialogue response, select Agent dialogue and then type the following: Thank you for that information. Let me check on the availability of your ticket and click Add.
Click Save.
(Now stay on this page while you read on to the next step of confirming information.)
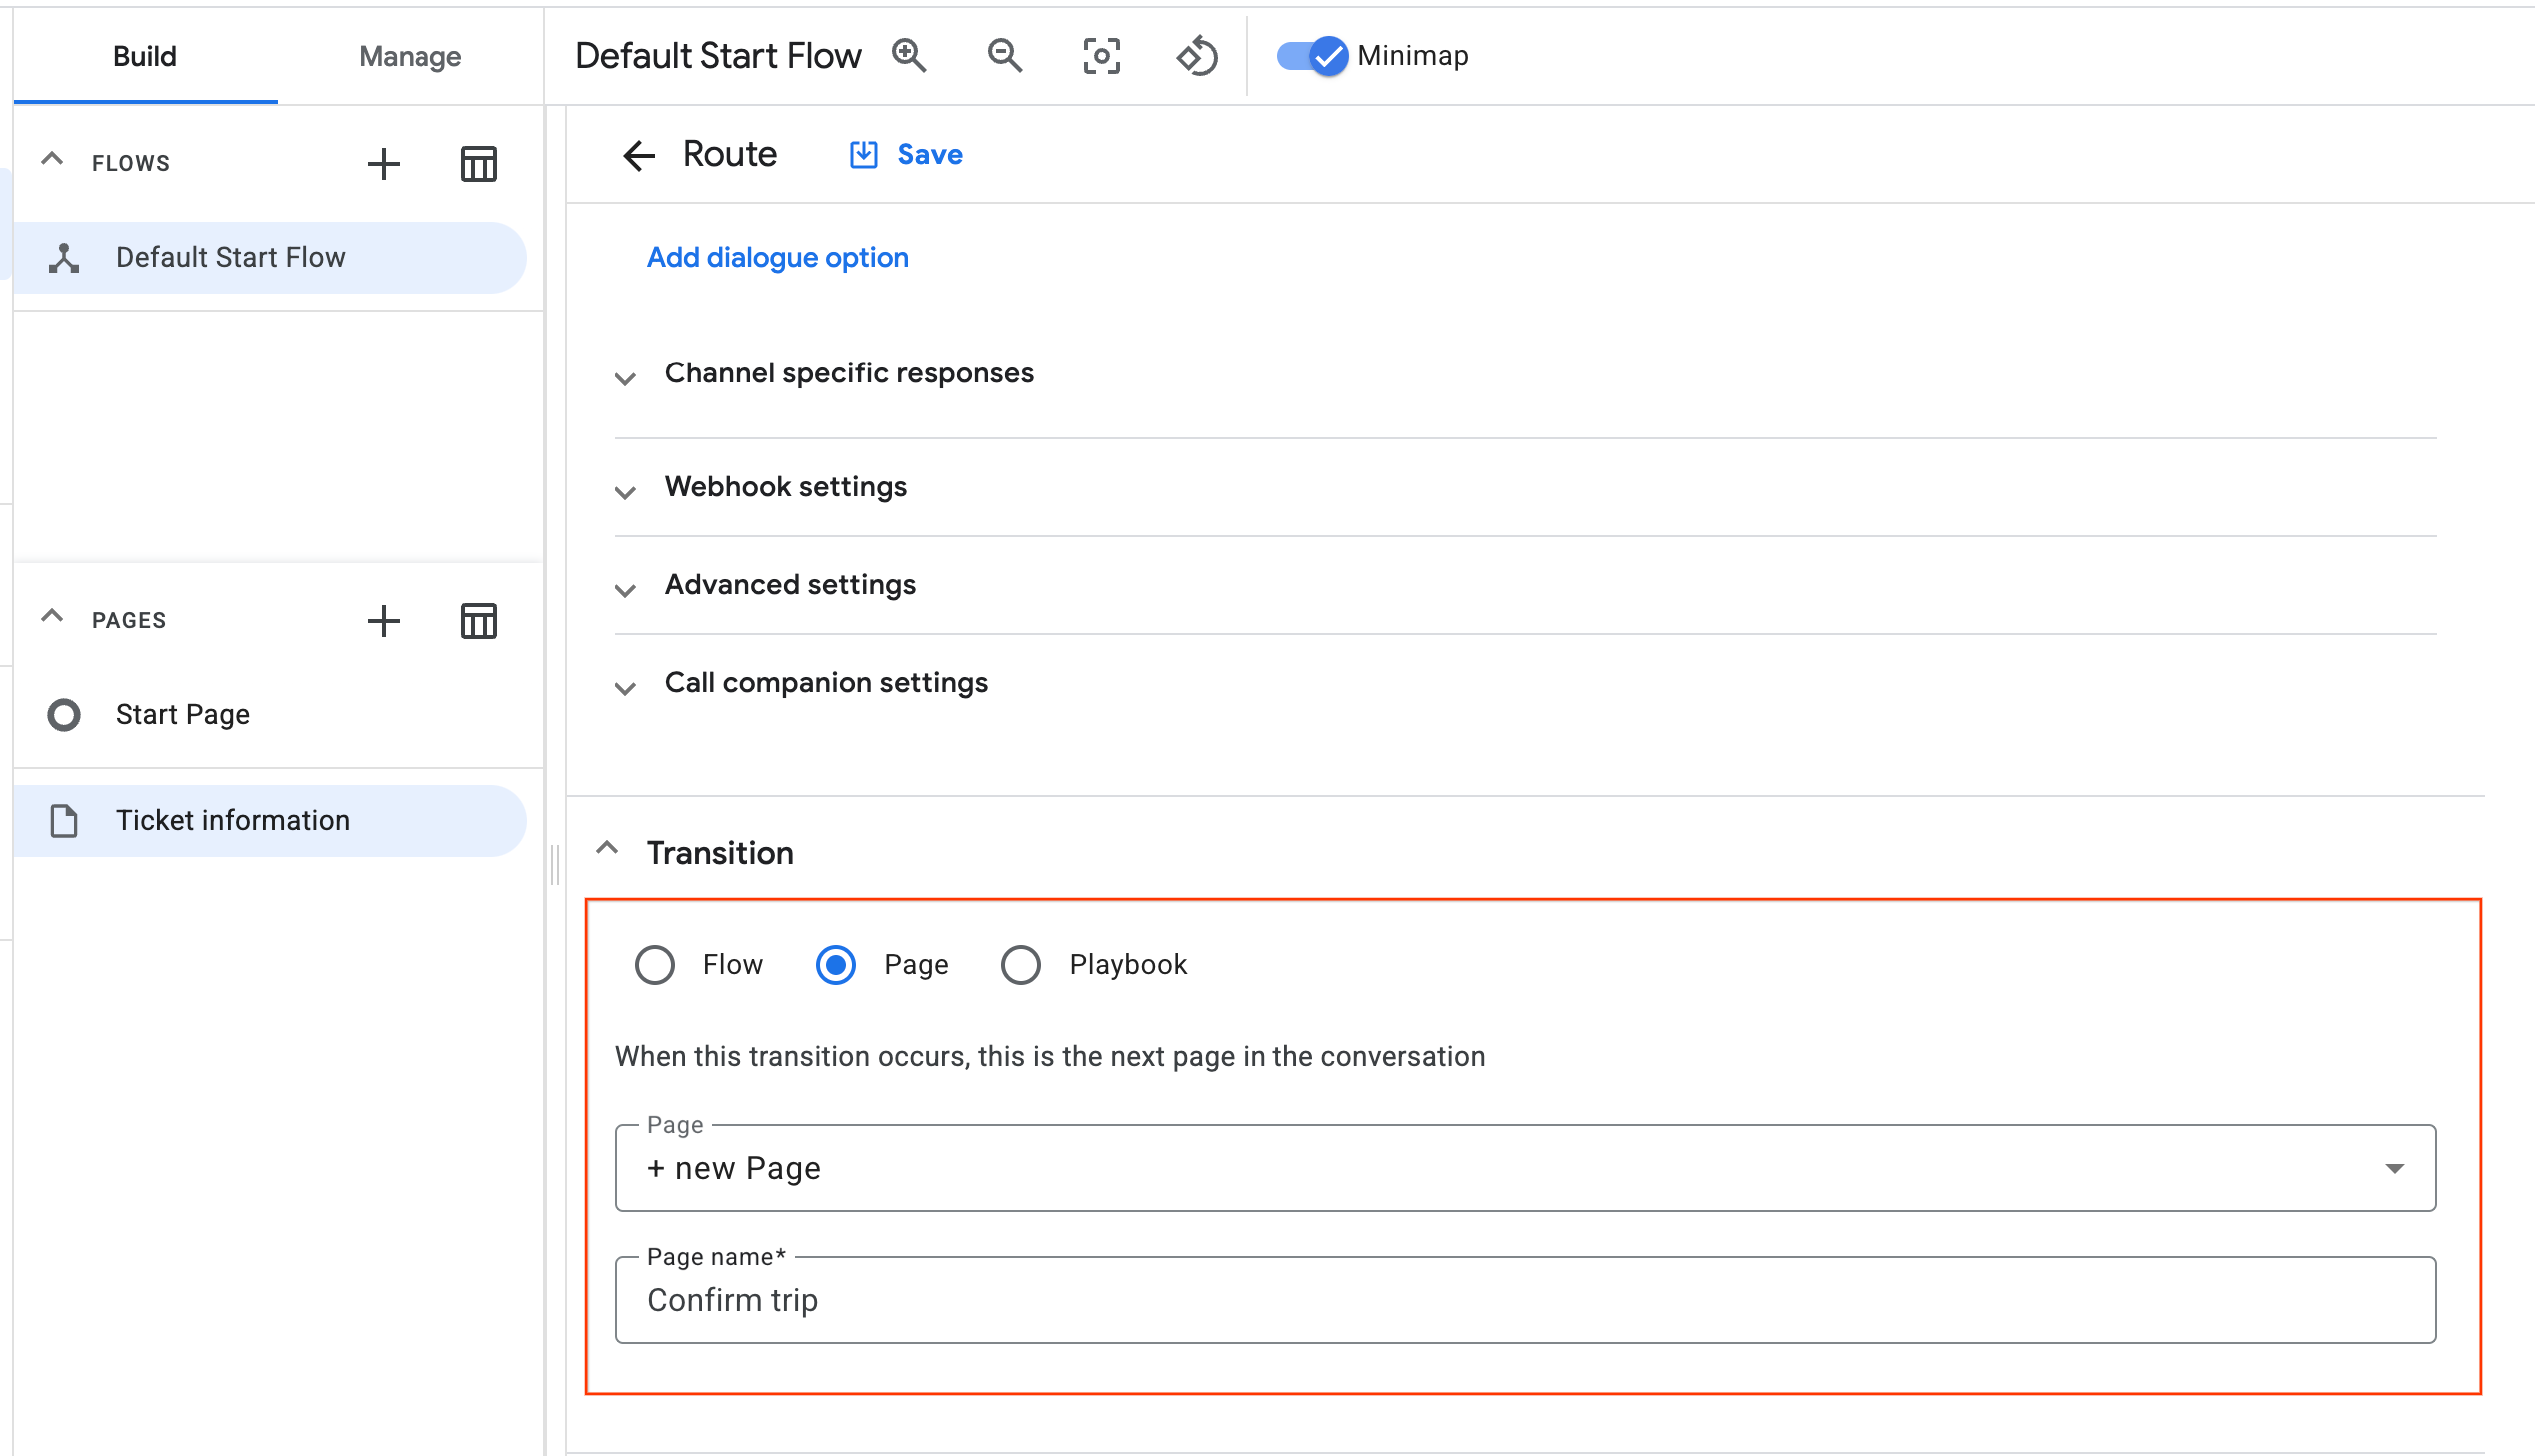
After offering a response (or fulfillment), you need to create a transition to a new page that will repeat back to the end-user if the travel information collected (parameters) are correct.
Continue to scroll down (past the fulfillment you just created) until you reach Transition.
On the Page field, select the drop down to choose + new Page.
Type Confirm trip in the field called Page name.
Click Save.
Exit out of the window.
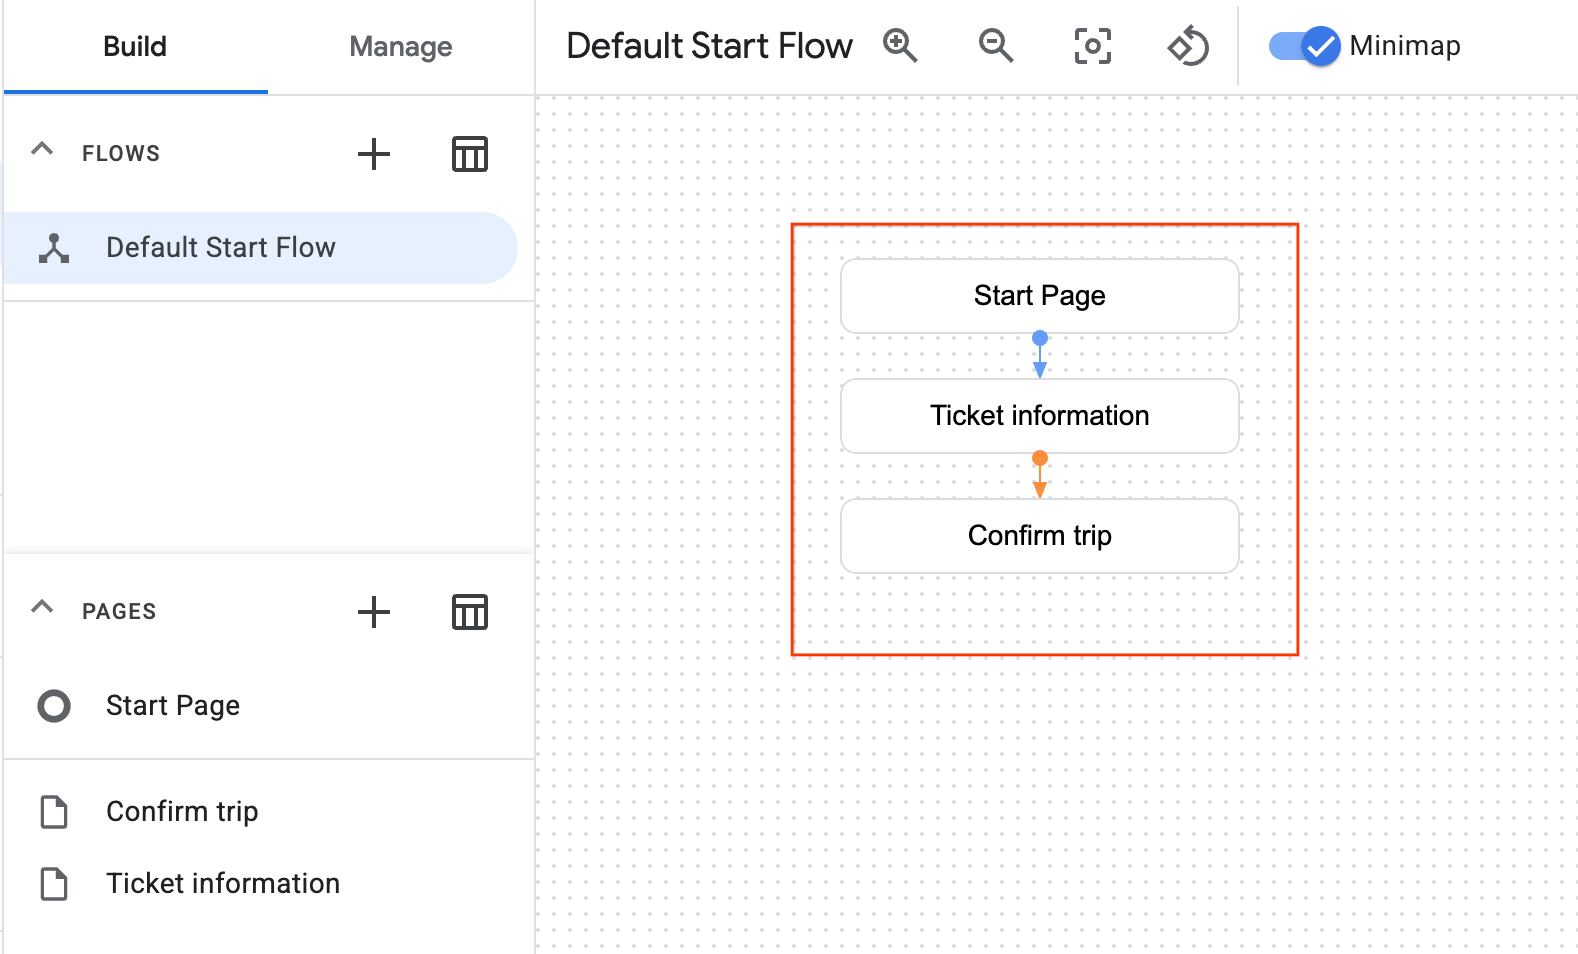
Take a look at the flow of your 3 pages.
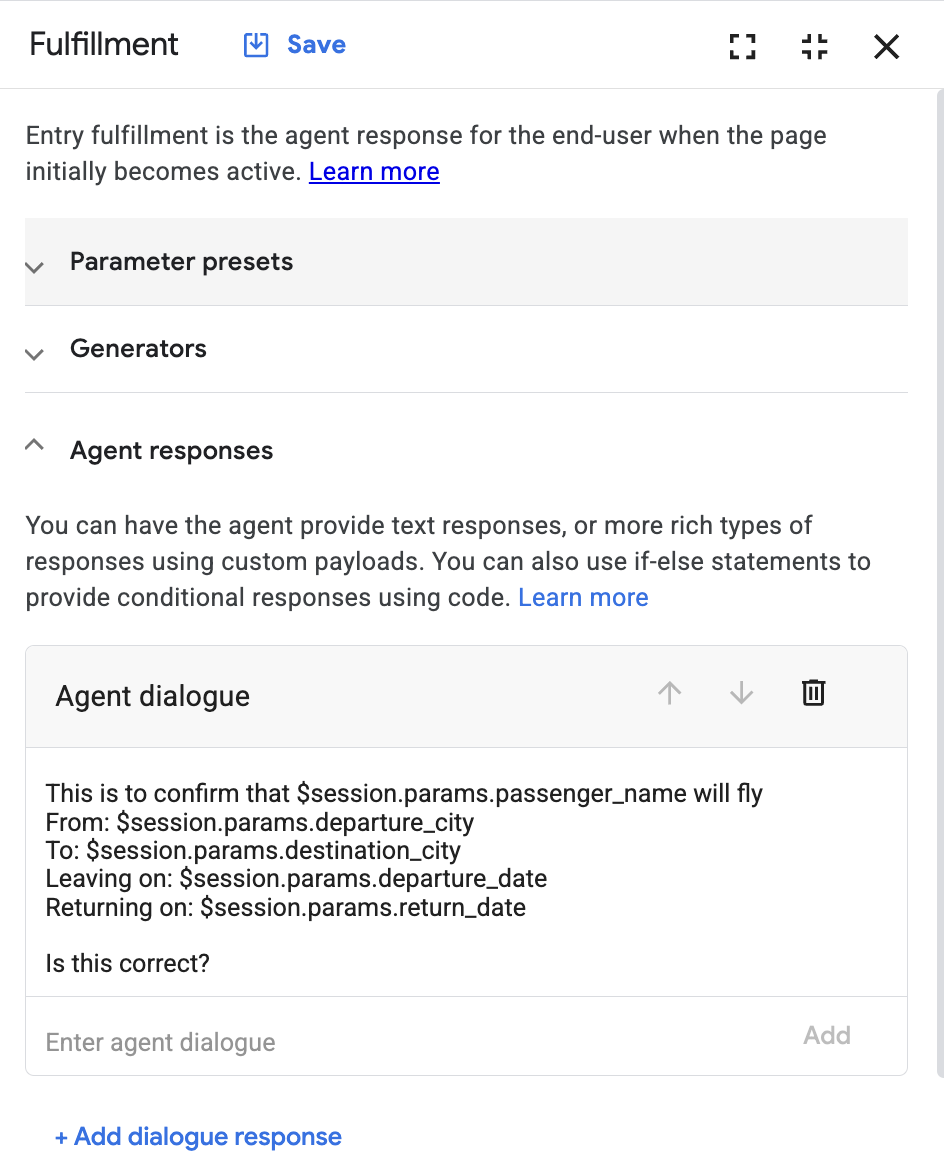
Session Parameters store information previously collected from the end-user and are active throughout the session. They also help you repeat information back to the end-user.
For example, we can have the agent repeat back a passenger's name: "Thanks for providing that information, $session.params.passenger_name." This displays to the end-user as "Thanks for providing information, John Day."
They are formatted as follows:
So referencing the departure city would look like: $session.params.departure_city
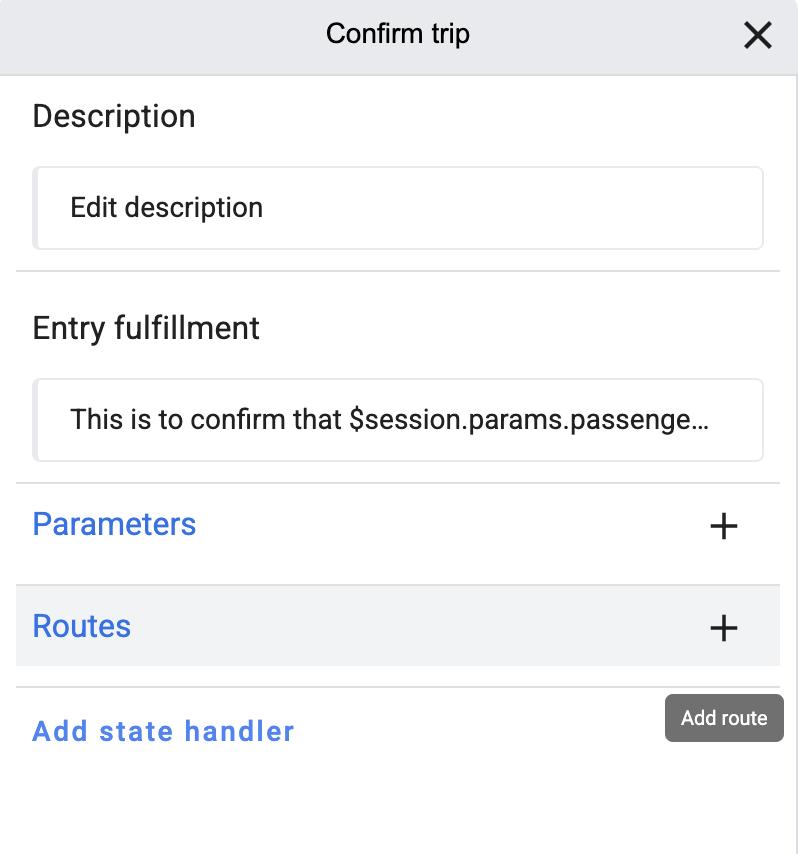
Starting from the Build view, click on the Confirm Trip page > Entry fulfillment > Edit fulfillment field.
Since you used 5 parameters, you can repeat them back to the user via the following session parameters. Paste the following text within the Agent dialogue section and click Add:
Click Save.
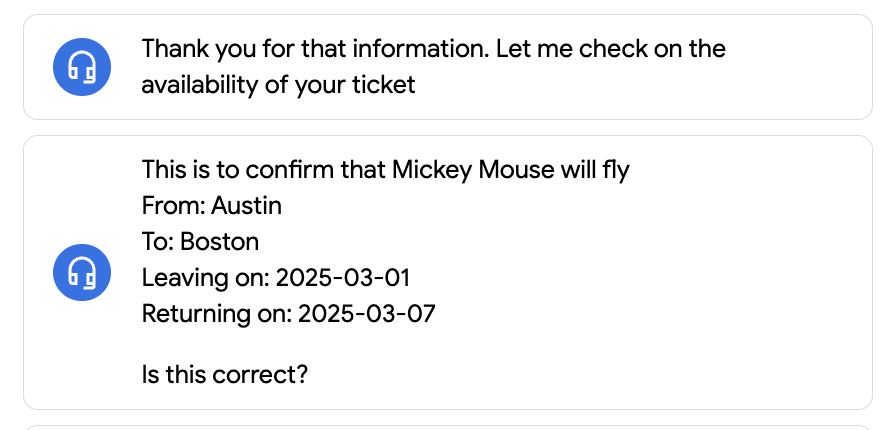
This is what it will look like to the end-user when the Conversational Agent repeats back the collected session parameters:
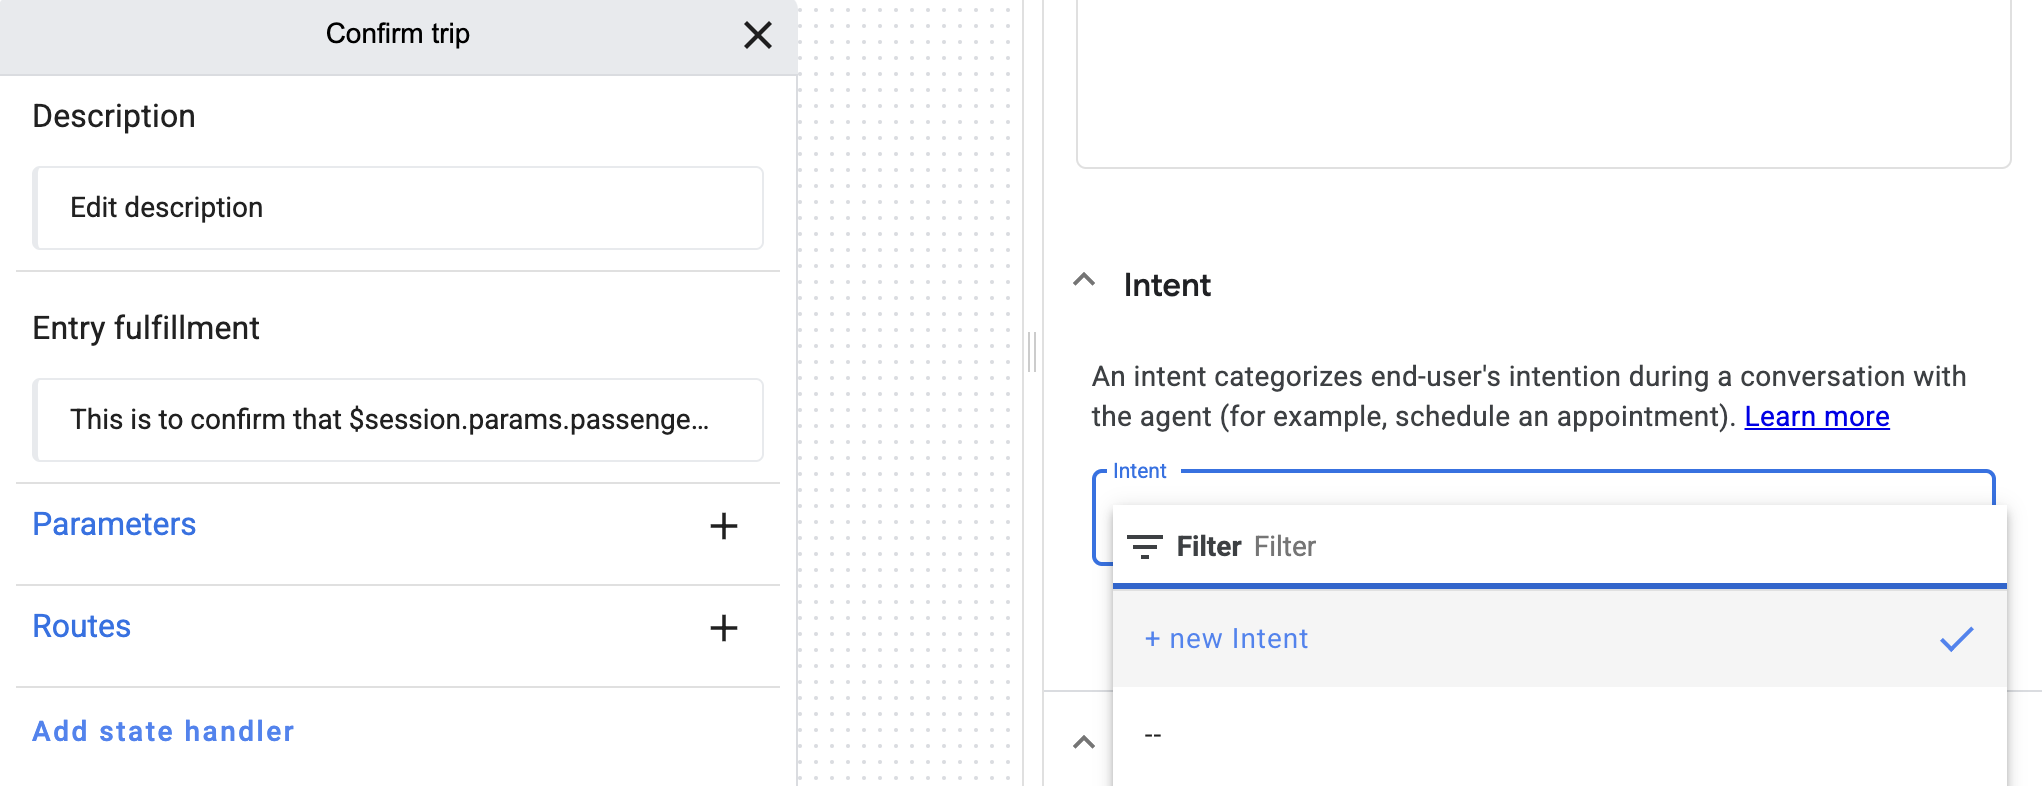
Exit out of the window to return to your Confirm Trip page. Click + next to Routes.
Click the Intents drop-down , then click + new Intent.
In Display name type confirmation.yes.
In Training phrases enter yes then Enter (you can add more phrases like "correct", "yup", etc., to improve the NLU matching for this intent).
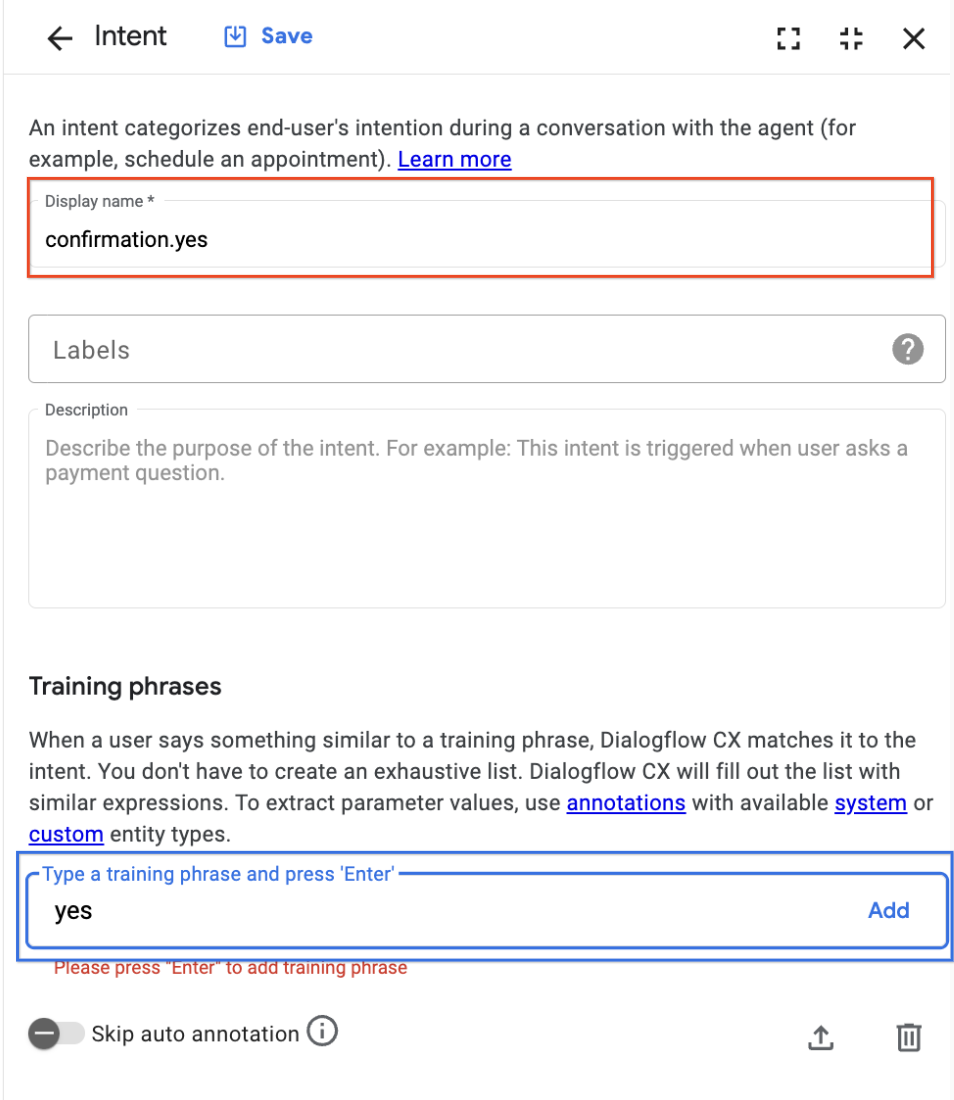
Click Save.
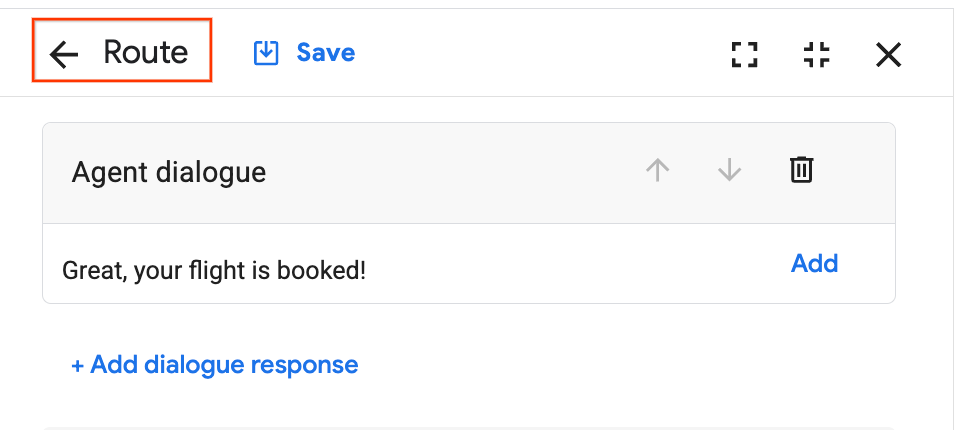
After saving, scroll down to the Fulfillment section and under Agent responses click Add dialogue response, select Agent dialogue and then type the following: Great, your flight is booked!. Click Add.

Then click Save.
Click the back arrow, next to Route.
Now add logic to route an end-user to recollect their flight parameters if they say the information is incorrect.
Still on the Routes section select Add route.
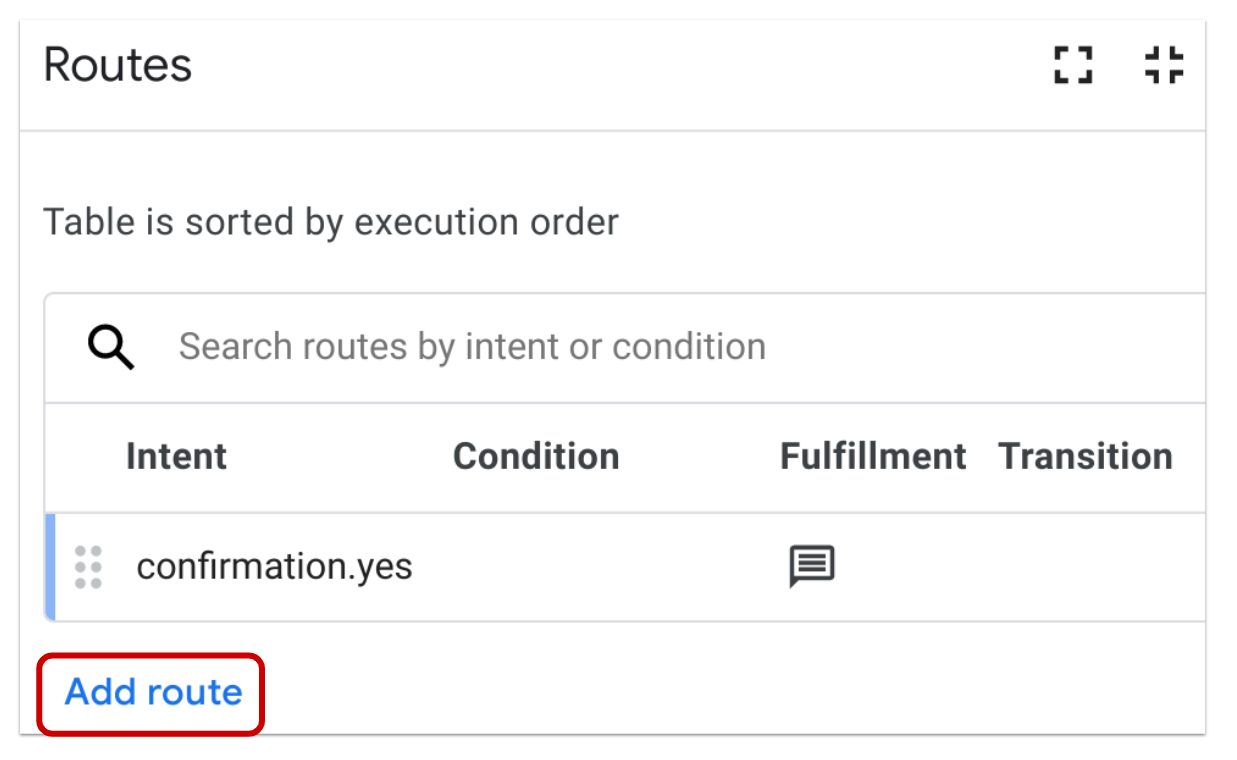
From the Intents drop-down choose + new Intent.
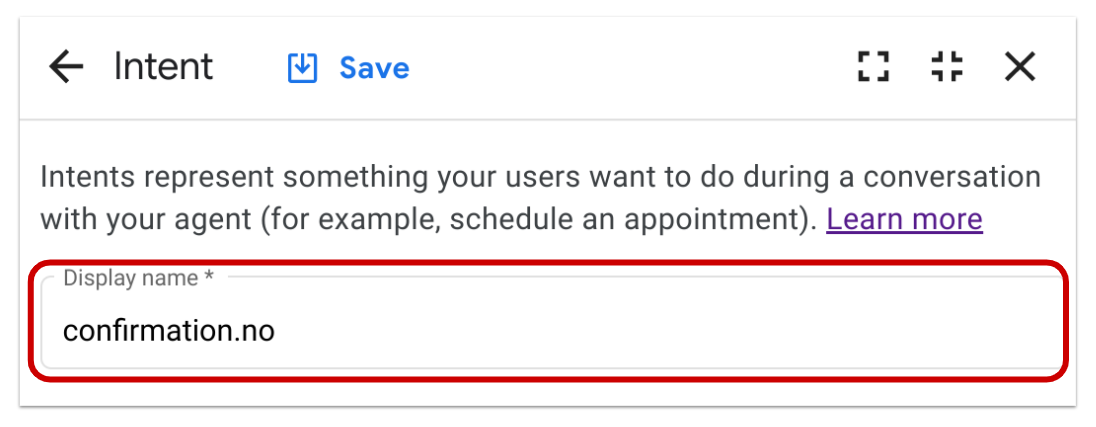
Name the intent confirmation.no in the Display name field.
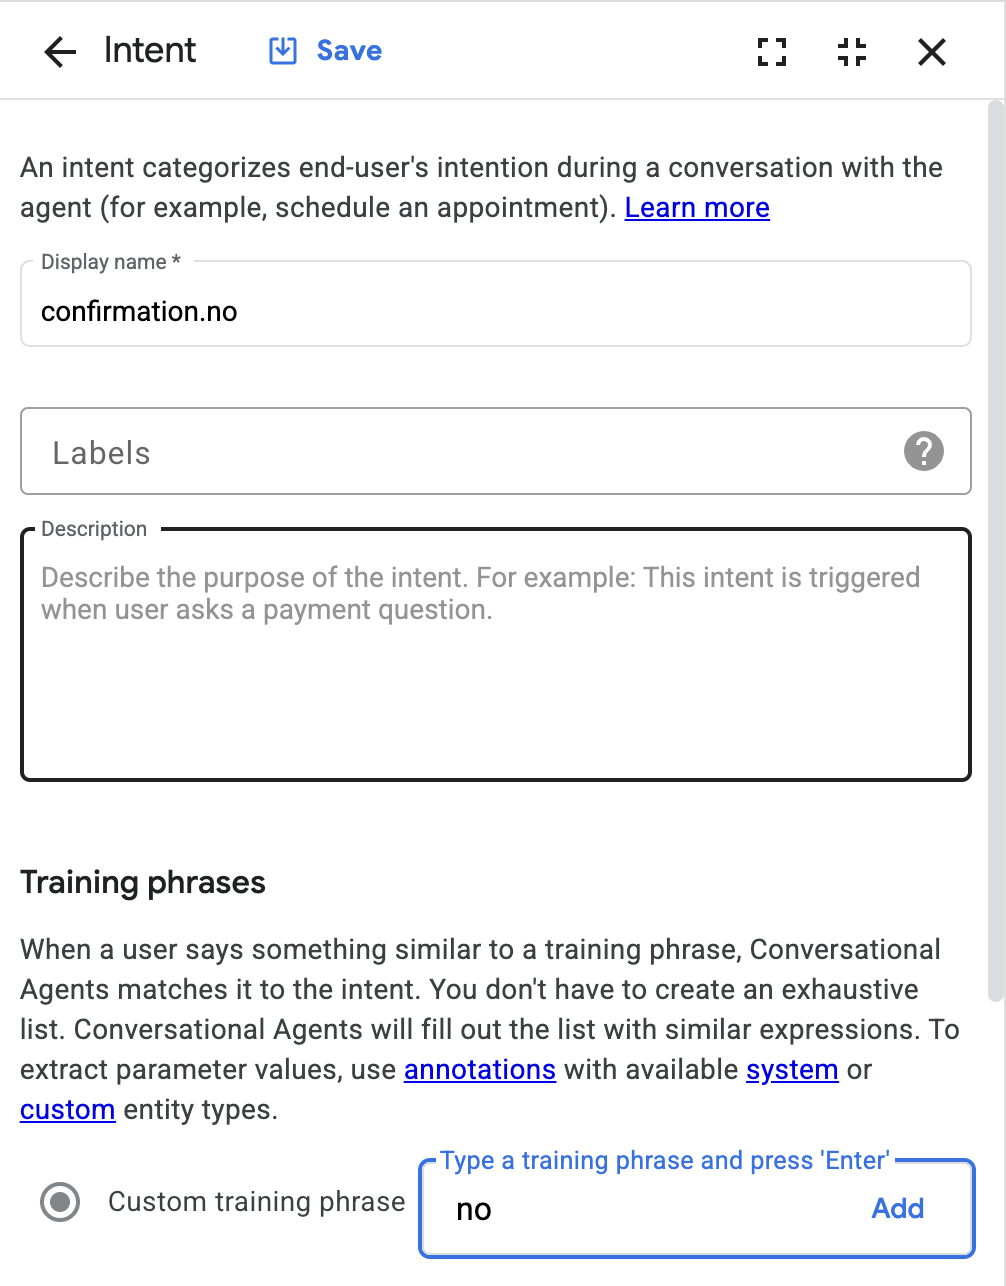
Scroll down to the Training phrases section type no then click Enter.
Click Save.
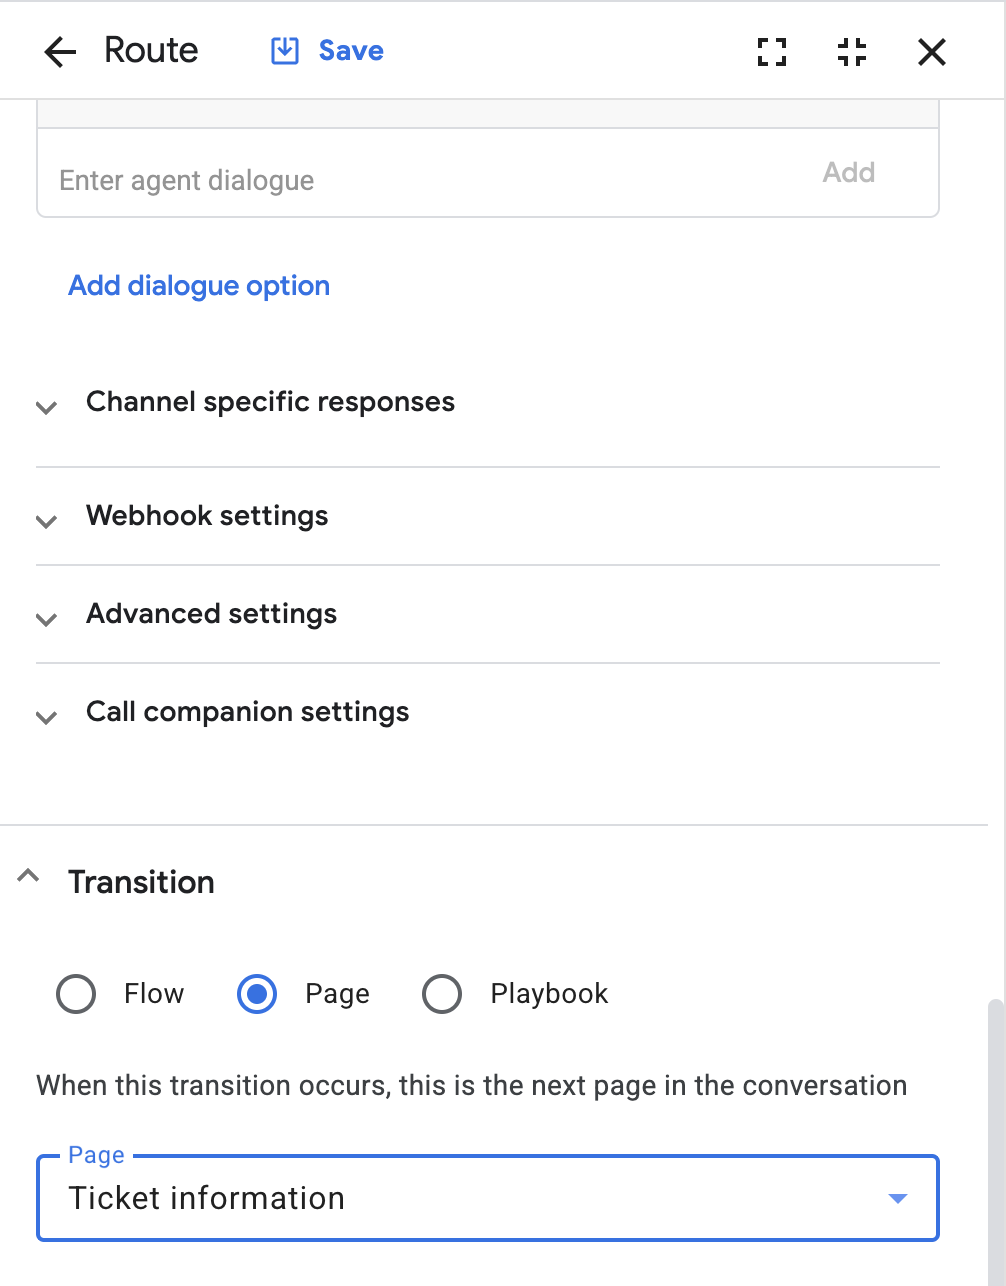
Next, scroll down to the section called Transition > Page, then choose Ticket information from the drop-down.
Scroll up to Parameter presets and click Add parameter . Enter the following 5 values and assign their value to null without the quotation marks.
| Parameter | Value |
|---|---|
departure_city |
null |
destination_city |
null |
departure_date |
null |
return_date |
null |
passenger_name |
null |
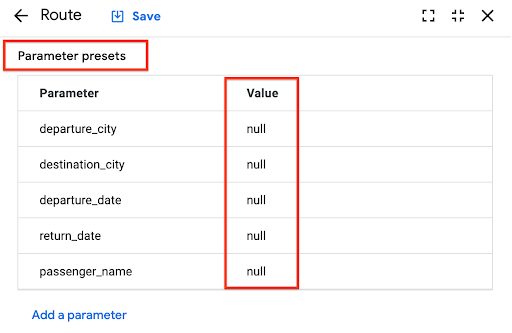
The purpose of this is to remove the value that was previously collected from the end user to allow them to submit a new value. If this step is missed, it might result in an infinite loop scenario in your bot!
Click Save.
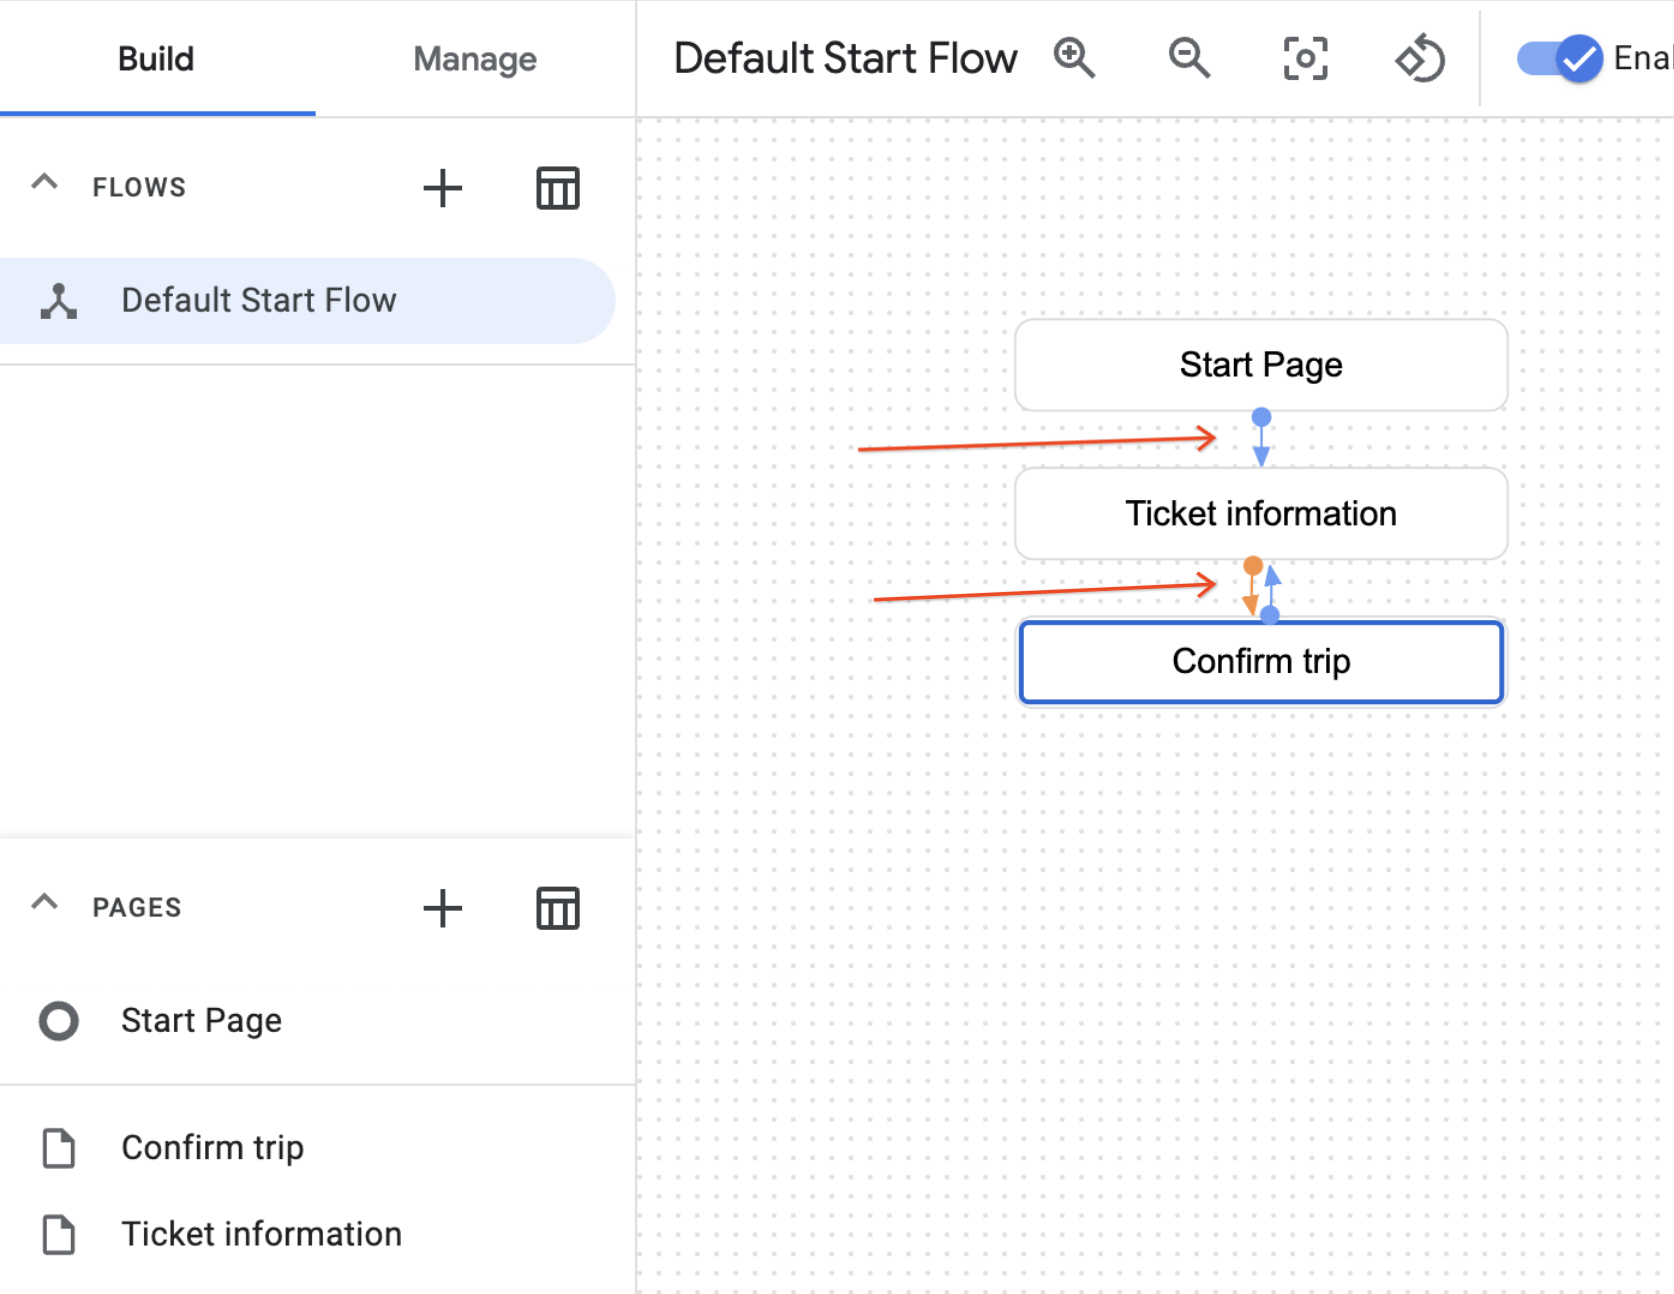
Exit out of the window to return to the Build view, you will now see how all 3 pages flow. Note that the last page has two arrows between the Confirm trip and Ticket information page because the confirmation.no intent is linked back.
Knowledge check
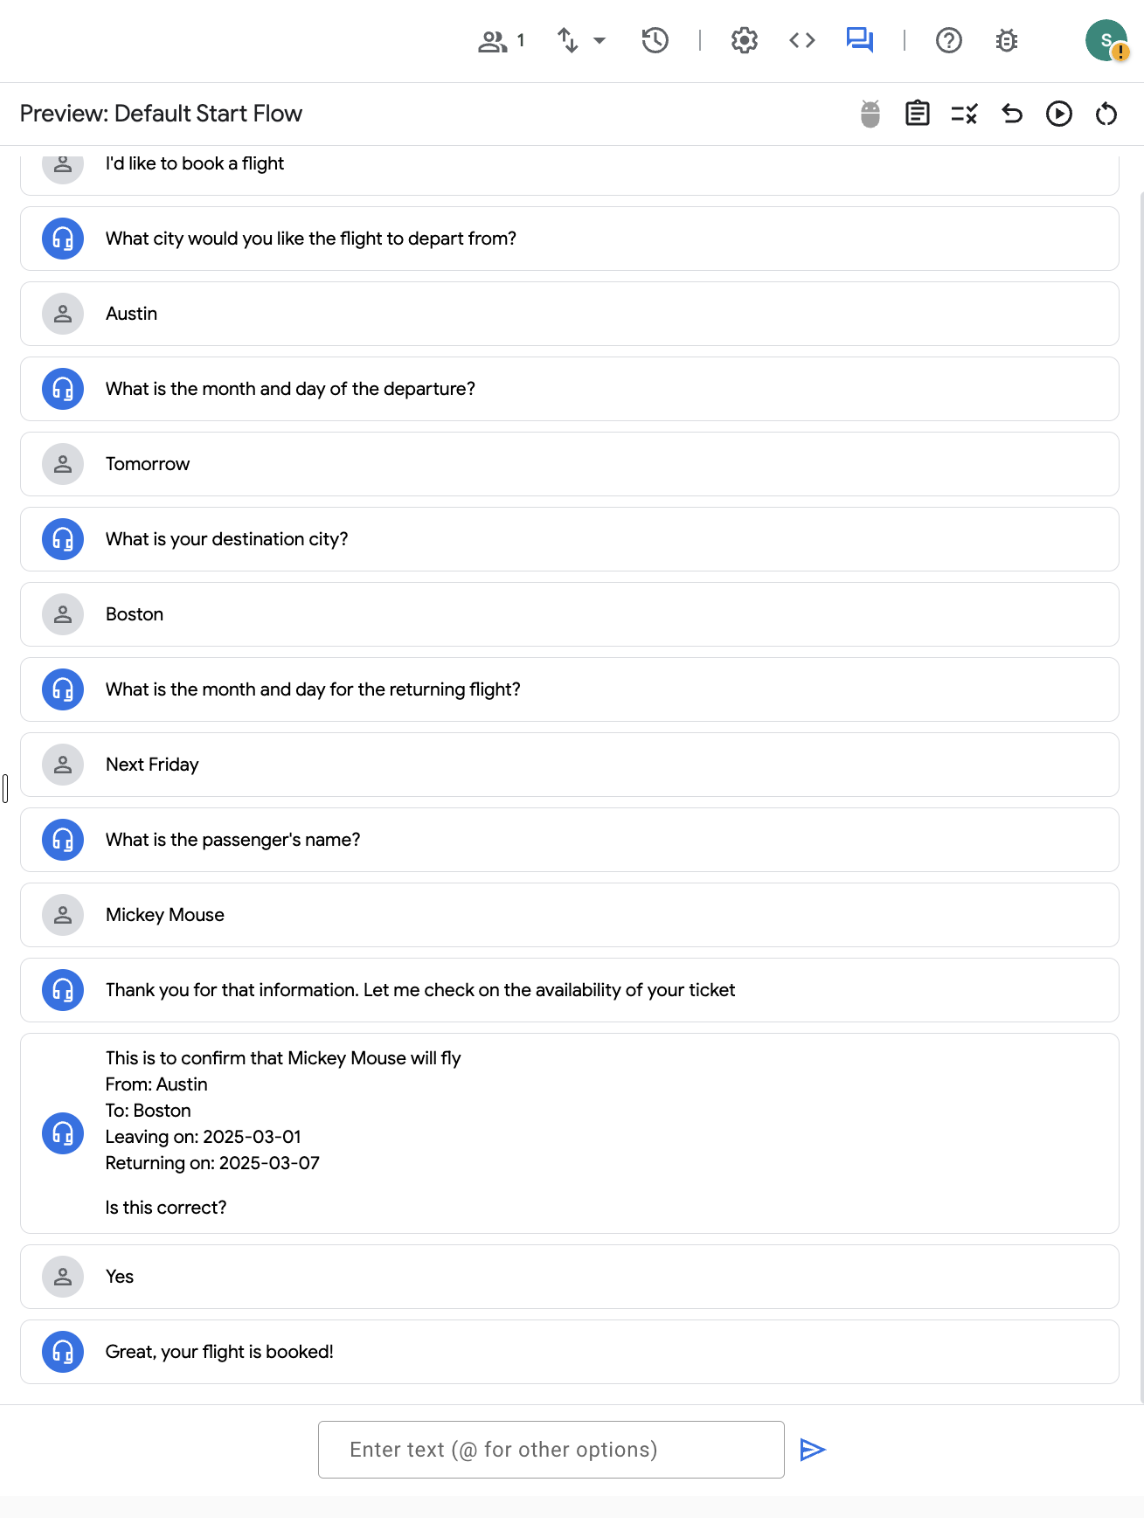
To test that your agent works as intended, click on Toggle Simulator in the upper right corner of the screen.
In the Start resource dropdown, select Default Start Flow.
Interact with the agent as if you were the end-user. As you move through the main flow, notice the pages, intents, and transitions you created.
Depending on how you arranged your parameter collection, you can try typing in the following sample dialogue:
This should result in a successful transaction through your agent, commonly known as the “happy path”.
Here is an example of the above agent testing in the Test Agent console:
Click Check my progress to verify the objective.
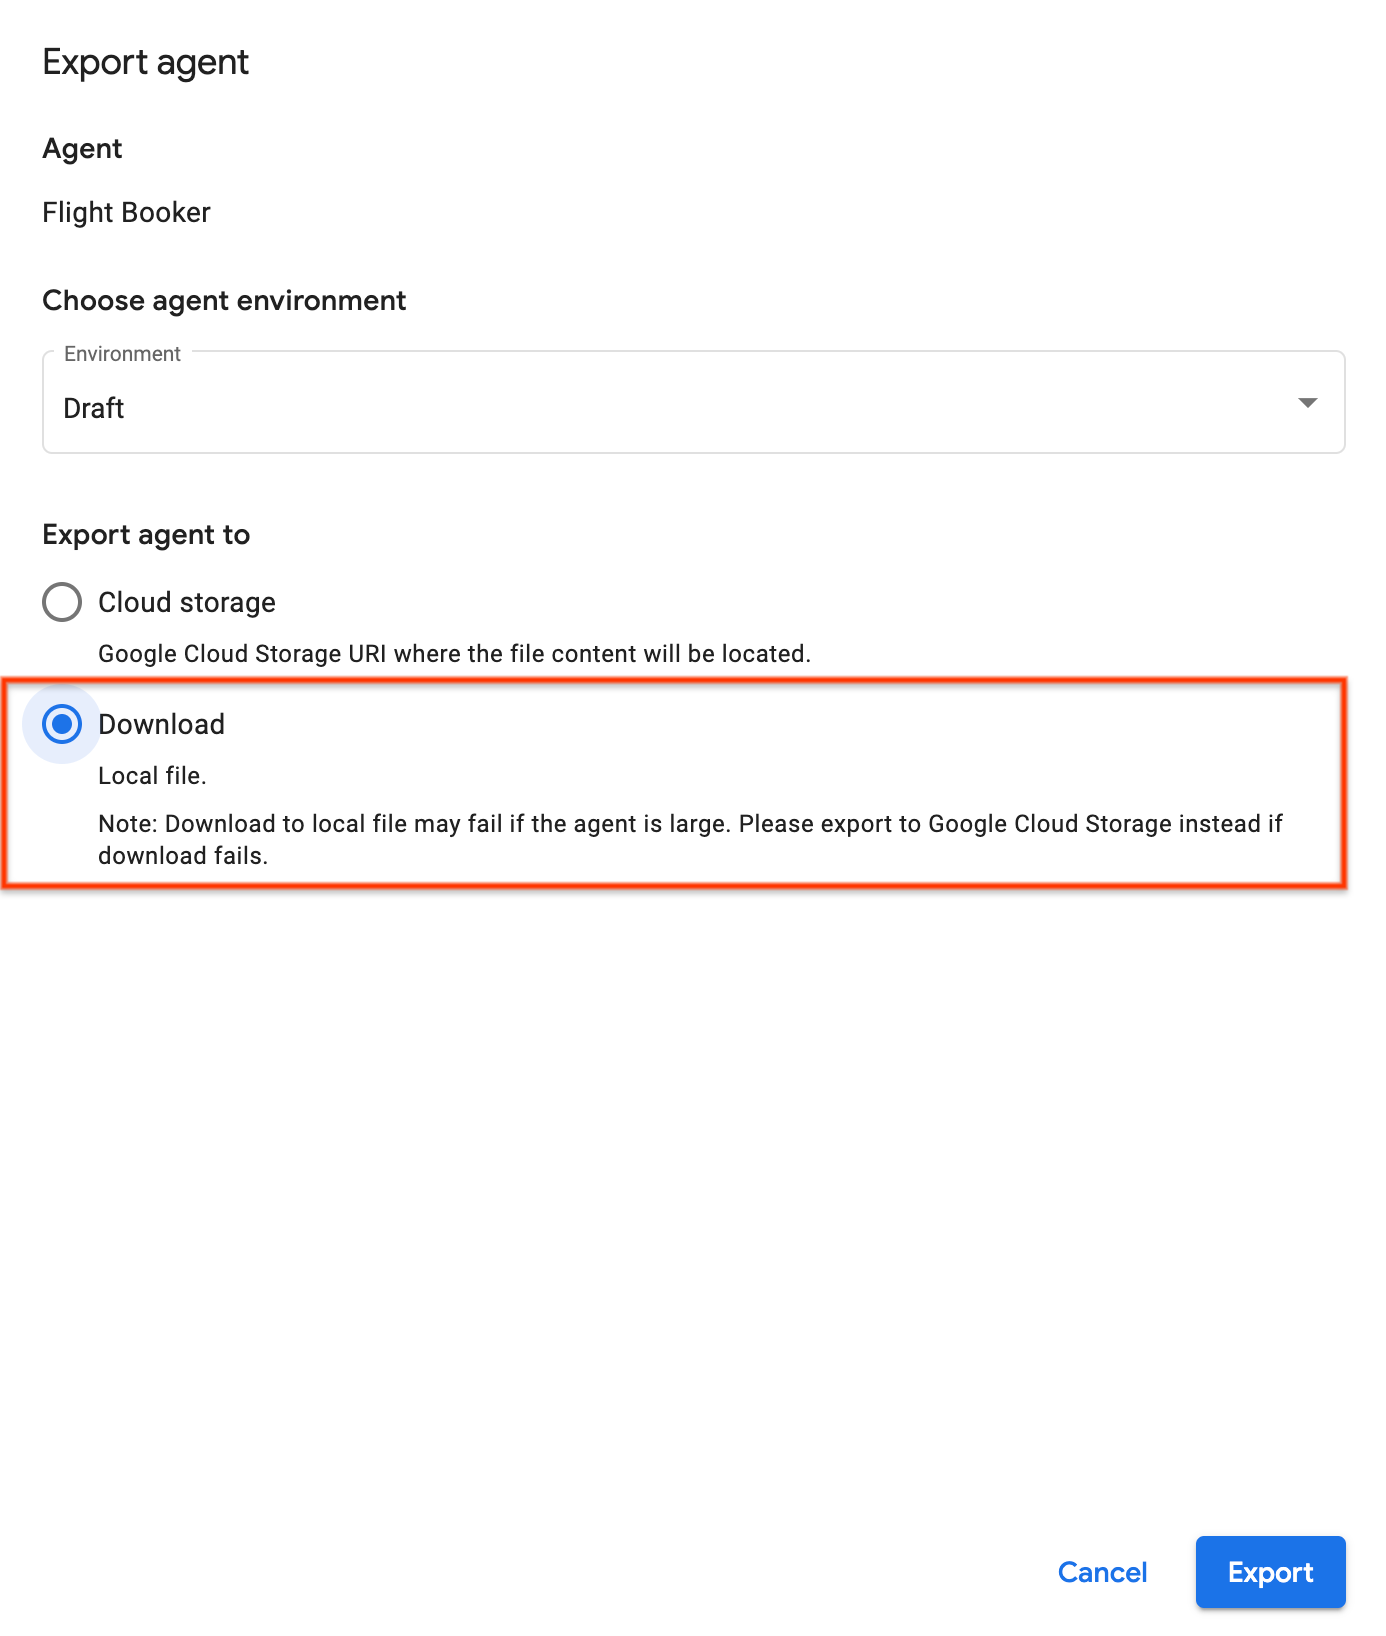
When you build an agent for one project, you can export it to use in a different project. You can export your agent and save it to use in future labs or to continue building in your own personal project!
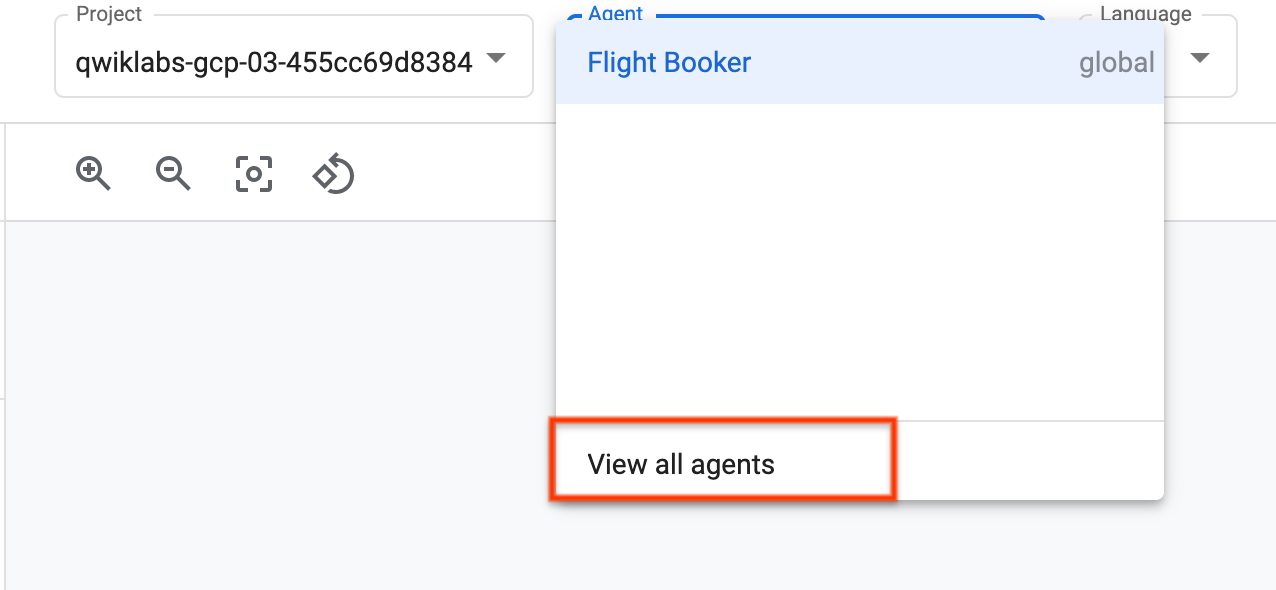
In the Agent drop down at the top of the Conversational Agents console, click View all agents.
On the Agent list screen, click the context menu next to your agent and then click Export.
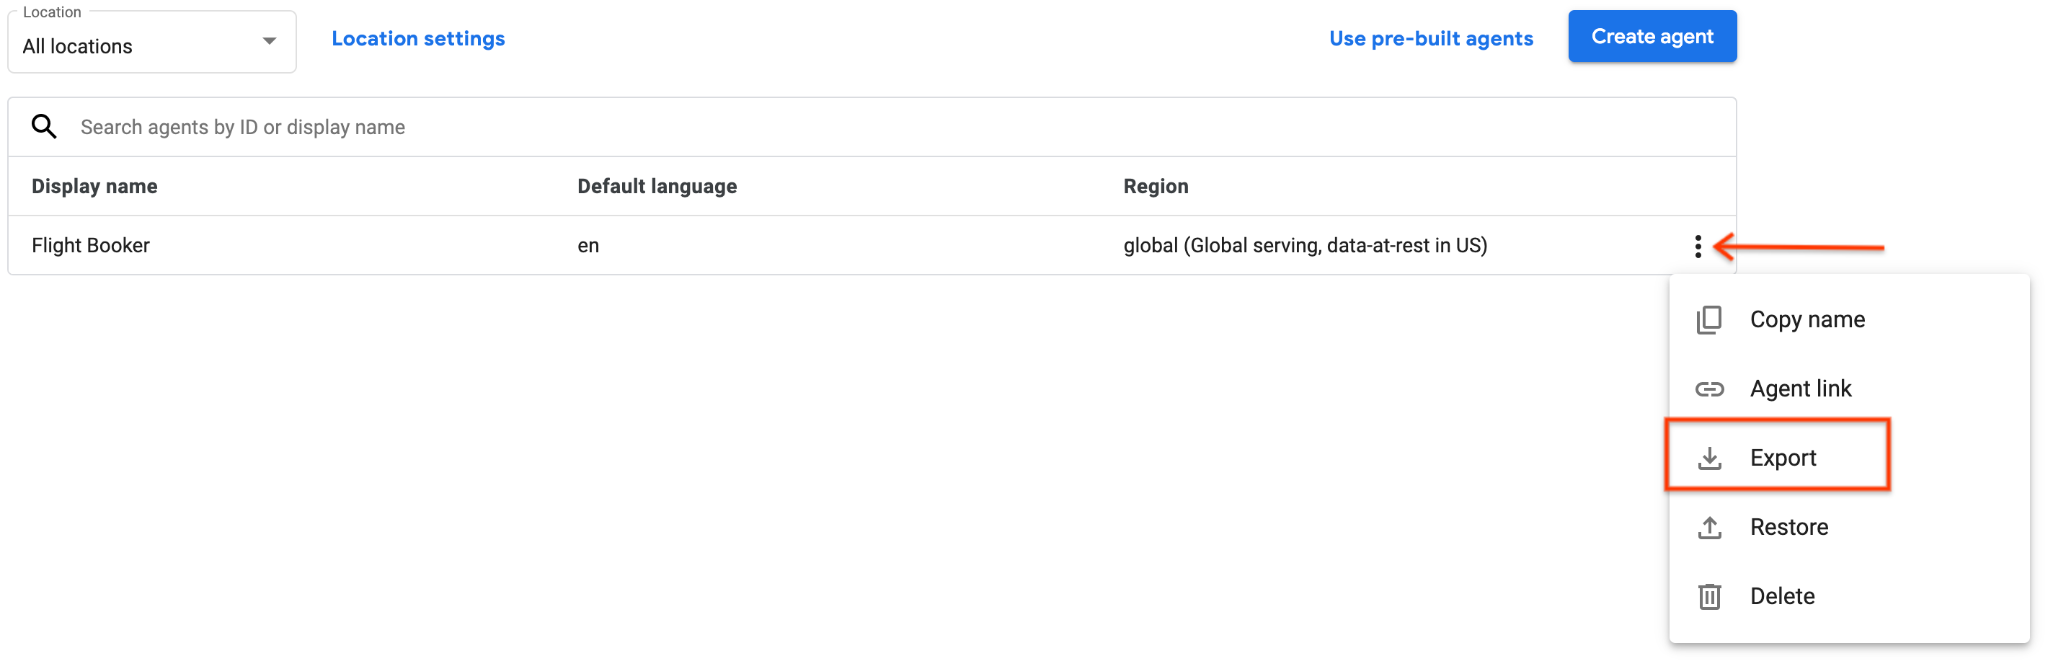
On the Export Agent screen, choose Download to local file, then click Export.
You have built a Conversational Agent and become familiar with the foundational concepts.
Manual Last Updated February 28, 2025
Lab Last Tested February 28, 2025
Copyright 2025 Google LLC. All rights reserved. Google and the Google logo are trademarks of Google LLC. All other company and product names may be trademarks of the respective companies with which they are associated.


This content is not currently available
We will notify you via email when it becomes available

Great!
We will contact you via email if it becomes available

One lab at a time
Confirm to end all existing labs and start this one