

Before you begin
- Labs create a Google Cloud project and resources for a fixed time
- Labs have a time limit and no pause feature. If you end the lab, you'll have to restart from the beginning.
- On the top left of your screen, click Start lab to begin
Create the BigQuery AWS connection
/ 25
Create the BigQuery Dataset and External Table
/ 25
Query the External Table
/ 25
Export query results to AWS S3
/ 25
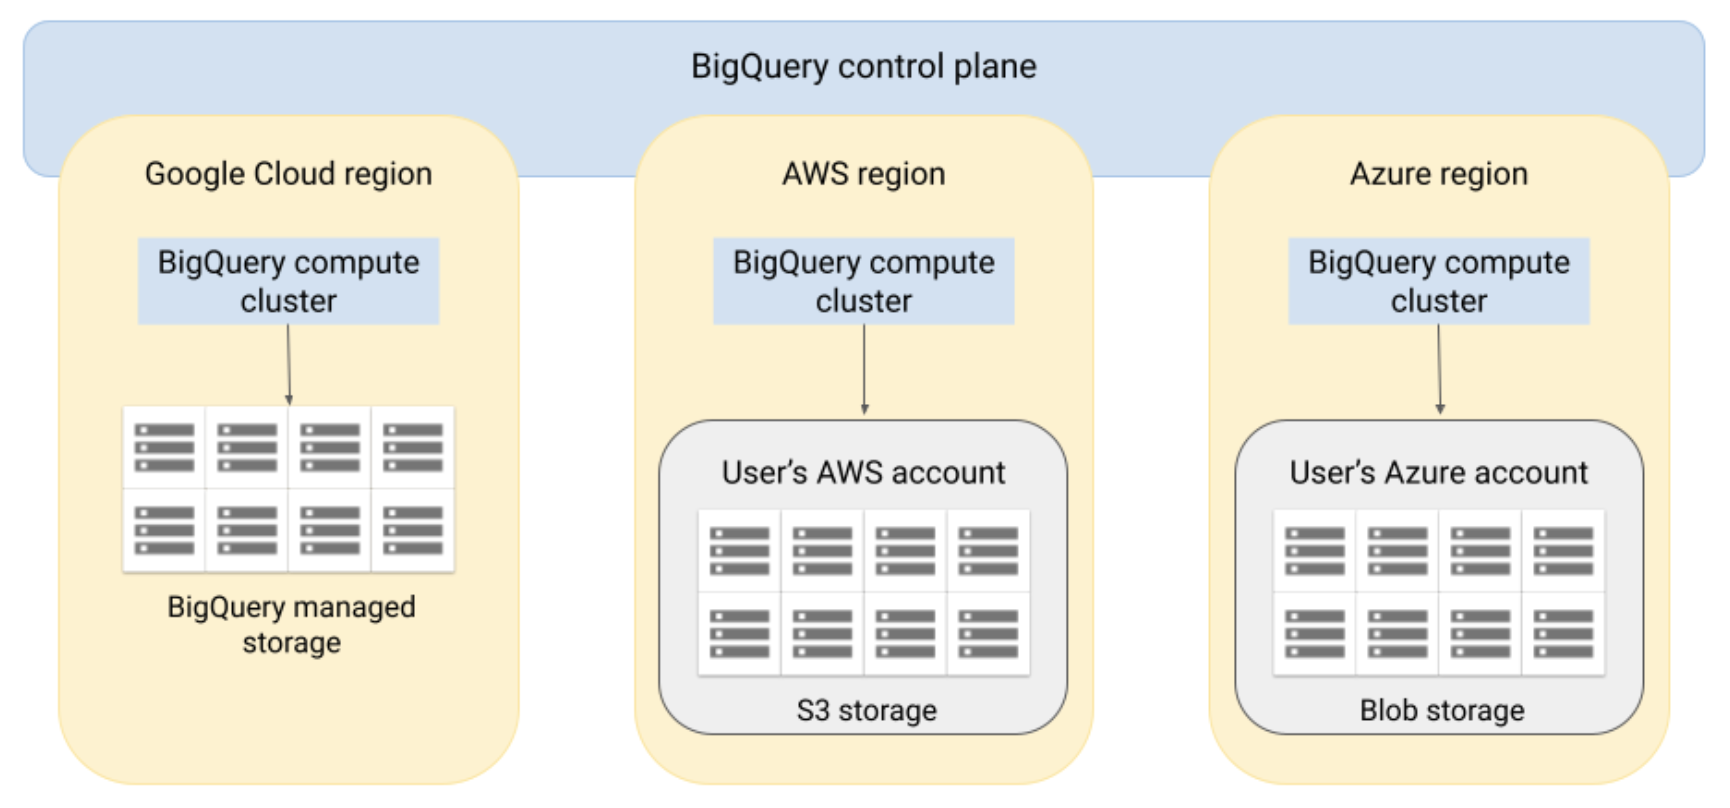
In this lab, you will learn how to use BigQuery Omni with AWS. BigQuery Omni lets you run BigQuery analytics on data stored in AWS S3. You will create an authorized connection between Google Cloud BigQuery and AWS S3, query data residing in S3 buckets without any data movement and write query results back to AWS S3 buckets. This lab is derived from a BigQuery Omni Guide published by Google.
In this lab, you learn how to perform the following tasks:
Read these instructions. Labs are timed and you cannot pause them. The timer, which starts when you click Start Lab, shows how long Google Cloud resources are made available to you.
This hands-on lab lets you do the lab activities in a real cloud environment, not in a simulation or demo environment. It does so by giving you new, temporary credentials you use to sign in and access Google Cloud for the duration of the lab.
To complete this lab, you need:
Click the Start Lab button. If you need to pay for the lab, a dialog opens for you to select your payment method. On the left is the Lab Details pane with the following:
Click Open Google Cloud console (or right-click and select Open Link in Incognito Window if you are running the Chrome browser).
The lab spins up resources, and then opens another tab that shows the Sign in page.
Tip: Arrange the tabs in separate windows, side-by-side.
If necessary, copy the Username below and paste it into the Sign in dialog.
You can also find the Username in the Lab Details pane.
Click Next.
Copy the Password below and paste it into the Welcome dialog.
You can also find the Password in the Lab Details pane.
Click Next.
Click through the subsequent pages:
After a few moments, the Google Cloud console opens in this tab.

BigQuery Omni accesses Amazon S3 data through authorized connections from Google Cloud. Each connection has its own unique Amazon Web Services (AWS) Identity and Access Management (IAM) user. You grant permissions to users through AWS IAM roles. The policies within the AWS IAM roles determine what data BigQuery can access for each connection.
Sign in to the AWS Management Console. Click the Open AWS Console button on the lab pane, and log in with the provided username and password.
Search for Amazon S3 in the Search bar at the top and select S3. A regional bucket named
Search for AWS Identity and Access Management (IAM) in the Search bar at the top and select IAM.
From the left pane select Policies and click bigquery-omni-connection-policy.
Click Edit policy > JSON and paste the following into the editor. Replace all instances of <BUCKET_NAME> with your S3 bucket name copied from Step 2.
Click Next.
Click Save changes.
From the left pane, select Roles.
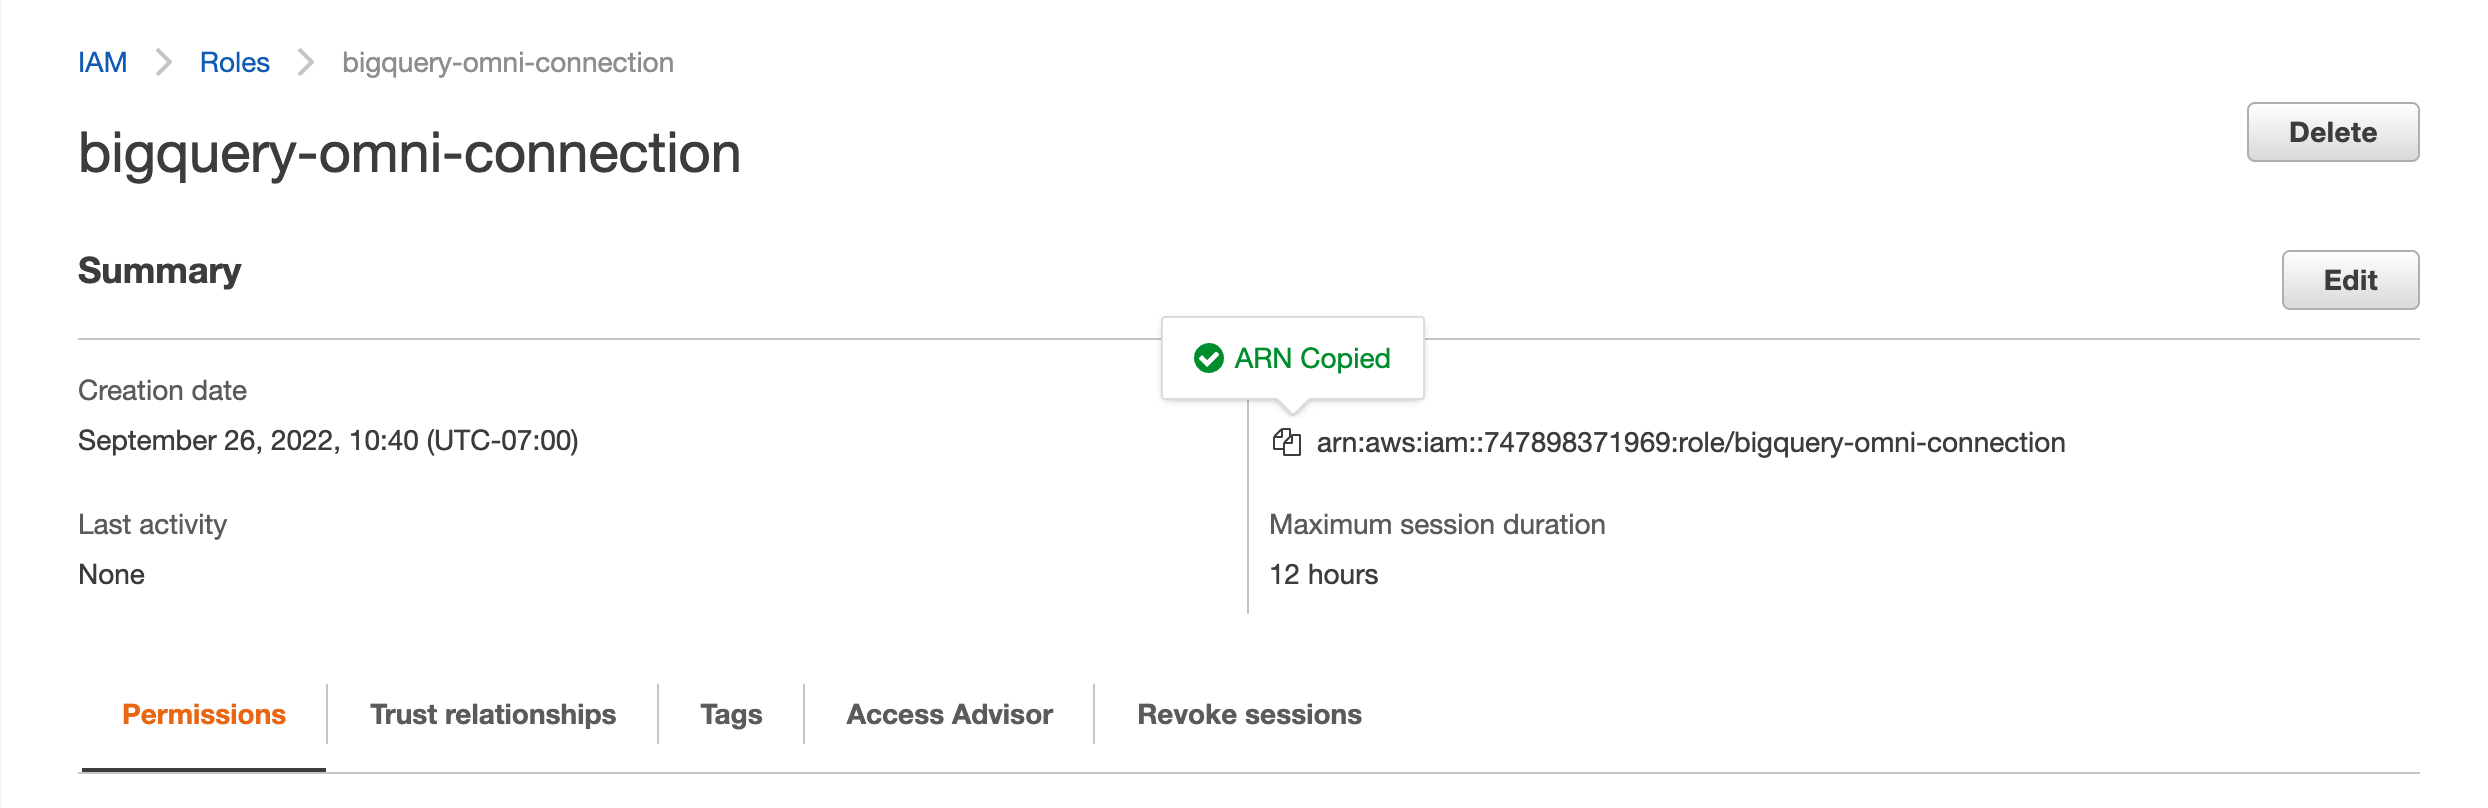
Click the bigquery-omni-connection role.
Copy the Role ARN, it will be in the following format, where <ACCOUNT_ID> is your AWS Account ID.
In the Google Cloud Console, from the Navigation Menu, go to BigQuery > BigQuery Studio.
Click +ADD, then select Connections to external data sources.
In the External data source pane, enter the following information:
bq-omni-aws-connector for an identifier for the connection resource.aws-us-east-1.Optional: For Friendly name, enter a user-friendly name for the connection. The friendly name can be any value that helps you identify the connection resource if you need to modify it later.Optional: For Description, enter a description for this connection resource.arn:aws:iam::AWS_ACCOUNT_ID:role/ROLE_NAME
Click Create connection.
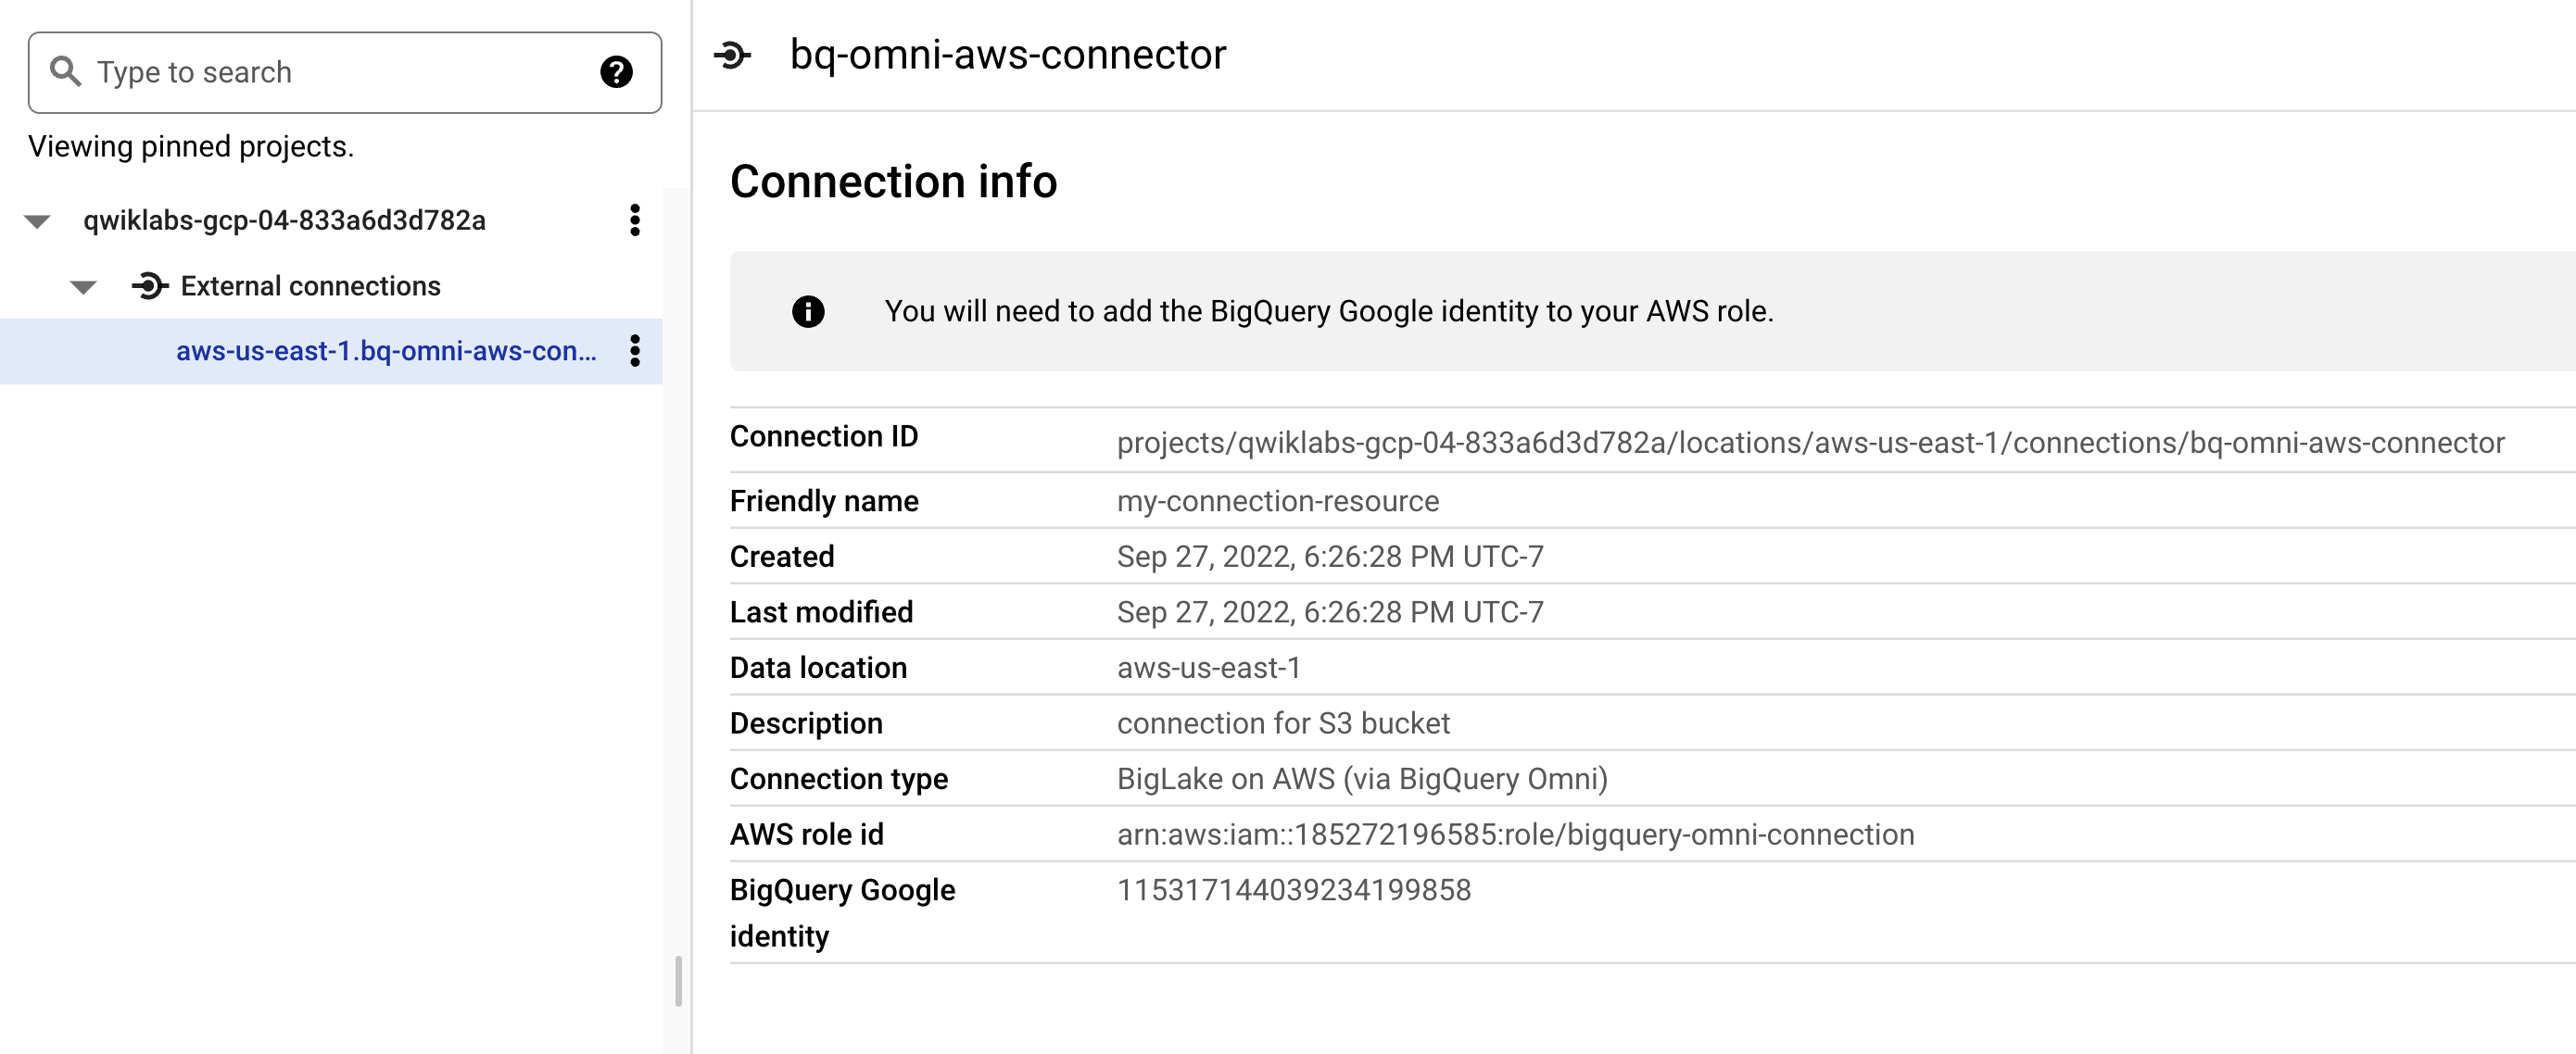
In the BigQuery Explorer, click the dropdown next to your project name and navigate to the newly created connection in the External Connections list.
Your BigQuery Google Identity should resemble the following:
Click Check my progress to verify the objective.
The trust relationship lets the BigQuery AWS connection assume the role and access the S3 data as specified in the roles policy.
Navigate back to the AWS IAM console.
From the left pane, select Roles.
Select the bigquery-omni-connection role.
Click Edit and then do the following:
Select Trust Relationships tab and click Edit trust policy.
Replace the policy content with the following, replacing "00000" with the BigQuery Google identity you copied in the previous section.
The connection is now ready to use.
BigQuery Omni does not manage data stored in Amazon S3. To access S3 data, define an external table. This table is called an external table because the data is not stored in BigQuery managed storage. For more information about external tables, see External tables.
In this section, you will create a BigQuery dataset in the same region as your AWS S3 bucket.
In the Google Cloud Console, go to the BigQuery page to create a dataset.
Click the 3 dots next to your project name and select Create dataset.
On the Create dataset page, enter the following information:
bq_omni_demo.Region.aws-us-east-1.Click Create dataset.
In this section you will create an external table in the above dataset.
In this BigQuery explorer, expand your project and select the bq_omni_demo dataset created.
In the details panel, click Create table.
On the Create table page, in the Source section, do the following:
s3://[S3 bucket name]/taxi-data_green_trips_table.csv.
[S3 bucket name] with On the Create table page, in the Destination section, do the following:
bq_omni_demo.bq-omni-table.Click Create table.
Click Check my progress to verify the objective.
BigQuery Omni lets you query the external table like any BigQuery table. The maximum result size for interactive queries is 10 GB (preview). For more information, see Limitations. If your query result is larger than 10 GB, then we recommend that you export it to Amazon S3. The query result is stored in a BigQuery temporary table.
From the bq-omni-table details page, click on Query a new editor will open.
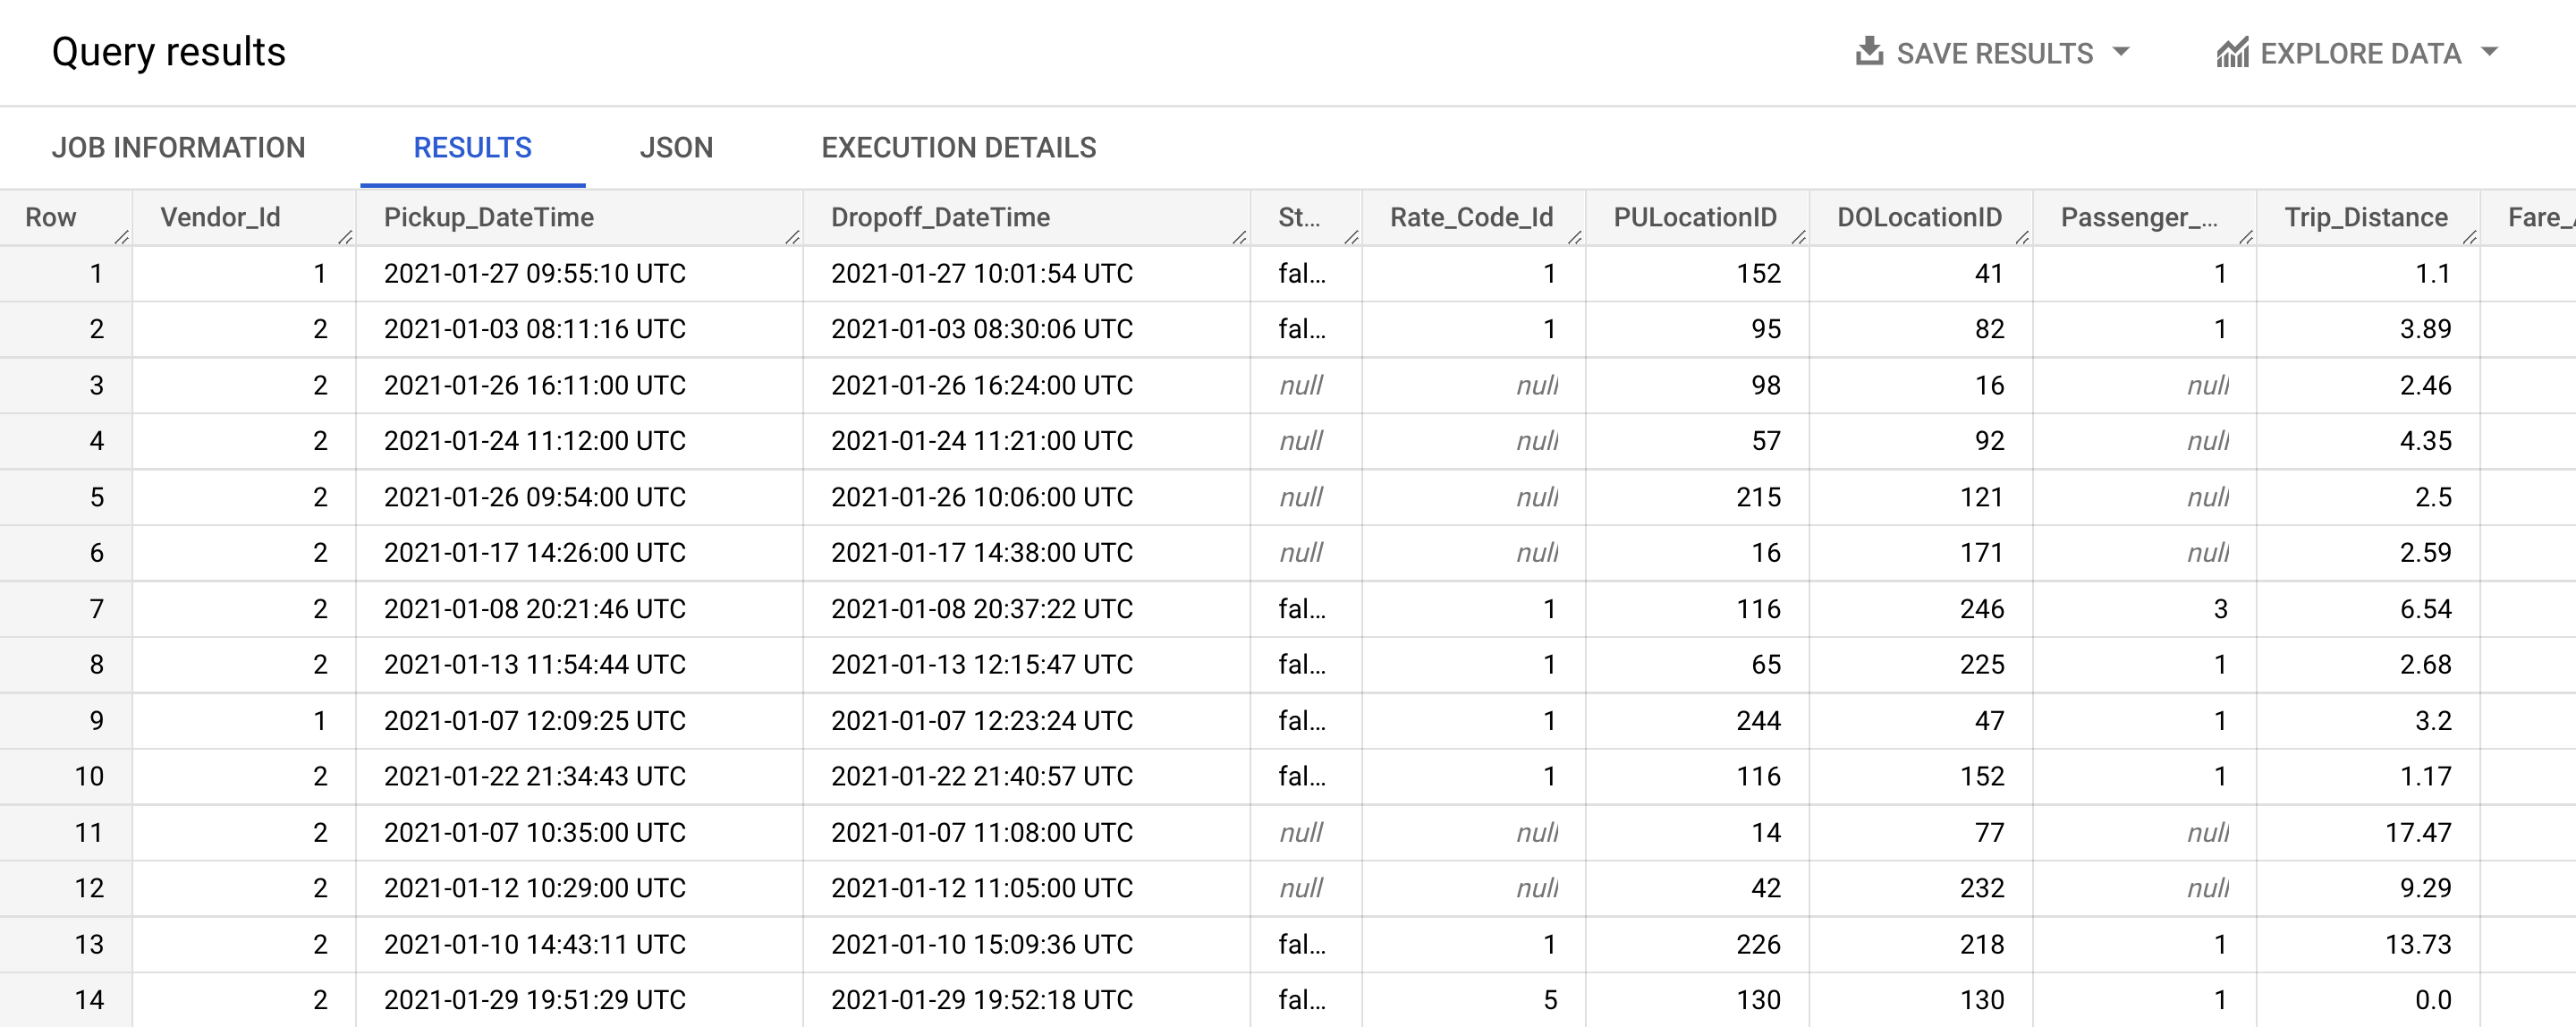
In the Query editor, execute the following statement:
You should see the following output:
Click Check my progress to verify the objective.
BigQuery Omni lets you export the result of a query against a BigQuery external table to Amazon S3.
BigQuery Omni writes to the specified Amazon S3 location irrespective of any existing content. The export query can overwrite existing data or mix the query result with existing data. In the Query editor field, you will need to run a Google Standard SQL export query. Google Standard SQL is the default syntax in the Google Cloud console. The following is the template for what you will need to write:
You will need to replace the following:
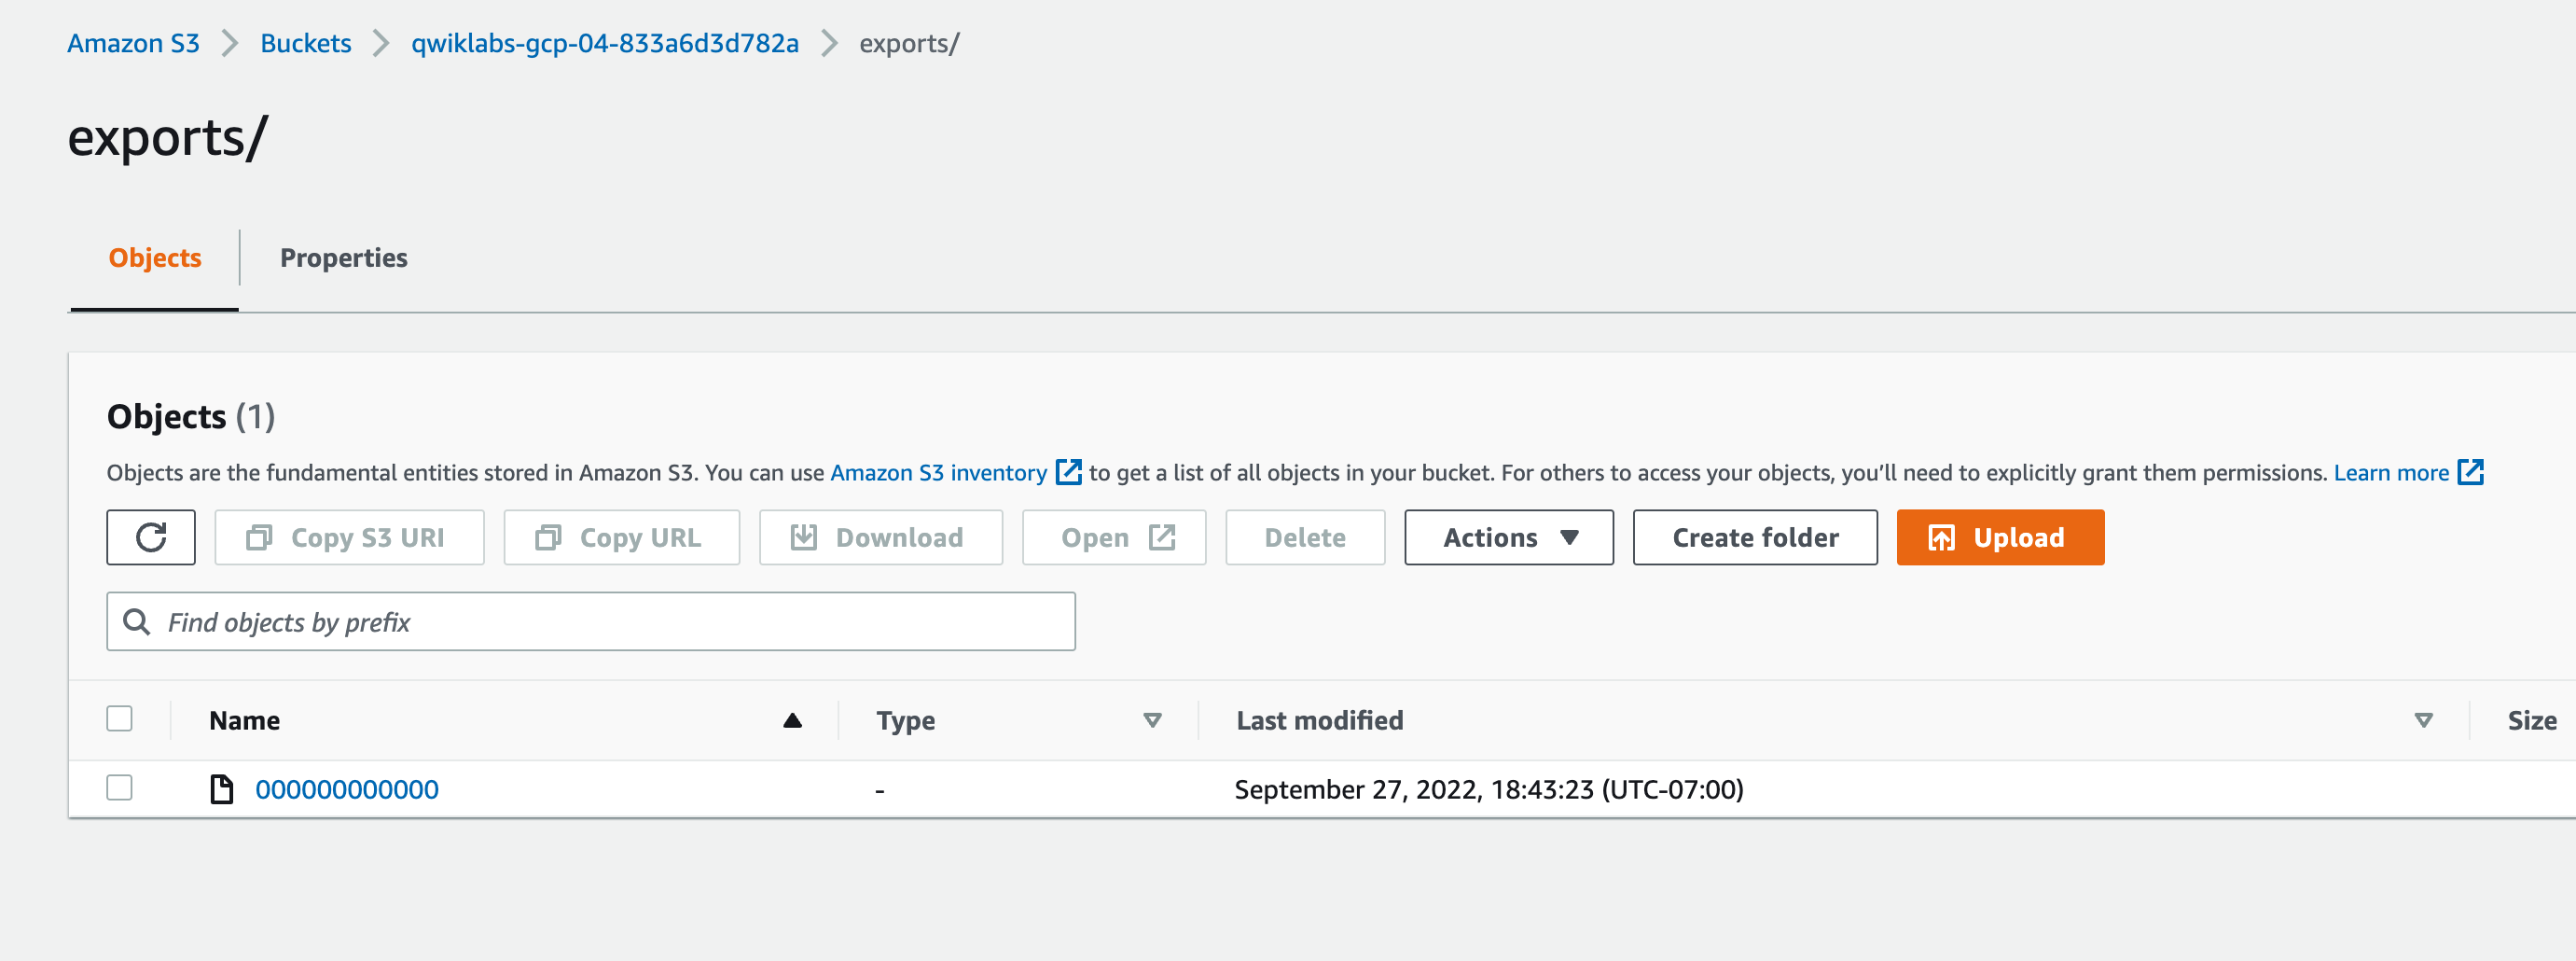
CONNECTION_REGION: the region where the connection was created.CONNECTION_NAME: the connection name that you created with the necessary permission to write to the S3 bucket.BUCKET_NAME: the Amazon S3 bucket where you want to write the data.PATH: the path where you want to write the exported file toFORMAT: supported formats are JSON, AVRO, and CSV.QUERY: the query to analyze the data that is stored in a BigQuery external table.You should see the following output:
exports directory.Great! You have successfully executed an export query and created a file in your S3 bucket.
Click Check my progress to verify the objective.
In this lab you created a connection between Google Cloud and AWS and authorized BigQuery Omni to read the data in an AWS S3 bucket. You then created a BigQuery external table that references the raw data in the AWS S3 bucket, ran queries on the data, and exported query results back to an AWS S3 bucket.
Be sure to check out the following to receive more information about BigQuery Omni:
...helps you make the most of Google Cloud technologies. Our classes include technical skills and best practices to help you get up to speed quickly and continue your learning journey. We offer fundamental to advanced level training, with on-demand, live, and virtual options to suit your busy schedule. Certifications help you validate and prove your skill and expertise in Google Cloud technologies.
Manual Last Updated April 07, 2025
Lab Last Tested April 07, 2025
Copyright 2025 Google LLC. All rights reserved. Google and the Google logo are trademarks of Google LLC. All other company and product names may be trademarks of the respective companies with which they are associated.


This content is not currently available
We will notify you via email when it becomes available

Great!
We will contact you via email if it becomes available

One lab at a time
Confirm to end all existing labs and start this one