arrow_back

AHYBRID022 North-south routing with Multi-Cluster Gateways

Sign in Join
Get access to 700+ labs and courses

AHYBRID022 North-south routing with Multi-Cluster Gateways

Lab 3 hours universal_currency_alt 5 Credits show_chart Intermediate
info This lab may incorporate AI tools to support your learning.
Get access to 700+ labs and courses

Overview

Introduction

This lab shows you how to enable, use and deploy the multi-cluster GKE Gateway controller, a Google-hosted controller that provisions external and internal load balancers, which balance traffic across multiple Kubernetes clusters.

In GKE the gke-l7-gxlb-mc and gke-l7-rilb-mc GatewayClasses deploy multi-cluster Gateways that provide HTTP routing, traffic splitting, traffic mirroring, health-based failover, and more across different GKE clusters, Kubernetes Namespaces, and across different regions. Multi-cluster Gateways make managing application networking across many clusters and teams easy, secure, and scalable for infrastructure administrators.

Objectives

In this lab, you learn how to perform the following tasks:

  • Register GKE clusters to an Anthos Fleet
  • Enable and configure Multi-cluster Services (MCS)
  • Enable and configure Multi-clusster Gateways (MCG)
  • Deploy a distributed application and balance traffic accross clusters

Setup and requirements

In this task, you use Qwiklabs and perform initialization steps for your lab.

For each lab, you get a new Google Cloud project and set of resources for a fixed time at no cost.

  1. Sign in to Qwiklabs using an incognito window.

  2. Note the lab's access time (for example, 1:15:00), and make sure you can finish within that time.
    There is no pause feature. You can restart if needed, but you have to start at the beginning.

  3. When ready, click Start lab.

  4. Note your lab credentials (Username and Password). You will use them to sign in to the Google Cloud Console.

  5. Click Open Google Console.

  6. Click Use another account and copy/paste credentials for this lab into the prompts.
    If you use other credentials, you'll receive errors or incur charges.

  7. Accept the terms and skip the recovery resource page.

Google Cloud Platform Console

After you complete the initial sign-in steps, the project dashboard appears.

GCP Project Dashboard

  • Click Select a project, highlight your GCP Project ID, and click OPEN to select your project.

Activate Google Cloud Shell

Google Cloud Shell is a virtual machine that is loaded with development tools. It offers a persistent 5GB home directory and runs on the Google Cloud.

Google Cloud Shell provides command-line access to your Google Cloud resources.

  1. In Cloud console, on the top right toolbar, click the Open Cloud Shell button.

    Highlighted Cloud Shell icon

  2. Click Continue.

It takes a few moments to provision and connect to the environment. When you are connected, you are already authenticated, and the project is set to your PROJECT_ID. For example:

Project ID highlighted in the Cloud Shell Terminal

gcloud is the command-line tool for Google Cloud. It comes pre-installed on Cloud Shell and supports tab-completion.

  • You can list the active account name with this command:
gcloud auth list

Output:

Credentialed accounts: - @.com (active)

Example output:

Credentialed accounts: - google1623327_student@qwiklabs.net
  • You can list the project ID with this command:
gcloud config list project

Output:

[core] project =

Example output:

[core] project = qwiklabs-gcp-44776a13dea667a6 Note: Full documentation of gcloud is available in the gcloud CLI overview guide . 
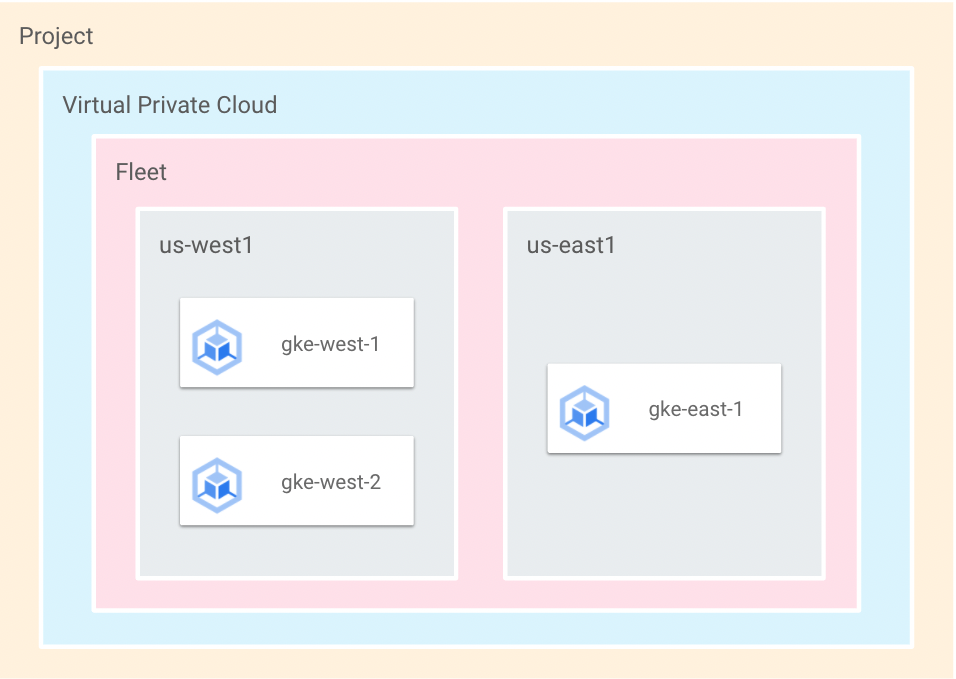
Note: The lab environment has already been partially configured:

  • A GKE cluster named gke-west-1 has been created
  • A GKE cluster named gke-west-2 has been created
  • A GKE cluster named gke-east-1 has been created

Task 1. Configure access for kubectl and verify the cluster

3 Google Kubernetes Engine (GKE) clusters have already been created. You are going to setup access to these clusters.

GKE Clusters architecture diagram

  1. In Cloud Shell, set environment variables for use in scripts using the following commands:

    export PROJECT_ID=$(gcloud config get-value project) export PROJECT_NUMBER=$(gcloud projects describe "$PROJECT_ID" \ --format "value(projectNumber)")
  2. Set the zone environment variable for the west1 cluster:

    WEST1_LOCATION={{{ project_0.startup_script.west1_cluster_zone| "Zone added at lab start" }}}
  3. Set the zone environment variable for the west2 cluster:

    WEST2_LOCATION={{{ project_0.startup_script.west2_cluster_zone| "Zone added at lab start" }}}
  4. Set the zone environment variable for the east1 cluster:

    EAST1_LOCATION={{{ project_0.startup_script.east1_cluster_zone| "Zone added at lab start" }}}
  5. Configure kubectl to manage your GKE clusters by running:

    gcloud container clusters get-credentials gke-west-2 --zone=${WEST2_LOCATION} --project=${PROJECT_ID} gcloud container clusters get-credentials gke-east-1 --zone=${EAST1_LOCATION} --project=${PROJECT_ID} gcloud container clusters get-credentials gke-west-1 --zone=${WEST1_LOCATION} --project=${PROJECT_ID}
  6. Rename the cluster contexts so they are easier to reference later:

    kubectl config rename-context gke_${PROJECT_ID}_${WEST2_LOCATION}_gke-west-2 gke-west-2 kubectl config rename-context gke_${PROJECT_ID}_${EAST1_LOCATION}_gke-east-1 gke-east-1 kubectl config rename-context gke_${PROJECT_ID}_${WEST1_LOCATION}_gke-west-1 gke-west-1
  7. Enable the multi-cluster gateway API. (Please note this will take a few minutes.)

    gcloud container clusters update gke-west-1 --gateway-api=standard --region=${WEST1_LOCATION}

Task 2. Register clusters in an Anthos Fleet

  1. Register these clusters in an Anthos Fleet:

    gcloud container fleet memberships register gke-west-1 \ --gke-cluster ${WEST1_LOCATION}/gke-west-1 \ --enable-workload-identity \ --project=${PROJECT_ID} gcloud container fleet memberships register gke-west-2 \ --gke-cluster ${WEST2_LOCATION}/gke-west-2 \ --enable-workload-identity \ --project=${PROJECT_ID} gcloud container fleet memberships register gke-east-1 \ --gke-cluster ${EAST1_LOCATION}/gke-east-1 \ --enable-workload-identity \ --project=${PROJECT_ID}
  2. Confirm that the clusters have successfully registered with an Anthos Fleet:

    gcloud container fleet memberships list --project=${PROJECT_ID}

    Output:

    NAME EXTERNAL_ID gke-east-1 657e835d-3b6b-4bc5-9283-99d2da8c2e1b gke-west-2 f3727836-9cb0-4ffa-b0c8-d51001742f19 gke-west-1 93de69c0-859e-4ddd-bf3a-e3d62ef5090b

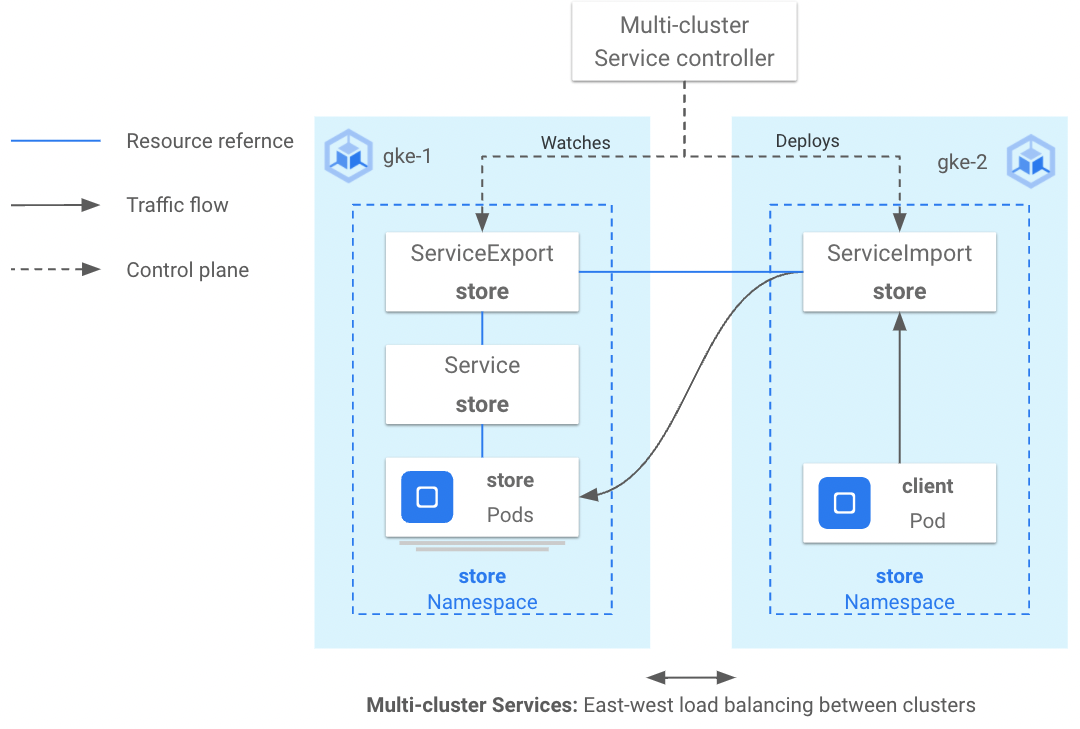
Task 3. Enable Multi-cluster Services (MCS)

In this task, you enable Multi-cluster Services (MCS) in your fleet for the registered clusters. MCS controller listens for import/export Services, so that Kubernetes Services are routable across clusters and traffic can be distributed across them.

MCS Controller architecture diagram.

  1. Enable multi-cluster Services in your fleet for the registered clusters:

    gcloud container fleet multi-cluster-services enable \ --project ${PROJECT_ID}
  2. Grant the required Identity and Access Management (IAM) permissions required for MCS:

    gcloud projects add-iam-policy-binding ${PROJECT_ID} \ --member "serviceAccount:${PROJECT_ID}.svc.id.goog[gke-mcs/gke-mcs-importer]" \ --role "roles/compute.networkViewer" \ --project=${PROJECT_ID}
  3. Confirm that MCS is enabled for the registered clusters. You will see the memberships for the three registered clusters. It may take several minutes for all of the clusters to show. Wait and retry until you see a similar output.

    gcloud container fleet multi-cluster-services describe --project=${PROJECT_ID}

Output:

createTime: '2021-04-02T19:34:57.832055223Z' membershipStates projects/381015962062/locations/global/memberships/gke-east-1: state: code: OK description: Firewall successfully updated updateTime: '2021-05-27T11:03:07.770208064Z' projects/381015962062/locations/global/memberships/gke-west-1: state: code: OK description: Firewall successfully updated updateTime: '2021-05-27T09:32:14.401508987Z' projects/381015962062/locations/global/memberships/gke-west-2: state: code: OK description: Firewall successfully updated updateTime: '2021-05-27T13:53:27.628109510Z' name: projects/PROJECT_ID/locations/global/features/multiclusterservicediscovery resourceState: state: ACTIVE spec: {} updateTime: '2021-04-02T19:34:58.983512446Z'

Click Check my progress to verify the objective. Enable Multi-cluster Services (MCS) and grant the required IAM roles.

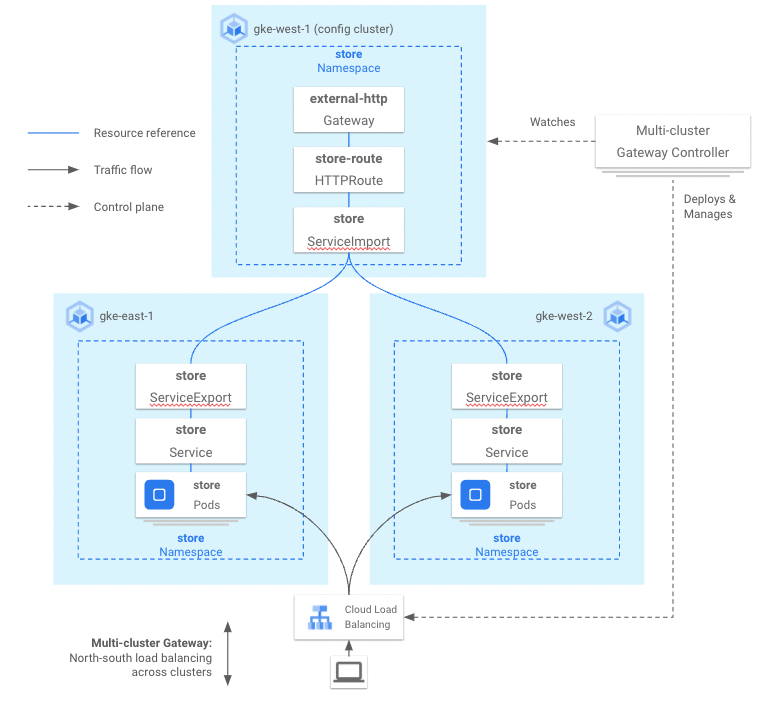
Task 4. Enable the Multi-cluster Gateway (MCG) controller

Before using Gateway resources in GKE, you must enable the Multi-cluster Gateway (MCG) controller. The config cluster is the GKE cluster in which your Gateway and Route resources are deployed. It is a central place that controls routing across your clusters. You will use gke-west-1 as your config cluster.

Config cluster and MCG Controller architecture diagram

  1. Enable the Multi-cluster Gateway controller for the gke-west-1 cluster:

    gcloud container fleet ingress enable \ --config-membership=gke-west-1 \ --project=${PROJECT_ID} \ --location=us-west2
  2. Confirm that the global Gateway controller is enabled for the registered clusters:

    gcloud container fleet ingress describe --project=${PROJECT_ID}

    Output:

    createTime: '2021-05-26T13:27:37.460383111Z' membershipStates: projects/381015962062/locations/global/memberships/gke-east-1: state: code: OK updateTime: '2021-05-27T15:08:19.397896080Z' projects/381015962062/locations/global/memberships/gke-west-1: state: code: OK updateTime: '2021-05-27T15:08:19.397895711Z' projects/381015962062/locations/global/memberships/gke-west-2: state: code: OK updateTime: '2021-05-27T15:08:19.397896293Z' resourceState: state: ACTIVE spec: multiclusteringress: configMembership: projects/PROJECT_ID/locations/global/memberships/gke-west-1 state: state: code: OK description: Ready to use updateTime: '2021-05-26T13:27:37.899549111Z' updateTime: '2021-05-27T15:08:19.397895711Z'
  3. Grant Identity and Access Management (IAM) permissions required by the Gateway controller:

    gcloud projects add-iam-policy-binding ${PROJECT_ID} \ --member "serviceAccount:service-${PROJECT_NUMBER}@gcp-sa-multiclusteringress.iam.gserviceaccount.com" \ --role "roles/container.admin" \ --project=${PROJECT_ID}
  4. List the GatewayClasses:

    kubectl get gatewayclasses --context=gke-west-1

    Output:

    NAME CONTROLLER gke-l7-gxlb networking.gke.io/gateway gke-l7-gxlb-mc networking.gke.io/gateway gke-l7-rilb networking.gke.io/gateway gke-l7-rilb-mc networking.gke.io/gateway

Four Gateway classes have been installed. The gke-l7-gxlb-mc for external multi-cluster Gateways and gke-l7-rilb-mc for internal multi-cluster Gateways. The other two are used for single cluster deployments.

Congratulations! You can now create multi-cluster Gateways using these Gateway classes.

Click Check my progress to verify the objective. Enable the MCG controller and grant the IAM permissions required by the Gateway controller.

Task 5. Deploy the demo application

  1. Create the store Deployment and Namespace in the gke-east-1 and gke-west-2. The config cluster can also host workloads, but in this lab, you only run the Gateway controllers and configuration on it:

    cat <<EOF > store-deployment.yaml kind: Namespace apiVersion: v1 metadata: name: store --- apiVersion: apps/v1 kind: Deployment metadata: name: store namespace: store spec: replicas: 2 selector: matchLabels: app: store version: v1 template: metadata: labels: app: store version: v1 spec: containers: - name: whereami image: gcr.io/google-samples/whereami:v1.2.1 ports: - containerPort: 8080 EOF kubectl apply -f store-deployment.yaml --context=gke-west-2 kubectl apply -f store-deployment.yaml --context=gke-east-1
  2. Create the Service and ServiceExports for the gke-west-2 cluster:

    cat <<EOF > store-west-service.yaml apiVersion: v1 kind: Service metadata: name: store namespace: store spec: selector: app: store ports: - port: 8080 targetPort: 8080 --- kind: ServiceExport apiVersion: net.gke.io/v1 metadata: name: store namespace: store --- apiVersion: v1 kind: Service metadata: name: store-west-2 namespace: store spec: selector: app: store ports: - port: 8080 targetPort: 8080 --- kind: ServiceExport apiVersion: net.gke.io/v1 metadata: name: store-west-2 namespace: store EOF kubectl apply -f store-west-service.yaml --context=gke-west-2
  3. Create the Service and ServiceExports for the gke-east-1 cluster:

    cat <<EOF > store-east-service.yaml apiVersion: v1 kind: Service metadata: name: store namespace: store spec: selector: app: store ports: - port: 8080 targetPort: 8080 --- kind: ServiceExport apiVersion: net.gke.io/v1 metadata: name: store namespace: store --- apiVersion: v1 kind: Service metadata: name: store-east-1 namespace: store spec: selector: app: store ports: - port: 8080 targetPort: 8080 --- kind: ServiceExport apiVersion: net.gke.io/v1 metadata: name: store-east-1 namespace: store EOF kubectl apply -f store-east-service.yaml --context=gke-east-1
  4. Make sure that the service exports have been successfully created:

    kubectl get serviceexports --context gke-west-2 --namespace store kubectl get serviceexports --context gke-east-1 --namespace store

    Output:

    # gke-west-1 NAME AGE store 2m40s store-west-2 2m40s # gke-east-1 NAME AGE store 2m25s store-east-1 2m25s

Task 6. Deploy the Gateway and HTTPRoutes

Gateway and HTTPRoutes are resources deployed in the Config cluster, which in this case is the gke-west-1 cluster.

Platform administrators manage and deploy Gateways to centralize security policies such as TLS.

Service Owners in different teams deploy HTTPRoutes in their own namespace so that they can independently control their routing logic.

Roles for Gateway and HTTPRoutes diagram

  1. Deploy the Gateway in the gke-west-1 config cluster:

    cat <<EOF > external-http-gateway.yaml kind: Namespace apiVersion: v1 metadata: name: store --- kind: Gateway apiVersion: gateway.networking.k8s.io/v1beta1 metadata: name: external-http namespace: store spec: gatewayClassName: gke-l7-gxlb-mc listeners: - name: http protocol: HTTP port: 80 allowedRoutes: kinds: - kind: HTTPRoute EOF kubectl apply -f external-http-gateway.yaml --context=gke-west-1
  2. Deploy the HTTPRoute in the gke-west-1 config cluster:

    cat <<EOF > public-store-route.yaml kind: HTTPRoute apiVersion: gateway.networking.k8s.io/v1beta1 metadata: name: public-store-route namespace: store labels: gateway: external-http spec: hostnames: - "store.example.com" parentRefs: - name: external-http rules: - matches: - path: type: PathPrefix value: /west backendRefs: - group: net.gke.io kind: ServiceImport name: store-west-2 port: 8080 - matches: - path: type: PathPrefix value: /east backendRefs: - group: net.gke.io kind: ServiceImport name: store-east-1 port: 8080 - backendRefs: - group: net.gke.io kind: ServiceImport name: store port: 8080 EOF kubectl apply -f public-store-route.yaml --context=gke-west-1

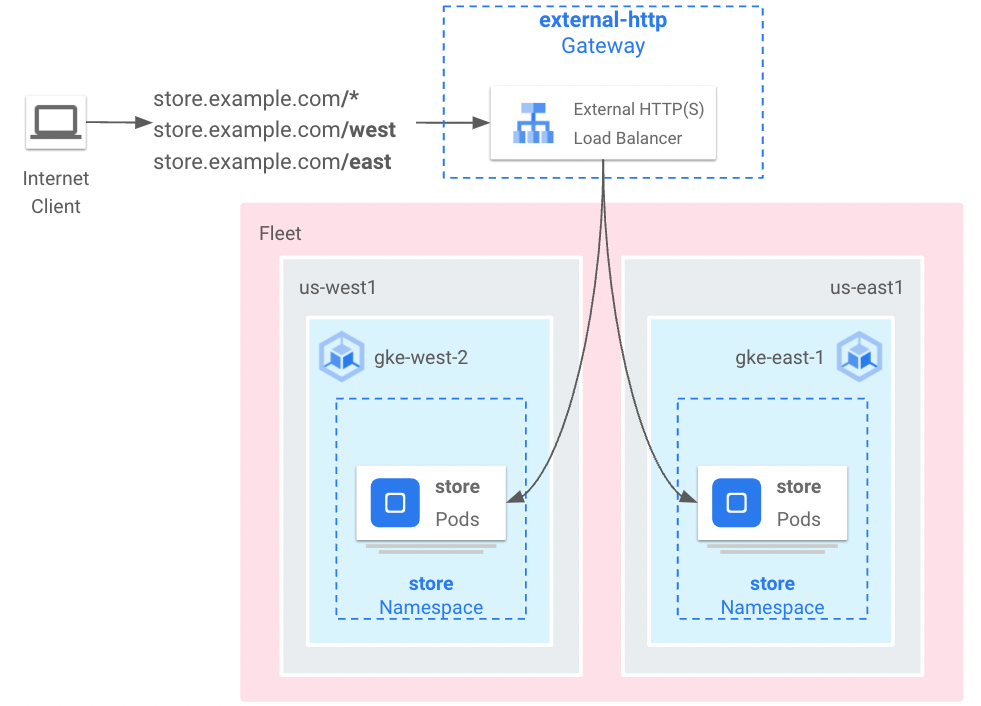
    Notice that we are sending the default requests to the closest backend defined by the default rule. In case that the path /west is in the request, the request is routed to the service in gke-west-2. If the request's path matches /east, the request is routed to the gke-east-1 cluster.

    Routing architecture diagram

  3. View the status of the Gateway that you just created in gke-west-1:

    kubectl describe gateway external-http --context gke-west-1 --namespace store Status: Addresses: Type: IPAddress Value: 35.186.207.183 Conditions: Last Transition Time: 2022-08-22T09:33:06Z Message: Reason: Scheduled Status: True Type: Scheduled Last Transition Time: 2022-08-22T09:38:54Z Message: Reason: Ready Status: True Type: Ready Listeners: Attached Routes: 1 Conditions: Last Transition Time: 2022-08-22T09:38:54Z Message: Reason: Ready Status: True Type: Ready Name: http Supported Kinds: Group: gateway.networking.k8s.io Kind: HTTPRoute Events: Type Reason Age From Message ---- ------ ---- ---- ------- Normal ADD 10m mc-gateway-controller store/external-http Normal SYNC 8m39s mc-gateway-controller store/external-http Warning SYNC 8m20s mc-gateway-controller failed to translate Gateway "store/external-http": error getting ServiceImportConfig gw-serve404.kube-system: serviceimportconfigs.net.gke.io "gw-serve404.kube-system" not found Warning SYNC 6m19s mc-gateway-controller failed to translate Gateway "store/external-http": Error GWCER104: HTTPRoute "store/public-store-route" is misconfigured, err: Error GWCER102: serviceimports store/store-east-1 not found.. Normal UPDATE 2m32s (x3 over 10m) mc-gateway-controller store/external-http Normal SYNC 119s (x2 over 2m32s) mc-gateway-controller SYNC on store/external-http was a success

    Sometimes there are transient errors shown in the Events section. Wait till it shows the follwoing message: "SYNC on store/external-http was a success". It might take up to 10 minutes to sync.

  4. It takes some time for the external IP to be created. To ensure that it is, run this command until you see the external IP.

    kubectl get gateway external-http -o=jsonpath="{.status.addresses[0].value}" --context gke-west-1 --namespace store | xargs echo -e

    If it doesn't return an external IP, wait for a few minutes and run it again.

  5. Get the external IP created by the Gateway:

    EXTERNAL_IP=$(kubectl get gateway external-http -o=jsonpath="{.status.addresses[0].value}" --context gke-west-1 --namespace store) echo $EXTERNAL_IP

    Make sure that the IP is not empty.

  6. Access the default application. This returns the cluster closest to you:

    curl -H "host: store.example.com" http://${EXTERNAL_IP}

    Output:

    { "cluster_name": "gke-east-1", "host_header": "store.example.com", "node_name": "gke-gke-east-1-default-pool-c90e1d34-xzzp.us-east1-b.c.qwiklabs-gcp-03-0533825e9b29.internal", "pod_name": "store-5f5b954888-lqwg6", "pod_name_emoji": "👊", "project_id": "qwiklabs-gcp-03-0533825e9b29", "timestamp": "2022-01-11T15:28:31", "zone": "us-east1-b" }

    If you see the following message: "default backend - 404" or "curl: (52) Empty reply from server", the Gateway is not ready yet. Wait a couple of minutes and try again.

  7. Access the application located in the gke-west-2 cluster:

    curl -H "host: store.example.com" http://${EXTERNAL_IP}/west

    Output:

    { "cluster_name": "gke-west-2", "host_header": "store.example.com", "node_name": "gke-gke-west-2-default-pool-bd902492-stx2.us-west2-a.c.qwiklabs-gcp-03-0533825e9b29.internal", "pod_name": "store-5f5b954888-94rwf", "pod_name_emoji": "🛀🏻", "project_id": "qwiklabs-gcp-03-0533825e9b29", "timestamp": "2022-01-11T15:27:24", "zone": "us-west2-a" }
  8. Access the application located in the gke-east-1 cluster:

    curl -H "host: store.example.com" http://${EXTERNAL_IP}/east

    Output:

    { "cluster_name": "gke-east-1", "host_header": "store.example.com", "node_name": "gke-gke-east-1-default-pool-c90e1d34-xzzp.us-east1-b.c.qwiklabs-gcp-03-0533825e9b29.internal", "pod_name": "store-5f5b954888-lqwg6", "pod_name_emoji": "👊", "project_id": "qwiklabs-gcp-03-0533825e9b29", "timestamp": "2022-01-11T15:27:57", "zone": "us-east1-b" }

Click Check my progress to verify the objective. Deploy the Gateway and HTTPRoutes.

Congratulations!

In this lab, you registered the pre-created GKE clusters to an Anthos Fleet, enabled and configured the Multi-cluster Services (MCS) and Multi-cluster Gateways (MCG) controllers, deployed Gateways and HTTPRoutes in the config cluster, and run a distributed application across multiple clusters with a unique Load Balancer routing the traffic to the right pods.

End your lab

When you have completed your lab, click End Lab. Google Cloud Skills Boost removes the resources you’ve used and cleans the account for you.

You will be given an opportunity to rate the lab experience. Select the applicable number of stars, type a comment, and then click Submit.

The number of stars indicates the following:

  • 1 star = Very dissatisfied
  • 2 stars = Dissatisfied
  • 3 stars = Neutral
  • 4 stars = Satisfied
  • 5 stars = Very satisfied

You can close the dialog box if you don't want to provide feedback.

For feedback, suggestions, or corrections, please use the Support tab.

Copyright 2022 Google LLC All rights reserved. Google and the Google logo are trademarks of Google LLC. All other company and product names may be trademarks of the respective companies with which they are associated.

Before you begin

  1. Labs create a Google Cloud project and resources for a fixed time
  2. Labs have a time limit and no pause feature. If you end the lab, you'll have to restart from the beginning.
  3. On the top left of your screen, click Start lab to begin

Use private browsing

  1. Copy the provided Username and Password for the lab
  2. Click Open console in private mode

Sign in to the Console

  1. Sign in using your lab credentials. Using other credentials might cause errors or incur charges.
  2. Accept the terms, and skip the recovery resource page
  3. Don't click End lab unless you've finished the lab or want to restart it, as it will clear your work and remove the project

This content is not currently available

We will notify you via email when it becomes available

Great!

We will contact you via email if it becomes available

One lab at a time

Confirm to end all existing labs and start this one

Use private browsing to run the lab

Use an Incognito or private browser window to run this lab. This prevents any conflicts between your personal account and the Student account, which may cause extra charges incurred to your personal account.