


Before you begin
- Labs create a Google Cloud project and resources for a fixed time
- Labs have a time limit and no pause feature. If you end the lab, you'll have to restart from the beginning.
- On the top left of your screen, click Start lab to begin
Create a modeled query in Explore
/ 50
Create a Look report using the modeled query
/ 50
Looker provides the ability for LookML developers to build modeled queries that help all Looker business users quickly get started and easily explore data in the platform.
This three-task lab will provide you with practical, hands-on experience using the query parameter to create a modeled query for an Explore. The modeled query is listed in the Quick Start section of a blank Explore. Modeled queries are extremely helpful to Looker business users, since you can specify elements like the dimensions, measures, filters, and pivots that may be the most relevant and insightful. In this lab you will learn how to create a modeled query, which can be a helpful starting point for users who are new to Looker and learning how to query data.
In this lab, you learn how to perform the following tasks:
Read these instructions. Labs are timed and you cannot pause them. The timer, which starts when you click Start Lab, shows how long Google Cloud resources are made available to you.
This hands-on lab lets you do the lab activities yourself in a real cloud environment, not in a simulation or demo environment. It does so by giving you new, temporary credentials that you use to sign in and access Google Cloud for the duration of the lab.
To complete this lab, you need:
When ready, click Start Lab.
The Lab Details pane appears with the temporary credentials that you must use for this lab.
If you need to pay for the lab, a pop-up opens for you to select your payment method.
Notice your lab credentials in the Lab details pane. You use them to sign in to the Looker instance for this lab.
Click Open Looker.
Enter the provided Username and Password in the Email and Password fields.
Username:
Password:
Click Log In.
After a successful login, you see the Looker instance for this lab.
Modeled queries are created from the query parameter in LookML. The modeled analyses are listed in the Quick Start section of a blank Explore, or in the Quick Start pop-up after an Explore has already been run. Quick Start analyses provide a helpful starting point for users to quickly explore the meaningful data and build reports.
The query parameter includes a list of subparameters that you can define in a LookML model. The easiest way to define a query in your model is by building the analysis in an Explore, borrowing the functionality used to generate aggregate_table LookML and then copying the aggregate table LookML to use as a starting point for your modeled analysis LookML.
This lab takes you through the process shown below.
In this task, you will use Looker Explore to create a modeled query with dimensions, measures, and filters to provide a basic-level business insight.
In the Looker navigation menu, click Explore.
Under E-Commerce Training, click Order Items.
Select the fields below:
Under Users>Dimensions, find Country and click the filter icon (
In the Filter pane, set the Users Country filter to is equal to USA.
In the Data pane, click on the column name Users Count to sort in descending order.
Click Run and review the results data.
Click Check my progress to verify the objective.
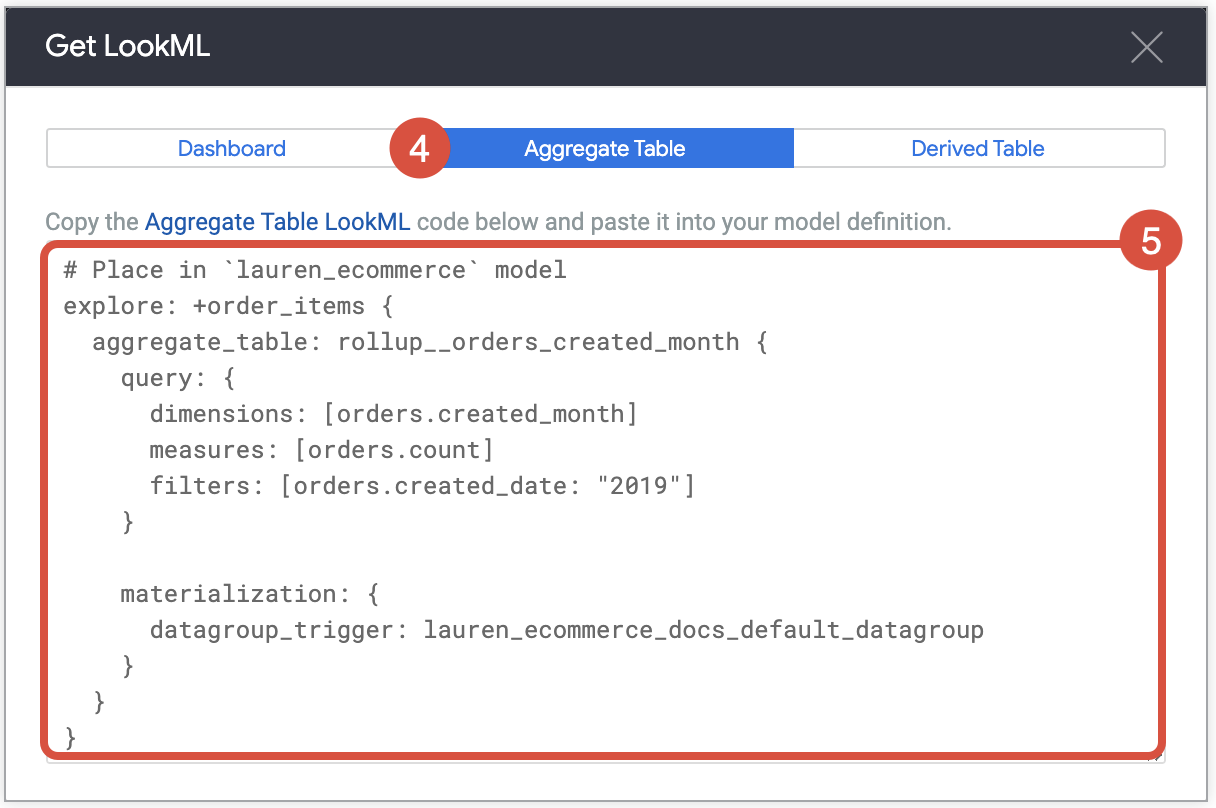
In this task, you will save the modeled query from Explore to LookML.
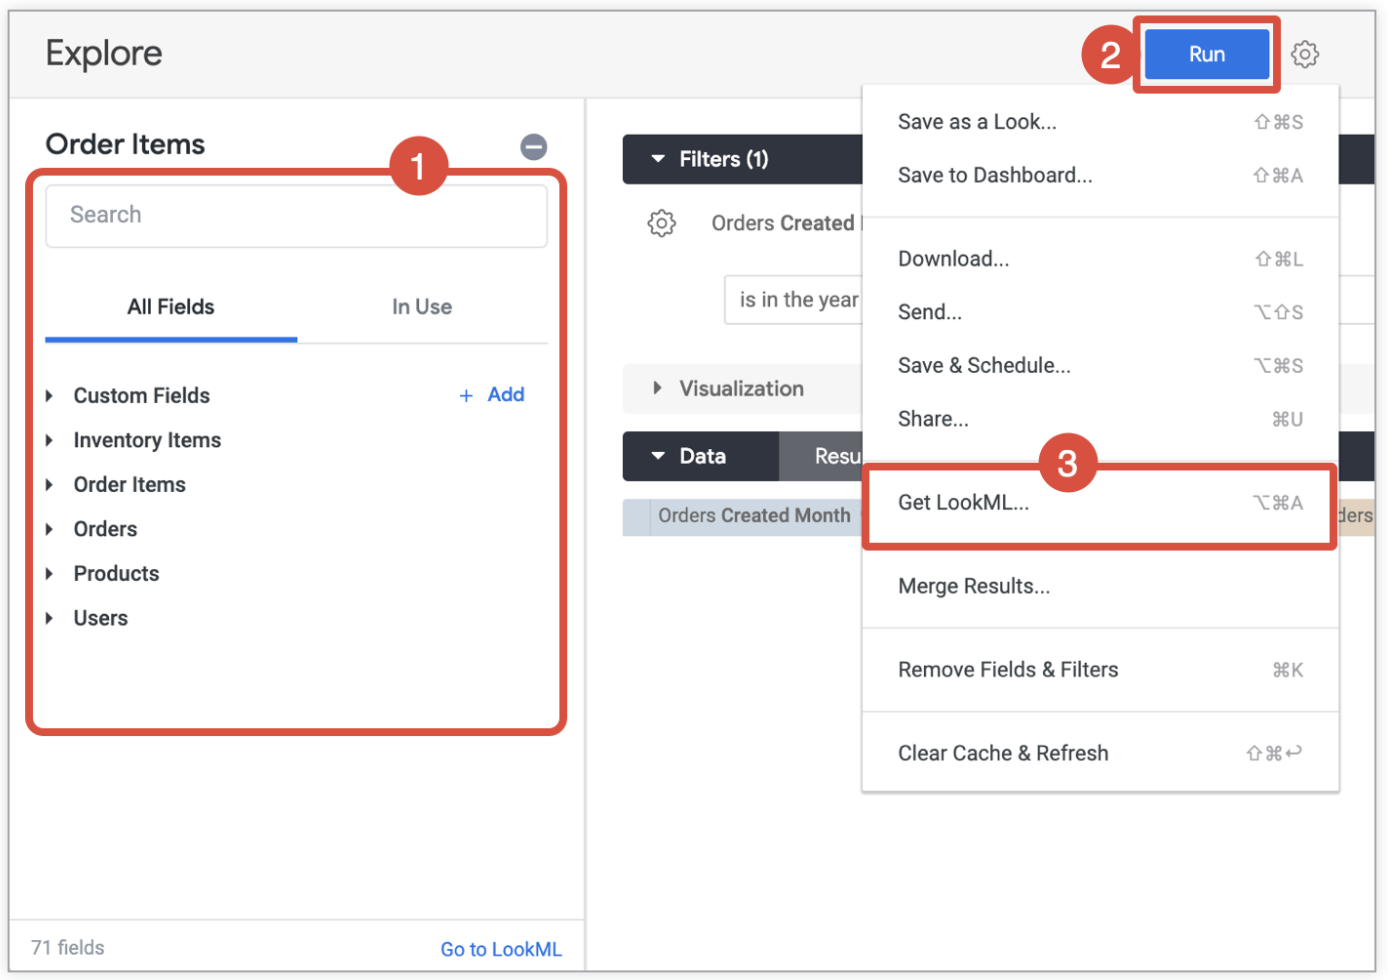
On the Explore page with modeled query, click on Settings (
Click the Aggregate Table tab and copy the LookML code.
Open a new Looker window in a new tab. On the bottom left of the Looker User Interface, click the toggle button to enter Development mode.
On the left side navigation menu of the Looker User Interface, click Develop.
Under Projects, click on qwiklabs-ecommerce.
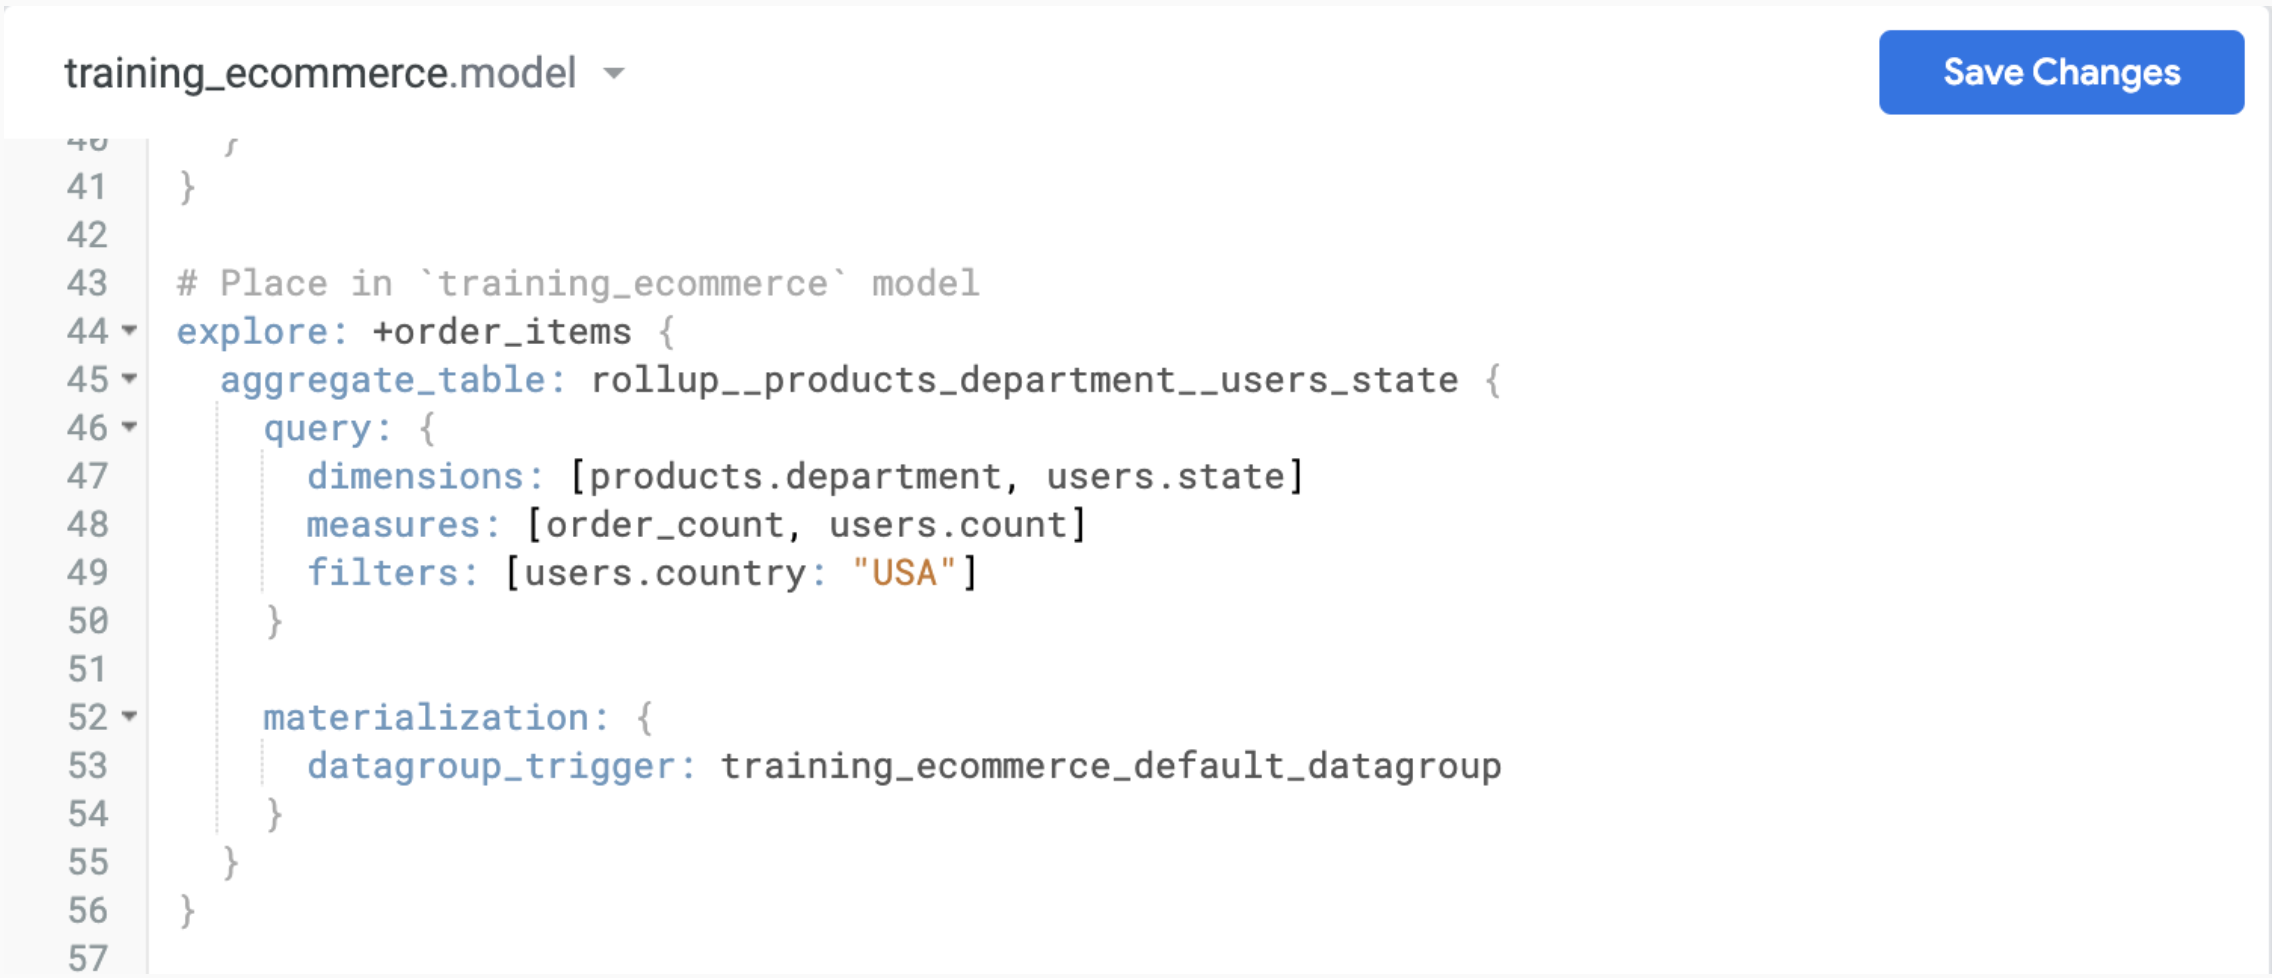
In the training_ecommerce.model file, paste the copied code after explore order_items but before explore events, around row 43.
Remove the line for aggregate_table and the ending closing parenthesis. There will now only be two closing parenthesis at the end of the explore+ definition.
Then, remove the lines for the materialization parameter including datagroup_trigger.
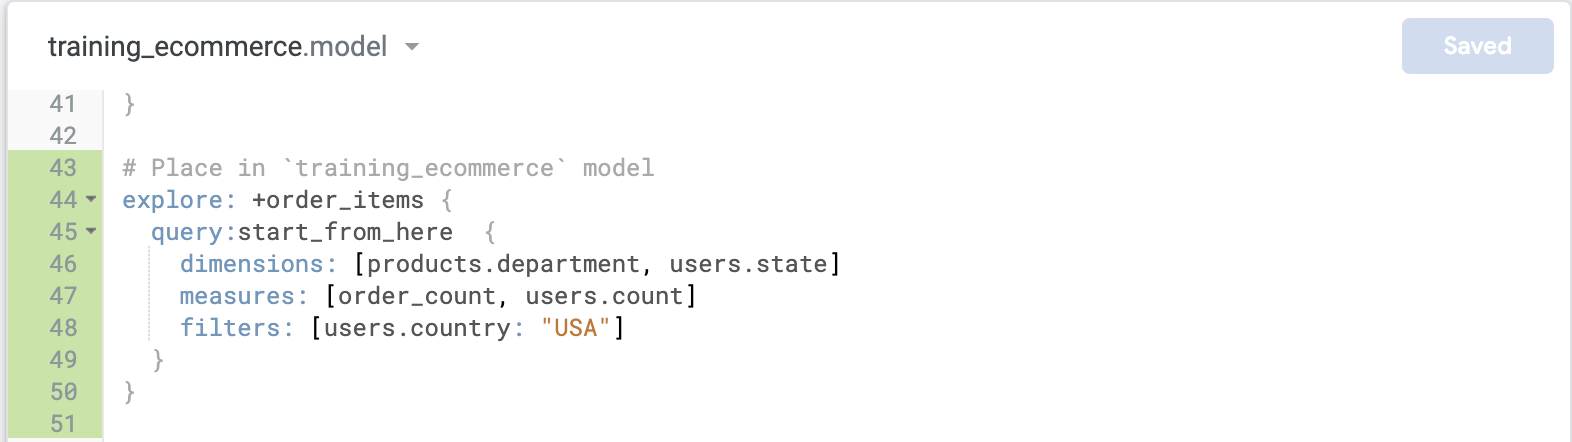
Add a name in the query parameter, start_from_here.
Click Save Changes.
Click Validate LookML
Click Commit Changes & Push.
In the Commit window, add a message to specify the changes you made, and click Commit.
Click Deploy to Production.
In this task, you will build a Look report using the modeled query.
Open a new Looker window in a new tab.
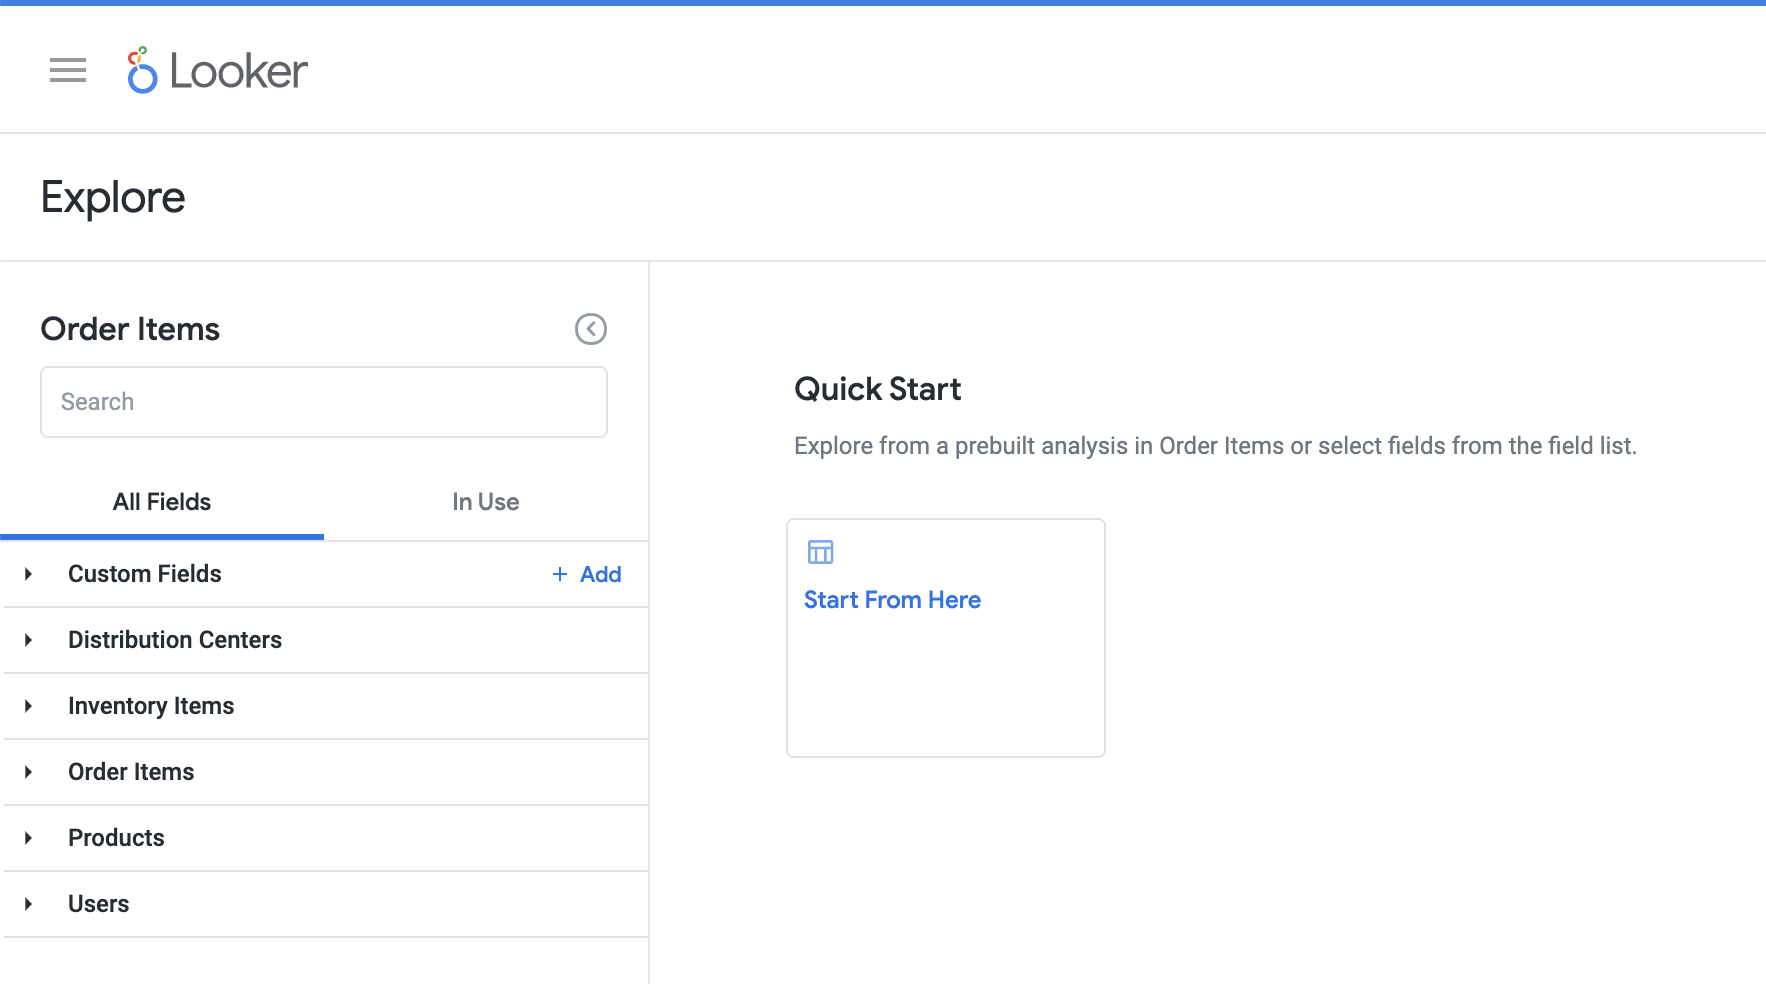
On the left side navigation menu of the Looker User Interface, click Explore> Order Items. Click Start From Here under Quick Start.
In the Data pane, click on the gear icon on column name Products Department and select pivot.
In the Data pane, click on the gear icon on column name Users Count and select Hide from Visualization.
Expand Visualization pane and choose Column chart.
Click on the gear icon (
Click on gear icon (
Enter a title for the Look report, Order Items Count per State. Chose the Shared folder to save the report.
Click Save.
Open a new Looker window in a new tab. Click Shared folders.
Click the Order Items Count per State Look report and review the data and visualization.
Click Check my progress to verify the objective.
In this lab, you learned how to create a modeled query in Explore and save it in LookML where a beginner Looker user can access it in the future.
...helps you make the most of Google Cloud technologies. Our classes include technical skills and best practices to help you get up to speed quickly and continue your learning journey. We offer fundamental to advanced level training, with on-demand, live, and virtual options to suit your busy schedule. Certifications help you validate and prove your skill and expertise in Google Cloud technologies.
Manual Last Updated January 31, 2024
Lab Last Tested August 29, 2023
Copyright 2025 Google LLC. All rights reserved. Google and the Google logo are trademarks of Google LLC. All other company and product names may be trademarks of the respective companies with which they are associated.


This content is not currently available
We will notify you via email when it becomes available

Great!
We will contact you via email if it becomes available

One lab at a time
Confirm to end all existing labs and start this one