


Before you begin
- Labs create a Google Cloud project and resources for a fixed time
- Labs have a time limit and no pause feature. If you end the lab, you'll have to restart from the beginning.
- On the top left of your screen, click Start lab to begin
Add a linked web search to a dimension
/ 25
Use the html parameter to render dimension values as link buttons
/ 25
Use the html parameter to customize formatting of measure values
/ 25
Advanced Linking with Liquid
/ 25
Looker is a modern data platform in Google Cloud that lets you analyze and visualize your data interactively. You can use Looker to do in-depth data analysis, integrate insights across different data sources, build actionable data-driven workflows, and create custom data applications.
In this lab, you will explore common use cases for Liquid and learn how to use it to customize dimensions and measures.
In this lab, you will learn how to:
html parameterFamiliarity with LookML is necessary. Completing the Understanding LookML in Looker course is recommended before you begin this lab.
Read these instructions. Labs are timed and you cannot pause them. The timer, which starts when you click Start Lab, shows how long Google Cloud resources will be made available to you.
This hands-on lab lets you do the lab activities yourself in a real cloud environment, not in a simulation or demo environment. It does so by giving you new, temporary credentials that you use to sign in and access Google Cloud for the duration of the lab.
To complete this lab, you need:
When ready, click 
A new panel will appear with the temporary credentials that you must use for this lab.
If you need to pay for the lab, a pop-up will open for you to select your payment method.
Note your lab credentials in the left pane. You will use them to sign in to the Looker instance for this lab.
Click Open Looker.
Enter the provided Username and Password in the Email and Password fields.
Click Log In.
After a successful login, you will see the Looker instance for this lab.
Liquid is an open source, Ruby-based templating language created by Shopify. You can use it in conjunction with LookML to build more flexible, dynamic code.
There are 3 categories of Liquid code:
{{ first_name }} {{ last_name }}”? A lot of these email templates use Liquid, and if someone had made an error in that template, then those objects might be exposed when your actual first and last name failed to populate.|, and then the name of a supported keyword like append.
You can only use Liquid in certain LookML parameters, as detailed in the Liquid Variable Reference. The Liquid Variable Definitions table in particular is very useful. The Usage column shows which LookML parameters support which variable type. Check it out before you spend half an hour troubleshooting why your flawless Liquid code doesn’t work in an unsupported area!
You may notice filters aren’t mentioned on this page, such as append or concat. You should look up Shopify’s own Liquid documentation to read more about those. Most, if not all, Liquid filters should also work in Looker.
Specifically, there are several places in LookML where Liquid can be used:
action parameter
html parameter
label parameter of a field
link parameter
sql, sql_on, sql_table_name
Basic usage of Liquid variables is straightforward. Once you’ve identified the variable you’d like to use, simply insert it into a valid LookML parameter. The specific Liquid variables that you can use in specific LookML parameters are defined in the Liquid variable definitions documentation.
There are two ways to make use of a Liquid variable:
{{ value }}.{% if value > 10000 %}.In this example of HTML usage, a product ID is being inserted into an <img> tag to generate product images:
In this example of URL usage, an artist name is being inserted into a URL to produce a Google search for that artist.
Liquid variables are usually based on the field where they are being used. However, you can also access values from other fields if needed.
Use the format {{ view_name.field_name._liquid-variable-name }} to access other fields from the same row in the query result. Replace _liquid-variable-name with any of the Looker Liquid variables. Make sure the variable name is preceded by an underscore if it isn’t normally, like these:
{{ view_name.field_name._value }}{{ view_name.field_name._rendered_value }}{{ view_name.field_name._model._name }}This example shows this type of usage to access a website URL from a different field:
Liquid can be used in a wide variety of ways in Looker. Some of the most popular use cases include:
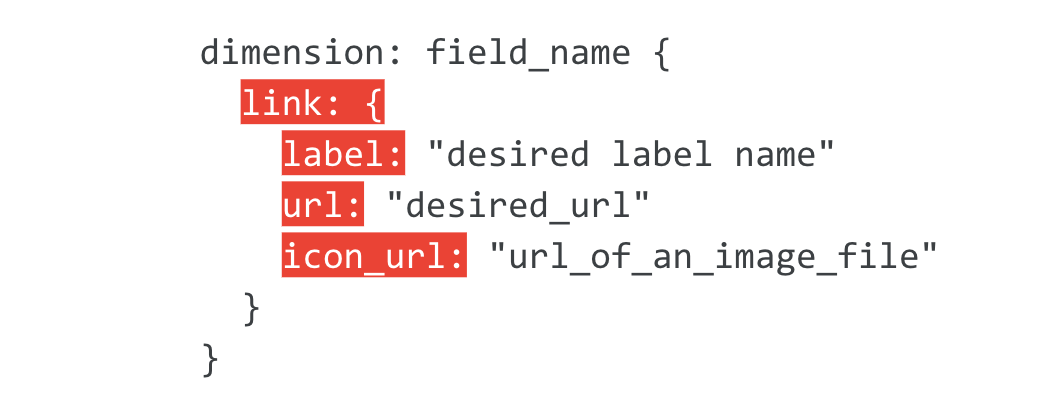
Most links are added to dimensions and measures using the link parameter. The link parameter creates a custom link or drill. This takes 3 sub-parameters:
{{ value }} object. It supports full Liquid (but not full HTML)icon_url parameter is not required if you do not want an icon. If you need corporate logos, try running a Google search with the pattern http://www.google.com/s2/favicons?domain=[company website of interest] to find images in the favicon (.ico) formatTo learn more about the link parameter, refer to the Looker's link Documentation parameter.
In this section, you will add a link to the City dimension in the Users view that allows a user to click on a city in the user interface and link to a Google search for that city.
First, on the bottom left of the Looker User Interface, click the toggle button to enter Development mode.
Click the Develop tab and then select the qwiklabs-ecommerce LookML project. Navigate to the Users view file.
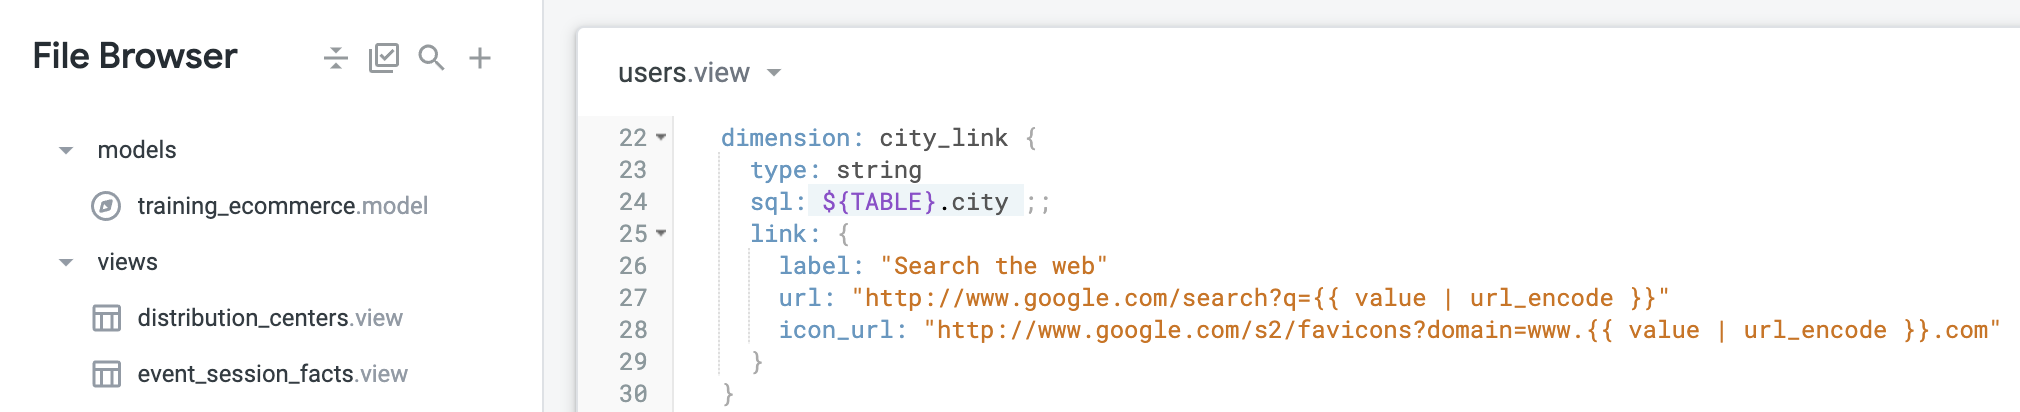
Within the Users view file, find the city dimension:
In the link parameter you just added, the sub-parameters are defined as the following:
label - for the label here you use the string "Search the web" which simply conveys the action being done by clicking the link.url - here you use the city value from the dimension, with the url_encode filter applied to convert any URL-unsafe characters into percent-encoded characters.icon_url - this is the image URL to be used as an icon for the link. The URL used above finds favicon images for the city on the city's website (where applicable).Your new city_link dimension should now resemble the following:
Navigate to the Order Items Explore.
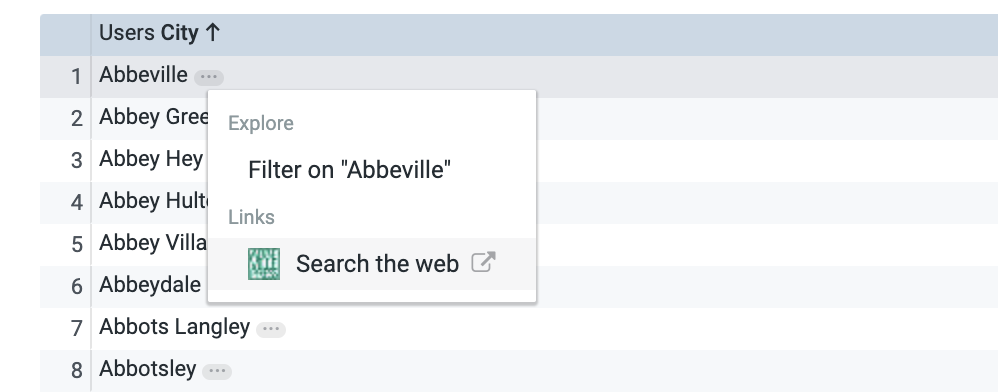
Under the Users view, select the City Link dimension. Click Run.
Click on the three dots next to a City value (e.g. Abbeville).
Select Search the web. Great! You just added your first link to a dimension.
Navigate back to the Users view file.
Click Validate LookML and then click Commit Changes & Push.
Add a commit message and click Commit.
Lastly, click Deploy to Production.
Click Check my progress to verify that you've performed the above task.
Sometimes business users don’t like the three dots produced in the UI by the link parameter, or they have other requirements such as font styling or the way the link should be launched. The html parameter gives you greater flexibility for such cases. Using the html parameter allows for even more customized drilling and linking:
To learn more about the html parameter, refer to Looker's html Documentation
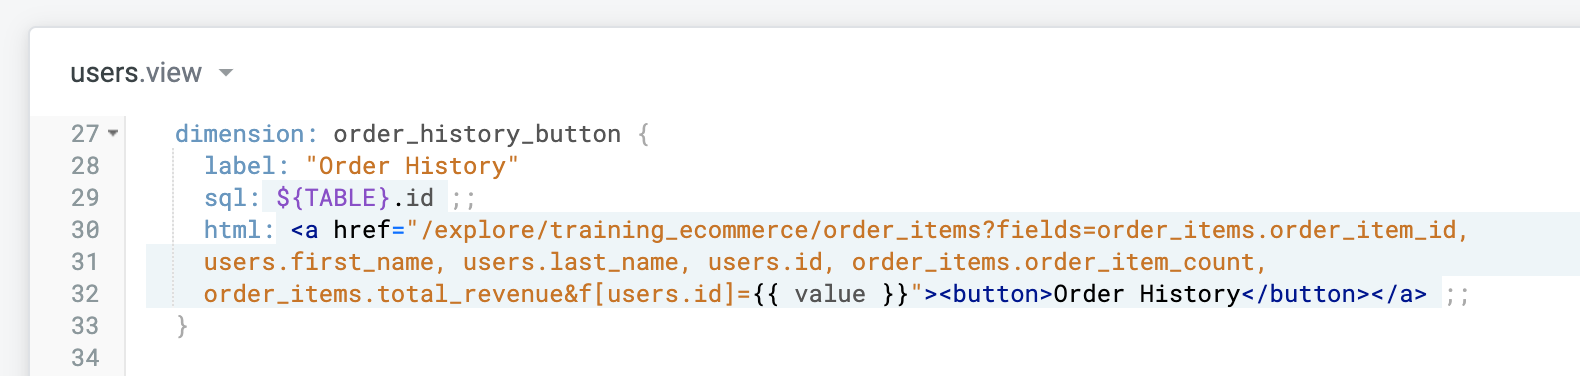
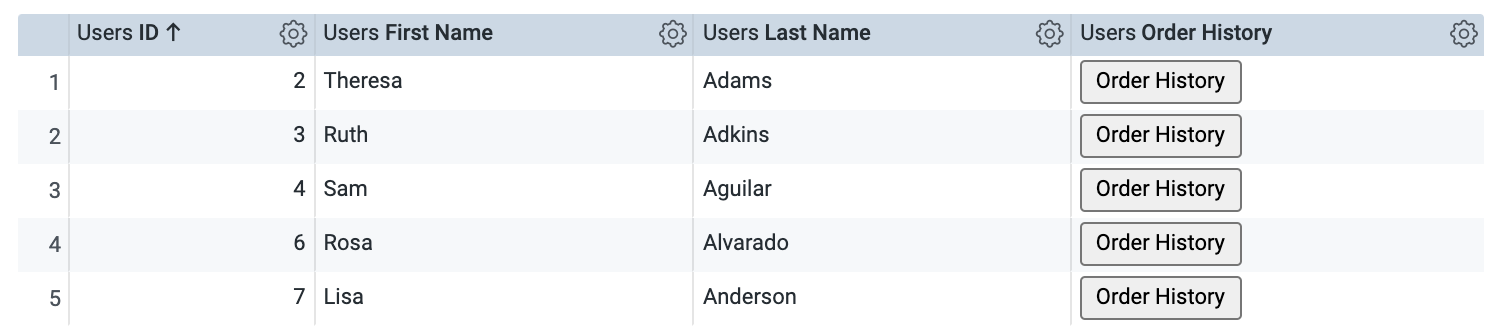
In this section, you will create a new dimension whose values render as linked buttons to a pre-configured Explore of the order history for the selected user ID.
Navigate back to the Users view file.
In the html parameter you just added, the Order History Button dimension’s values are all IDs, but instead of displaying each ID—which may not be meaningful for business users—we display the words “Order History”.
This links to the “Order Items” Explore in the Ecommerce Training model, with specific fields—note how we can use sets to make it easier to list multiple fields—and a filter on the selected User ID. Also, since the html parameter itself doesn’t generate any visual cues that the value contains a hyperlink, you can style it as a button with the <button> tag to make it obviously clickable. For reference: Creating hyperlinked button dimensions.
href parameter value could also be used as a URL value to create a link like in the previous section.
Your file should resemble the following:
Navigate to the Order Items Explore.
From the Users view, select the ID, First Name, Last Name, and Order History dimensions. Click Run.
Right-click on the Order History button for a user and open in a new tab. For example, if you click the button for Sam Aguilar, you can see that they have two past orders. Great! You have created a functional dimension with a linked button as the rendered values.
Navigate back to the Users view.
Click Validate LookML and then click Commit Changes & Push.
Add a commit message and click Commit.
Lastly, click Deploy to Production.
Click Check my progress to verify that you've performed the above task.
In Looker’s table visualization, business users can enable conditional formatting to create heat-maps. However, the feature only provides different fill colors for the table cells. For more flexibility to customize things like font colors or sizes, a LookML developer needs to employ the html parameter. Using this parameter, you can:
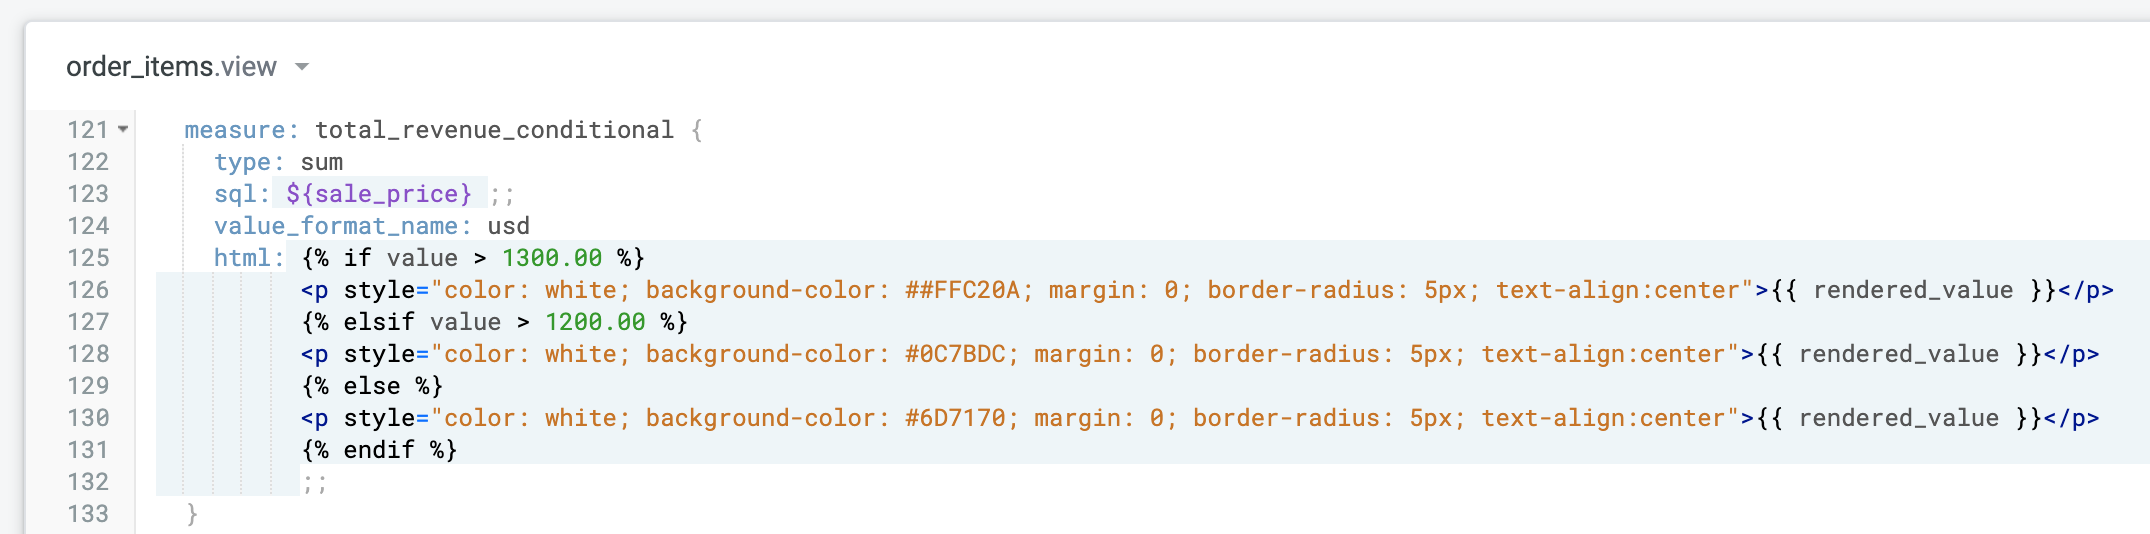
In this section, you will modify an existing measure to customize the formatting of the values based on whether the value is higher or lower than a defined amount.
Click the Develop tab and then select the qwiklabs-ecommerce LookML project. Navigate to the Order Items view file.
Within the Order Items view, find the total_revenue measure.
html parameter:In the html parameter you just added, the formatting of the measure is now customized based on the value. With if-then logic, you have defined the following:
Your file should resemble the following:
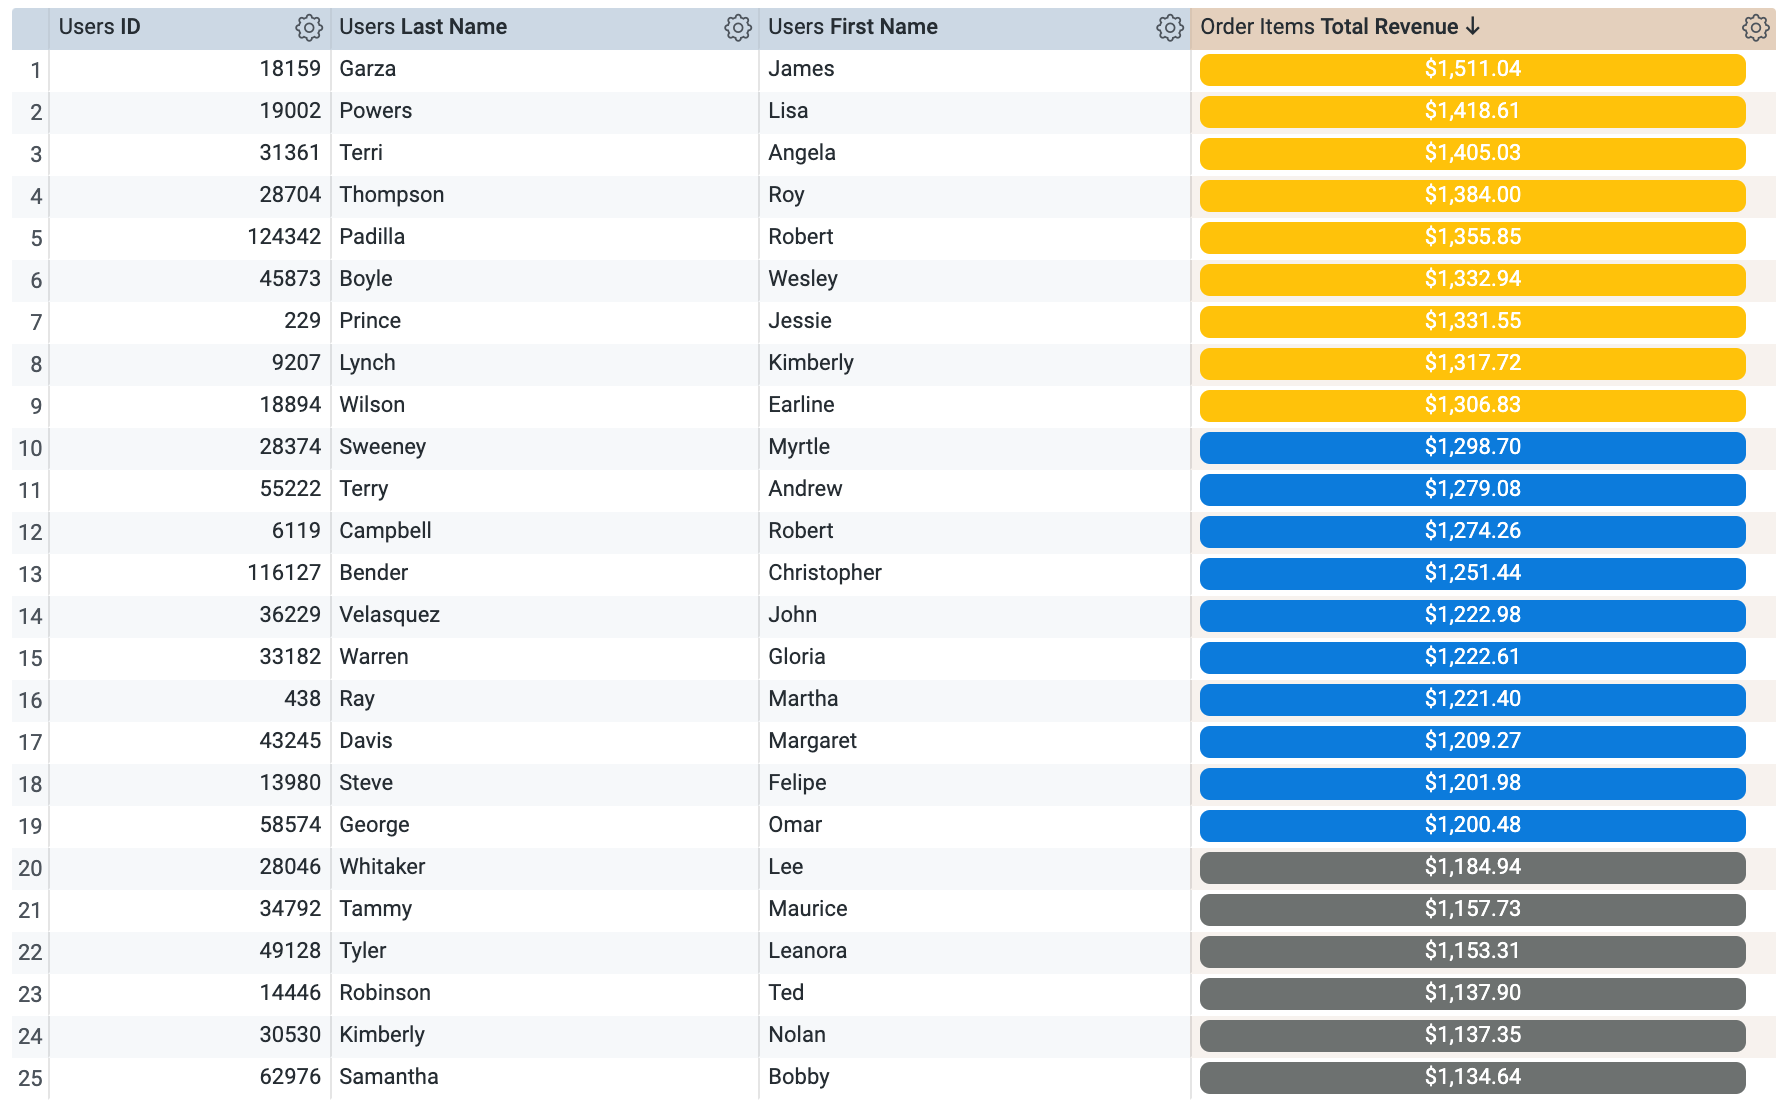
Navigate to the Order Items Explore.
From the Users view, select the ID, First Name, and Last Name. From the Order Items view, select the Total Revenue Conditional. Click Run.
Great! You just used the html parameter on the total revenue measure to color the values based on whether the value was higher or lower than a defined amount.
Click Validate LookML and then click Commit Changes & Push.
Add a commit message and click Commit.
Lastly, click Deploy to Production.
Click Check my progress to verify that you've performed the above task.
For even more advanced use cases that require different links in different Explores, you can use Liquid tags to incorporate conditions into links. In this section, you will add a condition to a link to check the Explore name, which will then send the user to a specific link depending on where they start.
Click the Develop tab and then select the qwiklabs-ecommerce LookML project. Navigate back to the Users view file.
Within the Users view, find the state dimension.
html parameter.This is a more advanced example incorporating Liquid tags for if-then logic. When someone clicks on a value in the State dimension, if they’re currently in the order_items Explore, then they should get redirected to the same Explore with some fields and a filter applied. If they’re in any other Explore that happens to include this view and dimension, then they get sent to the “Users” Explore with some other fields and a filter applied. For reference: Conditional URL Links Depending on Explore.
Navigate to the Order Items Explore.
From the Users view, select the ID, First Name, Last Name, and State Link. Click Run.
Click one of the states, and see how it redirects you to the same Explore with some fields and a filter applied. Try following the same steps from a different Explore that includes the same views and dimensions, and see how the Liquid logic reacts.
Navigate back to the Order Items view.
Click Validate LookML and then click Commit Changes & Push.
Add a commit message and click Commit.
Lastly, click Deploy to Production.
Click Check my progress to verify that you've performed the above task.
In this lab, you used Liquid in Looker to add links to dimensions, used the html parameter to render dimension values as link buttons, customized formatting of measure values, and incorporated conditions into links.
...helps you make the most of Google Cloud technologies. Our classes include technical skills and best practices to help you get up to speed quickly and continue your learning journey. We offer fundamental to advanced level training, with on-demand, live, and virtual options to suit your busy schedule. Certifications help you validate and prove your skill and expertise in Google Cloud technologies.
Manual Last Updated October 30, 2024
Lab Last Tested October 30, 2024
Copyright 2024 Google LLC All rights reserved. Google and the Google logo are trademarks of Google LLC. All other company and product names may be trademarks of the respective companies with which they are associated.


This content is not currently available
We will notify you via email when it becomes available

Great!
We will contact you via email if it becomes available

One lab at a time
Confirm to end all existing labs and start this one