

Before you begin
- Labs create a Google Cloud project and resources for a fixed time
- Labs have a time limit and no pause feature. If you end the lab, you'll have to restart from the beginning.
- On the top left of your screen, click Start lab to begin
Create a global firewall rules
/ 20
Create secure Tags
/ 10
Bind Tags to VMs
/ 10
Migrate the VPC firewall rules to a global network firewall
/ 10
Associate the global network firewall policy with your network
/ 10
Change the policy and rule evaluation order
/ 10
Enable logging of firewall rules
/ 10
Test the global network firewall policy
/ 10
Delete the VPC firewall rules from the network
/ 10
Cloud Next Generation Firewall (Cloud NGFW) is a fully distributed firewall service with advanced protection capabilities, micro-segmentation, and pervasive coverage to protect your Google Cloud workloads from internal and external attacks.
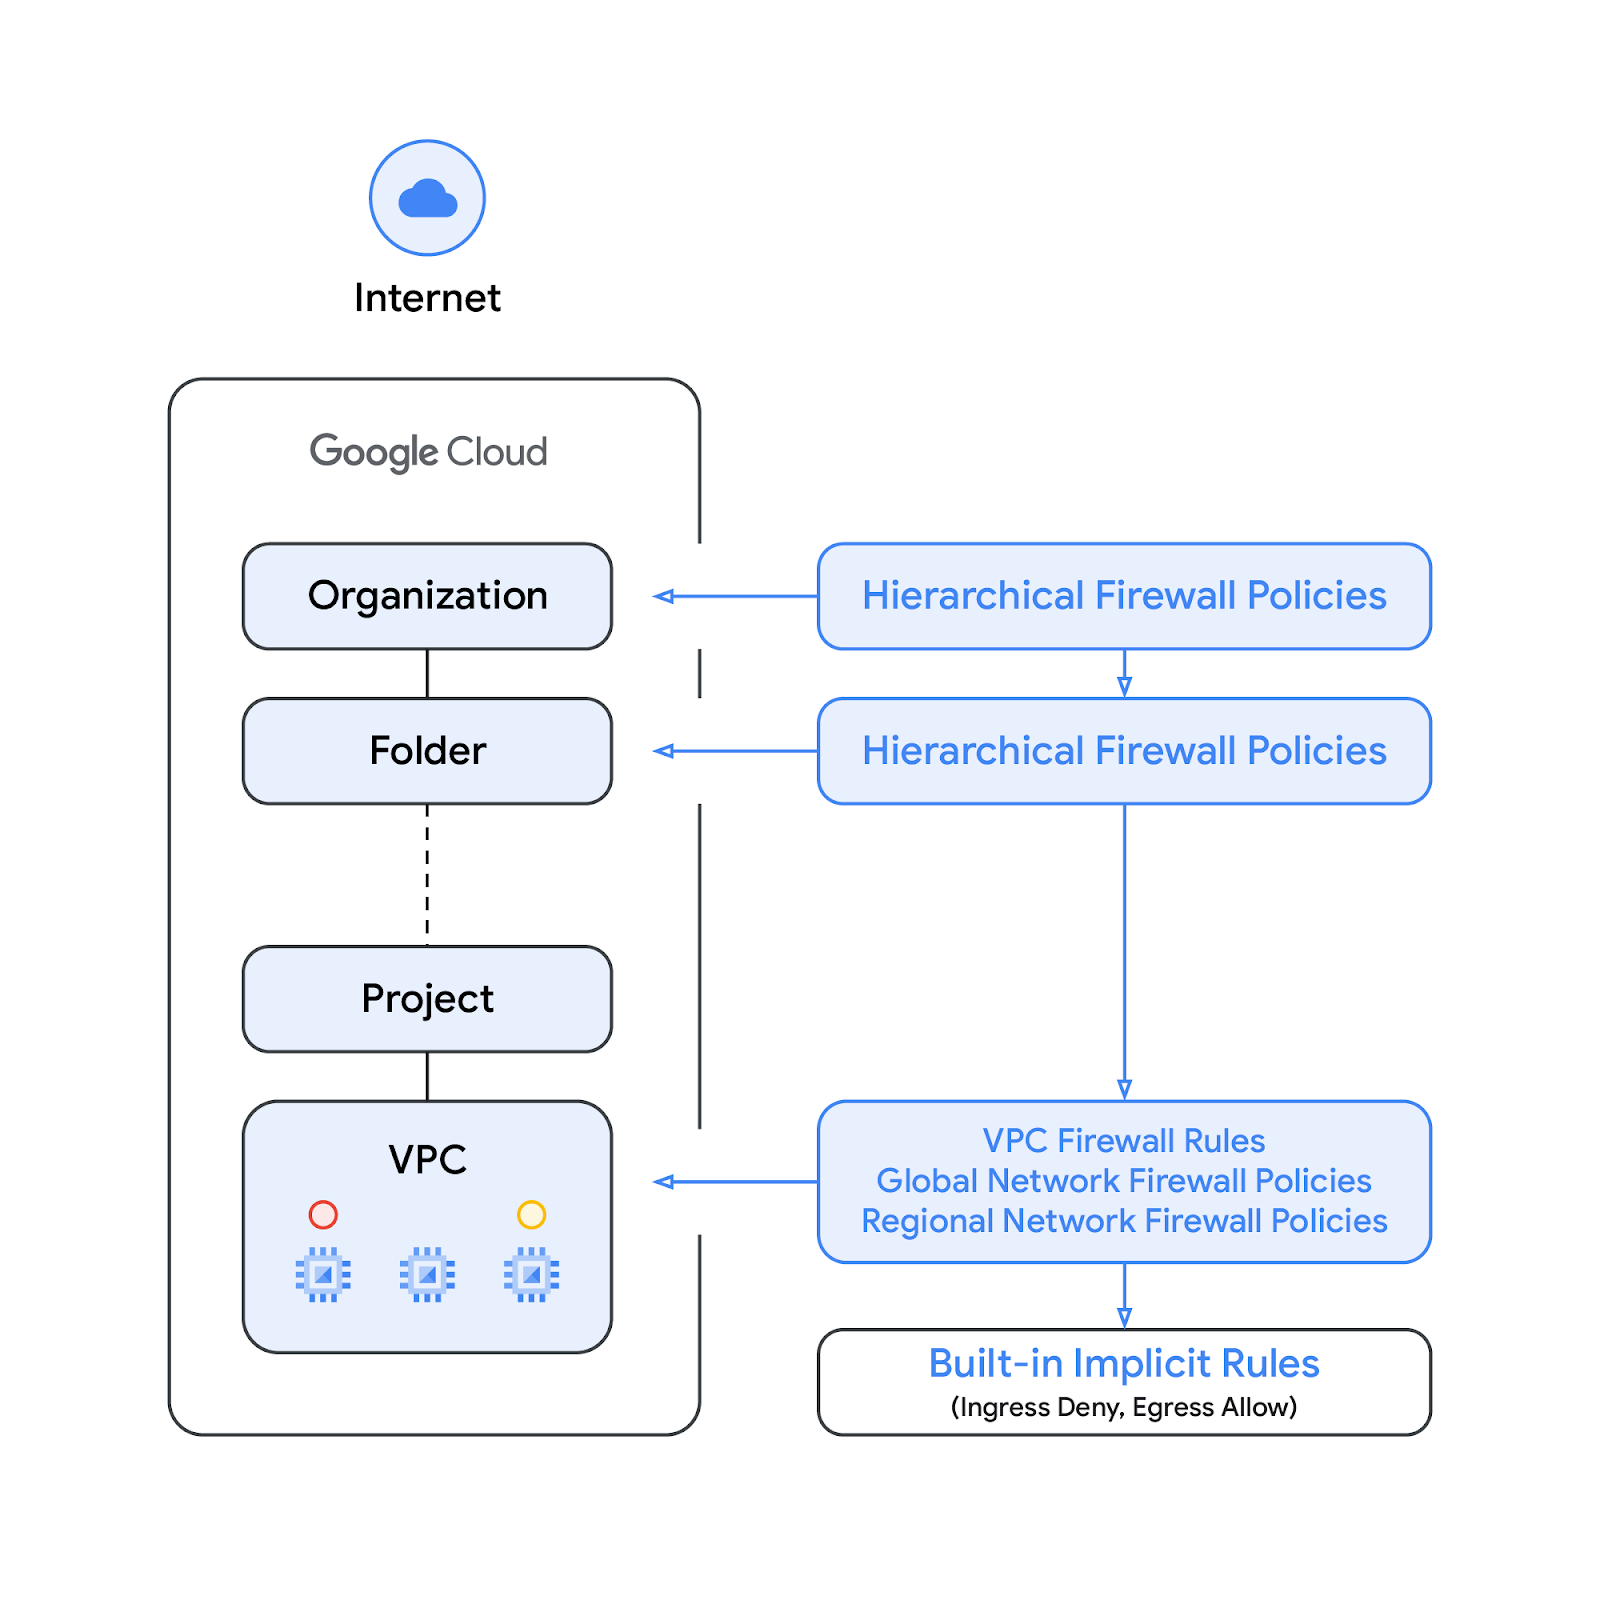
Global network firewall policy acts as a container for firewall rules. Rules defined in a global network firewall policy are not enforced anywhere until the policy is associated with a VPC network. Each VPC network can have one network firewall policy associated with it. Global network firewall policies support IAM-governed Tags (or just Tags) in firewall rules, which replace current network tags and can be used to provide identity to workload.
Sharing a global network firewall policy across networks, and the integration with IAM-governed Tags, greatly simplifies the configuration and management of firewalls. A big difference between VPC firewall rules and global network firewall policies is that VPC firewall rules can be applied only to a single VPC network, whereas network firewall policies can get attached to a single VPC or group of VPCs, amongst other benefits like batch update.
By default, the enforcement sequence is shown in the following diagram:
The enforcement order between the VPC firewall rules and the global network firewall policy can be swapped. You can specify the enforcement order at any time with a compute networks update gcloud command.
The new Tags for firewalls are integrated in network firewall policy rules and are key-value pair resources defined at the organization level of the Google Cloud resource hierarchy. Such a Tag contains an IAM access control, as the name implies, that specifies who can do what on the Tag. IAM permissions, for instance, allow one to specify which principals can assign values to tags and which principals can attach tags to resources. Once a Tag has been applied to a resource, network firewall rules can use it to allow and deny traffic.
Tags adhere to Google Cloud's inheritance resource model, meaning tags and their values are passed down across the hierarchy from their parents. As a result, tags may be created in one place and then used by other folders and projects throughout the resource hierarchy. Visit Tags and conditional access for further details on tags and access restriction.
Tags are than network tags. Network tags are strings, not key values. VPC firewall rules may include network tags, but since they are not regarded as cloud resources, they are not subject to IAM access control.
Although not required, to understand how to create a network and apply firewall rules, take the Create a Custom Network and Apply Firewall Rules lab. For this lab it is presumed that you understand these concepts.
Read these instructions. Labs are timed and you cannot pause them. The timer, which starts when you click Start Lab, shows how long Google Cloud resources are made available to you.
This hands-on lab lets you do the lab activities in a real cloud environment, not in a simulation or demo environment. It does so by giving you new, temporary credentials you use to sign in and access Google Cloud for the duration of the lab.
To complete this lab, you need:
Click the Start Lab button. If you need to pay for the lab, a dialog opens for you to select your payment method. On the left is the Lab Details pane with the following:
Click Open Google Cloud console (or right-click and select Open Link in Incognito Window if you are running the Chrome browser).
The lab spins up resources, and then opens another tab that shows the Sign in page.
Tip: Arrange the tabs in separate windows, side-by-side.
If necessary, copy the Username below and paste it into the Sign in dialog.
You can also find the Username in the Lab Details pane.
Click Next.
Copy the Password below and paste it into the Welcome dialog.
You can also find the Password in the Lab Details pane.
Click Next.
Click through the subsequent pages:
After a few moments, the Google Cloud console opens in this tab.

Cloud Shell is a virtual machine that is loaded with development tools. It offers a persistent 5GB home directory and runs on the Google Cloud. Cloud Shell provides command-line access to your Google Cloud resources.
Click Activate Cloud Shell 
Click through the following windows:
When you are connected, you are already authenticated, and the project is set to your Project_ID,
gcloud is the command-line tool for Google Cloud. It comes pre-installed on Cloud Shell and supports tab-completion.
Output:
Output:
gcloud, in Google Cloud, refer to the gcloud CLI overview guide.
Certain Compute Engine resources live in regions and zones. A region is a specific geographical location where you can run your resources. Each region has one or more zones.
gcloud commands in Cloud Shell to set the default region for your lab:gcloud commands in Cloud Shell to set the default zone for your lab:You may get a warning setting the Region and Zone. This can be ignored.
Identify the number of existing VPC firewall rules in your network
In the console, from the Navigation menu, select VPC Network and review the networks available for this lab.
Open each network and note the firewall rules.
Make a note of the priorities associated with each VPC firewall rule.
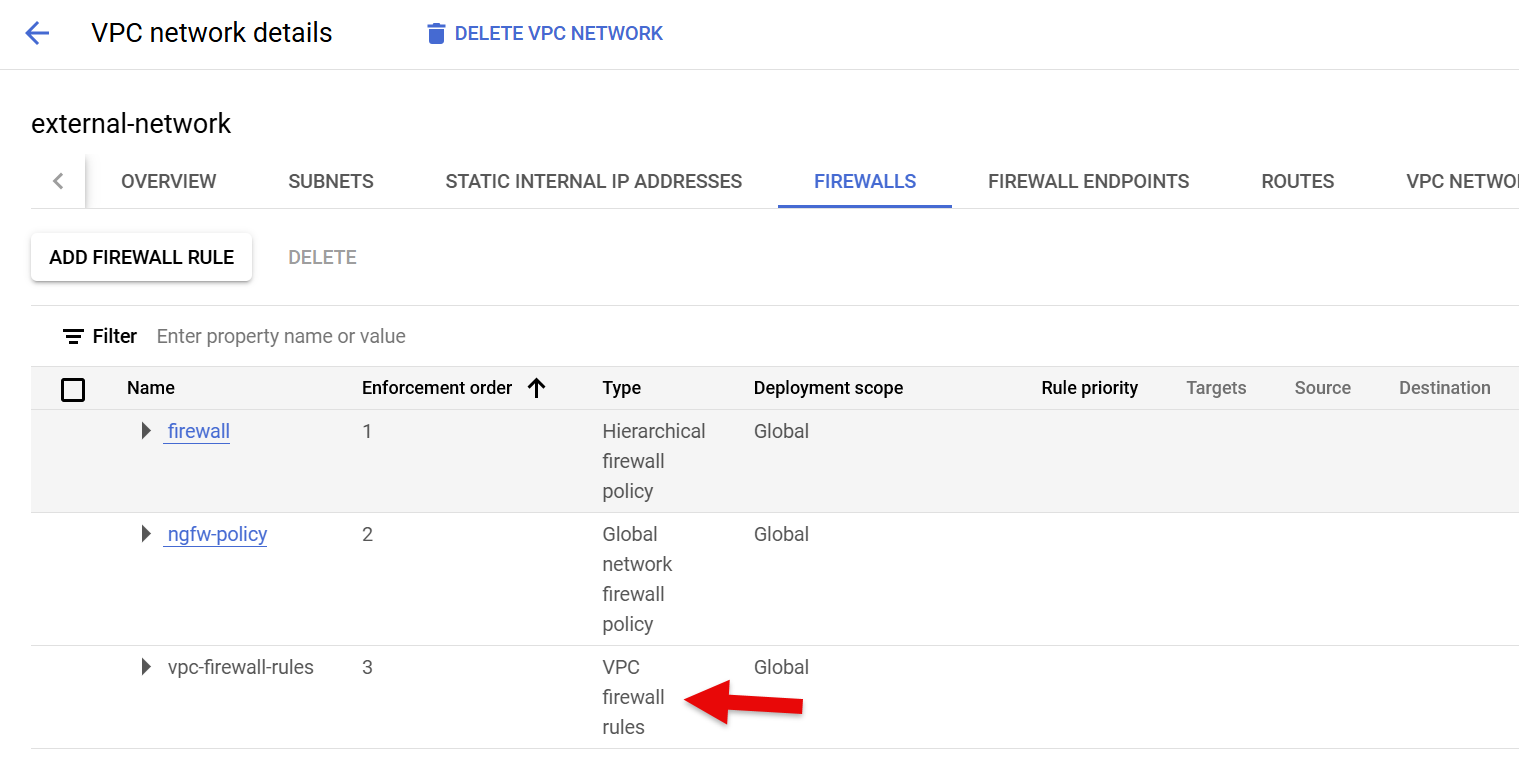
You will be able to see the tags that your firewall rules have in the console. Go to VPC Networks then click on the external-network. Click on the Firewalls tab, then expand vpc-firewall-rules to see the firewall rules and their network tags. You may need to expand each row by clicking the arrow on the row's right side.
In Cloud Shell, run the following command to see the firewall rules for the external-netowrk:
Global network firewall policy rules must be created in a global network firewall policy. The rules are not active until you associate the policy that contains those rules with a VPC network.
Each global network firewall policy rule can include either IPv4 or IPv6 ranges, but not both.
Click Check my progress to verify the objective.
Next you will create a JSON file to save the details of the existing network tags .
To export the network tags in your network to a mapping JSON file, use the compute firewall-rules migrate command with the --export-tag-mapping flag.
Replace the following:
NETWORK_NAME: the name of your VPC network containing the VPC firewall rules that you want to migrate. For this lab use external-network.
TAG_MAPPING_FILE: create a name for the JSON mapping file.
Based on the network tags listed in the mapping file, create the corresponding secure Tags in your network.
The new secure Tags serve as a replacement to the network tags and preserve the original network configuration after migration.
Together, they form a key-value pair that provides a flexible and powerful way to manage your Google Cloud resource.
Replace the following:
vpc-tags.external-network.ssh, external and web.--purpose field must be set to GCE_FIREWALL. Each of these secure Tags must have a single target VPC network and the Tags can only be associated with the network interfaces in that VPC network.
Click Check my progress to verify the objective.
After creating IAM-governed secure Tags for each network tag used by your VPC firewall rules, map the Tags to the corresponding network tags in the mapping JSON file.
The output of the previous command will give you the numeric value of the TAG_VALUE.
Based on the tag mapping JSON file, bind the newly created secure Tag to the VMs to which the existing network tags are attached:
compute firewall-rules migrate command with the --bind-tags-to-instances flag.Replace the following:
NETWORK_NAME: the name of your VPC network.
TAG_MAPPING_FILE: the name of the mapping JSON file.
--bind-tags-to-instances flag binds the secure Tags to only running VMs. In addition, if VMs in your network are created using instance templates or if the VMs are a part of a Google Kubernetes Engine (GKE) cluster, you must manually bind the secure Tags.
Click Check my progress to verify the objective.
gcloud beta compute firewall-rules migrate command.Replace the following:
NETWORK_NAME: the name of your VPC network containing the firewall rules that you want to migrate. Replace this with external-network.
POLICY_NAME: the name of the global network firewall policy to create during migration.
--exclusion-patterns-file flag, but that is not covered in this lab.
Click Check my progress to verify the objective.
Before you associate the newly created global policy to a VPC network, review the policy to ensure that the migration process has completed accurately.
Verify whether the secure Tags are attached to the correct VM. Use the resource-manager tags bindings list command.
The migration tool creates the global network firewall policy based on the existing VPC firewall rules. You must manually associate the policy with the required VPC network to activate the policy rules for any VMs within that network. To associate the global network firewall policy, use the compute network-firewall-policies associations create command.
external-network, then click Associate.After it's associated, the policy's rules become active for VMs in the associated network.
Click Check my progress to verify the objective.
By default, Cloud Next Generation Firewall evaluates the VPC firewall rules before it evaluates a global network firewall policy. To make sure that global network firewall policies take precedence over VPC firewall rules, use the compute networks update command to change the rule evaluation order.
compute networks get-effective-firewalls command.In the output of the preceding command, if TYPE: network-firewall-policy is displayed before TYPE: network-firewall, then the global network firewall policy is evaluated first.
Click Check my progress to verify the objective.
Firewall Rules Logging lets you audit, verify, and analyze the effects of your firewall rules. For example, you can determine if a firewall rule designed to deny traffic is functioning as intended. Firewall Rules Logging is also useful if you need to determine how many connections are affected by a given firewall rule.
Logging helps you to determine whether a firewall rule is functioning as intended. The migration tool retains the logging status of the existing VPC firewall rules when it creates the new global network firewall policy. To enable logging for firewall policy rules, use the compute network-firewall-policies rules update command, and add in a priority order to ensure the globally policy takes precidence over legacy VPC firewall rules.
Replace the following:
POLICY_NAME: The name of the global network firewall policy whose rule you want to update.
To verify the firewall policy is attached to the network, return to VPC network in the Cloud console, and click on the external-network > Firewalls.
Click Check my progress to verify the objective.
Continued monitoring of hit counts reveals the gradual shift towards the new rules, with the legacy rules eventually receiving zero hits. At this point you should be able to disable the old rules, validate possible negative impacts, then delete the old legacy VPC firewall rules.
Now test your network-level access! if you're on the "approved" external networks, you're in. If not, you're blocked.
Send some traffic to the network that has the global firewall rule. You need to get the external IP address of VMs that are in your VPC Network.
external-server.Now move to Logs Explorer to see the results.
Check the logs
In the console, go to the Logs Explorer page.
OPTIONAL - Check connectivity
For this test you'll use the Network Intelligence Center.
external-server.internal-server-1.You'll see that the test is unsuccessful - there is no firewall rule policy to allow tcp traffic to the internal-server-1.
Now repeat the test, switching the direction. Add the internal-server-1 IP as the Source IP and the external-server as the Destination.
Click Check my progress to verify the objective.
It is recommended that you disable the VPC firewall rules first before entirely deleting them. You can revert to those rules if the global network firewall policy created by the migration tool fails to provide the expected results. For this lab, move directly to removing the VPC firewall rules now that they are migrated to the global firewall policy.
Be sure to use the individual firewall rule names.
compute firewall-rules update command.Replace RULE_NAME with the name of the VPC firewall rule to be disabled.
compute firewall-rules delete command.Optional: Delete firewall rules in the console.
external-network, then click on the Firewalls tab.Click Check my progress to verify the objective.
You have learned how to migrate a VPC firewall rule with tags to a global firewall policy, applied it to 2 networks, verified that it is working, and disabled the legacy firewall rules in preparation of deleting them.
...helps you make the most of Google Cloud technologies. Our classes include technical skills and best practices to help you get up to speed quickly and continue your learning journey. We offer fundamental to advanced level training, with on-demand, live, and virtual options to suit your busy schedule. Certifications help you validate and prove your skill and expertise in Google Cloud technologies.
Manual last updated April 03, 2025
Lab last tested April 03, 2025
Copyright 2025 Google LLC. All rights reserved. Google and the Google logo are trademarks of Google LLC. All other company and product names may be trademarks of the respective companies with which they are associated.


This content is not currently available
We will notify you via email when it becomes available

Great!
We will contact you via email if it becomes available

One lab at a time
Confirm to end all existing labs and start this one