


Before you begin
- Labs create a Google Cloud project and resources for a fixed time
- Labs have a time limit and no pause feature. If you end the lab, you'll have to restart from the beginning.
- On the top left of your screen, click Start lab to begin
Explore transfers between parent, sub-agent, and peer agents
/ 25
Use session state to store and retrieve specific information
/ 25
Begin building a multi-agent system with a SequentialAgent
/ 25
Add a LoopAgent for iterative work
/ 25
This lab covers orchestrating multi-agent systems within the Google Agent Development Kit (Google ADK).
This lab assumes that you are familiar with the basics of ADK and tool use as covered in the labs:
In this lab, you will learn about multi-agent systems using the Agent Development Kit.
After this lab, you will be able to:
Read these instructions. Labs are timed and you cannot pause them. The timer, which starts when you click Start Lab, shows how long Google Cloud resources will be made available to you.
This Qwiklabs hands-on lab lets you do the lab activities yourself in a real cloud environment, not in a simulation or demo environment. It does so by giving you new, temporary credentials that you use to sign in and access Google Cloud for the duration of the lab.
To complete this lab, you need:
Note: If you already have your own personal Google Cloud account or project, do not use it for this lab.
Note: If you are using a Pixelbook, open an Incognito window to run this lab.
Click the Start Lab button. If you need to pay for the lab, a dialog opens for you to select your payment method. On the left is the Lab Details pane with the following:
Click Open Google Cloud console (or right-click and select Open Link in Incognito Window if you are running the Chrome browser).
The lab spins up resources, and then opens another tab that shows the Sign in page.
Tip: Arrange the tabs in separate windows, side-by-side.
If necessary, copy the Username below and paste it into the Sign in dialog.
You can also find the Username in the Lab Details pane.
Click Next.
Copy the Password below and paste it into the Welcome dialog.
You can also find the Password in the Lab Details pane.
Click Next.
Click through the subsequent pages:
After a few moments, the Google Cloud console opens in this tab.

The Agent Development Kit empowers developers to get more reliable, sophisticated, multi-step behaviors from generative models. Instead of writing long, complex prompts that may not deliver results reliably, you can construct a flow of multiple, simple agents that can collaborate on complex problems by dividing tasks and responsibilities.
This architectural approach offers several key advantages such as:
In Agent Development Kit, you organize your agents in a tree-like structure. This helps limit the options for transfers for each agent in the tree, making it easier to control and predict the possible routes the conversation can take through the tree. Benefits of the hierarchical structure include:
The structure always begins with the agent defined in the root_agent variable (although it may have a different user-facing name to identify itself). The root_agent may act as a parent to one or more sub-agents. Each sub-agent agent may have its own sub-agents.
With your Google Cloud console window selected, open Cloud Shell by pressing the G key and then the S key on your keyboard. Alternatively, you can click the Activate Cloud Shell button (
Click Continue.
When prompted to authorize Cloud Shell, click Authorize.
In the upper right corner of the Cloud Shell Terminal panel, click the Open in new window button 
In the Cloud Shell Terminal, enter the following to open the Cloud Shell Editor to your home directory:
Paste the following commands into the Cloud Shell Terminal to copy code files from a Cloud Storage bucket for this lab:
Update your PATH environment variable, install ADK, and install additional lab requirements by running the following commands in the Cloud Shell Terminal.
The conversation always begins with the agent defined as the root_agent variable.
The default behavior of a parent agent is to understand the description of each sub-agent and determine if control of the conversation should be transferred to a sub-agent at any point.
You can help guide those transfers in the parent's instruction by referring to the sub-agents by name (the values of their name parameter, not their variable names). Try an example:
In the Cloud Shell Terminal, run the following to create a .env file to authenticate the agent in the parent_and_subagents directory.
Run the following command to copy that .env file to the workflow_agents directory, which you will use later in the lab:
In the Cloud Shell Editor file explorer pane, navigate to the adk_multiagent_systems/parent_and_subagents directory.
Click on the agent.py file to open it.
Notice that there are three agents here:
steering (its name is used to identify it in ADK's dev UI and command line interfaces). It asks the user a question (if they know where they'd like to travel or if they need some help deciding), and the user's response to that question will help this steering agent know which of its two sub-agents to steer the conversation towards. Notice that it only has a simple instruction that does not mention the sub-agents, but it is aware of its sub-agents' descriptions.Make travel_brainstormer and attractions_planner sub-agents of the root_agent by adding the following line to the creation of the root_agent:
Save the file.
Note that you don't add a corresponding parent parameter to the sub-agents. The hierarchical tree is defined only by specifying sub_agents when creating parent agents.
In the Cloud Shell Terminal, run the following to use the ADK command line interface to chat with your agent:
When you are presented the [user]: prompt, greet the agent with:
Example output (yours may be a little different):
Tell the agent:
Example output (yours may be a little different):
Notice from the name [travel_brainstormer] in brackets in the response that the root_agent (named [steering]) has transferred the conversation to the appropriate sub-agent based on that sub-agent's description alone.
At the user: prompt, enter exit to end the conversation.
You can also provide your agent more detailed instructions about when to transfer to a sub-agent as part of its instructions. In the agent.py file, add the following lines to the root_agent's instruction:
Save the file.
In the Cloud Shell Terminal, run the following to start the command line interface again:
Greet the agent with:
Reply to the agent's greeting with:
Example output (yours may be a little different):
Notice that you have been transferred to the other sub-agent, attractions_planner.
Reply with:
Example output (yours may be a little different):
Notice you have been transferred to the travel_brainstormer agent, which is a peer agent to the attractions_planner. This is allowed by default. If you wanted to prevent transfers to peers, you could have set the disallow_transfer_to_peers parameter to True on the attractions_planner agent.
At the user prompt, type exit to end the session.
If you are interested in an agent that guides a user through a process step-by-step, one useful pattern can be to make the first step the root_agent with the second step agent its only sub-agent, and continue with each additional step being the only sub-agent of the previous step's agent.
Click Check my progress to verify the objective.
Each conversation in ADK is contained within a Session that all agents involved in the conversation can access. A session includes the conversation history, which agents read as part of the context used to generate a response. The session also includes a session state dictionary that you can use to take greater control over the most important pieces of information you would like to highlight and how they are accessed.
This can be particularly helpful to pass information between agents or to maintain a simple data structure, like a list of tasks, over the course of a conversation with a user.
To explore adding to and reading from state:
Return to the file adk_multiagent_systems/parent_and_subagents/agent.py
Paste the following function definition after the # Tools header:
In this code, notice:
ToolContext. All you need to do is assign a parameter to receive it, as you see here with the parameter named tool_context. You can then use tool_context to access session information like conversation history (through tool_context.events) and the session state dictionary (through tool_context.state). When the tool_context.state dictionary is modified by your tool function, those changes will be reflected in the session's state after the tool finishes its execution.Add the tool to the attractions_planner agent by adding the tools parameter when the agent is created:
Add the following bullet points to the attractions_planner agent's existing instruction:
Notice the section in curly braces: { attractions? }. This ADK feature, key templating, loads the value of the attractions key from the state dictionary. The question mark after the attractions key prevents this from erroring if the field is not yet present.
You will now run the agent from the web interface, which provides a tab for you to see the changes being made to the session state. Launch the Agent Development Kit Web UI with the following command:
Output
To view the web interface in a new tab, click the http://127.0.0.1:8000 link in the Terminal output.
A new browser tab will open with the ADK Dev UI.
From the Select an agent dropdown on the left, select the parent_and_subagents agent from the dropdown.
Start the conversation with: hello
After the agent greets you, reply with:
You should be transferred to the attractions_planner and be provided a list of attractions.
Choose an attraction, for example:
You should receive an acknowledgement in the response, like: Okay, I've saved The Sphinx to your list. Here are some other attractions...
Click the response tool box (marked with a check mark) to view the event created from the tool's response. Notice that it includes an actions field which includes state_delta describing the changes to the state.
You should be prompted by the agent to select more attractions. Reply to the agent by naming one of the options it has presented.
On the left-hand navigation menu, click the "X" to exit the focus on the event you inspected earlier.
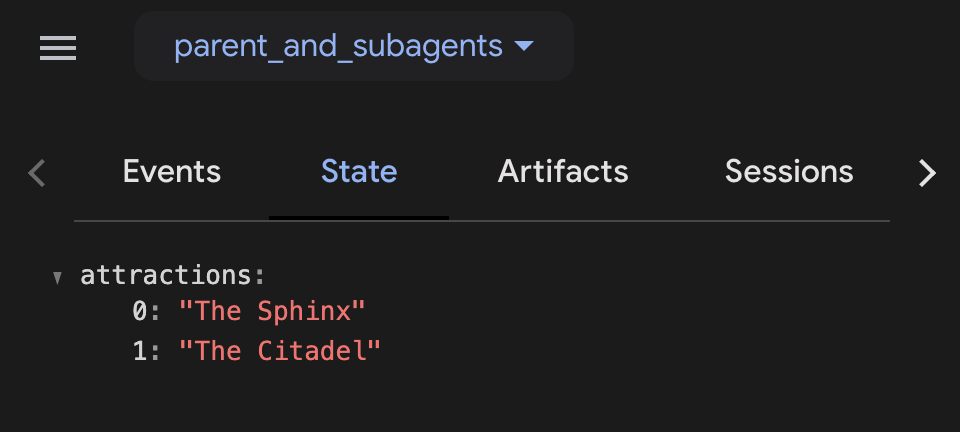
Now in the sidebar, you should see the list of events and a few tab options. Select the State tab. Here you can view the current state, including your attractions array with the two values you have requested.
Send this message to the agent:
It should return your list formatted as a bulleted list according to its instruction.
When you are finished experimenting with the agent, close the web browser tab and press CTRL + C in the Cloud Shell Terminal to stop the server.
Later in this lab, you will demonstrate how to use state to communicate between agents.
Click Check my progress to verify the objective.
output_key parameter when you define the agent, and its entire output will be stored in the state dictionary under that field name.
Parent to sub-agent transfers are ideal when you have multiple specialist sub-agents, and you want the user to interact with each of them.
However, if you would like agents to act one-after-another without waiting for a turn from the user, you can use workflow agents. Some example scenarios when you might use workflow agents include when you would like your agents to:
To accomplish these kinds of tasks, workflow agents have sub-agents and guarantee that each of their sub-agents acts. Agent Development Kit provides three built-in workflow agents and the opportunity to define your own:
SequentialAgentLoopAgentParallelAgentThroughout the rest of this lab, you will build a multi-agent system that uses multiple LLM agents, workflow agents, and tools to help control the flow of the agent.
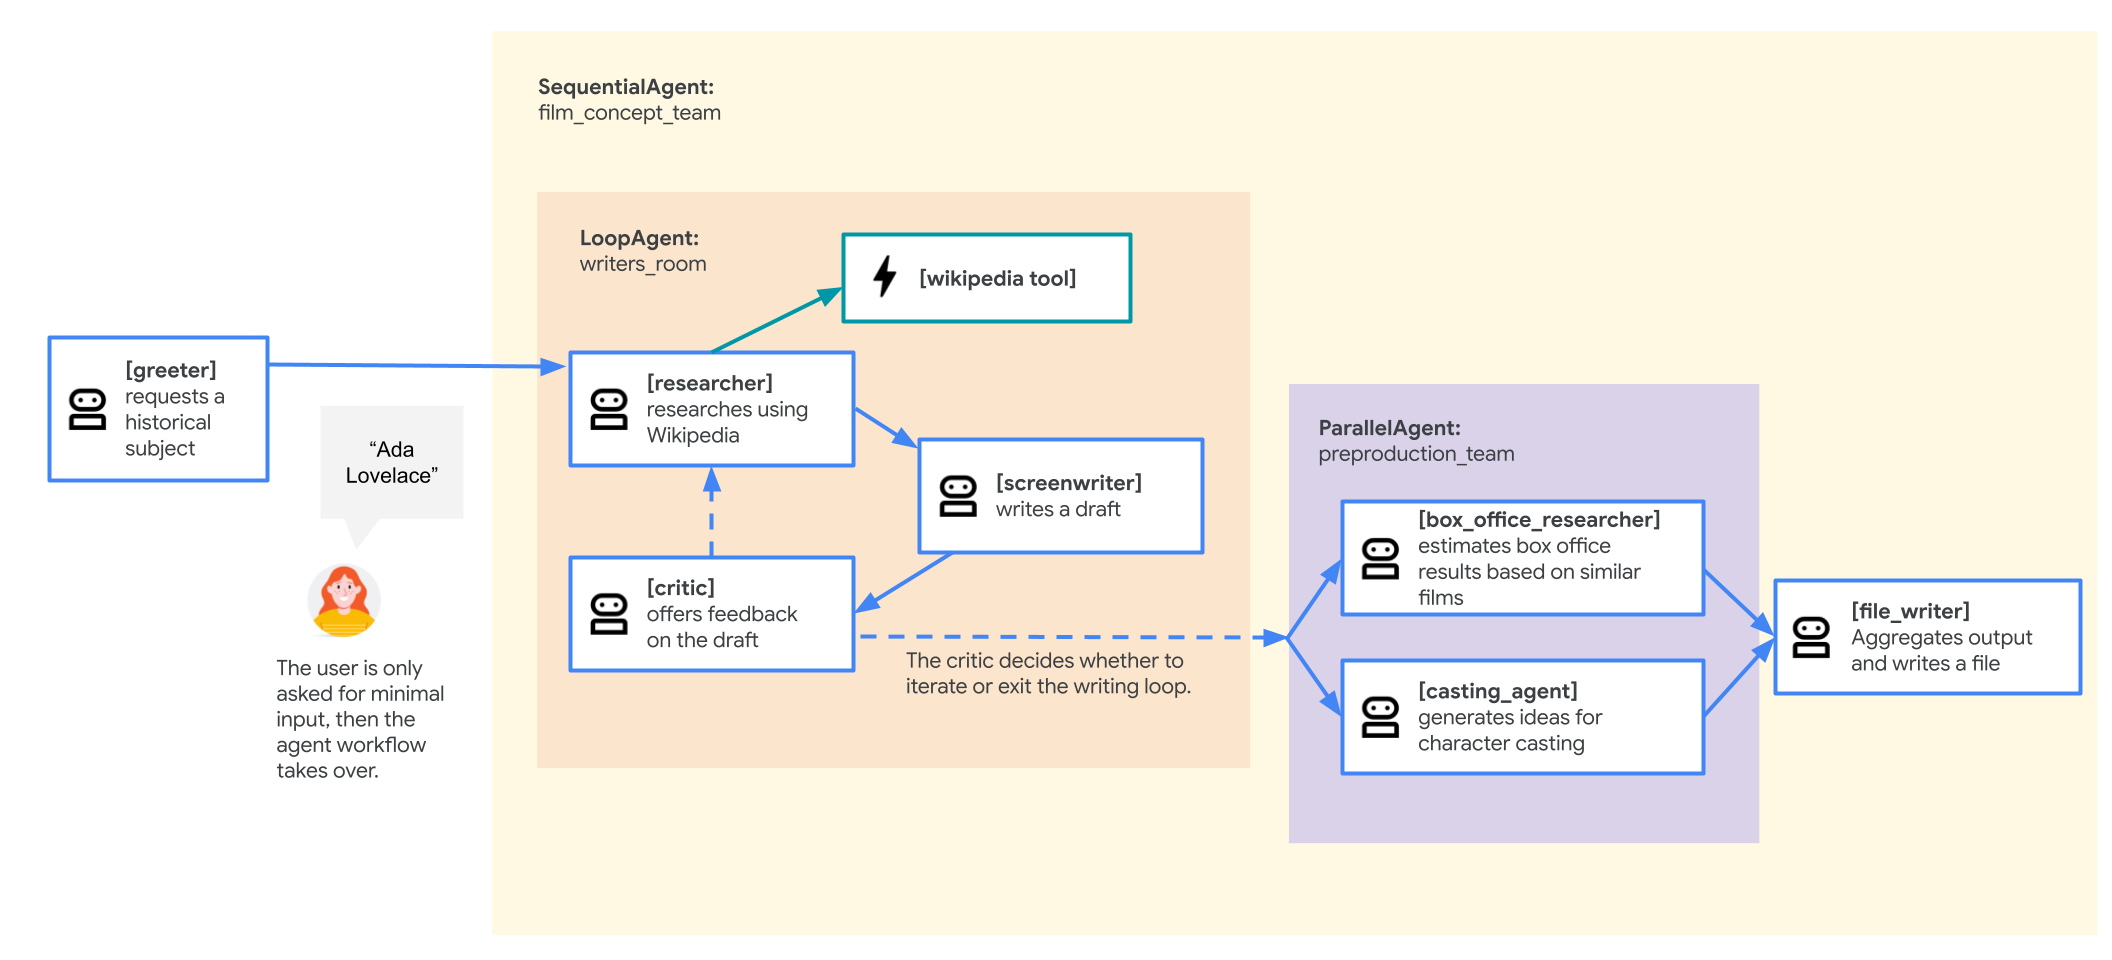
Specifically, you will build an agent that will develop a pitch document for a new hit movie: a biographical film based on the life of a historical character. Your sub-agents will handle the research, an iterative writing loop with a screenwriter and a critic, and finally some additional sub-agents will help brainstorm casting ideas and use historical box office data to make some predictions about box office results.
In the end, your multi-agent system will look like this (you can click on the image to see it larger):
But you will begin with a simpler version.
The SequentialAgent executes its sub-agents in a linear sequence. Each sub-agent in its sub_agents list is run, one after the other, in the order they are defined.
This is ideal for workflows where tasks must be performed in a specific order, and the output of one task serves as the input for the next.
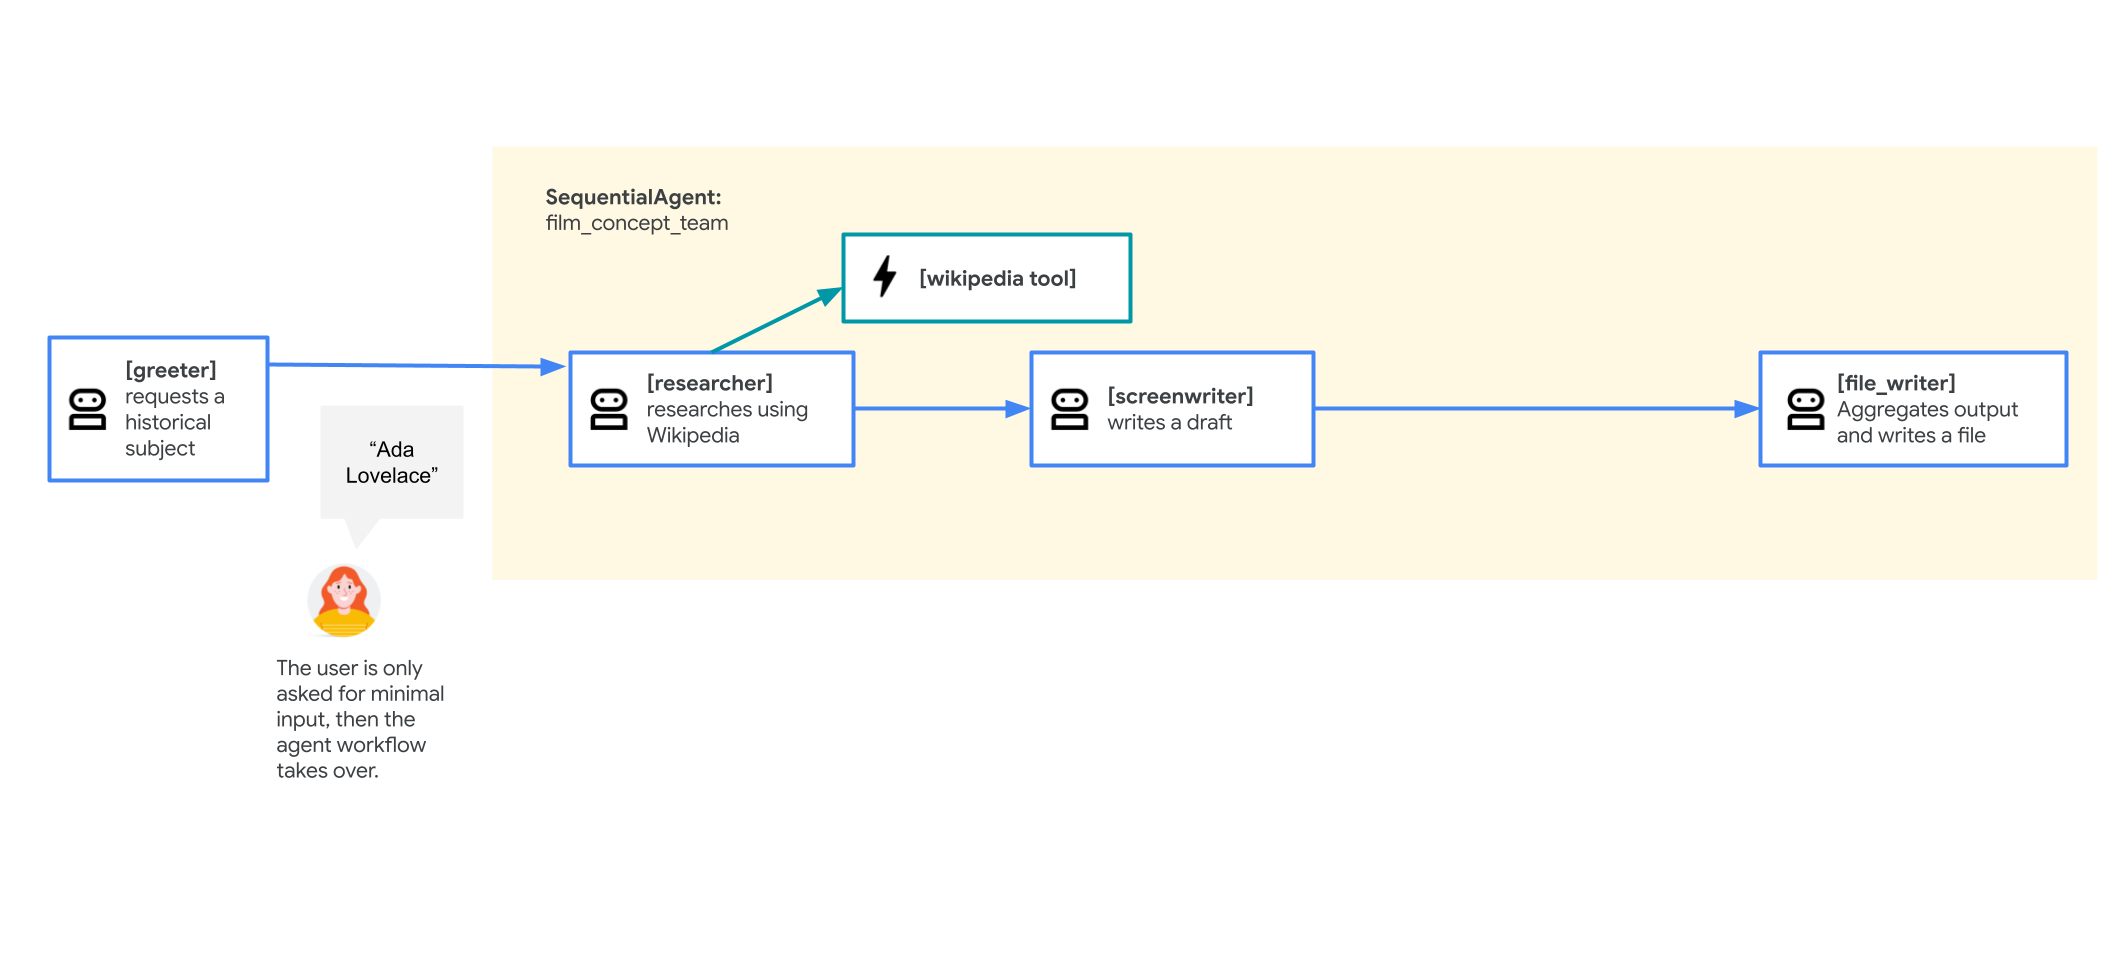
In this task, you will run a SequentialAgent to build a first version of your movie pitch-development multi-agent system. The first draft of your agent will be structured like this:
A root_agent named greeter to welcome the user and request a historical character as a movie subject
A SequentialAgent called film_concept_team will include:
In the Cloud Shell Editor, navigate to the directory adk_multiagent_systems/workflow_agents.
Click on the agent.py file in the workflow_agents directory.
Read through this agent definition file. Because sub-agents must be defined before they can be assigned to a parent, to read the file in the order of the conversational flow, you can read the agents from the bottom of the file to the top.
You also have a function tool append_to_state. This function allows agents with the tool the ability to add content to a dictionary value in state. It is particularly useful for agents that might call a tool multiple times or act in multiple passes of a LoopAgent, so that each time they act their output is stored.
Try out the current version of the agent by launching the web interface from the Cloud Shell Terminal. You will use the --reload_agents argument to enable live reloading of agents based on agent changes:
adk web session, the default port of 8000 will be blocked, but you can launch the Dev UI with a new port by using adk web --port 8001, for example.
To view the web interface in a new tab, click the http://127.0.0.1:8000 link in the Terminal output.
A new browser tab will open with the ADK Dev UI.
From the Select an agent dropdown on the left, select workflow_agents.
Start the conversation with: hello. It may take a few moments for the agent to respond, but it should request you enter a historical figure to start your film plot generation.
When prompted to enter a historical figure, you can enter one of your choice or use one of these examples:
Zhang Zhongjing - a renowned Chinese physician from the 2nd Century CE.Ada Lovelace - an English mathematician and writer known for her work on early computersMarcus Aurelius - a Roman emperor known for his philosophical writings.The agent should now call its agents one after the other as it executes the workflow and writes the plot outline file to your ~/adk_multiagent_systems/movie_pitches directory. It should inform you when it has written the file to disk.
If you don't see the agent reporting that it generated a file for you or want to try another character, you can click + New Session in the upper right and try again.
View the agent's output in the Cloud Shell Editor. (You may need to use the Cloud Shell Editor's menu to enable View > Word Wrap to see the full text without lots of horizontal scrolling.)
In the ADK Dev UI, click on one of the agent icons (
The event view provides a visual representation of the tree of agents and tools used in this session. You may need to scroll in the event panel to see the full plot.
Note: While this system can produce interesting results, it is not intended to imply that instructions can be so brief or adding examples can be skipped. The system's reliability would benefit greatly from the additional layer of adding more rigorous instructions and examples for each agent.
Click Check my progress to verify the objective.
The LoopAgent executes its sub-agents in a defined sequence and then starts at the beginning of the sequence again without breaking for a user input. It repeats the loop until a number of iterations has been reached or a call to exit the loop has been made by one of its sub-agents (usually by calling a built-in exit_loop tool).
This is beneficial for tasks that require continuous refinement, monitoring, or cyclical workflows. Examples include:
You will add a LoopAgent to your movie pitch agent to allow multiple rounds of research and iteration while crafting the story. In addition to refining the script, this allows a user to start with a less specific input: instead of suggesting a specific historical figure, they might only know they want a story about an ancient doctor, and a research-and-writing iteration loop will allow the agents to find a good candidate, then work on the story.
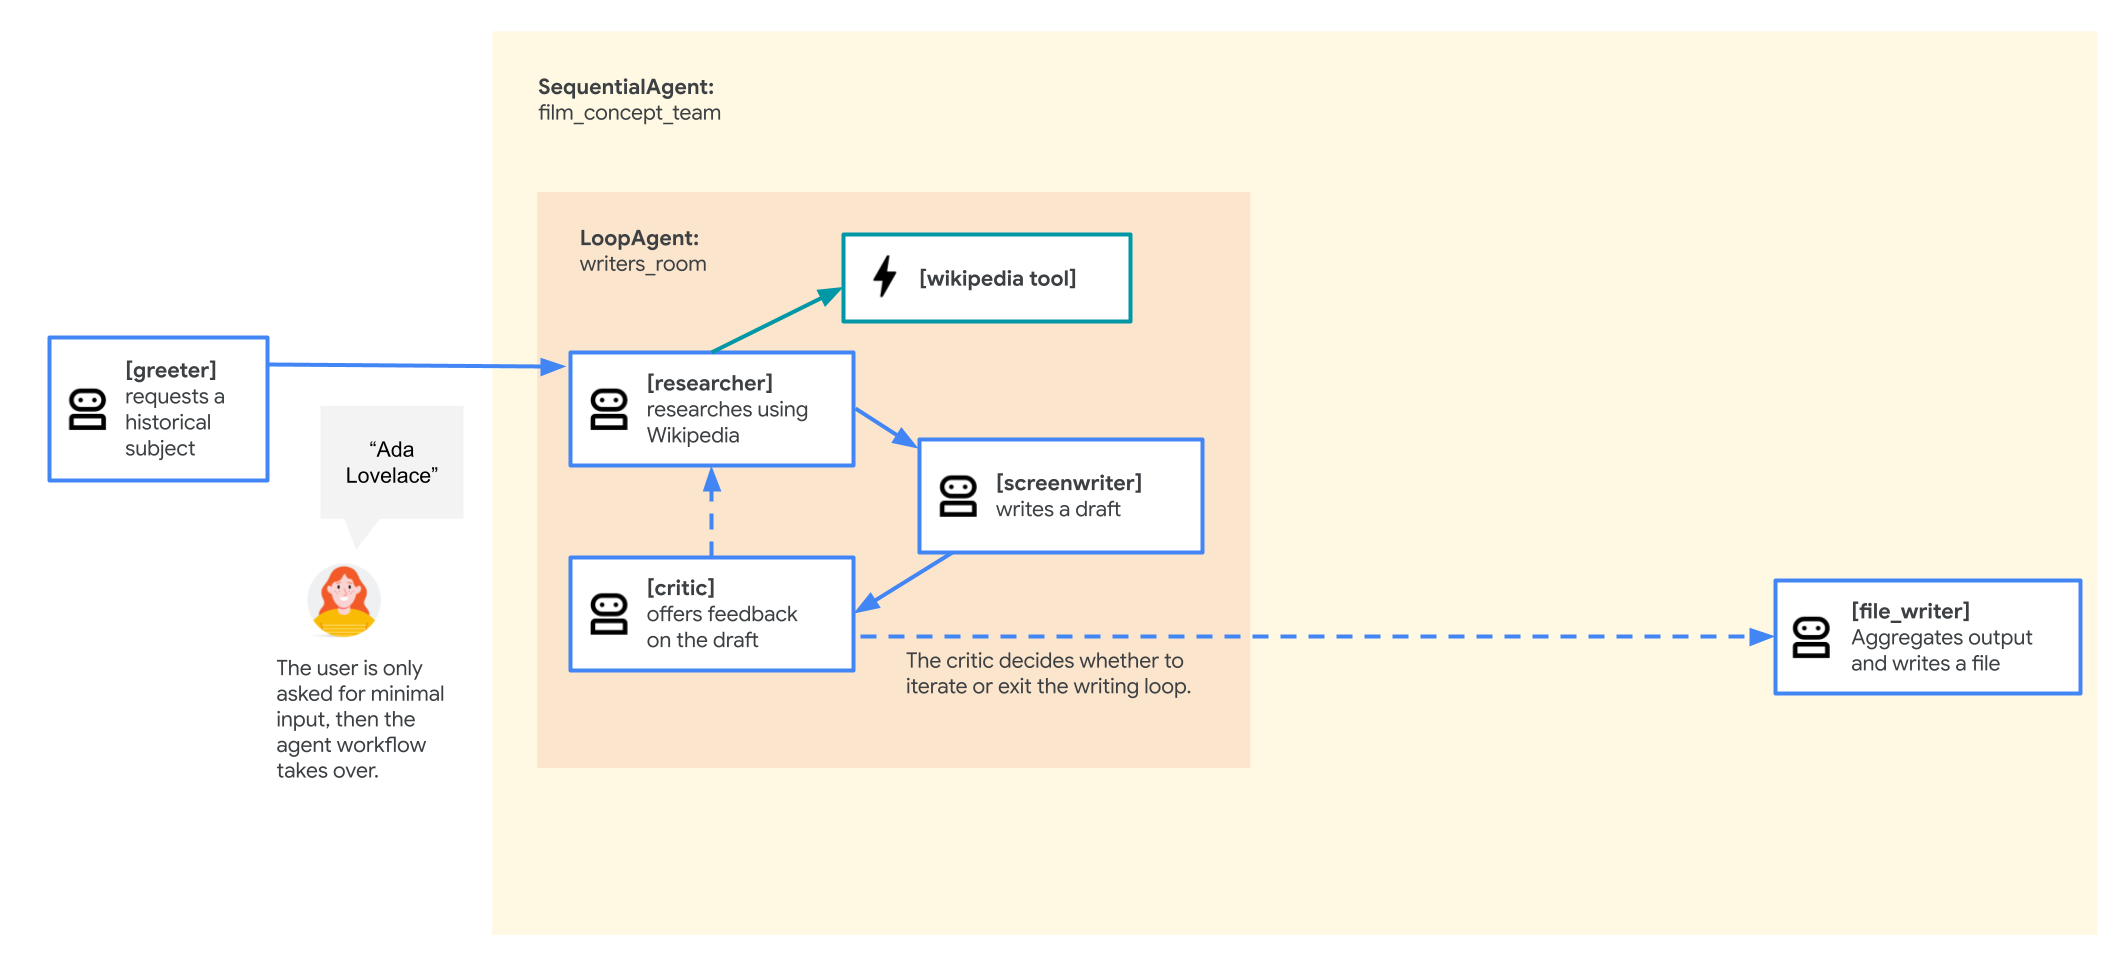
Your revised agent will flow like this:
SequentialAgent will now consist of:
LoopAgent that will begin the sequence. It will consist of:
SequentialAgent, which will then pass control to the next agent in its sequence: the file_writer that will remain as before to give the movie a title and write the results of the sequence to a file.To make these changes:
In the adk_multiagent_systems/workflow_agents/agent.py file, add this tool import so that you can provide an agent the ability to exit the loop when desired:
To determine when to exit the loop, add this critic agent to decide when the plot outline is ready. Paste the following new agent into the agent.py file under the # Agents section header (without overwriting the existing agents). Note that it has the exit_loop tool as one of its tools and instructions on when to use it:
Create a new LoopAgent called writers_room that creates the iterative loop of the researcher, screenwriter, and critic. Each pass through the loop will end with a critical review of the work so far, which will prompt improvements for the next round. Paste the following above the existing film_concept_team SequentialAgent.
Note that the LoopAgent creation includes a parameter for max_iterations. This defines how many times the loop will run before it ends. Even if you plan to interrupt the loop via another method, it is a good idea to include a cap on the total number of iterations.
Update the film_concept_team SequentialAgent to replace the researcher and screenwriter with the writers_room LoopAgent you just created. The file_writer agent should remain at the end of the sequence. The film_concept_team should now look like this:
Return to the ADK Dev UI tab and click the + New Session button in the upper right to start a new session.
Begin a new conversation with: hello
When prompted to choose a kind of historical character, choose one that interests you. Some ideas include:
an industrial designer who made products for the massesa cartographer (a map maker)that guy who made crops yield more foodOnce you have chosen a type of character, the agent should work its way through iterations of the loop and finally give the film a title and write the outline to a file.
Using the Cloud Shell Editor, review the file generated, which should be saved in the adk_multiagent_systems/movie_pitches directory. (Once again, you may need to use the Editor's menu to enable View > Word Wrap to see the full text without lots of horizontal scrolling.)
Click Check my progress to verify the objective.
The ParallelAgent enables concurrent execution of its sub-agents. Each sub-agent operates in its own branch, and by default, they do not share conversation history or state directly with each other during parallel execution.
This is valuable for tasks that can be divided into independent sub-tasks that can be processed simultaneously. Using a ParallelAgent can significantly reduce the overall execution time for such tasks.
In this lab, you will add some supplemental reports -- some research on potential box office performance and some initial ideas on casting -- to enhance the pitch for your new film.
Your revised agent will flow like this:
SequentialAgent will now consist of:
LoopAgent, which will remain the same including:
ParallelAgent will then act, consisting of:
While much of this example demonstrates creative work that would be done by human teams, this workflow represents how a complex chain of tasks can be broken across several sub-agents to produce drafts of complex documents which human team members can then edit and improve upon.
Paste the following new agents and ParallelAgent into your workflow_agents/agent.py file under the # Agents header:
Update the existing film_concept_team agent's sub_agents list to include the preproduction_team between the writers_room and file_writer:
Update the file_writer's instruction to:
Save the file.
In the ADK Dev UI, click + New Session in the upper right.
Enter hello to start the conversation.
When prompted, enter a new character idea that you are interested in. Some ideas include:
that actress who invented the technology for wifian exciting chefkey players in the worlds fair exhibitionsWhen the agent has completed its writing and report-generation, inspect the file it produced in the adk_multiagent_systems/movie_pitches directory. If a part of the process fails, click + New session in the upper right and try again.
When the pre-defined workflow agents of SequentialAgent, LoopAgent, and ParallelAgent are insufficient for your needs, CustomAgent provides the flexibility to implement new workflow logic. You can define patterns for flow control, conditional execution, or state management between sub-agents. This is useful for complex workflows, stateful orchestrations, or integrating custom business logic into the framework's orchestration layer.
Creation of a CustomAgent is out of the scope of this lab, but it is good to know that it exists if you need it!
In this lab, you’ve learned to:
Learn to deploy agents to Agent Engine in the lab Deploy ADK agents to Agent Engine.
...helps you make the most of Google Cloud technologies. Our classes include technical skills and best practices to help you get up to speed quickly and continue your learning journey. We offer fundamental to advanced level training, with on-demand, live, and virtual options to suit your busy schedule. Certifications help you validate and prove your skill and expertise in Google Cloud technologies.
Manual Last Updated May 22, 2025
Lab Last Tested May 22, 2025
Copyright 2023 Google LLC All rights reserved. Google and the Google logo are trademarks of Google LLC. All other company and product names may be trademarks of the respective companies with which they are associated.


This content is not currently available
We will notify you via email when it becomes available

Great!
We will contact you via email if it becomes available

One lab at a time
Confirm to end all existing labs and start this one