


Before you begin
- Labs create a Google Cloud project and resources for a fixed time
- Labs have a time limit and no pause feature. If you end the lab, you'll have to restart from the beginning.
- On the top left of your screen, click Start lab to begin
Create a BigQuery dataset and table where travel requests can be recorded
/ 10
Create a Cloud Run function to record the requests
/ 20
Create a Conversational Agent tool to call the Cloud Run function
/ 20
Create a Conversational Agent playbook
/ 10
Create a BigQuery data store
/ 10
Create an Agentspace app
/ 10
Integrate the conversational agent with the Agentspace app
/ 10
Communicate with the conversational agent through the Agentspace assistant
/ 10
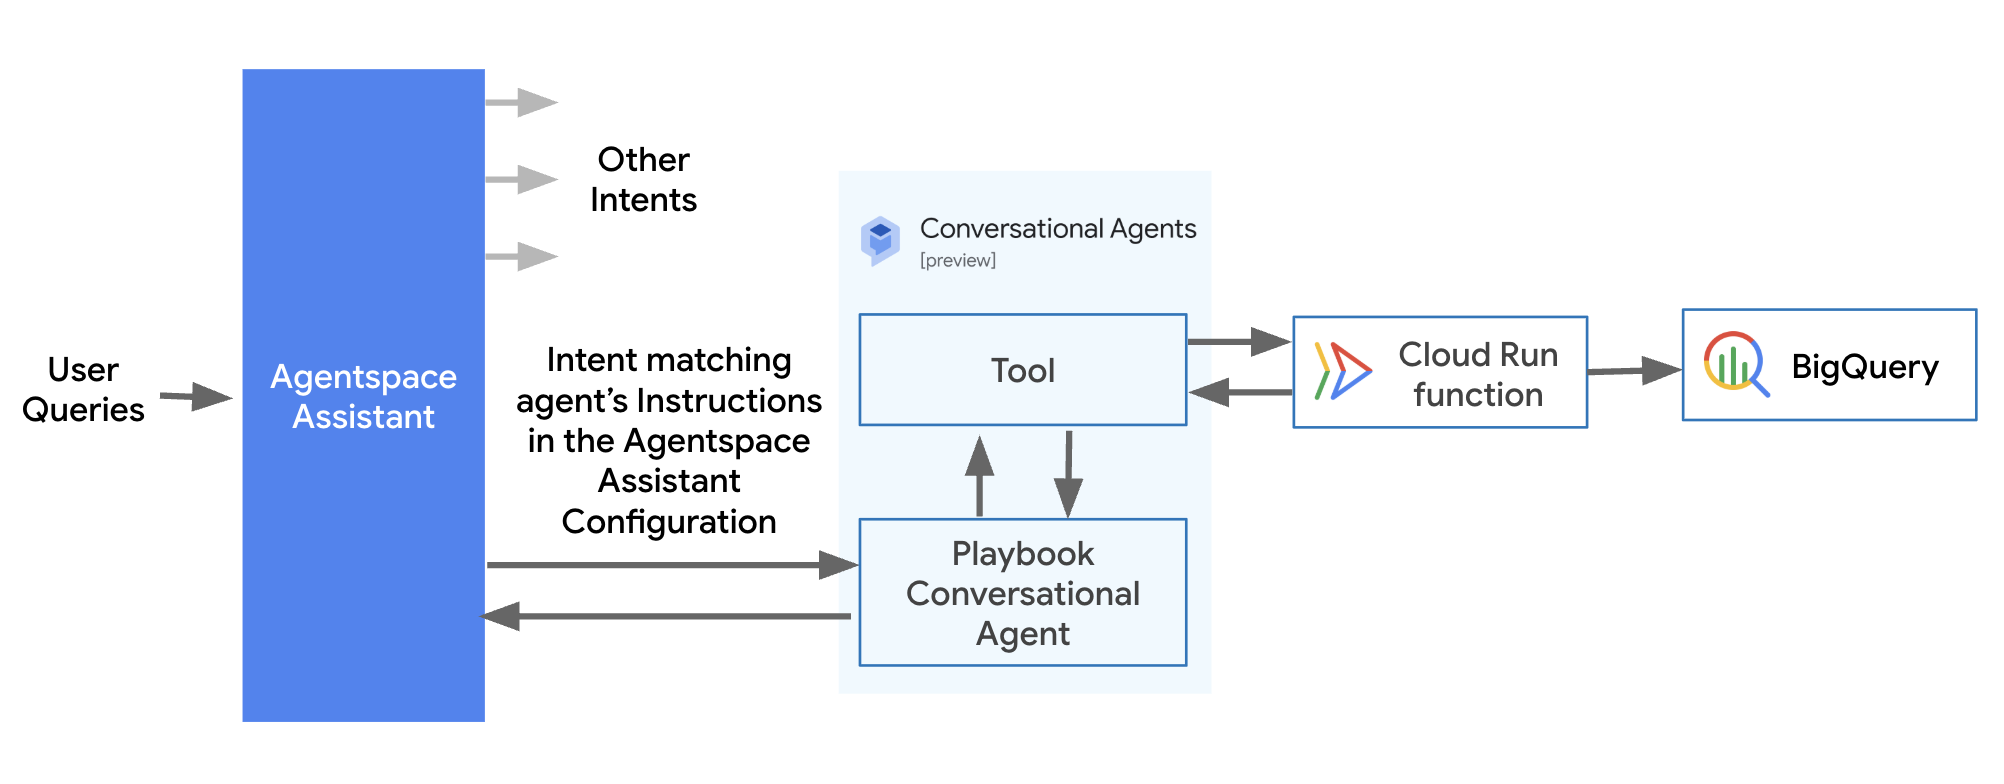
In this lab, you will enhance your Agentspace assistant by enabling it to handle employee business travel requests. The assistant will communicate with a conversational agent that processes these requests. To facilitate this, you will integrate an OpenAPI Tool, allowing the conversational agent to interact with a Cloud Run function. This function will then write the travel requests directly to BigQuery for storage and further processing. This diagram shows the flow you will enable:
In this lab, you learn how to:
Read these instructions. Labs are timed and you cannot pause them. The timer, which starts when you click Start Lab, shows how long Google Cloud resources will be made available to you.
This Qwiklabs hands-on lab lets you do the lab activities yourself in a real cloud environment, not in a simulation or demo environment. It does so by giving you new, temporary credentials that you use to sign in and access Google Cloud for the duration of the lab.
To complete this lab, you need:
Note: If you already have your own personal Google Cloud account or project, do not use it for this lab.
Note: If you are using a Pixelbook, open an Incognito window to run this lab.
Click the Start Lab button. If you need to pay for the lab, a dialog opens for you to select your payment method. On the left is the Lab Details pane with the following:
Click Open Google Cloud console (or right-click and select Open Link in Incognito Window if you are running the Chrome browser).
The lab spins up resources, and then opens another tab that shows the Sign in page.
Tip: Arrange the tabs in separate windows, side-by-side.
If necessary, copy the Username below and paste it into the Sign in dialog.
You can also find the Username in the Lab Details pane.
Click Next.
Copy the Password below and paste it into the Welcome dialog.
You can also find the Password in the Lab Details pane.
Click Next.
Click through the subsequent pages:
After a few moments, the Google Cloud console opens in this tab.

In this task, you'll create a table to serve as the destination to store incoming travel requests that will be sent to the Agentspace assistant.
Open a Cloud Shell terminal, by pressing the G key followed by the S key on your keyboard.
Click the Authorize button when prompted to authorize Cloud Shell.
In your Cloud Shell terminal, paste the following to create a travel_requests_schema.json file to define the schema for a BigQuery table which will be used to record travel requests:
Run the following commands in Cloud Shell to create the BigQuery dataset travel_requests_schema.json file:
Once the dataset and table have been successfully created, you can close the Cloud Shell panel by clicking the X in the upper right of the terminal panel.
Click Check my progress to verify the objectives.
In this task, you'll create the Cloud Run function that will take requests sent as JSON and write them to the table you created above.
Using the search bar at the top of the Cloud Console, navigate to Cloud Run.
From the options at the top of the Cloud Run console, select Write a Function.
Under the Configure header, enter a Service name of record-travel-request.
Set the Region to
Under the Endpoint URL header, copy the provided URL and paste it in a text document. You will need to access it later.
Set the Runtime to Python 3.12.
Under the Authentication header, selet Require authentication.
Keep the other settings as default and select CREATE. The Source tab for the function will be loaded.
Rename the Function entry point to record_travel_request.
Click the requirements.txt file on the left, delete its contents, and paste in the following:
Click the main.py file on the left, delete its contents, and paste in the following code. This function will take the travel request details provided to a POST request as JSON and write those values to a new row in the BigQuery table you created earlier:
Wait til all the steps of creating the service are completed in the upper left, then click SAVE AND REDEPLOY.
Wait until the the Deploying revision activities all show a Completed status message.
Click TEST at the top of the Cloud Run console.
Paste these values into the Configure triggering event test input field:
At the bottom of the testing pane, click TEST IN CLOUD SHELL.
The Cloud Shell terminal window will open, and a curl command will be prepared for you to call your function. Select the Terminal window and press enter or return on your keyboard to send the command.
You should see a successful execution response:
Close the Cloud Shell Terminal by pressing the X in the upper right of the Cloud Shell panel.
Open a new browser tab (or if you are using Chrome, duplicate your current browser tab by right-clicking on it and selecting Duplicate). In the new tab, navigate to BigQuery.
In the BigQuery Explorer pane, select your project ID
Select the
Select the
Select the PREVIEW tab to see travel requests that have been recorded. Keep this tab open to return and check for new rows as you work through the other components in this lab.
Click Check my progress to verify the objectives.
In this task, you'll create a Tool in the Conversational Agent console that can call the Cloud Run function. Your conversational agent will be able to use this Tool to record the travel requests.
At the top of the Google Cloud Console, search for Dialogflow API and select it.
Click Enable.
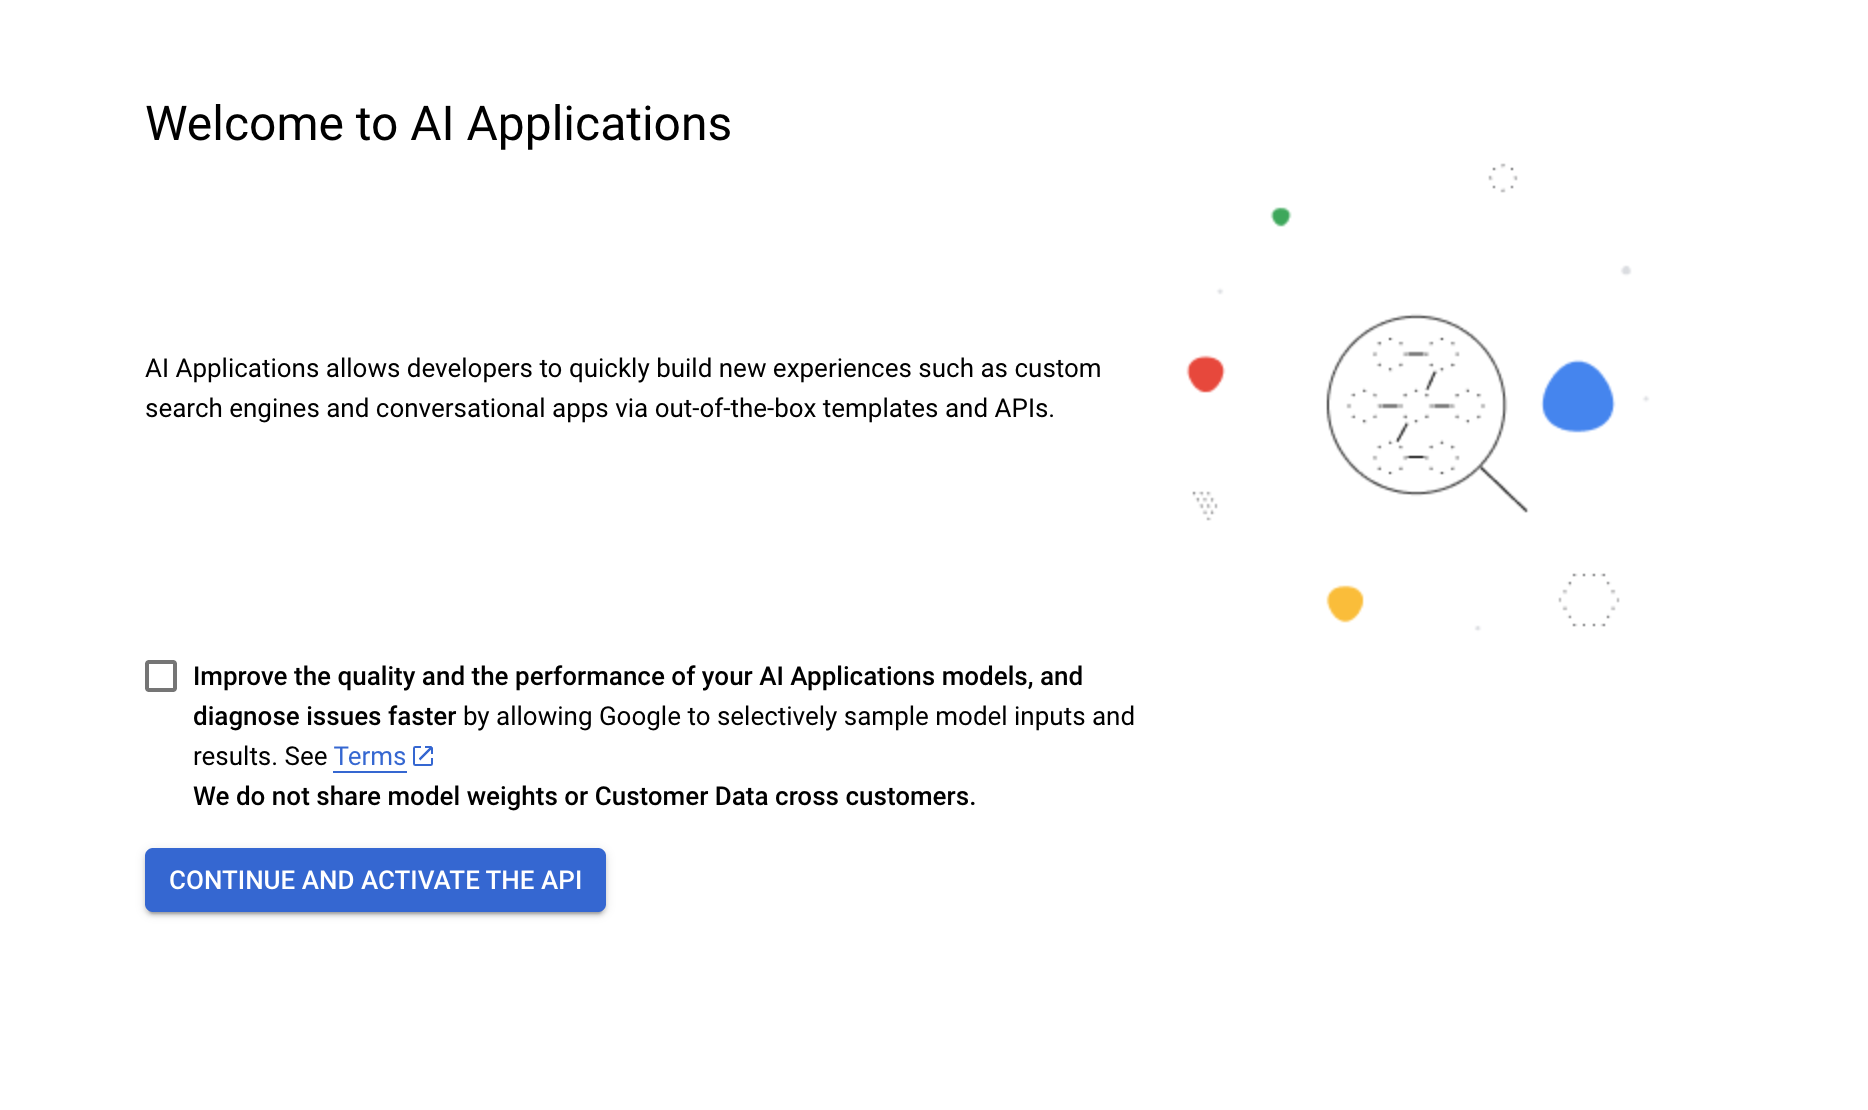
Navigate to AI Applications by searching for it at the top of the console.
Click on CONTINUE AND ACTIVATE THE API.
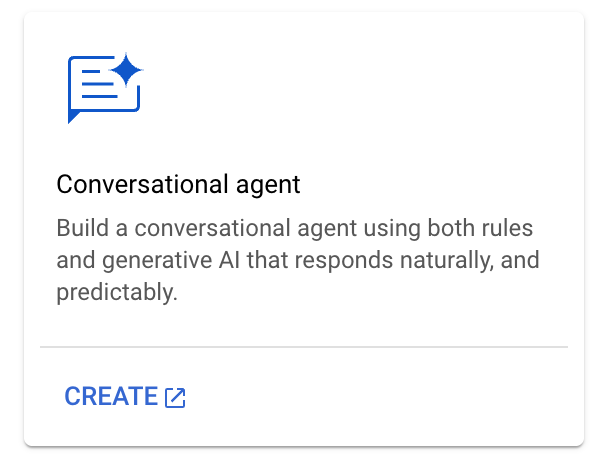
For an app type, find the card for Conversational agent and select Create. This will open the Conversational Agents console in a new tab.
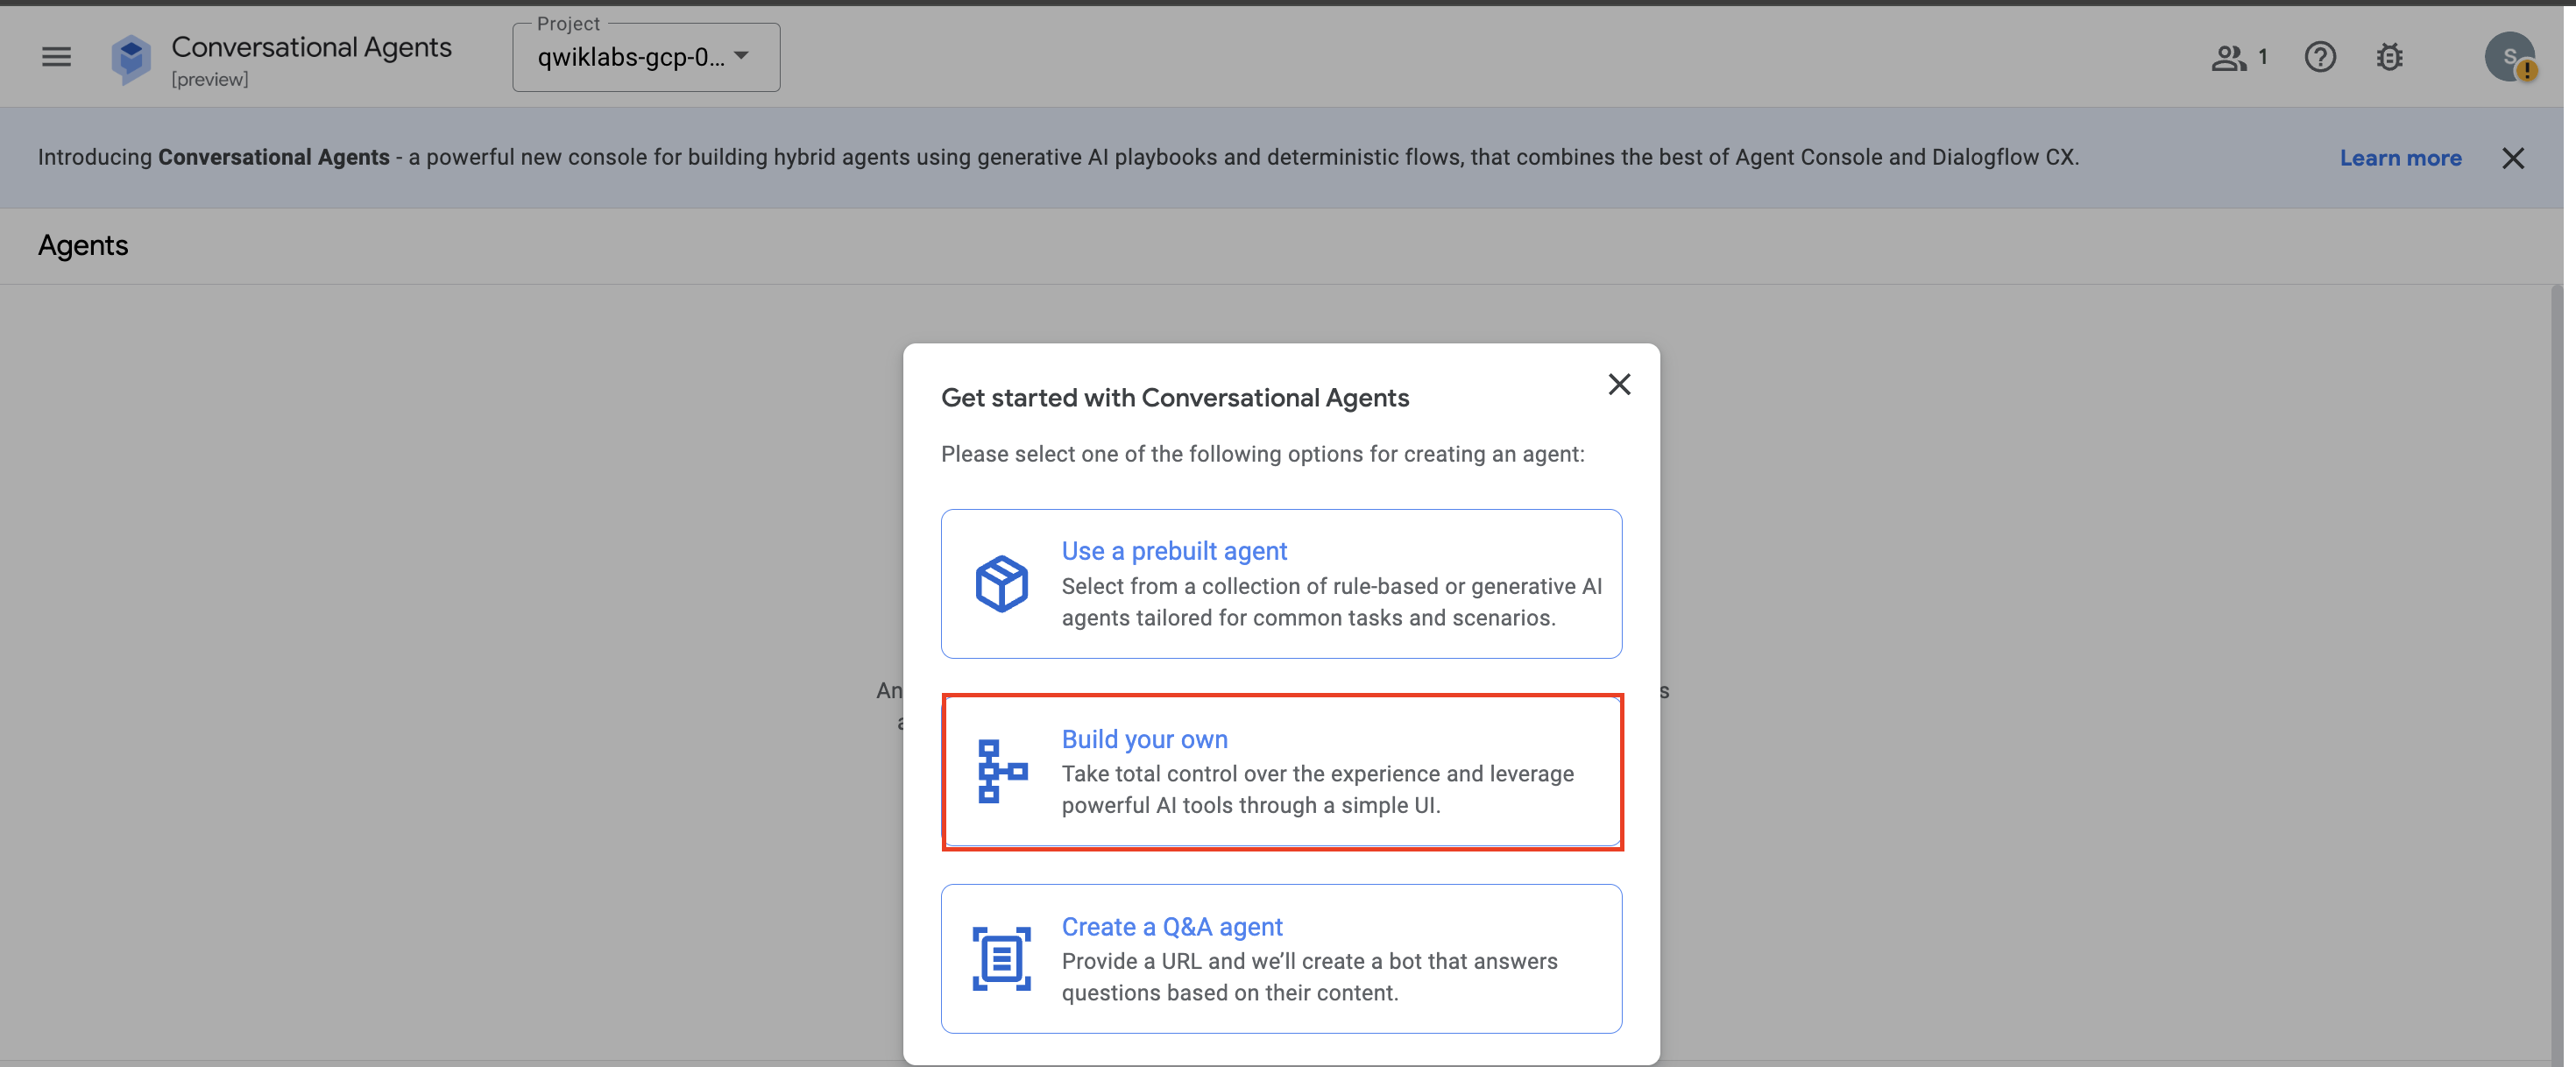
In the Get started with Conversational Agents pane, select Build your own.
For your agent's Display name, use Corporate Travel Bot.
Set the location to global.
Keep the Conversation start option Playbook selected.
Click Create.
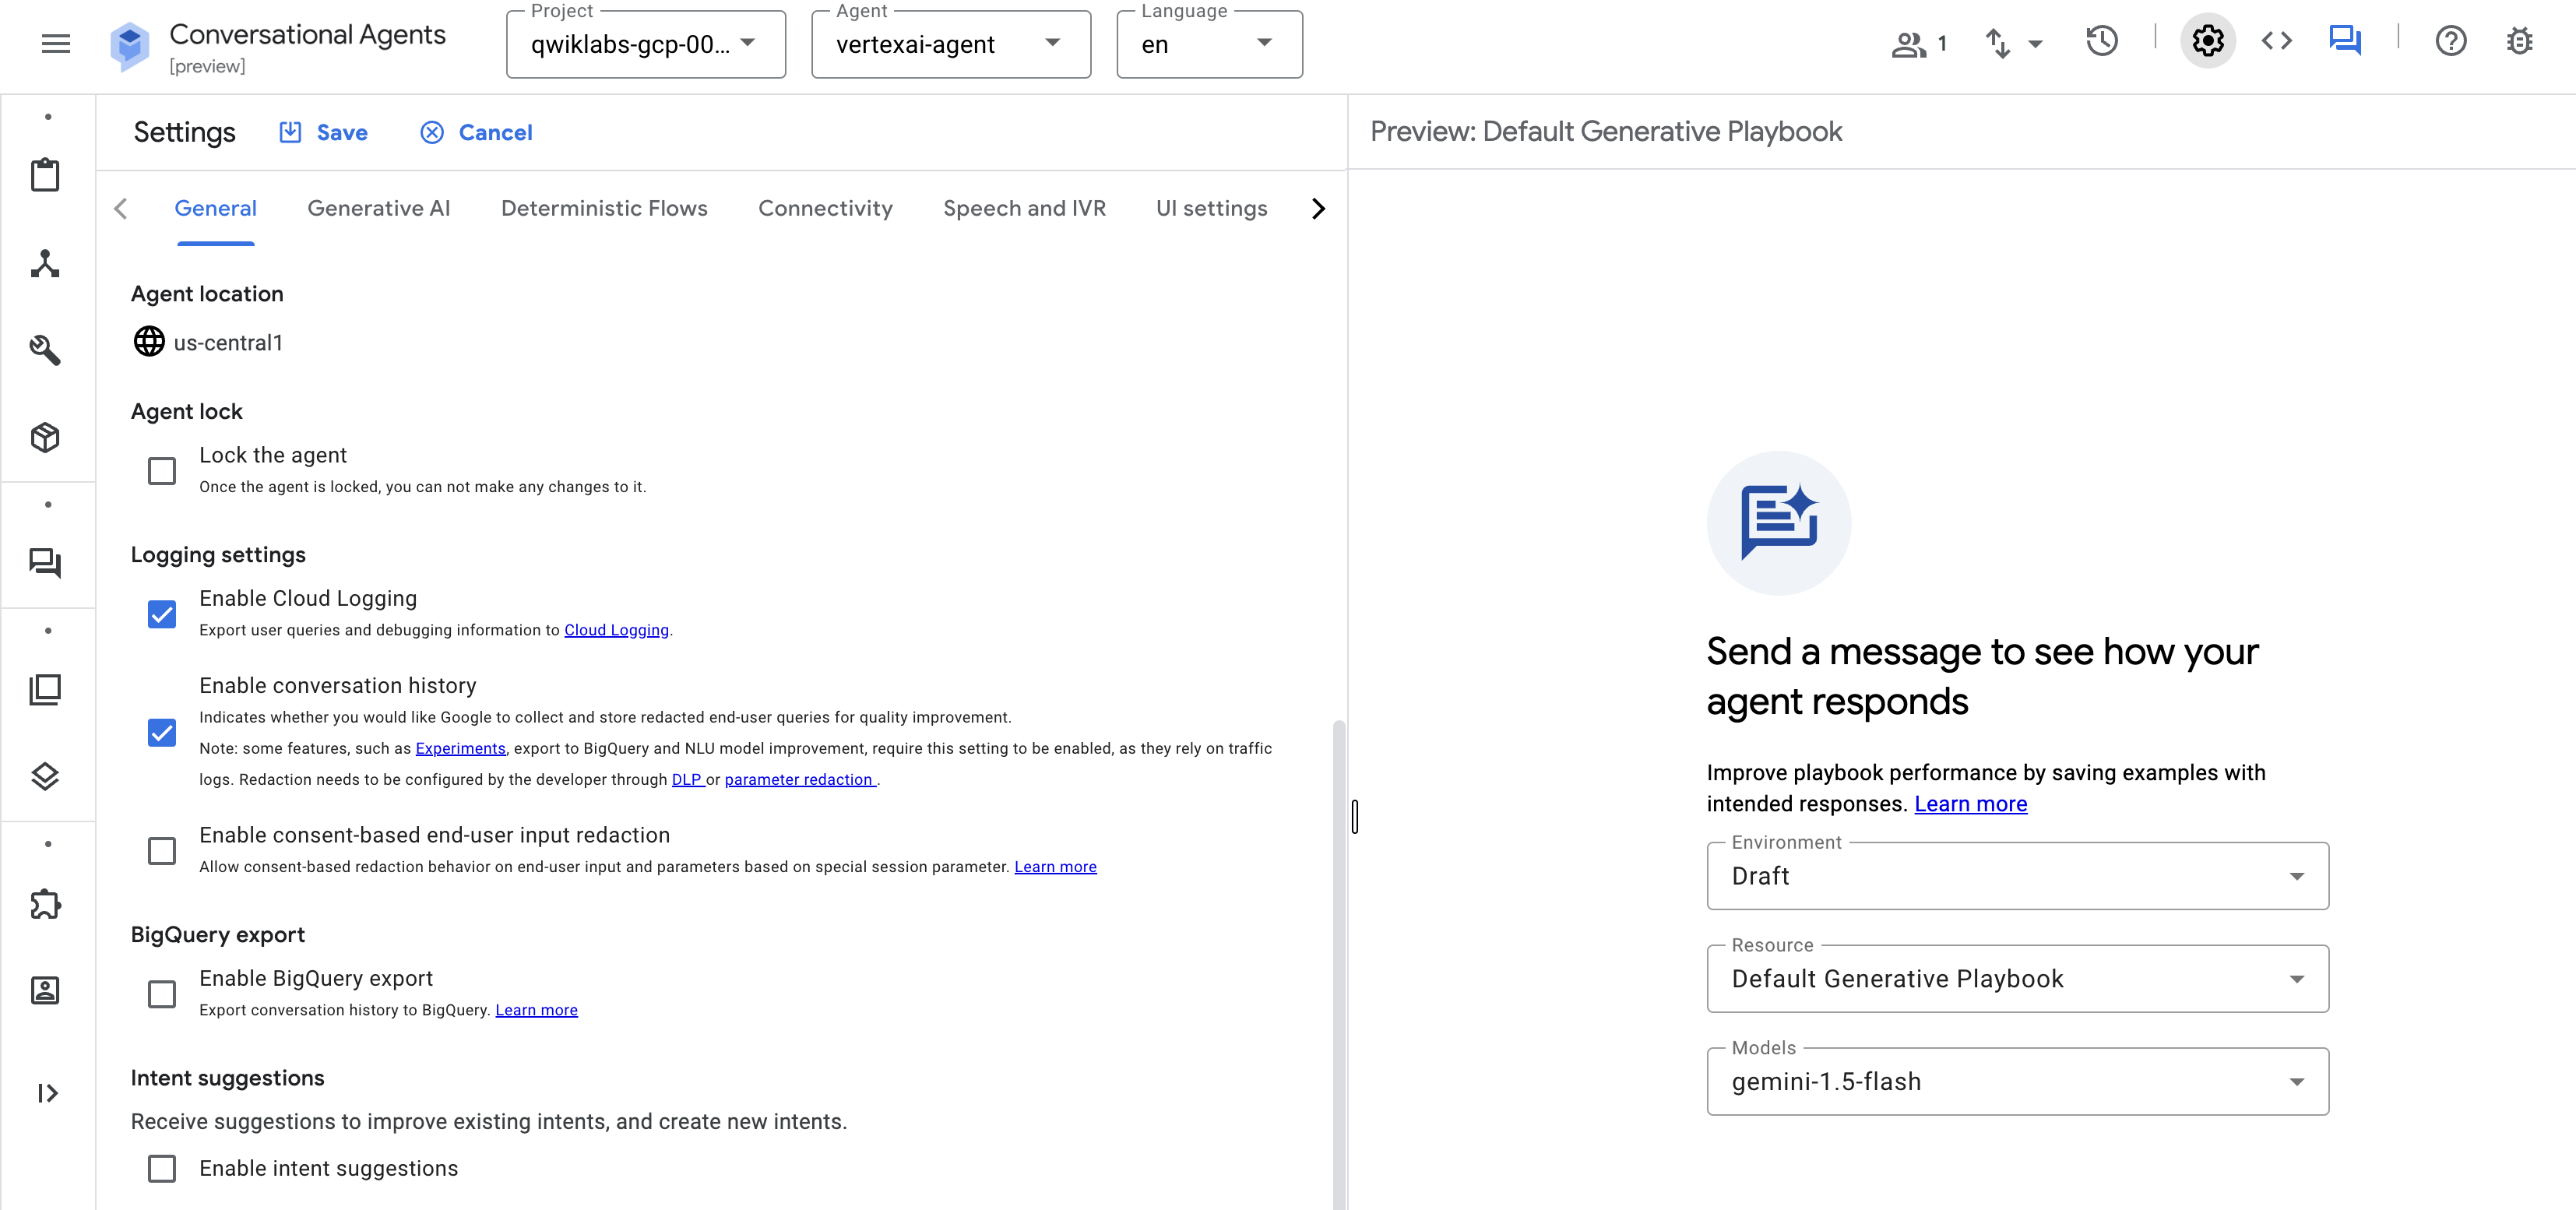
After the Conversational Agent Playbook is created. Dismiss any instructional pop-ups and select the Settings button on the top right-hand side of the UI.
Navigate to General > Logging Settings.
Click the checkboxs for Enable Cloud Logging and Enable Conversation History to enable the Cloud Logging and conversation history features for your agent.
Click the Save button at the top of the Settings pane to save your changes.
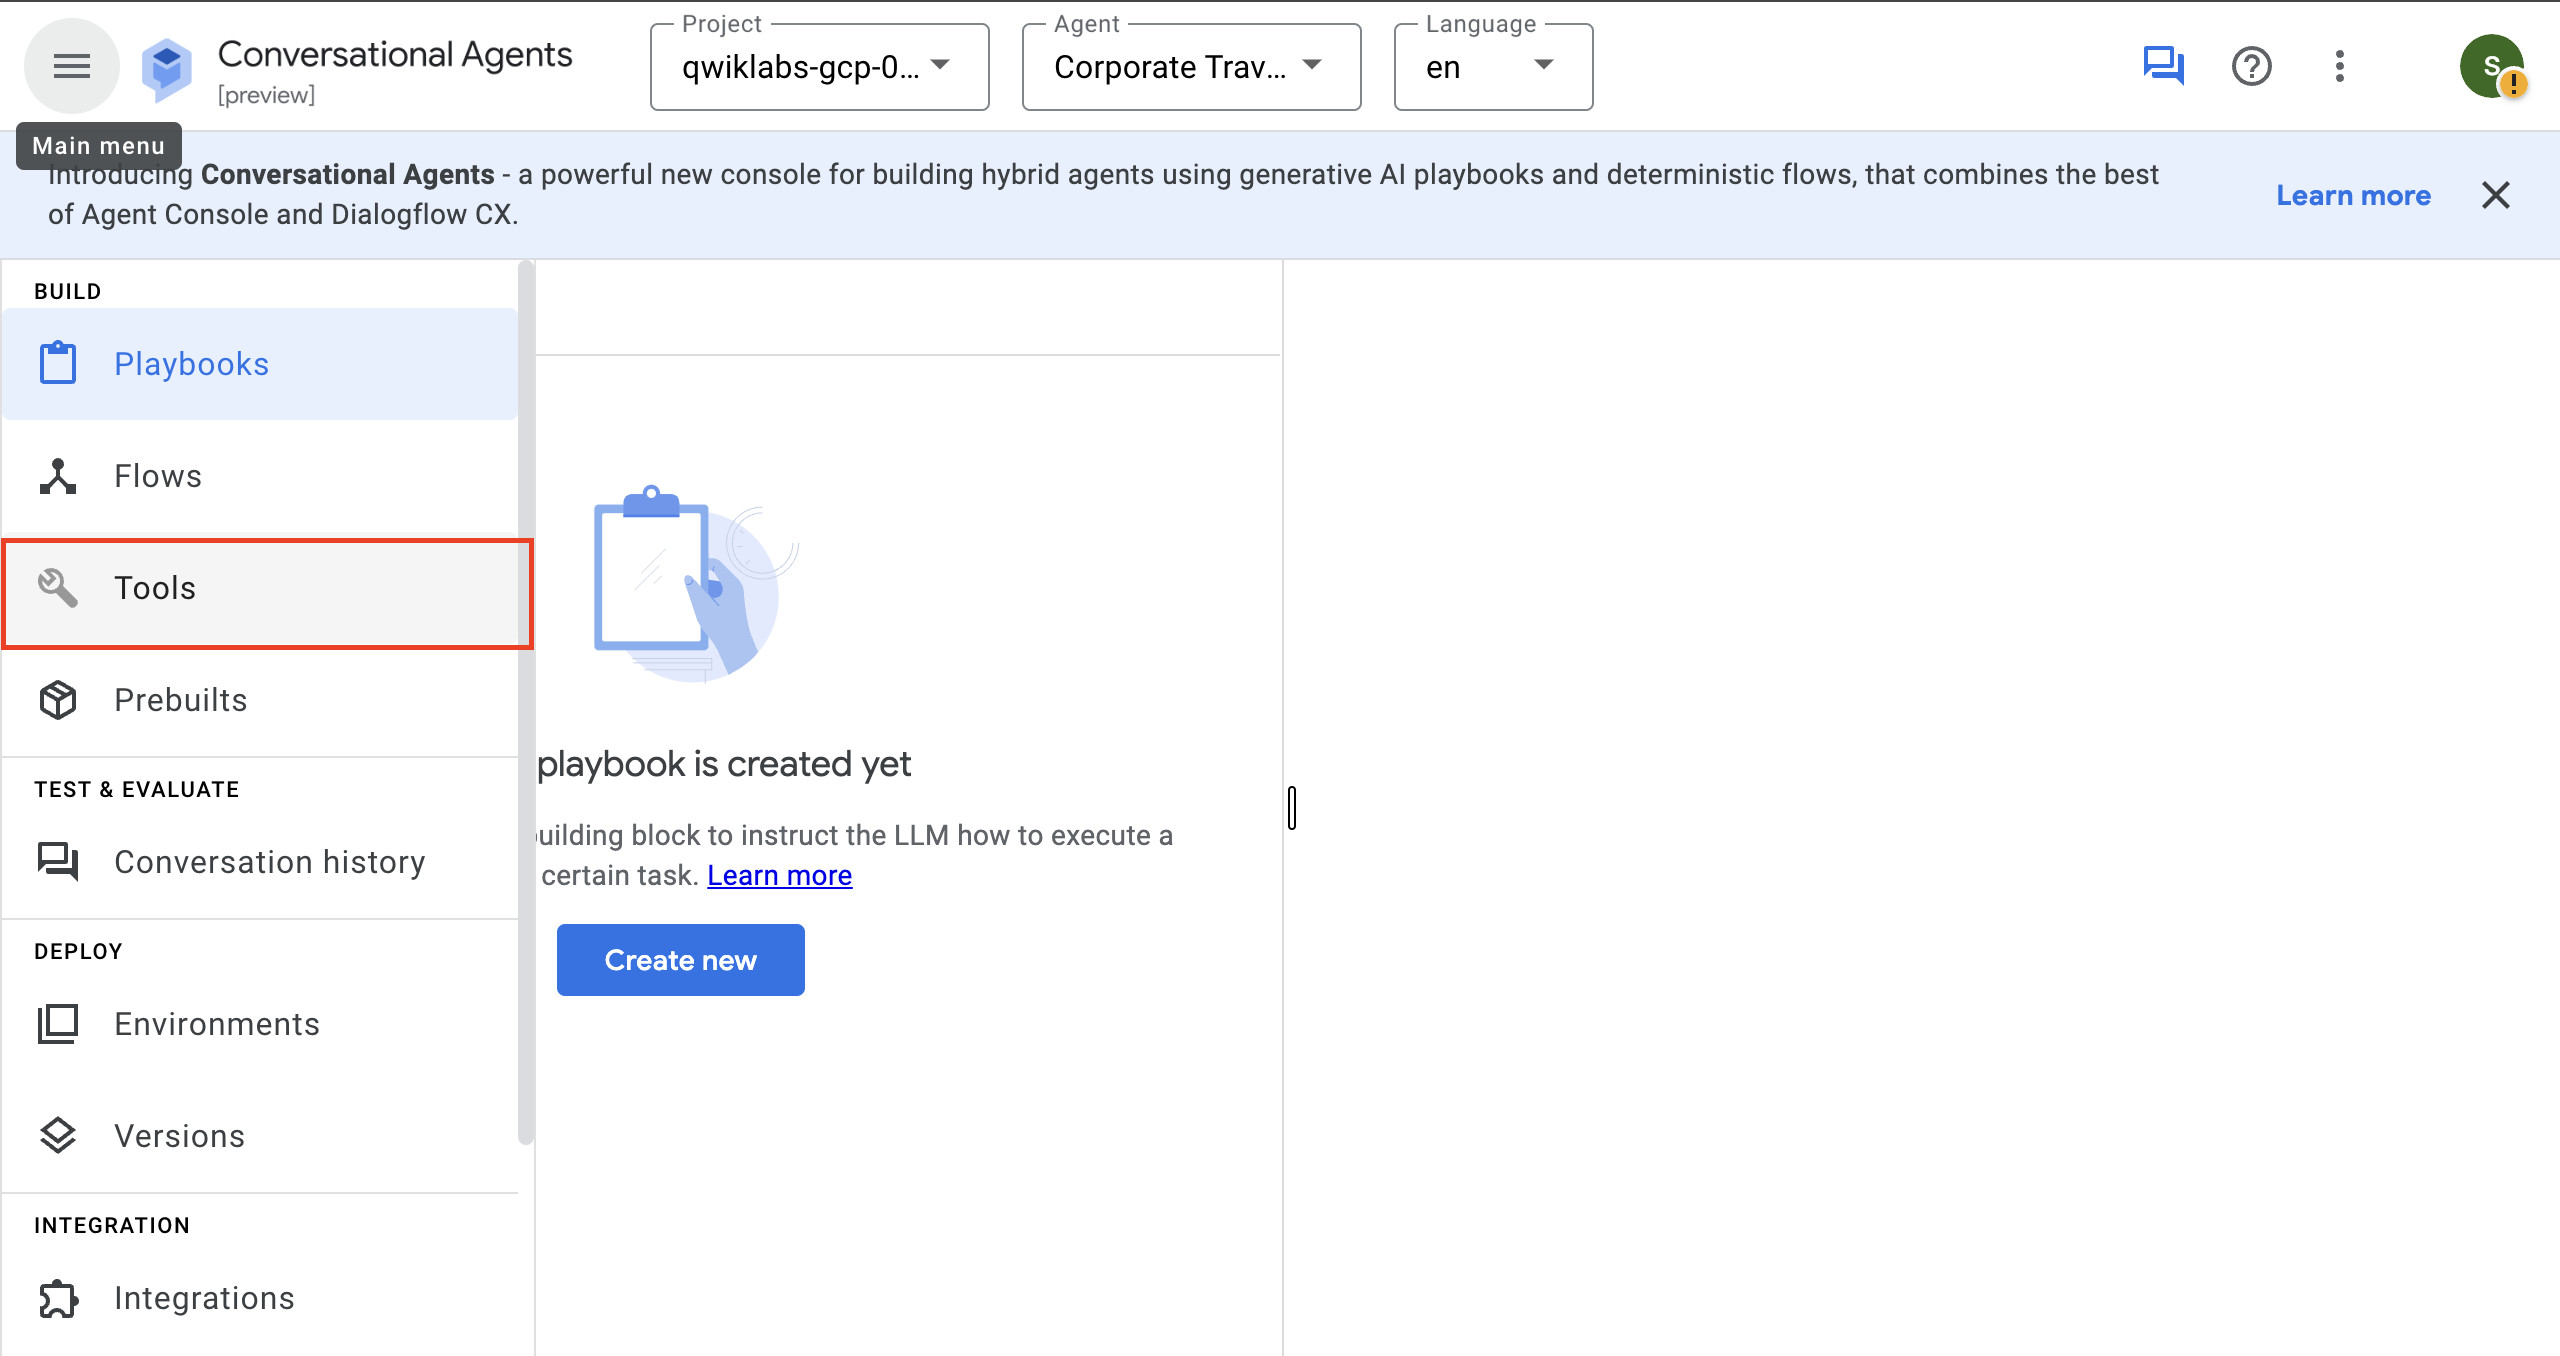
Before you create a Playbook, you will create a Tool that the playbook can use to call the Cloud Run function you created. From the left-hand navigation menu, select Tools.
Click + Create.
For Tool name enter Record Travel Request.
Keep the Type set to OpenAPI.
For a Description, enter Used to record a travel request.
For Schema, keep the type YAML selected, and paste the following into the text box. This OpenAPI spec describes an API with:
A server url set to your Cloud Functions domain
A path called / that accepts POST requests that include JSON in a schema called TravelRequest
A definition of that TravelRequest schema to include the fields you defined in your BigQuery schema at the start of this lab:
Replace YOUR_CLOUD_RUN_FUNCTION_URL in the spec above with your Cloud Run function's URL that you copied earlier.
Click Save at the top of the Tools pane.
To allow the Tool to invoke the Cloud Run function, switch to your browser tab displaying the Cloud Console (not the Conversational Agents console) and use the search bar at the top of the console to navigate to IAM.
Check the checkbox to Include Google-provided role grants.
Find the row for the Dialogflow Service Agent (you may need to refresh the page) and click the pencil edit icon on its row.
Click + Add Another Role.
In the Select a role field, enter Cloud Run Invoker.
Click SAVE.
Click Check my progress to verify the objectives.
In this task, you'll create the conversational agent that can receive requests in natural language and use the Tool to write them to the BigQuery table via the Cloud Run function.
In the browser tab with the Conversational Agents console, use the left-hand navigation menu to select Playbooks.
Select the Default Generative Playbook that has already been created.
Change the Playbook name to Confirm Travel Data.
For a Goal, enter: Help users book travel.
For Instructions, paste the following into the text field:
These Playbook instructions are designed for use by Agentspace because it only includes one turn of conversation, even though it does multiple things within that turn (invokes its tool and generates a response). Later, you will give the Agentspace agent the responsibility for gathering the relevant info before invoking this Playbook.
Click Save at the top of the Playbook pane.
In the upper right of the Conversational Agents console, click the Toggle simulator chat button (
In the Enter text input box at the bottom of this panel, start the chat with can you help me book a flight?
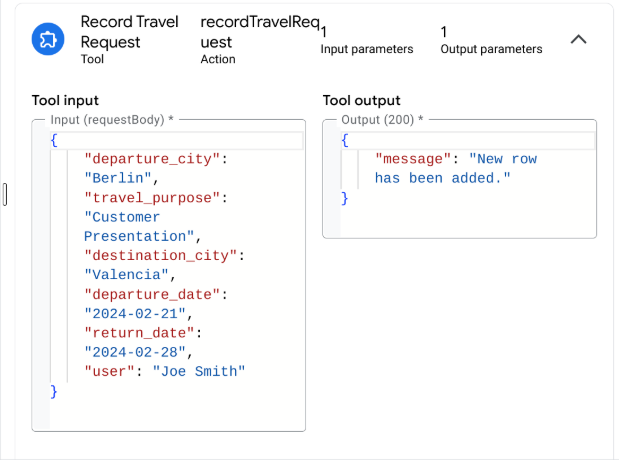
Provide a name, travel purpose, departure city, destination city, and a date range (for example, Joe Smith. Customer Presentation. Berlin to Valencia. Feb 21 to 28.) to observe how the agent behaves.
You should see a card indicating that the Record Travel Request Tool was used, and you can click on it to see the Tool input and response:
200 and restart the chat by resetting the conversation ( ).
).
Your chat should end with a statement similar to:
Click Check my progress to verify the objectives.
In this task, you'll be deploying an Agentspace app, and to do so, you'll need to create a data store. We'll set up a BigQuery data store, allowing you to query and access previously recorded travel requests and integrate Google as the Identity Provider.
Switch back to your Google Cloud Console browser tab and navigate to AI Applications by searching for it at the top of the console.
Select Settings from the left-hand navigation pane.
On the row for the global location, click the pencil icon 
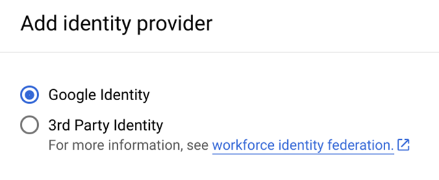
Select Google Identity as your identity provider and click on Save.
Select Data Stores from the left-hand navigation pane.
Click + Create Data Store.
Search for BigQuery to locate the BigQuery card and click SELECT on it.
For the kind of data, keep the default choice of Structured - BigQuery table with your own schema.
For the BigQuery path select Browse.
Search for dataset
Select the radio button next to your table name:
Click Select.
Click Continue.
You can keep the schema as it is and click Continue.
For a name, enter Travel Requests.
Click Create.
Click Check my progress to verify the objectives.
In this task, you'll create a new Agentspace app and link it to a data store.
Navigate to AI Applications > Apps > + Create App.
Find the Agentspace card and click CREATE to create an Agentspace app.
For an app name, enter
Set the location to global.
Under Advanced Options, for the company name, enter
Click Create.
From the left-hand navigation pane, click on Connected data stores > Add existing data store.
On the Data pane, select the Travel Requests data store you created above.
Click on Connect.
Click Check my progress to verify the objectives.
In this task, you'll grant your Agentspace assistant the ability to send messages to your conversational agent and receive its responses.
Navigate to AI Applications > Apps and select
From the left-hand navigation, select Configurations.
Select the Assistant tab.
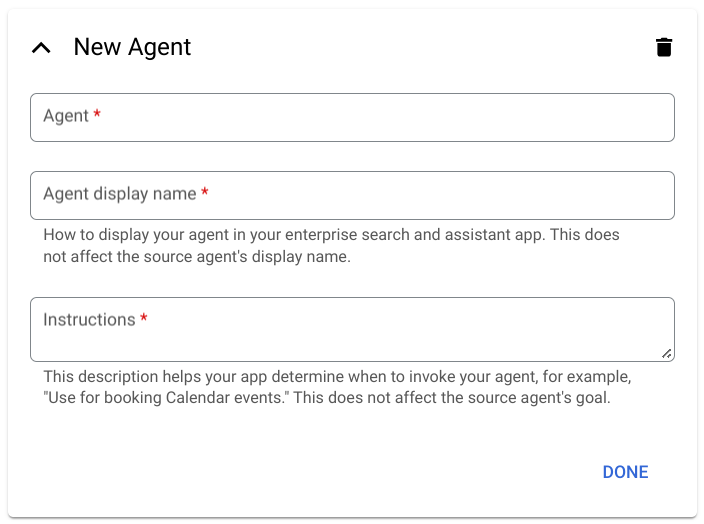
Under the Agents header, select Add an Item. A card will be displayed to connect a New Agent:
Select your browser tab displaying your Conversational Agents console.
From the Agent dropdown at the top of the console, select View all agents.
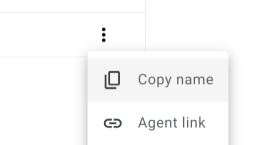
At the end of your Corporate Travel Bot agent's row, select the Options icon (three vertical dots) and select Copy name.
Navigate back to your AI Applications tab, and in the New Agent card, paste the copied value in the Agent field.
For an Agent display name, use Corporate Travel Bot.
For Instructions enter:
Notice that these instructions instruct the Agentspace assistant to do the work of gathering the required information before passing the details to the conversational agent for a single turn of conversation.
Click Done.
Click Save and Publish at the bottom of the pane.
Click Check my progress to verify the objectives.
In this task, your Agentspace assistant will be able to communicate with the conversational agent, which will then utilize its tool to record travel requests.
Select your Agentspace app's
Under The link to your web app header, click Copy and paste the url in a new browser tab. As stated at the start of this task, if you see a 404 error, you may need to give your app more time to be created. You can reload the page every few minutes until the Agentspace web app appears.
Navigate to the Agents and select Corporate Travel Bot.
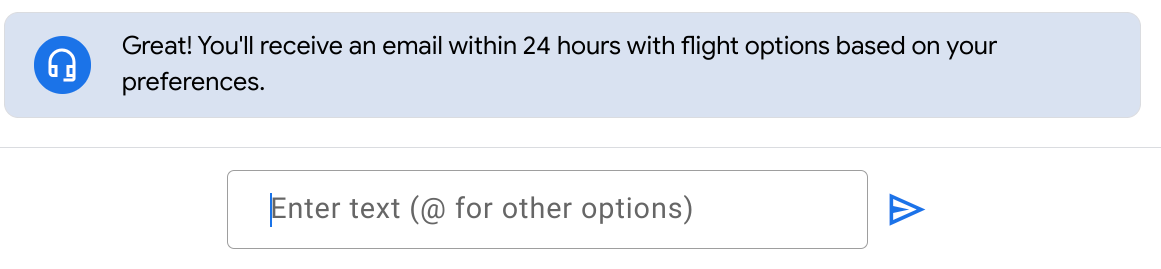
In the primary search bar, enter:
Your assistant should have responded that your request has been recorded, and you will receive a follow up email within 24 hours.
Please note, in this activity you used very minimal Playbook instructions and no conversation examples, which means that this agent will not be very robust. If you need to restart the conversation to try it again, click the New button in the upper left.
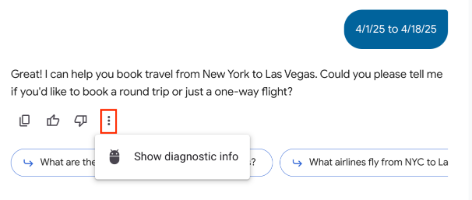
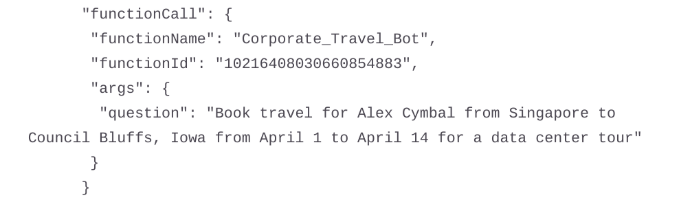
Under the assistant's response, there is an Options menu (three vertical dots). Expand it and click on the Show diagnostic info.
In the diagnostic info displayed, confirm that your conversation has triggered invoking your Cloud Run function by finding "functionName": "Corporate_Travel_Bot".
To confirm that requests are being recorded, return to the browser tab displaying your BigQuery 
Click Check my progress to verify the objectives.
In this lab, you’ve learned how to extend the Agentspace assistant with conversational agents. More specifically, you've learned to:
Manual Last Updated August 27, 2025
Lab Last Tested August 27, 2025
Copyright 2023 Google LLC All rights reserved. Google and the Google logo are trademarks of Google LLC. All other company and product names may be trademarks of the respective companies with which they are associated.


This content is not currently available
We will notify you via email when it becomes available

Great!
We will contact you via email if it becomes available

One lab at a time
Confirm to end all existing labs and start this one