


Before you begin
- Labs create a Google Cloud project and resources for a fixed time
- Labs have a time limit and no pause feature. If you end the lab, you'll have to restart from the beginning.
- On the top left of your screen, click Start lab to begin
Create and schedule a scan configuration
/ 20
Modify the existing inspection template and create a de-identify template for structured data.
/ 20
Create and run an inspection job
/ 30
Create and run a de-identify job
/ 30
Sensitive Data Protection is a fully managed service designed to help you discover, classify, and protect sensitive information. Key options include Sensitive Data Discovery for continuously profiling your sensitive data, de-identification of sensitive data including redaction, and Cloud Data Loss Prevention (DLP) API to let you build in discovery, inspection, and de-identification into custom workloads and applications.
Imagine you have raw data in Cloud Storage that contains sensitive data, and you want to identify, protect, and redact it before the files get used by end users for analysis or to train machine learning models. Sensitive Data Protection can help!
In this lab, you begin by enabling discovery for continuous monitoring of sensitive data in Cloud Storage. Based on the discovery results, you create and modify custom, reusable templates for inspection and de-identification (redaction) of Cloud Storage files. Last, you use those templates to run jobs for deeper inspection and redaction of specific sensitive data types in your Cloud Storage files.
In this lab, you learn how to:
Read these instructions. Labs are timed and you cannot pause them. The timer, which starts when you click Start Lab, shows how long Google Cloud resources are made available to you.
This hands-on lab lets you do the lab activities in a real cloud environment, not in a simulation or demo environment. It does so by giving you new, temporary credentials you use to sign in and access Google Cloud for the duration of the lab.
To complete this lab, you need:
Click the Start Lab button. If you need to pay for the lab, a dialog opens for you to select your payment method. On the left is the Lab Details pane with the following:
Click Open Google Cloud console (or right-click and select Open Link in Incognito Window if you are running the Chrome browser).
The lab spins up resources, and then opens another tab that shows the Sign in page.
Tip: Arrange the tabs in separate windows, side-by-side.
If necessary, copy the Username below and paste it into the Sign in dialog.
You can also find the Username in the Lab Details pane.
Click Next.
Copy the Password below and paste it into the Welcome dialog.
You can also find the Password in the Lab Details pane.
Click Next.
Click through the subsequent pages:
After a few moments, the Google Cloud console opens in this tab.

The discovery service within Sensitive Data Protection empowers you to identify where sensitive and high-risk data reside across your organization. When you create a discovery scan configuration, Sensitive Data Protection scans the resources you select for review and generates data profiles, which are a set of insights on the infoTypes (types of sensitive data) identified and metadata on data risk and sensitivity level.
In this task, you create a discovery scan to automatically profile data across all Cloud Storage buckets in the project. As it can take some time for the full discovery results to be generated, you are provided with highlights and summaries of the key results in the last section of this task.
In the Google Cloud console, click on the Navigation menu (
Under Data Protection, click Sensitive Data Protection.
Click the tab named Discovery.
Under Cloud Storage, click Enable.
For Select a discovery type, leave the option enabled for Cloud Storage, and click Continue.
For Select scope, leave the option enabled for Scan selected project, and click Continue.
For Managed schedules, leave the default, click Continue.
In this lab, you are scheduling the discovery scan to run immediately after creation, but there are many options for scheduling scans to run on a periodic basis (such as daily or weekly) or after certain events (such as when an inspection template is updated.)
For Select inspection template, leave the option enabled for Create a new inspection template.
Leave all other defaults, and click Continue.
By default, the new inspection template includes all existing infoTypes.
For Confidence threshold, the default for Minimum likelihood is Possible, which means that you get only the findings that are evaluated as Possible, Likely, and Very_Likely.
In a later task, you modify this inspection template to explore other options for infoTypes and confidence threshold.
For Add actions, enable Publish to Security Command Center.
For Add actions, also enable Save data profile copies to BigQuery and provide the dataset and table (which have been pre-created in this lab) to save the results to BigQuery.
| Property | Value |
|---|---|
| Project ID | |
| Dataset ID | cloudstorage_discovery |
| Table ID | data_profiles |
Click Continue.
For Set location to store configuration, leave the option enabled for us (multiple regions in United States), and click Continue.
Provide a display name for this config: Cloud Storage Discovery
Click Create, and then confirm the creation by clicking Create configuration.
Click Check my progress to verify the objective.
Note: After the configuration scan begins, it may be some time before full results are available.
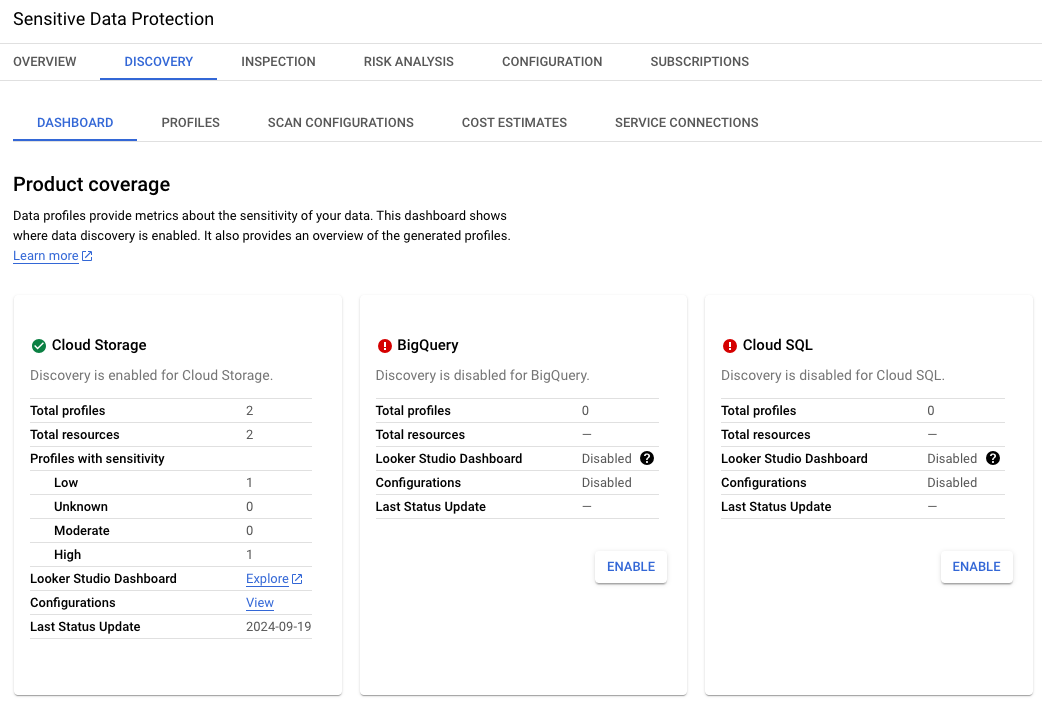
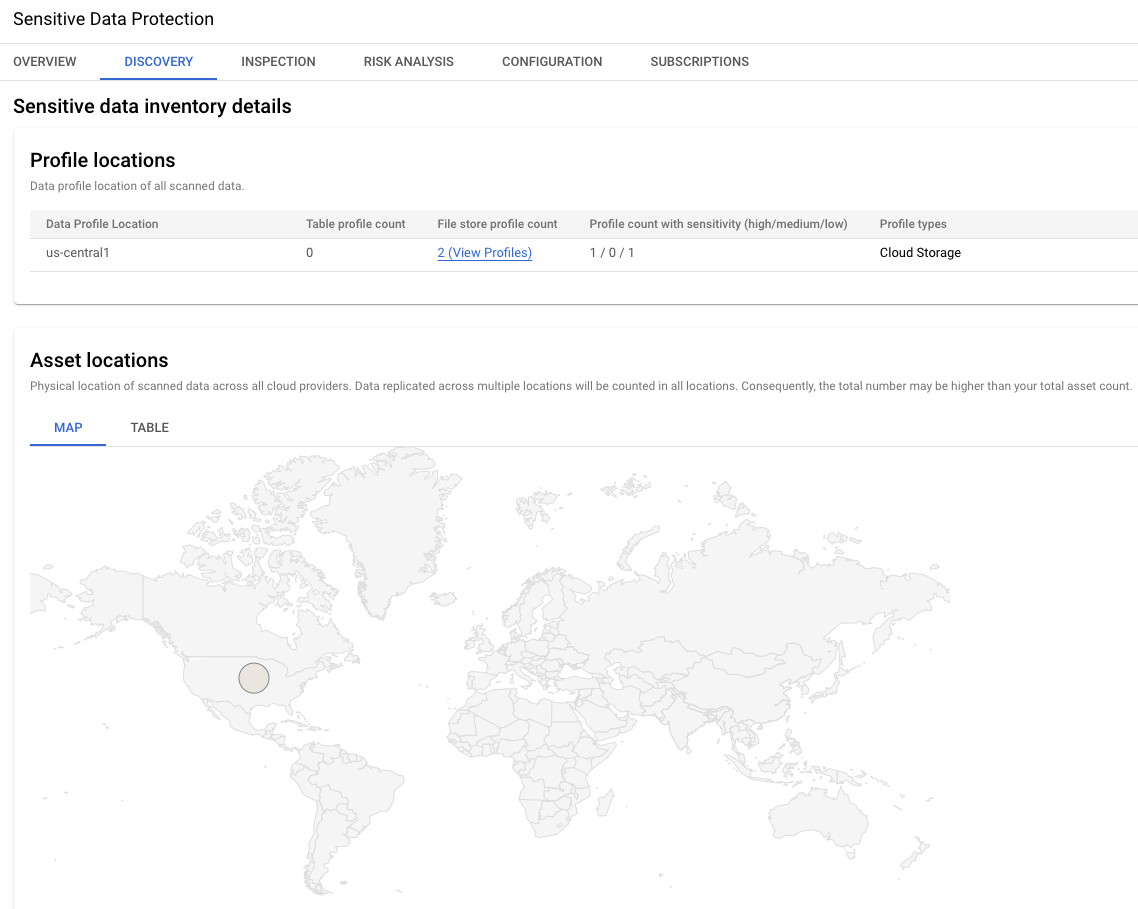
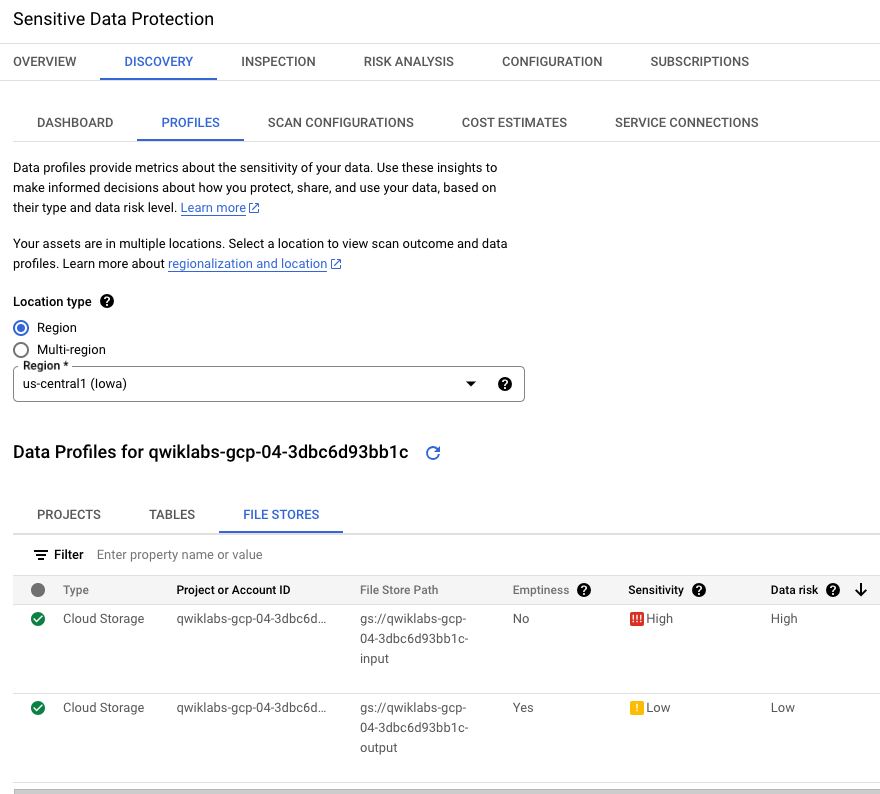
The images below display the key results of enabling discovery for Cloud Storage in this lab environment.For the Cloud Storage data included in this lab environment, the results have flagged the potential presence of several infoTypes including US Social Security numbers, which are highly sensitive data.
Two profiles have been identified for Cloud Storage: one with low sensitivity (empty bucket to receive output from jobs) and one with high sensitivity (bucket containing raw data).
This section of the results provides the global location of the two data profiles. In this example, both are in the us-central1 region.
The discovery results also provide the key infoTypes identified in Cloud Storage: US Social Security number, date of birth, email address, name, etc.
The Profiles tab identifies the sensitivity and risk levels for each specific Cloud Storage bucket name: one with low sensitivity (empty bucket to receive output from jobs) and one with high sensitivity (bucket containing raw data including US Social Security number).
In this lab environment, be sure to select the Location type as Region >
Now that you know US Social Security numbers have been identified in your Cloud Storage files, you can start making a plan to inspect and redact this sensitive data before the files are used to train machine learning models.
In this task, you configure two templates:
Later in the lab, you use these templates to further inspect and redact the US Social Security numbers by running inspection and de-identify jobs.
Recall that when you enabled discovery for Cloud Storage, a new inspection template was created with several default values, including those for infoTypes and confidence threshold.
In this section, imagine that you have already reviewed the full discovery results, and now, you want to modify that inspection template to focus on US Social Security numbers.
Return to the Sensitive Data Protection overview page by clicking Navigation menu (
Click the Configuration tab.
In the Templates tab, locate the line for the template generated by discovery (such as template ID 7216194786087173213).
Note this template ID for use later in Task 4.
Under Actions for this template ID, click on the three vertical dots, and select Edit.
Update Display name to Inspection Template for US SSN.
Update Description to This template was created as part of a Sensitive Data Protection profiler configuration and was modified for deeper inspection for US Social Security numbers.
For InfoTypes, click Manage InfoTypes.
Enable the checkbox for US_SOCIAL_SECURITY_NUMBER, and deselect all other options.
You can easily deselect all other options by clicking on Select all rows (under the Filter icon), and clicking it again to deselect all values.
Click Done to return to the inspection template.
For Confidence threshold ("minimum likelihood"), select Unlikely.
In addition to the findings that are evaluated as Possible, Likely, and Very_Likely, the results will now include Unlikely to support further review of potential instances of US Social Security numbers.
Leave all other defaults, and click Save.
Click Confirm save.
Return to Sensitive Data Protection overview page.
Click the Configuration tab.
In the Templates tab, click Create Template.
Provide the following values to create the de-identify template:
| Property | Value |
|---|---|
| Template type | De-identify (remove sensitive data) |
| Data transformation type | Record |
| Template ID | us_ssn_deidentify |
| Display name | De-identification Template for US SSN |
| Location type | Multi_region > global (Global) |
Leave all other default values, and click Continue.
For Configure de-identification > Transformation Rule, add the following field names by typing the name and then hitting enter key: ssn and email
For the Transformation type, select Primitive field transformation.
For Transformation method > Transformation, select Replace.
This option replaces the contents of each instance for the fields that you provided in step 6 (ssn and email).
For Transformation method > Replace type, select String.
For Transformation method > String value, leave the default value of [redacted].
Click + Add Transformation Rule to add a second rule.
For Transformation Rule for this second rule, add the following field name by typing the name and then hitting enter key: message
In this lab environment, there are CSV files in Cloud Storage that contain a column (or field) named message, which stores the example chat messages between customers and service agents.
For Transformation type, select Match on infoType, and then click Add Transformation.
For Transformation Method, select Replace with infoType name.
For InfoTypes to transform, select Any detected infoTypes defined in an inspection template or inspect config that are not specified in other rules.
This option applies infoType inspection and redaction to any files with a field called message when this template is used to run a job.
Click Create.
Click Check my progress to verify the objective.
Note: As mentioned previously, after the configuration scan begins, it may be some time before full results are available.
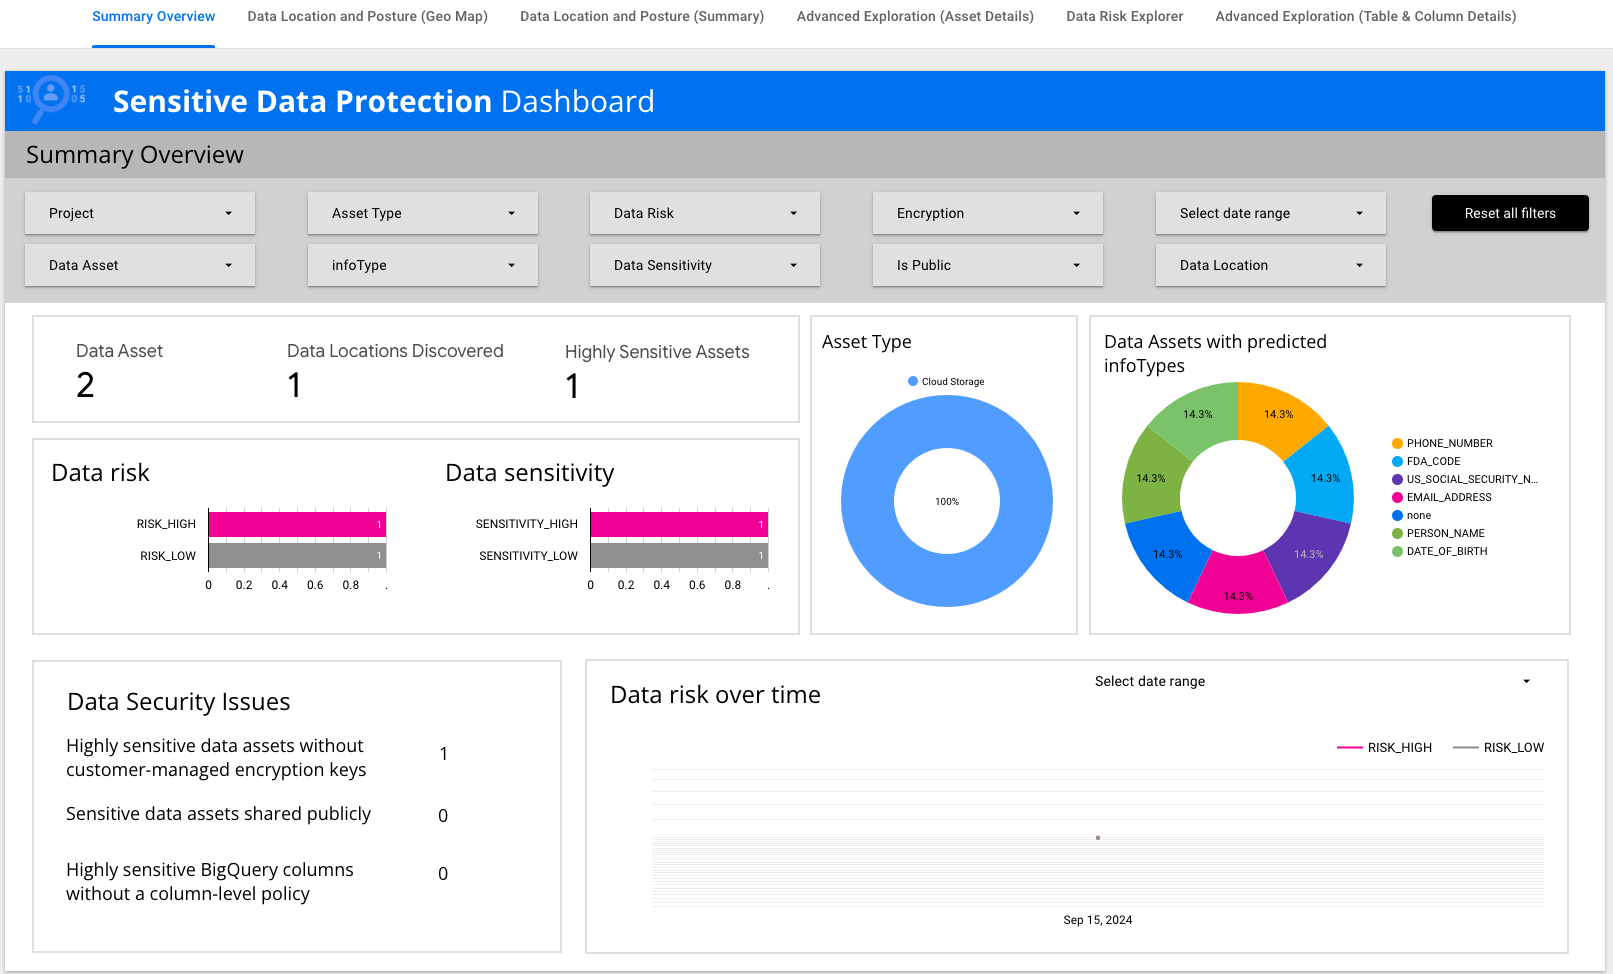
Now that some time has passed while you created the templates, some results will be available in the Looker dashboard that is generated by the discovery scan.In this task, you review the initial discovery results that are provided in a Looker dashboard sourced from the data profile information saved to BigQuery in Task 1.
Return to Sensitive Data Protection overview page.
Under Discovery > Scan Configurations tab, locate the row named Cloud Storage Discovery. Under Looker Studio, click Looker for that row.
For Requesting Authorization, click Authorize.
In the dialog window for Choose an account from qwiklabs.net, select
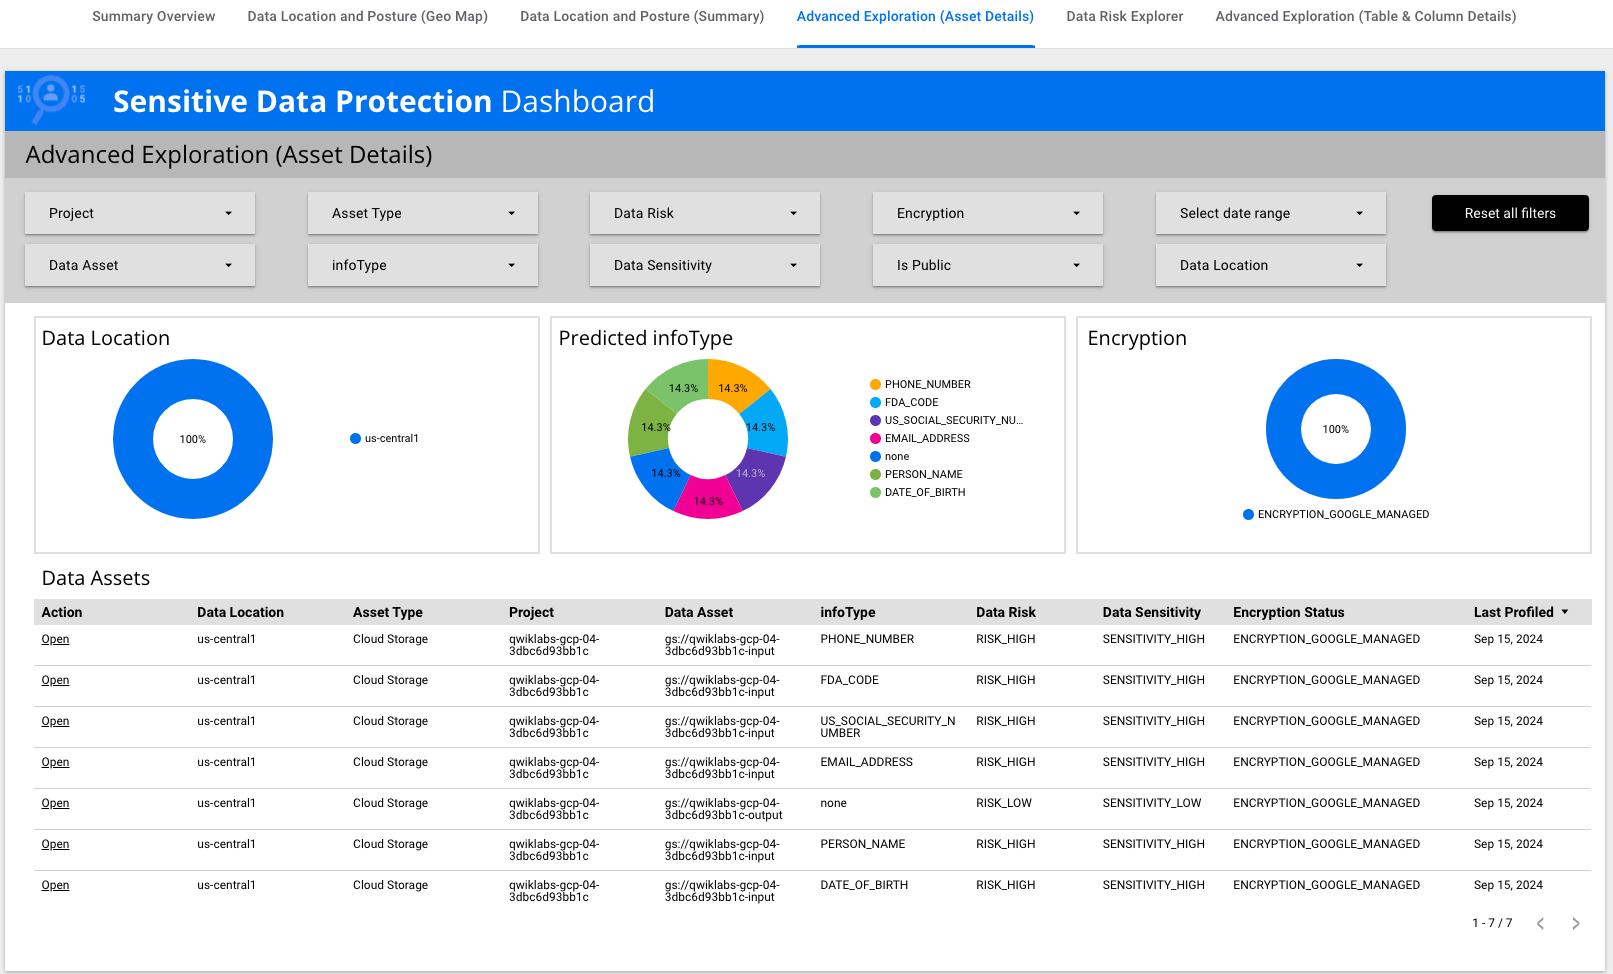
Review Summary Overview.
Notice that there are data tiles summarizing key information such as data risk, data sensitivity, and asset types.
Click on Advanced Exploration (Asset Details).
Locate the row that has infoType of US_SOCIAL_SECURITY_NUMBER. Under Action, click Open for that row.
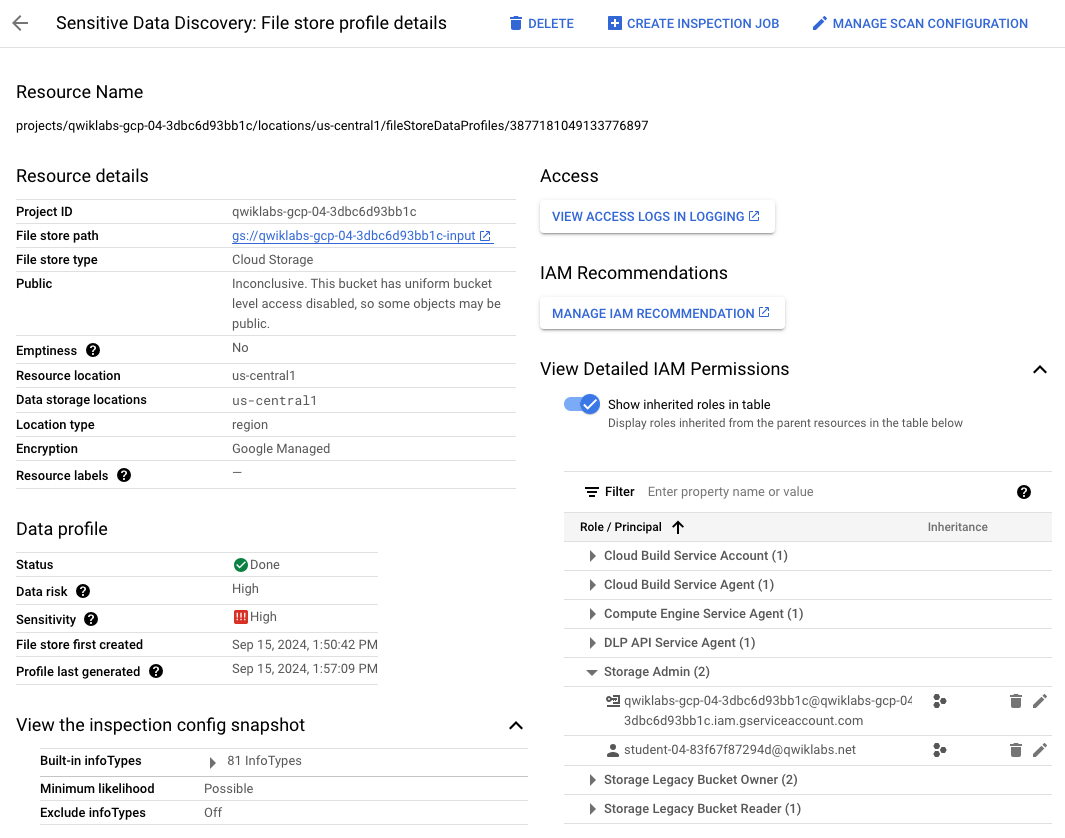
Review the opened page, which is titled Sensitive Data Discovery: File store profile details.
Notice that there are many details provided on the resources scanned, including IAM permissions.
Expand the arrow next to View Detailed IAM Permissions.
Expand the arrow next to Storage Admin.
You can see that another user (
Remain on this page, and proceed to the next task.
For Sensitive Data Protection, a typical workflow after a discovery scan is to run a more detailed inspection job for deeper investigation into specific infoTypes.
Recall that in Task 2, you created an inspection template for deeper inspection for US Social Security numbers. In this task, you use that template to create and run the inspection job.
Click Create inspection job.
For Choose input data, provide the following values:
| Property | Value |
|---|---|
| Job ID | us_ssn_inspection |
| Location type | Multi_region > us (multiple regions in United States) |
| Storage type | Google Cloud Storage |
| Location type | Scan a single file or folder path |
| URL |
gs:/// at end of URL) |
| Scan recursively | Enable this option (Be sure to add a trailing / to the URL above, so that this option can be enabled) |
| Sampling | Increase value to 100% |
| Sampling method | No sampling |
| Files | Select TEXT and CSV (and deselect all other options), and click OK |
Click Continue.
For Inspection template > Template name, add the path to the inspection template as provided below, replacing TEMPLATE_ID with the Template ID for the inspection template that you modfied in Task 2 (such as 7216194786087173213):
projects/
To view the template ID again, navigate to the Configuration tab of the Sensitive Data Protection overview page.
Leave all other defaults, and click Continue.
For Add actions, enable the option for Save to BigQuery, and enable the checkbox for Include quote.
This option enables the job to copy both the location and contents of the potentially sensitive data to the BigQuery.
Provide the dataset and table (which have been pre-created in this lab) to save the results to BigQuery:
| Property | Value |
|---|---|
| Project ID | |
| Dataset ID | cloudstorage_inspection |
| Table ID | us_ssn |
For Add actions, also enable Publish to Security Command Center.
Click Continue.
Leave the default for Schedule as None (run the one-off job immediately upon creation) to run the job immediately, and click Continue.
Similar to discovery scans, you can schedule inspection jobs to run on a specific schedule. In this case, you run the job immediately after it is created.
Remain on this page, and wait for the job to complete.
When the job has a status of Done, proceed to the next section.
In the previous section, you selected to save the inspection results to the BigQuery table named us_ssn. With one click below, you can easily be routed to BigQuery to review the results.
Click View findings in BigQuery.
In BigQuery, click Preview to see the contents of the table.
Notice the column named quote, which contains a copy of the exact value that has been flagged by the inspection job for additional review. You can also scroll to the right of the table and review the column named container name to see the location (specifically filename) containing the quoted value.
Click Check my progress to verify the objective.
With Sensitive Data Protection, you mitigate sensitive data vulnerabilities in Cloud Storage by running a de-identification job to create new copies of Cloud Storage files with the sensitive data redacted. These new copies can be shared with downstream workflows, instead of the original versions that contain the sensitive data.
In this task, you create and run a de-identification job using the de-identify template that you created in Task 2.
Return to Sensitive Data Protection overview page.
Click on the Inspection tab, and then click Create job and job triggers.
For Choose input data, provide the following values:
| Property | Value |
|---|---|
| Job ID | us_ssn_deidentify |
| Location type | Multi_region > us (multiple regions in United States) |
| Storage type | Google Cloud Storage |
| Location type | Scan a bucket with optional include/exclude rules |
| Bucket name | |
| Sampling | Increase value to 100% |
| Sampling method | No sampling |
| Files | Select TEXT and CSV (and deselect all other options), and click OK |
ignore
The Exclude paths 1 value is now:
gs://
This option allows you to tell the de-identify job to ignore files in that subdirectory named ignore.
Note that you do not add a value for the inspection template. In an upcoming step, you define the value for the de-identify template instead.
For Configure detection, leave all default values, and click Continue.
For Add actions, scroll down the page to find and enable Make a de-identified copy.
For Structured de-identification template, enter the de-identify template that you previously created for structured files (such as CSV and text files):
projects/
| Property | Value |
|---|---|
| Project ID | |
| Dataset ID | cloudstorage_transformations |
| Table ID | deidentify_ssn_csv |
gs://
This value tells the job to write the redacted output to the second bucket that has been pre-created in this lab for output files.
For Files, select TEXT and CSV (and deselect all other options), and click OK.
Click Continue.
Leave the default for Schedule as None to run the job immediately, and click Continue.
Similar to inspection jobs, the options for scheduling include running the de-identify job on a periodic schedule (such as weekly).
Remain on this page, and wait for the job to complete.
When the job has a status of Done, leave this browser tab open, and proceed to the next section.
In the previous section, you selected to save the de-identify details to the BigQuery table named deidentify_ssn_csv. In this section, you navigate to BigQuery to view the transformation details.
In the Google Cloud console, click on the Navigation menu (
In the Explorer pane, expand
Click Preview to see the results.
Notice the columns named container_name and transformation.type, which provides the details on the files that were de-identified using specific transformation rules.
Return to the inspection job results page, and click on Configuration.
Scroll down to Actions > Output bucket for de-identified Cloud Storage Data.
Click on the bucket link (gs://
Click Check my progress to verify the objective.
In this lab, you enabled discovery for continuous monitoring of sensitive data in Cloud Storage files. You also created and modified reusable templates for inspection and de-identification and ran inspection and de-identification jobs with the option enabled to write job results to BigQuery for additional investigation.
Check out the following resources to learn more about Sensitive Data Protection for Cloud Storage:
...helps you make the most of Google Cloud technologies. Our classes include technical skills and best practices to help you get up to speed quickly and continue your learning journey. We offer fundamental to advanced level training, with on-demand, live, and virtual options to suit your busy schedule. Certifications help you validate and prove your skill and expertise in Google Cloud technologies.
Manual Last Updated November 15, 2024
Lab Last Tested November 15, 2024
Copyright 2025 Google LLC All rights reserved. Google and the Google logo are trademarks of Google LLC. All other company and product names may be trademarks of the respective companies with which they are associated.

This content is not currently available
We will notify you via email when it becomes available

Great!
We will contact you via email if it becomes available

One lab at a time
Confirm to end all existing labs and start this one