


Before you begin
- Labs create a Google Cloud project and resources for a fixed time
- Labs have a time limit and no pause feature. If you end the lab, you'll have to restart from the beginning.
- On the top left of your screen, click Start lab to begin
Enable relevant APIs
/ 20
Create a service and check Cloud Run Deployment
/ 40
Redeploy a new version of your application
/ 40
Deploying a web application for the first time can be intimidating. Even after the first deployment, if the process is too much work, you might avoid deploying new versions of your application. With continuous deployment, you can automatically deploy changes of your application with ease.
In this lab, you write a Python web application and configure Cloud Run to automatically deploy your application when a change is made to the source code of your application. Then you modify your application and deploy it again.
If you do not already have a GitHub account, you will need to create a GitHub account
Recommendations
Read these instructions. Labs are timed and you cannot pause them. The timer, which starts when you click Start Lab, shows how long Google Cloud resources will be made available to you.
This Qwiklabs hands-on lab lets you do the lab activities yourself in a real cloud environment, not in a simulation or demo environment. It does so by giving you new, temporary credentials that you use to sign in and access Google Cloud for the duration of the lab.
To complete this lab, you need:
Note: If you already have your own personal Google Cloud account or project, do not use it for this lab.
Note: If you are using a Pixelbook, open an Incognito window to run this lab.
Click the Start Lab button. If you need to pay for the lab, a pop-up opens for you to select your payment method. On the left is a panel populated with the temporary credentials that you must use for this lab.
Copy the username, and then click Open Google Console. The lab spins up resources, and then opens another tab that shows the Sign in page.
Tip: Open the tabs in separate windows, side-by-side.
In the Sign in page, paste the username that you copied from the Connection Details panel. Then copy and paste the password.
Important: You must use the credentials from the Connection Details panel. Do not use your Qwiklabs credentials. If you have your own Google Cloud account, do not use it for this lab (avoids incurring charges).
Click through the subsequent pages:
After a few moments, the Cloud Console opens in this tab.
Cloud Shell is a virtual machine that is loaded with development tools. It offers a persistent 5GB home directory and runs on the Google Cloud. Cloud Shell provides command-line access to your Google Cloud resources.
In the Cloud Console, in the top right toolbar, click the Activate Cloud Shell button.
Click Continue.
It takes a few moments to provision and connect to the environment. When you are connected, you are already authenticated, and the project is set to your PROJECT_ID. For example:
gcloud is the command-line tool for Google Cloud. It comes pre-installed on Cloud Shell and supports tab-completion.
You can list the active account name with this command:
(Output)
(Example output)
You can list the project ID with this command:
(Output)
(Example output)
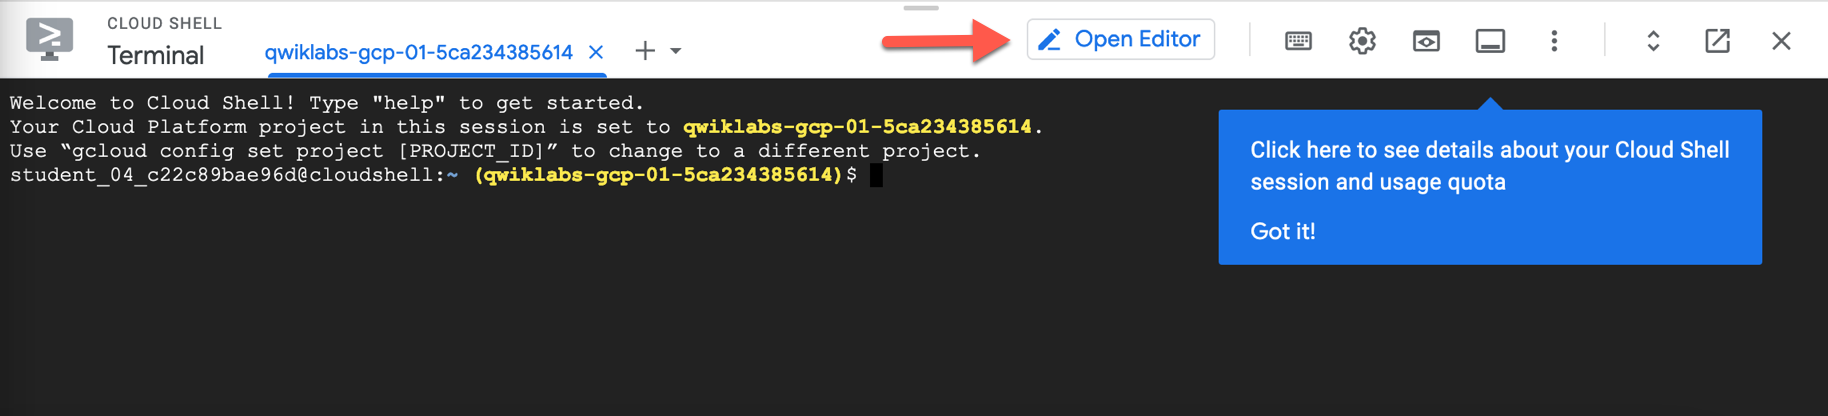
Once you activate the Cloud Shell from the above screenshot, click on Open Editor
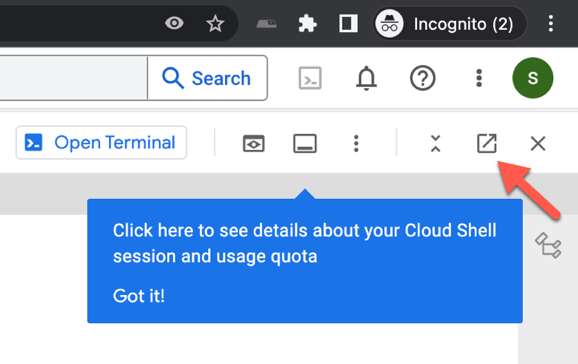
To make it easier to toggle between the Cloud console and the Editor, click on open in new window which should open up a separate tab:
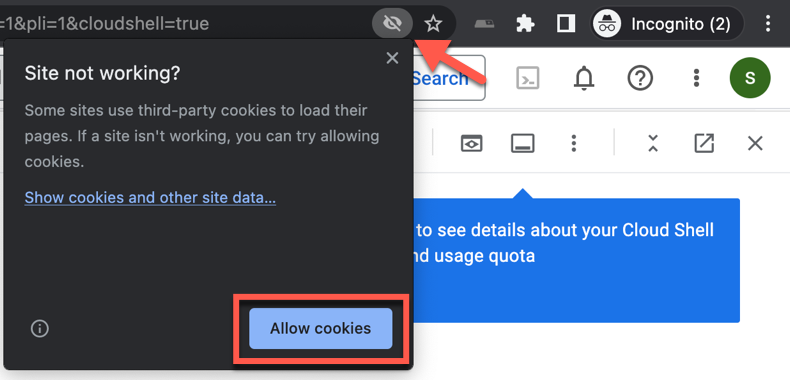
If you see a message that says We can't load the code editor here because third-party cookies are disabled. We will need to allow cookies. Click on the eye icon on the top of the browser and select Allow cookies:
In the bottom part of the screen, you should see a terminal window which is where we'll be running the commands in this lab. This is your Cloud Shell Terminal.
Click Check my progress to verify the objective.
Navigate to the correct directory:
Create the helloworld directory:
Navigate to the helloworld directory:
Create the requirements.txt with the list of dependencies:
Create a main.py file:
Open the main.py file in Cloud Shell Editor:
An empty file should now appear in the top part of the screen. This is where you can edit this main.py file.
Copy and paste this code into the empty main.py file:
This code responds to requests with the greeting: "Hello! This is version 0.0.0 of my application."
Return to the Cloud Shell terminal on the bottom of your screen.
Ensure that you are still in the correct directory:
Initialize your git repository
Install the GitHub CLI to run gh commands
Log in to the GitHub CLI
Press Enter to accept the default options. Read the instructions in the CLI tool to log in through the GitHub website.
Confirm you are logged in:
If you have logged in successfully, this should output your GitHub username.
Create a GITHUB_USERNAME variable
Confirm you have created the environment variable:
If you have successfully created the variable, this should output your GitHub username.
Set your global git credentials:
This command creates a git user for your Cloud Shell terminal.
Add all files in the current directory to this commit:
Create the first commit:
Confirm you are in the correct directory:
Create an empty GitHub repository named hello-world:
Add the hello-world repository as the remote origin:
Push your commit to main branch of the origin repository:
Run this command and visit the resulting URL to view your application code on GitHub:

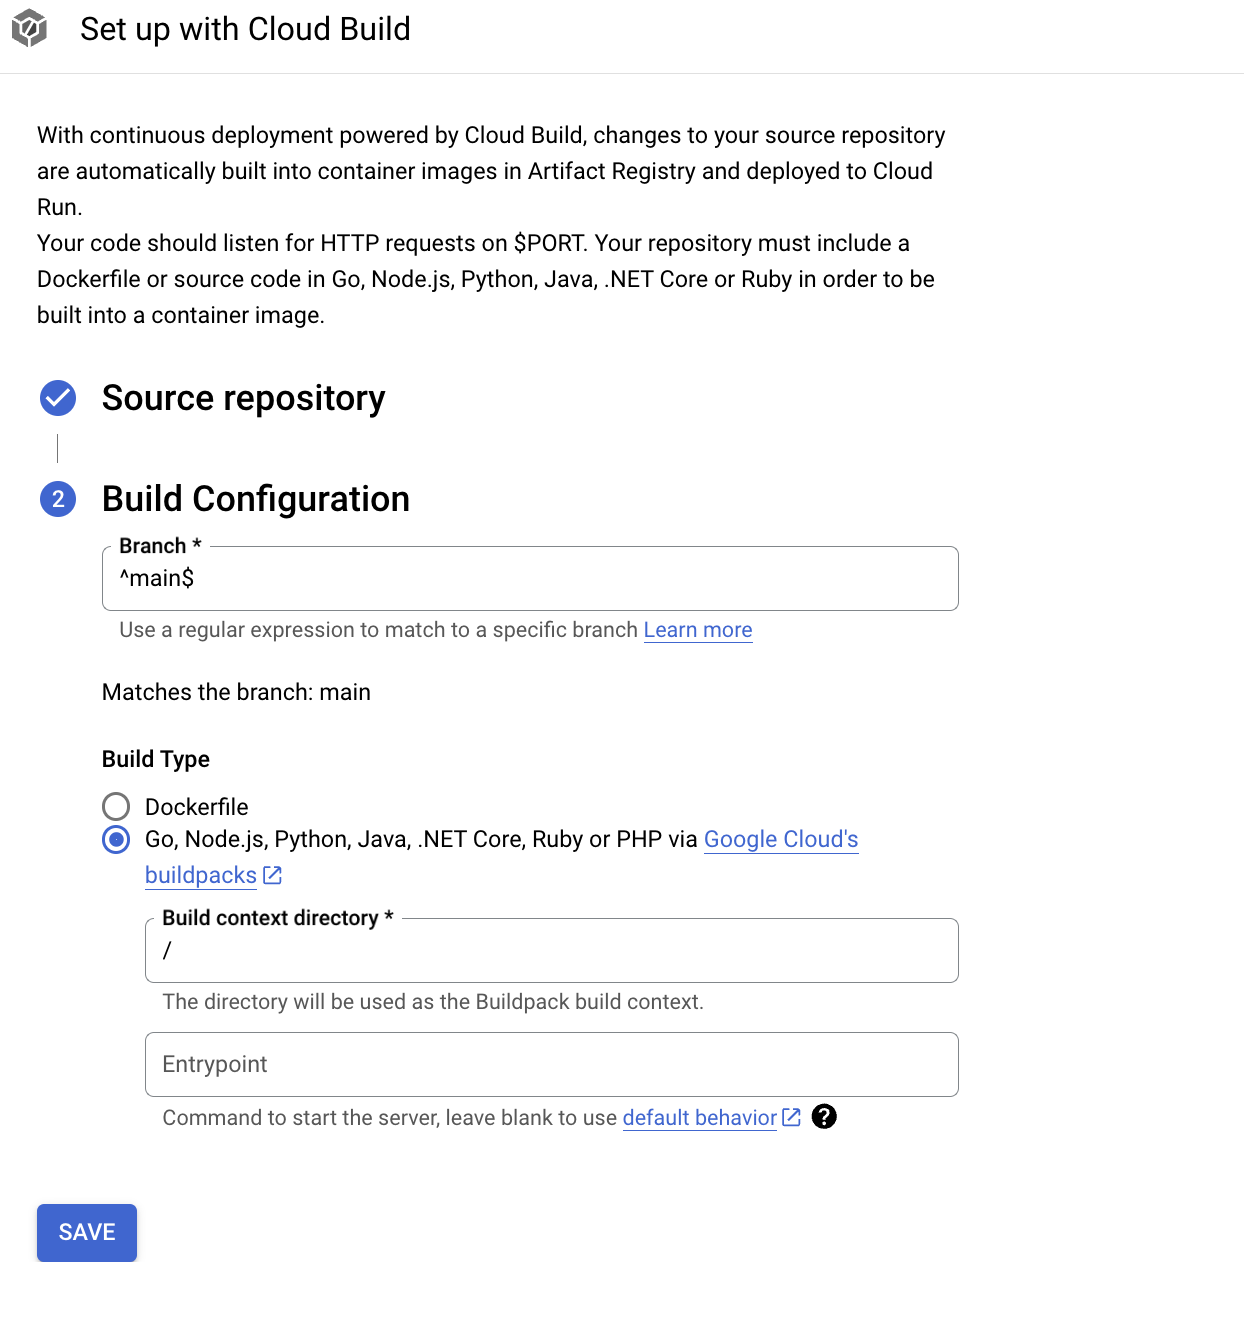
your-user-name/hello-world as the Repository
^main$
/
Once the build finishes, run this command and visit the resulting URL to view your running application:
It may take several minutes for the build to finish before you can see your changes.
Click Check my progress to verify the objective.
helloworld direoctory, reopen main.py the Cloud Shell Editor
0.0.0 in main.py to 0.0.1. The code in main.py should now include the line:
Click Check my progress to verify the objective.
In this lab, you wrote a Python web application and configure Cloud Run to automatically deploy your application when a change was made to the source code of your application. Then you modified your application and deployed it again.
When you have completed your lab, click End Lab. Qwiklabs removes the resources you’ve used and cleans the account for you.
You will be given an opportunity to rate the lab experience. Select the applicable number of stars, type a comment, and then click Submit.
The number of stars indicates the following:
You can close the dialog box if you don't want to provide feedback.
For feedback, suggestions, or corrections, please use the Support tab.
Manual Last Updated April 3, 2024
Lab Last Tested April 3, 2024
Copyright 2022 Google LLC All rights reserved. Google and the Google logo are trademarks of Google LLC. All other company and product names may be trademarks of the respective companies with which they are associated.


This content is not currently available
We will notify you via email when it becomes available

Great!
We will contact you via email if it becomes available

One lab at a time
Confirm to end all existing labs and start this one