arrow_back

Building a DevOps Pipeline

Sign in Join
Get access to 700+ labs and courses

Building a DevOps Pipeline

Lab 2 hours universal_currency_alt 5 Credits show_chart Introductory
info This lab may incorporate AI tools to support your learning.
Get access to 700+ labs and courses

Overview

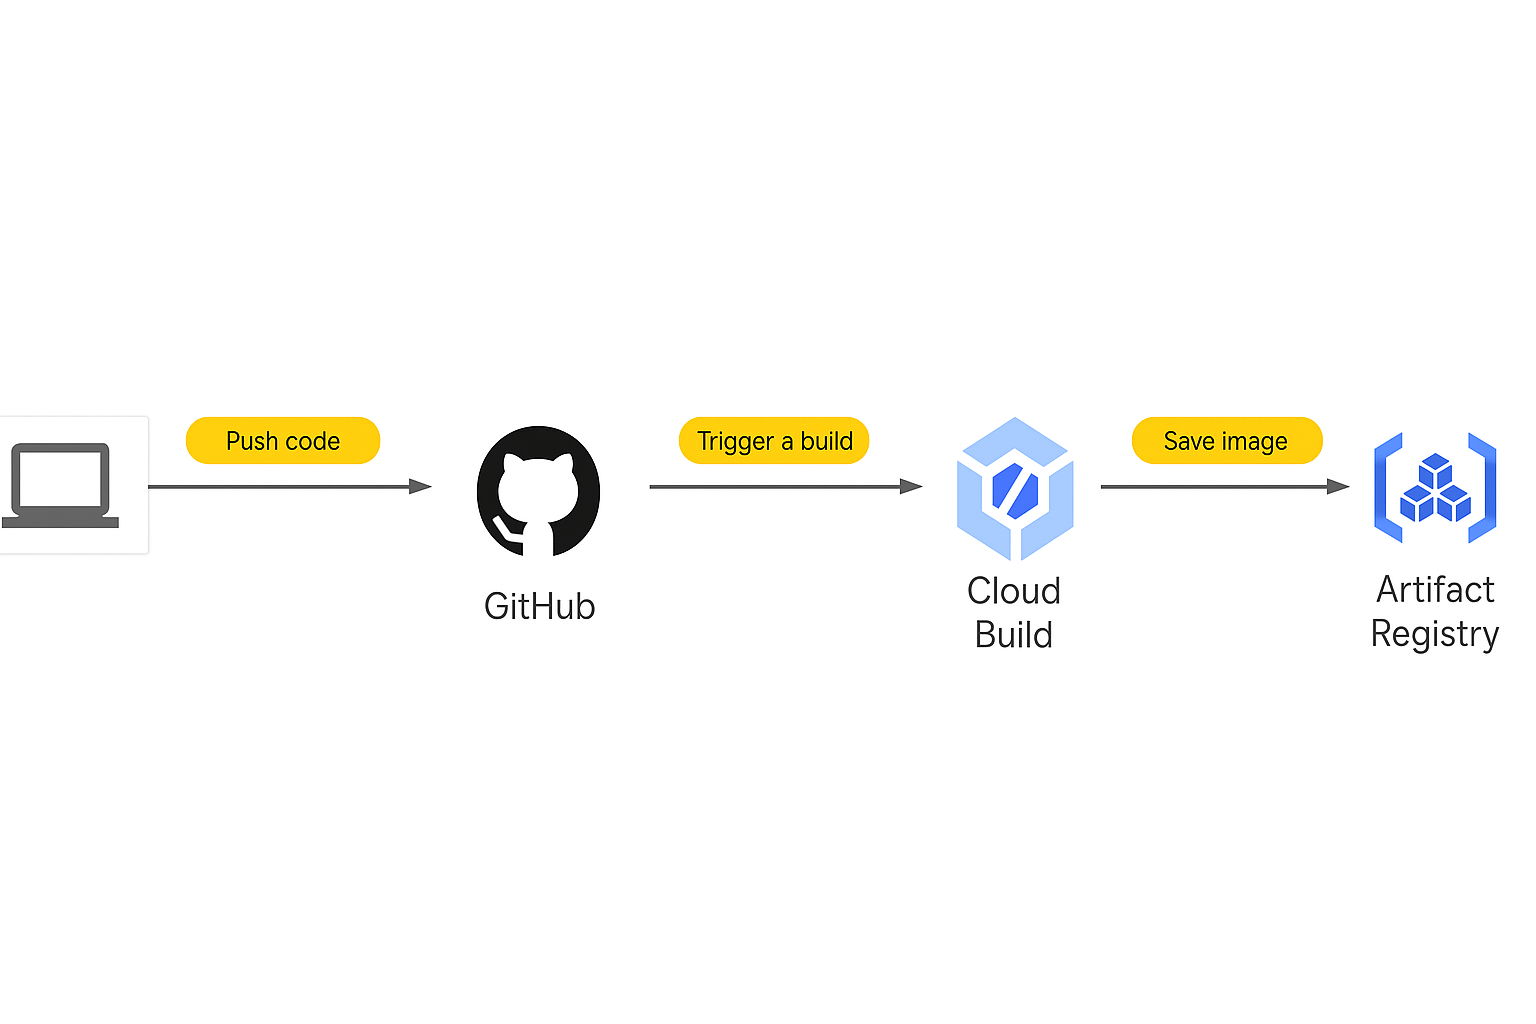
In this lab, you will build a continuous integration pipeline using GitHub, Cloud Build, Build triggers, and Artifact Registry.

Continuous integration pipeline architecture

Objectives

In this lab, you will learn how to perform the following tasks:

  • Create a Git repository on GitHub
  • Create a simple Python application
  • Test Your web application in Cloud Shell
  • Define a Docker build
  • Manage Docker images with Cloud Build and Artifact Registry
  • Automate builds with triggers
  • Test your build changes

Prerequisites

If you do not already have a GitHub account, you will need to create a GitHub account

Recommendations

  1. Use an existing GitHub account if you have one. GitHub is more likely to block a new account as spam.
  2. Configure two-factor authentication on your GitHub account to reduce the chances of your account being marked as spam. R

Set up your lab environment

For each lab, you get a new Google Cloud project and set of resources for a fixed time at no cost.

  1. Sign in to Qwiklabs using an incognito window.

  2. Note the lab's access time (for example, 1:15:00), and make sure you can finish within that time.
    There is no pause feature. You can restart if needed, but you have to start at the beginning.

  3. When ready, click Start lab.

  4. Note your lab credentials (Username and Password). You will use them to sign in to the Google Cloud Console.

  5. Click Open Google Console.

  6. Click Use another account and copy/paste credentials for this lab into the prompts.
    If you use other credentials, you'll receive errors or incur charges.

  7. Accept the terms and skip the recovery resource page.

Task 1. Create a Git repository

First, you will create a Git repository using the GitHub. This Git repository will be used to store your source code. Eventually, you will create a build trigger that starts a continuous integration pipeline when code is pushed to it.

  1. Click Cloud Console, and in the new tab click Activate Cloud Shell (Cloud Shell icon).
  2. If prompted, click Continue.
  3. Run the following command to install the GitHub CLI:
curl -sS https://webi.sh/gh | sh
  1. Log in to the GitHub CLI
gh auth login

Press Enter to accept the default options. Read the instructions in the CLI tool to log in through the GitHub website.

  1. Confirm you are logged in:
gh api user -q ".login"

If you have logged in successfully, this should output your GitHub username.

  1. Create a GITHUB_USERNAME variable
GITHUB_USERNAME=$(gh api user -q ".login")
  1. Confirm you have created the environment variable:
echo ${GITHUB_USERNAME}

If you have successfully created the variable, this should output your GitHub username.

  1. Set your global git credentials:
git config --global user.name "${GITHUB_USERNAME}" git config --global user.email "${USER_EMAIL}"

This command creates a git user for your Cloud Shell terminal.

  1. Create an empty GitHub repository named devops-repo:
gh repo create devops-repo --private
  1. Enter the following command in Cloud Shell to create a folder called gcp-course:
mkdir gcp-course
  1. Change to the folder you just created:
cd gcp-course
  1. Now clone the empty repository you just created. If prompted, click Authorize:
gh repo clone devops-repo Note: You may see a warning that you have cloned an empty repository. That is expected at this point.
  1. The previous command created an empty folder called devops-repo. Change to that folder:
cd devops-repo

Task 2. Create a simple Python application

You need some source code to manage. So, you will create a simple Python Flask web application. The application will be only slightly better than "hello world", but it will be good enough to test the pipeline you will build.

  1. In Cloud Shell, click Open Editor (Editor icon) to open the code editor.
  2. Select the gcp-course > devops-repo folder in the explorer tree on the left.
  3. Click on devops-repo.
  4. Click New File.
  5. Name the file main.py and press Enter.
  6. Paste the following code into the file you just created:
from flask import Flask, render_template, request app = Flask(__name__) @app.route("/") def main(): model = {"title": "Hello DevOps Fans."} return render_template('index.html', model=model) if __name__ == "__main__": app.run(host='0.0.0.0', port=8080, debug=True, threaded=True)
  1. To save your changes. Press CTRL + S.
  2. Click on the devops-repo folder.
  3. Click New Folder.
  4. Name the folder templates and press Enter.
  5. Right-click on the templates folder and create a new file called layout.html.
  6. Add the following code and save the file as you did before:
<!doctype html> <html lang="en"> <head> <title>{{model.title}}</title> <!-- Bootstrap CSS --> <link rel="stylesheet" href="https://stackpath.bootstrapcdn.com/bootstrap/4.4.1/css/bootstrap.min.css"> </head> <body> <div class="container"> {% block content %}{% endblock %} <footer></footer> </div> </body> </html>
  1. Also in the templates folder, add another new file called index.html.

  2. Add the following code and save the file as you did before:

{% extends "layout.html" %} {% block content %} <div class="jumbotron"> <div class="container"> <h1>{{model.title}}</h1> </div> </div> {% endblock %}
  1. In Python, application prerequisites are managed using pip. Now you will add a file that lists the requirements for this application.

  2. In the devops-repo folder (not the templates folder), create a New File and add the following to that file and save it as requirements.txt:

Flask>=2.0.3
  1. You have some files now, so save them to the repository. First, you need to add all the files you created to your local Git repo. Click Open Terminal and in Cloud Shell, enter the following code:
cd ~/gcp-course/devops-repo git add --all
  1. To commit changes to the repository, you have to identify yourself. Enter the following commands, but with your information (you can just use your Gmail address or any other email address):
git config --global user.email "you@example.com" git config --global user.name "Your Name"
  1. Now, commit the changes locally:
git commit -a -m "Initial Commit"
  1. You committed the changes locally, but have not updated the Git repository you created in Cloud Source Repositories. Enter the following command to push your changes to the cloud:
git push origin main
  1. Refresh the GitHub web page. You should see the files you just created.

Task 3. Define a Docker build

The first step to using Docker is to create a file called Dockerfile. This file defines how a Docker container is constructed. You will do that now.

  1. Click Open Editor, and expand the gcp-course/devops-repo folder. With the devops-repo folder selected, click New File and name the new file Dockerfile.

The file Dockerfile is used to define how the container is built.

  1. At the top of the file, enter the following:
FROM python:3.9

This is the base image. You could choose many base images. In this case, you are using one with Python already installed on it.

  1. Enter the following:
WORKDIR /app COPY . .

These lines copy the source code from the current folder into the /app folder in the container image.

  1. Enter the following:
RUN pip install gunicorn RUN pip install -r requirements.txt

This uses pip to install the requirements of the Python application into the container. Gunicorn is a Python web server that will be used to run the web app.

  1. Enter the following:
ENV PORT=80 CMD exec gunicorn --bind :$PORT --workers 1 --threads 8 main:app

The environment variable sets the port that the application will run on (in this case, 80). The last line runs the web app using the gunicorn web server.

  1. Verify that the completed file looks as follows and save it:
FROM python:3.9 WORKDIR /app COPY . . RUN pip install gunicorn RUN pip install -r requirements.txt ENV PORT=80 CMD exec gunicorn --bind :$PORT --workers 1 --threads 8 main:app

Task 4. Manage Docker images with Cloud Build and Artifact Registry

The Docker image has to be built and then stored somewhere. You will use Cloud Build and Artifact Registry.

  1. Click Open Terminal to return to Cloud Shell. Make sure you are in the right folder:
cd ~/gcp-course/devops-repo
  1. The Cloud Shell environment variable DEVSHELL_PROJECT_ID automatically has your current project ID stored. The project ID is required to store images in Artifact Registry. Enter the following command to view your project ID:
echo $DEVSHELL_PROJECT_ID
  1. Enter the following command to create an Artifact Registry repository named devops-repo:
gcloud artifacts repositories create devops-repo \ --repository-format=docker \ --location={{{ project_0.default_region | "REGION" }}}
  1. To configure Docker to authenticate to the Artifact Registry Docker repository, enter the following command:
gcloud auth configure-docker {{{ project_0.default_region | "REGION" }}}-docker.pkg.dev
  1. To use Cloud Build to create the image and store it in Artifact Registry, type the following command:
gcloud builds submit --tag {{{ project_0.default_region | "REGION" }}}-docker.pkg.dev/$DEVSHELL_PROJECT_ID/devops-repo/devops-image:v0.1 .

Notice the environment variable in the command. The image will be stored in Artifact Registry.

  1. On the Google Cloud console title bar, type Artifact Registry in the Search field, then click Artifact Registry in the search results.

  2. Click on the Pin icon next to Artifact Registry.

  3. Click devops-repo.

  4. Click devops-image. Your image should be listed.

  5. On the Google Cloud console title bar, type Cloud Build in the Search field, then click Cloud Build in the search results.

  6. Click on the Pin icon next to Cloud Build.

  7. Your build should be listed in the history.

You will now try running this image from a Compute Engine virtual machine.

  1. On the Navigation menu, click Compute Engine > VM Instance.

  2. Click Create Instance to create a VM.

  3. On the Create an instance page, specify the following, and leave the remaining settings as their defaults:

Property Value
OS and storage > Container Click DEPLOY CONTAINER
Container image '-docker.pkg.dev//devops-repo/devops-image:v0.1` and click SELECT
Networking > Firewall Allow HTTP traffic
  1. Click Create.

  2. Once the VM starts, click the VM's external IP address. A browser tab opens and the page displays Hello DevOps Fans.

Note: You might have to wait a minute or so after the VM is created for the Docker container to start.
  1. You will now save your changes to your Git repository. In Cloud Shell, enter the following to make sure you are in the right folder and add your new Dockerfile to Git:
cd ~/gcp-course/devops-repo git add --all
  1. Commit your changes locally:
git commit -am "Added Docker Support"
  1. Push your changes to Cloud Source Repositories:
git push origin main

Click Check my progress to verify the objective. Manage Docker images with Cloud Build and Artifact Registry.

Task 5. Automate builds with triggers

  1. On the Navigation menu, click Cloud Build. The Build history page should open, and one or more builds should be in your history.

  2. Click Settings.

  3. From Service account dropdown, select @.iam.gserviceaccount.com

  4. Enable the Set as Preferred Service Account option. Set the status of the Cloud Build service to Enabled.

  5. Go to Triggers in the left navigation and click Create trigger .

  6. Specify the following:

    Name: devops-trigger

    Region:

    For Repository, click Connect new repopository

    • In the Connect repository pane select GitHub (Cloud Build GitHub App) and click Continue.
    • Select {your github username}/devops-repo as Repopository, click OK then select {your github username}/devops-repo (GitHub App).
    • Accept the terms and conditions and click Connect

    Branch: .*(any branch)

    Configuration Type: Cloud Build configuration file (yaml or json)

    Location: Inline

  7. Click Open Editor and replace the code with the code mentioned below and click Done.

steps: - name: 'gcr.io/cloud-builders/docker' args: ['build', '-t', '{{{project_0.default_region|REGION}}}-docker.pkg.dev/{{{project_0.project_id|Project ID}}}/devops-repo/devops-image:$COMMIT_SHA', '.'] images: - '{{{project_0.default_region|REGION}}}-docker.pkg.dev/{{{project_0.project_id|Project ID}}}/devops-repo/devops-image:$COMMIT_SHA' options: logging: CLOUD_LOGGING_ONLY
  1. For Service account select the service account starting with your project-id that look similar to (@.iam.gserviceaccount.com) and and click Create.

  2. To test the trigger, click Run and then Run trigger.

  3. Click the History link and you should see a build running. Wait for the build to finish, and then click the link to it to see its details.

  4. Scroll down and look at the logs. The output of the build here is what you would have seen if you were running it on your machine.

  5. Return to the Artifact Registry service. You should see a new image in the devops-repo > devops-image folder.

  6. Return to the Cloud Shell Code Editor. Find the file main.py in the gcp-course/devops-repo folder.

  7. In the main() function, change the title property to "Hello Build Trigger." as shown below:

@app.route("/") def main(): model = {"title": "Hello Build Trigger."} return render_template("index.html", model=model)
  1. Commit the change with the following command:
cd ~/gcp-course/devops-repo git commit -a -m "Testing Build Trigger"
  1. Enter the following to push your changes to Cloud Source Repositories:
git push origin main
  1. Return to the Cloud Console and the Cloud Build service. You should see another build running.

Click Check my progress to verify the objective. Automate Builds with Trigger.

Task 6. Test your build changes

  1. When the build completes, click on it to see its details.

  2. Click Execution Details,

  3. Click the Image name. This redirects you to the image page in Artifact Registry.

  4. At the top of the pane, click Copy path next to the image name. You will need this for the next steps. The format will look as follows.

{{{project_0.default_region | Lab Region }}}-docker.pkg.dev/{{{project_0.project_id|Project ID}}}/devops-demo/devops-image@sha256:8aede81a8b6ba1a90d4d808f509d05ddbb1cee60a50ebcf0cee46e1df9a54810 Note: Do not use the image name located in Digest.
  1. Go to the Compute Engine service. As you did earlier, create a new virtual machine to test this image. Click DEPLOY CONTAINER and paste the image you just copied.

  2. Select Allow HTTP traffic.

  3. When the machine is created, test your change by making a request to the VM's external IP address in your browser. Your new message should be displayed.

Note: You might have to wait a few minutes after the VM is created for the Docker container to start.

Click Check my progress to verify the objective. Test your Build Changes.

Congratulations!

In this lab, you built a continuous integration pipeline using the GitHub, Cloud Build, Build triggers, and Artifact Registry.

End your lab

When you have completed your lab, click End Lab. Google Cloud Skills Boost removes the resources you’ve used and cleans the account for you.

You will be given an opportunity to rate the lab experience. Select the applicable number of stars, type a comment, and then click Submit.

The number of stars indicates the following:

  • 1 star = Very dissatisfied
  • 2 stars = Dissatisfied
  • 3 stars = Neutral
  • 4 stars = Satisfied
  • 5 stars = Very satisfied

You can close the dialog box if you don't want to provide feedback.

For feedback, suggestions, or corrections, please use the Support tab.

Copyright 2025 Google LLC All rights reserved. Google and the Google logo are trademarks of Google LLC. All other company and product names may be trademarks of the respective companies with which they are associated.

Before you begin

  1. Labs create a Google Cloud project and resources for a fixed time
  2. Labs have a time limit and no pause feature. If you end the lab, you'll have to restart from the beginning.
  3. On the top left of your screen, click Start lab to begin

Use private browsing

  1. Copy the provided Username and Password for the lab
  2. Click Open console in private mode

Sign in to the Console

  1. Sign in using your lab credentials. Using other credentials might cause errors or incur charges.
  2. Accept the terms, and skip the recovery resource page
  3. Don't click End lab unless you've finished the lab or want to restart it, as it will clear your work and remove the project

This content is not currently available

We will notify you via email when it becomes available

Great!

We will contact you via email if it becomes available

One lab at a time

Confirm to end all existing labs and start this one

Use private browsing to run the lab

Use an Incognito or private browser window to run this lab. This prevents any conflicts between your personal account and the Student account, which may cause extra charges incurred to your personal account.