In this lab, you learn how to extract text from the images using the Google Cloud Vision API. This lab demonstrates how to upload image files to Google Cloud Storage, extract text from the images using the Google Cloud Vision API, translate the text using the Google Cloud Translation API, and save your translations back to Cloud Storage. Google Cloud Pub/Sub is used to queue various tasks and trigger the right Cloud Functions to carry them out.
Lab objectives
In this lab, you learn how to perform the following tasks:
Write and deploy several Background Cloud Functions.
Upload images to Cloud Storage.
Extract, translate and save text contained in uploaded images.
Setup and requirements
For each lab, you get a new Google Cloud project and set of resources for a fixed time at no cost.
Sign in to Qwiklabs using an incognito window.
Note the lab's access time (for example, 1:15:00), and make sure you can finish within that time.
There is no pause feature. You can restart if needed, but you have to start at the beginning.
When ready, click Start lab.
Note your lab credentials (Username and Password). You will use them to sign in to the Google Cloud Console.
Click Open Google Console.
Click Use another account and copy/paste credentials for this lab into the prompts.
If you use other credentials, you'll receive errors or incur charges.
Accept the terms and skip the recovery resource page.
Activate Cloud Shell
Cloud Shell is a virtual machine that contains development tools. It offers a persistent 5-GB home directory and runs on Google Cloud. Cloud Shell provides command-line access to your Google Cloud resources. gcloud is the command-line tool for Google Cloud. It comes pre-installed on Cloud Shell and supports tab completion.
Click the Activate Cloud Shell button () at the top right of the console.
Click Continue.
It takes a few moments to provision and connect to the environment. When you are connected, you are also authenticated, and the project is set to your PROJECT_ID.
[core]
project = qwiklabs-gcp-44776a13dea667a6
Note: Full documentation of gcloud is available in the gcloud CLI overview guide.
Task 1. Visualize the flow of data
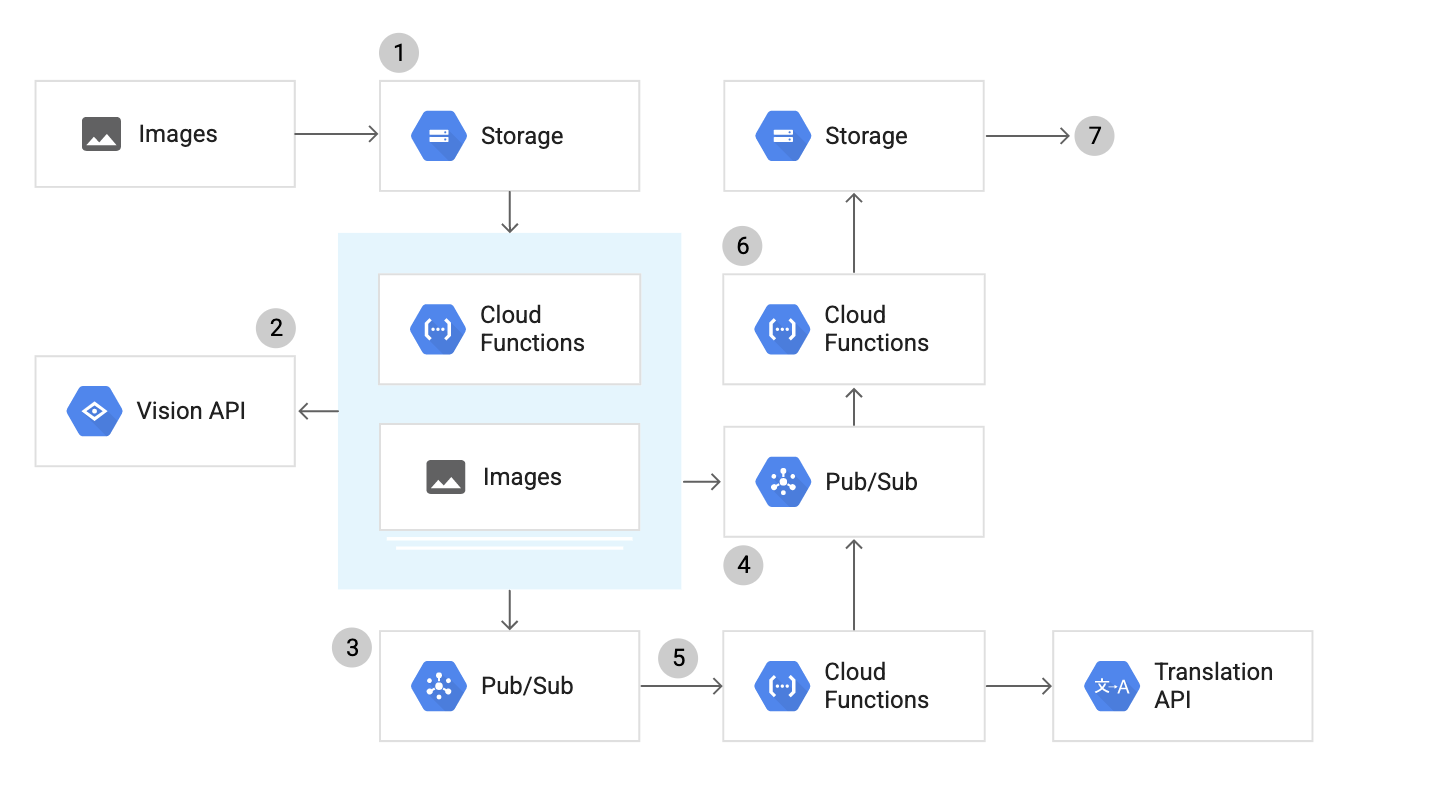
The flow of data in the Extract Text from the Images using the Google Cloud Vision API lab application involves several steps:
An image that contains text in any language is uploaded to Cloud Storage.
A Cloud Function is triggered, which uses the Vision API to extract the text and detect the source language.
The text is queued for translation by publishing a message to a Pub/Sub topic. A translation is queued for each target language different from the source language.
If a target language matches the source language, the translation queue is skipped, and text is sent to the result queue, another Pub/Sub topic.
A Cloud Function uses the Translation API to translate the text in the translation queue. The translated result is sent to the result queue.
Another Cloud Function saves the translated text from the result queue to Cloud Storage.
The results are found in Cloud Storage as txt files for each translation.
It may help to visualize the steps:
Task 2. Prepare the application
Copy below script and paste it in the Cloud Shell. Before hitting the enter, change the bucket name (In order to set a unique name use your project ID because it is unique. For example, “image_bucket_YOUR_PROJECT_ID” can be your unique bucket name. Or feel free to choose any name as long as you use only lowercase letters, numbers, hyphens (-), underscores (_) and dots (.))
gcloud storage buckets create gs://YOUR_IMAGE_BUCKET_NAME --location={{{project_0.default_region|set at lab start}}}
Copy below script and paste it in the Cloud Shell. Before hitting the enter, change the bucket name (In order to set a unique name use your project ID because it is unique. For example, “result_bucket_YOUR_PROJECT_ID” can be your unique bucket name. Or feel free to choose any name as long as you use only lowercase letters, numbers, hyphens (-), underscores (_) and dots (.))
gcloud storage buckets create gs://YOUR_RESULT_BUCKET_NAME --location={{{project_0.default_region|set at lab start}}}
Click Check my progress to verify the objective.
Create two cloud storage buckets
Copy below script and paste it in the Cloud Shell. Before hitting the enter, change YOUR_TRANSLATE_TOPIC_NAME.
Change to the directory that contains the Cloud Functions sample code:
cd python-docs-samples/functions/ocr/app/
python-docs-samples/functions/ocr/app/ folder consists of a main.py file which includes ocr_detect, ocr_process, ocr_translate, ocr_ save and message_validatation_helper functions defined in Task 1. Visualizing the flow of data.
Task 3. Understand the code
Let’s look at your main.py file a bit closer:
Import dependencies
The application must import several dependencies in order to communicate with Google Cloud services:
functions/ocr/app/main.py
import base64
import json
import os
from google.cloud import pubsub_v1
from google.cloud import storage
from google.cloud import translate_v2 as translate
from google.cloud import vision
vision_client = vision.ImageAnnotatorClient()
translate_client = translate.Client()
publisher = pubsub_v1.PublisherClient()
storage_client = storage.Client()
project_id = os.environ["GCP_PROJECT"]
Process images
The following function reads an uploaded image file from Cloud Storage and calls a function to detect whether the image contains text:
functions/ocr/app/main.py
def process_image(file, context):
"""Cloud Function triggered by Cloud Storage when a file is changed.
Args:
file (dict): Metadata of the changed file, provided by the triggering
Cloud Storage event.
context (google.cloud.functions.Context): Metadata of triggering event.
Returns:
None; the output is written to stdout and Stackdriver Logging
"""
bucket = validate_message(file, "bucket")
name = validate_message(file, "name")
detect_text(bucket, name)
print("File {} processed.".format(file["name"]))
The following function extracts text from the image using the Cloud Vision API and queues the text for translation:
functions/ocr/app/main.py
def detect_text(bucket, filename):
print("Looking for text in image {}".format(filename))
futures = []
image = vision.Image(
source=vision.ImageSource(gcs_image_uri=f"gs://{bucket}/{filename}")
)
text_detection_response = vision_client.text_detection(image=image)
annotations = text_detection_response.text_annotations
if len(annotations) > 0:
text = annotations[0].description
else:
text = ""
print("Extracted text {} from image ({} chars).".format(text, len(text)))
detect_language_response = translate_client.detect_language(text)
src_lang = detect_language_response["language"]
print("Detected language {} for text {}.".format(src_lang, text))
# Submit a message to the bus for each target language
to_langs = os.environ["TO_LANG"].split(",")
for target_lang in to_langs:
topic_name = os.environ["TRANSLATE_TOPIC"]
if src_lang == target_lang or src_lang == "und":
topic_name = os.environ["RESULT_TOPIC"]
message = {
"text": text,
"filename": filename,
"lang": target_lang,
"src_lang": src_lang,
}
message_data = json.dumps(message).encode("utf-8")
topic_path = publisher.topic_path(project_id, topic_name)
future = publisher.publish(topic_path, data=message_data)
futures.append(future)
for future in futures:
future.result()
Translate text
The following function translates the extracted text and queues the translated text to be saved back to Cloud Storage:
To deploy the image processing function with a Cloud Storage trigger, run the following command in the directory that contains the sample code. Replace YOUR_IMAGE_BUCKET_NAME, YOUR_GCP_PROJECT_ID, YOUR_TRANSLATE_TOPIC_NAME and YOUR_RESULT_TOPIC_NAME.
where YOUR_IMAGE_BUCKET_NAME is the name of your Cloud Storage bucket where you upload the images.
Note: If you get an permission error while deploying function wait for 2-3 minutes and re-run the commands.
Click Check my progress to verify the objective.
Deploy the image processing function with a Cloud Storage trigger
To deploy the text translation function with a Cloud Pub/Sub trigger, run the following command in the directory that contains the sample code. Replace YOUR_TRANSLATE_TOPIC_NAME, YOUR_GCP_PROJECT_ID and YOUR_RESULT_TOPIC_NAME.
Deploy the text translation function with a Cloud Pub/Sub trigger
To deploy the function that saves results to Cloud Storage with a Cloud Pub/Sub trigger, run the following command in the directory that contains the sample code. Replace YOUR_RESULT_TOPIC_NAME, YOUR_GCP_PROJECT_ID and YOUR_RESULT_BUCKET_NAME.
You can also delete Cloud Functions from the Google Cloud.
End your lab
When you have completed your lab, click End Lab. Qwiklabs removes the resources you’ve used and cleans the account for you.
You will be given an opportunity to rate the lab experience. Select the applicable number of stars, type a comment, and then click Submit.
The number of stars indicates the following:
1 star = Very dissatisfied
2 stars = Dissatisfied
3 stars = Neutral
4 stars = Satisfied
5 stars = Very satisfied
You can close the dialog box if you don't want to provide feedback.
For feedback, suggestions, or corrections, please use the Support tab.
Copyright 2022 Google LLC All rights reserved. Google and the Google logo are trademarks of Google LLC. All other company and product names may be trademarks of the respective companies with which they are associated.