02
Google Cloud Compute and Scalability for AWS Professionals
Checkpoints
Configure internal traffic and health check firewall rules
/ 10
Create a NAT configuration using Cloud Router
/ 10
Configure instance templates and create instance groups
/ 10
Configure the internal load balancer
/ 10
Test and share your knowledge with our community!
Configuring an Internal Load Balancer (AWS)
Lab instructions and tasks
- Overview
- Setup and requirements
- Task 1. Configure internal traffic and health check firewall rules
- Task 2. Create a NAT configuration using Cloud Router
- Task 3. Configure instance templates and create instance groups
- Task 4. Configure the internal load balancer
- Task 5. Test the internal load balancer
- Congratulations!
- End your lab
Test and share your knowledge with our community!
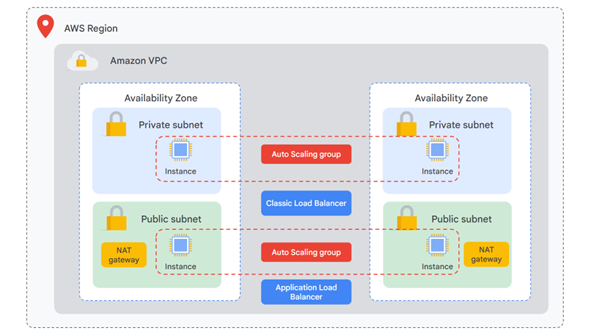
As a Cloud Engineer, you want to ensure that your solution is fault-tolerant and scalable. Your applications can be multi-tier and, even if not all of the virtual machine (VM) instances deployed in your architecture need to be publicly accessible, these instances need to be scalable and able to handle failure. As well, traffic needs to be balanced among the VMs in your solution. For these reasons, one of the most important services in your architecture is a resilient and scalable load balancer that can handle and redirect traffic and continuously perform health checks.
In AWS, you can distribute traffic across Elastic Compute Cloud (EC2) instances that have public IP addresses with internet-facing load balancers. For applications that have multiple tiers, you usually have backend instances connected to the frontend only with no external IPs. In this scenario, you can use a combination of internet-facing and internal load balancers.
Even when your backend VM instances aren´t public, they still must be able to download security patches and updates. You set up Network Address Translation (NAT) gateways to provide one-way communication with the public internet. In this case, your private VM instances can initiate connections to the internet, but the internet cannot initiate connections with your VM instances.
For fault tolerance, cost-effectiveness, and high availability (HA), you use a combination of Amazon Machine Images (AMI), launch templates, and Auto Scaling groups to dynamically meet increases in demand, deallocate resources when no longer needed, and perform health checks to guarantee that your instances are always up and running.
Now you will explore how you can manage traffic and scale services efficiently in Google Cloud.
Overview
Google Cloud offers Internal Load Balancing for your TCP/UDP-based traffic. Internal Load Balancing enables you to run and scale your services behind a private load balancing IP address that is accessible only to your internal virtual machine instances.
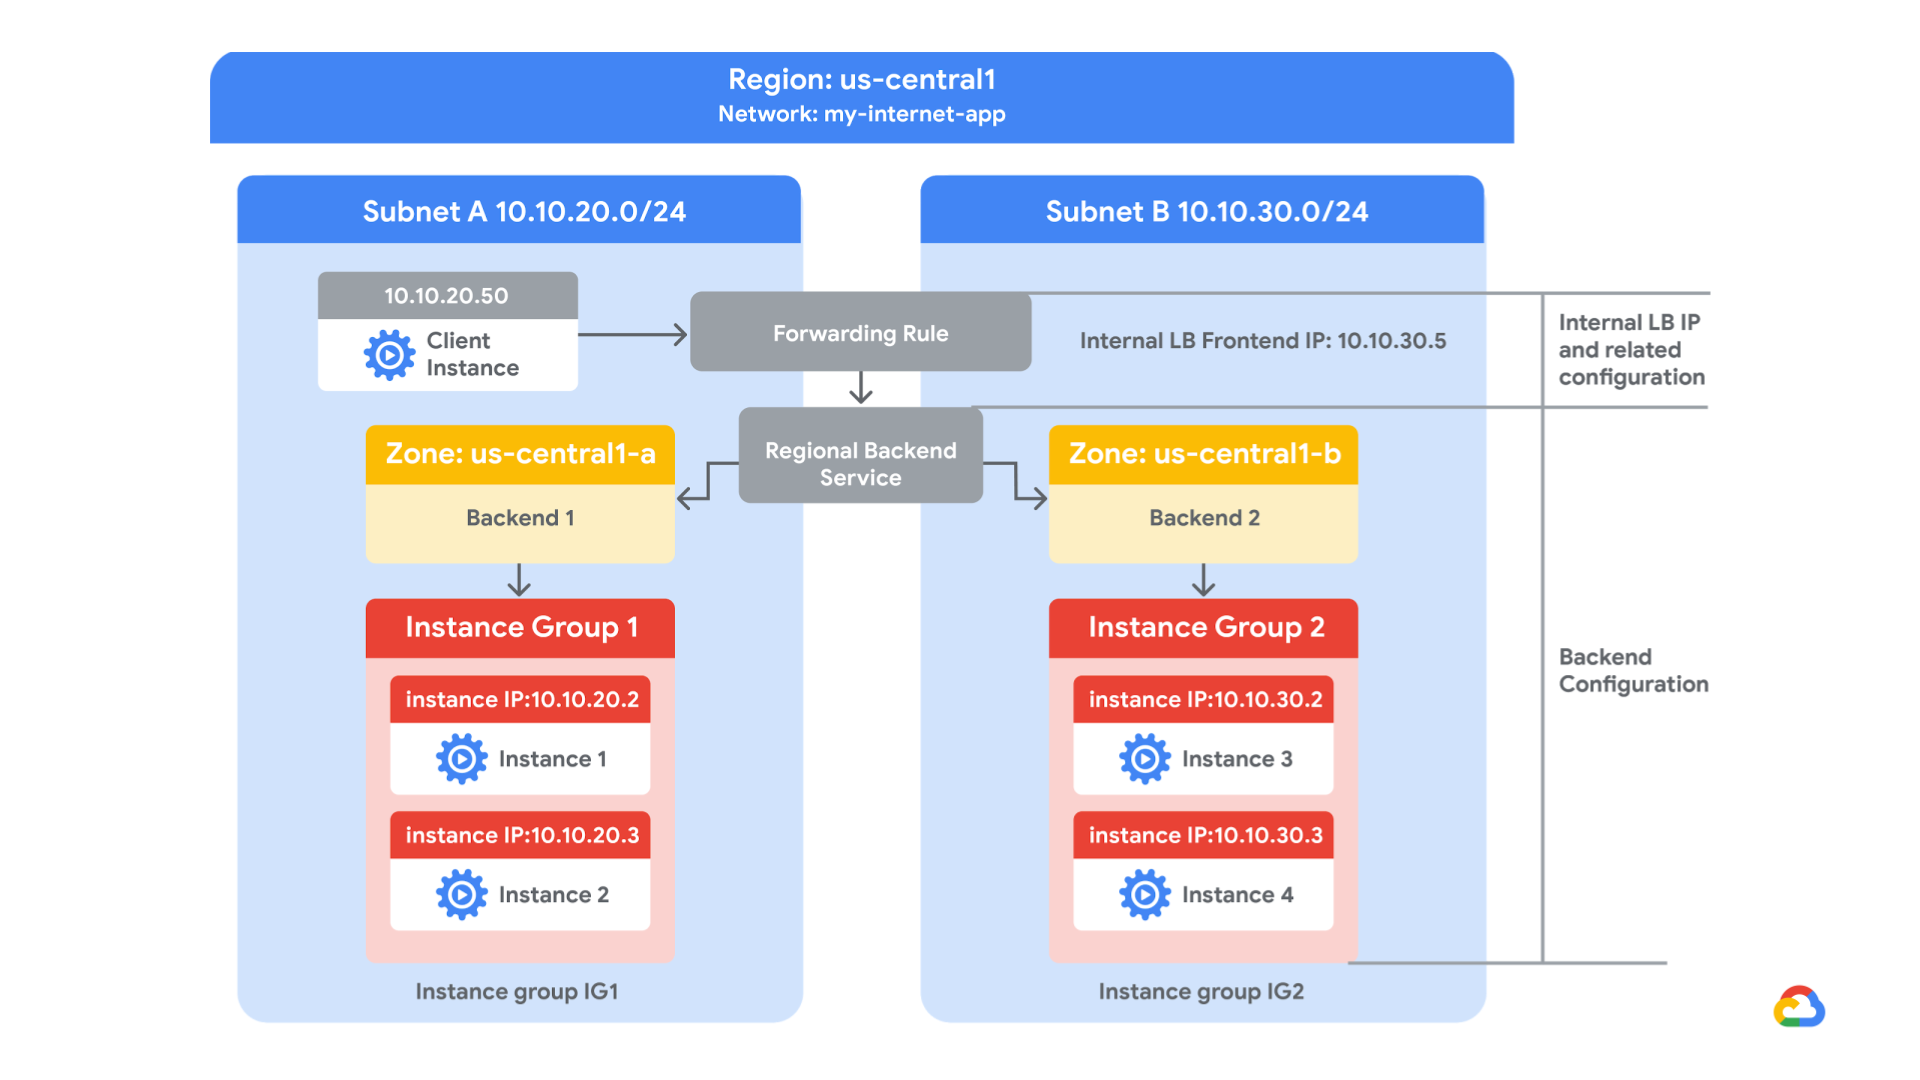
In this lab, you create two managed instance groups in the same region. Then you configure and test an internal load balancer with the instances groups as the backends, as shown in this network diagram:
Objectives
In this lab, you will learn how to perform the following tasks:
-
Create internal traffic and health check firewall rules.
-
Create a NAT configuration using Cloud Router.
-
Configure two instance templates.
-
Create two managed instance groups.
-
Configure and test an internal load balancer.
Setup and requirements
For each lab, you get a new Google Cloud project and set of resources for a fixed time at no cost.
-
Sign in to Qwiklabs using an incognito window.
-
Note the lab's access time (for example,
1:15:00), and make sure you can finish within that time.
There is no pause feature. You can restart if needed, but you have to start at the beginning. -
When ready, click Start lab.
-
Note your lab credentials (Username and Password). You will use them to sign in to the Google Cloud Console.
-
Click Open Google Console.
-
Click Use another account and copy/paste credentials for this lab into the prompts.
If you use other credentials, you'll receive errors or incur charges. -
Accept the terms and skip the recovery resource page.
Task 1. Configure internal traffic and health check firewall rules
Configure firewall rules to allow internal traffic connectivity from sources in the 10.10.0.0/16 range. This rule allows incoming traffic from any client located in the subnet.
Health checks determine which instances of a load balancer can receive new connections. For HTTP load balancing, the health check probes to your load-balanced instances come from addresses in the ranges 130.211.0.0/22 and 35.191.0.0/16. Your firewall rules must allow these connections.
Explore the my-internal-app network
The network my-internal-app with subnet-a and subnet-b and firewall rules for RDP, SSH, and ICMP traffic have been configured for you.
-
In the Cloud Console, on the Navigation menu (
), click VPC network > VPC networks.
Notice the my-internal-app network with its subnets: subnet-a and subnet-b.Each Google Cloud project starts with the default network. In addition, the my-internal-app network has been created for you as part of your network diagram.
You will create the managed instance groups in subnet-a and subnet-b. Both subnets are in the us-central1 region because an internal load balancer is a regional service. The managed instance groups will be in different zones, making your service immune to zonal failures.
Create the firewall rule to allow traffic from any sources in the 10.10.0.0/16 range
Create a firewall rule to allow traffic in the 10.10.0.0/16 subnet.
-
On the Navigation menu (
Notice the app-allow-icmp and app-allow-ssh-rdp firewall rules.These firewall rules have been created for you.
-
Click Create Firewall Rule.
-
Specify the following, and leave the remaining settings as their defaults.
Property Value (type value or select option as specified) Name fw-allow-lb-access Network my-internal-app Targets Specified target tags Target tags backend-service Source filter IPv4 ranges Source IPv4 ranges 10.10.0.0/16 Protocols and ports Allow all
-
Click Create.
Create the health check rule
Create a firewall rule to allow health checks.
-
On the Navigation menu (
-
Click Create Firewall Rule.
-
Specify the following, and leave the remaining settings as their defaults.
Property Value (type value or select option as specified) Name fw-allow-health-checks Network my-internal-app Targets Specified target tags Target tags backend-service Source filter IPv4 Ranges Source IPv4 ranges 130.211.0.0/22 and 35.191.0.0/16 Protocols and ports Specified protocols and ports
- For tcp, check the checkbox and specify port 80.
- Click Create.
Click Check my progress to verify the objective.
Task 2. Create a NAT configuration using Cloud Router
The Google Cloud VM backend instances that you setup in Task 3 will not be configured with external IP addresses.
Instead, you will setup the Cloud NAT service to allow these VM instances to send outbound traffic only through the Cloud NAT, and receive inbound traffic through the load balancer.
Create the Cloud Router instance
-
In the Cloud Console, on the Navigation menu (
-
Click Get started.
-
Specify the following, and leave the remaining settings as their defaults.
Property Value (type value or select option as specified) Gateway name nat-config Network my-internal-app Region us-central1 (Iowa) -
Click Cloud Router, and select Create new router.
-
For Name, type
nat-router-us-central1. -
Click Create.
-
In Create Cloud NAT gateway, click Create.
Click Check my progress to verify the objective.
Task 3. Configure instance templates and create instance groups
A managed instance group uses an instance template to create a group of identical instances. Use these to create the backends of the internal load balancer.
This task has been performed for you at the start of this lab. You will need to SSH into each instance group VM and run the following command to setup the environment.
-
On the Navigation menu, click Compute Engine > VM instances.
Notice two instances that start with instance-group-1 and instance-group-2. -
Select the SSH button next to instance-group-1 to SSH into the VM.
-
Run the following command to re-run the instance's startup script:
-
Repeat the previous steps for instance-group-2.
-
Wait for both startup scripts to finish executing, then close the SSH terminal to each VM. The output of the startup script should state the following:
Verify the backends
Verify that VM instances are being created in both subnets and create a utility VM to access the backends' HTTP sites.
-
On the Navigation menu, click Compute Engine > VM instances.
Notice two instances that start with instance-group-1 and instance-group-2.These instances are in separate zones, and their internal IP addresses are part of the subnet-a and subnet-b CIDR blocks.
-
Click Create Instance.
-
Specify the following, and leave the remaining settings as their defaults.
Property Value (type value or select option as specified) Name utility-vm Region us-central1 Zone us-central1-f Series N1 Machine type n1-standard-1 (1 vCPU, 3.75 GB memory) Boot disk Debian GNU/Linux 10 (buster) -
In Advanced options, click Networking, disks, security, management, sole tenancy.
-
Click Networking.
-
For Network interfaces, click the dropdown to edit.
-
Specify the following, and leave the remaining settings as their defaults.
Property Value (type value or select option as specified) Network my-internal-app Subnetwork subnet-a Primary internal IP Ephemeral (Custom) Custom ephemeral IP address 10.10.20.50 External IPv4 address None -
Click Done.
-
Click Create.
-
Note that the internal IP addresses for the backends are 10.10.20.2 and 10.10.30.2.
Click Check my progress to verify the objective.
-
For utility-vm, click SSH to launch a terminal and connect. If you see the Connection via Cloud Identity-Aware Proxy Failed popup, click Retry.
-
To verify the welcome page for instance-group-1-xxxx, run the following command:
The output should look like this.
Output:
-
To verify the welcome page for instance-group-2-xxxx, run the following command:
The output should look like this.
Output:
-
Close the SSH terminal to utility-vm:
Task 4. Configure the internal load balancer
Configure the internal load balancer to balance traffic between the two backends (instance-group-1 in us-central1-a and instance-group-2 in us-central1-b), as illustrated in the network diagram.
Start the configuration
- In the Cloud Console, on the Navigation menu (
- Click Create load balancer.
- Under TCP Load Balancing, click Start configuration.
- For Internet facing or internal only, select Only between my VMs.
-
Click Continue.
-
For Name, type
my-ilb. -
For Region, type
us-central1. -
For Network, type
my-internal-app.
Configure the regional backend service
The backend service monitors instance groups and prevents them from exceeding configured usage.
-
Click Backend configuration.
-
Specify the following, and leave the remaining settings as their defaults.
Property Value (select option as specified) Instance group instance-group-1 (us-central1-a) -
Click Done.
-
Click Add backend.
-
For Instance group, select instance-group-2 (us-central1-b).
-
Click Done.
-
For Health Check, select Create a health check.
-
Specify the following, and leave the remaining settings as their defaults.
Property Value (select option as specified) Name my-ilb-health-check Protocol TCP Port 80 Check interval 10 sec Timeout 5 sec Healthy threshold 2 Unhealthy threshold 3
-
Click Save.
-
Verify that there is a blue checkmark next to Backend configuration in the Cloud Console. If there isn't, double-check that you have completed all the steps above.
Configure the frontend
The frontend forwards traffic to the backend.
-
Click Frontend configuration.
-
Specify the following, and leave the remaining settings as their defaults.
Property Value (type value or select option as specified) Subnetwork subnet-b Internal IP > IP address Create IP address -
Specify the following, and leave the remaining settings as their defaults.
Property Value (type value or select option as specified) Name my-ilb-ip Static IP address Let me choose Custom IP address 10.10.30.5 -
Click Reserve.
-
Under Ports, for Port number, type
80. -
Click Done.
Review and create the internal load balancer
- Click Review and finalize.
- Review the Backend and Frontend.
- Click Create.
Wait for the load balancer to be created before moving to the next task.
Click Check my progress to verify the objective.
Task 5. Test the internal load balancer
Verify that the my-ilb IP address forwards traffic to instance-group-1 in us-central1-a and instance-group-2 in us-central1-b.
Access the internal load balancer
-
On the Navigation menu, click Compute Engine > VM instances.
-
For utility-vm, click SSH to launch a terminal and connect.
-
To verify that the internal load balancer forwards traffic, run the following command:
The output should look like this.
Output:
-
Run the same command a couple of times:
You should be able to see responses from instance-group-1 in us-central1-a and instance-group-2 in us-central1-b. If not, run the command again.
Congratulations!
In this lab, you created two managed instance groups in the us-central1 region and a firewall rule to allow HTTP traffic to those instances and TCP traffic from the Google Cloud health checker. Then you configured and tested an internal load balancer for those instance groups.
In AWS, the common pattern includes Network Address Translation (NAT) gateways, Auto Scaling groups, and Elastic Load Balancers (ELBs) to keep your Elastic Compute Cloud (EC2) instances private. This solution allows your EC2 instances to communicate with frontend instances and to download updates securely from the public internet.
In Google Cloud, you can use an Internal Load Balancer to distribute traffic to instances or Managed Instance Groups (MIGs) inside of the same Google Cloud region. If your backends are distributed across multiple regions, you will need a global load balancer, and this can only be deployed as external. You can use an Internal Load Balancer for the following types of traffic:
- TCP/UDP (pass-through)
- HTTP/HTTPS
- TCP (proxy)
To allow your instances without external IPs to start outbound connections to the internet, you can create a Cloud NAT configuration.
End your lab
When you have completed your lab, click End Lab. Google Cloud Skills Boost removes the resources you’ve used and cleans the account for you.
You will be given an opportunity to rate the lab experience. Select the applicable number of stars, type a comment, and then click Submit.
The number of stars indicates the following:
- 1 star = Very dissatisfied
- 2 stars = Dissatisfied
- 3 stars = Neutral
- 4 stars = Satisfied
- 5 stars = Very satisfied
You can close the dialog box if you don't want to provide feedback.
For feedback, suggestions, or corrections, please use the Support tab.
Copyright 2022 Google LLC All rights reserved. Google and the Google logo are trademarks of Google LLC. All other company and product names may be trademarks of the respective companies with which they are associated.