


Before you begin
- Labs create a Google Cloud project and resources for a fixed time
- Labs have a time limit and no pause feature. If you end the lab, you'll have to restart from the beginning.
- On the top left of your screen, click Start lab to begin
In this lab, you use the RegularExpressionProtection policy to detect malicious requests.
In this lab, you learn how to protect your API proxy against malicious requests using regular expressions.
For each lab, you get a new Google Cloud project and set of resources for a fixed time at no cost.
Sign in to Qwiklabs using an incognito window.
Note the lab's access time (for example, 1:15:00), and make sure you can finish within that time.
There is no pause feature. You can restart if needed, but you have to start at the beginning.
When ready, click Start lab.
Note your lab credentials (Username and Password). You will use them to sign in to the Google Cloud Console.
Click Open Google Console.
Click Use another account and copy/paste credentials for this lab into the prompts.
If you use other credentials, you'll receive errors or incur charges.
Accept the terms and skip the recovery resource page.
Google Cloud Shell is a virtual machine that is loaded with development tools. It offers a persistent 5GB home directory and runs on the Google Cloud.
Google Cloud Shell provides command-line access to your Google Cloud resources.
In Cloud console, on the top right toolbar, click the Open Cloud Shell button.
Click Continue.
It takes a few moments to provision and connect to the environment. When you are connected, you are already authenticated, and the project is set to your PROJECT_ID. For example:
gcloud is the command-line tool for Google Cloud. It comes pre-installed on Cloud Shell and supports tab-completion.
Output:
Example output:
Output:
Example output:
In this task, you create a new API proxy.
In the Google Cloud console, on the Navigation menu (
The Apigee console page will open.
If Apigee is not pinned, search for Apigee in the top search bar and navigate to the Apigee service.
Hover over the name, then click the pin icon (
The Apigee console page will now be pinned to the Navigation menu.
On the left navigation menu, select Proxy development > API proxies.
To start the proxy wizard, click +Create.
Leave Proxy template unchanged.
Specify the following settings:
| Property | Value |
|---|---|
| Proxy Name | lab5a-v1 |
| Base path | /lab5a/v1 |
| Target (Existing API) | https://httpbin.org/anything |
The httpbin.org/anything API returns detailed information about the API request it was sent.
Click Create.
Click the Develop tab.
In this task, you add a RegularExpressionProtection policy to protect against malicious requests.
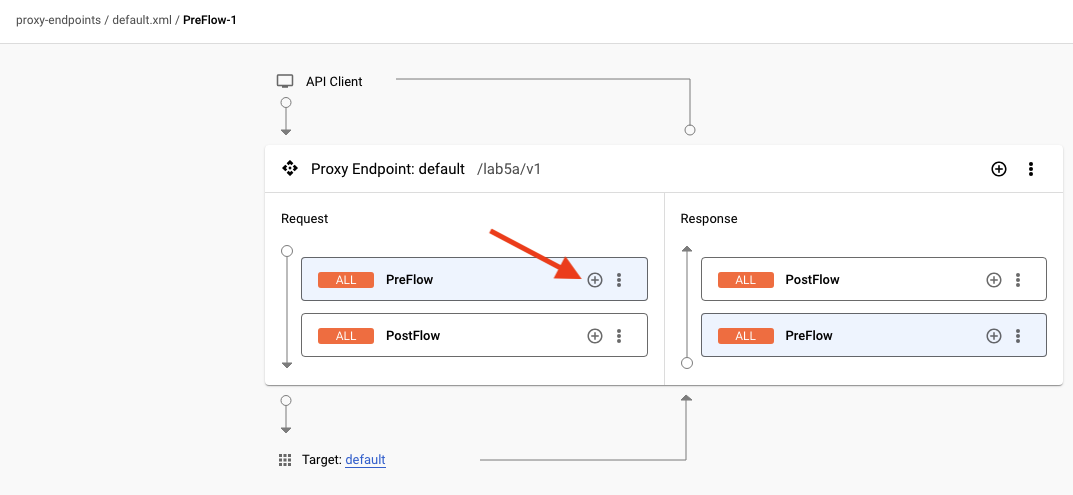
Click Proxy endpoints > default > PreFlow.
On the Request PreFlow, click Add Policy Step (+).
In the Add policy step pane, select Create new policy, and then select Security > Regular Expression Protection.
Specify the following values:
| Property | Value |
|---|---|
| Name | RegexTP-SQLInjection |
| Display name | RegexTP-SQLInjection |
Click Add.
Click Policies > RegexTP-SQLInjection.
Replace the policy's default configuration with:
A RegularExpressionProtection policy raises a fault if any of the regular expressions in the policy match the data in the configured location.
The Source is set to request. A RegularExpressionProtection policy can validate many parts of the request. In this case, the policy is configured to check the query parameter named test using a regular expression that contains several dangerous SQL patterns.
Click Save.
Click Deploy.
To specify that you want the new revision deployed to the eval environment, select eval as the Environment, and then click Deploy.
Click Confirm.
A proxy that is deployed and ready to take traffic will show a green status on the Overview tab.
When a proxy is marked as deployed but the runtime is not yet available and the environment is not yet attached, you may see a red warning sign. Hold the pointer over the Status icon to see the current status.
If the proxy is deployed and shows as green, your proxy is ready for API traffic. If your proxy is not deployed because there are no runtime pods, you can check the provisioning status.
In Cloud Shell, to confirm that the runtime instance has been installed and the eval environment has been attached, run the following commands:
When the script returns ORG IS READY TO USE, you can proceed to the next steps.
While you wait for the lab to start up, learn more about the policy and regular expressions:
In this task, you use curl to test your proxy.
The eval environment in the Apigee organization can be called using the hostname eval.example.com. The DNS entry for this hostname has been created within your project, and it resolves to the IP address of the Apigee runtime instance. This DNS entry has been created in a private zone, which means it is only visible on the internal network.
Cloud Shell does not reside on the internal network, so Cloud Shell commands cannot resolve this DNS entry. A virtual machine (VM) within your project can access the private zone DNS. A virtual machine named apigeex-test-vm was automatically created for this purpose. You can make API proxy calls from this machine.
The curl command will be used to send API requests to an API proxy. The -k option for curl tells it to skip verification of the TLS certificate. For this lab, the Apigee runtime uses a self-signed certificate. For a production environment, you should use certificates that have been created by a trusted certificate authority (CA).
In Cloud Shell, open a new tab, and then open an SSH connection to your test VM:
The first gcloud command retrieves the zone of the test VM, and the second opens the SSH connection to the VM.
If asked to authorize, click Authorize.
For each question asked in the Cloud Shell, click Enter or Return to specify the default input.
Your logged in identity is the owner of the project, so SSH to this machine is allowed.
Your Cloud Shell session is now running inside the VM.
In the Cloud Shell SSH session, send the following curl command:
The curl command responds successfully with the response from httpbin.org. There was no query parameter named test, so there was no invalid pattern detected.
Send the following curl command:
This command sends the test query parameter with the value ok. This does not match the regular expression in the policy, so the policy does not raise a fault, and the curl command responds successfully with the response from httpbin.org.
Send the following curl command:
This command sends the test query parameter with the value delete. This matches the regular expression in the policy, so this time the policy raises a fault, and httpbin.org is never called.
In this lab, you used the RegularExpressionProtection policy to detect a dangerous input and reject the request.
When you have completed your lab, click End Lab. Google Cloud Skills Boost removes the resources you’ve used and cleans the account for you.
You will be given an opportunity to rate the lab experience. Select the applicable number of stars, type a comment, and then click Submit.
The number of stars indicates the following:
You can close the dialog box if you don't want to provide feedback.
For feedback, suggestions, or corrections, please use the Support tab.
Copyright 2022 Google LLC All rights reserved. Google and the Google logo are trademarks of Google LLC. All other company and product names may be trademarks of the respective companies with which they are associated.


This content is not currently available
We will notify you via email when it becomes available

Great!
We will contact you via email if it becomes available

One lab at a time
Confirm to end all existing labs and start this one