


시작하기 전에
- 실습에서는 정해진 기간 동안 Google Cloud 프로젝트와 리소스를 만듭니다.
- 실습에는 시간 제한이 있으며 일시중지 기능이 없습니다. 실습을 종료하면 처음부터 다시 시작해야 합니다.
- 화면 왼쪽 상단에서 실습 시작을 클릭하여 시작합니다.
Set up the Python application and necessary resources
/ 40
Containerize and publish the application to Artifact Registry
/ 10
Deploy the app to Cloud Run
/ 10
Find the issue and fix the application
/ 30
Add Error Reporting to the application
/ 10
Artifact Registry provides a single location for storing and managing your packages and Docker container images.
Cloud Build is a service that executes your builds on Google Cloud.
Cloud Run is a managed compute platform that lets you run containers on Google's scalable infrastructure.
Google Cloud Observability provides integrated monitoring, logging, and tracing managed services for applications.
Cloud Client Libraries are the recommended method for calling Google Cloud APIs from your applications. Cloud Client Libraries use the natural conventions and style of the programming language that you're using for your application. Cloud Client Libraries handle low-level communication with the server, including authentication and retry logic.
Google APIs use the OAuth 2.0 protocol for authentication and authorization.
Secret Manager lets you store API keys, passwords, certificates, and other sensitive data as binary blobs or text strings.
In this lab, you run a Python application in Cloud Shell, and then deploy the application to Cloud Run. You work through issues that arise when the application is moved to Cloud Run, and explore application development features of Google Cloud's operations suite.
In this lab, you learn to:
This Qwiklabs hands-on lab lets you do the lab activities yourself in a real cloud environment, not in a simulation or demo environment. It does so by giving you new, temporary credentials that you use to sign in and access Google Cloud for the duration of the lab.
To complete this lab, you need:
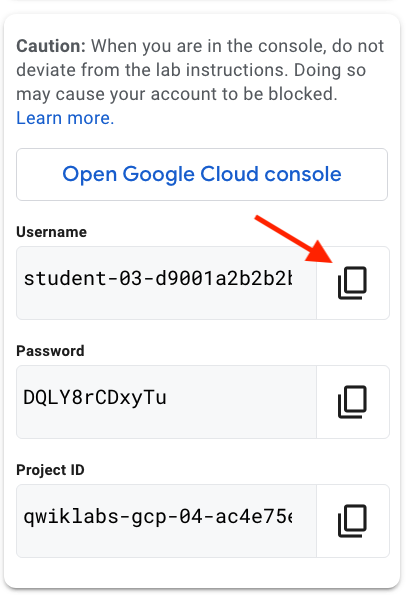
Click the Start Lab button. If you need to pay for the lab, a pop-up opens for you to select your payment method. On the left is a panel populated with the temporary credentials that you must use for this lab.
Copy the username, and then click Open Google Console. The lab spins up resources, and then opens another tab that shows the Choose an account page.
On the Choose an account page, click Use Another Account. The Sign in page opens.
Paste the username that you copied from the Connection Details panel. Then copy and paste the password.
After a few moments, the Cloud console opens in this tab.

Google Cloud Shell is a virtual machine that is loaded with development tools. It offers a persistent 5GB home directory and runs on the Google Cloud.
Google Cloud Shell provides command-line access to your Google Cloud resources.
In Cloud console, on the top right toolbar, click the Open Cloud Shell button.
Click Continue.
It takes a few moments to provision and connect to the environment. When you are connected, you are already authenticated, and the project is set to your PROJECT_ID. For example:
gcloud is the command-line tool for Google Cloud. It comes pre-installed on Cloud Shell and supports tab-completion.
Output:
Example output:
Output:
Example output:
In this task, you download the Python application and create the resources used by the current version of the app.
To create the Firestore database, in Cloud Shell, run the following command:
The Firestore database is used to store book and user profile data.
If you're asked to authorize Cloud Shell, click Authorize.
To create the Cloud Storage bucket, run the following command:
The Cloud Storage bucket is used to store book cover images. The bucket has uniform bucket level access and does not use public access prevention.
To make all objects in the bucket publicly readable, run the following command:
When you use OAuth 2.0 for authorization, your app requests one or more scopes of access from a Google Account. Google displays a consent screen to the user to capture the user's consent to share data with the application.
In the Google Cloud console, select the Navigation menu (
Click Get Started.
For App name, enter Bookshelf.
For User support email, select the student email.
Click Next.
For Audience, select Internal, and then click Next.
Users with access to the project will be able to log in to the app.
On the left panel of the lab instructions, copy the Username.
For Email addresses, paste the copied username, and then click Next.
Enable the checkbox to agree to the user data policy, and then click Continue.
Click Create.
In the navigation menu, click Branding.
Click + Add Domain.
In the Authorized domains section, for Authorized domain 1, enter cloudshell.dev.
Click Save.
In the navigation menu, click Data Access.
Click Add or Remove Scopes.
At the beginning of the list, select the box next to openid.
For Filter, enter userinfo.profile, press Enter, and then select the box next to the .../auth/userinfo.profile scope.
For Filter, clear the userinfo.profile filter, enter contacts, press Enter, and then select the box for the .../auth/contacts scope.
Click Update.
You should see two non-sensitive scopes (openid and userinfo.profile), and one sensitive scope (contacts).
Click Save.
In the navigation menu, click Clients, and then click + Create Client.
For Application type, select Web application.
For Name, enter Bookshelf.
For Authorized redirect URIs, click + Add URI.
The URI specified here will be used when Google redirects the browser back to the application after capturing user consent.
To get the redirect URI, in Cloud Shell, run the following command:
Copy the URI that was created by the echo command, and then, for URIs 1, paste in the URI.
Click Create.
Click Download JSON, and then save the client secret JSON to your local machine.
The client secret file will be used to verify your app with Google.
Click OK.
In Cloud Shell, click More (
Click Choose Files, and select the client secret JSON file, and then click Open.
Click Upload.
The client secret JSON file is now available in the home directory. The contents of this file will be used during the OAuth process.
Secret Manager is a secure and recommended place to store the client secret JSON file.
To enable the Secret Manager API, in Cloud Shell, run the following command:
To rename the client secret file, run the following command:
To create the secret, run the following command:
There is now a secret named bookshelf-client-secrets that can be accessed from your application.
To create a secret for the Flask secret key, run the following command:
This command creates a random 20 character alphanumeric password, and then stores it in a secret named flask-secret-key.
To copy the Python code from a Cloud Storage bucket into the home directory, run the following command:
To check the contents of the bookshelf directory, run the following command:
You should see a list that contains seven Python files, a requirements file, and six template files:
To list the dependencies in the requirements file, run the following command:
The requirements file specifies the following dependencies:
To install the dependencies in the requirements file, run the following command:
pip is the package installer for Python. This pip3 command installs the packages specified in the requirements.txt file for use with Python version 3.
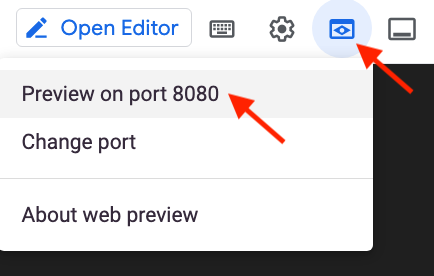
To start the HTTP server, run the following command:
There is an environment variable being passed in to the application:
EXTERNAL_HOST_URL specifies the scheme and hostname that should be used in the callback URL.The application is now hosted on port 8080.
To run the application in the web browser, click Web Preview, and then select Preview on port 8080.
A new tab is opened in the browser, and the application is running. This page displays a list of all existing books. There are no books yet.
Right-click this Wizard of Oz book cover image, and save it to your computer as oz.png:
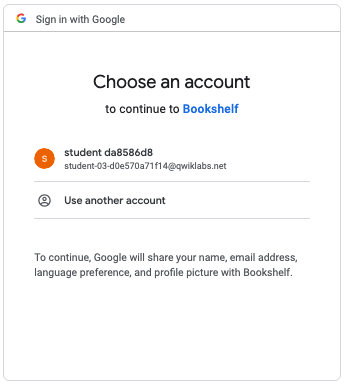
Click + Add book.
You must be logged-in to add a book, so you're asked to choose an account for signing in with Google:
Click the student email, and then click Continue.
Click Allow.
Enter the following information into the form:
| Field | Value |
|---|---|
| Title | Wonderful Wizard of Oz |
| Author | Frank L. Baum |
| Date Published | 1900 |
| Description | There's no place like home! |
For Cover Image, click Choose File.
Select the file that you downloaded (oz.png), and click Open.
Click Save.
You're returned to the view page, and your book details are shown. The book details are stored in the Firestore database, and the cover image is stored in Cloud Storage.
Click the email address.
The profile is displayed. The language select control should show English.
Change the Preferred Language to Spanish, and then click Save.
Click the Wonderful Wizard of Oz book.
The view page now contains both the original English description and the Spanish translation.
In Cloud Shell, to quit the application, enter CTRL-C.
To verify the objective, click Check my progress.
In this task, you use Cloud Build to containerize the application and publish it to Artifact Registry.
To create the Artifact Registry repository, in Cloud Shell, run the following command:
The repository will hold our application container.
To show the repository details, run the following command:
You can create your own Dockerfile to package your application into a Docker image, but Cloud Build can use buildpacks to build the container for you.
To build the application using Cloud Build, run the following command:
The command builds the Docker image of the code in the ~/bookshelf directory and stores it in the app-repo repository in Artifact Registry.
To see the list of builds, run the following command:
The bookshelf build is listed.
To verify the objective, click Check my progress.
In this task, you deploy the application to Cloud Run and then test the application in Cloud Run.
To deploy the application to Cloud Run, run the following command:
If you're asked to enable APIs, enter y.
The command deploys the image we just built to Cloud Run. We specify that unauthenticated calls are allowed because users only need to log in when they want to create, modify, or delete books. The GOOGLE_CLOUD_PROJECT environment variable is provided to the application because it is not available in Cloud Run by default.
Cloud Run deploys the application.
To get the application URL, run the following command:
Click the link created by the previous command.
A new tab should open and the message "Service Unavailable" (or another error) is shown.
The application is not running correctly: we must figure out why.
To verify the objective, click Check my progress.
In this task, you use logs to help fix the issue.
When you encounter an issue with your application, logs in Cloud Logging can often help you fix the issue.
In the Google Cloud console, select the Navigation menu (
Click bookshelf, and then click the Logs tab.
The logs are specific to the Bookshelf application on Cloud Run. If you look through the logs, you should see a permission denied error for secretmanager.versions.access.
When the app is running in Cloud Shell, the application is using the credentials of the logged-in user. Your student user can access items in Secret Manager, write files to Cloud Storage, and call the Translation API.
Unless you supply a service account, Cloud Run applications use the Compute Engine default service account. This default service account does not have those permissions.
It is a best practice to create a service account specific to your application, attach it to the application, and then provide the correct permissions to the service account.
To create a service account for the application, in Cloud Shell, run the following command:
You haven't added any permissions yet. To determine the correct role to add, you can look at the IAM basic and predefined roles reference. The Secret Manager roles include the Secret Manager Secret Accessor role, which should provide the minimal permissions for accessing secrets.
To add the required roles, run the following commands:
The permissions are for the Secret Manager, the Cloud Translation API, Firestore, and Cloud Storage.
The running application will not immediately pick up the permissions, but it will within a few minutes. To avoid the delay, the app can be redeployed.
To redeploy the application with a service account, run the following command:
To open the application, run the following command, and then click the link:
You may see an error. This error occurs because the permissions for the service account may have not yet propagated.
If you look at the Bookshelf logs for the Cloud Run service, you can see errors, which may include Missing or insufficient permissions. The app will fail until the permissions are propagated and the service account can call the required Google Cloud services.
Until the app successfully opens, close the application tab, and click the generated URL again.
When the permissions have been propagated, the familiar Books page will be displayed.
In the application, click Login.
The login fails.
The error message indicates that access is blocked, the app sent an invalid request, and the error is a redirect URI mismatch. This error is occurring because the OAuth configuration is only set up for running in cloudshell.dev, not the Cloud Run service URL.
In the Google Cloud console, select the Navigation menu (
Click + Add Domain.
In Cloud Shell, run the following command:
The command builds the application's URL without the https://.
Copy the domain name into the clipboard, and then paste it in Authorized domain 2.
Click Save.
In the navigation menu, select Clients.
In OAuth 2.0 Client IDs, click Bookshelf.
For Authorized redirect URIs, click + Add URI.
To get the redirect URI, in Cloud Shell, run the following command:
Copy the URI that was created by the echo command, and then, for URIs 2, paste in the URI.
Click Save.
The secret is only loaded once for the application, so you need to redeploy the application.
For your fix to take effect, redeploy the app with the following command:
When the application is deployed, run the following command, and then click the generated URL:
The application is up and running.
In the application, click Login, and then log the user in by providing consent.
The email address is now a link.
Click the email address.
The preferred language is still Spanish.
To verify the objective, click Check my progress.
In this task, you explore some of the features of Google Cloud Observability that can be used to maintain the health of your application.
Error Reporting aggregates errors in your running cloud services.
To add the required role to the service account, in Cloud Shell, run the following command:
In Cloud Shell, in a file editor, open the ~/bookshelf/requirements.txt file.
Add the following line:
The requirements.txt file should now look like this:
Save the file.
To install the updated dependencies, run the following command:
In a file editor, open the file ~/bookshelf/main.py.
On the line after the cloud_logging import statement, add the following code:
After the bottom of the /profile endpoint, add the following code:
Calling the /raiseerror endpoint will simulate an error by raising an error to Error Reporting and redirecting to the error page.
Save the file.
To build and redeploy the application, run the following commands:
When the application is deployed, run the following command, and then click the generated URL:
Add /raiseerror to the end of the URL, and then click Enter.
You're redirected to the application error page, with the error Intentionally Created Error.
Replace error with raiseerror in the URL, and then click Enter.
You're redirected to the application error page again. You will look at these errors in a later step.
To verify the objective, click Check my progress.
The Cloud Run service details page contains built-in dashboards that will help you manage your service.
In the Google Cloud console, select the Navigation menu (
Click bookshelf.
The Metrics tab is shown.
Click Last 1 day, and then select Last 1 hour.
The Metrics tab shows a list of service invocations that have happened over the past hour, and graphs of metrics that are automatically collected.
Click the Logs tab.
All logs for the Cloud Run service can be explored on this tab.
On the Google Cloud console title bar, in the Search field, type Logging, click Search, and then click Logging.
All logs are accessible here.
From the All resources drop down menu, select Cloud Run Revision, then click Apply.
All Cloud Run logs are shown here. You can filter by service name or revision name.
For Severity, click Error.
The errors raised in the application are shown here. If you had more applications, using more services, it would be difficult to distinguish the different sources of errors from this view.
On the Google Cloud console title bar, in the Search field, type Error Reporting, click Search, and then click Error Reporting.
Errors are grouped on this page. Many of the errors were automatically created when the Python application in Cloud Run crashed. The manually raised error is also shown.
Click 1 hour.
Click Intentionally Created Error.
Similar errors are grouped here. Grouping errors can help you debug issues.
On one of the samples, click View Logs.
This link takes you back to Cloud Logging to this log entry. You can pin a logged error and explore logs that happened around the same time.
You successfully containerized and deployed an application to Cloud Run, and debugged issues that arose. You granted required roles to the service account and updated the OAuth configuration to support both local and Cloud Run deployment. You added Error Reporting to the application, and then explored the application development features of Google Cloud Observability.
When you have completed your lab, click End Lab. Google Cloud Skills Boost removes the resources you’ve used and cleans the account for you.
You will be given an opportunity to rate the lab experience. Select the applicable number of stars, type a comment, and then click Submit.
The number of stars indicates the following:
You can close the dialog box if you don't want to provide feedback.
For feedback, suggestions, or corrections, please use the Support tab.
Copyright 2025 Google LLC All rights reserved. Google and the Google logo are trademarks of Google LLC. All other company and product names may be trademarks of the respective companies with which they are associated.


현재 이 콘텐츠를 이용할 수 없습니다
이용할 수 있게 되면 이메일로 알려드리겠습니다.

감사합니다
이용할 수 있게 되면 이메일로 알려드리겠습니다.

한 번에 실습 1개만 가능
모든 기존 실습을 종료하고 이 실습을 시작할지 확인하세요.