


Before you begin
- Labs create a Google Cloud project and resources for a fixed time
- Labs have a time limit and no pause feature. If you end the lab, you'll have to restart from the beginning.
- On the top left of your screen, click Start lab to begin
Create a database and enable pgVector extension
/ 20
Populate database with the sample dataset
/ 20
Create the service account toolbox-identity
/ 20
Create a Client Id
/ 20
Deploy the Toolbox
/ 20
One of the best tools for improving the quality of responses from large language models (LLMs) is retrieval augmented generation (RAG). RAG is the pattern of retrieving some non-public data and using that data to augment your prompt sent to the LLM. RAG allows the LLM to generate more accurate responses based on the data included in the prompt.
You'll use AlloyDB, Google Cloud's scalable and performant PostgreSQL-compatible database, to store and search by a special kind of vector data called vector embeddings. Vector embeddings can be retrieved using a semantic search, which allows retrieval of the available data that is the best match for a user's natural language query. The retrieved data is then passed to the LLM in the prompt.
To retrieve data from the database you'll use MCP Toolbox, a middleware server that exposes database operations as a set of tools. The agent connects to Toolbox to execute these tools. This provides a secure, scalable, and modular way to manage database interactions.
You'll also use Vertex AI, Google Cloud's fully-managed, unified AI development platform for building and using generative AI. Your application uses Gemini Pro, a multimodal foundation model that supports adding image, audio, video, and PDF files in text or chat prompts and supports long-context understanding.
In this lab, you'll learn:
This Qwiklabs hands-on lab lets you do the lab activities yourself in a real cloud environment, not in a simulation or demo environment. It does so by giving you new, temporary credentials that you use to sign in and access Google Cloud for the duration of the lab.
To complete this lab, you need:
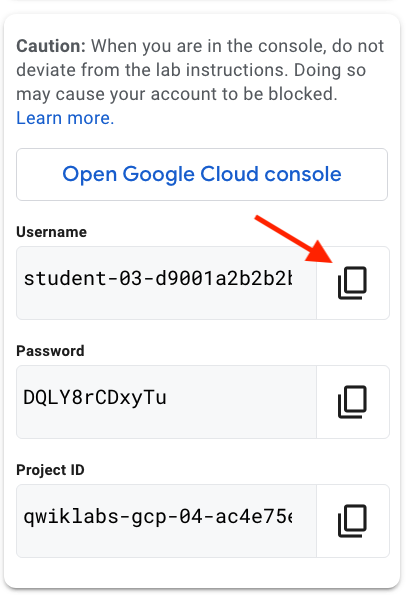
Click the Start Lab button. If you need to pay for the lab, a pop-up opens for you to select your payment method. On the left is a panel populated with the temporary credentials that you must use for this lab.
Copy the username, and then click Open Google Console. The lab spins up resources, and then opens another tab that shows the Choose an account page.
On the Choose an account page, click Use Another Account. The Sign in page opens.
Paste the username that you copied from the Connection Details panel. Then copy and paste the password.
After a few moments, the Cloud console opens in this tab.

Google Cloud Shell is a virtual machine that is loaded with development tools. It offers a persistent 5GB home directory and runs on the Google Cloud.
Google Cloud Shell provides command-line access to your Google Cloud resources.
In Cloud console, on the top right toolbar, click the Open Cloud Shell button.
Click Continue.
It takes a few moments to provision and connect to the environment. When you are connected, you are already authenticated, and the project is set to your PROJECT_ID. For example:
gcloud is the command-line tool for Google Cloud. It comes pre-installed on Cloud Shell and supports tab-completion.
Output:
Example output:
Output:
Example output:
In this task, you install Python, MCP Toolbox, and the PostgreSQL client.
A virtual machine (VM) has been created. This VM hosts the application and the MCP Toolbox.
To connect to the VM, in Cloud Shell, run the following command:
If asked to authorize, click Authorize.
For each question asked by the gcloud compute ssh command, click Enter or Return to specify the default input.
After a short wait, you are logged into the VM.
To install Python and Git, in the VM, run the following commands:
When the installation is complete, you are left in the virtual Python environment, with a (.venv) prompt.
If the VM SSH session ever times out or the tab is closed, you can SSH into the VM again and use the command source ~/.venv/bin/activate to restart the virtual Python environment.
To confirm the python version, run the following command:
Your response should look similar to this:
To install the PostgreSQL client, in the VM session, run the following commands:
To clone the code for this demo, run the following commands:
To download the MCP Toolbox binary, run the following commands:
In this task, you use the PostgreSQL client to create the vector database.
An AlloyDB instance has already been created.
To create a new database, run the following command:
psql responds with CREATE DATABASE.
To enable the database to support semantic searches, the entities should be represented by vector embeddings.
To enable vector embeddings in this database, run the following command:
psql responds with CREATE EXTENSION.
Click Check my progress to verify the objective.
In this task, you use MCP Toolbox to populate the vector database in AlloyDB with sample data. This data is used for the chat application.
To see the data model, run the following command:
The Python data models are shown here. The model includes airports, flights, amenities within the terminals, policies, and tickets.
To see an example of the airport data, run the following commands:
These commands show the CSV header that specifies the column names for the airport dataset followed by the row for the San Francisco International airport (SFO). The data in the airport model can be retrieved based on the International Air Transport Association (IATA) code, or by country, city, and airport name. You can use keyword search to find rows in this table, so there are no vector embeddings for this data.
To see an example of the flight data, run the following commands:
These commands show the CSV header that specifies the column names for the flights dataset followed by the first 10 rows of flights to or from SFO. The data in the flights model can be retrieved based on the airline and flight number, or by the departure and arrival airport codes.
To see an example of the amenities data, run the following command:
This command shows the CSV header that specifies the column names for the amenities dataset followed by the first amenity.
You'll notice that the first amenity has several simple values, including name, description, location, terminal, category, and business hours. The next value is content, which incorporates the name, description, and location. The last value is embedding, the vector embedding for the row.
The embedding is an array of 768 numbers which is used when performing a semantic search. These embeddings are calculated using an AI model provided by Vertex AI. When a user provides a query, a vector embedding can be created from the query, and data with vector embeddings that are close to the search's embedding can be retrieved.
The policy data also uses vector embeddings in a similar fashion.
To configure the required environment variables for MCP Toolbox, run the following commands:
These MCP Toolbox environment variables are similar to those that were used for the PostgreSQL client.
The next step is to run the MCP Toolbox.
To run MCP Toolbox in the background for data initialization, run the following command:
The ampersand (&) causes toolbox to run in the background, so you are able to perform the database init in the same SSH session.
To install the Python dependencies of the demo app, run the following command:
To run the database script, run the following commands:
The first command adds a path to the Python modules, and the init script populates the database.
To verify the data that was populated, run the following command:
The PostgreSQL command returns the number of airports in the airports table.
To end the background Toolbox process, run the following command:
In this task, you create a service account for the MCP toolbox.
For our chat app, the MCP toolbox is responsible for extracting relevant information from the database. It extracts the necessary information from the database based on the request from an AI application. This service account is used as the identity of the MCP toolbox service running in Cloud Run.
The SSH user does not have permission for the project instance to provide the service account with the correct role. You create the service account using a new Cloud Shell tab.
In Cloud Shell, to open a new Cloud Shell tab, click Open a new tab (+).
To create a service account, in the new tab, run the following command:
This service account is created.
To grant the service account the necessary privileges, run the following command:
This service account is granted the following roles:
roles/alloydb.client allows the toolbox to access AlloyDB databases.roles/serviceusage.serviceUsageConsumer allows the toolbox to consume services.roles/secretmanager.secretAccessor allows the toolbox to retrieve secrets stored in Secret Manager.To close the new tab, run the following command:
In this task, you register the OAuth consent screen that is presented to users who are logging in.
When you use OAuth 2.0 for authorization, Google displays a consent screen to capture the user's consent to share data with the application.
In the Google Cloud console, select the Navigation menu (
Click Get Started.
For App name, enter Cymbal Air.
Click User support email, then click the student email, and then click Next.
For Audience, select Internal, and then click Next.
Users with access to the project should be able to log in to the app.
On the left panel of the lab instructions, copy the Username.
For Contact information, paste the copied username.
Click Next.
Click Checkbox to agree the User Data Policy, then click Continue, and then click Create.
The consent screen is now set up.
In this task, you create a client ID for the application.
The application requires a client ID to use Google's OAuth service. You configure the allowed origins that can make this request, and a redirect URI where the web app is redirected after the user has consented to log in.
In the Google Cloud console, select the Navigation menu (
Click + Create Credentials, and then click OAuth client ID.
A client ID is used to identify a single app to Google's OAuth servers.
For Application type, select Web application.
For Name, enter Cymbal Air.
You can generate the JavaScript origin and redirect URI using Cloud Shell.
In Cloud Shell, to open a new Cloud Shell tab, click Open a new tab (+).
To get the origin and redirect URI, in the new tab, run the following commands:
For Authorized JavaScript origins, click + Add URI.
Copy the origin URI that was created by the echo command, and then, for URIs 1, paste in the URI.
For Authorized redirect URIs, click + Add URI.
Copy the redirect URI that was created by the echo command, and then, for URIs 1, paste in the URI.
To create the environment variable, switch to the VM SSH Cloud Shell tab, then paste the following command without clicking Enter:
In the Credentials window, click Create.
The client ID and client secret are created. For this test application, you only use the client ID.
Click Copy client ID (
The client ID is copied to the clipboard.
In the VM SSH Cloud Shell tab, paste the client ID, and then click Enter.
The export should look similar to this:
In this task, you deploy MCP toolbox to Cloud Run.
A sample tools.yaml file is provided for the toolbox, but several settings need to be modified.
To see the configuration settings, run the following command:
This YAML file contains configuration settings for the database and for OAuth.
It should look similar to this:
To update the settings to match your environment, run the following commands:
These commands use sed to replace the specific settings into the example tools.yaml file. The ipType line is also added below the password line, because the default IP type is public.
To see the file updates, run the following command:
The top of the settings file now contains your values.
Sensitive settings (especially the database password and the client ID) should be secured as secrets.
Instead of checking sensitive information into a code repository or as part of the running app, Secret Manager can be used to secure your secrets.
To create a secret, run the following command:
To validate that the secret was stored, run the following command:
You should now see that there is a secret named tools.
To deploy the toolbox to Cloud Run, in the VM SSH Cloud Shell tab, run the following commands:
Wait until the deployment completes.
To verify the service, run the following command:
If you see the "Hello, World!" message, the service is up and serving requests.
In this task, you run a sample chat application that uses the retrieval service.
To return to the root of the chat application, in the VM SSH Cloud Shell tab, run the following commands:
Before starting the application, you need to set up some environment variables. The basic functionality of the application, including querying flights and returning airport amenities, requires an environment variable named TOOLBOX_URL to contain the URL of the toolbox service running on Cloud Run.
To specify the URL of the toolbox service, run the following commands:
The toolbox URL is used by the local application to access databases through MCP Toolbox.
To run the application, run the following command:
Your response should look similar to this:
The application is now running.
You have several ways to connect to the application running on the VM. For example, you can open port 8081 on the VM using firewall rules in the VPC, or create a load balancer with a public IP. Here you use a SSH tunnel to the VM, translating the Cloud Shell port 8080 to the VM port 8081.
In Cloud Shell, to open a new Cloud Shell tab, click Open a new tab (+).
To create an SSH tunnel to the VM port, in the new tab, run the following command:
The gcloud command connects localhost port 8080 in Cloud Shell with port 8081 on the VM. You can ignore the error "Cannot assign requested address."
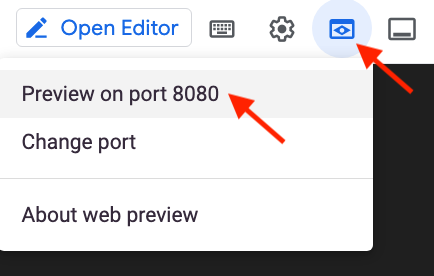
To run the application in the web browser, click Web Preview, and then select Preview on port 8080.
A new tab is opened in the browser, and the application is running. The Cymbal Air application prompts "Welcome to Cymbal Air! How may I assist you?"
Enter the following query:
The application responds with the next flight from SFO to LAX, or asks you for clarifying information.
Enter the following query:
The chat app may ask you to clarify which flight, but the app can understand the context and respond with restaurants near the departure gate in SFO.
In this task, you log into the application to book the flight.
Click Sign in.
A pop-up window opens.
In the pop-up window, select the student.
To allow Cymbal Air to access the info about the student user, click Continue.
The student account is logged in.
Enter the following query:
The application presents the flight that was being discussed.
Click Looks good to me. Book it.
The flight is booked.
Enter the following query:
The flight you just booked is shown.
The chat app can help answer user questions like:
The application uses the latest Google foundation models to generate responses and augment them with information about flights and amenities from the operational AlloyDB database. You can read more about this demo application on the GitHub page of the project.
You've successfully built a chat application that leverages large language models (LLMs) and retrieval augmented generation (RAG) to create engaging and informative conversations.
When you have completed your lab, click End Lab. Google Cloud Skills Boost removes the resources you’ve used and cleans the account for you.
You will be given an opportunity to rate the lab experience. Select the applicable number of stars, type a comment, and then click Submit.
The number of stars indicates the following:
You can close the dialog box if you don't want to provide feedback.
For feedback, suggestions, or corrections, please use the Support tab.
Manual Last Updated October 13, 2025
Lab Last Tested October 13, 2025
Copyright 2025 Google LLC All rights reserved. Google and the Google logo are trademarks of Google LLC. All other company and product names may be trademarks of the respective companies with which they are associated.


This content is not currently available
We will notify you via email when it becomes available

Great!
We will contact you via email if it becomes available

One lab at a time
Confirm to end all existing labs and start this one