Checkpoint
Deploy your app
/ 100
App Engine: Qwik Start - Java
GSP068

Overview
App Engine allows developers to focus on doing what they do best, writing code. The App Engine standard environment is based on container instances running on Google's infrastructure. Containers are preconfigured with one of several available runtimes (Java 8, Python 3.7, Go and PHP). Each runtime also includes libraries that support App Engine Standard APIs. For many applications, the standard environment runtimes and libraries might be all you need.
The App Engine standard environment makes it easy to build and deploy an application that runs reliably even under heavy load and with large amounts of data. It includes the following features:
- Persistent storage with queries, sorting, and transactions.
- Automatic scaling and load balancing.
- Asynchronous task queues for performing work outside the scope of a request.
- Scheduled tasks for triggering events at specified times or regular intervals.
- Integration with other Google cloud services and APIs.
Applications run in a secure, sandboxed environment, allowing App Engine standard environment to distribute requests across multiple servers, and scaling servers to meet traffic demands. Your application runs within its own secure, reliable environment that is independent of the hardware, operating system, or physical location of the server.
This hands-on lab shows you how to create a small App Engine application that displays a short message.
What you'll do
In this lab you will learn how to:
- Download starter code from a GitHub repository.
- Run your application locally from a Cloud Shell session.
- Deploy your application with Google App Engine.
Setup
Before you click the Start Lab button
Read these instructions. Labs are timed and you cannot pause them. The timer, which starts when you click Start Lab, shows how long Google Cloud resources will be made available to you.
This hands-on lab lets you do the lab activities yourself in a real cloud environment, not in a simulation or demo environment. It does so by giving you new, temporary credentials that you use to sign in and access Google Cloud for the duration of the lab.
To complete this lab, you need:
- Access to a standard internet browser (Chrome browser recommended).
- Time to complete the lab---remember, once you start, you cannot pause a lab.
How to start your lab and sign in to the Google Cloud console
-
Click the Start Lab button. If you need to pay for the lab, a pop-up opens for you to select your payment method. On the left is the Lab Details panel with the following:
- The Open Google Cloud console button
- Time remaining
- The temporary credentials that you must use for this lab
- Other information, if needed, to step through this lab
-
Click Open Google Cloud console (or right-click and select Open Link in Incognito Window if you are running the Chrome browser).
The lab spins up resources, and then opens another tab that shows the Sign in page.
Tip: Arrange the tabs in separate windows, side-by-side.
Note: If you see the Choose an account dialog, click Use Another Account. -
If necessary, copy the Username below and paste it into the Sign in dialog.
{{{user_0.username | "Username"}}} You can also find the Username in the Lab Details panel.
-
Click Next.
-
Copy the Password below and paste it into the Welcome dialog.
{{{user_0.password | "Password"}}} You can also find the Password in the Lab Details panel.
-
Click Next.
Important: You must use the credentials the lab provides you. Do not use your Google Cloud account credentials. Note: Using your own Google Cloud account for this lab may incur extra charges. -
Click through the subsequent pages:
- Accept the terms and conditions.
- Do not add recovery options or two-factor authentication (because this is a temporary account).
- Do not sign up for free trials.
After a few moments, the Google Cloud console opens in this tab.

Activate Cloud Shell
Cloud Shell is a virtual machine that is loaded with development tools. It offers a persistent 5GB home directory and runs on the Google Cloud. Cloud Shell provides command-line access to your Google Cloud resources.
- Click Activate Cloud Shell
at the top of the Google Cloud console.
When you are connected, you are already authenticated, and the project is set to your Project_ID,
gcloud is the command-line tool for Google Cloud. It comes pre-installed on Cloud Shell and supports tab-completion.
- (Optional) You can list the active account name with this command:
- Click Authorize.
Output:
- (Optional) You can list the project ID with this command:
Output:
gcloud, in Google Cloud, refer to the gcloud CLI overview guide.
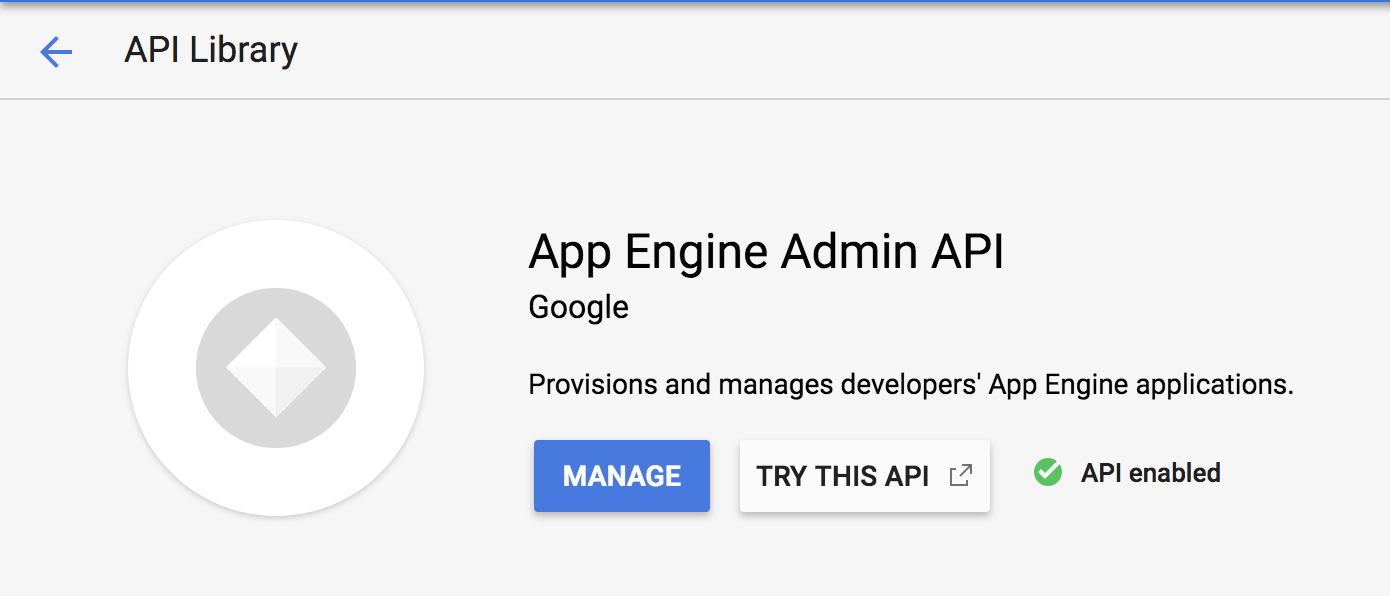
Task 1. Enable Google App Engine Admin API
The App Engine Admin API enables developers to provision and manage their App Engine Applications.
-
Expand the navigation menu (
) and select APIs & Services > Library.
-
Type "App Engine Admin API" in the search box.
-
Click App Engine Admin API.
-
Click Enable if it isn't already set. Your page should now resemble the following:
Task 2. Download the Hello World app
We've created a simple Hello World app written in Java so you can quickly get a feel for deploying an application to the Google Cloud. Follow these steps to download Hello World to your temporary Google Cloud shell environment.
- Open a Cloud Shell session and run the following command to clone the Hello World sample app repository:
Output:
- Then go to the directory that contains the sample code:
In this folder you will find the src directory that contains a package called com.example.appengine.helloworld that implements a simple HTTP Servlet.
Task 3. Test the application using the development server
To get the development server running, you'll download Maven to manage compiling your app and starting the development server.
- Run the following commands to configure your Maven environment:
- Enter the following Maven command to download and install Maven and run the app:
It will take a few minutes for Maven to download and install.
The development server is listening for requests on port 8080 when you see the following last line of output:
- View the app by clicking the Web preview button > Preview on port 8080:
Your page should resemble the following:
- In your terminal window, press
Ctrl+Cto stop the development server.
Task 4. Deploy your app
- Now you'll create an application on an App Engine with the following command:
- When prompted, enter your choice of number associated with
. You should receive the following output soon after:
- Open the
pom.xmlfile with the following command:
- Key down towards the bottom of the page until you find this section:
- Change
myProjectIdto your Project ID. Ensure this section resembles the following before moving on:
- Now exit nano and save the file with CTRL + X > Y > Enter.
DO NOT use the gcloud app deploy command as stated in the output to deploy your app.
- Instead, run the following command to deploy your application:
You should receive the following output:
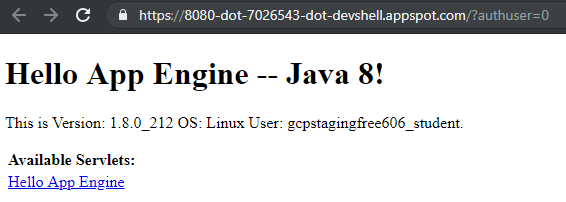
Task 5. View your application
- To launch your browser, enter the following command then click on the link it provides:
Example output; your link will be different:
Your application is deployed and you can read the short message in your browser:
Click Check my progress to verify the objective.
Task 6. Test your knowledge
Test your knowledge about Google cloud Platform by taking our quiz. (Please select multiple correct options if necessary.)
Congratulations!
Finish your quest
Continue your quest with Baseline: Deploy & Develop. A quest is a series of related labs that form a learning path. Completing this quest earns you a badge to recognize your achievement. You can make your badge or badges public and link to them in your online resume or social media account. Enroll in this quest and get immediate completion credit. Refer to the Google Cloud Skills Boost catalog for all available quests.
Take your next lab
This lab is also part of a series of labs called Qwik Starts. These labs are designed to give you a little taste of the many features available with Google Cloud. Search for "Qwik Starts" in the lab catalog to find the next lab you'd like to take!
Next steps /learn more
- Learn more about an App Engine with An Overview Of App Engine
- Try something else with an App Engine with Getting Started with Flask on App Engine Standard Environment
Google Cloud training and certification
...helps you make the most of Google Cloud technologies. Our classes include technical skills and best practices to help you get up to speed quickly and continue your learning journey. We offer fundamental to advanced level training, with on-demand, live, and virtual options to suit your busy schedule. Certifications help you validate and prove your skill and expertise in Google Cloud technologies.
Manual Last Updated January 24, 2024
Lab Last Tested January 24, 2024
Copyright 2024 Google LLC All rights reserved. Google and the Google logo are trademarks of Google LLC. All other company and product names may be trademarks of the respective companies with which they are associated.