This lab was developed with our partner, Datadog. Your personal information may be shared with Datadog, the lab sponsor, if you have opted-in to receive product updates, announcements, and offers in your Account Profile.
GSP1147
Overview
Datadog is a monitoring and analytics platform for cloud-based applications, infrastructure, and networks. It provides real-time visibility into application performance, infrastructure health, and user experience.
The Datadog integration for Google Cloud Platform is a powerful way to get data into Datadog with minimal effort. It is agentless and pulls metadata at the Platform level from Google Cloud APIs. In addition, the new Datadog Cloud Run agent delivers official support for traces and custom metrics in managed Cloud Run instances.
In this lab, you'll explore how to connect Datadog to your Google Cloud project, and use it to monitor a Cloud Run app. You'll also explore the new APM/tracing capabilities offered by the new Datadog Cloud Run agent.
Objectives
You will learn how to:
Set up the Datadog platform integration
Configure log forwarding
View tracing information collected by the new Datadog Cloud Run agent
Explore Cloud Run metrics in Datadog
Explore Cloud Run logs in Datadog
Setup and Requirements
Before you click the Start Lab button
Read these instructions. Labs are timed and you cannot pause them. The timer, which starts when you click Start Lab, shows how long Google Cloud resources will be made available to you.
This Qwiklabs hands-on lab lets you do the lab activities yourself in a real cloud environment, not in a simulation or demo environment. It does so by giving you new, temporary credentials that you use to sign in and access Google Cloud for the duration of the lab.
What you need
To complete this lab, you need:
Access to a standard internet browser (Chrome browser recommended).
Time to complete the lab.
Note: If you already have your own personal Google Cloud account or project, do not use it for this lab.
Note: If you are using a Pixelbook, open an Incognito window to run this lab.
How to start your lab and sign in to the Google Cloud Console
Click the Start Lab button. If you need to pay for the lab, a pop-up opens for you to select your payment method.
On the left is a panel populated with the temporary credentials that you must use for this lab.
Copy the username, and then click Open Google Console.
The lab spins up resources, and then opens another tab that shows the Sign in page.
Tip: Open the tabs in separate windows, side-by-side.
In the Sign in page, paste the username that you copied from the Connection Details panel. Then copy and paste the password.
Important: You must use the credentials from the Connection Details panel. Do not use your Qwiklabs credentials. If you have your own Google Cloud account, do not use it for this lab (avoids incurring charges).
Click through the subsequent pages:
Accept the terms and conditions.
Do not add recovery options or two-factor authentication (because this is a temporary account).
Do not sign up for free trials.
After a few moments, the Cloud Console opens in this tab.
Activate Cloud Shell
Cloud Shell is a virtual machine that is loaded with development tools. It offers a persistent 5GB home directory and runs on the Google Cloud. Cloud Shell provides command-line access to your Google Cloud resources.
In the Cloud Console, in the top right toolbar, click the Activate Cloud Shell button.
Click Continue.
It takes a few moments to provision and connect to the environment. When you are connected, you are already authenticated, and the project is set to your PROJECT_ID. For example:
gcloud is the command-line tool for Google Cloud. It comes pre-installed on Cloud Shell and supports tab-completion.
You can list the active account name with this command:
If you already have a trial account set up, you can use that. It is recommended that you do not use your production Datadog account to avoid cluttering the environment with test and training assets.
Back in the Cloud Console, navigate back to your Cloud Shell window. Run the following command, replacing <YOUR_DATADOG_API_KEY>with your API key in the appropriate slot:
export DD_API_KEY=<YOUR_DATADOG_API_KEY>
Run the following command to set your Project ID.
export PROJECT_ID={{{ project_0.project_id | Project ID }}}
Note: If you close Cloud Shell, you'll lose the environment variable you just added. Keep it somewhere safe temporarily, or just leave the page open with the API key as mentioned above in case you need to add it again.
Task 2. Enable Google Cloud services
With Google Cloud, nothing is enabled by default to protect you from using a costly system by accident. Run the following in Cloud Shell to enable all the APIs needed for this lab:
Task 3. Set up the Google Cloud platform-level integration for Datadog
To use Datadog to monitor a project, you need to enable APIs needed for Datadog, create a service account, and connect the service account to Datadog.
Create a service account
Datadog's Google Cloud integration uses a service account to make calls to the Cloud Logging API to collect node-level metrics from your Compute Engine instances.
In Cloud Shell, create a service account for Datadog:
DATADOG_SA_NAME=datadog-service-account
gcloud iam service-accounts create $DATADOG_SA_NAME \
--display-name "Datadog Service Account"
Enable the Datadog service account to collect metrics, tags, events, and user labels by granting the following IAM roles:
DATADOG_SA_EMAIL=$DATADOG_SA_NAME@$PROJECT_ID.iam.gserviceaccount.com
gcloud projects add-iam-policy-binding $PROJECT_ID \
--member serviceAccount:$DATADOG_SA_EMAIL \
--role roles/cloudasset.viewer
gcloud projects add-iam-policy-binding $PROJECT_ID \
--member serviceAccount:$DATADOG_SA_EMAIL \
--role roles/compute.viewer
gcloud projects add-iam-policy-binding $PROJECT_ID \
--member serviceAccount:$DATADOG_SA_EMAIL \
--role roles/monitoring.viewer
Note: These steps came directly from Datadog's documentation. For more information, visit https://docs.datadoghq.com/integrations/google_cloud_platform/#setup
Add the Datadog principal to your service account
In Datadog, navigate to Integrations, search for Google Cloud Platform and select it.
Click on Add GCP Account. If you have no configured projects, you are automatically redirected to this page.
If you have not generated a Datadog principal for your org, click the Generate Principal button.
Copy your Datadog principal to the clipboard and keep it for the next section.
Back in the Google Cloud console, under the Service Acounts menu, find the service account you created in the first section.
Go to the Permissions tab and click on Grant Access.
Paste your Datadog principal into the New principals text box.
Assign the role of Service Account Token Creator and click Save.
Note: If you previously configured access using a shared Datadog principal, you can revoke the permission for that principal after you complete these steps.
Complete the integration setup in Datadog
In your Google Cloud console, navigate to the Service Account > Details tab for the service account you created. There, you can find the email associated with this Google service account. It resembles <sa-name>@<project-id>.iam.gserviceaccount.com. Copy this email.
Return to the integration configuration tile in Datadog (where you copied your Datadog principal in the previous section).
In the box under Add Service Account Email, paste the email you previously copied.
Click on Verify and Save Account.
Task 4. Configure Cloud Pub/Sub from Google Cloud to Datadog (for log forwarding)
Give that topic the name export-logs-to-datadog (make sure to use this exact name for proper assessment.in this lab) and Save. The default options are fine. Make sure Add a default subscription is checked.
Create a subscription ID by selecting Create Subscription. Give it an appropriate name and select the topic you previously created (export-logs-to-datadog).
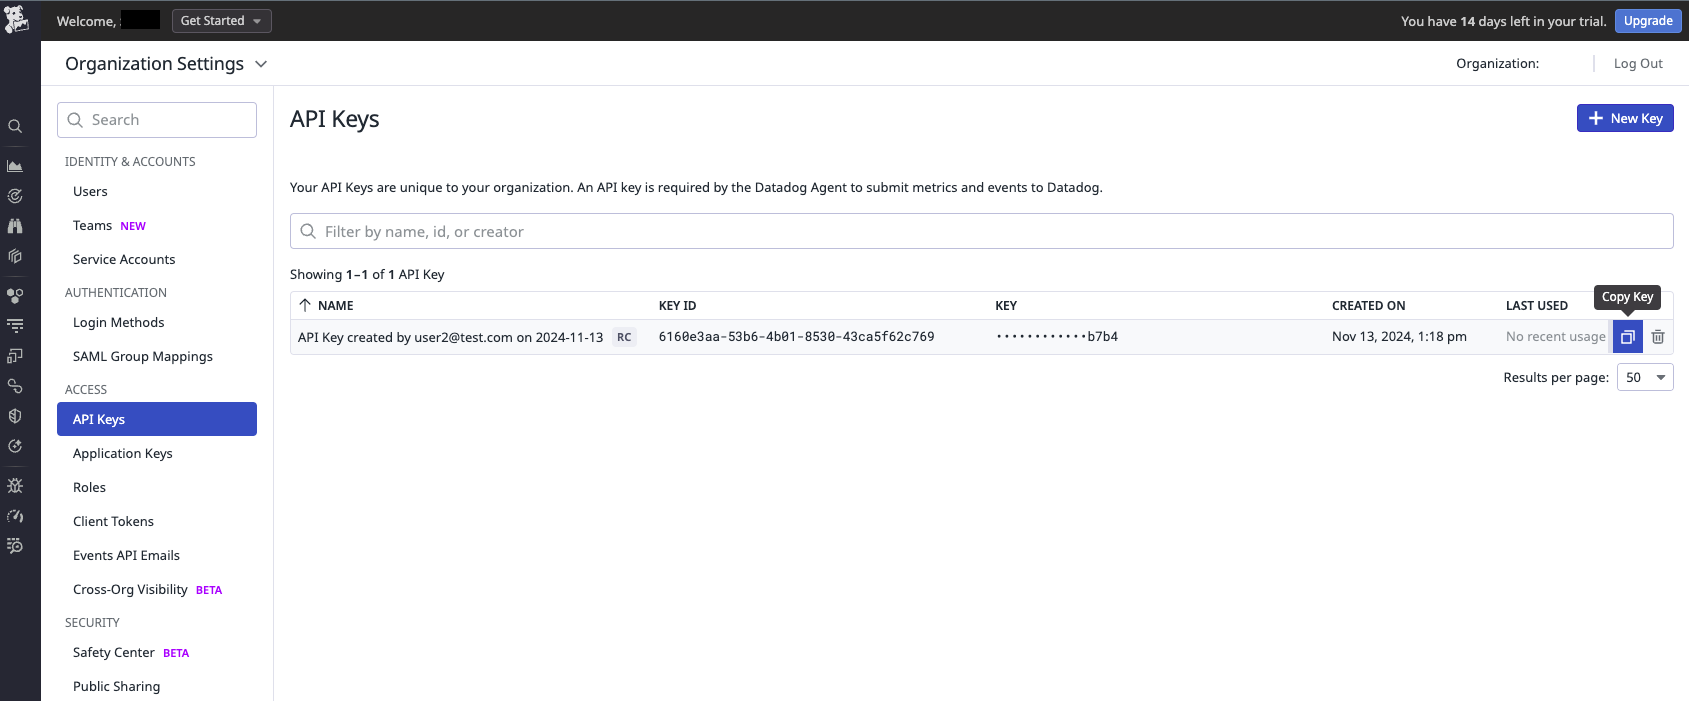
Change the method to Push. For the endpoint, enter the following (make sure to replace the Datadog API key in this string): https://gcp-intake.logs.us5.datadoghq.com/api/v2/logs?dd-api-key=<DD_API_KEY>&dd-protocol=gcp. Do NOT enable authentication.
Note: Make sure you replace with your API key from before. You can also create an API key or pick an existing API key in Datadog Organization Settings -> API Keys
Hit Create at the bottom.
🎉 The Cloud Pub/Sub is ready to receive logs from Google Cloud Logging and forward them to Datadog.
Click Check my progress to verify the objective.
Create Cloud PubSub Topic and Configure Subscription
Task 5. Clone the repo
In Cloud Shell, run the following commands to clone the repo and build the container.
First, Clone the repo with a sample app:
git clone https://github.com/Scott-Mabe/crpb.git
Next, set the repository name variable:
export REPO_NAME="datadog-repo"
Create a Google Cloud Artifact Registry repository:
If you get a message that says Allow unauthenticated invocations to [cloud-run-demo-go] (y/N)?, it probably means you typed something wrong or the command wasn't copied properly. Ctrl-C and try again.
When this completes, you should see the URL for your running app:
It's very important that you now click the URL and visit the page to generate some traces! Refresh the page a few times for good measure.
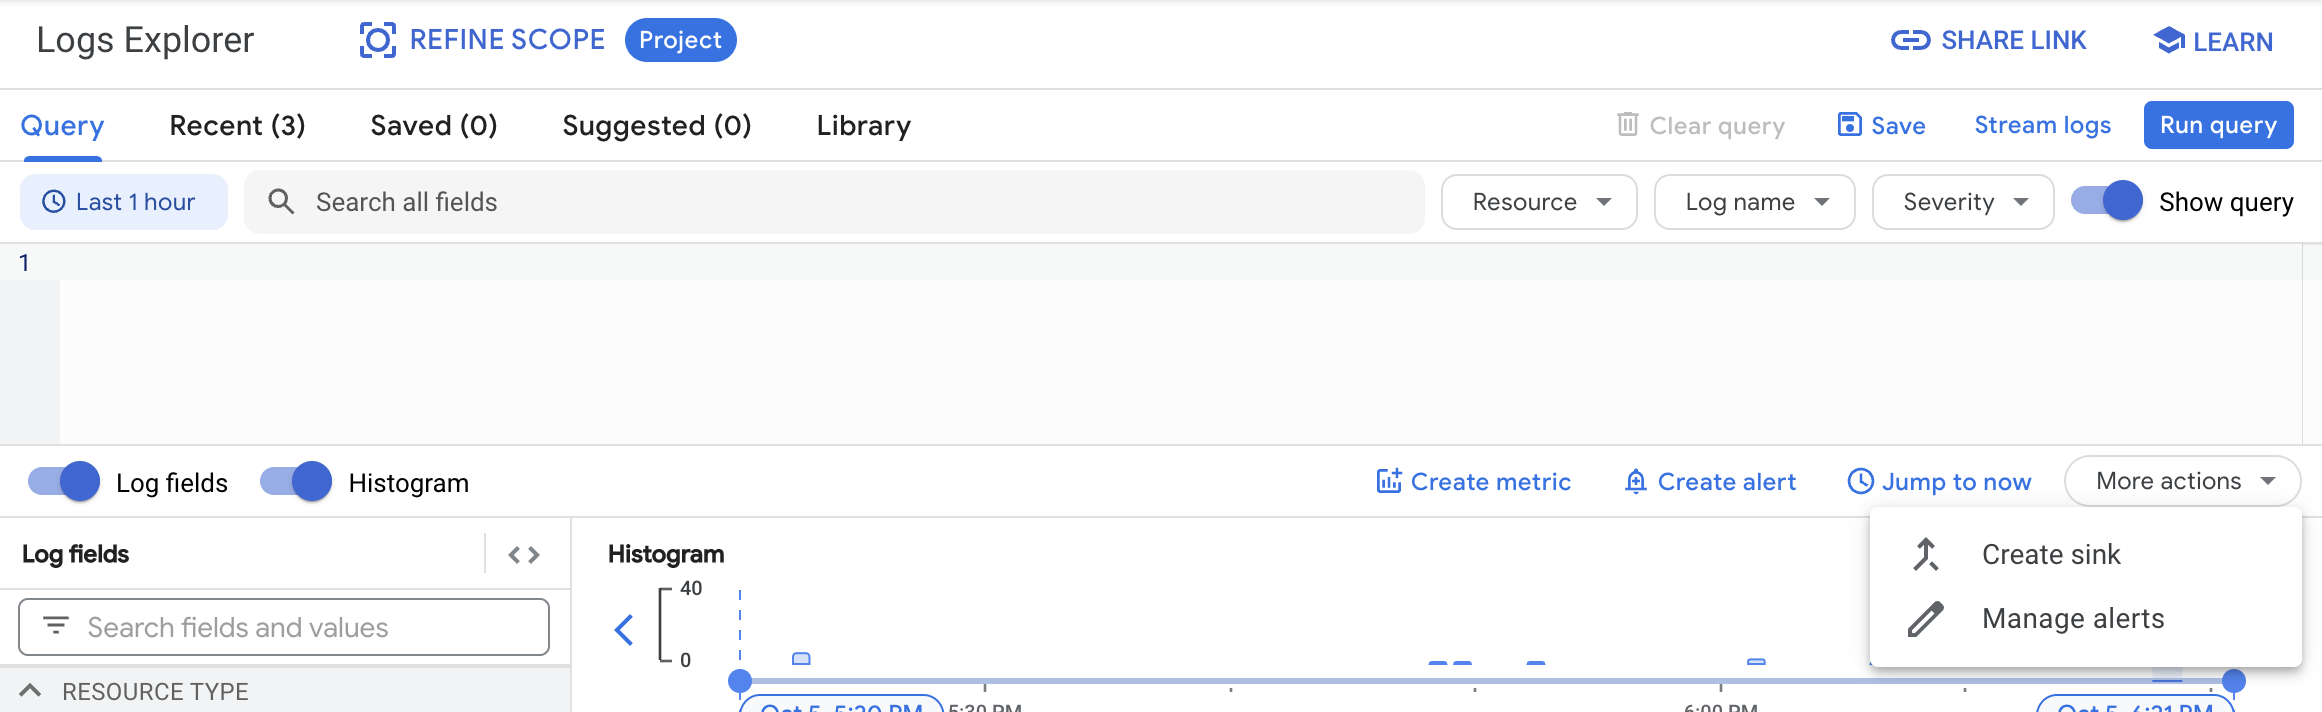
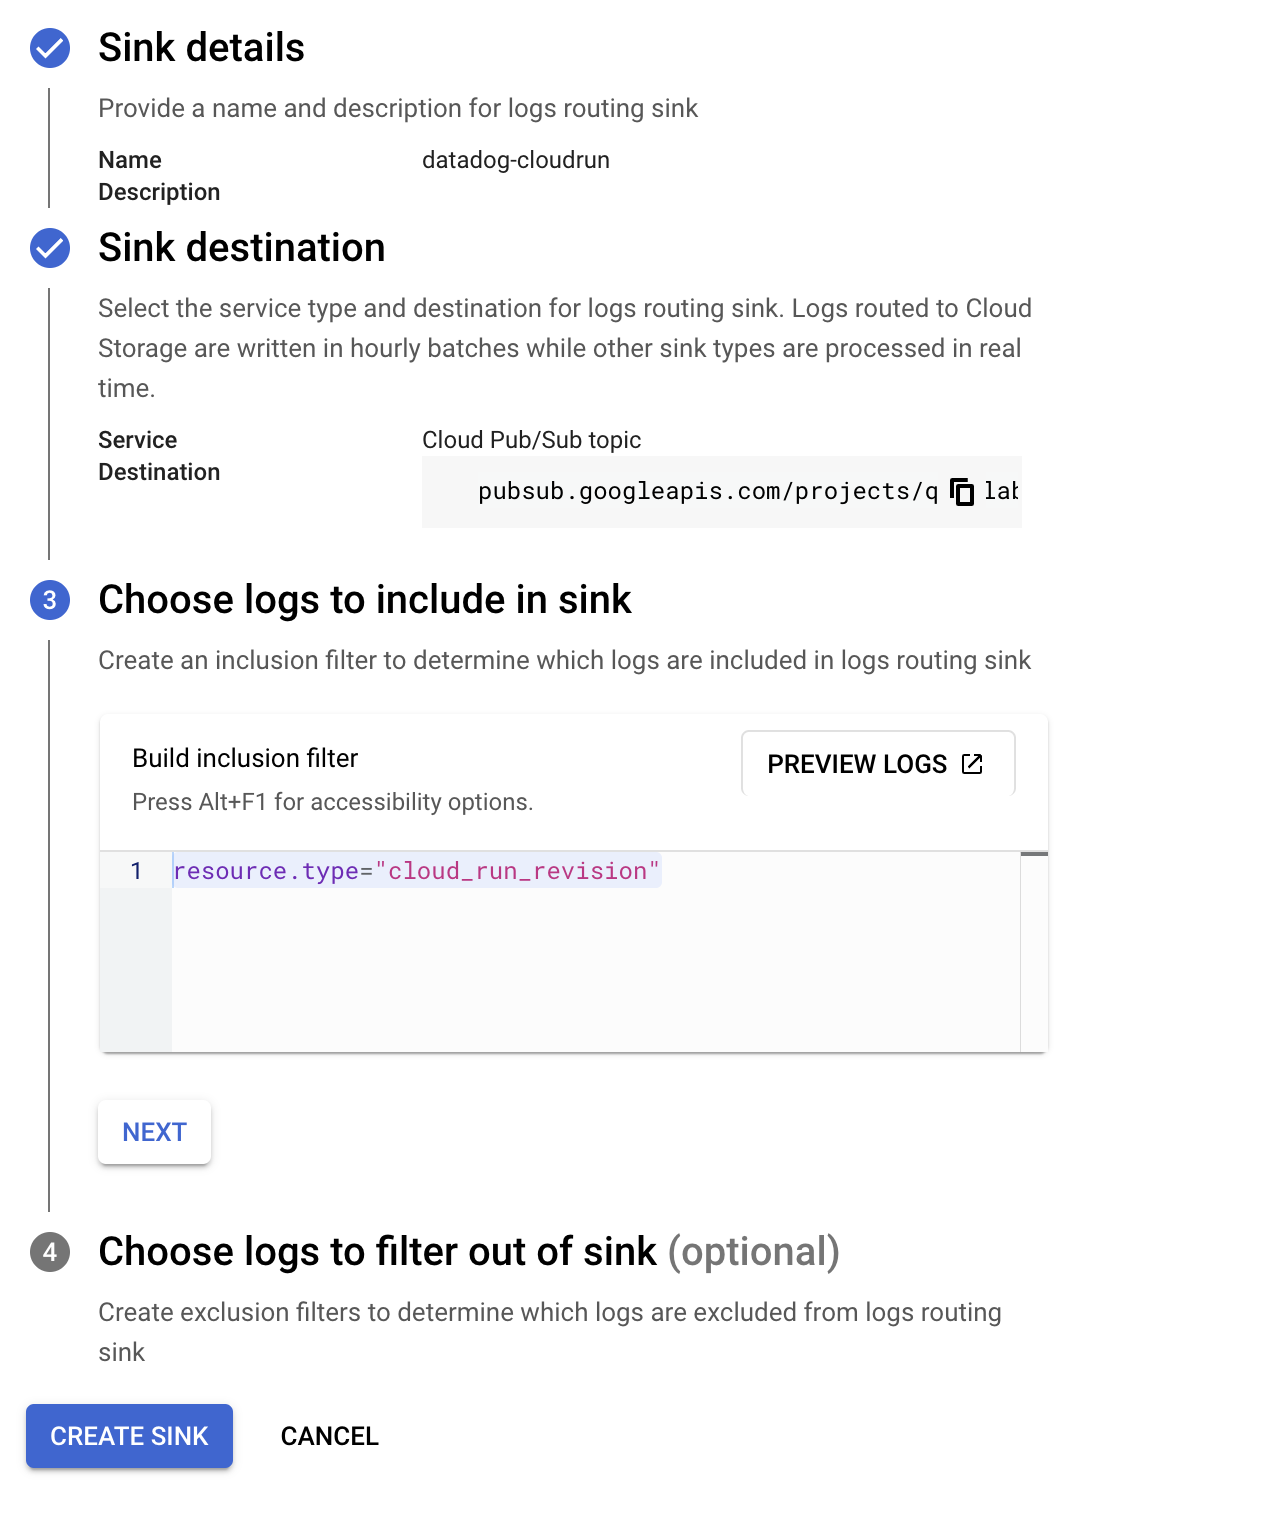
Click Create Sink (in the "More Actions" menu)and name the sink datadog-cloudrun (use this name exactly for proper assessment)
Choose “Cloud Pub/Sub” as the destination and select the Pub/Sub that was created for that purpose.
Note: For future reference, the pub/sub can be located in a different project.
In step 3, make sure the inclusion filter is resource.type="cloud_run_revision"
Click Create Sink and wait for the confirmation message to show up.
🎉 Nice work! The Cloud Run app should now be running and sending metrics to Datadog.
Click Check my progress to verify the objective.
Deploy App and Create Sink for Cloud Run Service
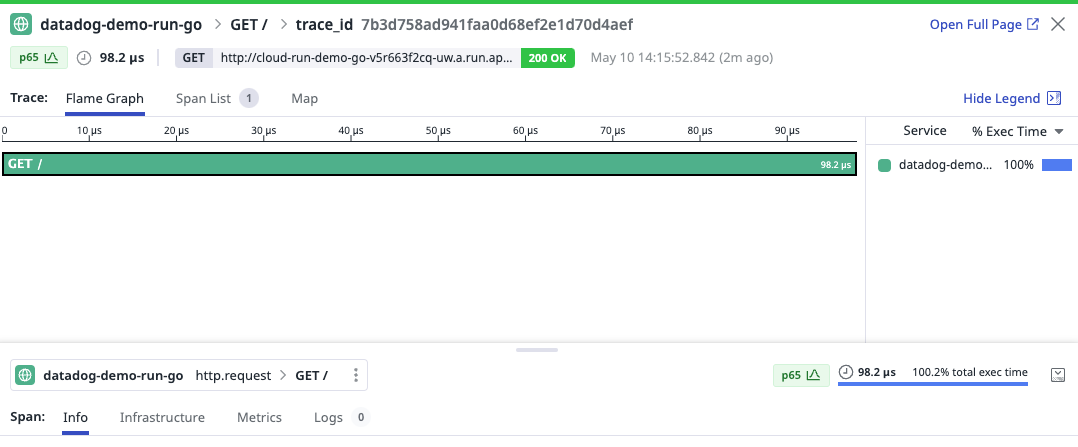
Task 6. Observe tracing in Datadog
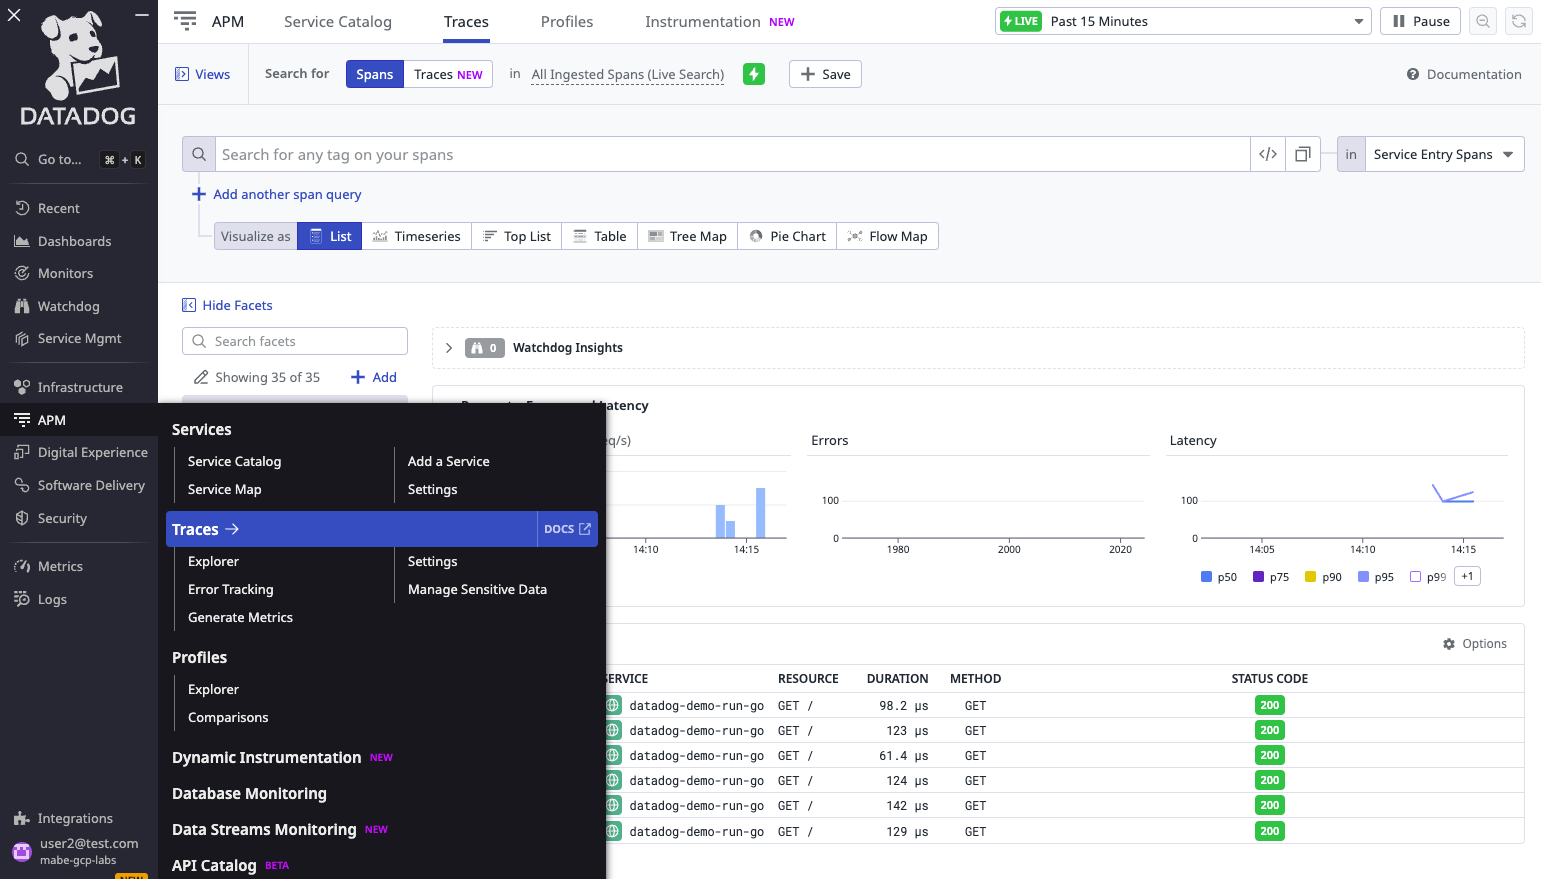
Head over to your Datadog console. If you go to APM > Traces, you should see some traces from your Cloud Run app!
You can click on a trace to see more details:
Not seeing your traces? Hit your app endpoint a view times (just refresh the Hello World page). You can also try changing the time period located at the top right of the Datadog UI
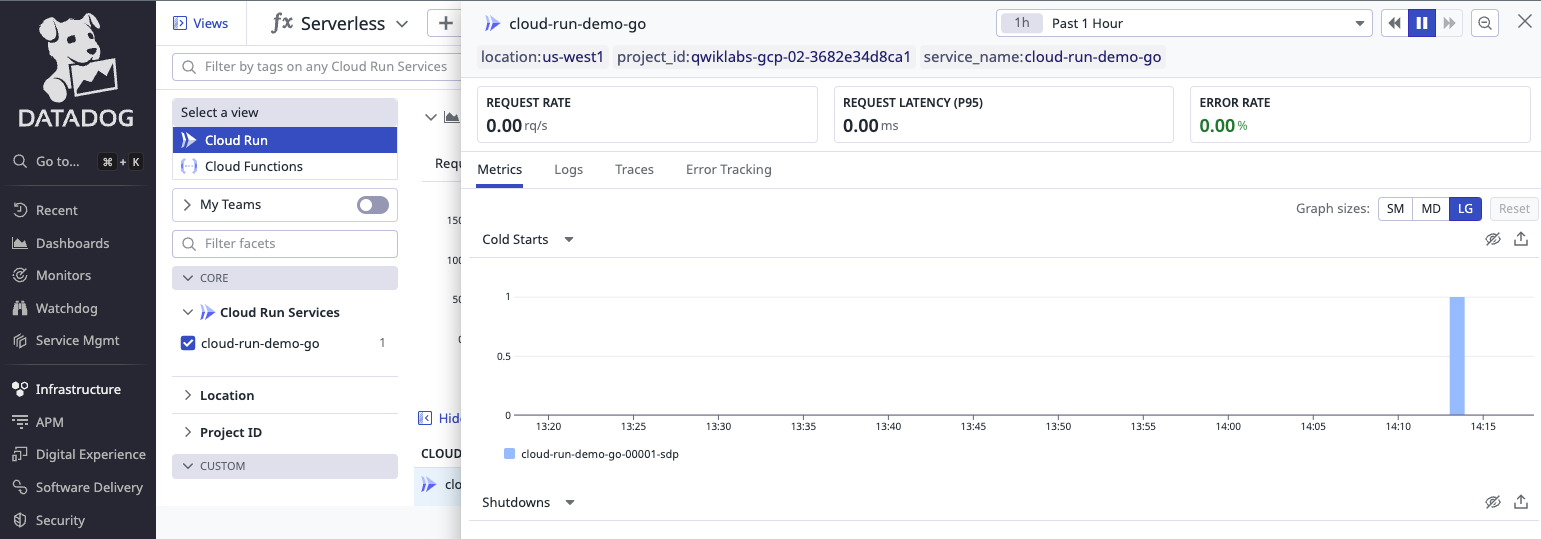
Task 7. Explore Metrics in Datadog
Head over to your Datadog console. If you go to Infrastructure > Serverless, you should see all of available metrics about your Cloud Run app!
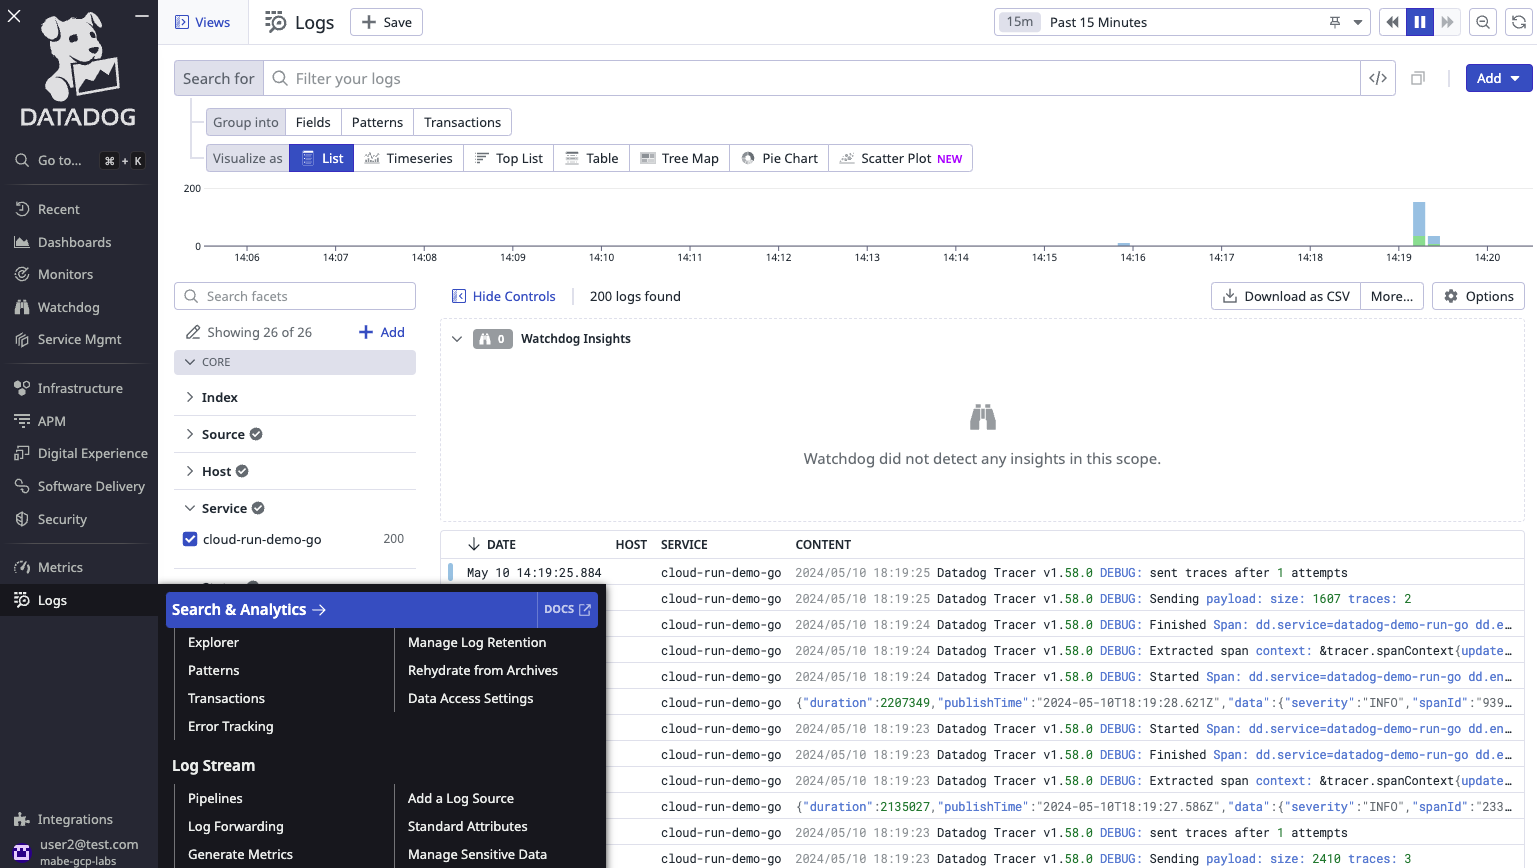
Task 8. Investigate Logs in Datadog
You should also be able to head over to Logs in the Datadog console, select a log, and get more context.
Congratulations!
In this lab, you got hands-on experience using Datadog's new Google Cloud Run integration and Datadog's Google Cloud Platform-level integration which makes monitoring your workloads easy!
Next Steps / Learn More
Be sure to check out the following labs for more practice with Datadog:
...helps you make the most of Google Cloud technologies. Our classes include technical skills and best practices to help you get up to speed quickly and continue your learning journey. We offer fundamental to advanced level training, with on-demand, live, and virtual options to suit your busy schedule. Certifications help you validate and prove your skill and expertise in Google Cloud technologies.
Manual Last Updated May 8, 2024
Lab Last Tested May 8, 2024
Copyright 2024 Google LLC All rights reserved. Google and the Google logo are trademarks of Google LLC. All other company and product names may be trademarks of the respective companies with which they are associated.
Os laboratórios criam um projeto e recursos do Google Cloud por um período fixo
Os laboratórios têm um limite de tempo e não têm o recurso de pausa. Se você encerrar o laboratório, vai precisar recomeçar do início.
No canto superior esquerdo da tela, clique em Começar o laboratório
Usar a navegação anônima
Copie o nome de usuário e a senha fornecidos para o laboratório
Clique em Abrir console no modo anônimo
Fazer login no console
Faça login usando suas credenciais do laboratório. Usar outras credenciais pode causar erros ou gerar cobranças.
Aceite os termos e pule a página de recursos de recuperação
Não clique em Terminar o laboratório a menos que você tenha concluído ou queira recomeçar, porque isso vai apagar seu trabalho e remover o projeto
Este conteúdo não está disponível no momento
Você vai receber uma notificação por e-mail quando ele estiver disponível
Ótimo!
Vamos entrar em contato por e-mail se ele ficar disponível
Um laboratório por vez
Confirme para encerrar todos os laboratórios atuais e iniciar este
Use a navegação anônima para executar o laboratório
Para executar este laboratório, use o modo de navegação anônima ou uma janela anônima do navegador. Isso evita conflitos entre sua conta pessoal e a conta de estudante, o que poderia causar cobranças extras na sua conta pessoal.
In this lab, you will learn how to use Cloud Run with Datadog.
Duração:
Configuração: 0 minutos
·
Tempo de acesso: 60 minutos
·
Tempo para conclusão: 60 minutos