Get access to over 700 hands-on labs, skill badges, and courses
GSP1245
Overview
Multi-cluster Gateways (MCG) make managing application networking across many clusters and teams easy and secure, which is useful in terms of scalability. GatewayClasses defines a cluster-scoped resource that's a template for creating load balancers in a cluster. In GKE, the gke-l7-gxlb-mc and gke-l7-rilb-mc GatewayClasses deploy multi-cluster Gateways that provide HTTP routing, traffic splitting, traffic mirroring, health-based failover, and more across different GKE clusters, Kubernetes Namespaces, and regions.
Multi-cluster Services (MCS) is an API standard for Services that span clusters. Its GKE controller also provides service-discovery across GKE clusters. The multi-cluster Gateway controller uses MCS API resources to group Pods into a Service that is addressable across or spans multiple clusters.
In this lab, you learn how to enable, use and deploy the multi-cluster Google Kubernetes Engine (GKE) Gateway controller. This Google-hosted controller provisions external and internal load balancers, which balance traffic across multiple Kubernetes clusters.
Objectives
In this lab, you learn how to perform the following tasks:
Enable GKE Enterprise
Create and Register GKE clusters to the fleet
Enable and configure Multi-cluster Services (MCS)
Enable and configure Multi-cluster Gateways (MCG)
Deploy a distributed application and balance traffic across clusters
Setup and requirements
Before you click the Start Lab button
Read these instructions. Labs are timed and you cannot pause them. The timer, which starts when you click Start Lab, shows how long Google Cloud resources will be made available to you.
This Qwiklabs hands-on lab lets you do the lab activities yourself in a real cloud environment, not in a simulation or demo environment. It does so by giving you new, temporary credentials that you use to sign in and access Google Cloud for the duration of the lab.
What you need
To complete this lab, you need:
Access to a standard internet browser (Chrome browser recommended).
Time to complete the lab.
Note: If you already have your own personal Google Cloud account or project, do not use it for this lab.
Note: If you are using a Pixelbook, open an Incognito window to run this lab.
How to start your lab and sign in to the Google Cloud Console
Click the Start Lab button. If you need to pay for the lab, a pop-up opens for you to select your payment method.
On the left is a panel populated with the temporary credentials that you must use for this lab.
Copy the username, and then click Open Google Console.
The lab spins up resources, and then opens another tab that shows the Sign in page.
Tip: Open the tabs in separate windows, side-by-side.
In the Sign in page, paste the username that you copied from the Connection Details panel. Then copy and paste the password.
Important: You must use the credentials from the Connection Details panel. Do not use your Qwiklabs credentials. If you have your own Google Cloud account, do not use it for this lab (avoids incurring charges).
Click through the subsequent pages:
Accept the terms and conditions.
Do not add recovery options or two-factor authentication (because this is a temporary account).
Do not sign up for free trials.
After a few moments, the Cloud Console opens in this tab.
Activate Cloud Shell
Cloud Shell is a virtual machine that is loaded with development tools. It offers a persistent 5GB home directory and runs on the Google Cloud. Cloud Shell provides command-line access to your Google Cloud resources.
In the Cloud Console, in the top right toolbar, click the Activate Cloud Shell button.
Click Continue.
It takes a few moments to provision and connect to the environment. When you are connected, you are already authenticated, and the project is set to your PROJECT_ID. For example:
gcloud is the command-line tool for Google Cloud. It comes pre-installed on Cloud Shell and supports tab-completion.
You can list the active account name with this command:
In the Google Cloud console, select Navigation Menu () > Kubernetes Engine > Overview.
Click the Fleet Dashboard tab.
Click the Learn about GKE Enterprise button. From here, you can see a description of the various features available in GKE Enterprise.
To learn more about the features included with GKE Enterprise, view the details in the Features and Benefits tab.
For a side-by-side comparison of the GKE Standard edition and GKE Enterprise features, click the Compare Plans tab. You can also view a hypothetical monthly cost scenario, should you enable GKE Enterprise.
Click the Enable GKE Enterprise button.
Click Edit Fleet Name or Cluster List.
On the Fleet registration page, enter gke-enterprise-fleet in the Fleet name field. The fleet name cannot be changed after initial creation.
Click Save to save the fleet name.
Click Confirm to enable GKE Enterprise.
Note: As an alternative to the console-based method, you can enable GKE enterprise by enabling the Anthos API using gcloud, and create an empty fleet using the following command:
gcloud container fleet create --display-name=gke-enterprise-fleet
Click Close to complete the operation.
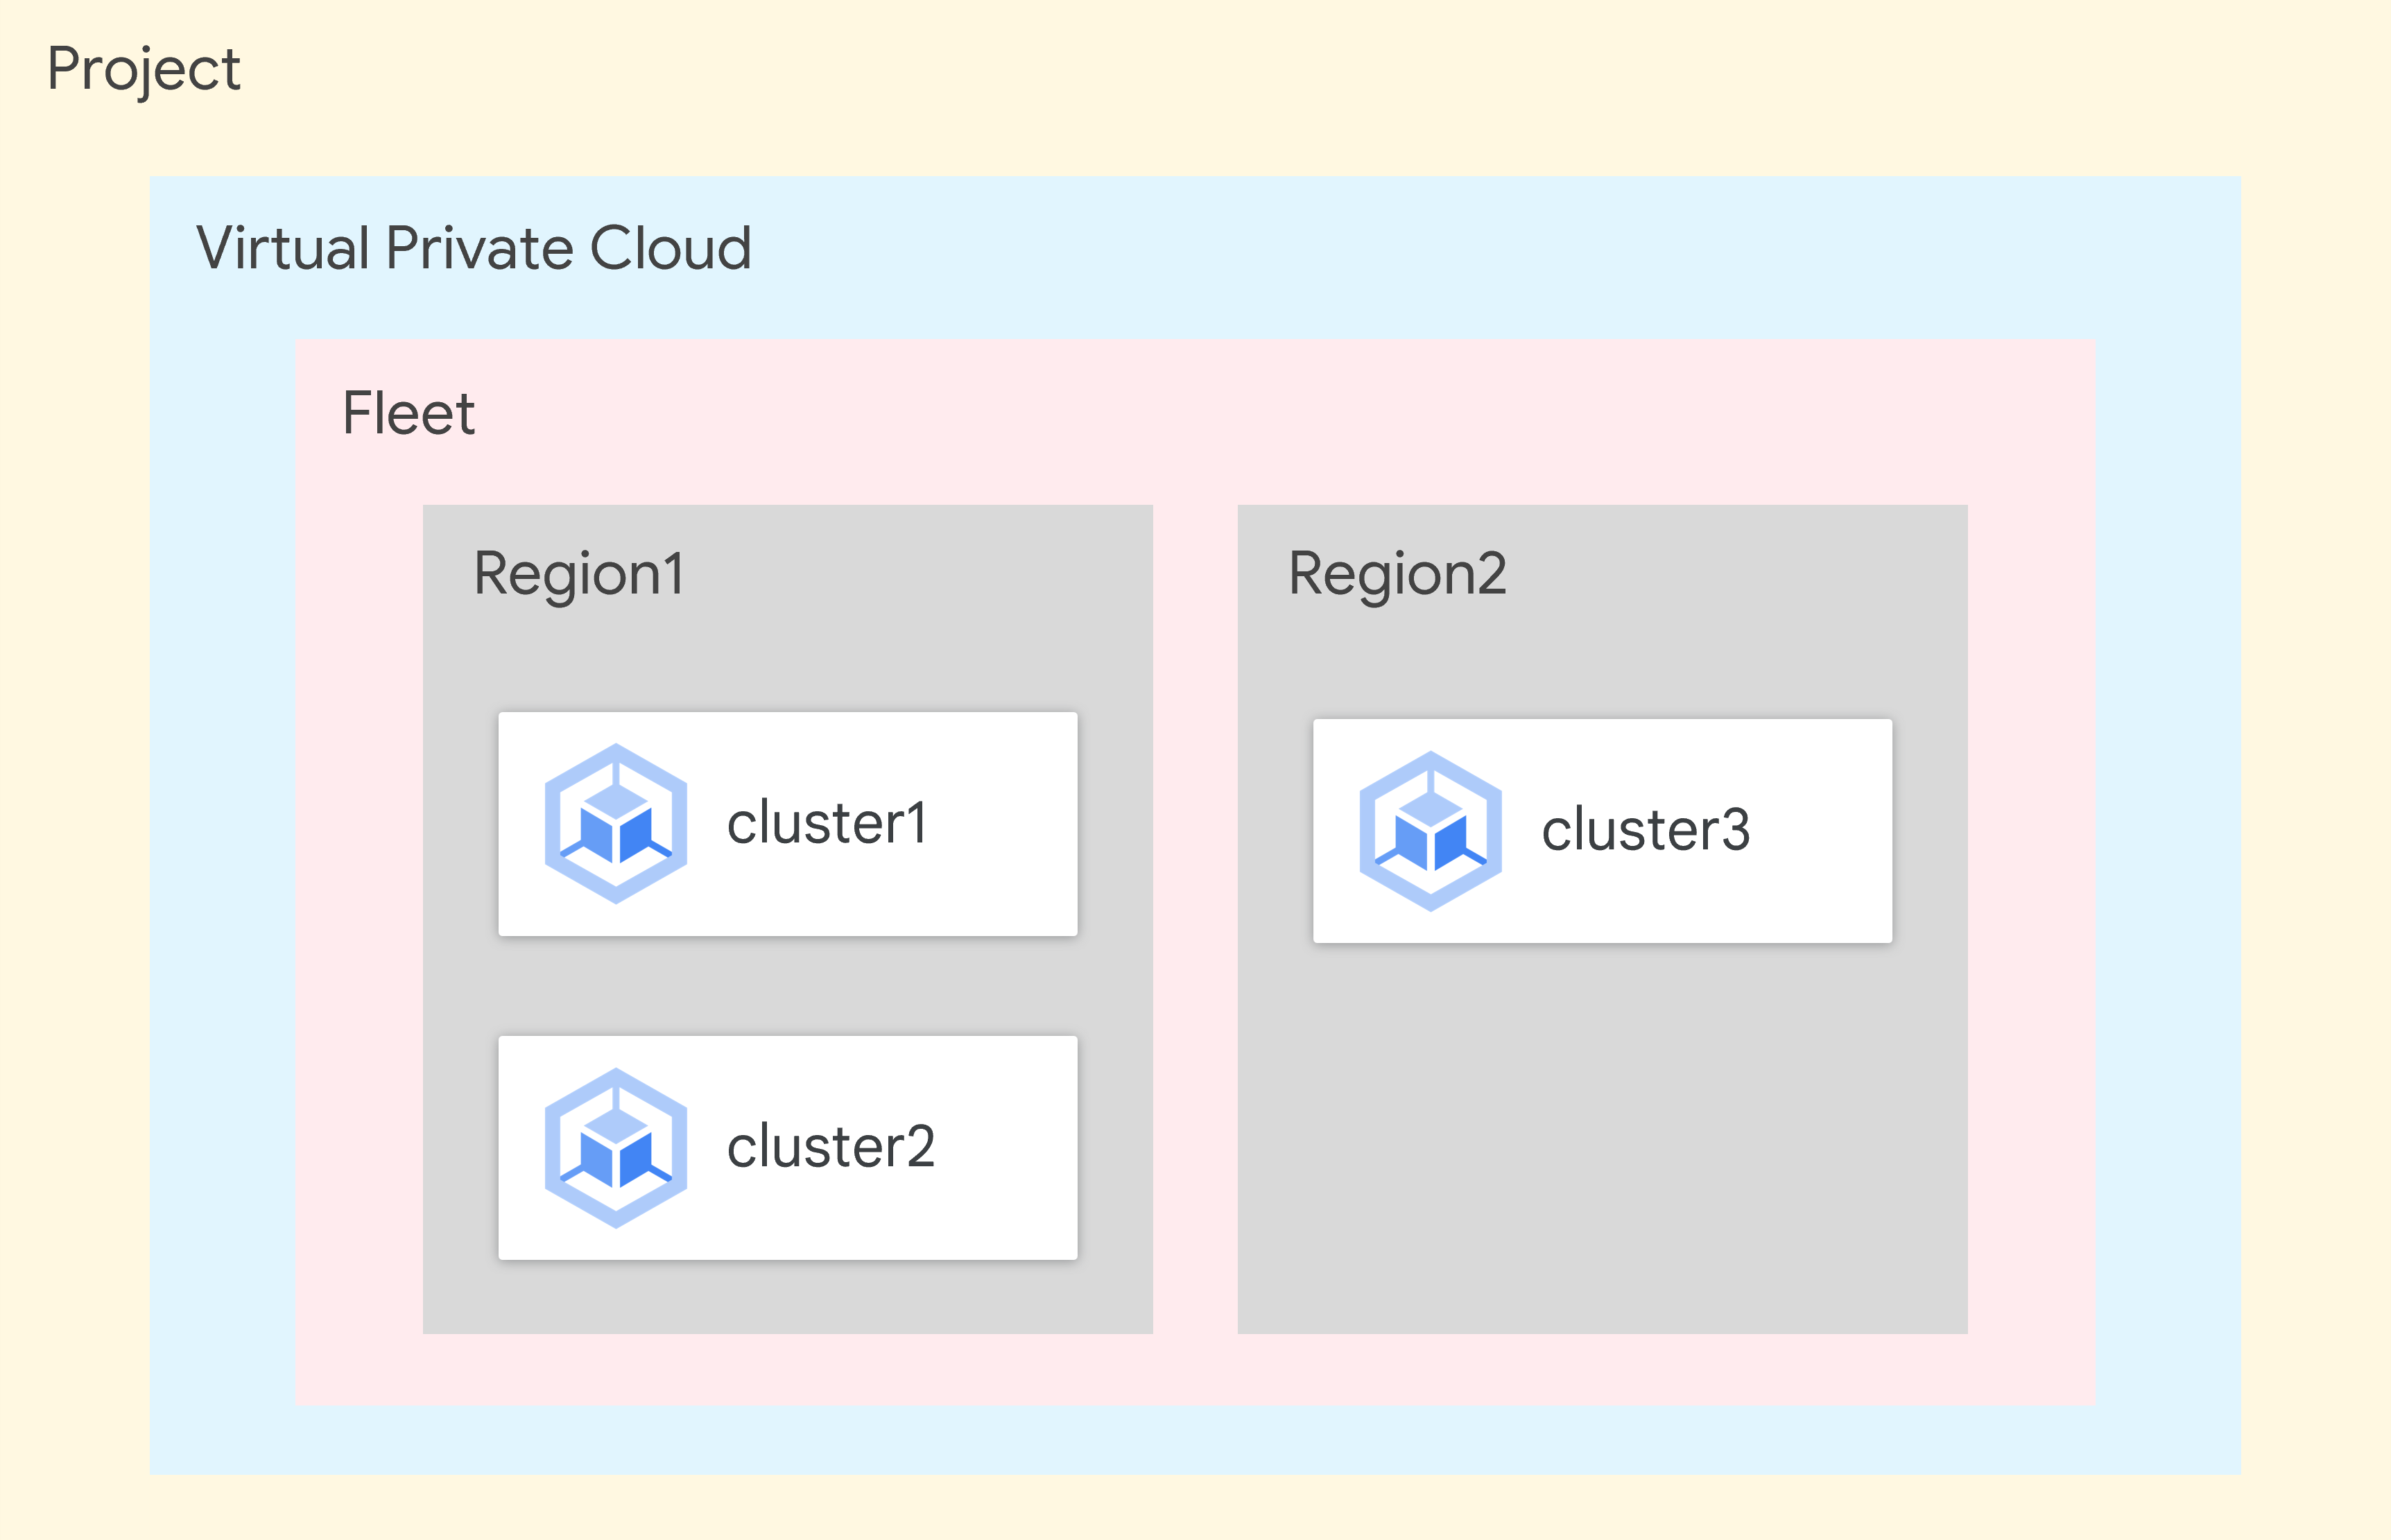
Task 1. Deploy clusters
In this task, you deploy three GKE clusters across two different regions in your project. All clusters are registered to the same fleet, allowing multi-cluster Gateways and Services to operate across them. Deploy three GKE clusters into and .
In Cloud Shell, create two GKE clusters in named cluster1 and cluster2 with the --async flag to avoid waiting for the other clusters to provision:
gcloud container clusters create cluster3 \
--zone={{{primary_project.default_zone_2|ZONE2}}} \
--enable-ip-alias \
--machine-type=e2-standard-4 \
--num-nodes=1 \
--workload-pool={{{primary_project.project_id|PROJECT_ID}}}.svc.id.goog \
--release-channel=regular \
--project={{{primary_project.project_id|PROJECT_ID}}}
Note: It can take up to 8 minutes to provision the GKE clusters.
Ensure all clusters are running:
gcloud container clusters list
Configure cluster credentials
Next, configure cluster credentials with memorable names. This makes it easier to switch between clusters when deploying resources across several clusters.
Fetch the credentials for cluster cluster1, cluster2, and cluster3:
This stores the credentials locally so that you can use your kubectl client to access the cluster API servers. By default, an auto-generated name is created for the credential.
Rename the cluster contexts so they are easier to reference later:
Enable the multi-cluster Gateway API on the cluster1 cluster:
gcloud container clusters update cluster1 --gateway-api=standard --region={{{primary_project.default_zone_1|ZONE}}}
Note: It can take up to 5 minutes to enable the multi-cluster Gateway API.
Click Check my progress to verify the objective.
Set up your environment for multi-cluster Gateways
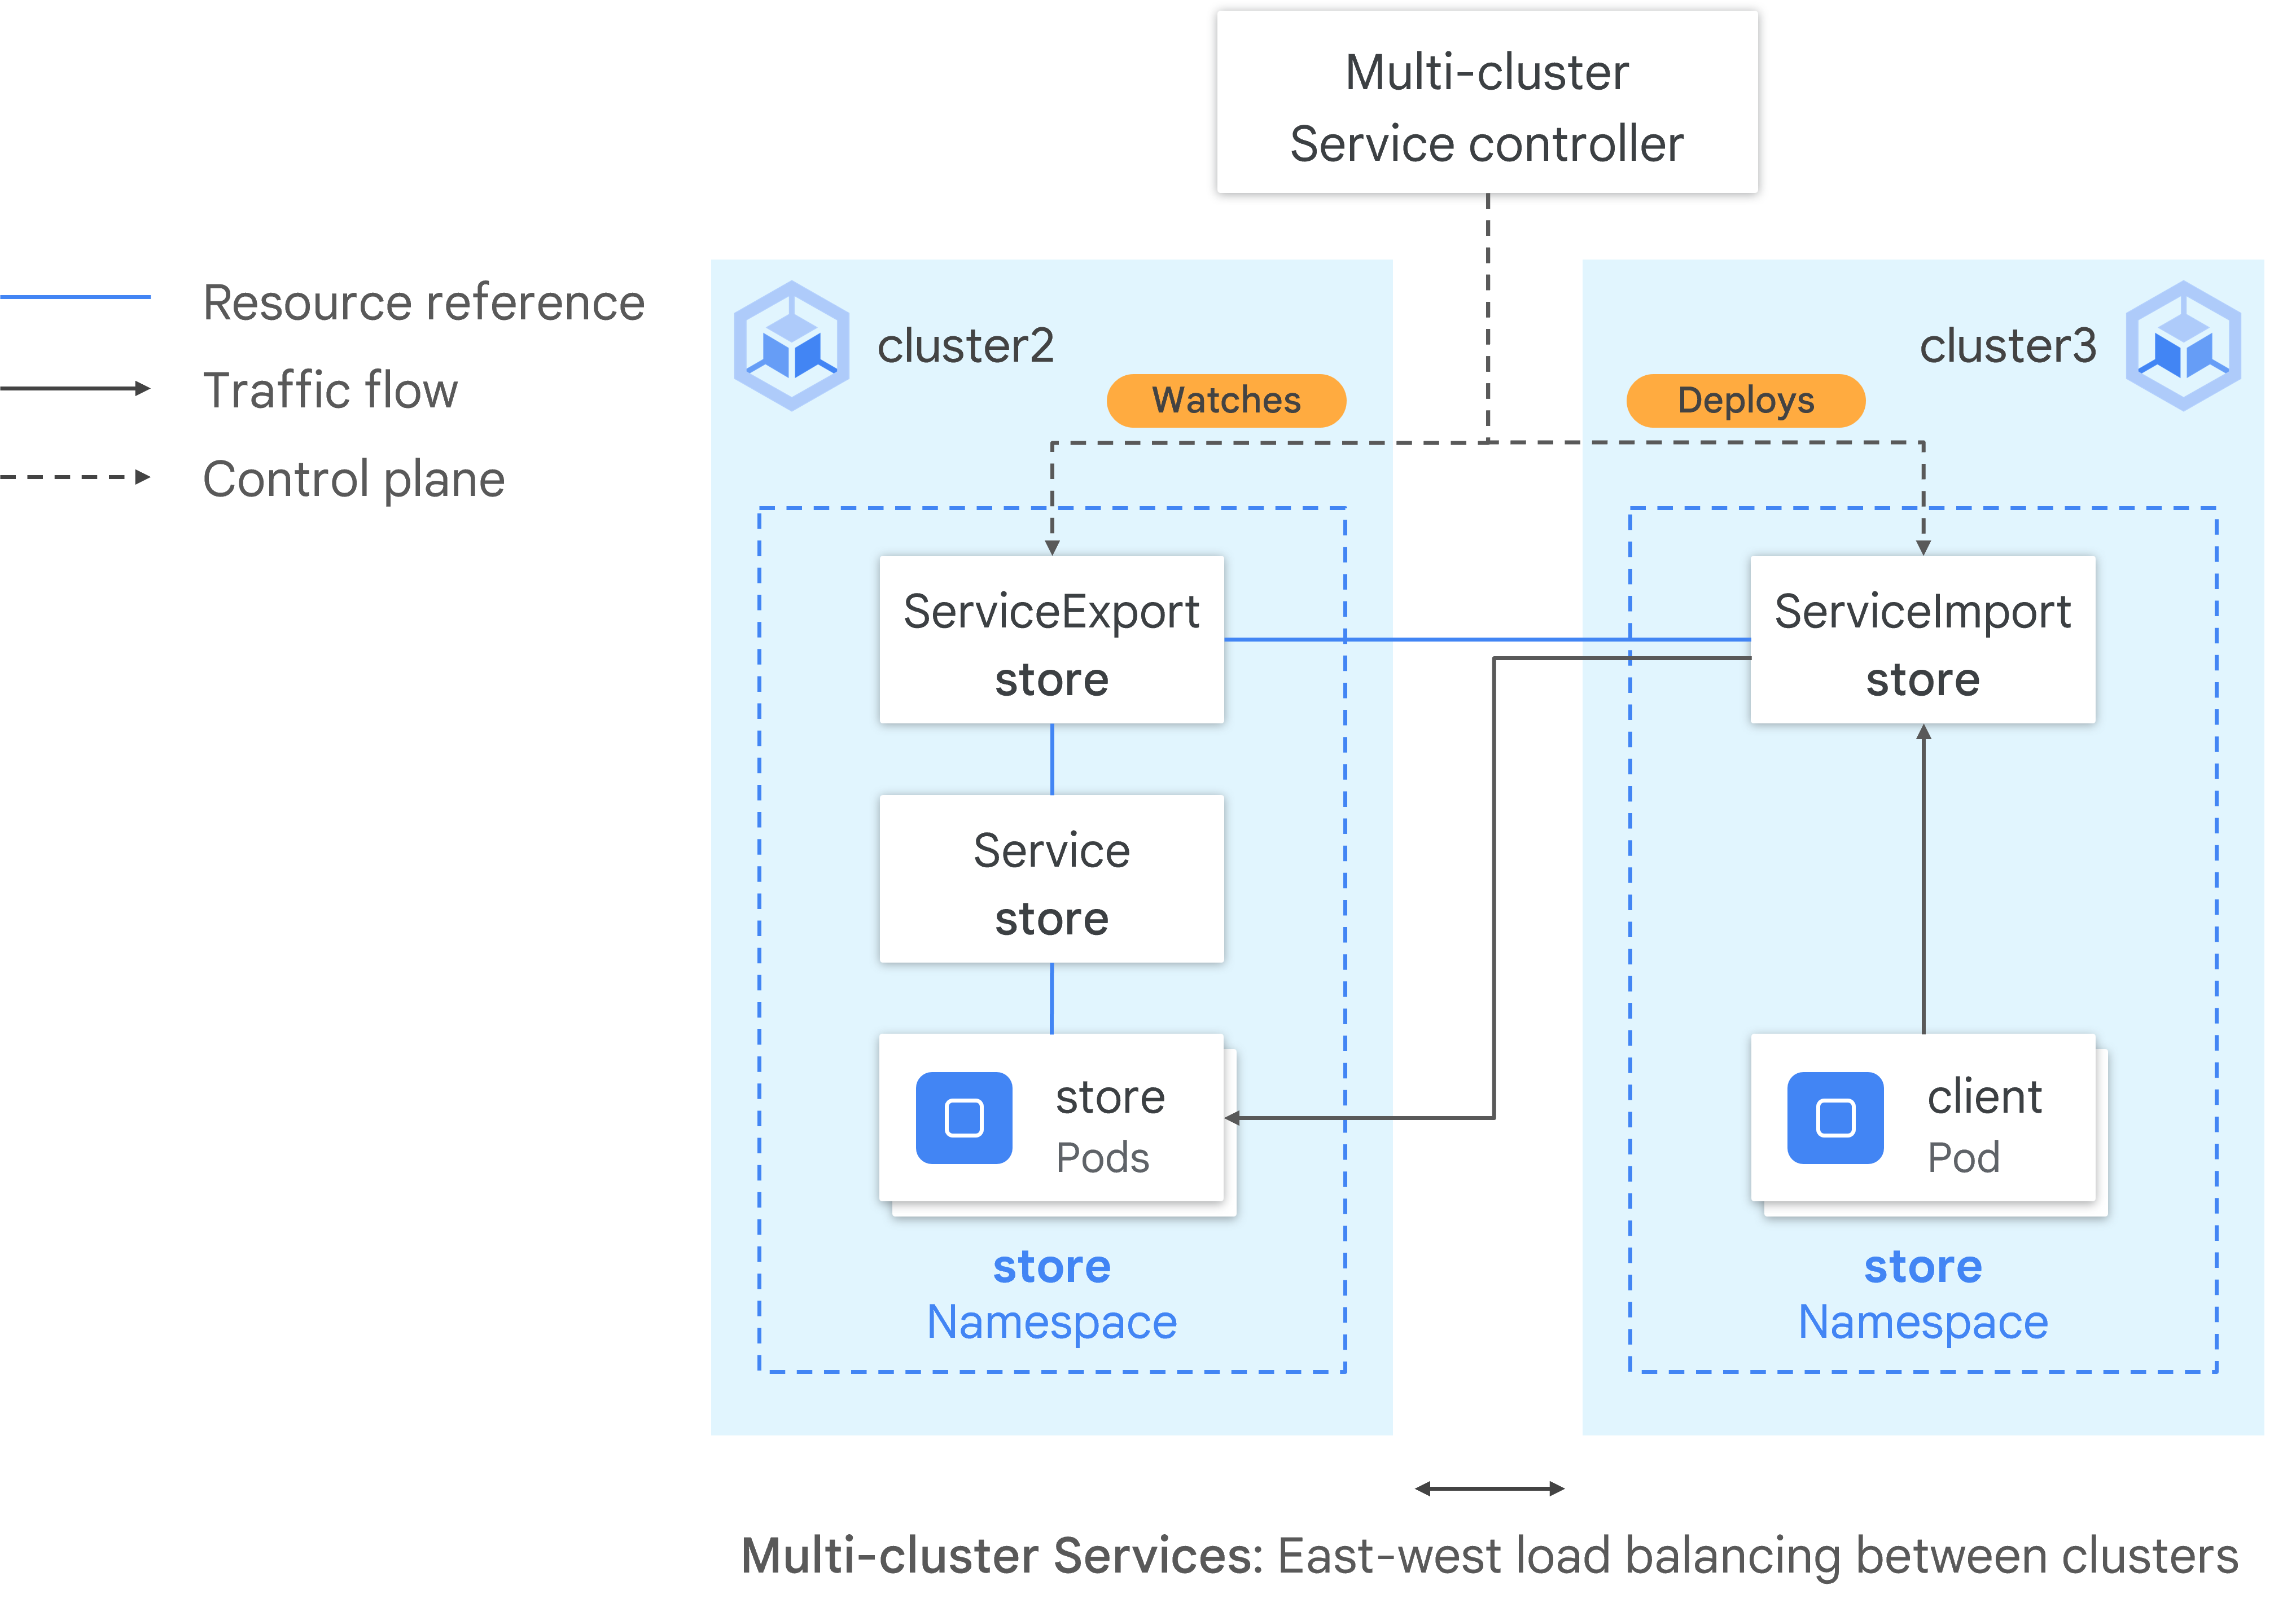
In this task, you enable MCS in your fleet for the registered clusters. The MCS controller listens for import/export Services, so that Kubernetes Services are routable across clusters, and traffic can be distributed
across them.
Enable multi-cluster Services in your fleet for the registered clusters:
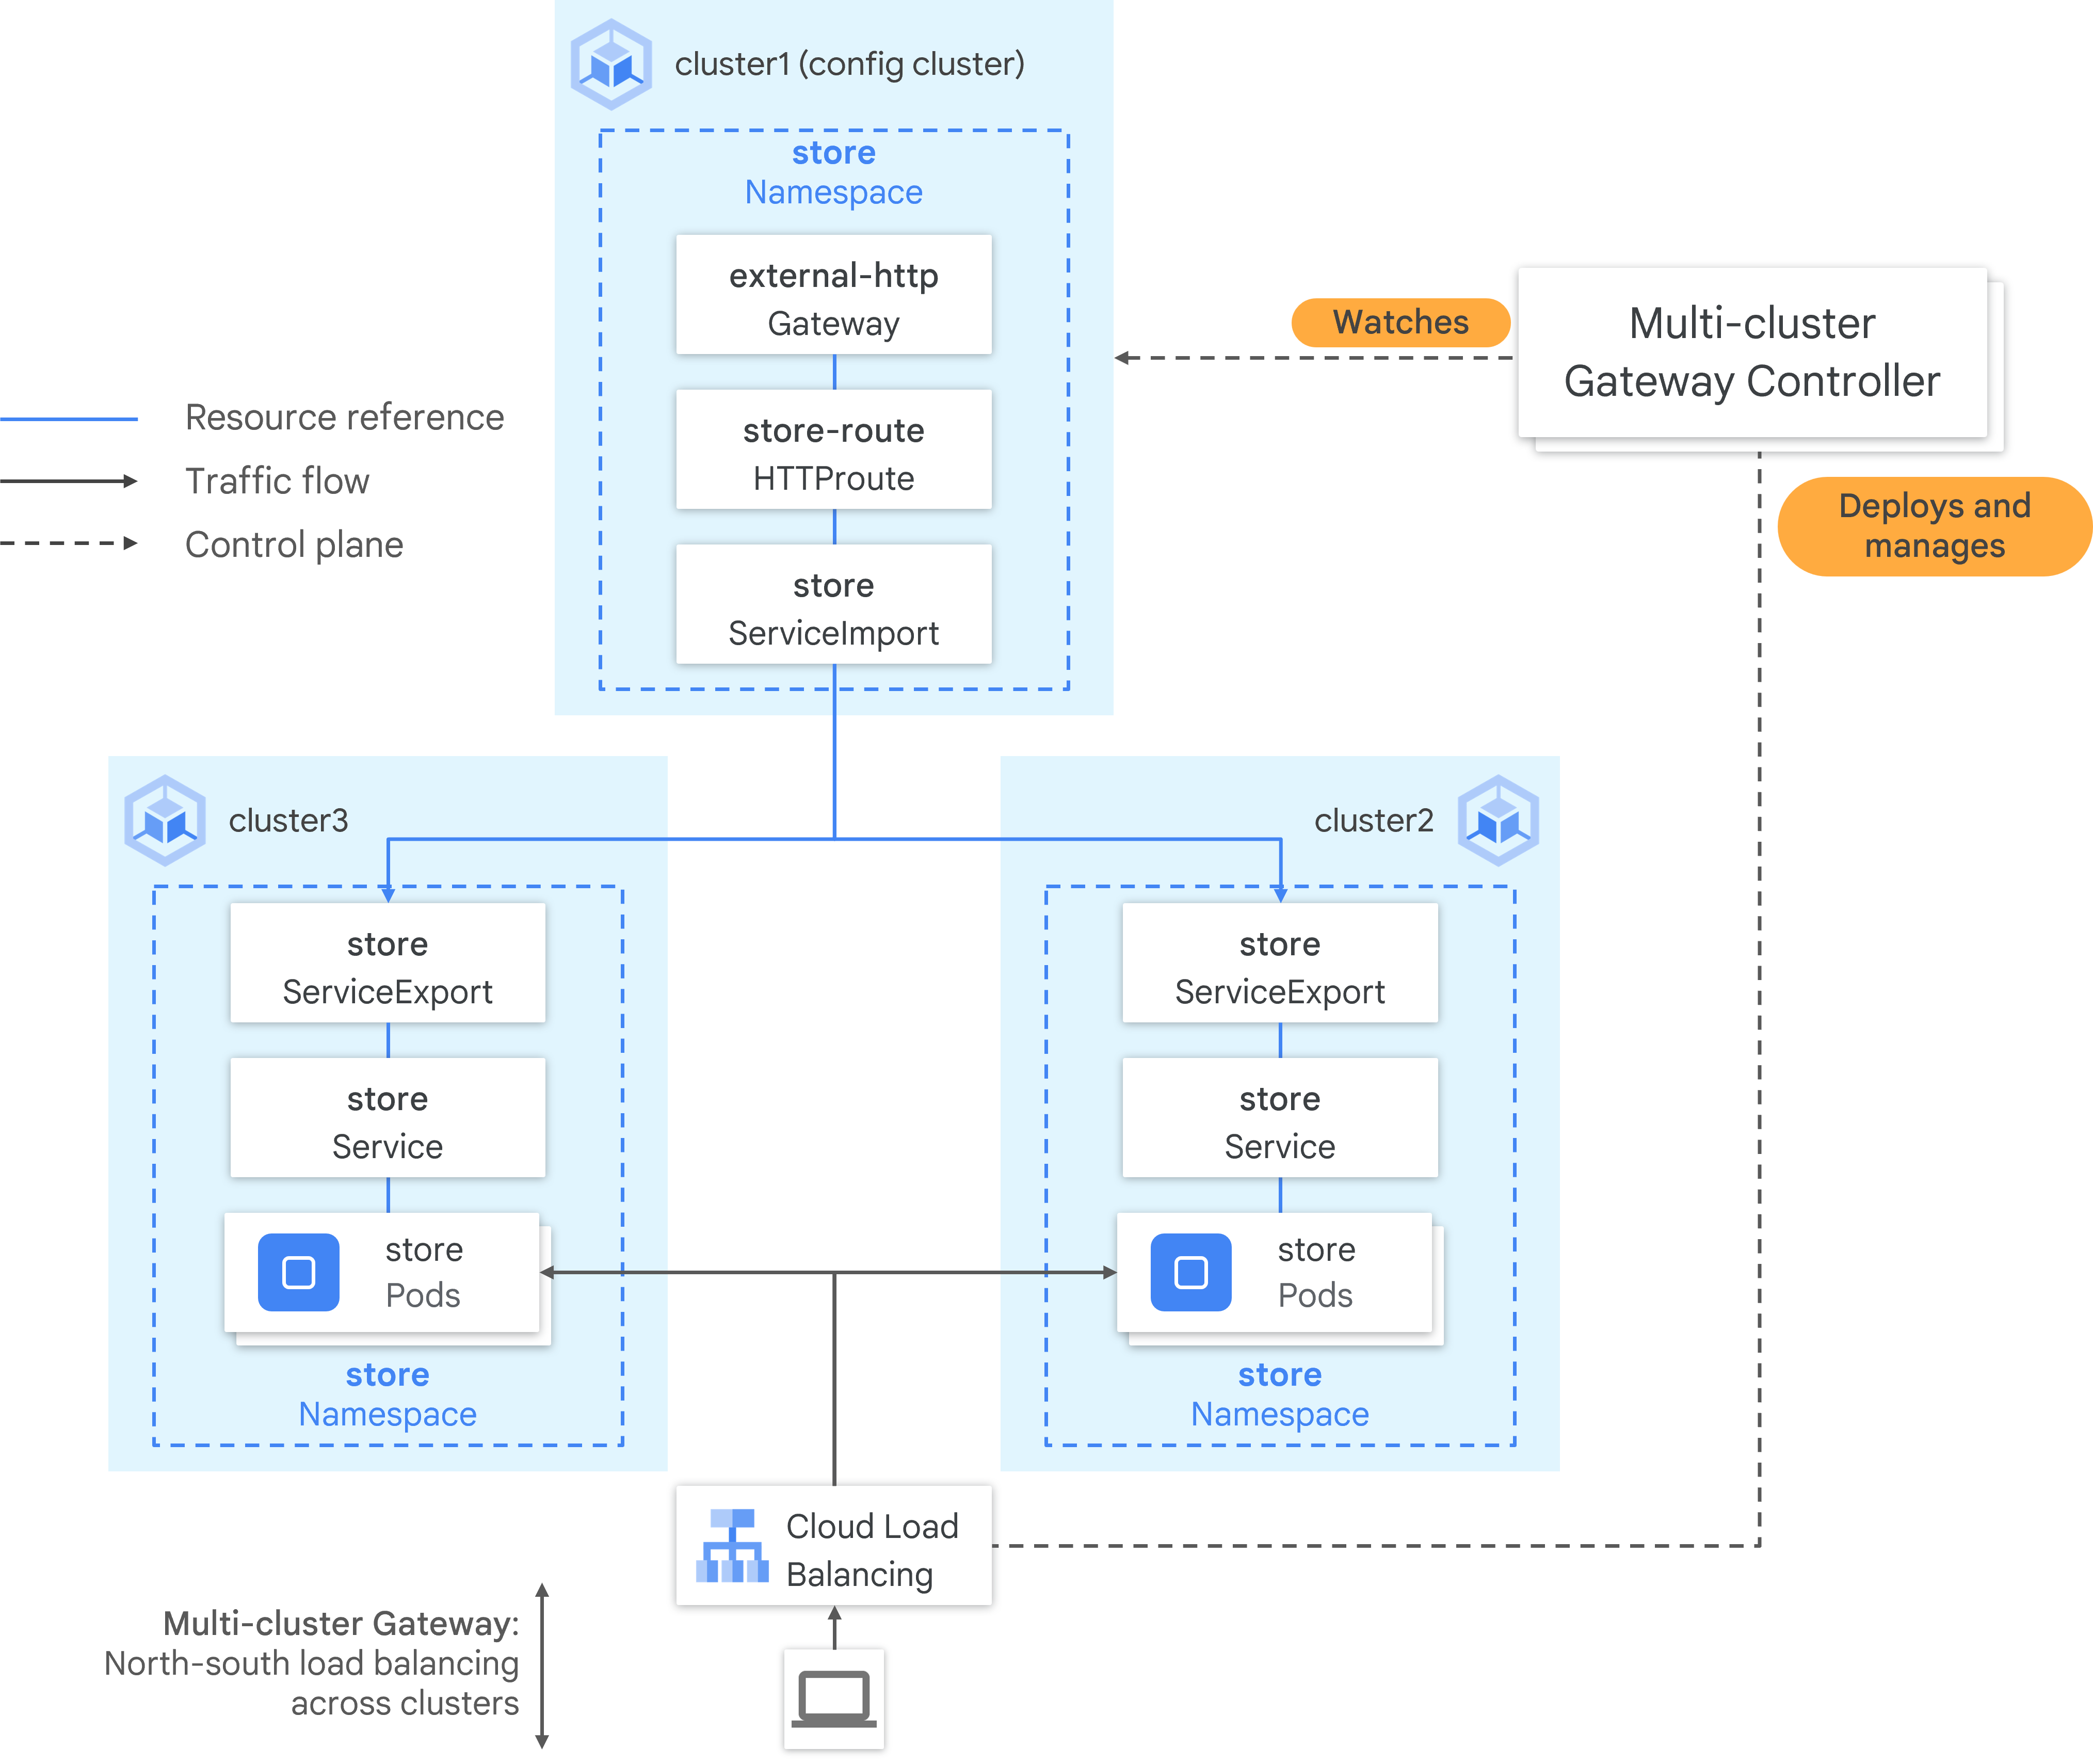
Task 4. Install Gateway API CRDs and enable the MCG controller
Before using Gateway resources in GKE, you must install the
Gateway API CustomResource Definitions (CRDs)
in your config cluster, and enable the MCG controller.
The config cluster is the GKE cluster in which your Gateway and Route resources
are deployed. It is a central place that controls routing across your clusters.
You will use cluster1 as your config cluster.
Deploy Gateway resources into the cluster1 cluster:
The config cluster cluster1 can also host workloads, but in this lab, you
only run the Gateway controllers and configuration on it.
Create the Service and ServiceExports for the cluster2 cluster:
cat <<EOF > store-west-service.yaml
apiVersion: v1
kind: Service
metadata:
name: store
namespace: store
spec:
selector:
app: store
ports:
- port: 8080
targetPort: 8080
---
kind: ServiceExport
apiVersion: net.gke.io/v1
metadata:
name: store
namespace: store
---
apiVersion: v1
kind: Service
metadata:
name: store-west-2
namespace: store
spec:
selector:
app: store
ports:
- port: 8080
targetPort: 8080
---
kind: ServiceExport
apiVersion: net.gke.io/v1
metadata:
name: store-west-2
namespace: store
EOF
kubectl apply -f store-west-service.yaml --context=cluster2
Create the Service and ServiceExports for the cluster3 cluster:
cat <<EOF > store-east-service.yaml
apiVersion: v1
kind: Service
metadata:
name: store
namespace: store
spec:
selector:
app: store
ports:
- port: 8080
targetPort: 8080
---
kind: ServiceExport
apiVersion: net.gke.io/v1
metadata:
name: store
namespace: store
---
apiVersion: v1
kind: Service
metadata:
name: store-east-1
namespace: store
spec:
selector:
app: store
ports:
- port: 8080
targetPort: 8080
---
kind: ServiceExport
apiVersion: net.gke.io/v1
metadata:
name: store-east-1
namespace: store
EOF
kubectl apply -f store-east-service.yaml --context=cluster3
Ensure that the service exports have been successfully created:
kubectl get serviceexports --context cluster2 --namespace store
kubectl get serviceexports --context cluster3 --namespace store
Your output should look similar to the following:
# cluster2 cluster
NAME AGE
store 2m40s
store-west-2 2m40s
# cluster3 cluster
NAME AGE
store 2m25s
store-east-1 2m25s
This demonstrates that the store Service contains store Pods across both clusters while the store-west-2 and store-east-1 Services only contain store Pods on their respective clusters. These overlapping Services are used to target the Pods across multiple clusters or a subset of Pods on a single cluster.
Click Check my progress to verify the objective.
Deploy the demo application
Task 6. Deploy the Gateway and HttpRoute
Platform administrators manage and deploy Gateways to centralize security
policies such as TLS, a security protocol that provides privacy and data integrity for Internet communications.
Service Owners in different teams deploy HttpRoutes in their own namespace
so that they can independently control their routing logic.
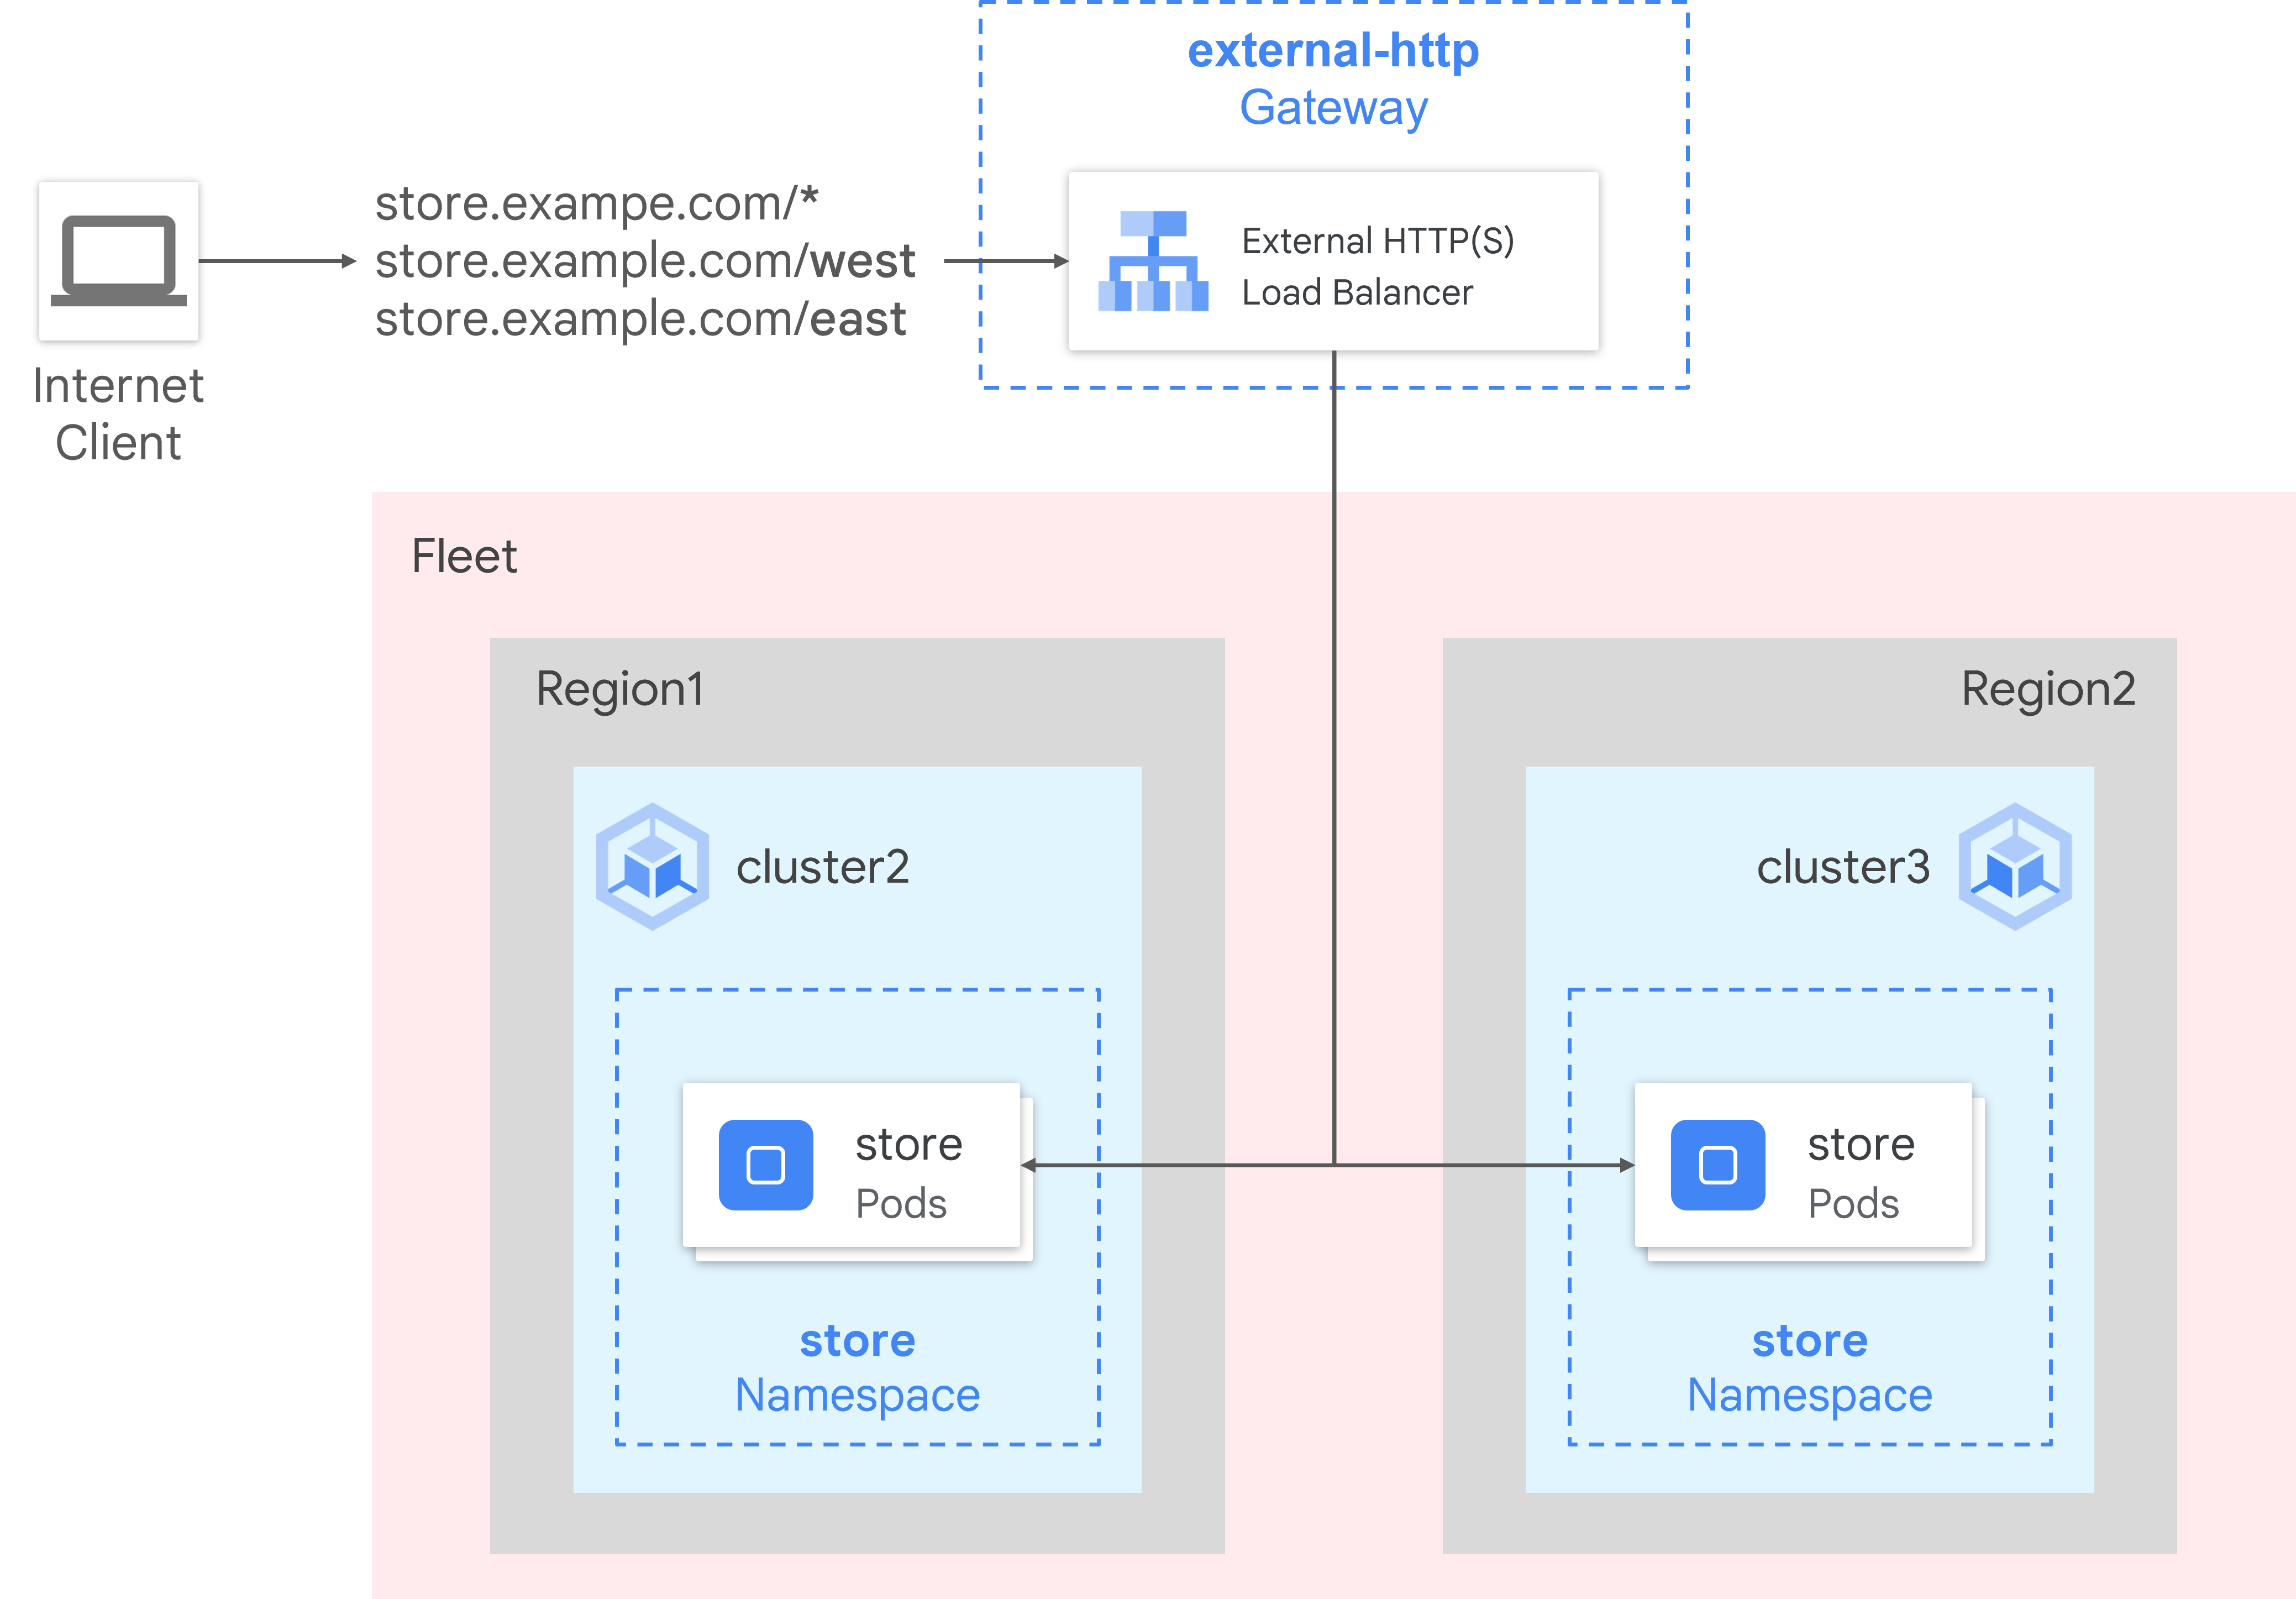
Once the applications have been deployed, you can configure a Gateway using the Gateway. This Gateway creates an external Application Load Balancer configured to distribute traffic across your target clusters.
Gateway and HttpRoute are resources deployed in the config cluster, which in
this case is the cluster1 cluster. HTTPRoute, specifically, is a Gateway API type for specifying routing behavior of HTTP requests from a Gateway listener to an API object.
Deploy the Gateway in the cluster1 config cluster:
Notice that the default requests are being sent to the closest backend
defined by the default rule. In case the path /west is in the
request, the request is routed to the service in cluster2. If the
request's path matches /east, the request is routed to the cluster3
cluster.
View the status of the Gateway you just created in cluster1:
kubectl describe gateway external-http --context cluster1 --namespace store
Status:
Addresses:
Type: IPAddress
Value: 35.190.90.199
Conditions:
Last Transition Time: 2024-04-08T11:11:44Z
Message: The OSS Gateway API has deprecated this condition, do not depend on it.
Observed Generation: 1
Reason: Scheduled
Status: True
Type: Scheduled
Last Transition Time: 2024-04-08T11:11:44Z
Message:
Observed Generation: 1
Reason: Accepted
Status: True
Type: Accepted
Last Transition Time: 2024-04-08T11:11:44Z
Message:
Observed Generation: 1
Reason: Programmed
Status: True
Type: Programmed
Last Transition Time: 2024-04-08T11:11:44Z
Message: The OSS Gateway API has altered the "Ready" condition semantics and reserved it for future use. GKE Gateway will stop emitting it in a future update, use "Programmed" instead.
Observed Generation: 1
Reason: Ready
Status: True
Type: Ready
Last Transition Time: 2024-04-08T11:11:44Z
Message:
Observed Generation: 1
Reason: Healthy
Status: True
Type: networking.gke.io/GatewayHealthy
Listeners:
Attached Routes: 0
Conditions:
Last Transition Time: 2024-04-08T11:11:44Z
Message:
Observed Generation: 1
Reason: Programmed
Status: True
Type: Programmed
Last Transition Time: 2024-04-08T11:11:44Z
Message: The OSS Gateway API has altered the "Ready" condition semantics and reserved it for future use. GKE Gateway will stop emitting it in a future update, use "Programmed" instead.
Observed Generation: 1
Reason: Ready
Status: True
Type: Ready
Name: http
Supported Kinds:
Group: gateway.networking.k8s.io
Kind: HTTPRoute
Events:
Type Reason Age From Message
---- ------ ---- ---- -------
Normal ADD 3m9s mc-gateway-controller store/external-http
Normal SYNC 68s (x13 over 3m1s) mc-gateway-controller store/external-http
Normal UPDATE 54s (x3 over 3m9s) mc-gateway-controller store/external-http
Normal SYNC 54s mc-gateway-controller SYNC on store/external-http was a success
Sometimes there are transient errors shown in the Events section. Wait until it shows the SYNC on store/external-http was a success message.
Note: It can take up to 10 minutes for the Gateway to fully deploy and serve traffic.
It takes some time for the external IP to be created. To ensure that it is, run the following command until you see the external IP:
kubectl get gateway external-http -o=jsonpath="{.status.addresses[0].value}" --context cluster1 --namespace store | xargs echo -e
If it doesn't return an external IP, wait a few minutes and run it again.
Once the Gateway has deployed successfully, retrieve the external IP address from external-http Gateway:
This load balances traffic to the store ServiceImport which is across clusters cluster2 and cluster3. The load balancer sends your traffic to the closest region to you, and you might not see responses from the other region.
If you see the default backend - 404 or curl: (52) Empty reply from server message, the Gateway is not ready yet. Wait a couple of minutes and try again.
Next, send traffic to the /west path to access the application located in the cluster2 cluster:
curl http://${EXTERNAL_IP}/west
This routes traffic to the store-west-2 ServiceImport which only has Pods running on the cluster2 cluster. A cluster-specific ServiceImport, like store-west-2, enables an application owner to explicitly send traffic to a specific cluster, rather than letting the load balancer make the decision.
The output confirms that the request was served by Pod from the cluster2 cluster:
In this lab, you registered the created GKE clusters to a fleet,
enabled and configured the MCS and MCG controllers, deployed gateways and HttpRoute in the config cluster, and ran a distributed application across multiple clusters with a unique load balancer routing the traffic to the right pods. Through these steps, you've learned about the features and capabilities of GKE Enterprise and its scalability.
Manual Last Updated May 03, 2024
Lab Last Tested April 08, 2024
Copyright 2024 Google LLC All rights reserved. Google and the Google logo are trademarks of Google LLC. All other company and product names may be trademarks of the respective companies with which they are associated.


) > Kubernetes Engine > Overview.