Checkpoints
Enable relevant APIs.
/ 5
Application is developed with Story tab.
/ 5
Application marketing campaign tab is developed.
/ 5
Application image playground with furniture recommendation tab is developed.
/ 5
Image playground with oven instructions tab is developed.
/ 10
Image playground with ER diagrams tab is developed
/ 10
Image playground with math reasoning tab is developed.
/ 10
Application video playground with video description tab is developed.
/ 10
Video playground with video tags tab is developed.
/ 10
Video playground with video highlights tab is developed.
/ 10
Video playground with video geolocation tab is developed.
/ 10
Application is deployed to Cloud Run.
/ 10
Develop an App with Vertex AI Gemini 1.0 Pro
- Overview
- Objectives
- Setup
- Task 1. Configure your environment and project
- Task 2. Set up the application environment
- Task 3. Develop the app
- Task 4. Run and test the app locally
- Task 5. Generate a marketing campaign
- Task 6. Generate the image playground
- Task 7. Analyze image layout
- Task 8. Analyze ER diagrams
- Task 9. Math reasoning
- Task 10. Generate the video playground
- Task 11. Generate video tags
- Task 12. Generate video highlights
- Task 13. Generate video location
- Task 14. Deploy the app to Cloud Run
- End your lab
- Congratulations!
Overview
Gemini is a family of generative AI models that is designed for multimodal use cases. It comes in three sizes: Ultra, Pro and Nano. Gemini 1.0 Pro is available for developers and enterprises to build for your own use cases. Gemini 1.0 Pro accepts text as input and generates text as output. There is also a dedicated Gemini 1.0 Pro Vision multimodal endpoint that accepts text and imagery as input, and generates text as output. SDKs are available to help you build apps in Python, Android (Kotlin), Node.js, Swift and JavaScript.
On Google Cloud, the Vertex AI Gemini API provides a unified interface for interacting with Gemini models. The API supports multimodal prompts as input and output text or code. There are currently two models available in the Gemini API:
-
Gemini 1.0 Pro model (gemini-pro): Designed to handle natural language tasks, multiturn text and code chat, and code generation.
-
Gemini 1.0 Pro Vision model (gemini-pro-vision): Supports multimodal prompts. You can include text, images, and video in your prompt requests and get text or code responses.
Vertex AI is a machine learning (ML) platform that lets you train and deploy ML models and AI applications, and customize large language models (LLMs) for use in your AI-powered applications. Vertex AI allows for customization of Gemini with full data control and benefits from additional Google Cloud features for enterprise security, safety, privacy and data governance and compliance. To learn more about Vertex AI, view the link in the Next Steps section at the end of the lab.
In this lab, you use the Vertex AI SDK for Python to call the Vertex AI Gemini API.
Objectives
In this lab, you learn how to perform the following tasks:
- Develop a Python app using the Streamlit framework.
- Install the Vertex AI SDK for Python.
- Develop code to interact with the Gemini 1.0 Pro model (gemini-pro) using the Vertex AI Gemini API.
- Develop code to interact with the Gemini 1.0 Pro Vision (gemini-pro-vision) model using the Vertex AI Gemini API.
- Containerize your application, and deploy and test it on Cloud Run.
Setup
For each lab, you get a new Google Cloud project and set of resources for a fixed time at no cost.
-
Sign in to Qwiklabs using an incognito window.
-
Note the lab's access time (for example,
1:15:00), and make sure you can finish within that time.
There is no pause feature. You can restart if needed, but you have to start at the beginning. -
When ready, click Start lab.
-
Note your lab credentials (Username and Password). You will use them to sign in to the Google Cloud Console.
-
Click Open Google Console.
-
Click Use another account and copy/paste credentials for this lab into the prompts.
If you use other credentials, you'll receive errors or incur charges. -
Accept the terms and skip the recovery resource page.
Activate Cloud Shell
Cloud Shell is a virtual machine that contains development tools. It offers a persistent 5-GB home directory and runs on Google Cloud. Cloud Shell provides command-line access to your Google Cloud resources. gcloud is the command-line tool for Google Cloud. It comes pre-installed on Cloud Shell and supports tab completion.
-
Click the Activate Cloud Shell button (
) at the top right of the console.
-
Click Continue.
It takes a few moments to provision and connect to the environment. When you are connected, you are also authenticated, and the project is set to your PROJECT_ID.
Sample commands
- List the active account name:
(Output)
(Example output)
- List the project ID:
(Output)
(Example output)
Task 1. Configure your environment and project
-
Sign in to the Google Cloud console with your lab credentials, and open the Cloud Shell terminal window.
-
To set your project ID and region environment variables, in Cloud Shell, run the following commands:
PROJECT_ID=$(gcloud config get-value project) REGION={{{project_0.default_region|set at lab start}}} echo "PROJECT_ID=${PROJECT_ID}" echo "REGION=${REGION}" -
In order to use various Google Cloud services in this lab, you must enable a few APIs:
gcloud services enable cloudbuild.googleapis.com cloudfunctions.googleapis.com run.googleapis.com logging.googleapis.com storage-component.googleapis.com aiplatform.googleapis.com
To verify the objective, click Check my progress.
Task 2. Set up the application environment
In this task, you set up a Python virtual environment, and install the application dependencies.
Confirm that Cloud Shell is authorized
-
To confirm that Cloud Shell is authorized, in Cloud Shell, run the following command:
gcloud auth list -
If you're asked to authorize Cloud Shell, click Authorize.
Create the app directory
-
To create the app directory, run the following command:
mkdir ~/gemini-app -
Change to the
~/gemini-appdirectory:cd ~/gemini-app The application files are created in the
~/gemini-appdirectory. This directory will contain the Python application source files, dependencies, and a Docker file which we will use later in this lab.
Set up a Python virtual environment
Create a virtual environment on top of the existing Python installation, so that any packages installed in this environment are isolated from the packages in the base environment. When used from within a virtual environment, installation tools such as pip will install Python packages into the virtual environment.
-
To create the Python virtual environment, from within the
gemini-appfolder, run the command:python3 -m venv gemini-streamlit The venv module creates a lightweight virtual environment, with its own independent set of Python packages. -
Activate the Python virtual environment:
source gemini-streamlit/bin/activate
Install application dependencies
A Python requirements file is a simple text file that lists the dependencies required by your project. To start, there are three modules we need in our requirements file.
Our app is written using Streamlit, an open-source Python library that is used to create web apps for machine learning and data science. The app uses the Vertex AI SDK for Python library to interact with the Gemini API and models. Cloud Logging is used to log information from our application.
-
To create the requirements file, run the following command:
cat > ~/gemini-app/requirements.txt <<EOF streamlit google-cloud-aiplatform==1.38.1 google-cloud-logging==3.6.0 EOF -
Install the application dependencies:
pip install -r requirements.txt pip is the package installer for Python.
Wait until all the packages are installed before continuing to the next task.
Task 3. Develop the app
The app source code will be written in mutliple .py source files. Let's start with the main entry point in app.py.
Write the main app entry point
-
To create the
app.pyentry point code, run the following command:cat > ~/gemini-app/app.py <<EOF import os import streamlit as st from app_tab1 import render_story_tab from vertexai.preview.generative_models import GenerativeModel import vertexai import logging from google.cloud import logging as cloud_logging # configure logging logging.basicConfig(level=logging.INFO) # attach a Cloud Logging handler to the root logger log_client = cloud_logging.Client() log_client.setup_logging() PROJECT_ID = os.environ.get('PROJECT_ID') # Your Qwiklabs Google Cloud Project ID LOCATION = os.environ.get('REGION') # Your Qwiklabs Google Cloud Project Region vertexai.init(project=PROJECT_ID, location=LOCATION) @st.cache_resource def load_models(): text_model_pro = GenerativeModel("gemini-pro") multimodal_model_pro = GenerativeModel("gemini-pro-vision") return text_model_pro, multimodal_model_pro st.header("Vertex AI Gemini API", divider="rainbow") text_model_pro, multimodal_model_pro = load_models() tab1, tab2, tab3, tab4 = st.tabs(["Story", "Marketing Campaign", "Image Playground", "Video Playground"]) with tab1: render_story_tab(text_model_pro) EOF -
View the contents of the
app.pyfile:cat ~/gemini-app/app.py The app uses
streamlitto create a number of tabs in the UI. In this initial version of the app, we build the first tab Story that contains functionality to generate a story, and then incrementally build the other tabs in subsequent tasks in the lab.The app first initializes the
Vertex AI SDKpassing in the values of the PROJECT_ID, and REGION environment variables.It then loads the
gemini-pro, andgemini-pro-visionmodels using theGenerativeModelclass that represents a Gemini model. This class includes methods to help generate content from text, images, and video.The app creates 4 tabs in the UI named Story, Marketing Campaign, Image Playground, and Video Playground.
The app code then invokes the
render_tab1()function to create the UI for the Story tab in the app's UI.
Develop tab1 - Story
-
To write code that renders the Story tab in the app's UI, run the following command:
cat > ~/gemini-app/app_tab1.py <<EOF import streamlit as st from vertexai.preview.generative_models import GenerativeModel from response_utils import * import logging # create the model prompt based on user input. def generate_prompt(): # Story character input character_name = st.text_input("Enter character name: \n\n",key="character_name",value="Mittens") character_type = st.text_input("What type of character is it? \n\n",key="character_type",value="Cat") character_persona = st.text_input("What personality does the character have? \n\n", key="character_persona",value="Mitten is a very friendly cat.") character_location = st.text_input("Where does the character live? \n\n",key="character_location",value="Andromeda Galaxy") # Story length and premise length_of_story = st.radio("Select the length of the story: \n\n",["Short","Long"],key="length_of_story",horizontal=True) story_premise = st.multiselect("What is the story premise? (can select multiple) \n\n",["Love","Adventure","Mystery","Horror","Comedy","Sci-Fi","Fantasy","Thriller"],key="story_premise",default=["Love","Adventure"]) creative_control = st.radio("Select the creativity level: \n\n",["Low","High"],key="creative_control",horizontal=True) if creative_control == "Low": temperature = 0.30 else: temperature = 0.95 prompt = f"""Write a {length_of_story} story based on the following premise: \n character_name: {character_name} \n character_type: {character_type} \n character_persona: {character_persona} \n character_location: {character_location} \n story_premise: {",".join(story_premise)} \n If the story is "short", then make sure to have 5 chapters or else if it is "long" then 10 chapters. Important point is that each chapter should be generated based on the premise given above. First start by giving the book introduction, chapter introductions and then each chapter. It should also have a proper ending. The book should have a prologue and an epilogue. """ return temperature, prompt # function to render the story tab, and call the model, and display the model prompt and response. def render_story_tab (text_model_pro: GenerativeModel): st.write("Using Gemini 1.0 Pro - Text only model") st.subheader("Generate a story") temperature, prompt = generate_prompt() config = { "temperature": temperature, "max_output_tokens": 2048, } generate_t2t = st.button("Generate my story", key="generate_t2t") if generate_t2t and prompt: # st.write(prompt) with st.spinner("Generating your story using Gemini..."): first_tab1, first_tab2 = st.tabs(["Story response", "Prompt"]) with first_tab1: response = get_gemini_pro_text_response(text_model_pro, prompt, generation_config=config) if response: st.write("Your story:") st.write(response) logging.info(response) with first_tab2: st.text(prompt) EOF -
View the contents of the
app_tab1.pyfile:cat ~/gemini-app/app_tab1.py The
render_story_tabfunction generates the UI controls in the tab by invoking functions to render the text input fields, and other options.The
generate_promptfunction generates the text prompt that is supplied to the Gemini API. The prompt string is created by concatenating user entered values in the tab UI for the character of the story, and options such as the story length (short, long), creativity level (low, high), and the story premise.The function also returns a
temperaturevalue based on the selected creativity level of the story. This value is supplied as thetemperatureconfiguration parameter to the model, which controls the randomness of the model's predictions. Themax_output_tokensconfiguration parameter specifies the maximum number of output tokens to generate per message.To generate the model response, a button is created in the tab UI. When the button is clicked, the
get_gemini_pro_text_responsefunction is invoked, which we will code in the next step in the lab.
Develop response_utils
The response_utils.py file contains functions to generate the model's responses.
-
To write code to generate the model's text response, run the following command:
cat > ~/gemini-app/response_utils.py <<EOF from vertexai.preview.generative_models import (Content, GenerationConfig, GenerativeModel, GenerationResponse, Image, HarmCategory, HarmBlockThreshold, Part) def get_gemini_pro_text_response( model: GenerativeModel, prompt: str, generation_config: GenerationConfig, stream=True): safety_settings={ HarmCategory.HARM_CATEGORY_HARASSMENT: HarmBlockThreshold.BLOCK_NONE, HarmCategory.HARM_CATEGORY_HATE_SPEECH: HarmBlockThreshold.BLOCK_NONE, HarmCategory.HARM_CATEGORY_SEXUALLY_EXPLICIT: HarmBlockThreshold.BLOCK_NONE, HarmCategory.HARM_CATEGORY_DANGEROUS_CONTENT: HarmBlockThreshold.BLOCK_NONE, } responses = model.generate_content(prompt, generation_config = generation_config, safety_settings = safety_settings, stream=True) final_response = [] for response in responses: try: final_response.append(response.text) except IndexError: final_response.append("") continue return " ".join(final_response) EOF -
View the contents of the
response_utils.pyfile:cat ~/gemini-app/response_utils.py The
get_gemini_pro_text_responsefunction uses theGenerativeModeland some of the other classes from thevertexai.preview.generative_modelspackage in the Vertex AI SDK for Python. From thegenerate_contentmethod of the class, a response is generated using the text prompt that is passed to the method.A
safety_settingsobject is also passed to this method to control the model response by blocking unsafe content. The sample code in this lab uses safety setting values that instructs the model to always return content regardless of the probability of the content being unsafe. You can assess the content generated, and then adjust these settings if your application requires more restrictive configuration. To learn more, view the safety settings documentation.
Task 4. Run and test the app locally
In this task, you run the app locally using streamlit, and test the app functionality.
Run the app
-
To run the app locally, in Cloud Shell, execute the command:
streamlit run app.py \ --browser.serverAddress=localhost \ --server.enableCORS=false \ --server.enableXsrfProtection=false \ --server.port 8080 The app starts and you are provided a URL to access the app.
-
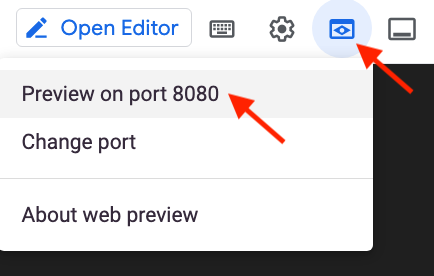
To launch the app home page in your browser, click web preview in the Cloud Shell menubar, and then click Preview on port 8080.
You can also copy and paste the app URL in a separate browser tab to access the app.
Test the app - Story tab
Generate a story by providing your input, view the prompt, and view the response generated by the Gemini 1.0 Pro model.
-
To generate a story, in the Story tab, leave the default settings, and then click Generate my story.
-
Wait for the response to be generated, and then click the Story response tab.
-
To view the prompt that was used to generate the response, click the Prompt tab.
-
In the Cloud Shell window, end the app and return to the command prompt by pressing control-c.
To verify the objective, click Check my progress.
Task 5. Generate a marketing campaign
In this task, you use the Gemini 1.0 Pro text model to generate a marketing campaign for a company. You develop the code that generates a second tab in your app.
Develop tab2 - Marketing Campaign
-
To write code that renders the Marketing Campaign tab in the app's UI, run the following command:
cat > ~/gemini-app/app_tab2.py <<EOF import streamlit as st from vertexai.preview.generative_models import GenerativeModel from response_utils import * import logging # create the model prompt based on user input. def generate_prompt(): st.write("Using Gemini 1.0 Pro - Text only model") st.subheader("Generate your marketing campaign") product_name = st.text_input("What is the name of the product? \n\n",key="product_name",value="ZomZoo") product_category = st.radio("Select your product category: \n\n",["Clothing","Electronics","Food","Health & Beauty","Home & Garden"],key="product_category",horizontal=True) st.write("Select your target audience: ") target_audience_age = st.radio("Target age: \n\n",["18-24","25-34","35-44","45-54","55-64","65+"],key="target_audience_age",horizontal=True) # target_audience_gender = st.radio("Target gender: \n\n",["male","female","trans","non-binary","others"],key="target_audience_gender",horizontal=True) target_audience_location = st.radio("Target location: \n\n",["Urban", "Suburban","Rural"],key="target_audience_location",horizontal=True) st.write("Select your marketing campaign goal: ") campaign_goal = st.multiselect("Select your marketing campaign goal: \n\n",["Increase brand awareness","Generate leads","Drive sales","Improve brand sentiment"],key="campaign_goal",default=["Increase brand awareness","Generate leads"]) if campaign_goal is None: campaign_goal = ["Increase brand awareness","Generate leads"] brand_voice = st.radio("Select your brand voice: \n\n",["Formal","Informal","Serious","Humorous"],key="brand_voice",horizontal=True) estimated_budget = st.radio("Select your estimated budget ($): \n\n",["1,000-5,000","5,000-10,000","10,000-20,000","20,000+"],key="estimated_budget",horizontal=True) prompt = f"""Generate a marketing campaign for {product_name}, a {product_category} designed for the age group: {target_audience_age}. The target location is this: {target_audience_location}. Aim to primarily achieve {campaign_goal}. Emphasize the product's unique selling proposition while using a {brand_voice} tone of voice. Allocate the total budget of {estimated_budget}. With these inputs, make sure to follow following guidelines and generate the marketing campaign with proper headlines: \n - Briefly describe the company, its values, mission, and target audience. - Highlight any relevant brand guidelines or messaging frameworks. - Provide a concise overview of the campaign's objectives and goals. - Briefly explain the product or service being promoted. - Define your ideal customer with clear demographics, psychographics, and behavioral insights. - Understand their needs, wants, motivations, and pain points. - Clearly articulate the desired outcomes for the campaign. - Use SMART goals (Specific, Measurable, Achievable, Relevant, and Time-bound) for clarity. - Define key performance indicators (KPIs) to track progress and success. - Specify the primary and secondary goals of the campaign. - Examples include brand awareness, lead generation, sales growth, or website traffic. - Clearly define what differentiates your product or service from competitors. - Emphasize the value proposition and unique benefits offered to the target audience. - Define the desired tone and personality of the campaign messaging. - Identify the specific channels you will use to reach your target audience. - Clearly state the desired action you want the audience to take. - Make it specific, compelling, and easy to understand. - Identify and analyze your key competitors in the market. - Understand their strengths and weaknesses, target audience, and marketing strategies. - Develop a differentiation strategy to stand out from the competition. - Define how you will track the success of the campaign. - Use relevant KPIs to measure performance and return on investment (ROI). Provide bullet points and headlines for the marketing campaign. Do not produce any empty lines. Be very succinct and to the point. """ return prompt # function to render the story tab, and call the model, and display the model prompt and response. def render_mktg_campaign_tab (text_model_pro: GenerativeModel): st.write("Using Gemini 1.0 Pro - Text only model") st.subheader("Generate a marketing campaign") prompt = generate_prompt() config = { "temperature": 0.8, "max_output_tokens": 2048, } generate_t2m = st.button("Generate campaign", key="generate_t2m") if generate_t2m and prompt: # st.write(prompt) with st.spinner("Generating a marketing campaign using Gemini..."): first_tab1, first_tab2 = st.tabs(["Campaign response", "Prompt"]) with first_tab1: response = get_gemini_pro_text_response(text_model_pro, prompt, generation_config=config) if response: st.write("Marketing campaign:") st.write(response) logging.info(response) with first_tab2: st.text(prompt) EOF
Modify the main app entry point
-
To add tab2 to the app, run the following command:
cat >> ~/gemini-app/app.py <<EOF from app_tab2 import render_mktg_campaign_tab with tab2: render_mktg_campaign_tab(text_model_pro) EOF
Test the app - Marketing campaign tab
Generate a marketing campaign by providing your input, view the prompt, and view the response generated by the Gemini 1.0 Pro model.
-
To run the app locally, in Cloud Shell, execute the command:
streamlit run app.py \ --browser.serverAddress=localhost \ --server.enableCORS=false \ --server.enableXsrfProtection=false \ --server.port 8080 The app starts and you are provided a URL to access the app.
-
To launch the app home page in your browser, click web preview in the Cloud Shell menubar, and then click Preview on port 8080.
-
To generate a marketing campaign, in the Marketing campaign tab, leave the default settings, and then click Generate campaign.
-
Wait for the response to be generated, and then click the Campaign response tab.
-
To view the prompt that was used to generate the response, click the Prompt tab.
-
Repeat the steps above to generate marketing campaigns with different values of the parameters such as the product category, target audience, location, and campaign goals.
-
In the Cloud Shell window, end the app and return to the command prompt by pressing control+c.
To verify the objective, click Check my progress.
Task 6. Generate the image playground
In this task, you use the Gemini 1.0 Pro vision model to process images and receive recommendations and information from the images that are supplied to the model.
Develop tab3 - Image Playground
In this subtask, you implement the code for the Image Playground tab, and the code to interact with the model to generate recommendations from an image.
-
To write code that renders the Image Playground tab in the app's UI, run the following command:
cat > ~/gemini-app/app_tab3.py <<EOF import streamlit as st from vertexai.preview.generative_models import GenerativeModel, Part from response_utils import * import logging # render the Image Playground tab with multiple child tabs def render_image_playground_tab(multimodal_model_pro: GenerativeModel): st.write("Using Gemini 1.0 Pro Vision - Multimodal model") recommendations, screens, diagrams, equations = st.tabs(["Furniture recommendation", "Oven instructions", "ER diagrams", "Math reasoning"]) with recommendations: room_image_uri = "gs://cloud-training/OCBL447/gemini-app/images/living_room.jpeg" chair_1_image_uri = "gs://cloud-training/OCBL447/gemini-app/images/chair1.jpeg" chair_2_image_uri = "gs://cloud-training/OCBL447/gemini-app/images/chair2.jpeg" chair_3_image_uri = "gs://cloud-training/OCBL447/gemini-app/images/chair3.jpeg" chair_4_image_uri = "gs://cloud-training/OCBL447/gemini-app/images/chair4.jpeg" room_image_url = "https://storage.googleapis.com/"+room_image_uri.split("gs://")[1] chair_1_image_url = "https://storage.googleapis.com/"+chair_1_image_uri.split("gs://")[1] chair_2_image_url = "https://storage.googleapis.com/"+chair_2_image_uri.split("gs://")[1] chair_3_image_url = "https://storage.googleapis.com/"+chair_3_image_uri.split("gs://")[1] chair_4_image_url = "https://storage.googleapis.com/"+chair_4_image_uri.split("gs://")[1] room_image = Part.from_uri(room_image_uri, mime_type="image/jpeg") chair_1_image = Part.from_uri(chair_1_image_uri,mime_type="image/jpeg") chair_2_image = Part.from_uri(chair_2_image_uri,mime_type="image/jpeg") chair_3_image = Part.from_uri(chair_3_image_uri,mime_type="image/jpeg") chair_4_image = Part.from_uri(chair_4_image_uri,mime_type="image/jpeg") st.image(room_image_url,width=350, caption="Image of a living room") st.image([chair_1_image_url,chair_2_image_url,chair_3_image_url,chair_4_image_url],width=200, caption=["Chair 1","Chair 2","Chair 3","Chair 4"]) st.write("Our expectation: Recommend a chair that would complement the given image of a living room.") prompt_list = ["Consider the following chairs:", "chair 1:", chair_1_image, "chair 2:", chair_2_image, "chair 3:", chair_3_image, "and", "chair 4:", chair_4_image, "\n" "For each chair, explain why it would be suitable or not suitable for the following room:", room_image, "Only recommend for the room provided and not other rooms. Provide your recommendation in a table format with chair name and reason as columns.", ] tab1, tab2 = st.tabs(["Response", "Prompt"]) generate_image_description = st.button("Generate recommendation", key="generate_image_description") with tab1: if generate_image_description and prompt_list: with st.spinner("Generating recommendation using Gemini..."): response = get_gemini_pro_vision_response(multimodal_model_pro, prompt_list) st.markdown(response) logging.info(response) with tab2: st.write("Prompt used:") st.text(prompt_list) EOF -
View the contents of the
app_tab3.pyfile:cat ~/gemini-app/app_tab3.py The
render_image_playground_tabfunction builds the UI that enables the app user to interact with the Gemini 1.0 Pro Vision model. It creates a set of tabs: "Furniture recommendation", "Oven instructions", "ER diagrams", "Math reasoning" in the UI. You write the code for the remaining tabs in subsequent tasks in this lab.In the
Furniture recommendationtab, a living room scene is used to perform visual understanding. Along with a set of additional images of chairs, the code invokes the Gemini 1.0 Pro Vision multimodal API endpoint to get a recommendation of a chair that complements the living room scene.The code uses more than one text prompt and the images of the living room and chairs, and provides that in a list to the model. The
Partclass is used to obtain the image from the multi-part content URI that is hosted in a Cloud Storage bucket. The prompt also specifies a tabular format for the model output, and to include the rationale for the recommendation.

Update response_utils
The response_utils.py file contains functions to generate the model's responses.
-
Update the file to add code that generates the model's multimodal response:
cat >> ~/gemini-app/response_utils.py <<EOF def get_gemini_pro_vision_response(model: GenerativeModel, prompt_list, generation_config={}, stream=True): generation_config = {'temperature': 0.1, 'max_output_tokens': 2048 } responses = model.generate_content(prompt_list, generation_config = generation_config, stream=True) final_response = [] for response in responses: try: final_response.append(response.text) except IndexError: final_response.append("") continue return(" ".join(final_response)) EOF
Modify the main app entry point
-
To add tab3 to the app, run the following command:
cat >> ~/gemini-app/app.py <<EOF from app_tab3 import render_image_playground_tab with tab3: render_image_playground_tab(multimodal_model_pro) EOF
Test the app - Image Playground tab
-
Run the app using the command provided in previous steps in the lab.
-
To launch the app home page in your browser, click web preview in the Cloud Shell menubar, and then click Preview on port 8080.
-
Click Image Playground, and then click Furniture recommendation.
The tab displays the images of the living room, and chairs.
-
Click Generate recommendation.
If you receive this error: FailedPrecondition: 400 We are preparing necessary resources. Please wait few minutes and retry., wait for a few minutes and then click Generate recommendation again. -
View the response from the Gemini 1.0 Pro vision model.
The response is in tabular format as requested in the prompt. The model recommends two of the four chairs, and provides the rationale for the recommendation.
-
In the Cloud Shell window, end the app and return to the command prompt by pressing control+c.
To verify the objective, click Check my progress.
Task 7. Analyze image layout
In this task, you use the Gemini 1.0 Pro Vision model to extract information from an image after analyzing it's layout of icons and text.
Update the Image Playground tab - Oven instructions
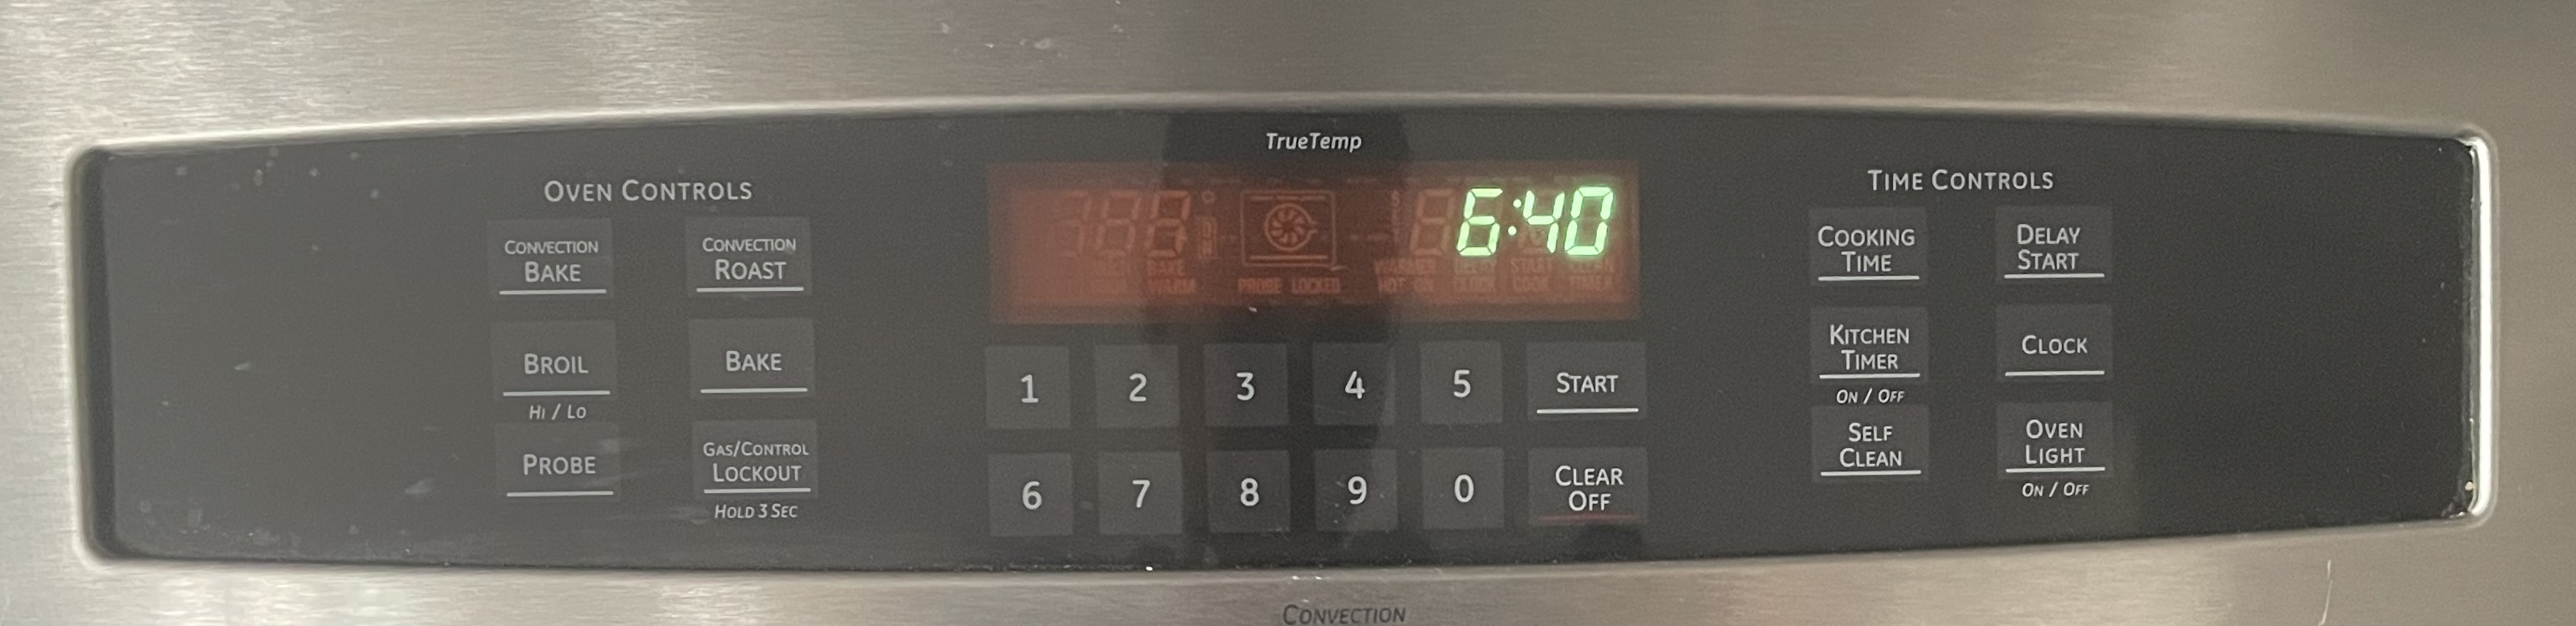
Equipped with the ability to extract information from visual elements on screens, Gemini can analyze screenshots, icons, and layouts to provide a holistic understanding of the depicted scene. In this task, you provide an image of a kitchen oven's control panel to the model, and then prompt the model to generate instructions for a specific function.
-
To implement code for the Oven instructions tab in the Image Playground tab in the app's UI, run the following command:
cat >> ~/gemini-app/app_tab3.py <<EOF with screens: oven_screen_uri = "gs://cloud-training/OCBL447/gemini-app/images/oven.jpg" oven_screen_url = "https://storage.googleapis.com/"+oven_screen_uri.split("gs://")[1] oven_screen_img = Part.from_uri(oven_screen_uri, mime_type="image/jpeg") st.image(oven_screen_url, width=350, caption="Image of an oven control panel") st.write("Provide instructions for resetting the clock on this appliance in English") prompt = """How can I reset the clock on this appliance? Provide the instructions in English. If instructions include buttons, also explain where those buttons are physically located. """ tab1, tab2 = st.tabs(["Response", "Prompt"]) generate_instructions_description = st.button("Generate instructions", key="generate_instructions_description") with tab1: if generate_instructions_description and prompt: with st.spinner("Generating instructions using Gemini..."): response = get_gemini_pro_vision_response(multimodal_model_pro, [oven_screen_img, prompt]) st.markdown(response) logging.info(response) with tab2: st.write("Prompt used:") st.text(prompt+"\n"+"input_image") EOF The code above builds the UI of the Oven instructions tab. An image of a kitchen oven's control panel is used along with text to prompt the model to generate instructions for a specific function that is available on the panel, in this case, resetting the clock.
Test the app - Image playground - Oven instructions tab
-
Run the app using the command provided in previous steps in the lab.
-
To launch the app home page in your browser, click web preview in the Cloud Shell menubar, and then click Preview on port 8080.
-
Click Image Playground, and then click Oven instructions.
The tab displays an image of the oven control panel.
-
Click Generate instructions.
-
View the response from the Gemini 1.0 Pro Vision model.
The response contains the steps that can be used to reset the clock on the oven's control panel. It also includes instructions that indicate where to locate the button on the panel, showcasing the model's ability to analyze the layout of the panel in the image.
-
In the Cloud Shell window, end the app and return to the command prompt by pressing control+c.
To verify the objective, click Check my progress.
Task 8. Analyze ER diagrams
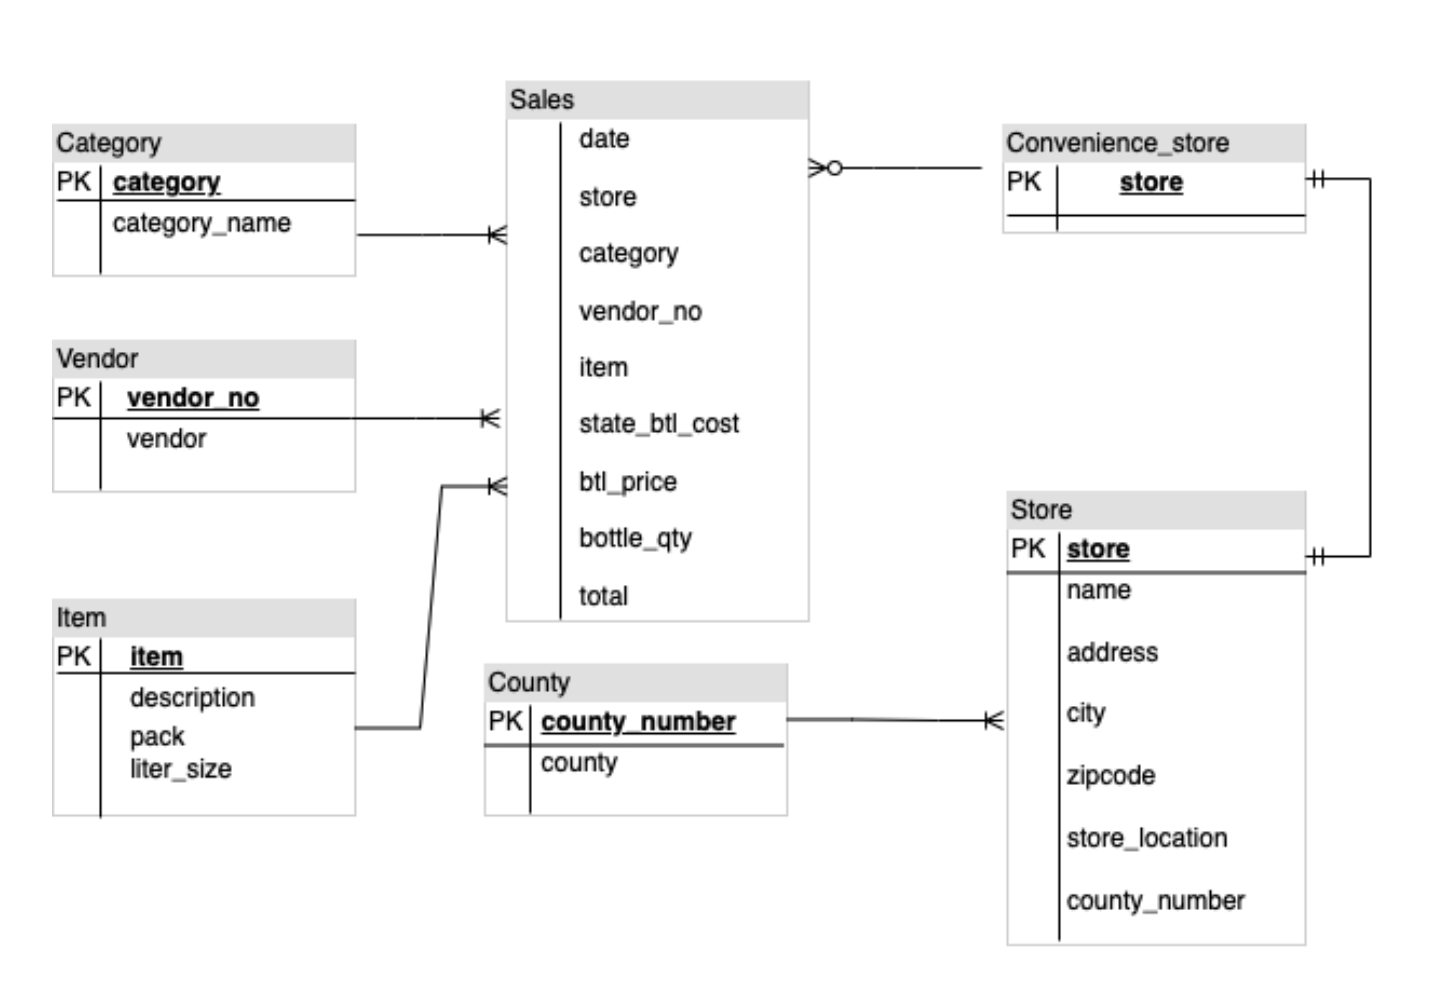
Gemini's multimodal capabilities enable it to comprehend diagrams and take actionable steps, such as document or code generation. In this task, you use the Gemini 1.0 Pro Vision model to analyze an Entity-Relationship (ER) diagram and generate documentation on the entities and relationships found in the diagram.
Update the Image Playground tab - ER diagrams
In this task, you provide an image of an ER diagram to the model, and then prompt the model to generate documentation.
-
To implement code for the ER diagrams tab in the Image Playground tab in the app's UI, run the following command:
cat >> ~/gemini-app/app_tab3.py <<EOF with diagrams: er_diag_uri = "gs://cloud-training/OCBL447/gemini-app/images/er.png" er_diag_url = "https://storage.googleapis.com/"+er_diag_uri.split("gs://")[1] er_diag_img = Part.from_uri(er_diag_uri,mime_type="image/png") st.image(er_diag_url, width=350, caption="Image of an ER diagram") st.write("Document the entities and relationships in this ER diagram.") prompt = """Document the entities and relationships in this ER diagram.""" tab1, tab2 = st.tabs(["Response", "Prompt"]) er_diag_img_description = st.button("Generate documentation", key="er_diag_img_description") with tab1: if er_diag_img_description and prompt: with st.spinner("Generating..."): response = get_gemini_pro_vision_response(multimodal_model_pro,[er_diag_img,prompt]) st.markdown(response) logging.info(response) with tab2: st.write("Prompt used:") st.text(prompt+"\n"+"input_image") EOF The code above builds the UI of the ER diagrams tab. An image of an ER diagram is used along with text to prompt the model to generate documentation about the entities and relationships found in the diagram.
Test the app - Image playground - ER diagrams tab
-
Run the app using the command provided in previous steps in the lab.
-
To launch the app home page in your browser, click web preview in the Cloud Shell menubar, and then click Preview on port 8080.
-
Click Image Playground, and then click ER diagrams.
The tab displays the ER diagram image.
-
Click Generate documentation.
-
View the response from the Gemini 1.0 Pro Vision model.
The response contains the list of entities and their relationships found in the diagram.
-
In the Cloud Shell window, end the app and return to the command prompt by pressing control+c.
To verify the objective, click Check my progress.
Task 9. Math reasoning
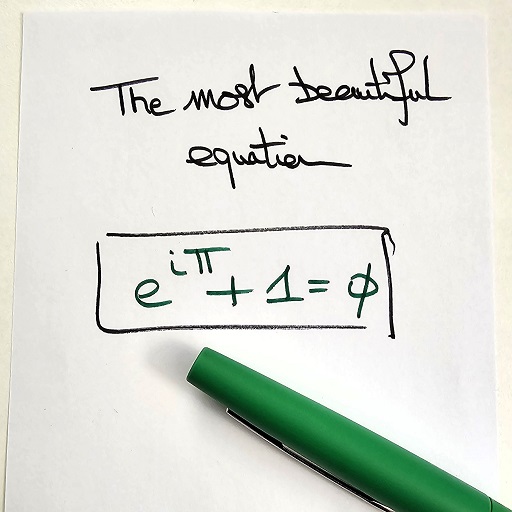
Gemini 1.0 Pro Vision can also recognize math formulas and equations and extract specific information from them. This capability is particularly useful for generating explanations for math problems.
Update the Image Playground tab - Math reasoning
In this task, you use the Gemini 1.0 Pro Vision model to extract and interpret a math formula from an image.
-
To implement code for the Math reasoning tab in the Image Playground tab in the app's UI, run the following command:
cat >> ~/gemini-app/app_tab3.py <<EOF with equations: math_image_uri = "gs://cloud-training/OCBL447/gemini-app/images/math_eqn.jpg" math_image_url = "https://storage.googleapis.com/"+math_image_uri.split("gs://")[1] math_image_img = Part.from_uri(math_image_uri,mime_type="image/jpeg") st.image(math_image_url,width=350, caption="Image of a math equation") st.markdown(f""" Ask questions about the math equation as follows: - Extract the formula. - What is the symbol right before Pi? What does it mean? - Is this a famous formula? Does it have a name? """) prompt = """Follow the instructions. Surround math expressions with $. Use a table with a row for each instruction and its result. INSTRUCTIONS: - Extract the formula. - What is the symbol right before Pi? What does it mean? - Is this a famous formula? Does it have a name? """ tab1, tab2 = st.tabs(["Response", "Prompt"]) math_image_description = st.button("Generate answers", key="math_image_description") with tab1: if math_image_description and prompt: with st.spinner("Generating answers for formula using Gemini..."): response = get_gemini_pro_vision_response(multimodal_model_pro, [math_image_img, prompt]) st.markdown(response) logging.info(response) with tab2: st.write("Prompt used:") st.text(prompt) EOF The code above builds the UI of the Math reasoning tab. An image of a math equation is used along with text to prompt the model to generate answers and other characteristics about the equation.
Test the app - Image playground - Math reasoning tab
-
Run the app using the command provided in previous steps in the lab.
-
To launch the app home page in your browser, click web preview in the Cloud Shell menubar, and then click Preview on port 8080.
-
Click Image Playground, and then click Math reasoning.
The tab displays the image containing the math equation.
-
Click Generate answers.
-
View the response from the Gemini 1.0 Pro Vision model.
The response contains the answers to the questions supplied in the prompt to the model.
-
In the Cloud Shell window, end the app and return to the command prompt by pressing control+c.
To verify the objective, click Check my progress.
Task 10. Generate the video playground
In this task, you use the Gemini 1.0 Pro vision model to process videos and generate tags and information from the videos that are supplied to the model.
Develop tab4 - Video Playground
The Gemini 1.0 Pro Vision model can also provide the description of what is going on in a video. In this subtask, you implement the code for the Video Playground tab, and the code to interact with the model to generate the description of a video.
-
To write code that renders the Video Playground tab in the app's UI, run the following command:
cat > ~/gemini-app/app_tab4.py <<EOF import streamlit as st from vertexai.preview.generative_models import GenerativeModel, Part from response_utils import * import logging # render the Video Playground tab with multiple child tabs def render_video_playground_tab(multimodal_model_pro: GenerativeModel): st.write("Using Gemini 1.0 Pro Vision - Multimodal model") video_desc, video_tags, video_highlights, video_geoloc = st.tabs(["Video description", "Video tags", "Video highlights", "Video geolocation"]) with video_desc: video_desc_uri = "gs://cloud-training/OCBL447/gemini-app/videos/mediterraneansea.mp4" video_desc_url = "https://storage.googleapis.com/"+video_desc_uri.split("gs://")[1] video_desc_vid = Part.from_uri(video_desc_uri, mime_type="video/mp4") st.video(video_desc_url) st.write("Generate a description of the video.") prompt = """Describe what is happening in the video and answer the following questions: \n - What am I looking at? - Where should I go to see it? - What are other top 5 places in the world that look like this? """ tab1, tab2 = st.tabs(["Response", "Prompt"]) video_desc_description = st.button("Generate video description", key="video_desc_description") with tab1: if video_desc_description and prompt: with st.spinner("Generating video description"): response = get_gemini_pro_vision_response(multimodal_model_pro, [prompt, video_desc_vid]) st.markdown(response) logging.info(response) with tab2: st.write("Prompt used:") st.write(prompt,"\n","{video_data}") EOF -
View the contents of the
app_tab4.pyfile:cat ~/gemini-app/app_tab4.py The
render_video_playground_tabfunction builds the UI that enables the app user to interact with the Gemini 1.0 Pro Vision model. It creates a set of tabs: "Video description", "Video tags", "Video highlights", "Video geolocation" in the UI. You write the code for the remaining tabs in subsequent tasks in this lab.The
Video descriptiontab uses a prompt along with the video to generate a description of the video, and to identify other places that look similar to the place in the video.
Modify the main app entry point
-
To add tab4 to the app, run the following command:
cat >> ~/gemini-app/app.py <<EOF from app_tab4 import render_video_playground_tab with tab4: render_video_playground_tab(multimodal_model_pro) EOF
Test the app - Video Playground tab
-
Run the app using the command provided in previous steps in the lab.
-
To launch the app home page in your browser, click web preview in the Cloud Shell menubar, and then click Preview on port 8080.
-
Click Video Playground, and then click Video description.
-
The tab displays the video of a place. Click to play the video.
-
Click Generate video description.
-
View the response from the Gemini 1.0 Pro Vision model.
The response contains a description of the place, and 5 other places that look similar.
-
In the Cloud Shell window, end the app and return to the command prompt by pressing control+c.
To verify the objective, click Check my progress.
Task 11. Generate video tags
In this task, you use the Gemini 1.0 Pro Vision model to generate tags from a video.
Update the Image Playground tab - Video tags
-
To implement code for the Video tags tab in the Video Playground tab in the app's UI, run the following command:
cat >> ~/gemini-app/app_tab4.py <<EOF with video_tags: video_tags_uri = "gs://cloud-training/OCBL447/gemini-app/videos/photography.mp4" video_tags_url = "https://storage.googleapis.com/"+video_tags_uri.split("gs://")[1] video_tags_vid = Part.from_uri(video_tags_uri, mime_type="video/mp4") st.video(video_tags_url) st.write("Generate tags for the video.") prompt = """Answer the following questions using the video only: 1. What is in the video? 2. What objects are in the video? 3. What is the action in the video? 4. Provide 5 best tags for this video? Write the answer in table format with the questions and answers in columns. """ tab1, tab2 = st.tabs(["Response", "Prompt"]) video_tags_desc = st.button("Generate video tags", key="video_tags_desc") with tab1: if video_tags_desc and prompt: with st.spinner("Generating video tags"): response = get_gemini_pro_vision_response(multimodal_model_pro, [prompt, video_tags_vid]) st.markdown(response) logging.info(response) with tab2: st.write("Prompt used:") st.write(prompt,"\n","{video_data}") EOF The code above builds the UI of the Video tags tab. A video is used along with text to prompt the model to generate tags and answer questions about scenes in the video.
Test the app - Video playground - Video tags tab
-
Run the app using the command provided in previous steps in the lab.
-
To launch the app home page in your browser, click web preview in the Cloud Shell menubar, and then click Preview on port 8080.
-
Click Video Playground, and then click Video tags.
-
The tab displays the video that will be used to prompt the model. Click to play the video.
-
Click Generate video tags.
-
View the response from the Gemini 1.0 Pro Vision model.
The response contains the answers to the questions that were provided in the prompt to the model. The questions and answers are output in tabular format and include 5 tags as requested.
-
In the Cloud Shell window, end the app and return to the command prompt by pressing control+c.
To verify the objective, click Check my progress.
Task 12. Generate video highlights
In this task, you use the Gemini 1.0 Pro Vision model to generate highlights from a video that include information about the objects, people, and context shown in the video.
Update the Image Playground tab - Video highlights
-
To implement code for the Video highlights tab in the Video Playground tab in the app's UI, run the following command:
cat >> ~/gemini-app/app_tab4.py <<EOF with video_highlights: video_highlights_uri = "gs://cloud-training/OCBL447/gemini-app/videos/pixel8.mp4" video_highlights_url = "https://storage.googleapis.com/"+video_highlights_uri.split("gs://")[1] video_highlights_vid = Part.from_uri(video_highlights_uri, mime_type="video/mp4") st.video(video_highlights_url) st.write("Generate highlights for the video.") prompt = """Answer the following questions using the video only: What is the profession of the girl in this video? Which features of the phone are highlighted here? Summarize the video in one paragraph. Write these questions and their answers in table format. """ tab1, tab2 = st.tabs(["Response", "Prompt"]) video_highlights_description = st.button("Generate video highlights", key="video_highlights_description") with tab1: if video_highlights_description and prompt: with st.spinner("Generating video highlights"): response = get_gemini_pro_vision_response(multimodal_model_pro, [prompt, video_highlights_vid]) st.markdown(response) logging.info(response) with tab2: st.write("Prompt used:") st.write(prompt,"\n","{video_data}") EOF The code above builds the UI of the Video highlights tab. A video is used along with text to prompt the model to generate highlights from the video.
Test the app - Video playground - Video highlights tab
-
Run the app using the command provided in previous steps in the lab.
-
To launch the app home page in your browser, click web preview in the Cloud Shell menubar, and then click Preview on port 8080.
-
Click Video Playground, and then click Video highlights.
-
The tab displays the video that will be used to prompt the model. Click to play the video.
-
Click Generate video highlights.
-
View the response from the Gemini 1.0 Pro Vision model.
The response contains the answers to the questions that were provided in the prompt to the model. The questions and answers are output in tabular format and list features from the video such as the girl's profession, the features of the phone that are used. The response also contains a summary description of the scenes in the video.
-
In the Cloud Shell window, end the app and return to the command prompt by pressing control+c.
To verify the objective, click Check my progress.
Task 13. Generate video location
In this task, you use the Gemini 1.0 Pro Vision model to determine the location where the scene in the video takes place.
Update the Image Playground tab - Video geolocation
-
To implement code for the Video geolocation tab in the Video Playground tab in the app's UI, run the following command:
cat >> ~/gemini-app/app_tab4.py <<EOF with video_geoloc: video_geolocation_uri = "gs://cloud-training/OCBL447/gemini-app/videos/bus.mp4" video_geolocation_url = "https://storage.googleapis.com/"+video_geolocation_uri.split("gs://")[1] video_geolocation_vid = Part.from_uri(video_geolocation_uri, mime_type="video/mp4") st.video(video_geolocation_url) st.markdown("""Answer the following questions from the video: - What is this video about? - How do you know which city it is? - What street is this? - What is the nearest intersection? """) prompt = """Answer the following questions using the video only: What is this video about? How do you know which city it is? What street is this? What is the nearest intersection? Answer the following questions using a table format with the questions and answers as columns. """ tab1, tab2 = st.tabs(["Response", "Prompt"]) video_geolocation_description = st.button("Generate", key="video_geolocation_description") with tab1: if video_geolocation_description and prompt: with st.spinner("Generating location information"): response = get_gemini_pro_vision_response(multimodal_model_pro, [prompt, video_geolocation_vid]) st.markdown(response) logging.info(response) with tab2: st.write("Prompt used:") st.write(prompt,"\n","{video_data}") EOF The code above builds the UI of the Video geolocation tab. A video is used along with text to prompt the model to answer questions about the video that include location information about entities seen in the video.
Test the app - Video playground - Video geolocation tab
-
Run the app using the command provided in previous steps in the lab.
-
To launch the app home page in your browser, click web preview in the Cloud Shell menubar, and then click Preview on port 8080.
-
Click Video Playground, and then click Video geolocation.
-
The tab displays the video that will be used to prompt the model. Click to play the video.
-
Click Generate.
-
View the response from the Gemini 1.0 Pro Vision model.
The response contains the answers to the questions that were provided in the prompt to the model. The questions and answers are output in tabular format and include the location information as requested.
-
In the Cloud Shell window, end the app and return to the command prompt by pressing control+c.
To verify the objective, click Check my progress.
Task 14. Deploy the app to Cloud Run
Now that you've tested the app locally, you can make it available to others by deploying the app to Cloud Run on Google Cloud. Cloud Run is a managed compute platform that lets you run application containers on top of Google's scalable infrastructure.
Set up the environment
-
Make sure you are in the
appdirectory:cd ~/gemini-app -
Verify that the PROJECT_ID, and REGION environment variables are set:
echo "PROJECT_ID=${PROJECT_ID}" echo "REGION=${REGION}" -
If these environment variables are not set, then run the command to set them:
PROJECT_ID=$(gcloud config get-value project) REGION={{{project_0.default_region|set at lab start}}} echo "PROJECT_ID=${PROJECT_ID}" echo "REGION=${REGION}" -
Set environment variables for your service and artifact repository:
SERVICE_NAME='gemini-app-playground' # Name of your Cloud Run service. AR_REPO='gemini-app-repo' # Name of your repository in Artifact Registry that stores your application container image. echo "SERVICE_NAME=${SERVICE_NAME}" echo "AR_REPO=${AR_REPO}"
Create the Docker repository
-
To create the repository in Artifact Registry, run the command:
gcloud artifacts repositories create "$AR_REPO" --location="$REGION" --repository-format=Docker Artifact Registry ia a Google Cloud service that provides a single location for storing and managing your software packages and Docker container images. -
Set up authentication to the repository:
gcloud auth configure-docker "$REGION-docker.pkg.dev"
Build the container image
We'll use a Dockerfile to build the container image for our application. A Dockerfile is a text document that contains all the commands that a user could call on the command line to assemble a container image. It is used with Docker, a container platform that builds and runs container images.
-
To create a
Dockerfile, run the command:cat > ~/gemini-app/Dockerfile <<EOF FROM python:3.8 EXPOSE 8080 WORKDIR /app COPY . ./ RUN pip install -r requirements.txt ENTRYPOINT ["streamlit", "run", "app.py", "--server.port=8080", "--server.address=0.0.0.0"] EOF -
To build the container image for your app, run the command:
gcloud builds submit --tag "$REGION-docker.pkg.dev/$PROJECT_ID/$AR_REPO/$SERVICE_NAME" The gcloud builds submit command submits a build using Cloud Build. When used with the tag flag, Cloud Build uses a Dockerfile to build a container image from the application files in your source directory. Cloud Build is a service that executes builds based on your specifications on Google Cloud, and produces artifacts such as Docker containers or Java archives.
Wait until the command finishes before advancing to the next step.
Deploy and test your app on Cloud Run
The final task is to deploy the service to Cloud Run with the image that was built and pushed to the repository in Artifact Registry.
-
To deploy your app to Cloud Run, run the command:
gcloud run deploy "$SERVICE_NAME" \ --port=8080 \ --image="$REGION-docker.pkg.dev/$PROJECT_ID/$AR_REPO/$SERVICE_NAME" \ --allow-unauthenticated \ --region=$REGION \ --platform=managed \ --project=$PROJECT_ID \ --set-env-vars=PROJECT_ID=$PROJECT_ID,REGION=$REGION -
After the service is deployed, a URL to the service is generated in the output of the previous command. To test your app on Cloud Run, navigate to that URL in a separate browser tab or window.
-
Choose the app functionality that you want to test. The app will prompt the Vertex AI Gemini API to generate and display the responses.
To verify the objective, click Check my progress.
End your lab
When you have completed your lab, click End Lab. Qwiklabs removes the resources you’ve used and cleans the account for you.
You will be given an opportunity to rate the lab experience. Select the applicable number of stars, type a comment, and then click Submit.
The number of stars indicates the following:
- 1 star = Very dissatisfied
- 2 stars = Dissatisfied
- 3 stars = Neutral
- 4 stars = Satisfied
- 5 stars = Very satisfied
You can close the dialog box if you don't want to provide feedback.
For feedback, suggestions, or corrections, please use the Support tab.
Congratulations!
In this lab you:
- Developed a Python app using the Streamlit framework.
- Installed the Vertex AI SDK for Python.
- Developed code to interact with the Gemini 1.0 Pro model (gemini-pro) using the Vertex AI Gemini API.
- Used text prompts with the model to generate a story and marketing campaign.
- Develop code to interact with the Gemini 1.0 Pro Vision (gemini-pro-vision) model using the Vertex AI Gemini API.
- Used text, images, and videos with the model to process and extract information from images and videos.
- Deployed and tested the app on Cloud Run.
Next Steps/Learn More
Copyright 2023 Google LLC All rights reserved. Google and the Google logo are trademarks of Google LLC. All other company and product names may be trademarks of the respective companies with which they are associated.