總覽
Gemini for Google Cloud 這項 AI 協作工具全天候提供服務,無論使用者技能程度為何,都能在需要時獲得協助。在本實驗室中,您將瞭解如何使用 Google Cloud 的 AI 協作工具 Gemini,以 Autopilot 模式建立、測試及修改 Google Kubernetes Engine (GKE) 叢集。
注意:Duet AI 已更名為 Gemini,這是我們的新一代模型,本研究室的內容也已據此更新。參考研究室指示時,在使用者介面或說明文件中若有任何內容提及 Duet AI,請視為 Gemini。
注意:Gemini 仍處於早期技術階段,因此可能會輸出看似合理卻與事實不符的內容。使用輸出內容前,請先確認內容是否屬實。如要瞭解詳情,請參閱 Gemini 版 Google Cloud 和負責任的 AI 技術。
目標
在本實驗室中,您將瞭解如何執行下列工作:
- 啟用 Gemini
- 按照情境向 Gemini 提問,探索各種可用於將應用程式部署至 GKE 的 Google 服務。
- 提示 Gemini 提供指令,以利將基礎應用程式部署至 GKE 叢集。
- 運用 Gemini 解釋及生成殼層指令,建立、探索及修改 GKE 叢集。
設定和需求
每個實驗室都會提供新的 Google Cloud 專案和一組資源,讓您在時限內免費使用。
-
按一下「Start Lab」按鈕。如果研究室會產生費用,畫面中會出現選擇付款方式的彈出式視窗。左側的「Lab Details」窗格會顯示下列項目:
- 「Open Google Cloud console」按鈕
- 剩餘時間
- 必須在這個研究室中使用的臨時憑證
- 完成這個實驗室所需的其他資訊 (如有)
-
點選「Open Google Cloud console」;如果使用 Chrome 瀏覽器,也能按一下滑鼠右鍵,選取「在無痕視窗中開啟連結」。
接著,實驗室會啟動相關資源並開啟另一個分頁,當中顯示「登入」頁面。
提示:您可以在不同的視窗中並排開啟分頁。
注意:如果頁面中顯示「選擇帳戶」對話方塊,請點選「使用其他帳戶」。
-
如有必要,請將下方的 Username 貼到「登入」對話方塊。
{{{user_0.username | "Username"}}}
您也可以在「Lab Details」窗格找到 Username。
-
點選「下一步」。
-
複製下方的 Password,並貼到「歡迎使用」對話方塊。
{{{user_0.password | "Password"}}}
您也可以在「Lab Details」窗格找到 Password。
-
點選「下一步」。
重要事項:請務必使用實驗室提供的憑證,而非自己的 Google Cloud 帳戶憑證。
注意:如果使用自己的 Google Cloud 帳戶來進行這個實驗室,可能會產生額外費用。
-
按過後續的所有頁面:
- 接受條款及細則。
- 由於這是臨時帳戶,請勿新增救援選項或雙重驗證機制。
- 請勿申請免費試用。
Google Cloud 控制台稍後會在這個分頁開啟。
注意:如要查看列出 Google Cloud 產品和服務的選單,請點選左上角的「導覽選單」。
工作 1:啟用 Gemini
您將先在 Google Cloud 專案啟用 Gemini,並設定 Google Cloud Qwiklabs 使用者帳戶所需的權限。
-
在 Google Cloud 控制台工具列右上角,點選 Cloud Shell 圖示  。
。
-
執行下列指令,設定專案 ID 和區域環境變數:
PROJECT_ID=$(gcloud config get-value project)
REGION={{{project_0.default_region|lab region}}}
echo "PROJECT_ID=${PROJECT_ID}"
echo "REGION=${REGION}"
注意:請留意區域,因為這可能與下方的範例提示詞不同。
- 執行下列指令,將已登入的 Google 使用者帳戶儲存在環境變數:
USER=$(gcloud config get-value account 2> /dev/null)
echo "USER=${USER}"
-
如果出現提示訊息,請按一下「授權」。
-
為 Gemini 啟用 Cloud AI Companion API:
gcloud services enable cloudaicompanion.googleapis.com --project ${PROJECT_ID}
- 為您的 Google Cloud Qwiklabs 使用者帳戶授予必要的 IAM 角色,以便使用 Gemini:
gcloud projects add-iam-policy-binding ${PROJECT_ID} --member user:${USER} --role=roles/cloudaicompanion.user
gcloud projects add-iam-policy-binding ${PROJECT_ID} --member user:${USER} --role=roles/serviceusage.serviceUsageViewer
新增角色後,使用者即可透過 Gemini 取得協助。
點選「Check my progress」,確認目標已達成。
為 Gemini 啟用 Cloud AI Companion API 並授予 IAM 角色
工作 2:部署 GKE 叢集
您將使用 Google Cloud 控制台和 Cloud Shell 部署 GKE 叢集。
在以下範例中,假設您是基礎架構管理員,負責為開發網頁應用程式的團隊設定基礎架構。由於貴機構已採用容器和 Kubernetes 作為標準,團隊想瞭解如何在 Google Cloud 中的 Kubernetes 執行網頁應用程式,以及如何盡可能減少基礎架構管理負擔。
在這個情境中,您有現成的 GKE 叢集,並在其中執行一組微服務,組成電子商務網頁應用程式。現在,您要借助 Gemini 找出可改進的地方。
-
返回 Google Cloud 控制台的分頁。
-
重新整理 Google Cloud 控制台頁面。
-
在 Google Cloud 控制台工具列右上角,點選 Gemini 圖示  。
。
-
點選「開始對話」按鈕。
-
輸入下列提示詞:
How can I run Kubernetes on Google Cloud without having to own management of nodes and the control plane?
注意:為 Gemini 建構提示詞時,請提供與詢問主題專家時相同的詳細資訊和背景資訊。
Gemini 的回覆應類似如下:
To run Kubernetes on Google Cloud without having to own management of nodes and the control plane, you can use Google Kubernetes Engine (GKE) in Autopilot mode. In Autopilot mode, Google manages the control plane and system components for you, and also manages your worker nodes.
注意:我們不會將您的提示詞或其回覆內容做為 Gemini 模型的訓練資料。詳情請參閱「Google Cloud 中的 Gemini 如何使用您的資料」。
根據 Gemini 提供的資訊,GKE Autopilot 叢集似乎能滿足我們的需求。
工作 3:部署 GKE Autopilot 叢集
在這項工作中,您將提示 Gemini 說明如何部署 GKE Autopilot 叢集。
- 輸入下列提示詞:
How do I create a GKE Autopilot cluster?
Gemini 會回覆透過 Google Cloud 控制台建立叢集的操作說明,也會提供透過 Google Cloud CLI 建立叢集的操作說明。
注意事項:請盡可能提供背景資訊和具體細節,以便 Gemini 提供協助。由於 AI 生成的回覆是根據各種可能性而來,因此請您務必明確說明。
- 如果回覆包含 CLUSTER_NAME、REGION 和 PROJECT_ID 等預留位置值,將這些資訊加入提示詞,可能會獲得更實用的回覆。再次修正提示詞,加入更多詳細資訊:
What is the command to create a GKE Autopilot cluster in my current project and in the {{{project_0.default_region|lab region}}} region named gemini-demo using the gcloud CLI?
Gemini 的回覆應類似如下:
gcloud container clusters create-auto gemini-demo --region {{{project_0.default_region|lab region}}}
注意:如果 Gemini 提供的指令明顯與上述範例不一樣,請改用上述指令。
- 點選 Gemini 工具列中的 Cloud Shell 圖示 。
指令會複製到 Cloud Shell。
- 點選
輸入執行指令。
注意:須等待數分鐘才能完成叢集部署作業。
佈建完成時,「Kubernetes Engine」>「叢集」頁面會如螢幕截圖所示:
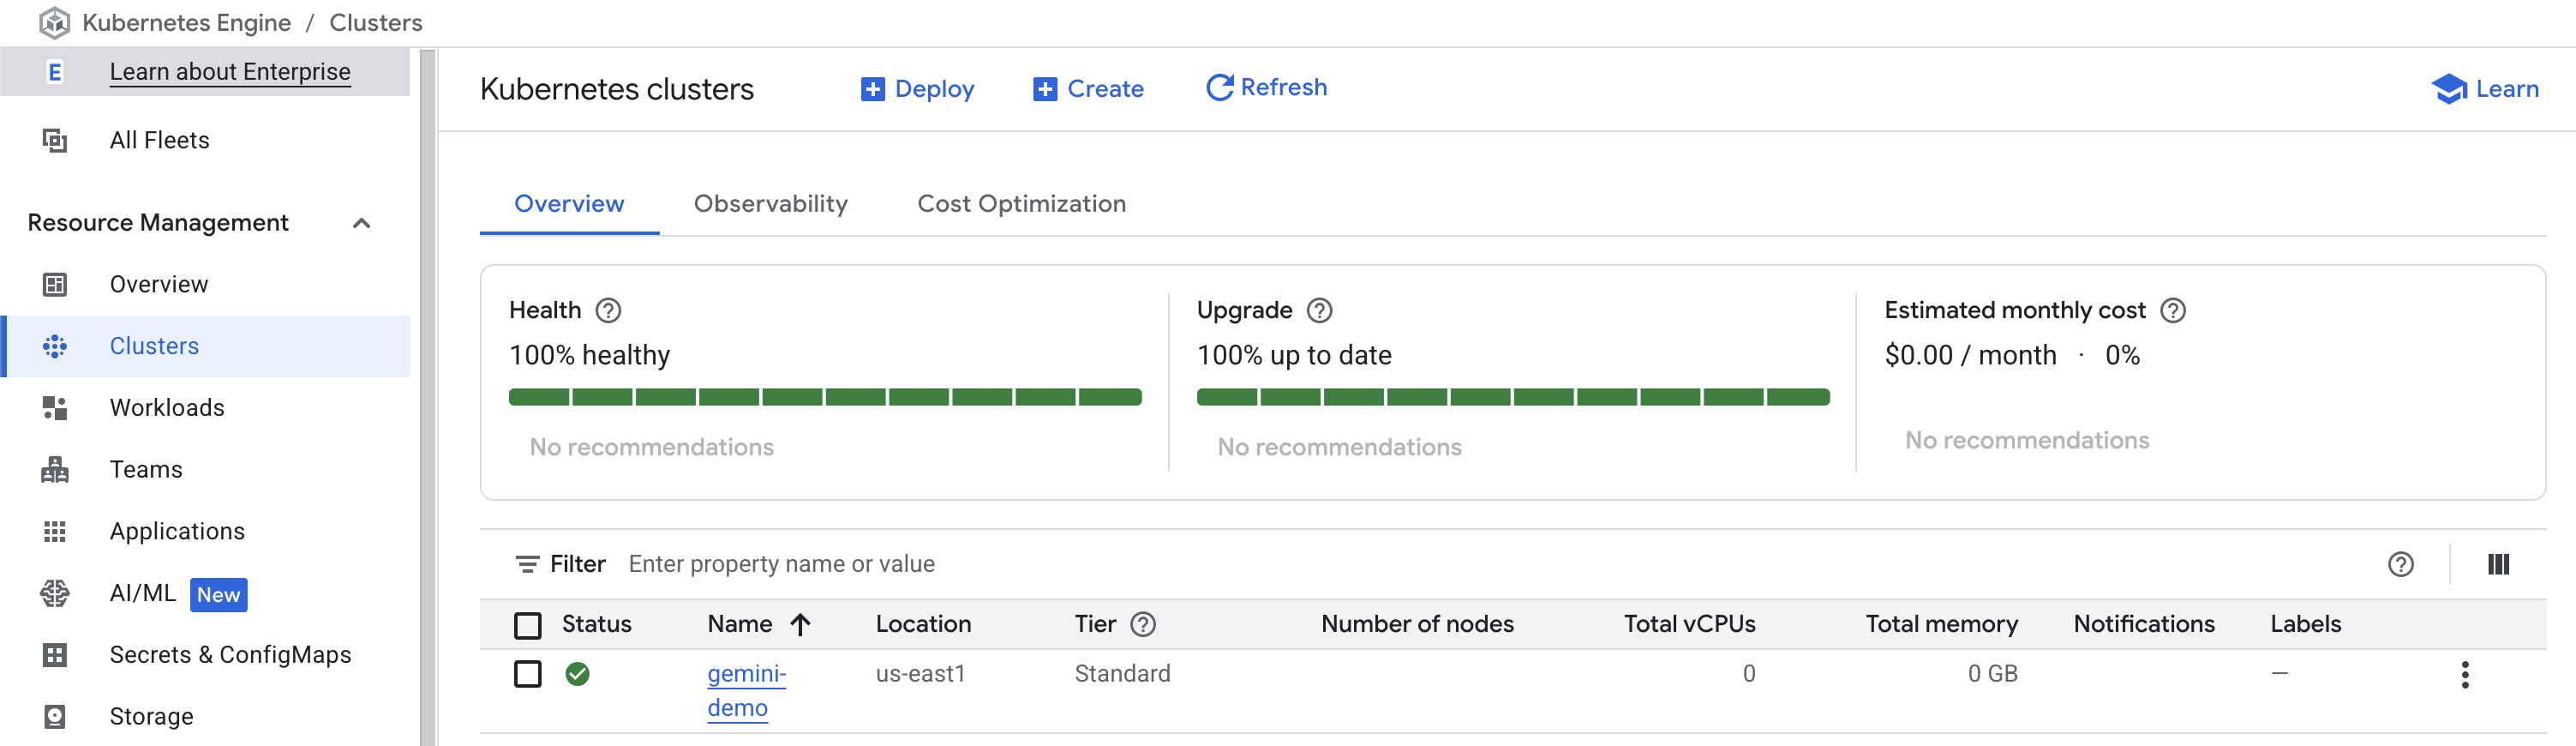
- 點選叢集名稱 gemini-demo,查看叢集的詳細資料。
向下捲動頁面,查看更多詳細資料。
點選「Check my progress」,確認目標已達成。
部署 GKE 叢集
工作 4:部署範例網頁應用程式
建立 Autopilot 模式的 GKE 叢集後,您決定要測試執行範例網頁應用程式,這與團隊將在此基礎架構上執行的網頁應用程式類似。您在內部看到 Google 的 s-docker.pkg.dev/google-samples/containers/gke/hello-app:1.0 的容器映像檔已加入書籤,可用於測試容器化網頁應用程式:
- 在「Gemini」窗格中輸入以下提示詞,然後點按「傳送」:
What is the kubectl command to create a deployment called hello-server for the image us-docker.pkg.dev/google-samples/containers/gke/hello-app:1.0?
Gemini 會回覆類似以下內容:
To create a deployment called hello-server for the image us-docker.pkg.dev/google-samples/containers/gke/hello-app:1.0, you can use the following kubectl command:
kubectl create deployment hello-server --image=us-docker.pkg.dev/google-samples/containers/gke/hello-app:1.0
在 Cloud Shell 執行 kubectl 指令。
- 網路伺服器建立完成後,您決定試著在網路伺服器前方佈建負載平衡器,並公開至網際網路。
在「Gemini」窗格中輸入以下提示詞,然後點按「傳送」:
What is the kubectl command to expose this deployment on port 80 and target port 8080 with a load balancer?
Gemini 的回覆應類似如下:
To expose a deployment called hello-server with a load balancer, you can use the following kubectl expose command:
kubectl expose deployment hello-server --type LoadBalancer --port 80 --target-port 8080
This will create a Compute Engine load balancer for your container.
雖然提供更多背景資訊總是有幫助,請注意 Gemini 能夠從對話記錄知道部署名稱是 hello-server,即使剛剛輸入的提示詞中並沒有該名稱。
-
在 Cloud Shell 執行 Gemini 提供的指令。
-
現在您要確認網路伺服器是否正常運作並處理要求。要查看已部署的應用程式,您需要從建立的 Kubernetes 服務擷取外部 IP 位址。
輸入下列提示詞:
What is the kubectl command to see the external IP address associated with this load balancer?
Gemini 的回覆應類似如下:
To see the external IP associated with a load balancer, you can use the following kubectl command:
kubectl get service hello-server
This will output the name of the service, the type of service, the cluster IP address, the external IP address, and the ports that the service is listening on.
- 在 Cloud Shell 執行 Gemini 提供的指令。
幾分鐘後,上述 kubectl 指令會產生類似下方的輸出結果:
NAME TYPE CLUSTER-IP EXTERNAL-IP PORT(S) AGE
hello-server LoadBalancer 34.118.227.57 35.225.15.112 80:31473/TCP 6m18s
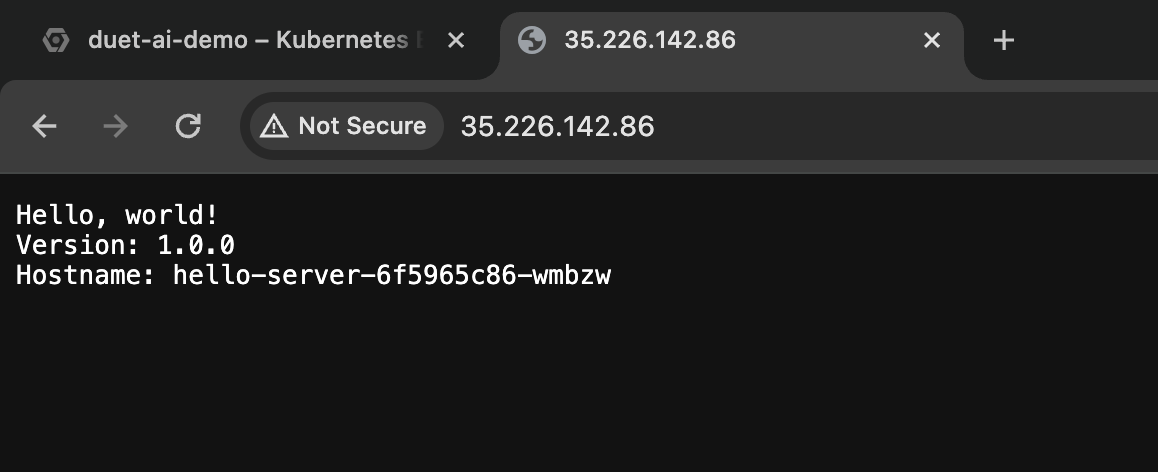
- 在瀏覽器中開啟另一個分頁,然後前往叢集的外部 IP 位址。注意:如果出現 IP 位址不支援 HTTPS 安全連線的訊息,請點選「Continue to site」。
您應該會在分頁中看到 hello-app 正在執行。
點選「Check my progress」,確認目標已達成。
部署範例工作負載
關閉研究室
如果您已完成研究室,請按一下「End Lab」(關閉研究室)。Qwiklabs 會移除您已用的資源,並清除使用帳戶。
您可以為研究室的使用體驗評分。請選取合適的星級評等並提供意見,然後按一下「Submit」(提交)。
星級評等代表您的滿意程度:
- 1 星 = 非常不滿意
- 2 星 = 不滿意
- 3 星 = 普通
- 4 星 = 滿意
- 5 星 = 非常滿意
如果不想提供意見回饋,您可以直接關閉對話方塊。
如有任何想法、建議或指教,請透過「Support」(支援) 分頁提交。
Copyright 2024 Google LLC 保留所有權利。Google 和 Google 標誌是 Google LLC 的商標,其他公司和產品名稱則有可能是其關聯公司的商標。


