Checkpoints
Enable Vertex AI API and create cloud storage bucket
/ 20
Upload SmartCon logo into the Bucket
/ 10
Share the bucket publicly
/ 10
Create and Deploy the Cloud function
/ 20
Test the Cloud Function
/ 10
Make the cloud function publicly invokable
/ 10
Chainlink Functions: Generate NFT Metadata
/ 10
Chainlink Functions: Update NFT Metadata
/ 10
Creating Generative Art Dynamic NFTs with Google Cloud Vertex AI and Chainlink Functions
- GSP1179
- Overview
- Setup and requirements
- Scenario
- Task 1. Create Cloud Storage Bbckets
- Task 2. Upload SmartCon logo into the Bucket
- Task 3. Share a bucket publicly
- Task 4. Create Cloud Function
- Task 5. Deploy the function
- Task 6. Test the function
- Task 7. Make the Function publicly invokable
- Task 8. Chainlink Functions
- Task 9. Configure your on-chain resources
- Task 10. Mint your NFT
- Task 11. Chainlink Functions: Create a subscription
- Task 12. Chainlink Functions: Generate NFT Metadata
- Task 13. Chainlink Functions: Update NFT Metadata
- Congratulations!
GSP1179

Overview
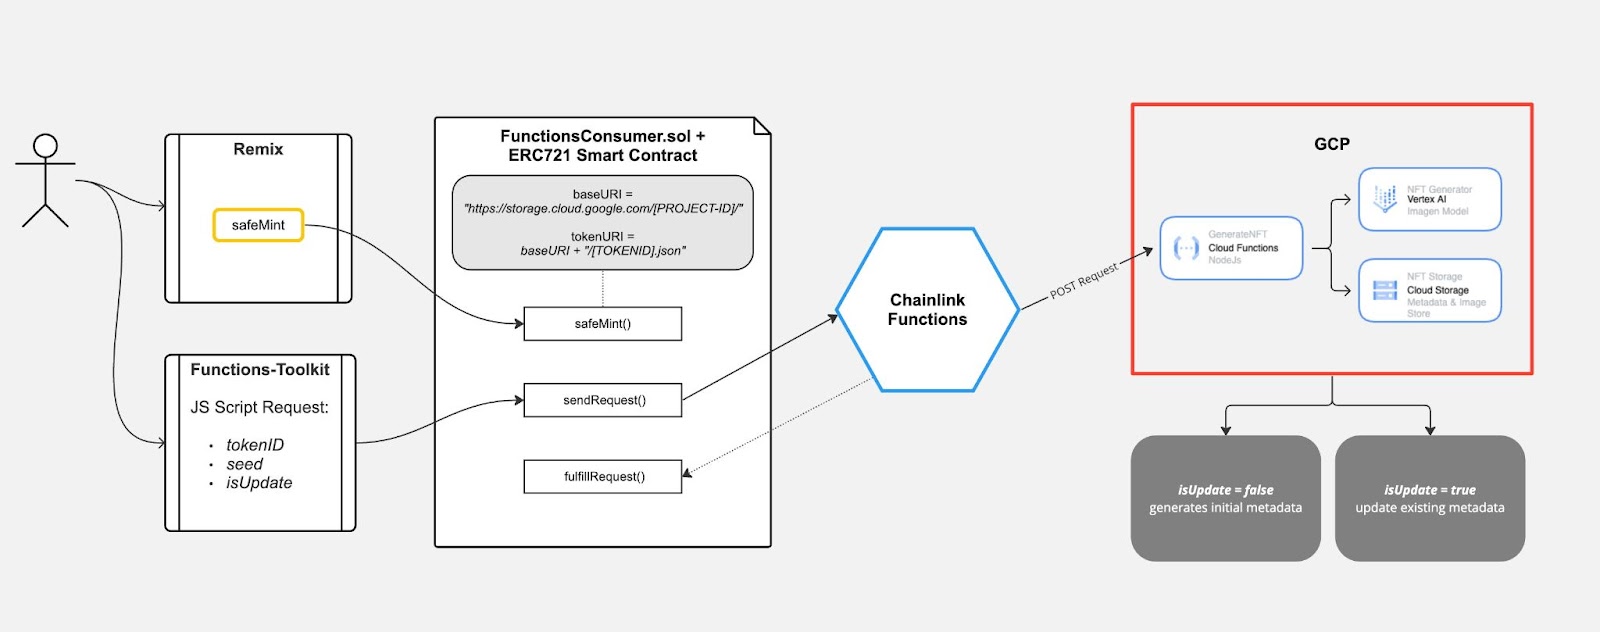
Chainlink Functions provides your smart contracts with access to a trust-minimized compute infrastructure. Your smart contract sends your code to a Decentralized Oracle Network (DON), and each DON's oracle runs the same code in a serverless environment. The DON aggregates all the independent runs and returns the final result to your smart contract. Your code can be anything from simple computation to fetching data from API providers.
Vertex AI is a machine learning (ML) platform from Google Cloud that lets you train and deploy ML models and AI applications. Vertex AI combines data engineering, data science, and ML engineering workflows, enabling your teams to collaborate using a common toolset. Learn more.
In this lab you'll learn the process of creating a Generative ART dynamic NFTs using Google Cloud Vertex AI and Chainlink functions.
Objectives
In this lab, you will learn how to:
- Use Vertex AI API to generate images using text prompt
- Build and deploy cloud functions
- Set up the Google Cloud Storage buckets
- Deploy NFT smart contract
- Integrate the Cloud Functions API with Chainlink Functions
Prerequisites
- Visual Studio Code or any other code editor
- The Metamask Plugin installed and configured in your Chrome browser other Ethereum Web3 wallet.
Install and configure your Web3 wallet for Polygon Mumbai
- Install the MetaMask wallet or other Ethereum Web3 wallet.
- Set the network for your wallet to the Polygon Mumbai testnet. If you need to add Mumbai to your wallet, you can find the chain ID and the LINK token contract address on the Mumbai Testnet Chainlist or LINK Token Contracts page.
- Request testnet MATIC from the Polygon Faucet.
- Request testnet LINK from Chainlink Faucet.
Setup and requirements
Before you click the Start Lab button
Read these instructions. Labs are timed and you cannot pause them. The timer, which starts when you click Start Lab, shows how long Google Cloud resources will be made available to you.
This Qwiklabs hands-on lab lets you do the lab activities yourself in a real cloud environment, not in a simulation or demo environment. It does so by giving you new, temporary credentials that you use to sign in and access Google Cloud for the duration of the lab.
What you need
To complete this lab, you need:
- Access to a standard internet browser (Chrome browser recommended).
- Time to complete the lab.
Note: If you already have your own personal Google Cloud account or project, do not use it for this lab.
Note: If you are using a Pixelbook, open an Incognito window to run this lab.
How to start your lab and sign in to the Google Cloud Console
-
Click the Start Lab button. If you need to pay for the lab, a pop-up opens for you to select your payment method. On the left is a panel populated with the temporary credentials that you must use for this lab.
-
Copy the username, and then click Open Google Console. The lab spins up resources, and then opens another tab that shows the Sign in page.
Tip: Open the tabs in separate windows, side-by-side.
-
In the Sign in page, paste the username that you copied from the Connection Details panel. Then copy and paste the password.
Important: You must use the credentials from the Connection Details panel. Do not use your Qwiklabs credentials. If you have your own Google Cloud account, do not use it for this lab (avoids incurring charges).
-
Click through the subsequent pages:
- Accept the terms and conditions.
- Do not add recovery options or two-factor authentication (because this is a temporary account).
- Do not sign up for free trials.


After a few moments, the Cloud Console opens in this tab.
Activate Cloud Shell
Cloud Shell is a virtual machine that is loaded with development tools. It offers a persistent 5GB home directory and runs on the Google Cloud. Cloud Shell provides command-line access to your Google Cloud resources.
In the Cloud Console, in the top right toolbar, click the Activate Cloud Shell button.

Click Continue.

It takes a few moments to provision and connect to the environment. When you are connected, you are already authenticated, and the project is set to your PROJECT_ID. For example:

gcloud is the command-line tool for Google Cloud. It comes pre-installed on Cloud Shell and supports tab-completion.
You can list the active account name with this command:
(Output)
(Example output)
You can list the project ID with this command:
(Output)
(Example output)
Enable Vertex AI API
Navigate to Vertex AI API. From the Navigation menu, click More Products, then click on Vertex AI. Click Enable all recommended APIs.
Scenario
You are developing an NFT campaign featuring popular monuments with underlying utilities. To create unique digital artworks, you intend to leverage the capabilities of Generative AI. To gamify the campaign, you also intend to make the NFTs dynamic, meaning that their attributes and images can be updated based on predefined rules and real-world data.
Task 1. Create Cloud Storage Bbckets
Cloud Storage allows world-wide storage and retrieval of any amount of data at any time. You can use Cloud Storage for a range of scenarios including serving website content, storing data for archival and disaster recovery, or distributing large data objects to users via direct download.
Buckets are the basic containers that hold your data in Cloud Storage.
In this step you will create a Cloud Storage Bucket which will be used to store NFTs metadata and images.
To create a bucket:
-
From the Navigation menu (
) > Cloud Storage > Buckets.
-
Click Create.
-
Enter your bucket information and click Continue to complete each step. Name your bucket: Enter a unique name for your bucket. For this lab, use your
as the bucket name because it will always be unique. -
Leave the rest of the fields as their default values and click Create.
Click Check my progress to verify the objective.
Task 2. Upload SmartCon logo into the Bucket

In this scenario, use the Google Cloud Function to compose a watermark onto the image generated by Vertex AI. The above image will be used as the watermark.
To upload the above image into your new bucket:
- Right-click on the image above and download it to your computer. Save the image as logo.png, renaming it on download.
- In the Cloud Storage browser page, click the name of the bucket that you created.
- In the Objects tab, click Upload files.
- In the file dialog, go to the file that you downloaded and select it.
- Ensure the file is named logo.png. If it is not, click the three dot icon for your file, select Rename from the dropdown, and rename the file to logo.png.
After the upload completes, you should see the file name and information about the file, such as its size and type.
Click Check my progress to verify the objective.
Task 3. Share a bucket publicly
To allow public access to the bucket and create a publicly accessible URL for the image:
- Click the Permissions tab above the list of files.
- Ensure the view is set to Principals. Click Grant Access to view the Add principals pane.
- In the New principals box, enter allUsers.
- In the Select a role drop-down, select Cloud Storage > Storage Object Viewer.
- Click Save.
- In the Are you sure you want to make this resource public? window, click Allow public access.
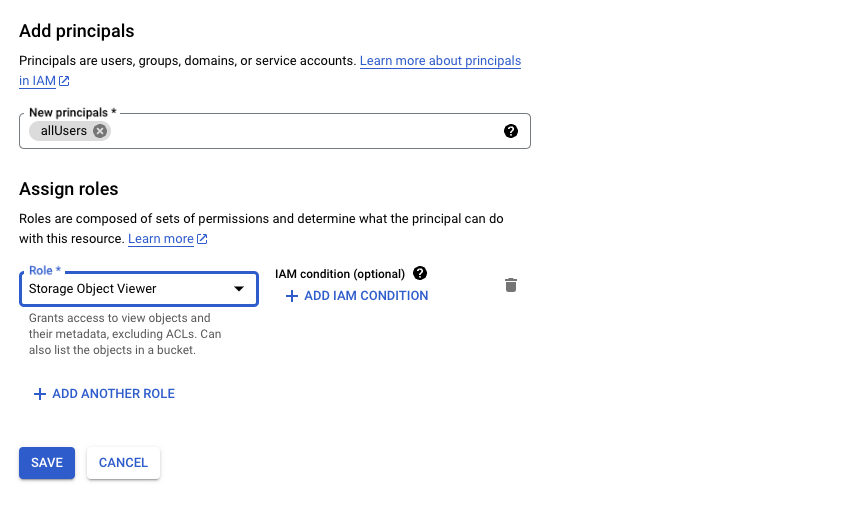
- To verify, click the Objects tab to return to the list of objects. Your object's Public access column should read Public to internet.
- Press the Copy URL button for your object and paste it into a separate tab to view your image.
The Copy URL button provides a shareable URL similar to the following:
https://storage.googleapis.com/
Click Check my progress to verify the objective.
Task 4. Create Cloud Function
A Cloud Function is a piece of code that runs in response to an event, such as an HTTP request, a message from a messaging service, or a file upload. Cloud events are things that happen in your cloud environment. These might be things like changes to data in a database, files added to a storage system, or a new virtual machine instance being created.
Since Cloud Functions are event-driven, they only run when something happens. This makes them a good choice for tasks that need to be done quickly or that don't need to be running all the time.
In this step, you're going to create a Cloud Function using the console.This function has the following functionalities:
- Generate the prompt from predefined set of attributes.
- Use the Generated prompt to generate Image using Vertex AI Imagen model.
- Compose the watermark logo on the image.
- Upload the image and metadata to Cloud Storage bucket.
To create the function, follow the below steps.
-
From the Navigation menu (
-
Click Create function.
-
Enter the following values:
| Field | Value |
|---|---|
| Environment | 2nd gen |
| Function name | GenerateNFT |
| Region | Leave Default |
| Trigger | Select Allow unauthenticated invocations |
| Memory allocated (In Runtime, Build, Connections and Security Settings) | Keep it default and click Next |
Task 5. Deploy the function
Still in the Create function dialog, in Source code for Inline editor replace the default code with the following implementation for index.js & package.json:
- In
package.jsonadd the following:
- In
Index.jsadd your your Bucket name and Project Id,and :
- At the bottom, click Deploy to deploy the function.
- After you click Deploy, the console redirects to the Cloud Functions Overview page.
While the function is being deployed, the icon next to it is a small spinner. When it's deployed, the spinner is a green check mark.
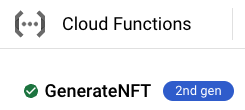
Click Check my progress to verify the objective.
Task 6. Test the function
-
In the Cloud Functions Overview page, got to Testing tab.
-
In the Configure Triggering event field, enter the following json object and click Test the function.
In the Output field, you should see the Token URI similar to below JSON:
In the Logs field, a status code of 200 indicates success. (It may take a minute for the logs to appear.)
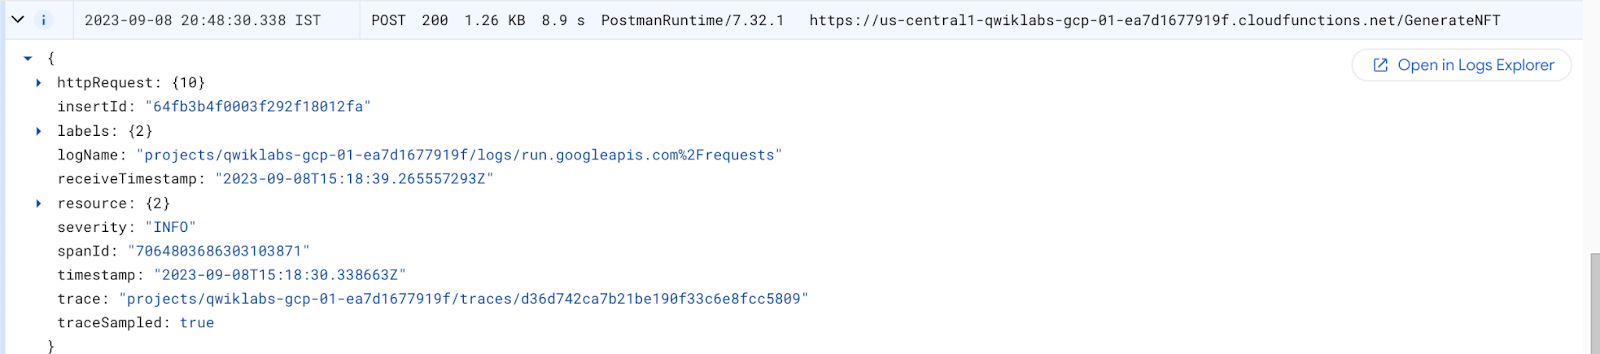
Click Check my progress to verify the objective.
Task 7. Make the Function publicly invokable
Follow the below steps to make the Functions API publicly callable without any authentication.
- In the Cloud Functions Overview page click the Permissions tab.
- Ensure the view is set to Principals. Click Grant Access to view the Add principals pane.
- In the New principals box, enter allUsers.
- In the Select a role drop-down, select Cloud Functions > Cloud Functions Invoker.
- Click Save.
- In the Are you sure you want to make this resource public? window, click Allow public access.
- Now copy the Function URL from the function overview page
Click Check my progress to verify the objective.
Task 8. Chainlink Functions
Install the required frameworks and dependencies
- Run below commands to clone this repo and change directories:
- You can use
gcloudprovided latest version of Node.js or Install Node.js 18. Optionally, you can use the nvm package to switch between Node.js versions withnvm use 18.
To ensure you are running the correct version in a terminal, run:
- Install DENO:
- Now check your version to confirm the install:
Optional: If you encounter problems, you may need to run:
- Run
npm installto install the dependencies.
-
For higher security, the starter kit encrypts your environment variables at rest. Note:
Set an encryption password for your environment variables.
- To configure your environment variables that you need to send your requests to the Polygon Mumbai network, run:
- You will be asked for a variable name, enter:
- Set a URL for the Polygon Mumbai testnet, You can sign up for a personal endpoint from Alchemy, Infura, or another node provider service. Enter:
- You will then be asked if you want to add another variable name, enter:
- Find the private key for your testnet wallet. If you use MetaMask, follow the instructions to Export a Private Key. Then enter:
The Chainlink Functions hardhat starter kit uses your private key to sign any transactions you make such as deploying your consumer contract, creating subscriptions, and making requests.
npm install dotenv --save
When complete, replace require("@chainlink/env-enc").config(); with the below line in these JS files request.js, secrets.js and env.js:
require('dotenv').config()
Task 9. Configure your on-chain resources
After you configure your local environment, configure some on-chain resources to process your requests using Chainlink Functions.
-
Open the Functions Consumer NFT contract in Remix.
-
Compile the contract by clicking the "Compile" button in the Solidity Compiler tab.
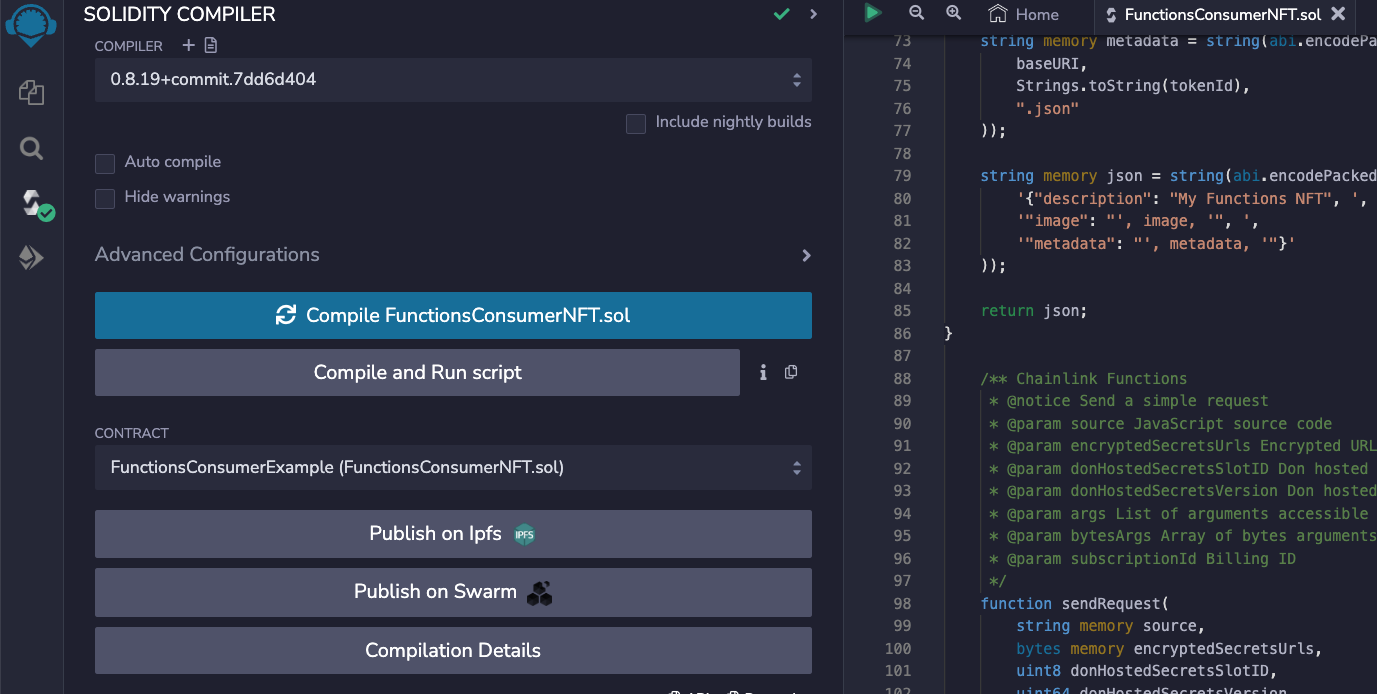
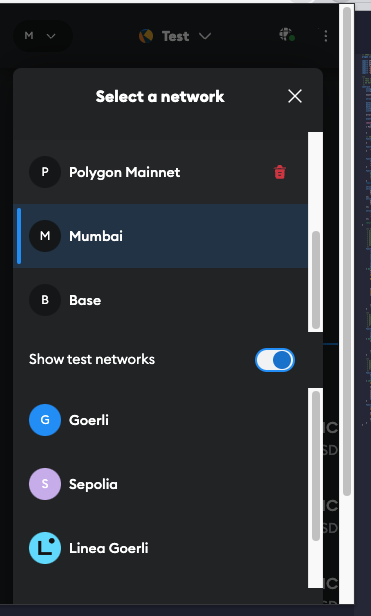
- Open MetaMask and select the Polygon Mumbai network.
- In Remix under the Deploy & Run Transactions tab, select Injected Provider - MetaMask in the Environment list. Remix will use the MetaMask wallet to communicate with Polygon Mumbai testnet.

- Under the Deploy section, fill in the router address. For Polygon Mumbai, the router address is:
- Under the Deploy section, put in your Cloud Storage bucket URL for base URL.
- Click the Deploy button to deploy the contract. MetaMask prompts you to confirm the transaction. Check the transaction details to make sure you are deploying the contract to Polygon Mumbai.
Task 10. Mint your NFT
-
Expand the contract you just deployed under Deployed Contracts.
-
Paste your wallet address into the safeMint field and hit the labeled orange button to call the function.
-
MetaMask prompts you to confirm the transaction.
-
After you confirm the transaction, get your contract address that appears in the Deployed Contracts list. Copy the contract address for the next steps.
Task 11. Chainlink Functions: Create a subscription
-
Follow the Managing Functions Subscriptions guide to accept the Chainlink Functions Terms of Service (ToS), create a subscription, fund it, then add your consumer contract address to it.
-
You can find the Chainlink Functions UI at https://functions.chain.link/.
Task 12. Chainlink Functions: Generate NFT Metadata
-
Click the Open Editor button in Cloud Shell and open file
request.js, which is located in the/functions-google-vertex-ai/examples/POST-data/request.jsfolder. -
Replace the consumer contract address and the subscription ID with your own values:
- Open the file
source.js, which is located in the/functions-google-vertex-ai/examples/POST-data/source.jsfolder:
- Run the below command in Cloud Shell to make a request:
-
You can now navigate to your
tokenUrlbelow:tokenUrl: https://storage.cloud.google.com/
/0.json -
At the end of this JSON metadata will be your NFT:
image: https://storage.cloud.google.com/
/0_img.png - Open this URL to see your NFT!
Click Check my progress to verify the objective.
Task 13. Chainlink Functions: Update NFT Metadata
- In Cloud Shell, open file
source.js, which is located in the/functions-google-vertex-ai/examples/POST-data/source.jsfolder.
- Run the below command to make a request.
[Similar output as above]
-
You can now navigate to your token metadata below:
Token metadata: https://storage.cloud.google.com/
/0.json -
At the end of this JSON metadata will be your updated NFT:
image: https://storage.cloud.google.com/
/0_img.png - Open this URL to see your NFT updated with a new seed!
Click Check my progress to verify the objective.
Congratulations!
You're ready to create your own NFT Collection from a few simple prompt attributes using Google Cloud Vertex AI and Chainlink Functions.
Next steps
- Read more about Imagen on Vertex AI.
Google Cloud Training & Certification
...helps you make the most of Google Cloud technologies. Our classes include technical skills and best practices to help you get up to speed quickly and continue your learning journey. We offer fundamental to advanced level training, with on-demand, live, and virtual options to suit your busy schedule. Certifications help you validate and prove your skill and expertise in Google Cloud technologies.
Manual Last Updated Date: November 23, 2023
Lab Last Tested Date: November 23, 2023
Copyright 2022 Google LLC All rights reserved. Google and the Google logo are trademarks of Google LLC. All other company and product names may be trademarks of the respective companies with which they are associated.