Checkpoints
Create a Firestore Database
/ 50
Deploy the Autoscaler
/ 50
Leverage the Autoscaler Tool for Cloud Spanner to Achieve Workload Elasticity
SCBL069
Overview
The Autoscaler tool for Cloud Spanner is an open source tool that allows you to automatically increase or reduce the compute capacity in one or more Spanner instances, based on their utilization.
Cloud Spanner is a fully managed relational database with unlimited scale, strong consistency, and up to 99.999% availability.
When you create a Cloud Spanner instance, you choose the number of nodes or processing units that provide compute resources for the instance. As the instance's workload changes, Cloud Spanner does not automatically adjust the number of nodes or processing units in the instance.
The Autoscaler monitors your instances and automatically adds or removes compute capacity to ensure that they stay within the recommended maximums for CPU utilization and the recommended limit for storage per node.
In this lab you'll deploy the Autoscaler in the per-project configuration. In this deployment configuration the Autoscaler is located in the same project as the Cloud Spanner instance being autoscaled.
Architecture
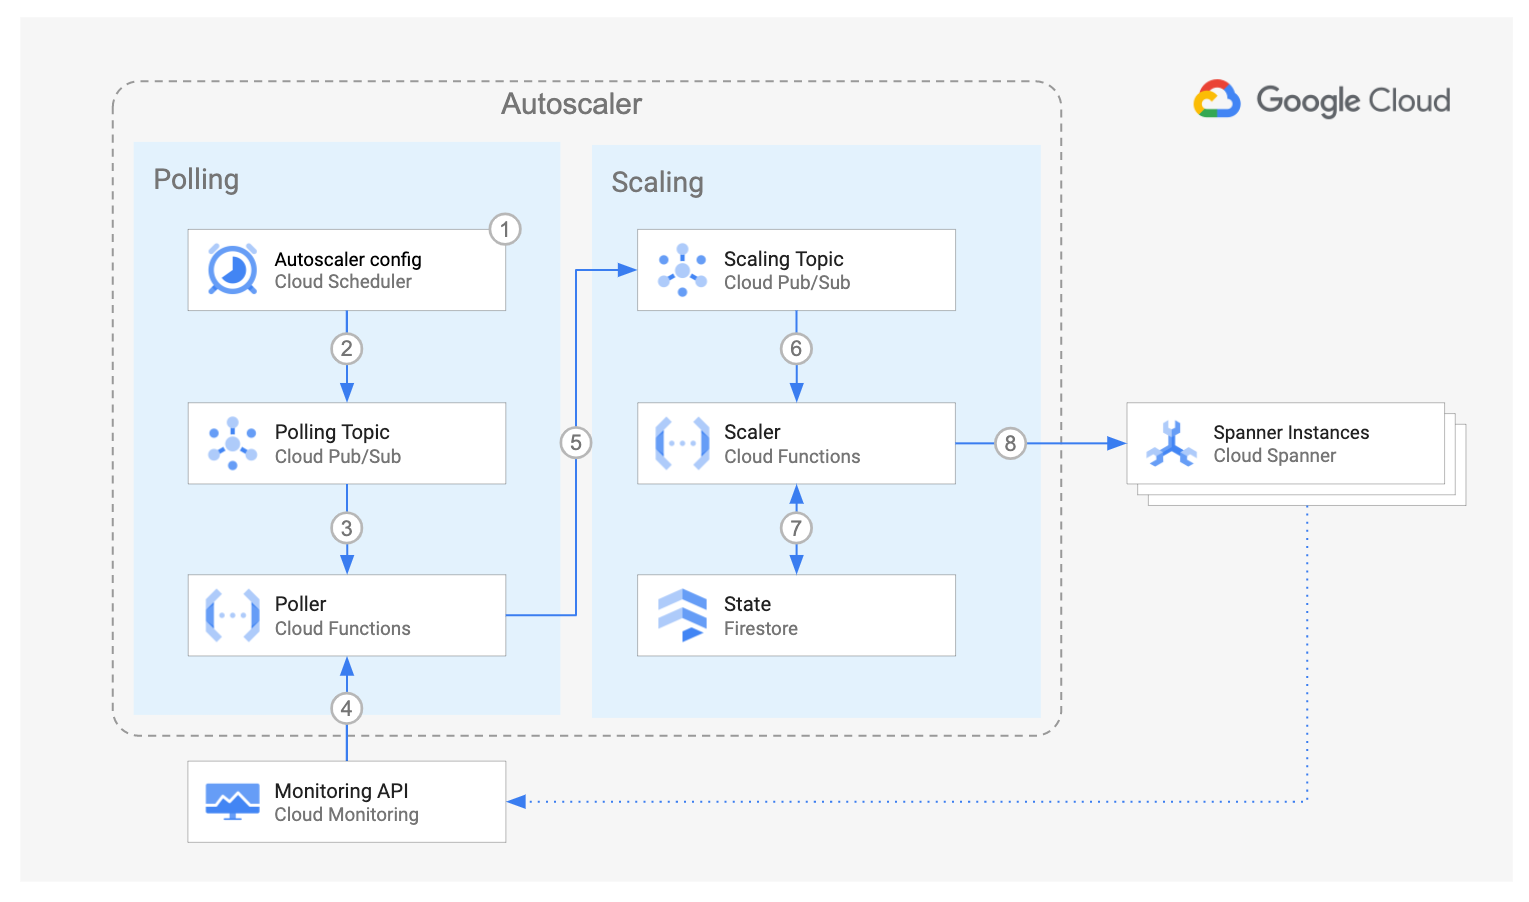
The diagram above shows the components of the Cloud Spanner Autoscaler and the interaction flow:
-
The Poller component, made up of Cloud Scheduler, Cloud Pub/Sub and the Poller Cloud Function, queries the Cloud Monitoring API to retrieve the utilization metrics for each Spanner instance. For each instance, the Poller function pushes one message into the Scaling Pub/Sub topic containing the utilization metrics for the specific Spanner instance, and some of its corresponding configuration parameters.
-
The Scaler component is made up of Cloud Pub/Sub, Scaler Cloud Function and Cloud Firestore. For each message the Scaler function compares the Spanner instance metrics against the recommended thresholds, plus or minus an allowed margin. Using the chosen scaling method it determines if the instance should be scaled, and the number of nodes or processing units that it should be scaled to.
Throughout the flow, the Spanner Autoscaler writes a step by step summary of its recommendations and actions to Cloud Logging for tracking and auditing.
Setup and requirements
Before you click the Start Lab button
Read these instructions. Labs are timed and you cannot pause them. The timer, which starts when you click Start Lab, shows how long Google Cloud resources will be made available to you.
This hands-on lab lets you do the lab activities yourself in a real cloud environment, not in a simulation or demo environment. It does so by giving you new, temporary credentials that you use to sign in and access Google Cloud for the duration of the lab.
To complete this lab, you need:
- Access to a standard internet browser (Chrome browser recommended).
- Time to complete the lab---remember, once you start, you cannot pause a lab.
How to start your lab and sign in to the Google Cloud Console
-
Click the Start Lab button. If you need to pay for the lab, a pop-up opens for you to select your payment method. On the left is the Lab Details panel with the following:
- The Open Google Console button
- Time remaining
- The temporary credentials that you must use for this lab
- Other information, if needed, to step through this lab
-
Click Open Google Console. The lab spins up resources, and then opens another tab that shows the Sign in page.
Tip: Arrange the tabs in separate windows, side-by-side.
Note: If you see the Choose an account dialog, click Use Another Account. -
If necessary, copy the Username from the Lab Details panel and paste it into the Sign in dialog. Click Next.
-
Copy the Password from the Lab Details panel and paste it into the Welcome dialog. Click Next.
Important: You must use the credentials from the left panel. Do not use your Google Cloud Skills Boost credentials. Note: Using your own Google Cloud account for this lab may incur extra charges. -
Click through the subsequent pages:
- Accept the terms and conditions.
- Do not add recovery options or two-factor authentication (because this is a temporary account).
- Do not sign up for free trials.
After a few moments, the Cloud Console opens in this tab.

Activate Cloud Shell
Cloud Shell is a virtual machine that is loaded with development tools. It offers a persistent 5GB home directory and runs on the Google Cloud. Cloud Shell provides command-line access to your Google Cloud resources.
- Click Activate Cloud Shell
at the top of the Google Cloud console.
When you are connected, you are already authenticated, and the project is set to your PROJECT_ID. The output contains a line that declares the PROJECT_ID for this session:
gcloud is the command-line tool for Google Cloud. It comes pre-installed on Cloud Shell and supports tab-completion.
- (Optional) You can list the active account name with this command:
-
Click Authorize.
-
Your output should now look like this:
Output:
- (Optional) You can list the project ID with this command:
Output:
Example output:
gcloud, in Google Cloud, refer to the gcloud CLI overview guide.
gcloud on your own machine, the config settings would've been persisted across sessions. But in Cloud Shell, you will need to set this for every new session / reconnection.
Task 1. Configure the Autoscaler and environment
- In Cloud Shell, clone the files needed for the lab:
- Set project and folder environment variables:
- Set the region and zone and App Engine Location where the Autoscaler infrastructure will be located:
- Enable the required Cloud APIs:
- Create a new App Engine application in the region where you want to deploy the Autoscaler. This will create a new Cloud Firestore instance for your project:
- Change the units used by the autoscaler to PROCESSING_UNITS, so they match with the units used by the Spanner instance that has already been created for you in this lab:
- Update values in a few of the Terraform variables files (variables.tf) to match your Qwiklabs project:
Click Check my progress to verify the objective.
Task 2. Deploy the Autoscaler
- Set the project ID, region and zone in the corresponding Terraform environment variables:
- Set
TF_VAR_spanner_nametoautoscale-test, the name of the Spanner instance that was created for you during lab setup:
This causes Terraform to configure the Autoscaler for a Cloud Spanner named autoscale-test and update IAM on the Cloud Spanner instance. That Cloud Spanner instance was created for you during lab setup.
Specifying the name of an existing instance is what you would typically do for production deployments where there is already a Cloud Spanner deployment.
- Change into the Terraform per-project directory and initialize it:
- Import the existing AppEngine application into Terraform state:
- Create the Autoscaler infrastructure:
- Answer
yeswhen prompted, after reviewing the resources that Terraform intends to create.
-
Go to Navigation menu > Firestore, click on your database id
(default). -
Now, click on Switch to Native Mode button and then click Switch Modes.
Collections failed to load then, wait for few minutes and refresh the page.Click Check my progress to verify the objective.
Task 3. Observe the autoscaling
-
Click on the three lines icon on the top left to open the Navigation menu, then click on View all products, then Databases and finally Spanner. The main Spanner page loads.
-
Click on the instance name autoscale-test, then click on System Insights on the left where you will see various Spanner metrics.
- Scroll down to see the CPU utilization. The load generation will produce spikes in high priority CPU utilization that will look similar to the following graph:
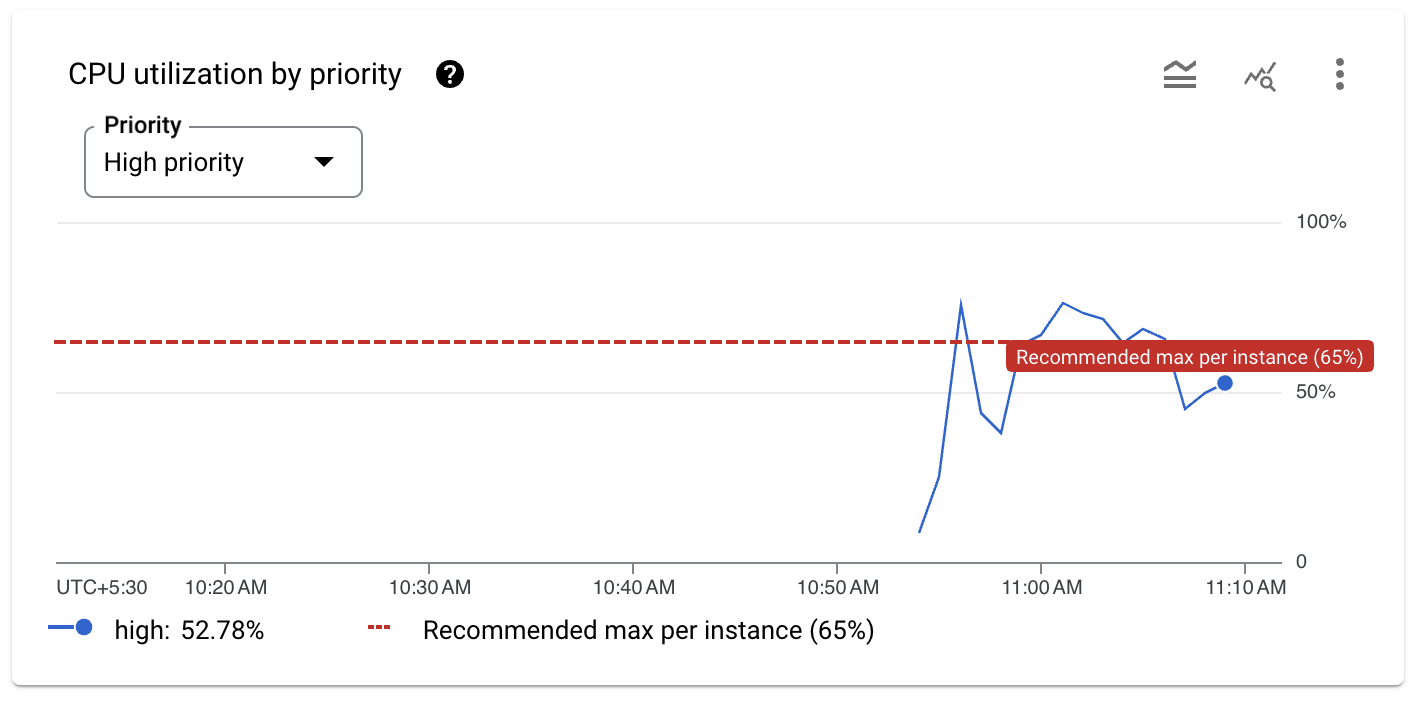
In the graph you can see two spikes that go over the 65% recommended threshold for CPU utilization.
- Scroll down to see the compute capacity graph. For Compute unit, select Processing units .
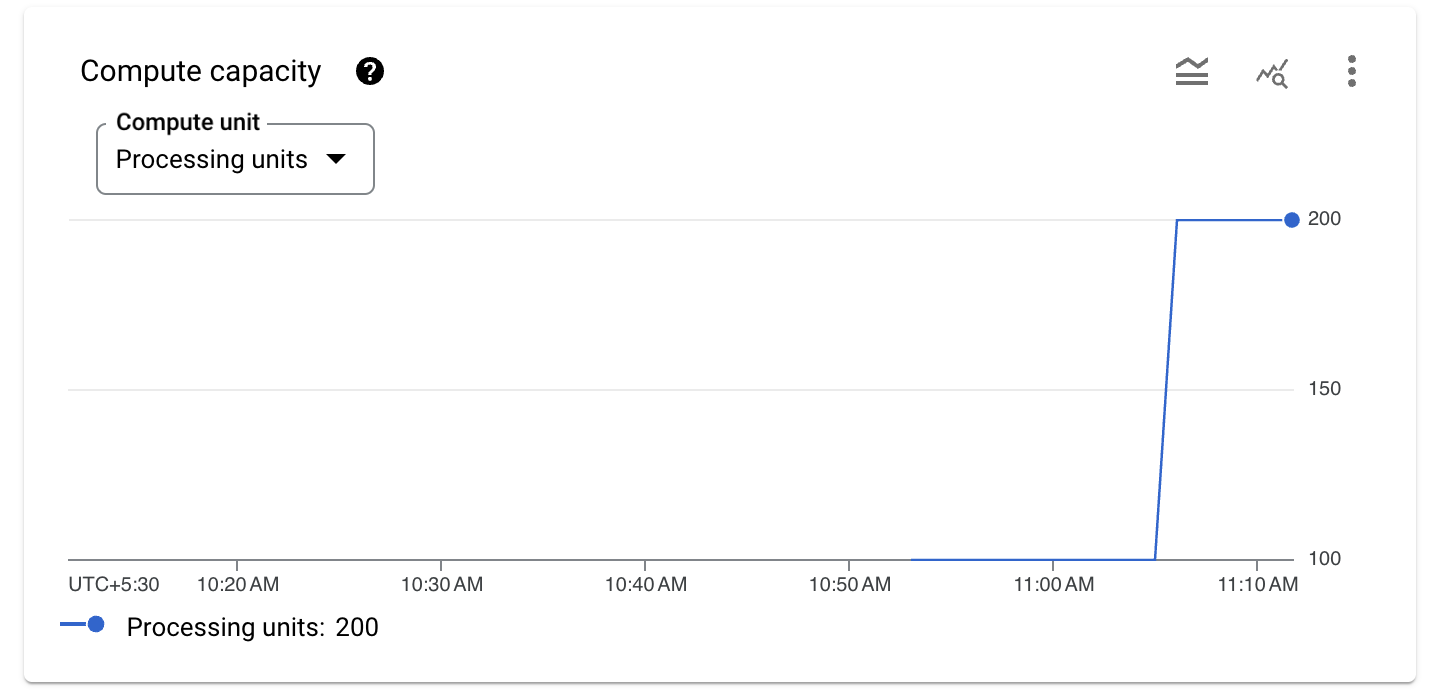
The Autoscaler monitors the Spanner instance, and when the CPU utilization goes over 65%, it adds compute capacity. In this example, it adds more processing units each time. The number of processing units or nodes that the Autoscaler adds is determined by the scaling method that the Autoscaler uses.
Check the Autoscaler logs
- To see the logs for the Autoscaler Poller and Scaler Cloud Functions, go to Navigation menu > Logging.
- Enter the following filter in the Query builder text box:
- Click Run Query on the far right.
Under Query results you can see all the messages from the Autoscaler functions. As the poller only runs every 2 minutes, you may need to re-run the query to receive the log messages.
- To only see messages from the poller function, enter the following filter in the Query builder text box:
- Click Run Query on the far right.
Under Query results you will see only the messages from the poller function. As the poller only runs every 2 minutes, you may need to re-run the query to receive the log messages.
- Look at the logs at the approximate times when the Autoscaling was triggered.
The Poller function is continuously monitoring the Spanner instance:

In this example, the Poller function gets the High Priority CPU, Rolling 24hr CPU and Storage metrics and publishes a message for the Scaler function. Note that the High Priority CPU is 78.32% at this point.
- To only see messages from the Scaler function, enter the following filter in the Query builder text box:
- Click Run Query on the far right.
- Under Query results you will see only the messages from the Scaler function related to "nodes" suggestions and scaling decisions.
The Scaler function receives that message, and decides if the Spanner instance should be scaled.

In this example the LINEAR scaling method suggests scaling from 300 to 400 processing units based on the High Priority CPU value. Since the last scaling operation was done more than five minutes ago, the Scaler makes the decision to scale to 400 processing units.
Congratulations!
You've now implemented the Autoscaler tool for Cloud Spanner which allows you to automatically increase or reduce the number of nodes based on workload needs. You practiced using Cloud Functions, Spanner and Scheduler, and Cloud Monitoring.
Manual Last Updated January 19, 2024
Lab Last Tested January 19, 2024
Copyright 2023 Google LLC All rights reserved. Google and the Google logo are trademarks of Google LLC. All other company and product names may be trademarks of the respective companies with which they are associated.