

Before you begin
- Labs create a Google Cloud project and resources for a fixed time
- Labs have a time limit and no pause feature. If you end the lab, you'll have to restart from the beginning.
- On the top left of your screen, click Start lab to begin
Create an instance with name as lab-1 in Project 1
/ 10
Update the default zone
/ 10
Create a configuration for Username 2 and name it as user2
/ 10
Restricting Username 2 to roles/viewer in Project 2
/ 10
Create a new role with permissions for the devops team
/ 10
Check binding to roles/iam.serviceAccountUser
/ 5
Bound Username 2 to devops role
/ 5
Create an instance with name as lab-2 in Project 1
/ 5
Check the created service account
/ 5
Check the binding for the service account to roles/iam.serviceAccountUser
/ 10
Check the binding for the service account to roles/compute.instanceAdmin
/ 10
Check lab-3 has the service account attached
/ 10
This lab looks at three common areas to understand with regards to IAM and gcloud:
In this lab you use the gcloud CLI tool to set up and configure command features of Cloud Identity and Access Management (IAM).
In this lab, you do the following:
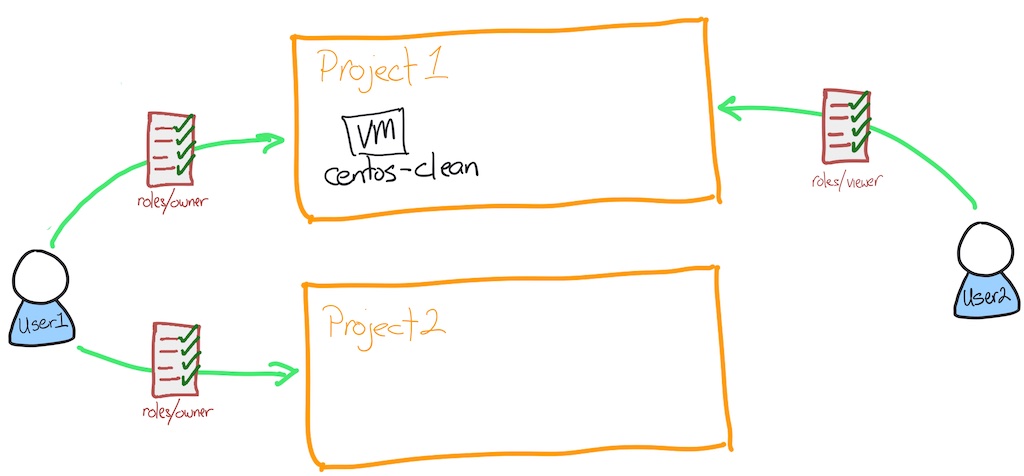
gcloud clientYou start with two user accounts and two projects;
user1 is the "owner" of both projectsuser2 is the "viewer" of only the first project.There is a Linux virtual machine (vm) running in the first project.
Google Cloud offers Cloud Identity and Access Management (IAM), which lets you manage access control by defining who (identity) has what access (role) for which resource.
In IAM, permission to access a resource isn't granted directly to the end user. Instead, permissions are grouped into roles, and roles are granted to authenticated principals. (In the past, IAM often referred to principals as members. Some APIs still use this term.)
In Cloud IAM, you grant access to principals. Principals can be of the following types:
Learn more about these identity types from the Concepts related to identity Guide.
In this lab, you use Google accounts, service accounts, and Cloud Identity domain groups.
A role is a collection of permissions. You cannot assign a permission to the user directly; instead you grant them a role. When you grant a role to a user, you grant them all the permissions that the role contains.
Learn more about roles from the Roles Guide.
The gcloud CLI is a part of the Cloud SDK. You must download and install the SDK on your system and initialize it before you can use the gcloud command-line tool. You can use this tool to perform many common platform tasks either from the command-line or in scripts and other automations.
Learn more about gcloud from the gcloud CLI overview Guide.
Read these instructions. Labs are timed and you cannot pause them. The timer, which starts when you click Start Lab, shows how long Google Cloud resources are made available to you.
This hands-on lab lets you do the lab activities in a real cloud environment, not in a simulation or demo environment. It does so by giving you new, temporary credentials you use to sign in and access Google Cloud for the duration of the lab.
To complete this lab, you need:
Click the Start Lab button. If you need to pay for the lab, a dialog opens for you to select your payment method. On the left is the Lab Details pane with the following:
Click Open Google Cloud console (or right-click and select Open Link in Incognito Window if you are running the Chrome browser).
The lab spins up resources, and then opens another tab that shows the Sign in page.
Tip: Arrange the tabs in separate windows, side-by-side.
If necessary, copy the Username below and paste it into the Sign in dialog.
You can also find the Username in the Lab Details pane.
Click Next.
Copy the Password below and paste it into the Welcome dialog.
You can also find the Password in the Lab Details pane.
Click Next.
Click through the subsequent pages:
After a few moments, the Google Cloud console opens in this tab.

This lab already has a Compute Engine instance called centos-clean that simulates an environment that doesn't have gcloud installed. You connect to this instance using the Google Cloud console.
Open the list of compute instances by going to Navigation Menu > Compute Engine > VM instances.
On the line with the compute instance named centos-clean, click SSH.
gcloud is successfully installed by checking the version. Inside the SSH session run:After verification that gcloud command-line tool is installed , make some changes by creating a compute instance.
Press ENTER when you see the prompt Do you want to continue (Y/n)?
Navigate to the link displayed in a new tab.
Click on your active username (
When you see the prompt Enter the following verification code in gcloud CLI on the machine you want to log into, click on the copy button then go back to the SSH session, and paste the code into the prompt Enter authorization code:.
In the SSH session, set the region and zone:
If you have correctly set everything up, the command creates an instance.
But what size? And where? What image is used?
There are a number of defaults the service uses. Some can be controlled in the gcloud configuration. For example, the location of the instance is controlled by the zone setting.
You now see a compute section, a core section, and an active configuration. You can change each of these, but for this lab you'll only change the zone. Look at the zone your VM was created in.
Identify one of the other zones in the same region as you. For example, if your current zone is us-west2-a, you could select us-west2-b.
Change your current zone for another zone in the same region. Inside the SSH session run the following, replacing ZONE with the zone you selected:
You see the stated zone reflects the change you made.
You can change other settings using the gcloud config set command. Those changes are permanent; they are written to your home directory.
The default configuration is stored in ~/.config/gcloud/configurations/config_default.
If you want to use a zone other than the default zone when creating an instance, you can use --zone switch. For example, gcloud compute instances create lab-1 --zone us-central1-f
You can see the configuration is just stored as text and can be backed up or copied.
You have now set up one account. In situations when you need to work on different teams or access different accounts, you can also manage that with gcloud config.
In your next task you learn how to create a second configuration and switch between both of them.
In this lab you have a second Google account you can log on with. This account has read-only (viewer) access to the first project. You create a new configuration for that user.
gcloud configuration for the second user account. Inside the SSH session run:Select option 2, Create a new configuration.
configuration name: Type user2.
Log in with a new account: select option 3 - you're logging in with the other provided user name.
Press ENTER when you see the prompt Do you want to continue (Y/n)?
Navigate to the link displayed in a new tab.
Click Use another account
Copy the second user account (
Copy the same password that you started the lab with, and paste into the enter your password prompt.
Click I understand.
Click Allow.
You are accepting that the Cloud SDK has the same access as your Google account.
When you see the prompt Enter the following verification code in gcloud CLI on the machine you want to log into, click on the copy button then go back to the SSH session and paste the code into the prompt Enter authorization code:.
For Pick cloud project to use: locate your current project (
The initialization completes and you see the zone and region are set for you.
This new account has viewer only access to the project, so you can test that you are indeed using this account by trying to view and then create some resources.
The second user account has viewer access so you should see centos-clean and lab-1 instances listed.
Because the second user account has only viewer access, they are not allowed to create an instance, so this command fails. It takes a little time to fail.
You are now back to using your original user account credentials. Later you switch between these two accounts as you learn about roles and permissions.
You have been provided two user accounts for this project. The first user has complete control of both projects and can be thought of as the admin account. The second user has viewer only access to the two projects. Call the second user a devops user and that user identity represents a typical devops level user.
Next you use gcloud to configure access to one project for the devops user by creating a custom role for the project that permits creation of buckets and instances.
The list of roles is returned. The addition of grep "name:" to the command reduces the amount of data returned to just the names of the roles.
Inspect one of these roles to see the permissions assigned to the role. To view the permissions use gcloud iam roles describe. Try looking at the simple role roles/compute.instanceAdmin.
compute.instanceAdmin predefined role. Inside the SSH session run:You can see roles/compute.instanceAdmin has many permissions, but these are the minimum needed for later:
To review the full list of roles and the permissions assigned, refer to the IAM permissions reference Guide.
Now that you know that roles contain permissions, how do you assign a role (and therefore all the associated permissions), to a user account?
There are two ways to attach a role:
Next you attach the basic role of "viewer" to the second user onto the second project.
gcloud configuration back to the second user (user2). Inside the SSH session run:Now you're back to user2.
PROJECTID2 to the second project. Inside the SSH session, run the following:bashrc file, so be careful.You get a warning: WARNING: You do not appear to have access to project [your 2nd project id] or it does not exist.
This means that user 2 doesn't have access to the PROJECTID2 project, which you fix in the next section.
jq:Next, set the value of USERID2 to the second user name and bind the role of viewer to the second user onto the second project.
Once you have run the command, the text looks something like the following (you may need to scroll up):
You should not see an error message this time.
You now see 0 instances in this project.
This command fails because user2 only has viewer access to the project.
You are now back to using your original user account credentials.
Next, create the new role with the set of permissions needed for the devops team.
devops that has the permissions to create an instance. Inside the SSH session run:This command creates a custom role in the project called devops with the permissions to create and manage instances.
The full name of the role is listed, note the role is in the project so the path is in the pattern of projects/PROJECT/roles/ROLENAME.
You now have the role created and need to bind the user and the role to the project. Use gcloud projects add-iam-policy-binding to perform the binding. To make this command easier to execute, set a couple of environment variables first; the project id and the user account.
iam.serviceAccountUser to the second user onto the second project. Inside the SSH session run:You need permissions to create an instance with a service account attached. The role iam.serviceAccountUser has those permissions, so use this pre-defined role.
devops to the second user onto the second project. You can find the second user account on the left of this page. Make sure you set USERID to the second user account.Inside the SSH session run:
Once you have run the command, the text that looks something like the following (you may need to scroll up):
Now you're back to user2.
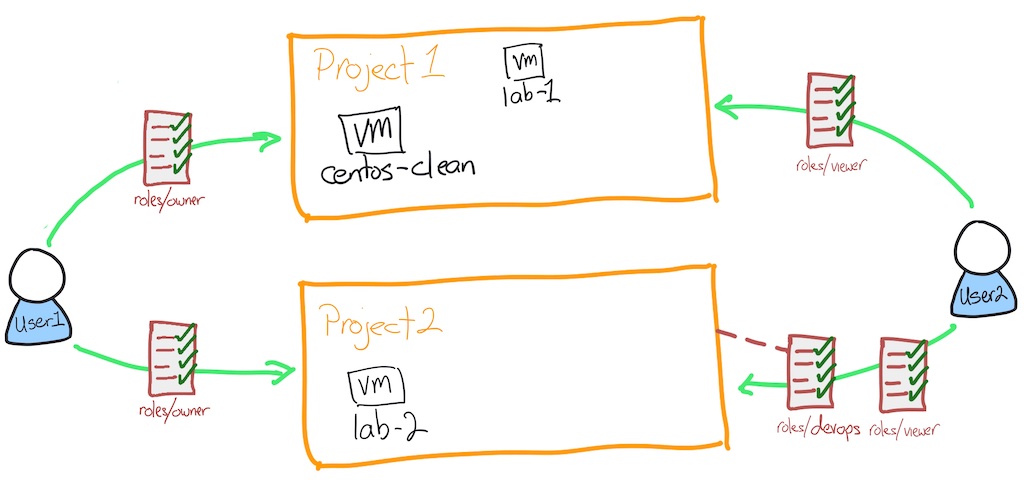
Now the instance creation works for user2.
After these last changes your environment looks like this:
You have seen how to authenticate and use gcloud to access Google Cloud services with roles. Now you'll look at a typical approach.
You have an application that uses the Application Programming Interfaces (APIs) to read and write to Cloud Storage buckets. You don't want to have to authenticate every time you launch a new server, that would be both painful and not in the spirit of using the cloud! So, you use service accounts.
A service account is a special Google account that belongs to your application or a virtual machine (VM) instead of to an individual end user. Your application uses the service account to call the Google API of a service so that the users aren't directly involved.
Learn more about service accounts from the Service accounts Guide.
Now you create a service account, use that service account with a compute instance, then test that the service account allows the access you need.
user2 doesn't have the rights to set up and configure service accounts. Inside the SSH session run:PROJECTID2 in your configuration. Inside the SSH session run:Make sure you are targeting the right project.
SA. Inside the SSH session run:This command sets the SA local variable to the email address of the service account. Pretty useful right?
iam.serviceAccountUser. Inside the SSH session run:This role allows the service account to assign a service account to a compute instance.
compute.instanceAdmin. Inside the SSH session run:This role allows the service account to manage compute instances.
Access scopes are the legacy method of specifying permissions for your instance. Access scopes are not a security mechanism. Instead, they define the default OAuth scopes used in requests from the gcloud tool or the client libraries. They have no effect when making requests not authenticated through OAuth, such as gRPC or the SignBlob APIs.
You must set up access scopes when you configure an instance to run as a service account.
A best practice is to set the full cloud-platform access scope on the instance, then securely limit the service account's API access with IAM roles.
Access scopes apply on a per-instance basis. You set access scopes when creating an instance and the access scopes persist only for the life of the instance.
Access scopes have no effect if you have not enabled the related API on the project that the service account belongs to. For example, granting an access scope for Cloud Storage on a virtual machine instance allows the instance to call the Cloud Storage API only if you have enabled the Cloud Storage API on the project.
gcloud compute ssh. Inside the SSH session run:Press ENTER when asked if you want to continue.
Press ENTER twice to skip making a password.
gcloud configuration. Inside the SSH session run:The configuration now has the service account
You can press ENTER to accept the default zone for this VM.
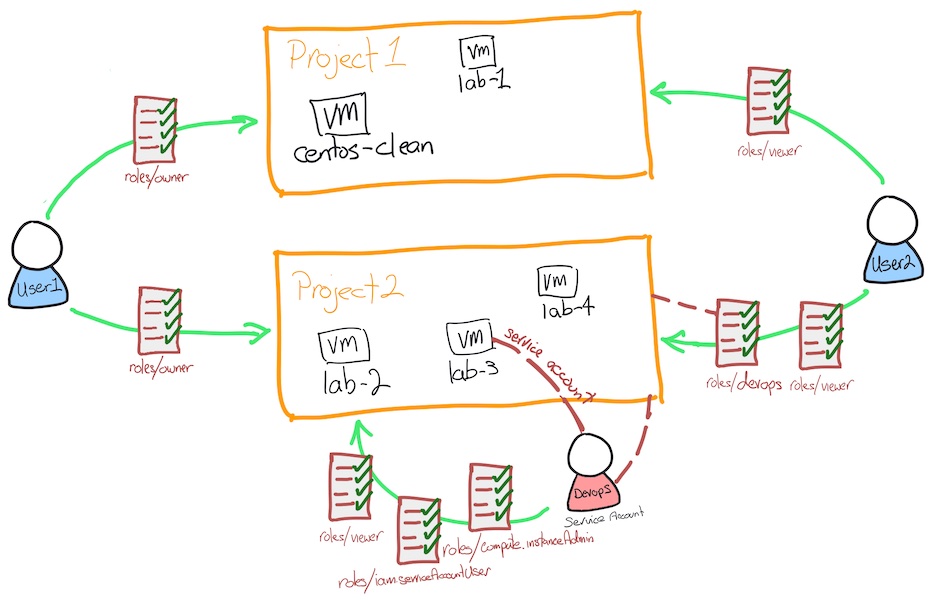
Because the service account has permissions, you can see the instances listed.
You have completed the following tasks using the Cloud SDK tool, gcloud:
...helps you make the most of Google Cloud technologies. Our classes include technical skills and best practices to help you get up to speed quickly and continue your learning journey. We offer fundamental to advanced level training, with on-demand, live, and virtual options to suit your busy schedule. Certifications help you validate and prove your skill and expertise in Google Cloud technologies.
Manual Last Updated April 10, 2024
Lab Last Tested July 22, 2024
Copyright 2025 Google LLC. All rights reserved. Google and the Google logo are trademarks of Google LLC. All other company and product names may be trademarks of the respective companies with which they are associated.


This content is not currently available
We will notify you via email when it becomes available

Great!
We will contact you via email if it becomes available

One lab at a time
Confirm to end all existing labs and start this one