


Before you begin
- Labs create a Google Cloud project and resources for a fixed time
- Labs have a time limit and no pause feature. If you end the lab, you'll have to restart from the beginning.
- On the top left of your screen, click Start lab to begin
Create machine learning models
/ 50
Use the model
/ 50
In this lab you will learn the basic ‘Hello World' of machine learning where, instead of programming explicit rules in a language such as Java or C++, you build a system that is trained on data to infer the rules that determine a relationship between numbers.
In this lab, you will learn how to:
Read these instructions. Labs are timed and you cannot pause them. The timer, which starts when you click Start Lab, shows how long Google Cloud resources are made available to you.
This hands-on lab lets you do the lab activities in a real cloud environment, not in a simulation or demo environment. It does so by giving you new, temporary credentials you use to sign in and access Google Cloud for the duration of the lab.
To complete this lab, you need:
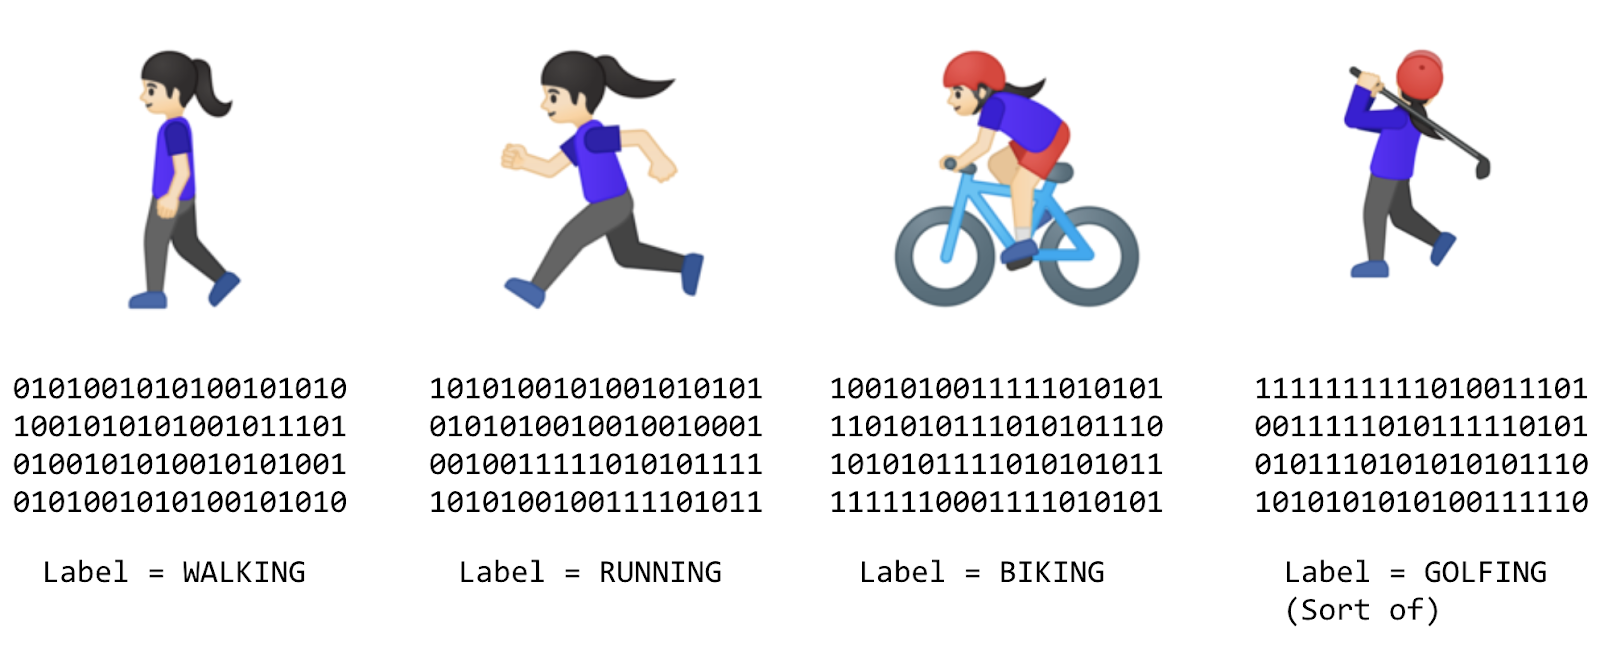
Consider the following problem: you're building a system that performs activity recognition for fitness tracking. You might have access to the speed at which a person is moving and attempt to infer their activity based on this speed using a conditional:
It's extremely difficult to write a program (expressed in code) that helps you detect the golfing activity.
So what do you do? You can use machine learning to solve the problem!
In the previous section you encountered a problem when you tried to determine a user's fitness activity. You hit limitations in what you could achieve by writing more code since your conditions have to be more complex to detect an activity like golf.
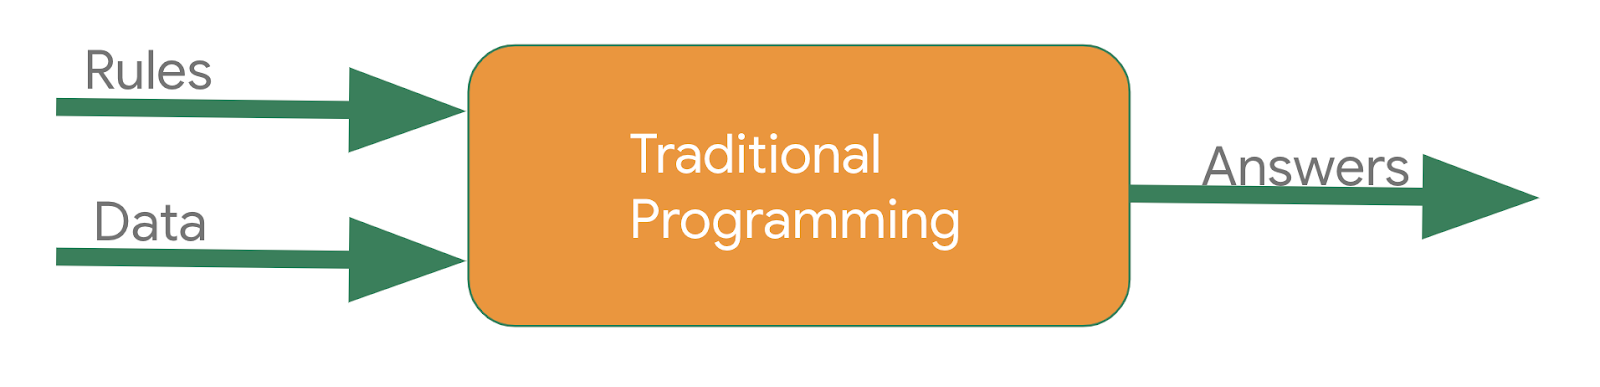
Consider building applications in the traditional manner as represented in the following diagram:
You express rules in a programming language. These act on data and your program provides answers. In the case of activity detection, the rules (the code you wrote to define types of activities) acted upon the data (the person's movement speed) in order to find an answer -- the return value from the function for determining the activity status of the user (whether they were walking, running, biking, etc.).
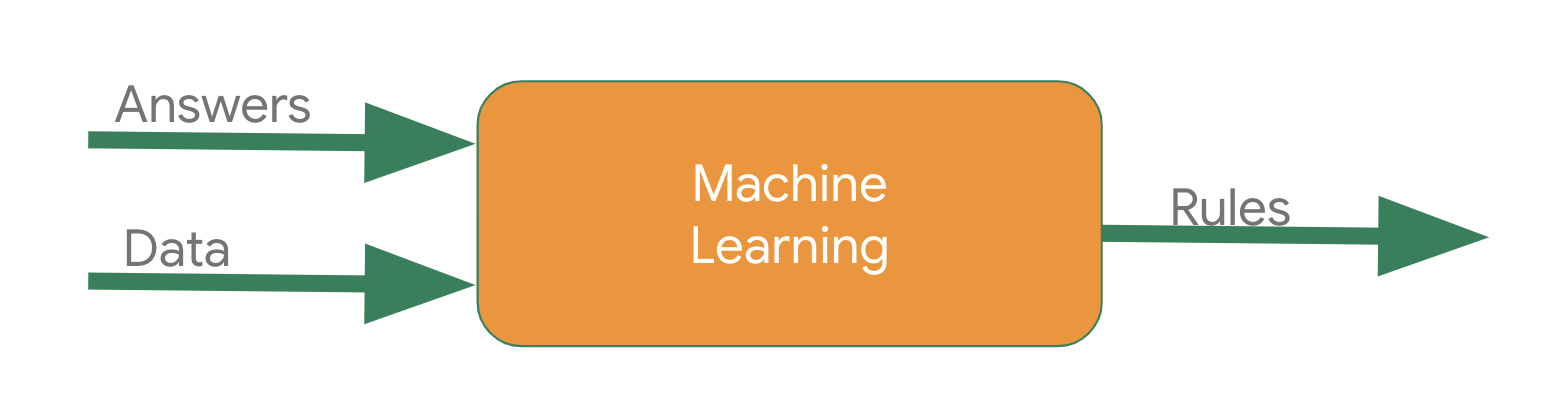
The process for detecting this activity via machine learning is very similar -- only the axes are different:
Instead of trying to define the rules and expressing them in a programming language, you provide the answers (typically called labels) along with the data. The machine then infers the rules that determine the relationship between the answers and the data. For example, in a machine learning context, your activity detection scenario might look like this:
You gather lots of data, and label it to effectively say "This is what walking looks like", "This is what running looks like" etc. Then, from the data, the computer can infer the rules that determine what the distinct patterns that denote a particular activity are.
Beyond being an alternative method to programming this scenario, this also gives you the ability to open up new scenarios, such as golfing, which may not have been possible under the traditional rule-based programming approach.
In traditional programming your code compiles into a binary that is typically called a program. In machine learning, the item that you create from the data and labels is called a model.
So if you go back to this diagram:
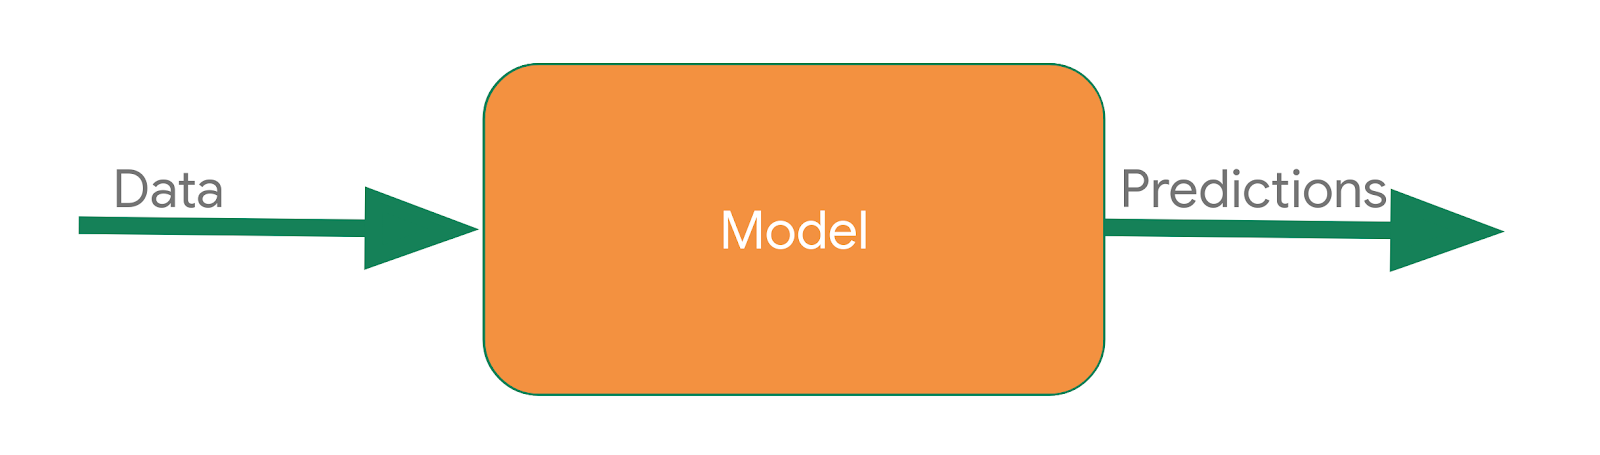
Consider the result of the above to be a model, which is used like this at runtime:
You pass the model some data, and the model uses the rules it inferred from the training to come up with a prediction -- i.e. "That data looks like walking", "That data looks like biking" etc.
In this lab you will build a very simple ‘Hello World' model made up of the building blocks that can be used in any machine learning scenario!
In the Google Cloud console, on the Navigation menu (
Find the
The JupyterLab interface for your Workbench instance opens in a new browser tab.
1. Close the browser tab for JupyterLab, and return to the Workbench home page.
2. Select the checkbox next to the instance name, and click Reset.
3. After the Open JupyterLab button is enabled again, wait one minute, and then click Open JupyterLab.
From the Launcher menu, under Other, select Terminal.
Check if your Python environment is already configured. Copy and paste the following command in the terminal.
Example output:
pip3, run the following command in the terminal.Pylint is a tool that checks for errors in Python code, and highlights syntactical and stylistic problems in your Python source code.
pylint package.requirements.txt file:Now, your environment is set up!
Consider the following sets of numbers. Can you see the relationship between them?
|
X: |
-1 |
0 |
1 |
2 |
3 |
4 |
|
Y: |
-2 |
1 |
4 |
7 |
10 |
13 |
As you read left to right, notice that the X value is increasing by 1 and the corresponding Y value is increasing by 3. So, the relationship should be Y=3X plus or minus some value.
Then, take look at the 0 on X and see that the corresponding Y value is 1.
From both of these observations, you can determine that the relationship is Y=3X+1.
This is almost exactly how you would use code to train a model, known as a neural network, to spot the patterns in the data!
You use data to train the neural network! By feeding it with a set of Xs and a set of Ys, it should be able to figure out the relationship between them.
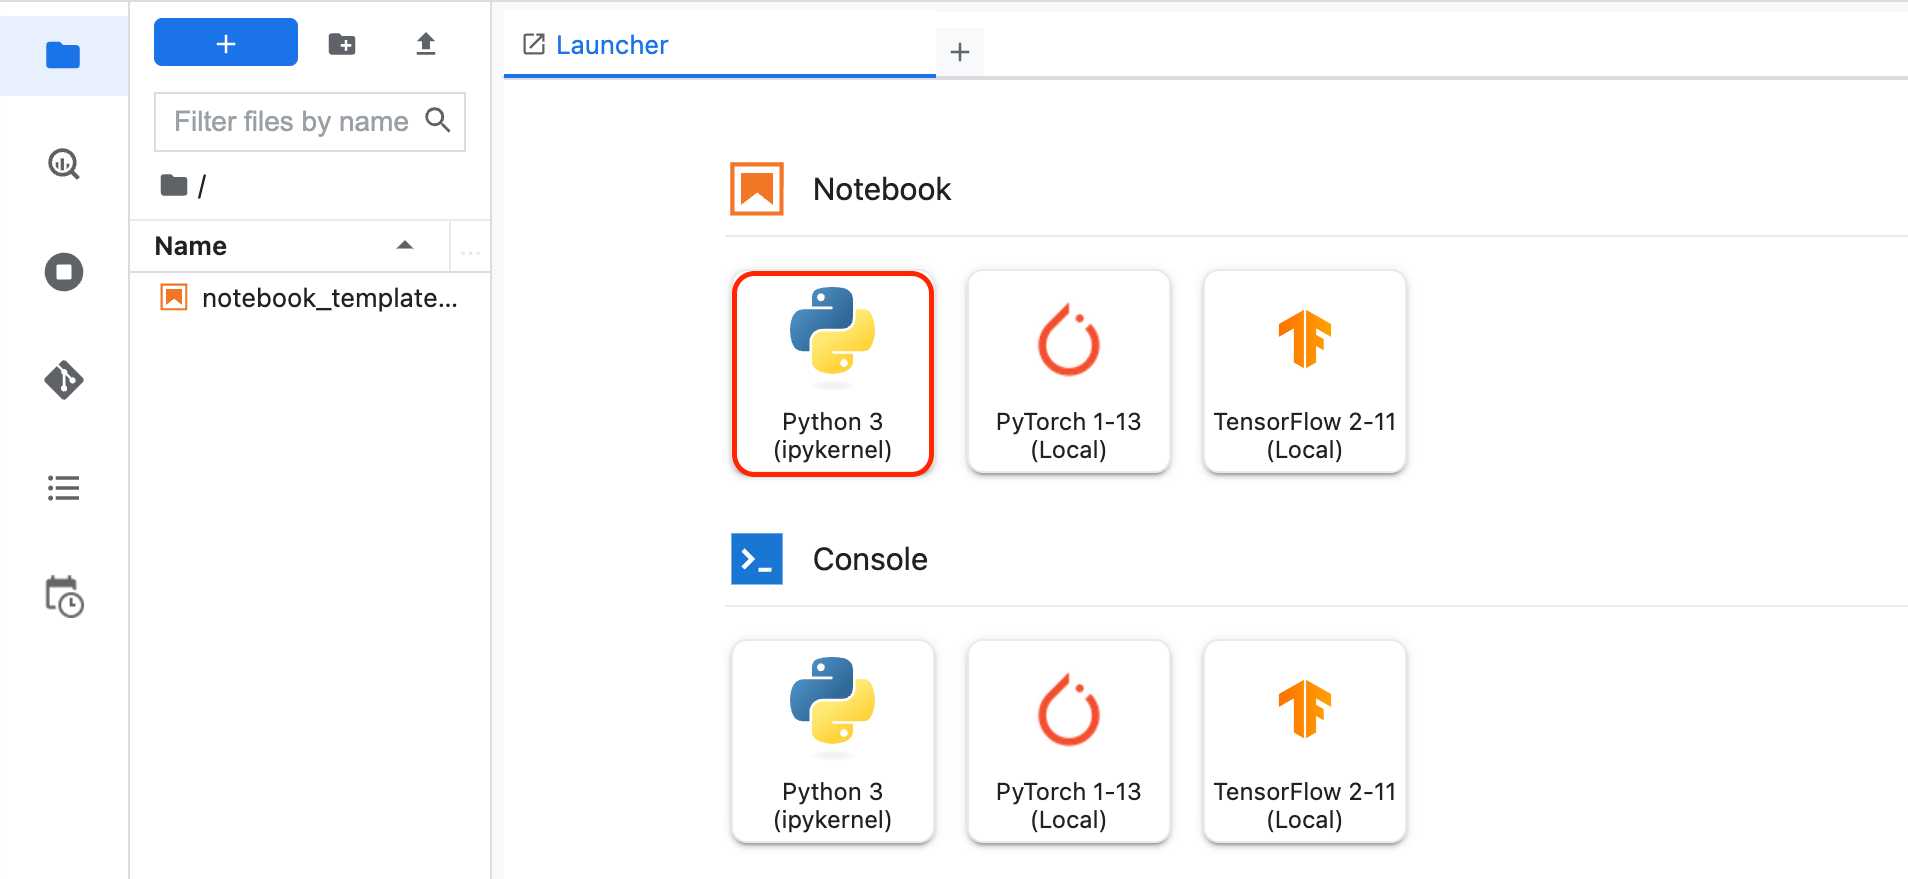
Click the + icon on the left side of the Workbench to open a new Launcher.
From the Launcher menu, under Notebook, select Python3.
You will be presented with a new Jupyter notebook. For more information on how to use Jupyter notebooks, see the Jupyter Notebook documentation.
logging and google-cloud-logging for Cloud Logging. In the first cell, add the following code:tensorflow for training and evaluating the model. Call it tf for ease of use. Add the following code to the first cell.numpy, to parse through the data for debugging purposes. Call it np for ease of use. Add the following code to the first cell.To run the cell, either click the Run button or press Shift + Enter.
Save the notebook. Click File -> Save. Name the file model.ipynb and click OK.
Next up, you will prepare the data your model will be trained on. In this lab, you're using the 6 Xs and 6 Ys used earlier:
|
X: |
-1 |
0 |
1 |
2 |
3 |
4 |
|
Y: |
-2 |
1 |
4 |
7 |
10 |
13 |
As you can see, the relationship between the Xs and Ys is Y=3x+1, so where X = 1, Y = 4 and so on.
A python library called numpy provides lots of array type data structures that are a defacto standard way of feeding in data. To use these, specify the values as an array in numpy using np.array([])
In this section, you will design your model using TensorFlow.
You will use a machine learning algorithm called neural network to train your model. You will create the simplest possible neural network. It has 1 layer, and that layer has 1 neuron. The neural network's input is only one value at a time. Hence, the input shape must be [1].
Next, you will write the code to compile your neural network. When you do, you must specify 2 functions, a loss and an optimizer.
If you've seen lots of math for machine learning, this is where you would usually use it, but tf.keras nicely encapsulates it in functions for you.
From your previous examination, you know that the relationship between the numbers is y=3x+1.
When the computer is trying to learn this relationship, it makes a guess...maybe y=10x+10. The loss function measures the guessed answers against the known correct answers and measures how well or how badly it did.
tf.keras from the Module: tf.keras.losses documentation.y=5x+5. While this is still pretty bad, it's closer to the correct result (i.e. the loss is lower).tf.keras from the Module: tf.keras.optimizers documentation.In the above code snippet, you tell the model to use mean_squared_error for the loss and stochastic gradient descent (sgd) for the optimizer. You don't need to understand the math for these yet, but you will see that they work!
To train the neural network to 'learn' the relationship between the Xs and Ys, you will use model.fit.
This function will train the model in a loop where it will make a guess, measure how good or bad it is (aka the loss), use the optimizer to make another guess, etc. It will repeat this process for the number of epochs you specify, which in this lab is 500.
In the above code model.fit will train the model for a fixed number of epochs.
model.fit from the fit section of the tf.keras.Model documentation.Now, your file should look like this (note that the code will be in two separate cells):
Your script is ready! Run it to see what happens.
Click the Run button or press Shift + Enter to run the second cell in the notebook.
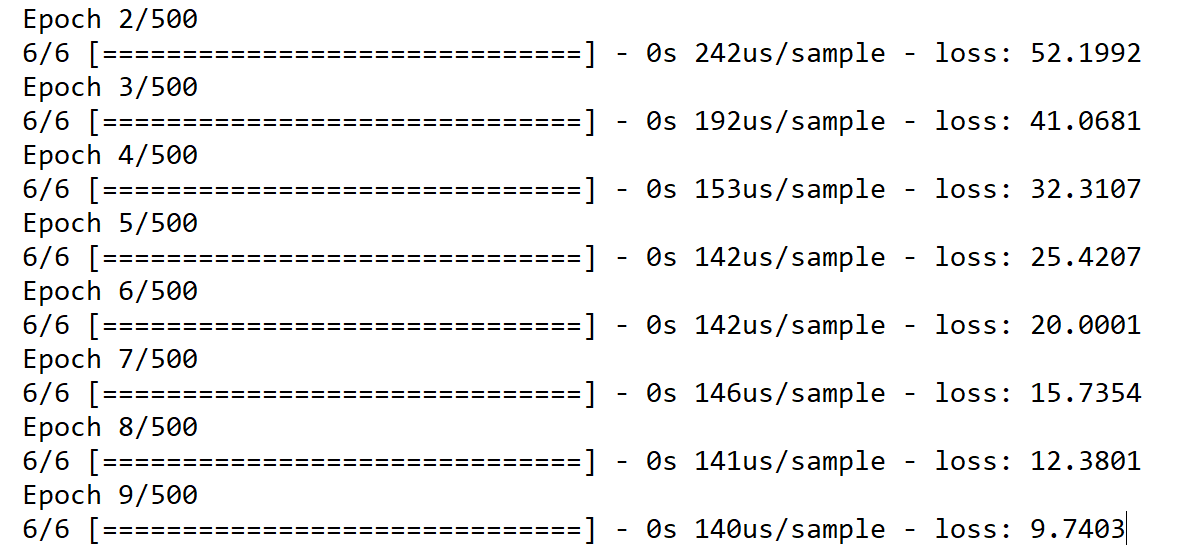
Look at the output. Notice that the script prints out the loss for each epoch. Your output may be slightly different that what is illustrated here.
e- in the value is being displayed in scientific notation with a negative exponent. If you scroll through the epochs, you see that the loss value is quite large for the first few epochs, but gets smaller with each step. For example:
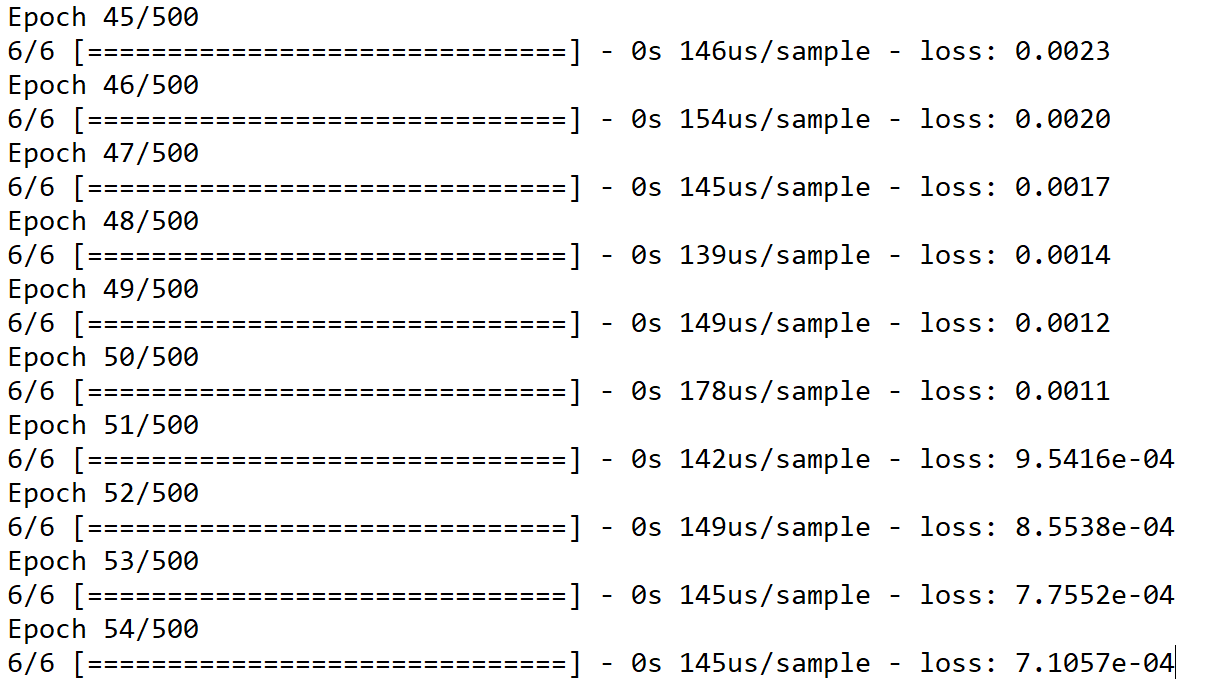
As the training progresses, the loss gets very small:
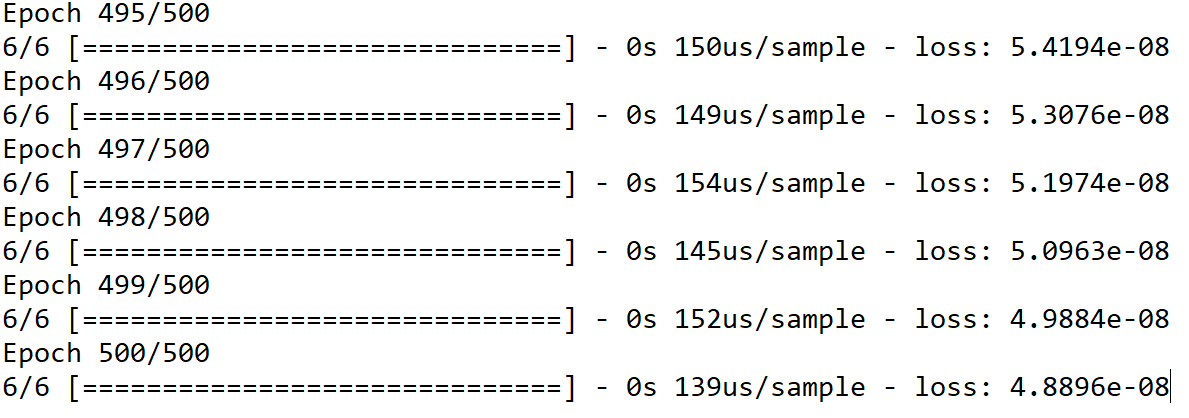
And by the time the training is done, the loss becomes extremely small, showing that our model is doing a great job of inferring the relationship between the numbers:
You probably don't need all 500 epochs, try experimenting with different values. Looking at this example, the loss is really small after only 50 epochs, so that might be enough!
Click Check my progress to verify the objective.
You now have a model that has been trained to learn the relationship between X and Y.
You can use the model.predict method to figure out the Y for the X not previously seen by the model during training. So, for example, if X = 10, what do you think Y will be?
cloud_logger in order to produce cloud logs which can be checked for progress. Press Ctrl+s or click File -> Save to save your notebook.
To run the third cell, either click the Run button or press Shift + Enter.
The Y value is listed after the training log (epochs).
Example output:
You might have thought Y=31, right? But it ended up being a little over (31.005917). Why do you think that is?
Answer: Neural networks deal with probabilities. It calculated that there is a very high probability that the relationship between X and Y is Y=3X+1. But with only 6 data points it can't know for sure. As a result, the result for 10 is very close to 31, but not necessarily 31.
As you work with neural networks, you'll see this pattern recurring. You will almost always deal with probabilities, not certainties, and will do a little bit of coding to figure out what the result is based on the probabilities, particularly when it comes to classification.
Click Check my progress to verify the objective.
Congratulations! In this lab, you have created, trained, and tested your own Machine Learning Model using TensorFlow.
...helps you make the most of Google Cloud technologies. Our classes include technical skills and best practices to help you get up to speed quickly and continue your learning journey. We offer fundamental to advanced level training, with on-demand, live, and virtual options to suit your busy schedule. Certifications help you validate and prove your skill and expertise in Google Cloud technologies.
Manual Last Updated July 11, 2025
Lab Last Tested July 11, 2025
Copyright 2025 Google LLC. All rights reserved. Google and the Google logo are trademarks of Google LLC. All other company and product names may be trademarks of the respective companies with which they are associated.


This content is not currently available
We will notify you via email when it becomes available

Great!
We will contact you via email if it becomes available

One lab at a time
Confirm to end all existing labs and start this one