This lab was developed with our partner, Redis. Your personal information may be shared with Redis, the lab sponsor, if you have opted into receive product updates, announcements, and offers in your Account Profile.
GSP1177

Overview
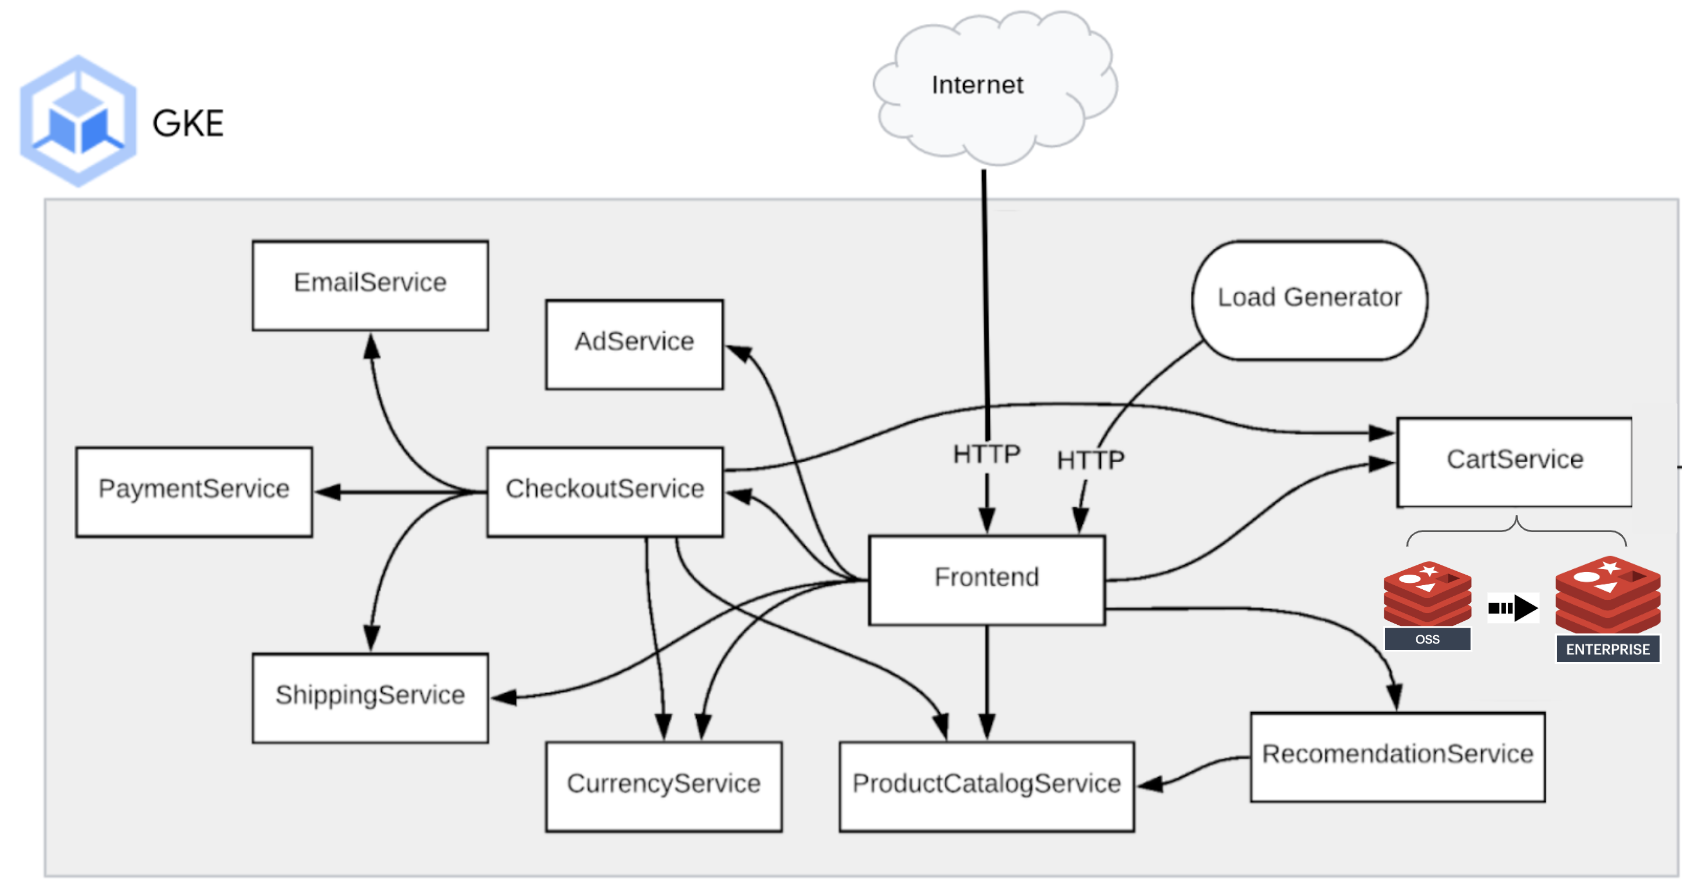
In this lab, you will deploy a fully functioning microservices e-Commerce website application on Google Cloud using Redis to run the shopping cart service. Open Source Redis is the original database to run the shopping cart service. It will migrate the shopping cart data to Redis Enterprise for scalability and high availability with minimal downtime.
Objectives
In this lab, you will learn how to:
-
Use Terraform to provision the following components in this order:
- VPC Network
- Google Kubernetes Engine cluster
- Deploy e-Commerce microservices application
- Deploy Redis Enterprise Cluster and Database using Redis Enterprise Operator for Kubernetes
-
Migrate the shopping cart data from OSS Redis to Redis Enterprise using RIOT ( Redis Input and Output Tool)
-
Roll back to the OSS Redis to back the shopping cart content
-
Patch the "Cart" deployment to point to the Redis Enterprise Database again for production
Setup and Requirements
Before you click the Start Lab button
Read these instructions. Labs are timed and you cannot pause them. The timer, which starts when you click Start Lab, shows how long Google Cloud resources are made available to you.
This hands-on lab lets you do the lab activities in a real cloud environment, not in a simulation or demo environment. It does so by giving you new, temporary credentials you use to sign in and access Google Cloud for the duration of the lab.
To complete this lab, you need:
- Access to a standard internet browser (Chrome browser recommended).
Note: Use an Incognito (recommended) or private browser window to run this lab. This prevents conflicts between your personal account and the student account, which may cause extra charges incurred to your personal account.
- Time to complete the lab—remember, once you start, you cannot pause a lab.
Note: Use only the student account for this lab. If you use a different Google Cloud account, you may incur charges to that account.
How to start your lab and sign in to the Google Cloud console
-
Click the Start Lab button. If you need to pay for the lab, a dialog opens for you to select your payment method.
On the left is the Lab Details pane with the following:
- The Open Google Cloud console button
- Time remaining
- The temporary credentials that you must use for this lab
- Other information, if needed, to step through this lab
-
Click Open Google Cloud console (or right-click and select Open Link in Incognito Window if you are running the Chrome browser).
The lab spins up resources, and then opens another tab that shows the Sign in page.
Tip: Arrange the tabs in separate windows, side-by-side.
Note: If you see the Choose an account dialog, click Use Another Account.
-
If necessary, copy the Username below and paste it into the Sign in dialog.
{{{user_0.username | "Username"}}}
You can also find the Username in the Lab Details pane.
-
Click Next.
-
Copy the Password below and paste it into the Welcome dialog.
{{{user_0.password | "Password"}}}
You can also find the Password in the Lab Details pane.
-
Click Next.
Important: You must use the credentials the lab provides you. Do not use your Google Cloud account credentials.
Note: Using your own Google Cloud account for this lab may incur extra charges.
-
Click through the subsequent pages:
- Accept the terms and conditions.
- Do not add recovery options or two-factor authentication (because this is a temporary account).
- Do not sign up for free trials.
After a few moments, the Google Cloud console opens in this tab.
Note: To access Google Cloud products and services, click the Navigation menu or type the service or product name in the Search field.

Activate Cloud Shell
Cloud Shell is a virtual machine that is loaded with development tools. It offers a persistent 5GB home directory and runs on the Google Cloud. Cloud Shell provides command-line access to your Google Cloud resources.
-
Click Activate Cloud Shell  at the top of the Google Cloud console.
-
Click through the following windows:
- Continue through the Cloud Shell information window.
- Authorize Cloud Shell to use your credentials to make Google Cloud API calls.
When you are connected, you are already authenticated, and the project is set to your Project_ID, . The output contains a line that declares the Project_ID for this session:
Your Cloud Platform project in this session is set to {{{project_0.project_id | "PROJECT_ID"}}}
gcloud is the command-line tool for Google Cloud. It comes pre-installed on Cloud Shell and supports tab-completion.
- (Optional) You can list the active account name with this command:
gcloud auth list
- Click Authorize.
Output:
ACTIVE: *
ACCOUNT: {{{user_0.username | "ACCOUNT"}}}
To set the active account, run:
$ gcloud config set account `ACCOUNT`
- (Optional) You can list the project ID with this command:
gcloud config list project
Output:
[core]
project = {{{project_0.project_id | "PROJECT_ID"}}}
Note: For full documentation of gcloud, in Google Cloud, refer to the gcloud CLI overview guide.
Task 1. Use Terraform to provision the infrastructure components and deploy the eCommerce website application
- In Cloud Shell, clone the following GitHub repository for the lab:
git clone https://github.com/Redislabs-Solution-Architects/gcp-microservices-demo-qwiklabs.git
pushd gcp-microservices-demo-qwiklabs
- Create your own terraform.tfvars. Copy this code and run it on Cloud Shell:
cat <<EOF > terraform.tfvars
gcp_project_id = "$(gcloud config list project \
--format='value(core.project)')"
gcp_region = "{{{project_0.default_region|REGION}}}"
EOF
- Initialize Terraform:
terraform init
- Deploy the stack:
terraform apply -auto-approve
Note: This process can take 5-10 minutes.
On success, you will see similar output below:
Apply complete! Resources: 9 added, 0 changed, 0 destroyed.
Outputs:
db_password =
gke_cluster_name = "gke-boutique"
db_private_endpoint = "redis-enterprise-database-headless:13188"
region = "{{{project_0.default_region|REGION}}}"
- Store Redis Enterprise database information in environment variables for later use:
export REDIS_DEST=`terraform output db_private_endpoint | tr -d '"'`
export REDIS_DEST_PASS=`terraform output db_password | tr -d '"'`
export REDIS_ENDPOINT="${REDIS_DEST},user=default,password=${REDIS_DEST_PASS}"
- Target your environment to the GKE cluster:
gcloud container clusters get-credentials \
$(terraform output -raw gke_cluster_name) \
--region $(terraform output -raw region)
- Get the External-IP from the web application (in the redis namespace)
kubectl get service frontend-external -n redis
-
Access the eCommerce website application by pointing your browser with the IP address from the following command as http://<EXTERNAL-IP>
-
The web application is using the inbuilt OSS Redis container as the backing store for the shopping cart by default. Make sure you add some items to your shopping cart in order to see that data migration from OSS Redis to Redis Enterprise works later in the lab.
Click Check my progress to verify the objective.
Deploy the eCommerce website application
Task 2. Migrate the shopping cart data from OSS Redis to Redis Enterprise using RIOT, Redis Input and Output Tool
- Set to redis namespace:
kubectl config set-context --current --namespace=redis
- Show the current pointer for the cartservice (it'll show it pointing to OSS Redis)
kubectl get deployment cartservice -o jsonpath='{.spec.template.spec.containers[0].env}' | jq
- Create a Kubernetes secret for the Redis Enterprise database connection:
kubectl apply -f - <<EOF
apiVersion: v1
kind: Secret
metadata:
name: redis-creds
type: Opaque
stringData:
REDIS_SOURCE: redis://redis-cart:6379
REDIS_DEST: redis://${REDIS_DEST}
REDIS_DEST_PASS: ${REDIS_DEST_PASS}
EOF
- Run a Kubernetes job to migrate data from OSS Redis to Redis Enterprise database (should take about 15 seconds or so):
kubectl apply -f https://raw.githubusercontent.com/Redislabs-Solution-Architects/gcp-microservices-demo-qwiklabs/main/util/redis-migrator-job.yaml
- Show the current pointer for the cartservice
kubectl get deployment cartservice -o jsonpath='{.spec.template.spec.containers[0].env}' | jq
Run a Kubernetes patch command below to update the cartservice deployment to point to the new Redis Enterprise database endpoint (should take about 30 seconds):
- Apply Kubernetes patch command to the cartservice
kubectl patch deployment cartservice --patch '{"spec":{"template":{"spec":{"containers":[{"name":"server","env":[{"name":"REDIS_ADDR","value":"'$REDIS_ENDPOINT'"}]}]}}}}'
- Show the new pointer for the cartservice (it'll show it pointing to OSS Redis)
kubectl get deployment cartservice -o jsonpath='{.spec.template.spec.containers[0].env}' | jq
- Verify if the same items remain in the shopping cart are now backed by the Redis Enterprise database by refreshing your browser and accessing the shopping cart content again. The same items should appear in the shopping cart. Then add a few items to the shopping cart in order to verify the online boutique web application is successfully pointing to the Redis Enterprise database.
Click Check my progress to verify the objective.
Migrate the shopping cart data
Task 3. Roll back to the OSS Redis to back the shopping cart content
- Run the following patch command to configure the shopping cart to use OSS Redis again (Should take about 30 seconds):
kubectl patch deployment cartservice --patch '{"spec":{"template":{"spec":{"containers":[{"name":"server","env":[{"name":"REDIS_ADDR","value":"redis-cart:6379"}]}]}}}}'
- Verify that the service has been pointed to the OSS Redis instance
kubectl get deployment cartservice -o jsonpath='{.spec.template.spec.containers[0].env}' | jq
- Refresh your browser and access the shopping cart content. You should not see the new items which are added earlier when Redis Enterprise is backing the shopping cart content. It is because the new items added to the shopping cart backed by the Redis Enterprise database is not replicated to the Redis OSS instance.
Click Check my progress to verify the objective.
Roll back the shopping cart content
Task 4. Patch the "Cart" deployment to point to the Redis Enterprise Database again for production
- Run a K8s patch command to update the cartservice deployment to point to the Redis Enterprise Endpoint (Should take about 30 seconds):
kubectl patch deployment cartservice --patch '{"spec":{"template":{"spec":{"containers":[{"name":"server","env":[{"name":"REDIS_ADDR","value":"'$REDIS_ENDPOINT'"}]}]}}}}'
- Verify that the service has been pointed to the Redis Enterprise
kubectl get deployment cartservice -o jsonpath='{.spec.template.spec.containers[0].env}' | jq
- Refresh your browser and access the shopping cart content. You should see the items which are added earlier. Now that everything is working and your items are still in your cart, you can delete the OSS Redis deployment as follows:
kubectl delete deploy redis-cart
Hooray!!! We are now ready for the upcoming big customer sales events.
Click Check my progress to verify the objective.
Delete redis deployment
Congratulations!
To summarize, you have accomplished the following in the lab:
- Use Terraform to provision the following components in this order:
- VPC Network
- Google Kubernetes Engine cluster
- Deploy e-Commerce microservices application
- Deploy Redis Enterprise Cluster and Database using Redis Enterprise Operator for Kubernetes
- Migrate the shopping cart data from OSS Redis to Redis Enterprise using RIOT ( Redis Input and Output Tool)
- Roll back to the OSS Redis to back the shopping cart content
- Patch the "Cart" deployment to point to the Redis Enterprise Database again for production
Next steps / Learn more
- Learn more about RIOT for data migration between Redis instances
-
Redis Enterprise on the Google Cloud Marketplace
Google Cloud training and certification
...helps you make the most of Google Cloud technologies. Our classes include technical skills and best practices to help you get up to speed quickly and continue your learning journey. We offer fundamental to advanced level training, with on-demand, live, and virtual options to suit your busy schedule. Certifications help you validate and prove your skill and expertise in Google Cloud technologies.
Cleaning up
The resources will be cleaned up when the Lab is stopped or the session expired, please click the "End Lab" button to terminate the lab if you complete the session earlier than the clock.
Manual Last Updated: January 07, 2025
Lab Last Tested: January 07, 2025
Copyright 2025 Google LLC. All rights reserved. Google and the Google logo are trademarks of Google LLC. All other company and product names may be trademarks of the respective companies with which they are associated.


