Checkpoints
Create the BigQuery dataset
/ 25
Create the external connection
/ 25
Create a remote ML model
/ 25
Generate text using the ML model
/ 25
Summarize Text using SQL and LLMs in BigQuery ML
GSP835

Overview
In this lab, you take steps to perform summarization of source code from GitHub, a popular open-source, source code repository, and identify the primary programming language using Vertex AI's Large Language Model (LLM) for text generation (text-bison) and hosted remote functions in BigQuery. The source data is from the GitHub Archive Project, which contains a full snapshot of over 2.8 million open source GitHub repositories in Google BigQuery Public Datasets.
Learning objectives
In this lab, you learn how to create:
- A BigQuery dataset to contain a model.
- A BigQuery model that hosts the Vertex AI PaLM API as a remote function.
- An external connection to establish the connection between BigQuery and Vertex AI.
Setup and requirements
Before you click the Start Lab button
Read these instructions. Labs are timed and you cannot pause them. The timer, which starts when you click Start Lab, shows how long Google Cloud resources will be made available to you.
This hands-on lab lets you do the lab activities yourself in a real cloud environment, not in a simulation or demo environment. It does so by giving you new, temporary credentials that you use to sign in and access Google Cloud for the duration of the lab.
To complete this lab, you need:
- Access to a standard internet browser (Chrome browser recommended).
- Time to complete the lab---remember, once you start, you cannot pause a lab.
How to start your lab and sign in to the Google Cloud console
-
Click the Start Lab button. If you need to pay for the lab, a pop-up opens for you to select your payment method. On the left is the Lab Details panel with the following:
- The Open Google Cloud console button
- Time remaining
- The temporary credentials that you must use for this lab
- Other information, if needed, to step through this lab
-
Click Open Google Cloud console (or right-click and select Open Link in Incognito Window if you are running the Chrome browser).
The lab spins up resources, and then opens another tab that shows the Sign in page.
Tip: Arrange the tabs in separate windows, side-by-side.
Note: If you see the Choose an account dialog, click Use Another Account. -
If necessary, copy the Username below and paste it into the Sign in dialog.
{{{user_0.username | "Username"}}} You can also find the Username in the Lab Details panel.
-
Click Next.
-
Copy the Password below and paste it into the Welcome dialog.
{{{user_0.password | "Password"}}} You can also find the Password in the Lab Details panel.
-
Click Next.
Important: You must use the credentials the lab provides you. Do not use your Google Cloud account credentials. Note: Using your own Google Cloud account for this lab may incur extra charges. -
Click through the subsequent pages:
- Accept the terms and conditions.
- Do not add recovery options or two-factor authentication (because this is a temporary account).
- Do not sign up for free trials.
After a few moments, the Google Cloud console opens in this tab.

Task 1. Preparing the data
You will be using the source code content from the github_repos dataset in the Google BigQuery Public Datasets. To do so, do the following:
-
From the Navigation menu choose BigQuery. If prompted click Done.
-
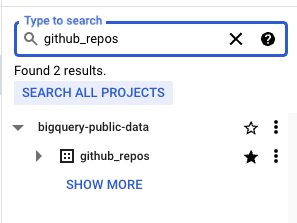
In the BigQuery console, search for
github_reposand press ENTER.
github_repos dataset after performing a search you may need to select SEARCH ALL PROJECTS to add the dataset.- Click on the star next to the dataset that is listed as the search result.
- Expand the
github_reposdataset and select thesample_contentstable. This table contains sample data containing 10% of the full data in the contents table. Click PREVIEW.
Task 2. Create the BigQuery dataset
A BigQuery dataset is a collection of tables. All tables in a dataset are stored in the same data location.
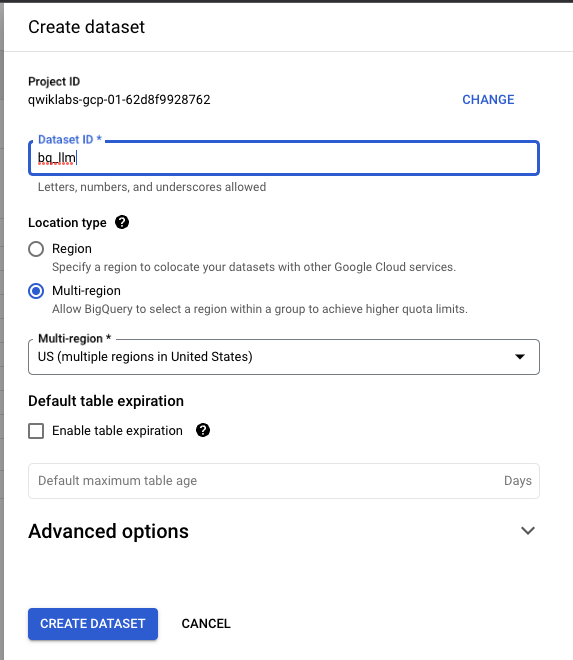
- Clear the search filter in the BigQuery console and select Create dataset using the three dots next to your lab's project.
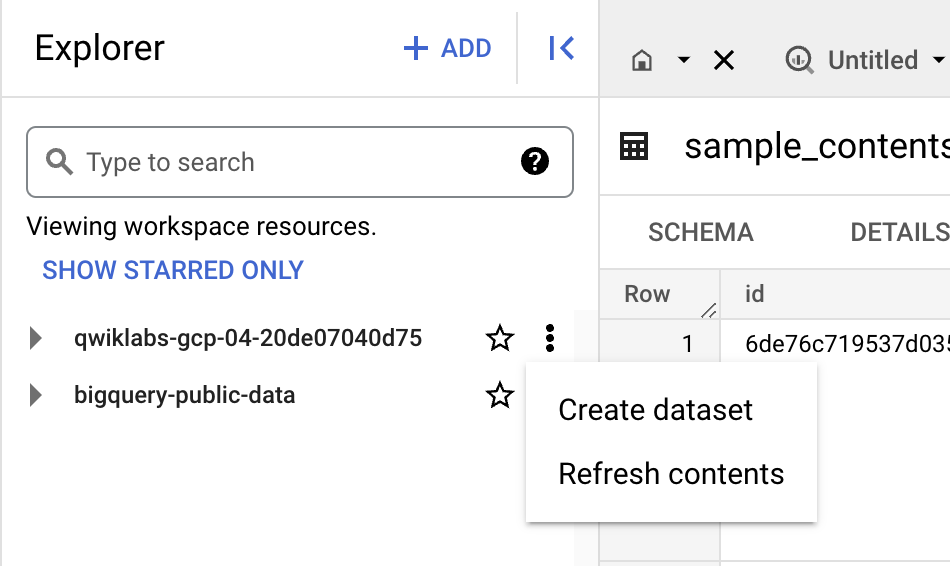
- In the Create dataset form enter "bq_llm" as the Dataset ID then click CREATE DATASET.
The dataset is going to be used to house the model that you create in the next tasks of this lab.
Typically, data that is used by an ML application is stored in a table in the dataset as well. Since the data is in a BigQuery public dataset, you reference that data directly from the public data using an external connection. You create the external connection in the next task of this lab.
Click Check my progress to verify the objective.
Task 3. Create the external connection
Now, create an external connection and save the Service Account ID from the connection configuration details.
-
Click the + ADD button on the BigQuery Explorer pane, then click Connections to external data sources in the popular sources listed.
-
Select Connection type as
Vertex AI remote models, remote functions and BigLake (Cloud Resource)and set Connection ID tollm-connection. -
Click CREATE CONNECTION.
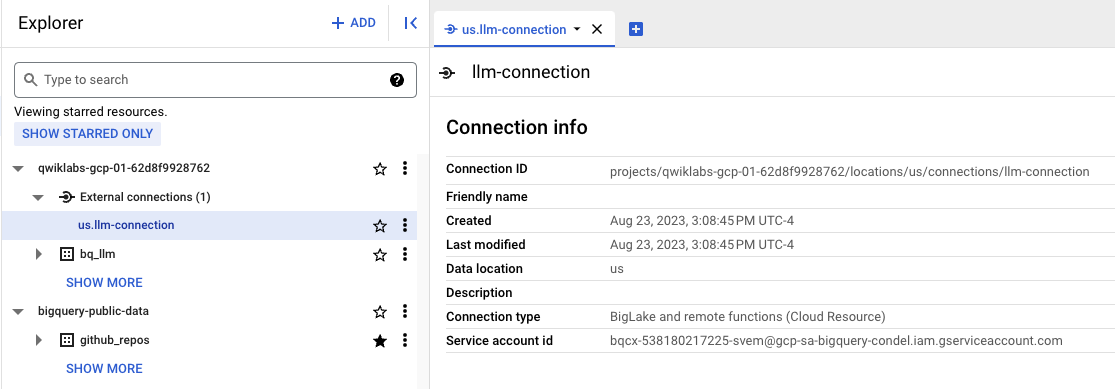
-
Select
us.llm-connectionunder the External connections section of the project's datasets. Copy the Service Account ID generated from the external connection configuration details to your clipboard. You use it in the next step.
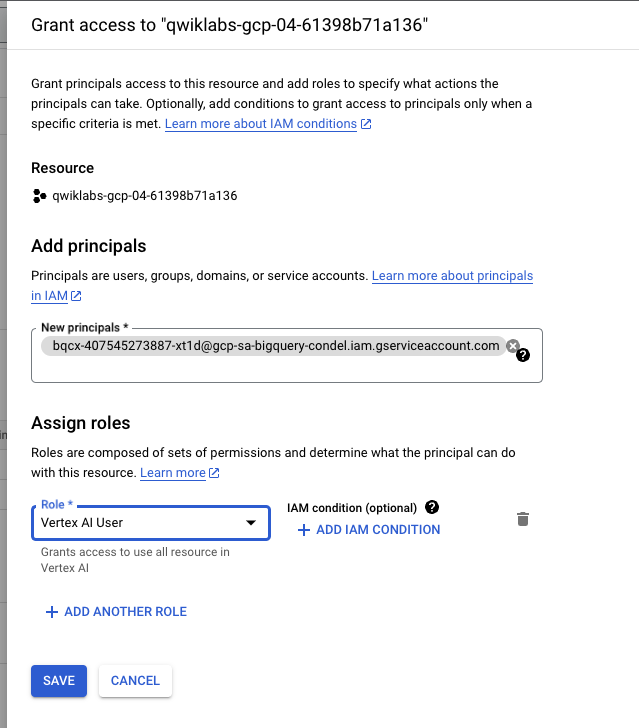
Grant permissions to the Service Account
You need to grant the Service Account generated by the external connection access to the Vertex AI service. To do so:
-
From the Navigation menu select IAM & Admin.
-
Click + GRANT ACCESS on the IAM page.
-
Paste the Service Account ID generated by the external connection in the New principals form input.
-
Set the Role to
Vertex AI Userthen click SAVE.
Click Check my progress to verify the objective.
Task 4. Create a remote ML model
In this task, you create a remote model that represents a hosted Vertex AI large language model (LLM).
-
From the Navigation menu select BigQuery. Click on + Compose new query.
-
Run the following SQL query in a new tab in BigQuery Explorer:
This creates a model named llm_model in the dataset bq_llm created earlier in the lab. The model leverages the CLOUD_AI_LARGE_LANGUAGE_MODEL_V1 of Vertex AI as a remote function. Once completed you see the model appear in the BigQuery console.

Click Check my progress to verify the objective.
Task 5. Generate text using the ML model
Use the ML model created to generate, summarize, or categorize text.
- Run the following query in a new tab of the BigQuery console:
- Review the following to understand the SQL query in more depth:
ml_generate_text_result is the response from the text generation model in JSON format that contains both content and safety attributes:
- Content represents the generated text result.
- Safety attributes represent built-in content filters with an adjustable threshold that is enabled in the Vertex AI Palm API to avoid any unintended or unforeseen responses from the LLM. Responses are blocked if they violate the safety thresholds defined.
ML.GENERATE_TEXT is the construct used in BigQuery to access the Vertex AI LLM to perform text generation tasks.
CONCAT appends the supplied PROMPT statement to a database record.
github_repos is the public dataset name and sample_contents is the name of the table that holds the data you use in the prompt design.
Temperature is the prompt parameter to control the randomness of the response - the lesser, the better the relevance.
Max_output_tokens is the number of words you want in response.
The query response should look similar to the following:

Click Check my progress to verify the objective.
Congratulations!
Congratulations! You have successfully used a Vertex AI Text Generation LLM programmatically to perform text analytics on your data using only SQL-queries. Check out Vertex AI LLM product documentation to learn more about available models.
Google Cloud training and certification
...helps you make the most of Google Cloud technologies. Our classes include technical skills and best practices to help you get up to speed quickly and continue your learning journey. We offer fundamental to advanced level training, with on-demand, live, and virtual options to suit your busy schedule. Certifications help you validate and prove your skill and expertise in Google Cloud technologies.
Manual Last Updated: March 21, 2024
Lab Last Tested: March 21, 2024
Copyright 2024 Google LLC All rights reserved. Google and the Google logo are trademarks of Google LLC. All other company and product names may be trademarks of the respective companies with which they are associated.