Checkpoints
Create a document summary and manage version history
/ 25
Review documents
/ 25
Facilitate productive meetings with Docs and Calendar
/ 25
Collaborate across Docs and Gmail
/ 25
Smart Canvas: Smart Chips, Templates and Collaboration in Google Docs
GSP1159

Overview
Google Workspace makes it easier to create documents that help you assign tasks, track progress and collaborate across several Workspace apps. Smart canvas from Workspace is a set of capabilities that makes it easier to create content in and collaborate on your documents. In this lab, you will learn to use smart canvas features like smart chips and building blocks to simplify the way you work.
Scenario: Project Manager at an Advertising Agency
Congratulations on starting your new job as a project manager for a small advertising agency! In the following tasks, you will use smart canvas in Google Docs to draft emails, create meeting notes and help keep your team on track.
What you’ll learn
- Insert smart chips into Docs files
- Use building blocks to draft emails and calendar invites
- Review documents using automatically generated summaries and version history
- Assign action items and tasks
Setup and requirements
Before you click Start Lab
Read these instructions. Labs are timed and you cannot pause them. The timer starts when you click Start Lab and shows how long Google Workspace resources are available to you.
This Google Workspace hands-on lab lets you do the lab activities yourself in a real cloud environment, not in a simulation or demo environment. It does so by giving you new, temporary credentials that you use to sign in and access Google Workspace for the duration of the lab.
What you need
To complete this lab, you need:
- Access to a standard internet browser (Chrome browser recommended).
- Time. Note the time at the top of the left panel, which is an estimate of how long it should take to complete all steps. Plan your schedule so you have time to complete the lab. Once you start the lab, you will not be able to pause and return later (you begin at step 1 every time you start a lab).
- You do NOT need a Google Workspace account. An account is provided to you as part of this lab.
Start your lab
When you are ready, click Start Lab in the upper left panel.
Find Your Lab's User Email and Password
To access the resources and console for this lab, locate the User Email and Password in the left panel. These are the credentials you use to log in to Google Drive.
Sign in to Google Drive
- Click Open Google Drive.
Tip: Open the tabs in separate windows, side-by-side.
-
Notice the Email or phone field has been pre-filled with the User Email. Click Next.
-
Enter the Password and click Next.
-
Accept all terms and conditions as prompted.
Google Drive opens and you are signed in to the Student Google Account.
Task 1. Mention names and dates in your docs
Smart chips are a powerful tool that can be used to add interactivity and context to your documents and spreadsheets. Where there’s a smart chip in your document, you can hover or click a chip to get more information. They can be used to:
- @-mention people, dates, and assign tasks
- Search for and link documents
- Insert and preview locations using Google Maps In this task, you add people and date chips to a project charter document. You also learn how to create a document summary and manage a file’s version history.
View more information about colleagues
-
After you have logged into Google Drive from your student account, double-click Project Charter to open the document that's been created for you.
A project charter is a brief document created during the beginning stage of a project. It includes details like a project’s goals, timeline, and budget.
-
To add yourself to the document using a people chip, in the box for Project Manager, type @me and select your student email address from the results.
Smart chips will automatically suggest matches to what you’re typing including people, dates, and tasks. Your email address should be the first result in the list.
-
Once you insert the smart chip, click it to display contact details.
Clicking a people chip can populate shortcuts to help you quickly send the person an email, chat message, or video meeting invite. These chips can also allow you to quickly view more information about colleagues or contacts, including their location, job title, and contact information.
Reference a date
-
To insert a date, in the box for Start date, type @ to open the search menu.
You can also access smart chip options from the Insert menu.
-
In the pop-up list that appears, click Date from the Smart Chips section to open the date picker.
The date picker opens a calendar with today's date highlighted.
-
Leave the Set time box as it is, and then click OK.
-
In the box for End Date, type @date, and then click Date.
-
Click the Next month (>) button 3-6 times, select a date in the future, and then click OK.
You can also try these shortcuts to quickly populate dates:
- @yesterday: Shows yesterday’s date
- @tomorrow: Shows tomorrow’s date
- A relative date, like @Monday, @next Tuesday, or @last Wednesday
- A specific date, like @8/29/23
Create a document summary and manage version history
You can add a document summary to help your team quickly understand what the project is about before reviewing your document.
-
At the top, click View > Show outline to open the document outline.
If the outline is already open, proceed to the next step.
-
In the left panel, next to Summary, click Add Summary (+).
-
Type a one sentence summary, and then click Enter to save.
When you add a summary to a document, the summary will automatically appear wherever the document is previewed across Workspace.
-
To identify all changes made to a document, click the See version history option that appears.
You can also access this feature using the Version history (
) button in the top right of your Google Docs tab. Alternatively, you can click File > Version history > See version history.
Either way, the Version history should appear in the right panel. You can use the options in this panel to view or revert to earlier versions of the document.
-
In the version history panel on the right, click Expand detailed versions (▸) to view more in-depth changes to the document.
-
Select a second version in the list, click More actions (
), click Make a copy.
-
Keep the file name as the default, and then click Make a copy.
-
Review this copy of the file, exit this tab, and then return to your original Project Charter document.
Click Check my progress to verify the objective.
Task 2. Review documents
In this task, you learn how to review and collaborate on documents by using dropdown chips, adding comments and creating action items.
Save time when entering information
-
In the Review Status box, type @dropdown, and then select Dropdown from the list.
-
In the Document Dropdowns section, click Review status, and then select In progress.
-
To edit an existing dropdown option, click the dropdown chip, and then select + Add / Edit Options.
-
To change an option's color, click Color, select a color, and then click Save.
Add comments and action items
After meeting with your team to discuss the project charter, you can add comments to the document to keep track of the changes you need to make.
-
Select some text in the document that you want to comment on.
-
Click Add comment (
) from the toolbar menu that appears on the right margin of the page.
You can also right-click and select Comment from the list of options, click (
-
In the comment box, type your comment, and then click Comment to create it.
-
To assign an action item in a comment, select a different section of text and then click, Add comment (
-
Type your comment and somewhere in your comment, add your student email address, with @ or + in front of it.
-
Check the box next to Assign to you, and then click Assign.
You make some updates to the doc and your manager messages you on Google Chat approving the changes.
-
In the top right of the comment, click Done (✔) to mark the item as completed.
-
Click the dropdown chip for Review Status and select Approved to change the review status.
Click Check my progress to verify the objective.
Task 3. Facilitate productive meetings with Google Docs and Google Calendar
Building blocks are components you can use to perform common tasks like coordinating team invites, creating checklists, and designing roadmaps. In this task, you use building blocks in Docs to create a calendar event draft, send an invite, and create meeting notes. You also learn how to use timer chips and keep your meetings on track.
Create a calendar event draft
While reviewing the remaining tasks to complete, you realize that you need more context on the project and want to meet with a colleague. However, you want to make sure you have the right point of contact and finalize other details before sending the meeting invitation. In this task, you use Docs and Calendar to create a calendar event draft, send an invite, and create meeting notes.
- Open Google Docs in a new incognito window, and then click + to create a blank document.
-
At the top, click Untitled document and change the filename to Collaborative Drafts
-
In the new document, type @ and then select Calendar event draft (
) from the Building blocks section.
-
Type Project Deliverables Review for the Title and type sherrie.west@example.org in the Guests box.
-
Click the box for Start time, select next Thursday, type 1:00 PM in the Set time box, and then click OK.
-
Click the box for End time, select next Thursday, type 2:00 PM in the Set time box, and then click OK.
-
Add a brief description, and then click Preview in Calendar (
) to open as a draft in Calendar in a new tab.
-
If you're prompted to reload the page, click Reload.
-
Click Save to create the event in Google Calendar, and then Send to email the invitation to included guests. Also click Invite all guests if you're presented with that option.
Start a shared meeting notes document
Your meeting is about to start and you want to make sure you capture the most important points that arise. You use the meeting notes building block because it generates a template with sections for taking notes, recording action items, and following up.
-
To create a document, open Google Drive, click + New, and then select Google Docs to create a new document.
-
In the new document, type @ to open the pop-up menu, then type Meeting notes
-
Select the meeting you just created.
-
At the top, click Untitled document and change the document name to Project Deliverables Review, so it reflects the meeting title.
-
In the right panel of your Google Docs tab, click Attach to attach the document to the Google Calendar event.
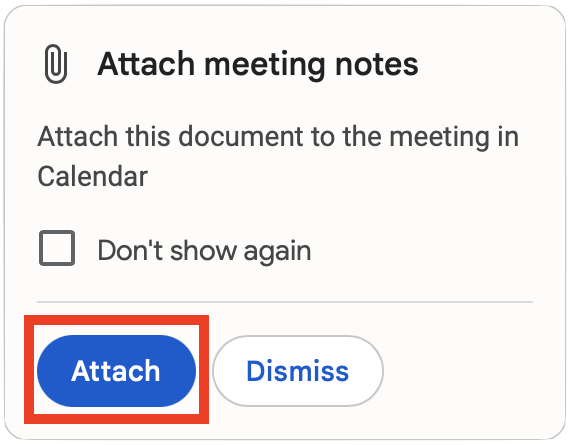
If you attach a document to a Calendar event and share the document with invitees, they can access the attachment from Google Calendar.
-
Add a few bullet points in the Notes section.
You can include items like introductions, status update, blocked items, upcoming client communications, and Q&A to the agenda.
Click Check my progress to verify the objective.
Keep the meeting on track
To help the meeting stay on schedule and avoid going over time, you assign a time limit to each agenda item in the meeting notes document.
-
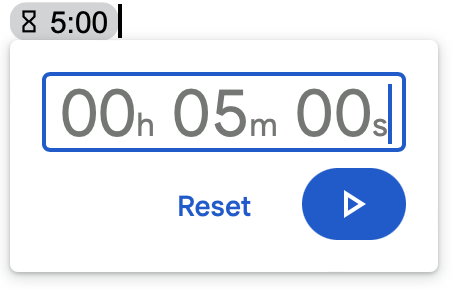
Add a space at the end of the line of the first agenda item, and then type @timer to open the pop-up menu.
-
Select 5 minute timer.
-
To start the timer, click the 5:00 chip.
-
Click the chip again to pause the clock, and then click Reset to return the clock to its original value.
-
To change the length of the timer, click the timer chip, press pause and then click in the time box.
The time box becomes editable once you click it.
- Type a new amount in HH:MM:SS format, and then press ENTER on your keyboard.
Task 4. Reference documents, places and tasks
In this task, you use various types of smart chips to help you and your collaborators quickly skim information and preview links without changing tabs.
Link documents and videos
-
To add a smart chip for the document stored in Google Drive, type @ followed by the title of the document. In this case, you type @Project Charter
-
Click the smart chip, and then select Open preview (
) to open a preview window for Project Charter within the document that you're currently editing.
Smart chips can help you view Google Docs, Sheets, or Slides files, as well as images and PDFs, without changing tabs. In addition to finding the files using the pop-up menu, you can create smart chips for documents by pasting their links.
-
Copy and paste this YouTube video link into your document: https://www.youtube.com/watch?v=SDBbFETGiA4
You should be prompted to convert the URL you pasted into a smart chip.

- To create the smart chip, press the tab on your keyboard.
If you press Enter or Space, the prompt will disappear and the URL will be displayed as a hyperlink. To convert a hyperlink to a smart chip, click the link and select Chip.
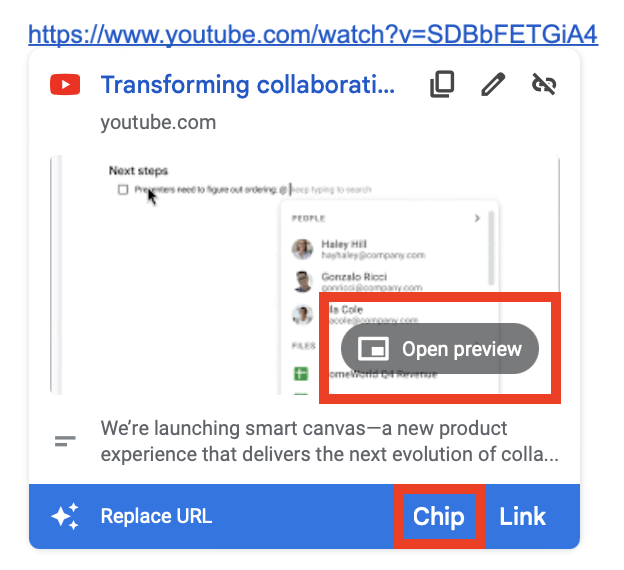
Alternatively, you can click Link to replace the URL with the video title. Whether it's a formatted link or a smart chip, you can watch YouTube videos from your Doc or Sheets file by clicking Open preview (
Reference locations
-
Type @ and enter an address or place name.
-
To create the place chip, select the desired location from the Places list in the dropdown.
You can also create a place chip from a Google Maps link.
-
In a new tab, open Google Maps.
-
Search for your chosen location and copy the link in the address bar.
-
Return to your Google Docs tab.
-
To convert the link into a place chip, paste the link into the doc and press Tab.
-
Click the chip to display the preview card, and then click Open Preview (
) to see more details about the location or find directions without leaving your Google Docs tab.
Add action items
-
In the Action items section, write Update project tracker.
-
To the left of the checklist item, click Assign as a task (
).
A pop-up window will appear.
-
Copy your student email address and paste it into the Assignee box.
-
To set a date for the task, click Date and then select next Thursday from the calendar.
-
Click Assign as task to create the task.
You can open Google Calendar and navigate to next Thursday to view the task in your calendar.
-
(Optional) Create additional tasks in your Google Doc by typing @task and then pressing ENTER.
Task 5. Collaborate across Google Docs and Gmail
You want to email a project status report to your client. Since you’re still new to the role, you’d like to draft an email message and get feedback from your team before emailing your client.
Create an email draft
-
Return to the Collaborative Drafts document. If you have exited this tab, navigate to Google Docs to reopen it.
-
To review building block options, type @, scroll to the Building Blocks section, and click Expand (>) to reveal all options.
Like smart chips, you can access building block options from the Insert menu.
-
Select Email draft from the list of building blocks.
You can also type @email in the doc and press Enter on your keyboard.
-
For the Subject, type Project Status Report
-
In the Write email message... section, type a 1-2 sentence summary of the project based on the project charter.
Use suggesting mode and emoji reactions
-
To suggest edits, click in the document where you want to make the edit, and then click the Suggest Edits (
) in the toolbar.
-
Type your suggested changes directly in the document.
You can propose changes to a document without changing the original text. If someone with editing permissions in the document accepts your recommendations, your changes replace the original text.
-
To accept the change, press the check mark in the top right of the suggested change box.
-
To use emoji reactions, select the text you want to react to, and then click Add emoji reaction (
) in the right margin.
Alternatively, at the top, click Insert > Emoji reaction.
-
Scroll or search to find the emoji you want to insert, then click it.
The emoji should appear in the right margin.
-
In the right margin, click the emoji to show more options.
You can click Resolve (✔) to archive the emoji or click the emoji to remove it. To add multiple emoji reactions to the same selected text or comment, click Add emoji reaction (
) doesn't appear in the toolbar, you may have view-only access to the file. Check out Suggest edits in Google Docs for more information about suggesting mode.Open the draft in Gmail
You want to share this document with your colleagues so they can add their comments and suggestions. Since your team is small, you decide to share it with everyone in the group.
-
In the top right, click Share.
-
Click Restricted and select Qwiklabs from the list.
-
Click Commenter.
Anyone in this group can make comments and suggestions, but can't change or share the file with others.
-
Click Copy link and then click Done.
You send your colleagues a link to the document and they give you great feedback. You incorporate their suggestions into the email and you’re now ready to send it.
-
Click Preview in Gmail (
) to open as a draft in Gmail.
Click Check my progress to verify the objective.
Congratulations!
You’ve successfully led the project to completion, and the client has given your team positive feedback. You learned how to:
- Use smart chips for people, dates, and locations
- Use building blocks to quickly create documents and collaborate on emails
- Assign action items, tasks, and review information
Take your next lab
Next steps / Learn more
- Read New smart canvas innovations in Google Workspace to explore variables and custom building blocks
- Learn more about how to insert third-party smart chips from other applications
- Watch this webinar to maximize your productivity with smart canvas and Google Docs
Google Cloud training and certification
...helps you make the most of Google Cloud technologies. Our classes include technical skills and best practices to help you get up to speed quickly and continue your learning journey. We offer fundamental to advanced level training, with on-demand, live, and virtual options to suit your busy schedule. Certifications help you validate and prove your skill and expertise in Google Cloud technologies.
Manual Last Updated 21 September, 2023
Lab Last Tested 21 September, 2023
Copyright 2023 Google LLC All rights reserved. Google and the Google logo are trademarks of Google LLC. All other company and product names may be trademarks of the respective companies with which they are associated.