


准备工作
- 实验会创建一个 Google Cloud 项目和一些资源,供您使用限定的一段时间
- 实验有时间限制,并且没有暂停功能。如果您中途结束实验,则必须重新开始。
- 在屏幕左上角,点击开始实验即可开始
Enable Document AI API
/ 10
Create a processor
/ 10
Create a dataset
/ 10
Import a test document
/ 10
Label the test document
/ 10
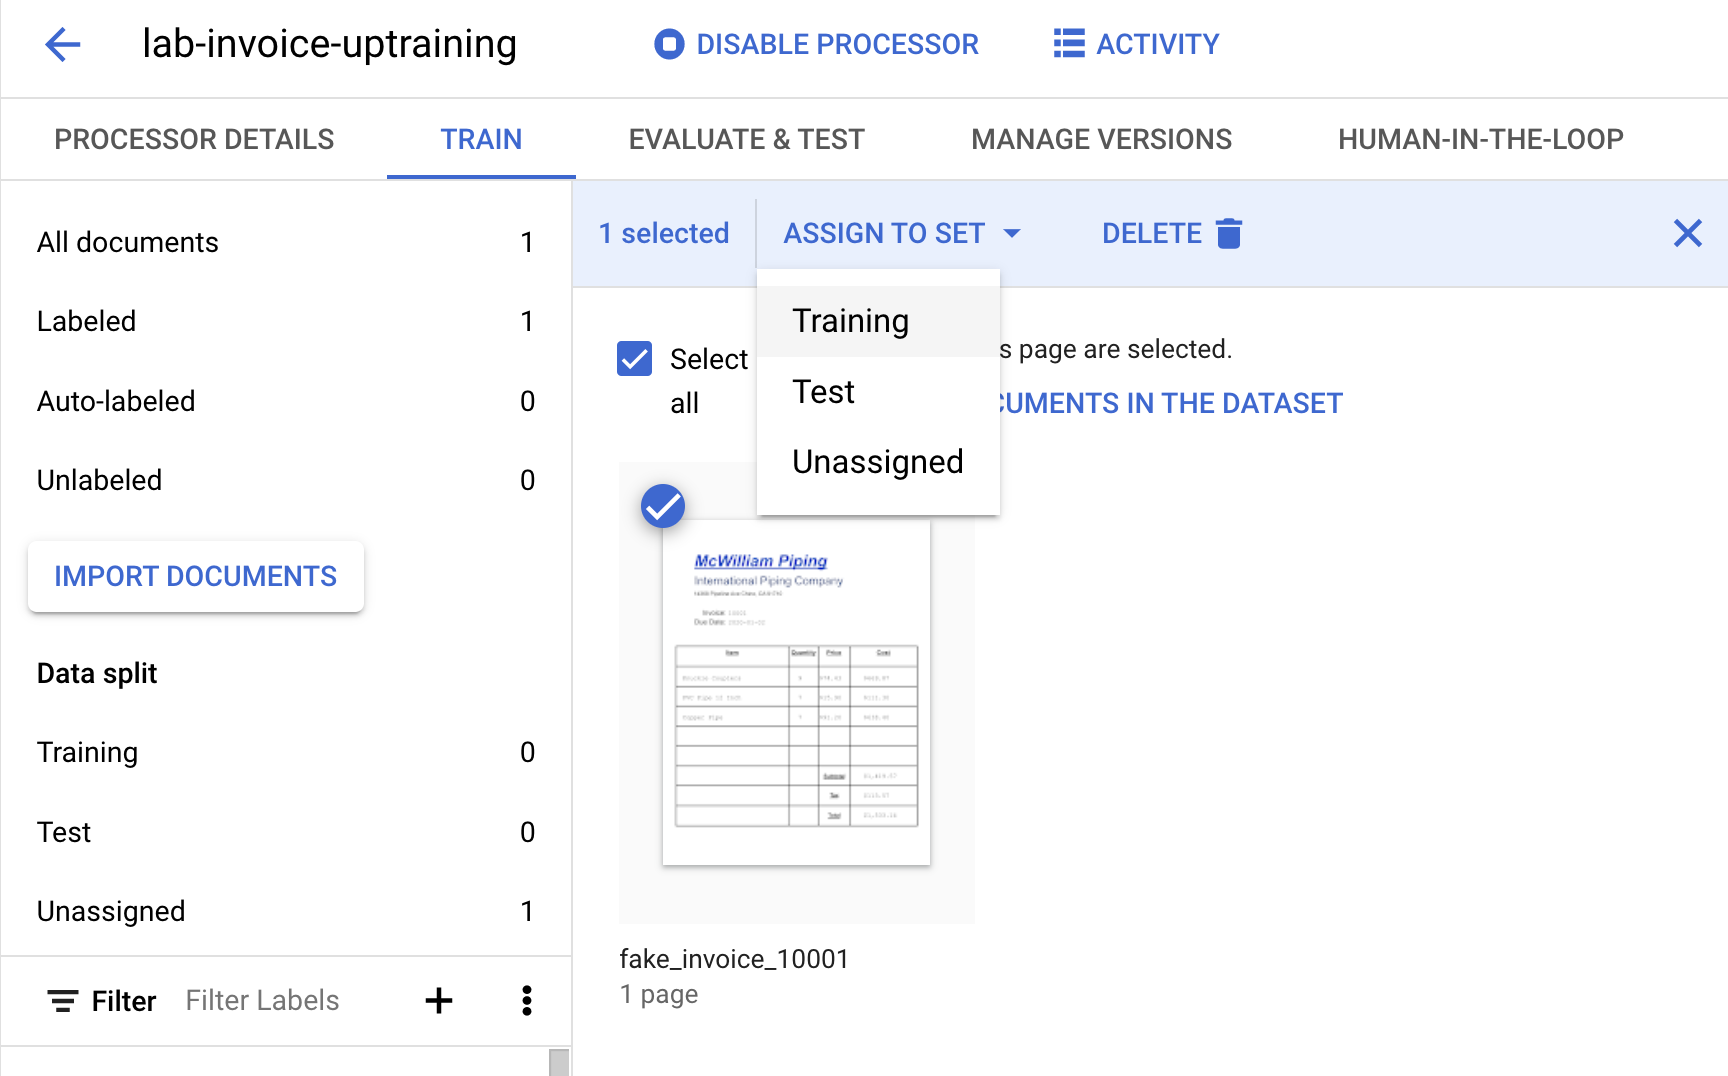
Assign a document to Training Set
/ 10
Import a pre-labeled data
/ 10
Edit labels
/ 10
Auto-label newly imported documents
/ 10
Uptrain the Model
/ 10
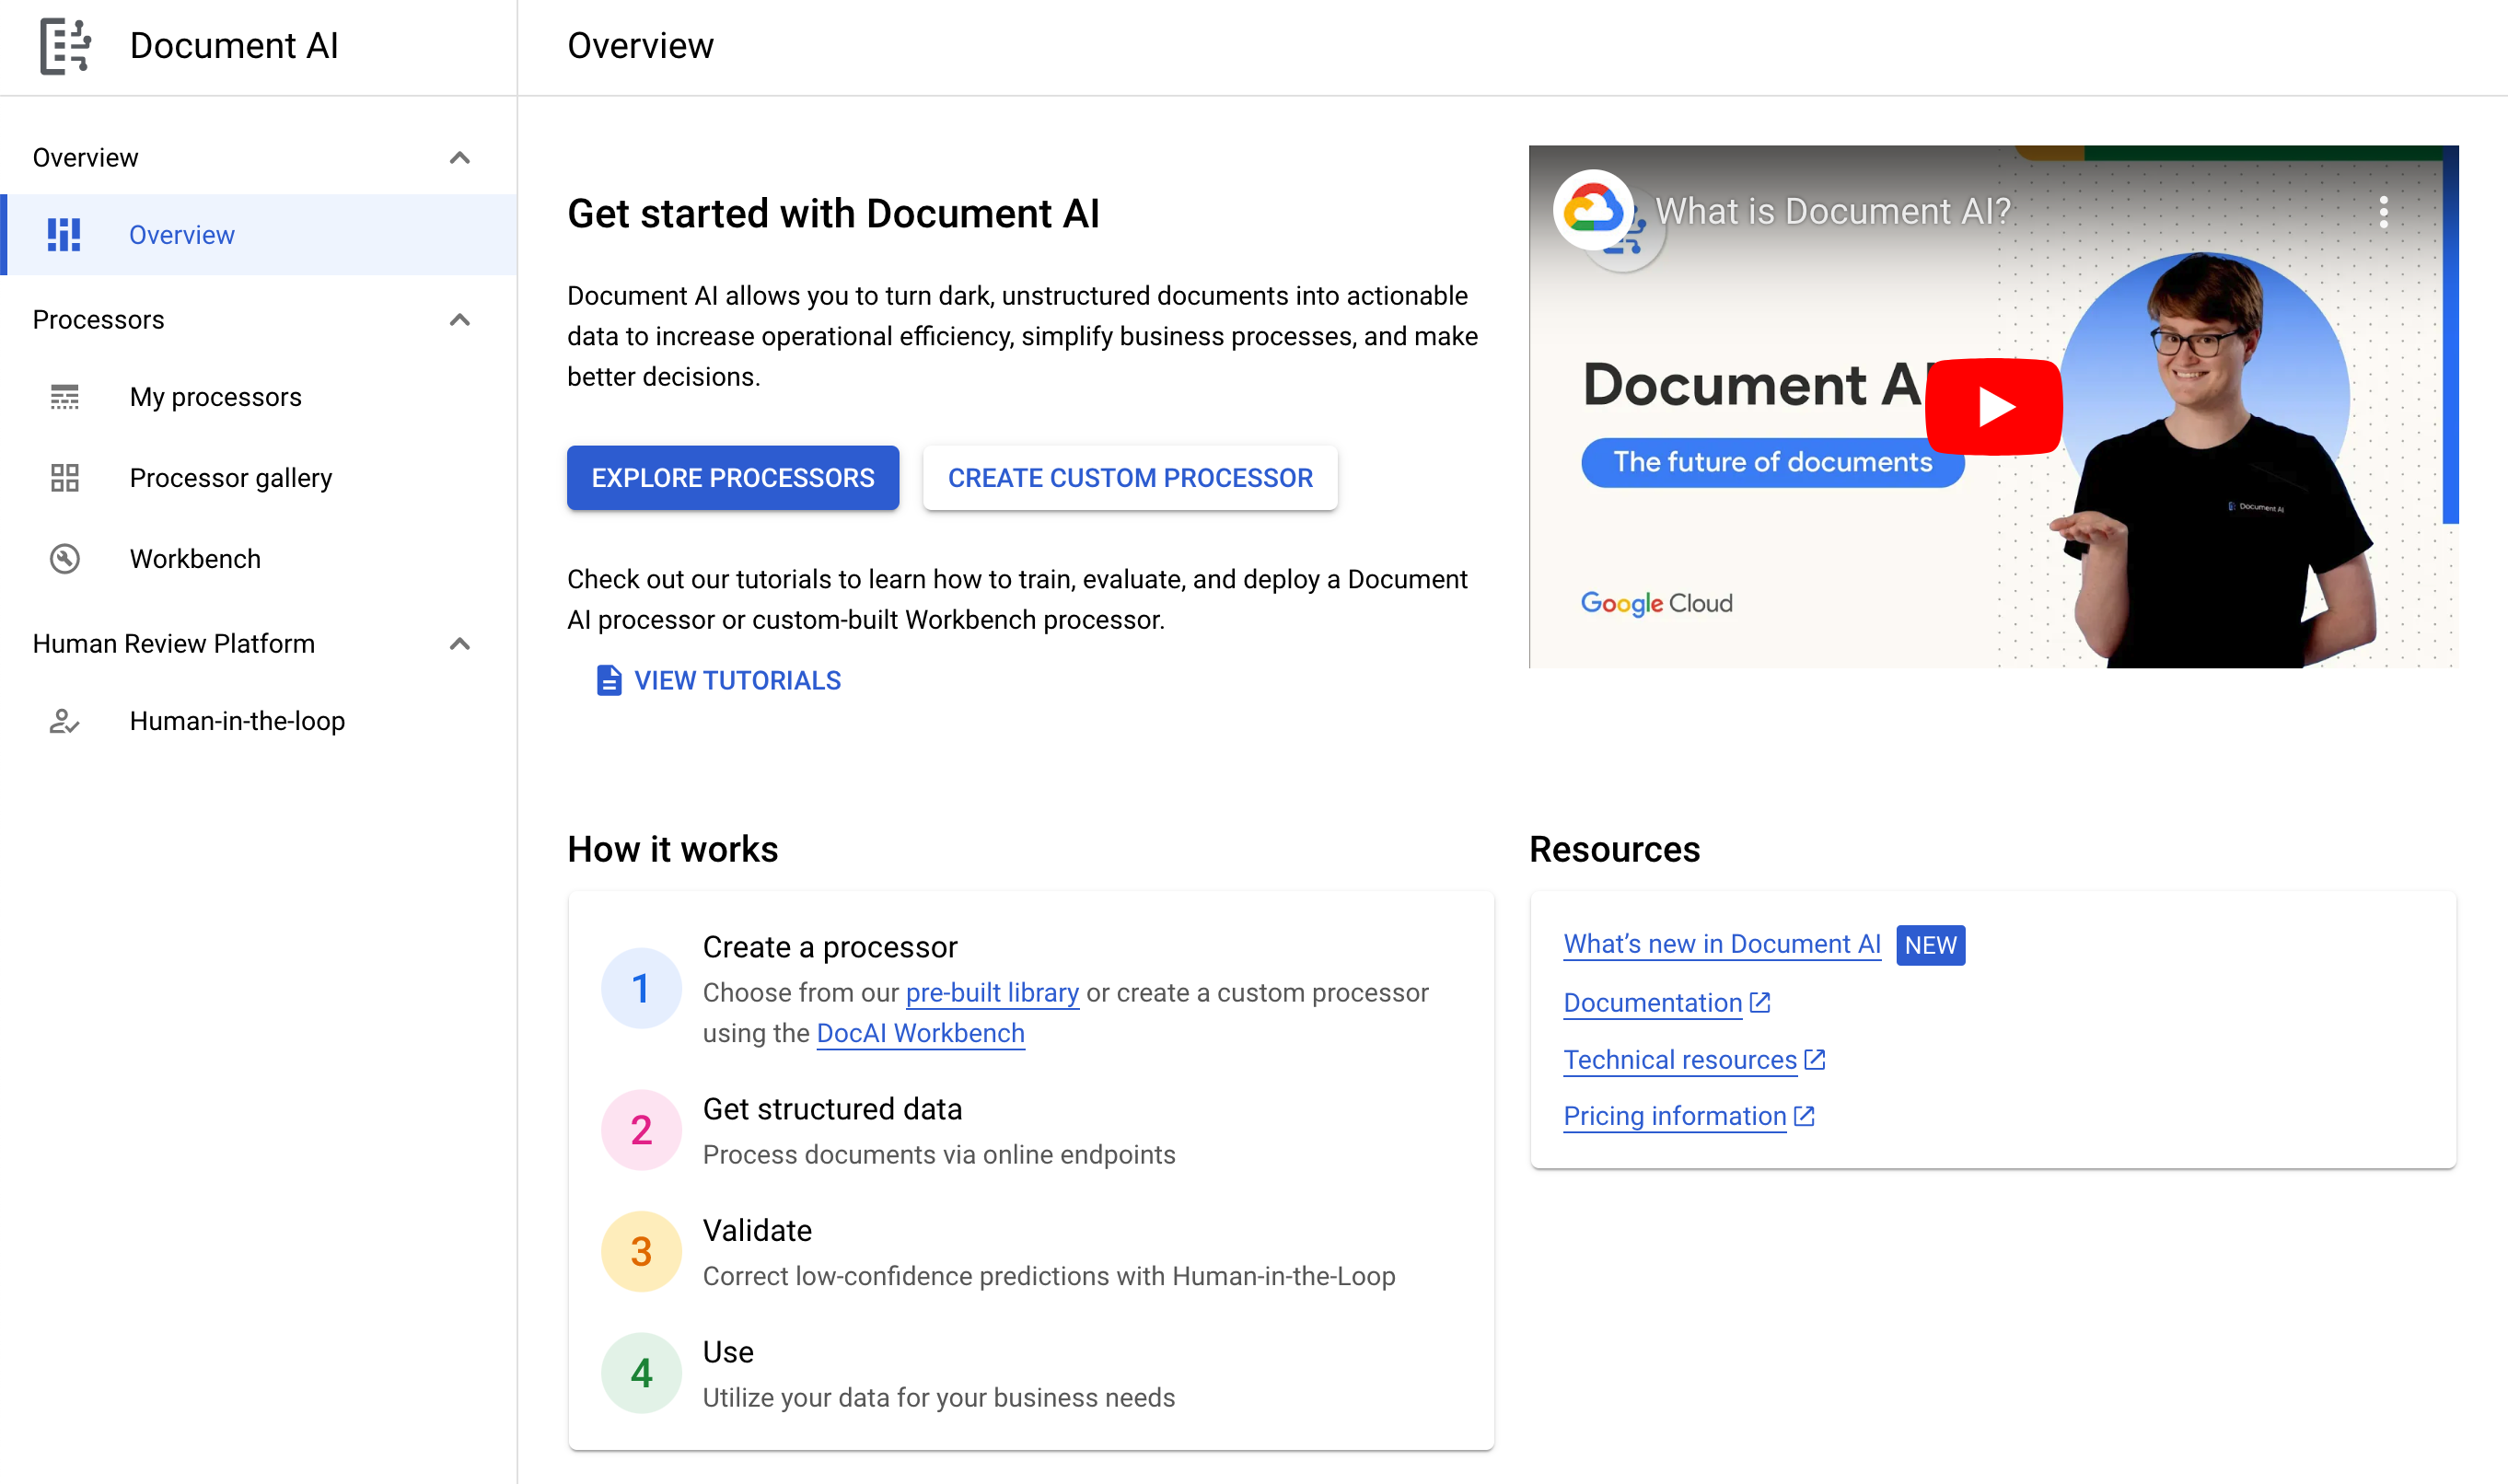
Document AI is a document understanding solution that takes unstructured data (e.g. documents, emails, invoices, forms, etc.) and makes the data easier to understand, analyze, and consume. The API provides structure through content classification, entity extraction, advanced searching, and more. With Document AI Workbench, you can achieve higher document processing accuracy by creating fully customized models using your own training data.
By using uptraining through Document AI Workbench, you can achieve higher document processing accuracy by providing additional labeled examples for Specialized Document Types and creating a new model version. In this lab, you will create an Invoice Parser processor, configure the processor for uptraining, label example documents, and uptrain the processor.
The document dataset used in this lab consists of randomly-generated invoices for a fictional piping company.
In this lab, you will learn how to perform the following tasks:
Read these instructions. Labs are timed and you cannot pause them. The timer, which starts when you click Start Lab, shows how long Google Cloud resources are made available to you.
This hands-on lab lets you do the lab activities in a real cloud environment, not in a simulation or demo environment. It does so by giving you new, temporary credentials you use to sign in and access Google Cloud for the duration of the lab.
To complete this lab, you need:
Click the Start Lab button. If you need to pay for the lab, a dialog opens for you to select your payment method. On the left is the Lab Details pane with the following:
Click Open Google Cloud console (or right-click and select Open Link in Incognito Window if you are running the Chrome browser).
The lab spins up resources, and then opens another tab that shows the Sign in page.
Tip: Arrange the tabs in separate windows, side-by-side.
If necessary, copy the Username below and paste it into the Sign in dialog.
You can also find the Username in the Lab Details pane.
Click Next.
Copy the Password below and paste it into the Welcome dialog.
You can also find the Password in the Lab Details pane.
Click Next.
Click through the subsequent pages:
After a few moments, the Google Cloud console opens in this tab.

Cloud Shell is a virtual machine that is loaded with development tools. It offers a persistent 5GB home directory and runs on the Google Cloud. Cloud Shell provides command-line access to your Google Cloud resources.
Click Activate Cloud Shell 
Click through the following windows:
When you are connected, you are already authenticated, and the project is set to your Project_ID,
gcloud is the command-line tool for Google Cloud. It comes pre-installed on Cloud Shell and supports tab-completion.
Output:
Output:
gcloud, in Google Cloud, refer to the gcloud CLI overview guide.
Before you can begin using Document AI, you must enable the API.
Open Cloud Shell by clicking the Activate Cloud Shell button at the top of the console.
In Cloud Shell, run the following command to enable the API for Document AI.
You should see something like this:
You should see something like this:
Now, you're ready to use the Document AI API!
Click Check my progress to verify the objective.
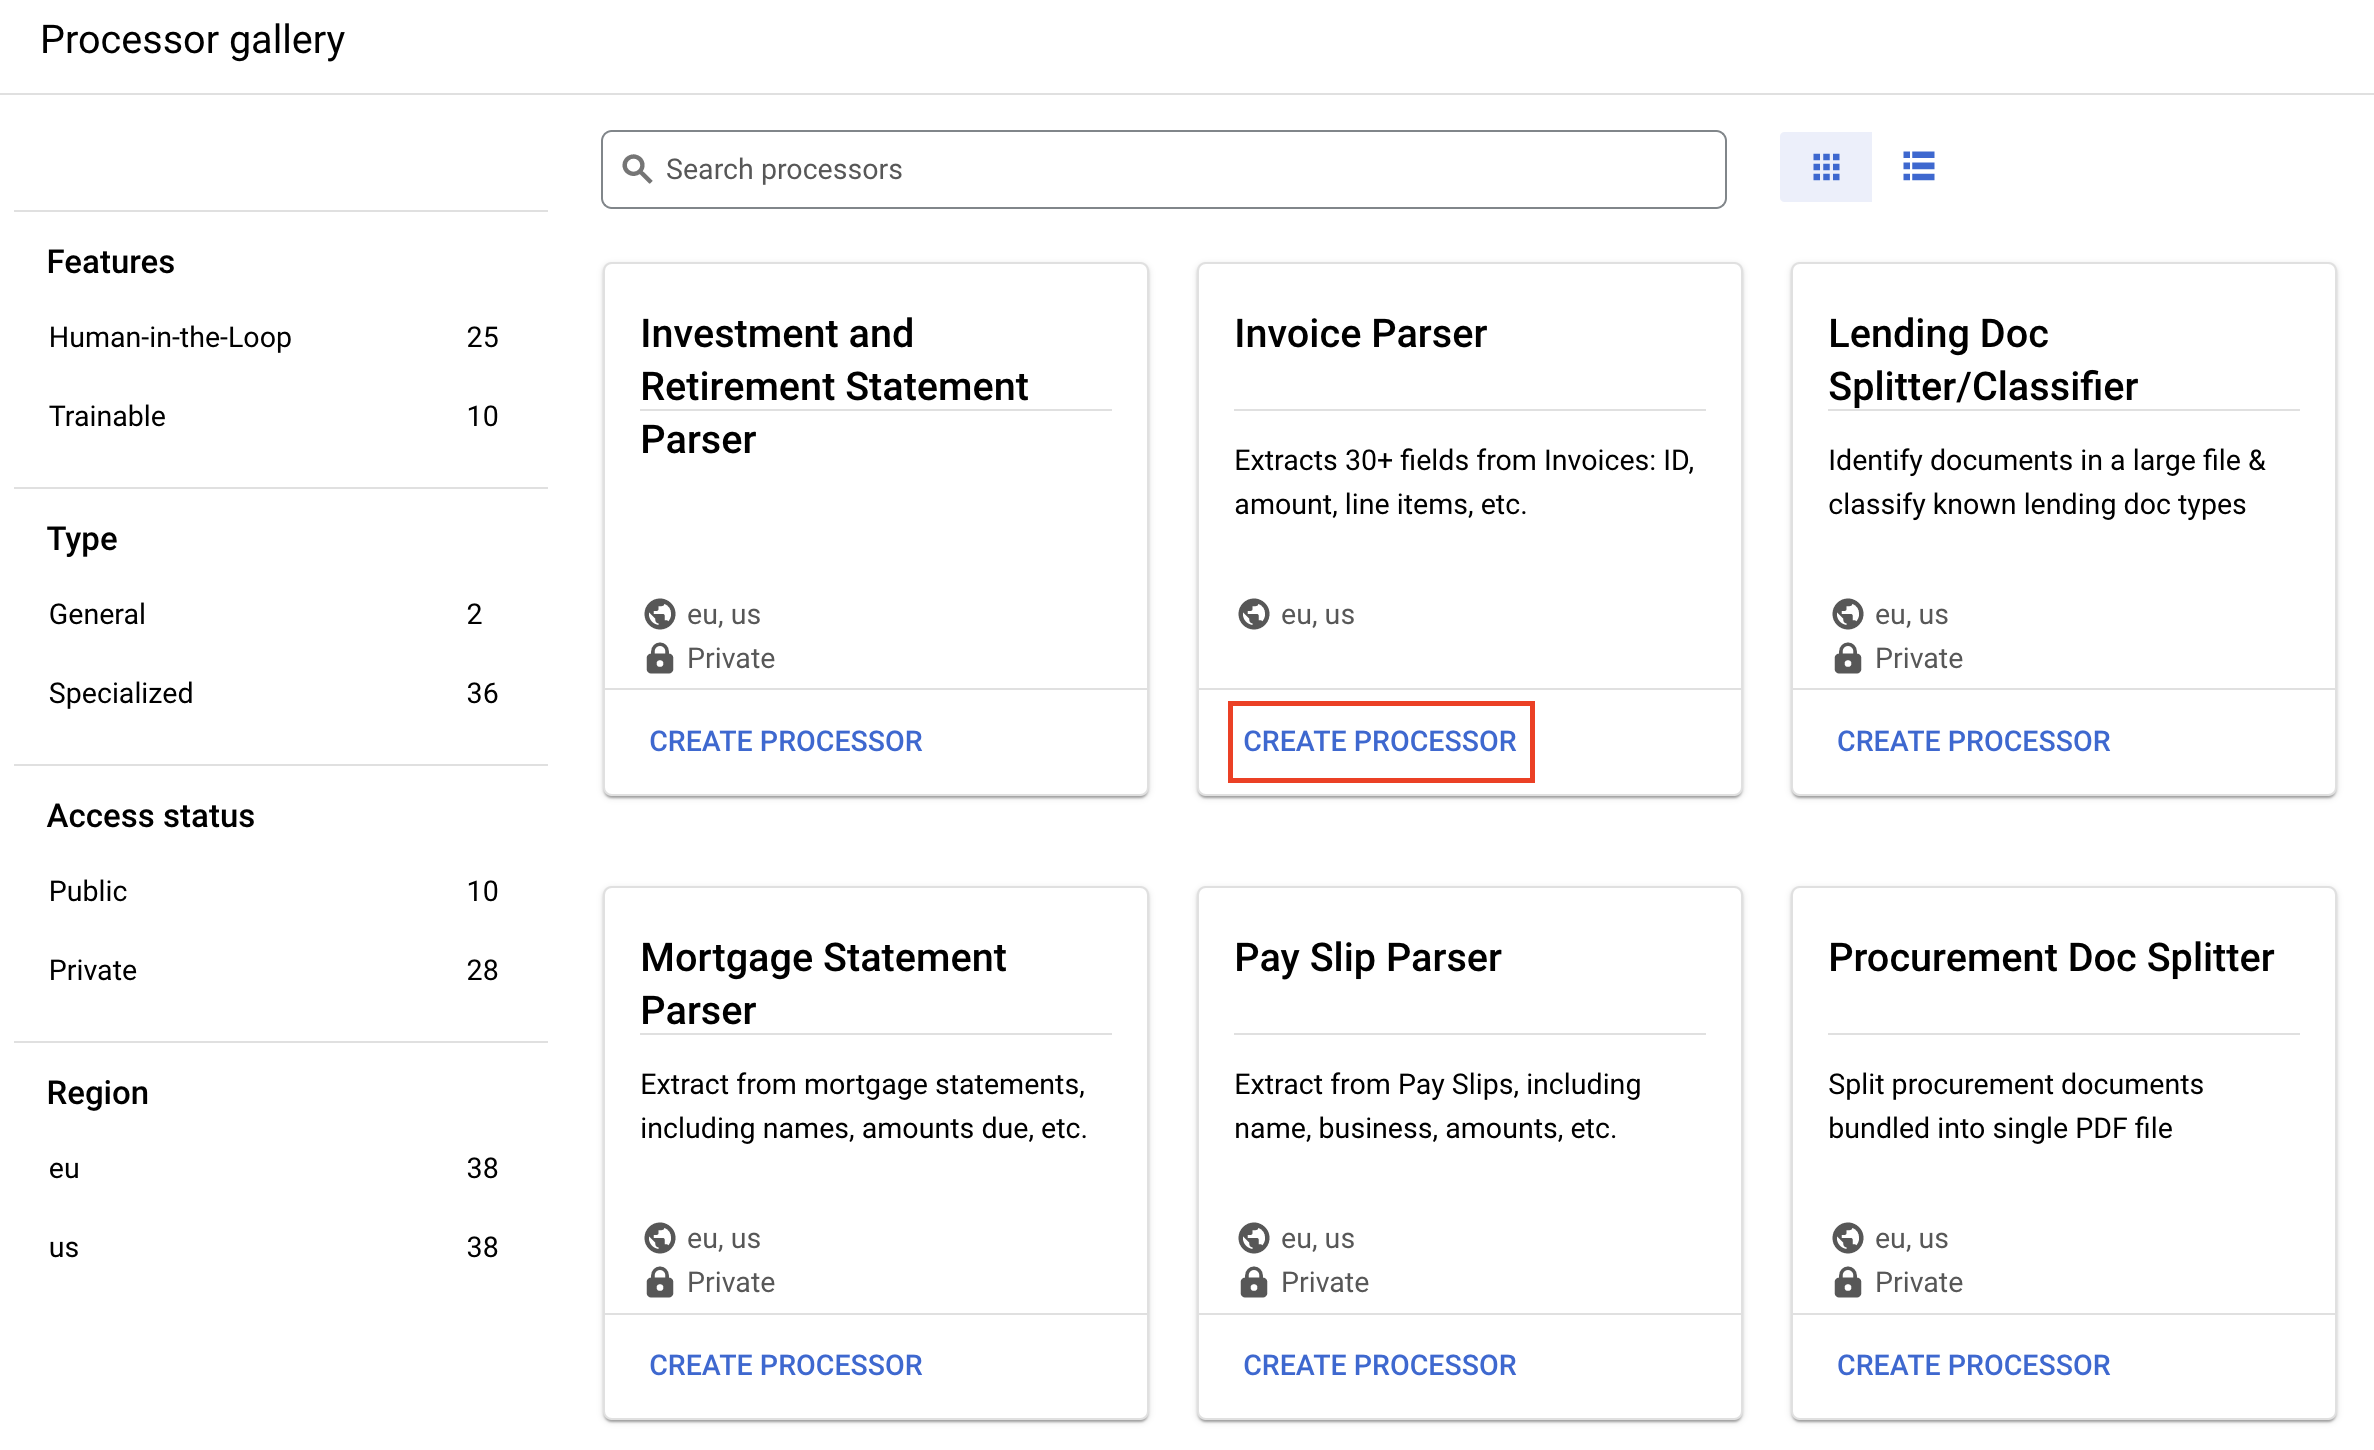
You must first create a Form Parser processor instance to use in the Document AI Platform for this tutorial.
Give it the name lab-invoice-uptraining and select the region
Click Create to create your processor.
Click Check my progress to verify the objective.
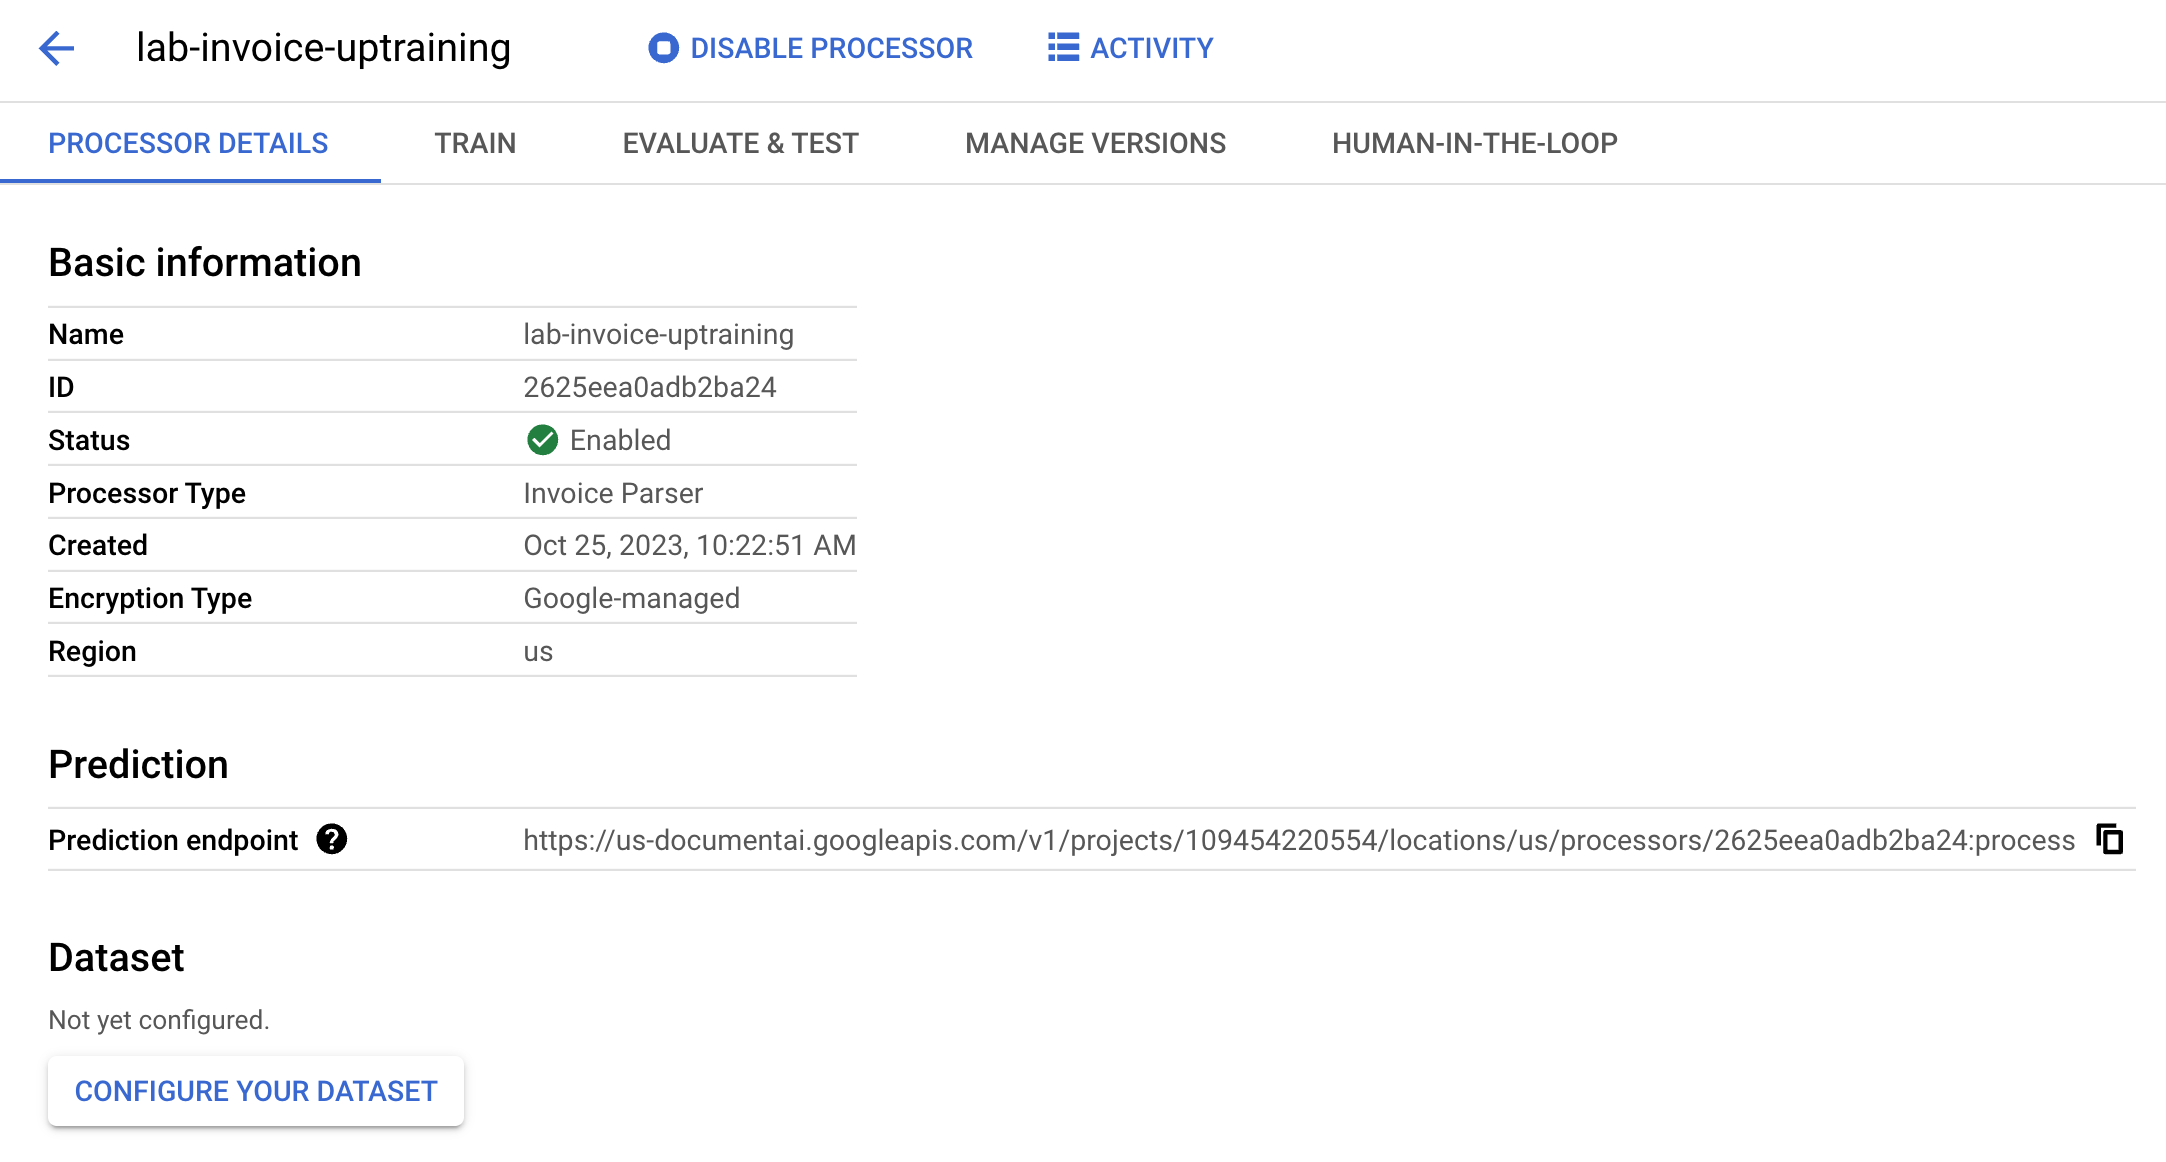
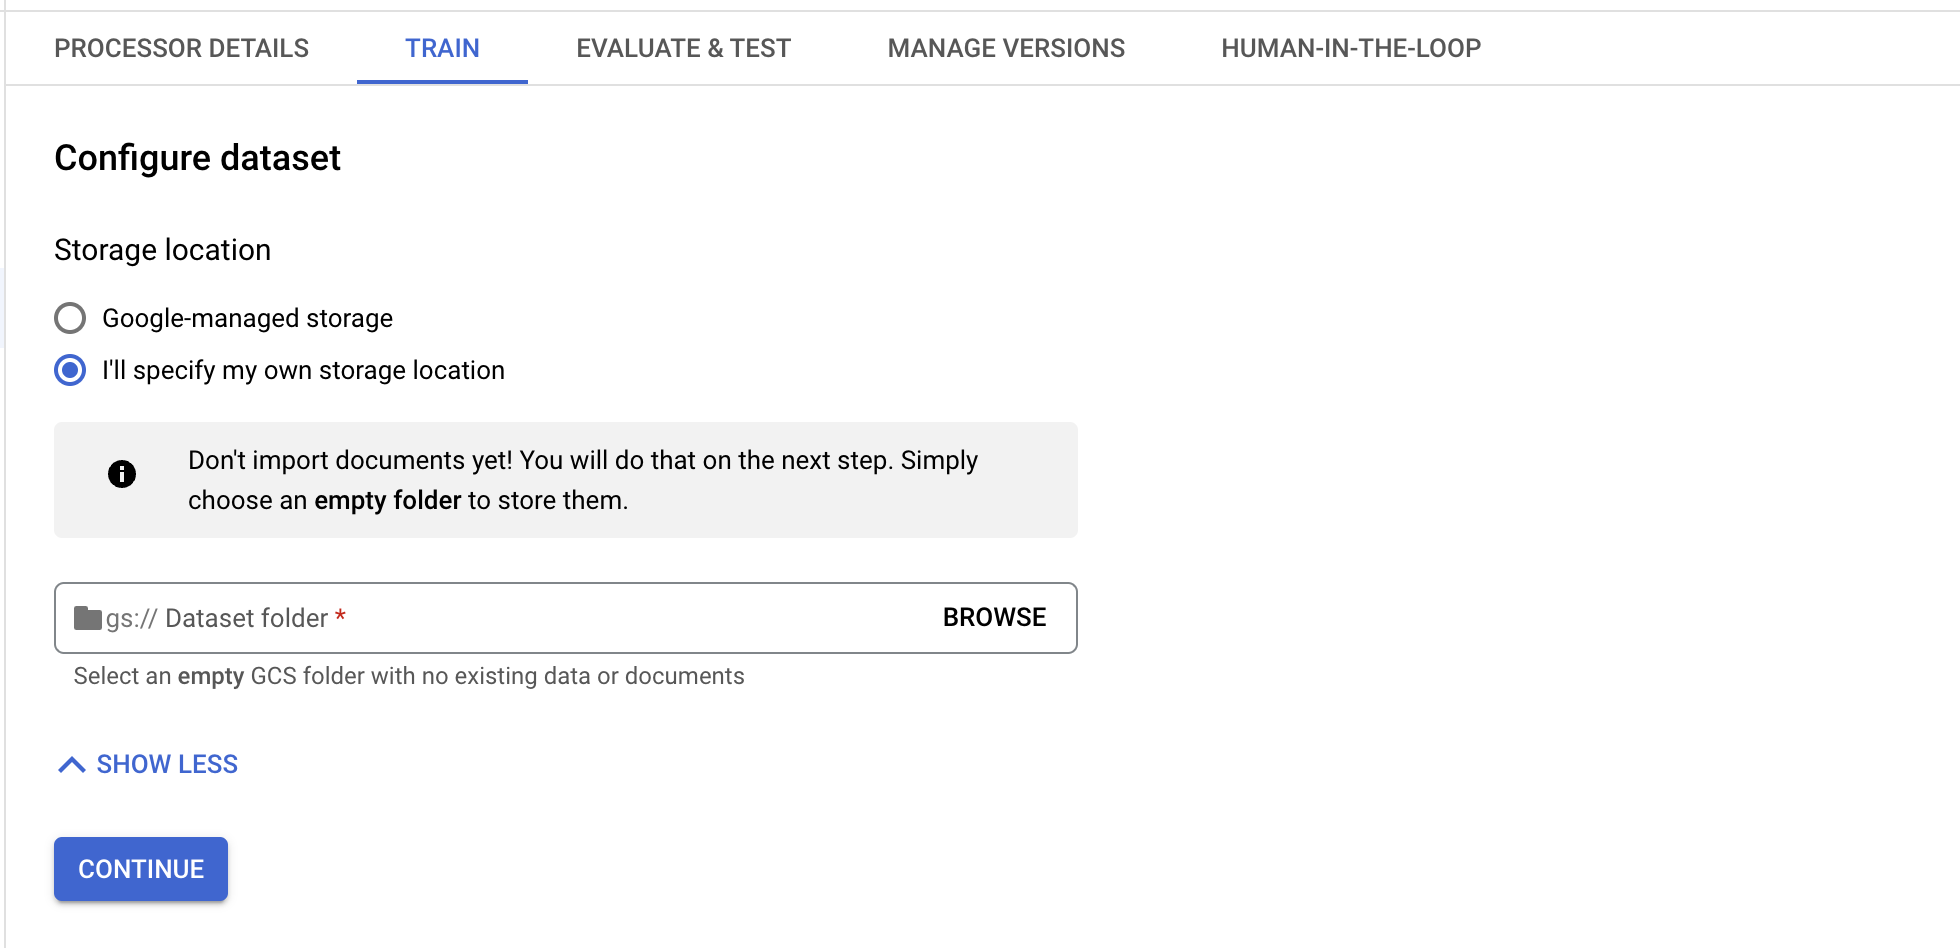
In order to train your processor, we will have to create a dataset with training and testing data to help the processor identify the entities we want to extract.
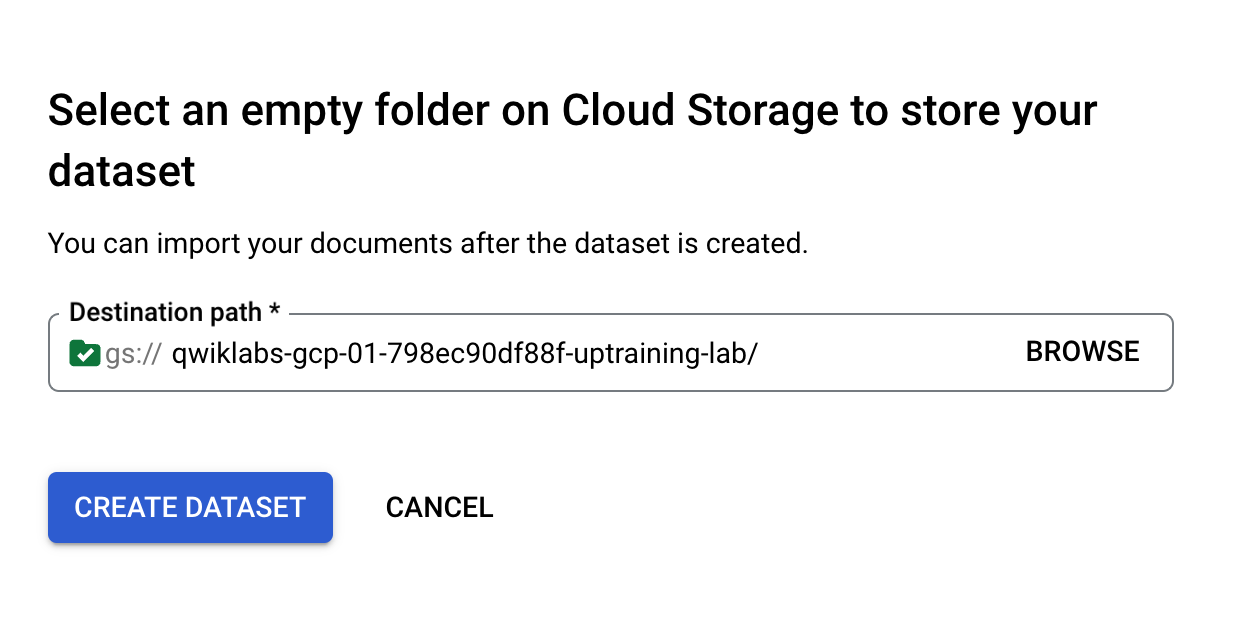
You will need to create a new bucket in Cloud Storage to store the dataset.
gs://).This should be:
Click Continue or click Create Dataset.
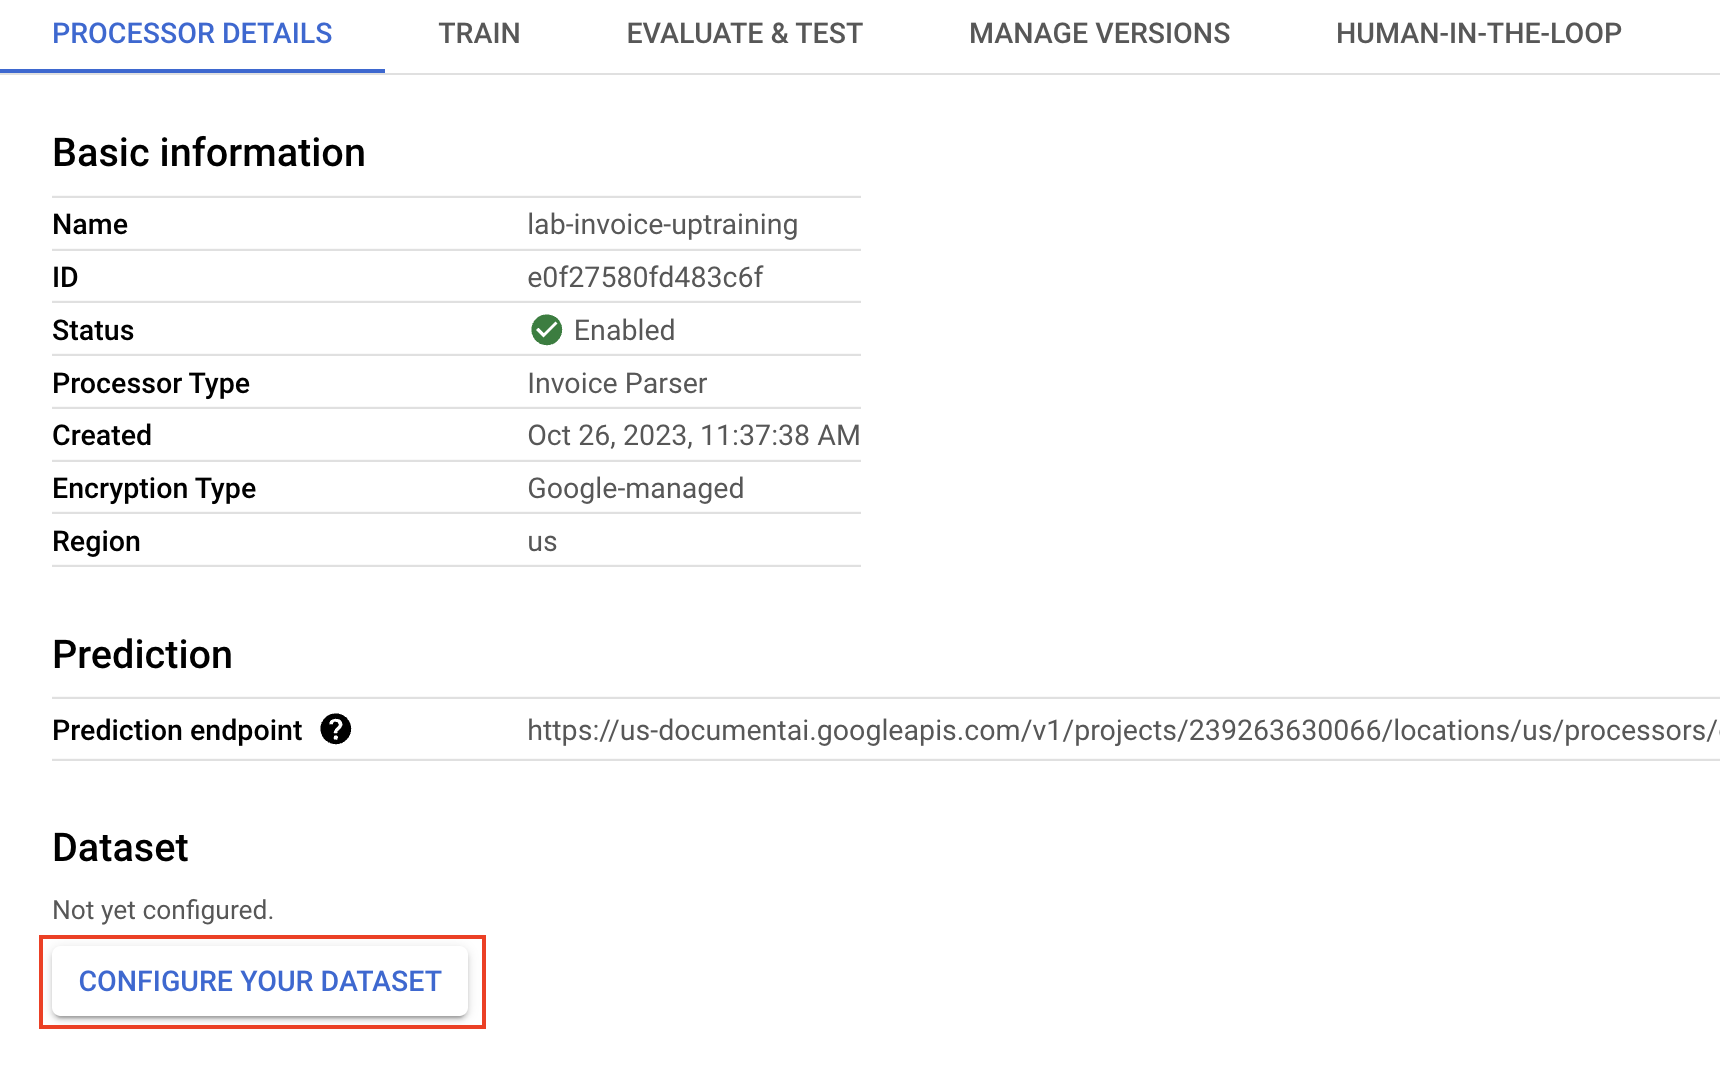
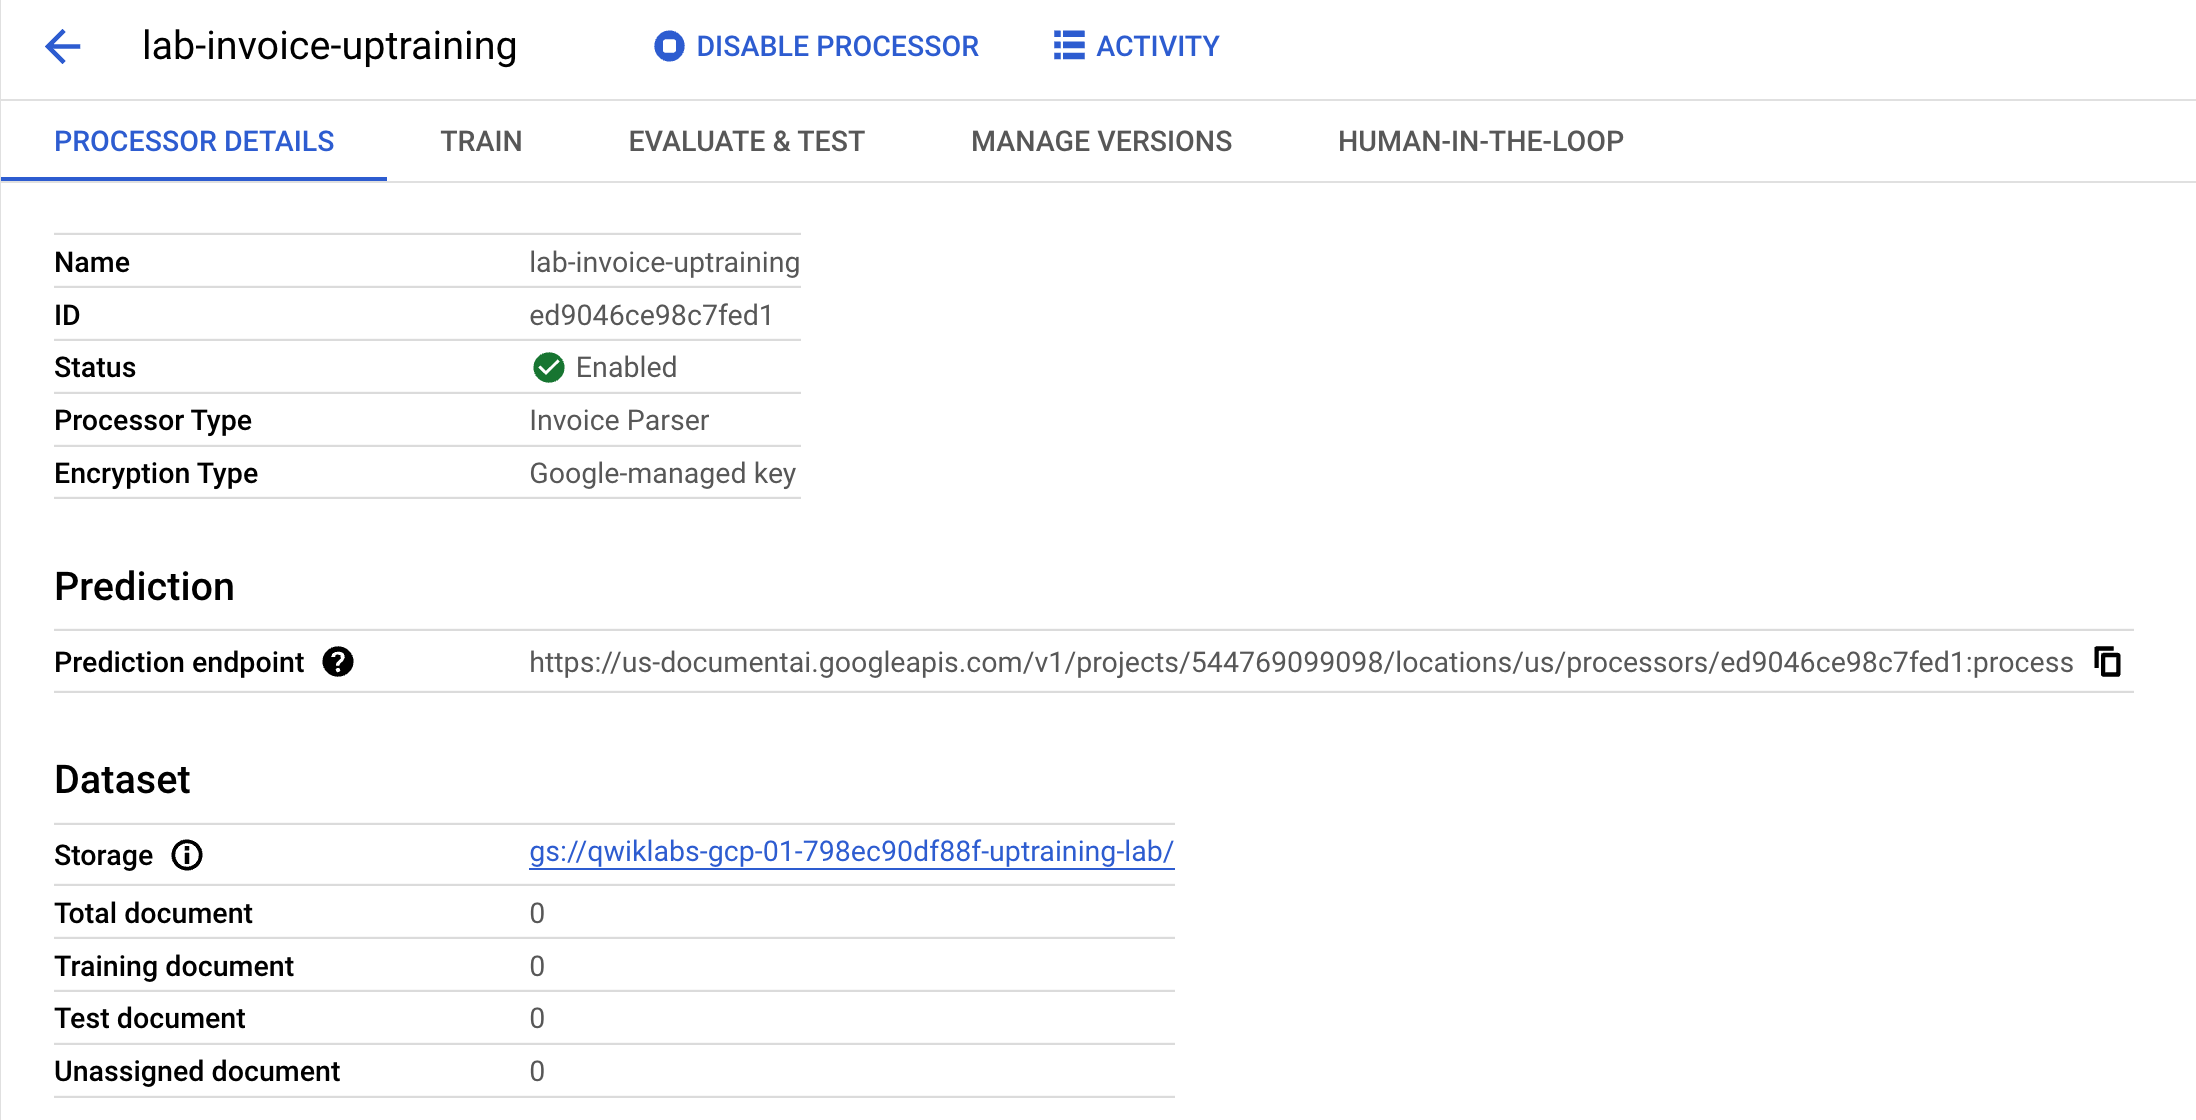
Wait for the dataset to be created, then it should direct you to the Processor Details page. Your dataset details should be listed under Dataset.
Click Check my progress to verify the objective.
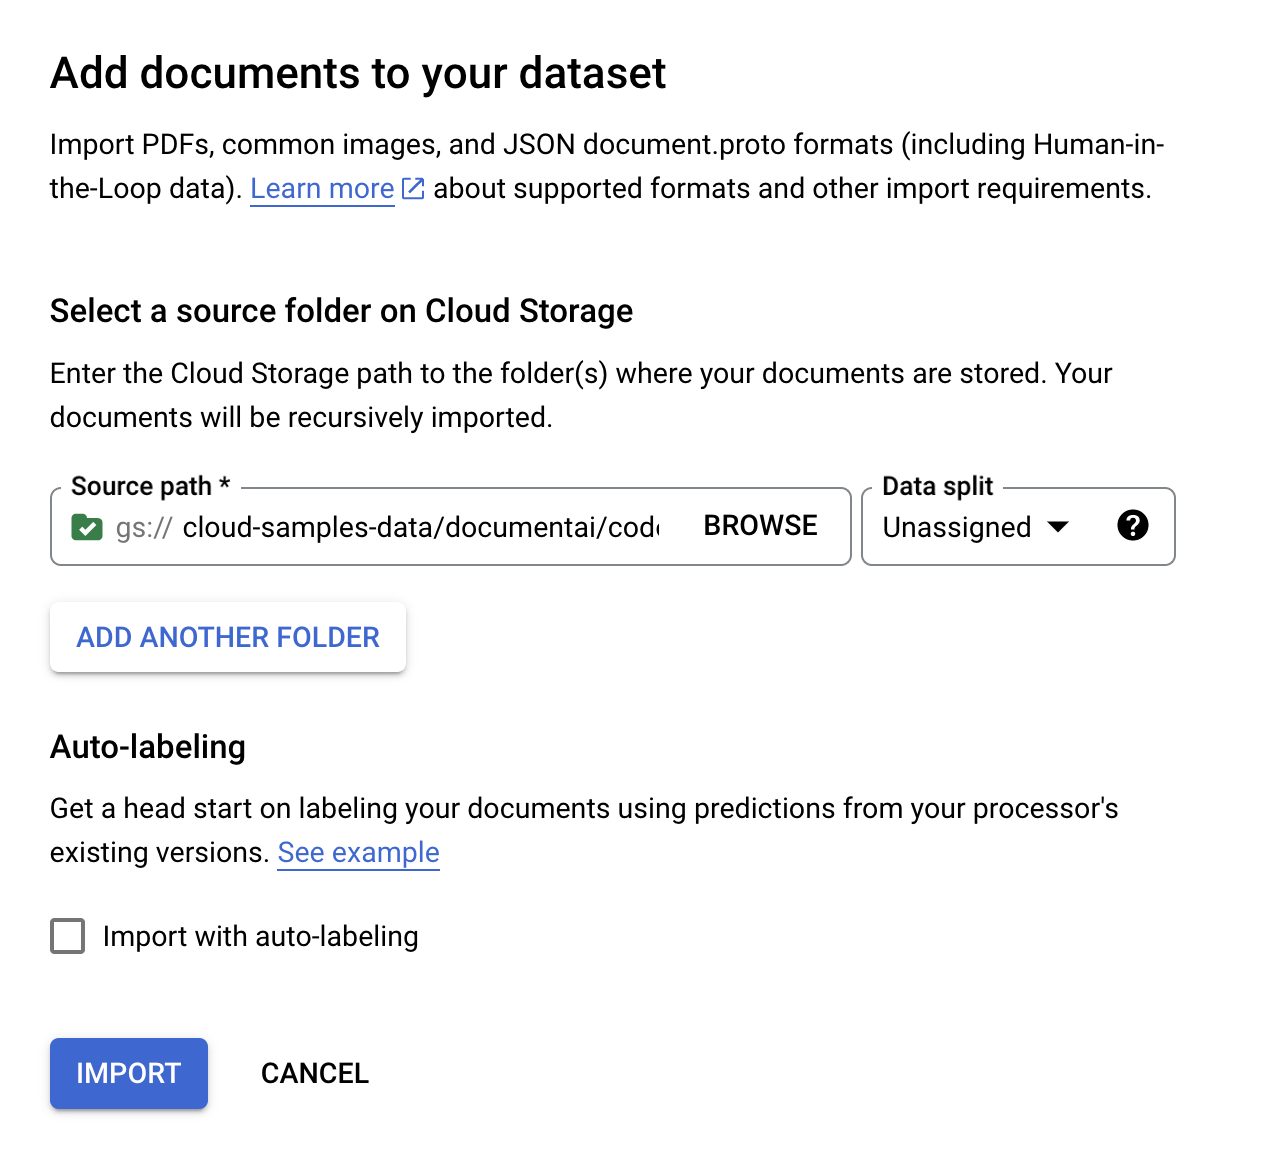
Now you will import a sample invoice PDF into your dataset.
Go to the Train tab, then click on Import Documents.
A a sample PDF is available for you to use in this lab. Copy and paste the following link into the Source Path box. Leave the Data split as Unassigned for now.
Click Import.
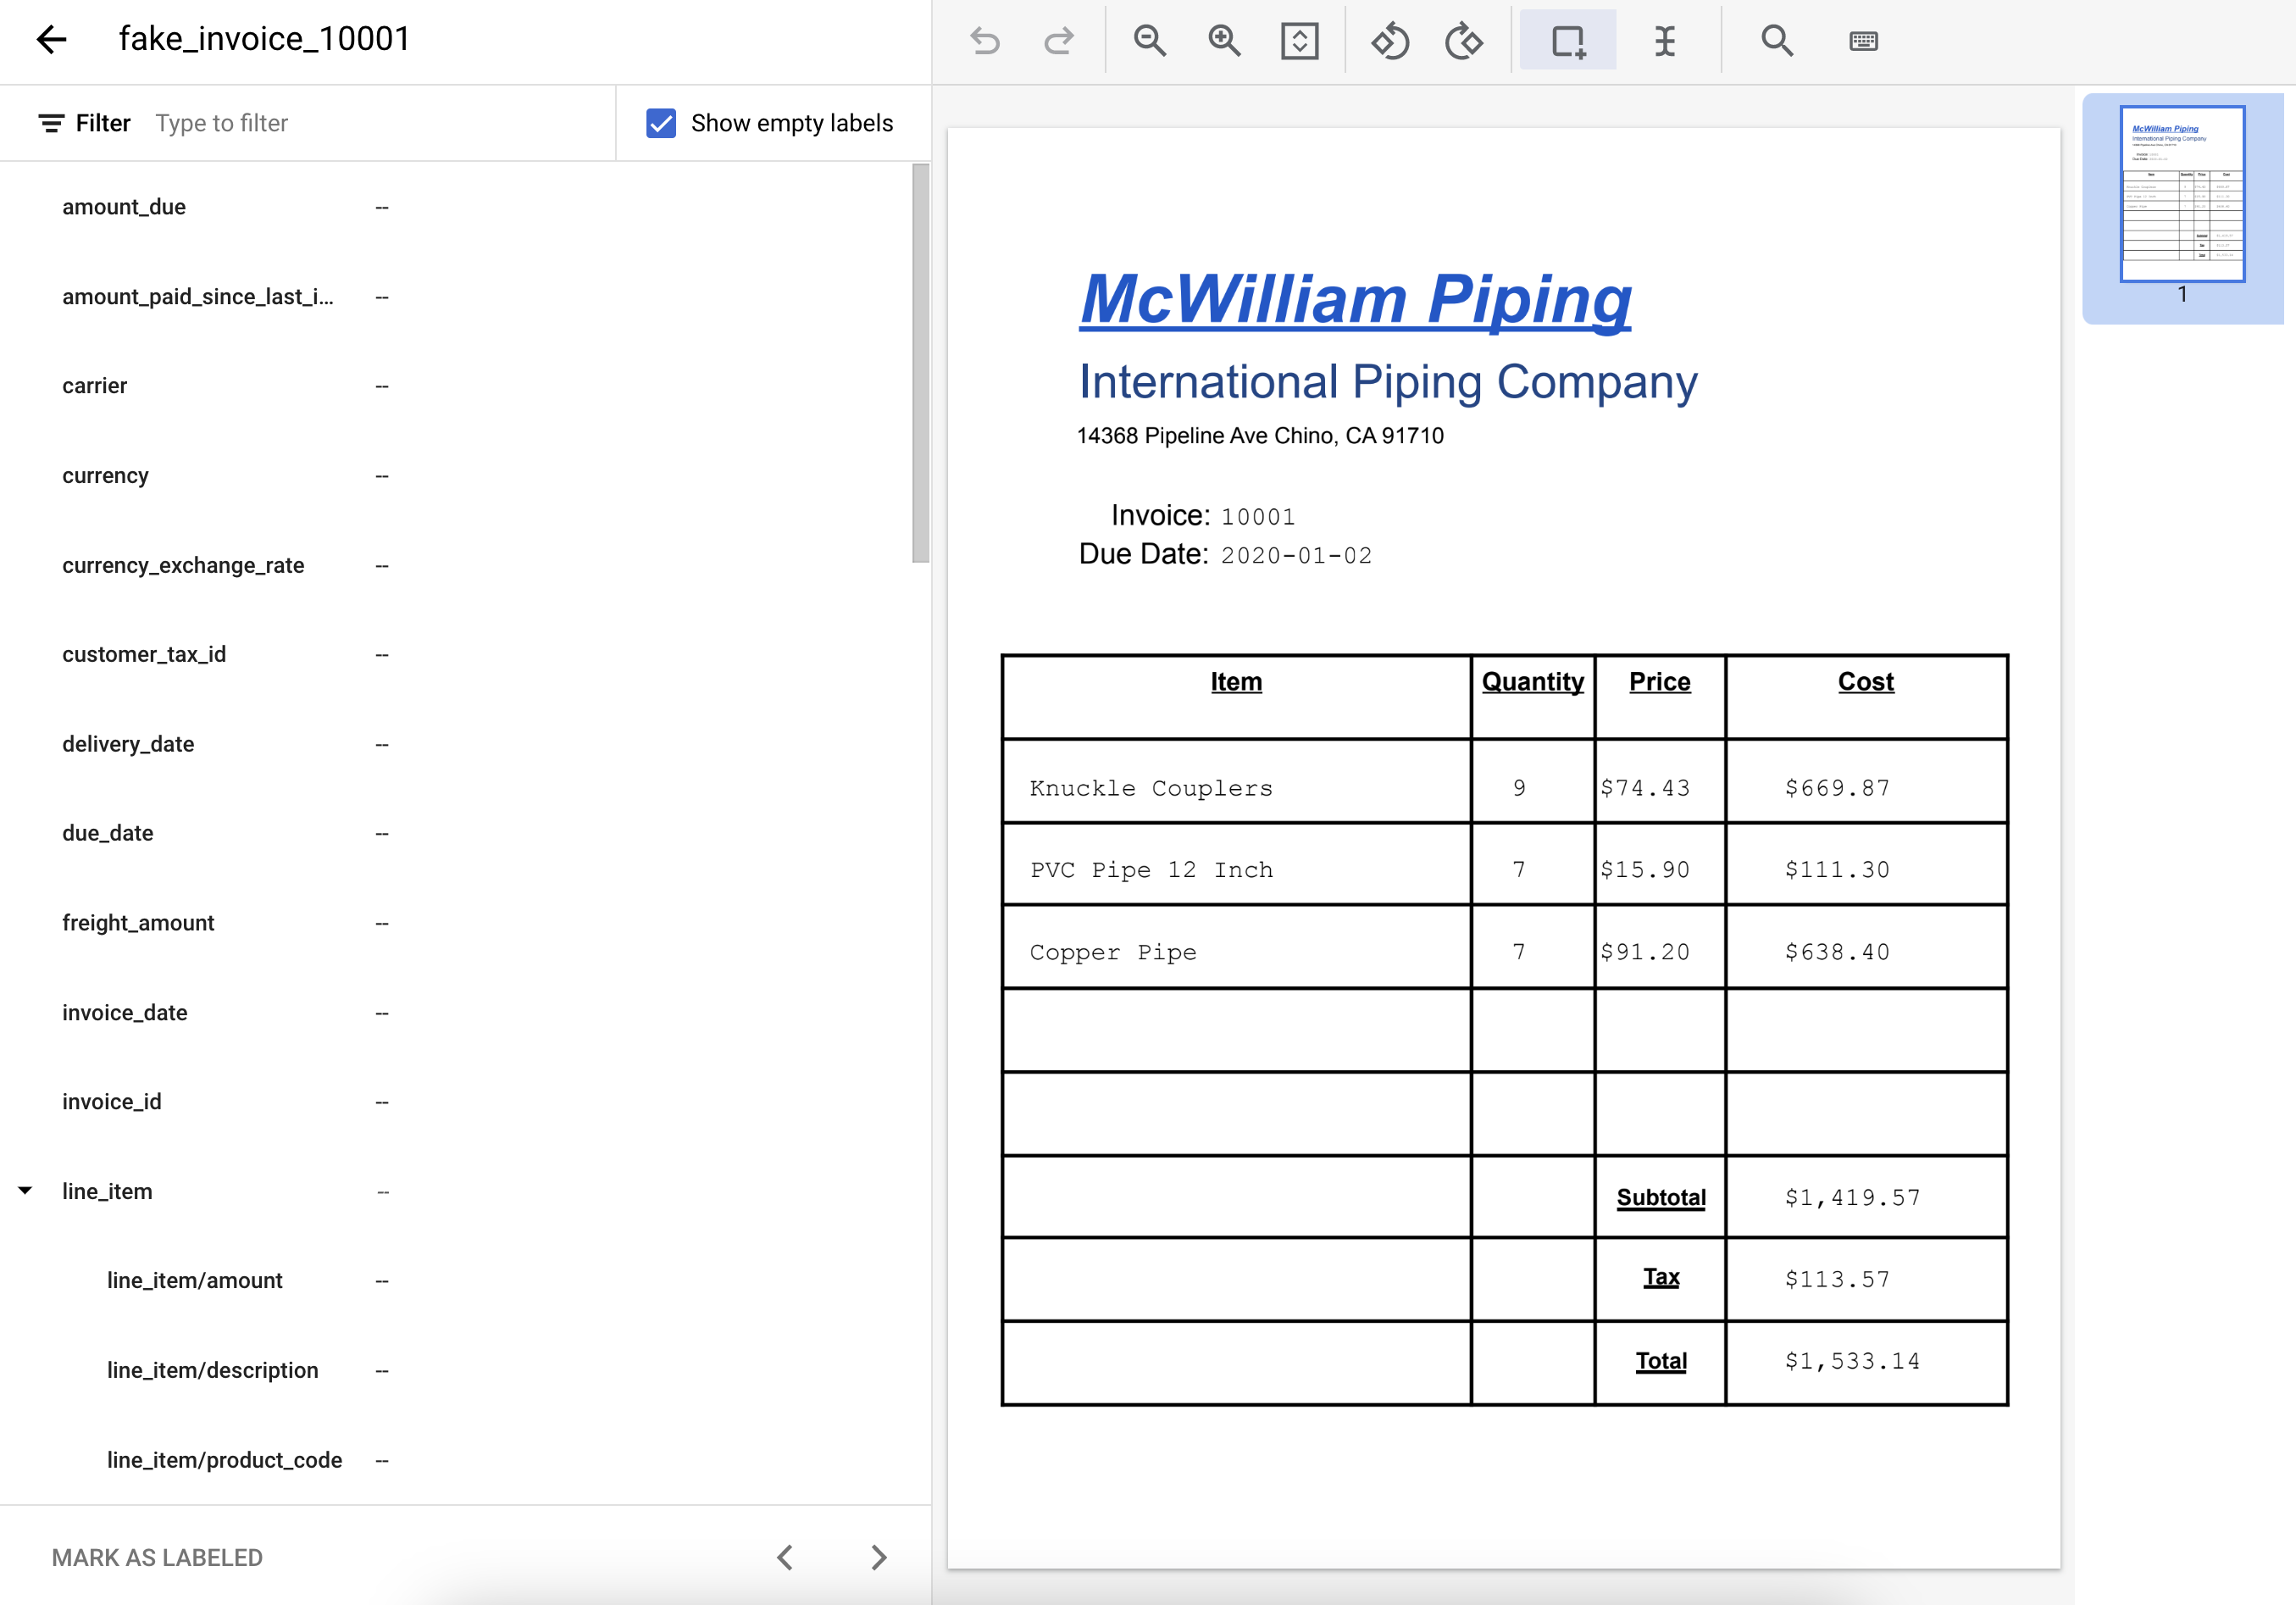
When the import completes, click on the fake_invoice_10001 document. You should see the document in the train management UI.
Click Check my progress to verify the objective.
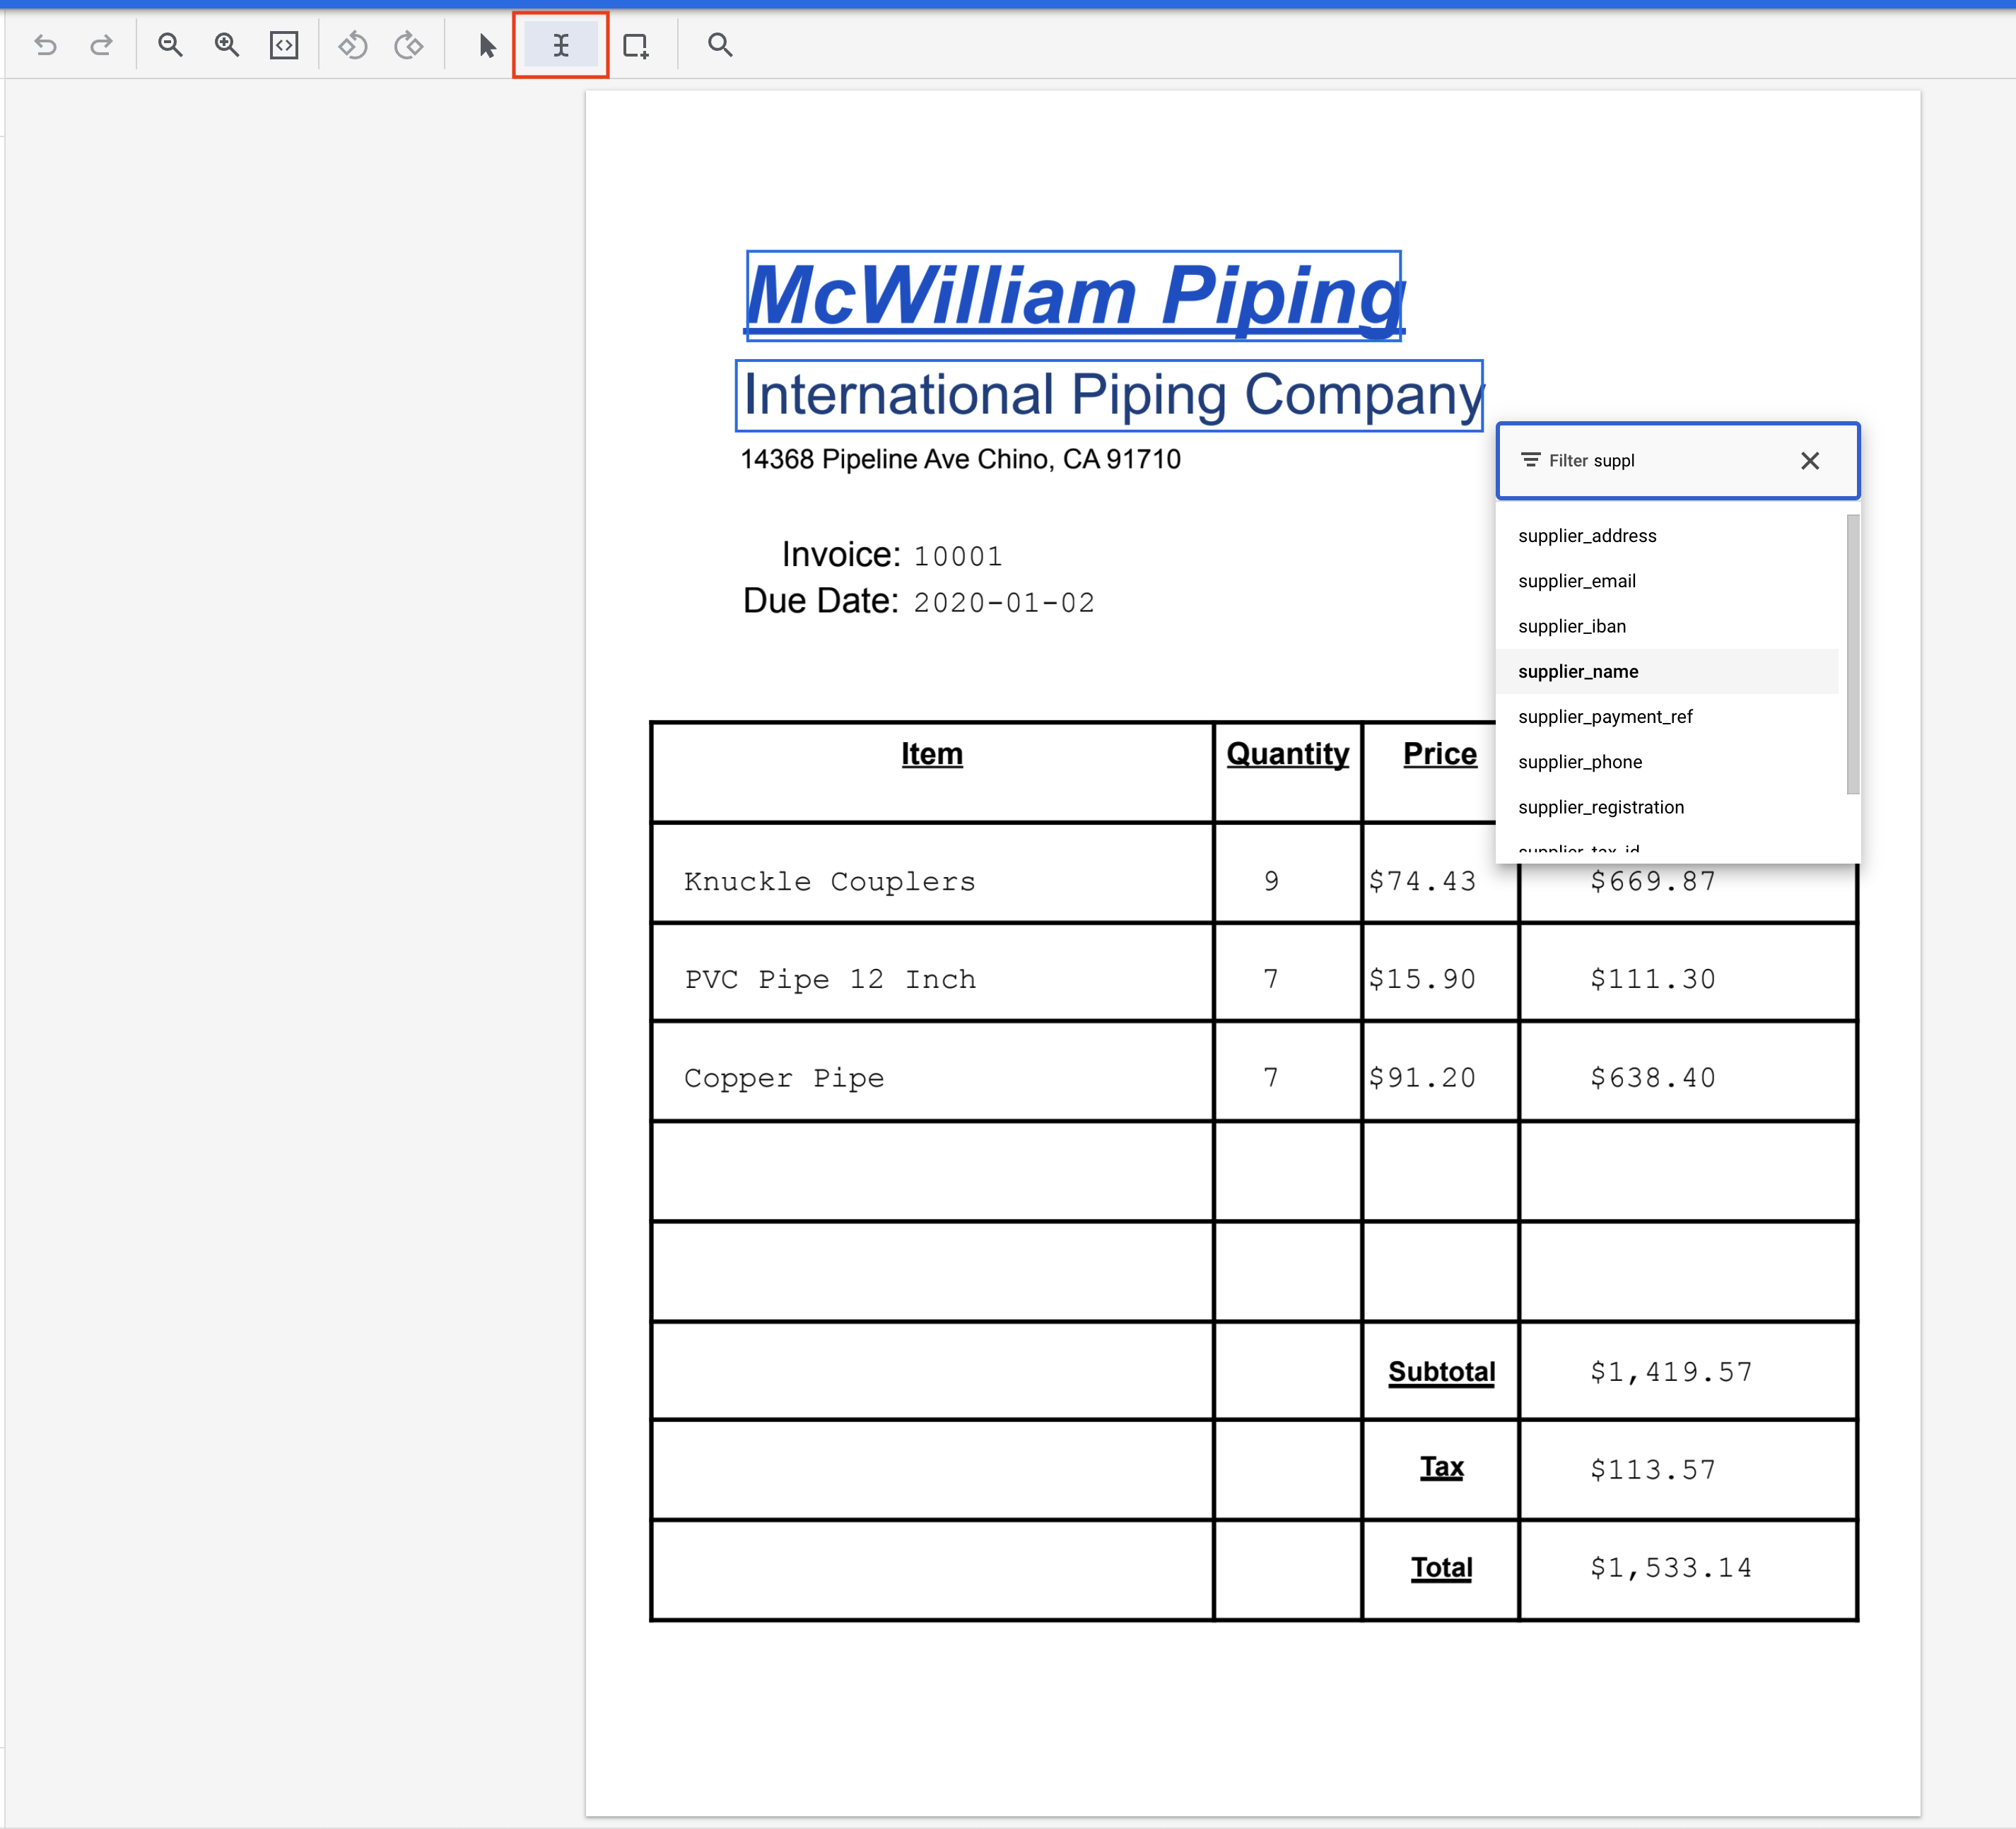
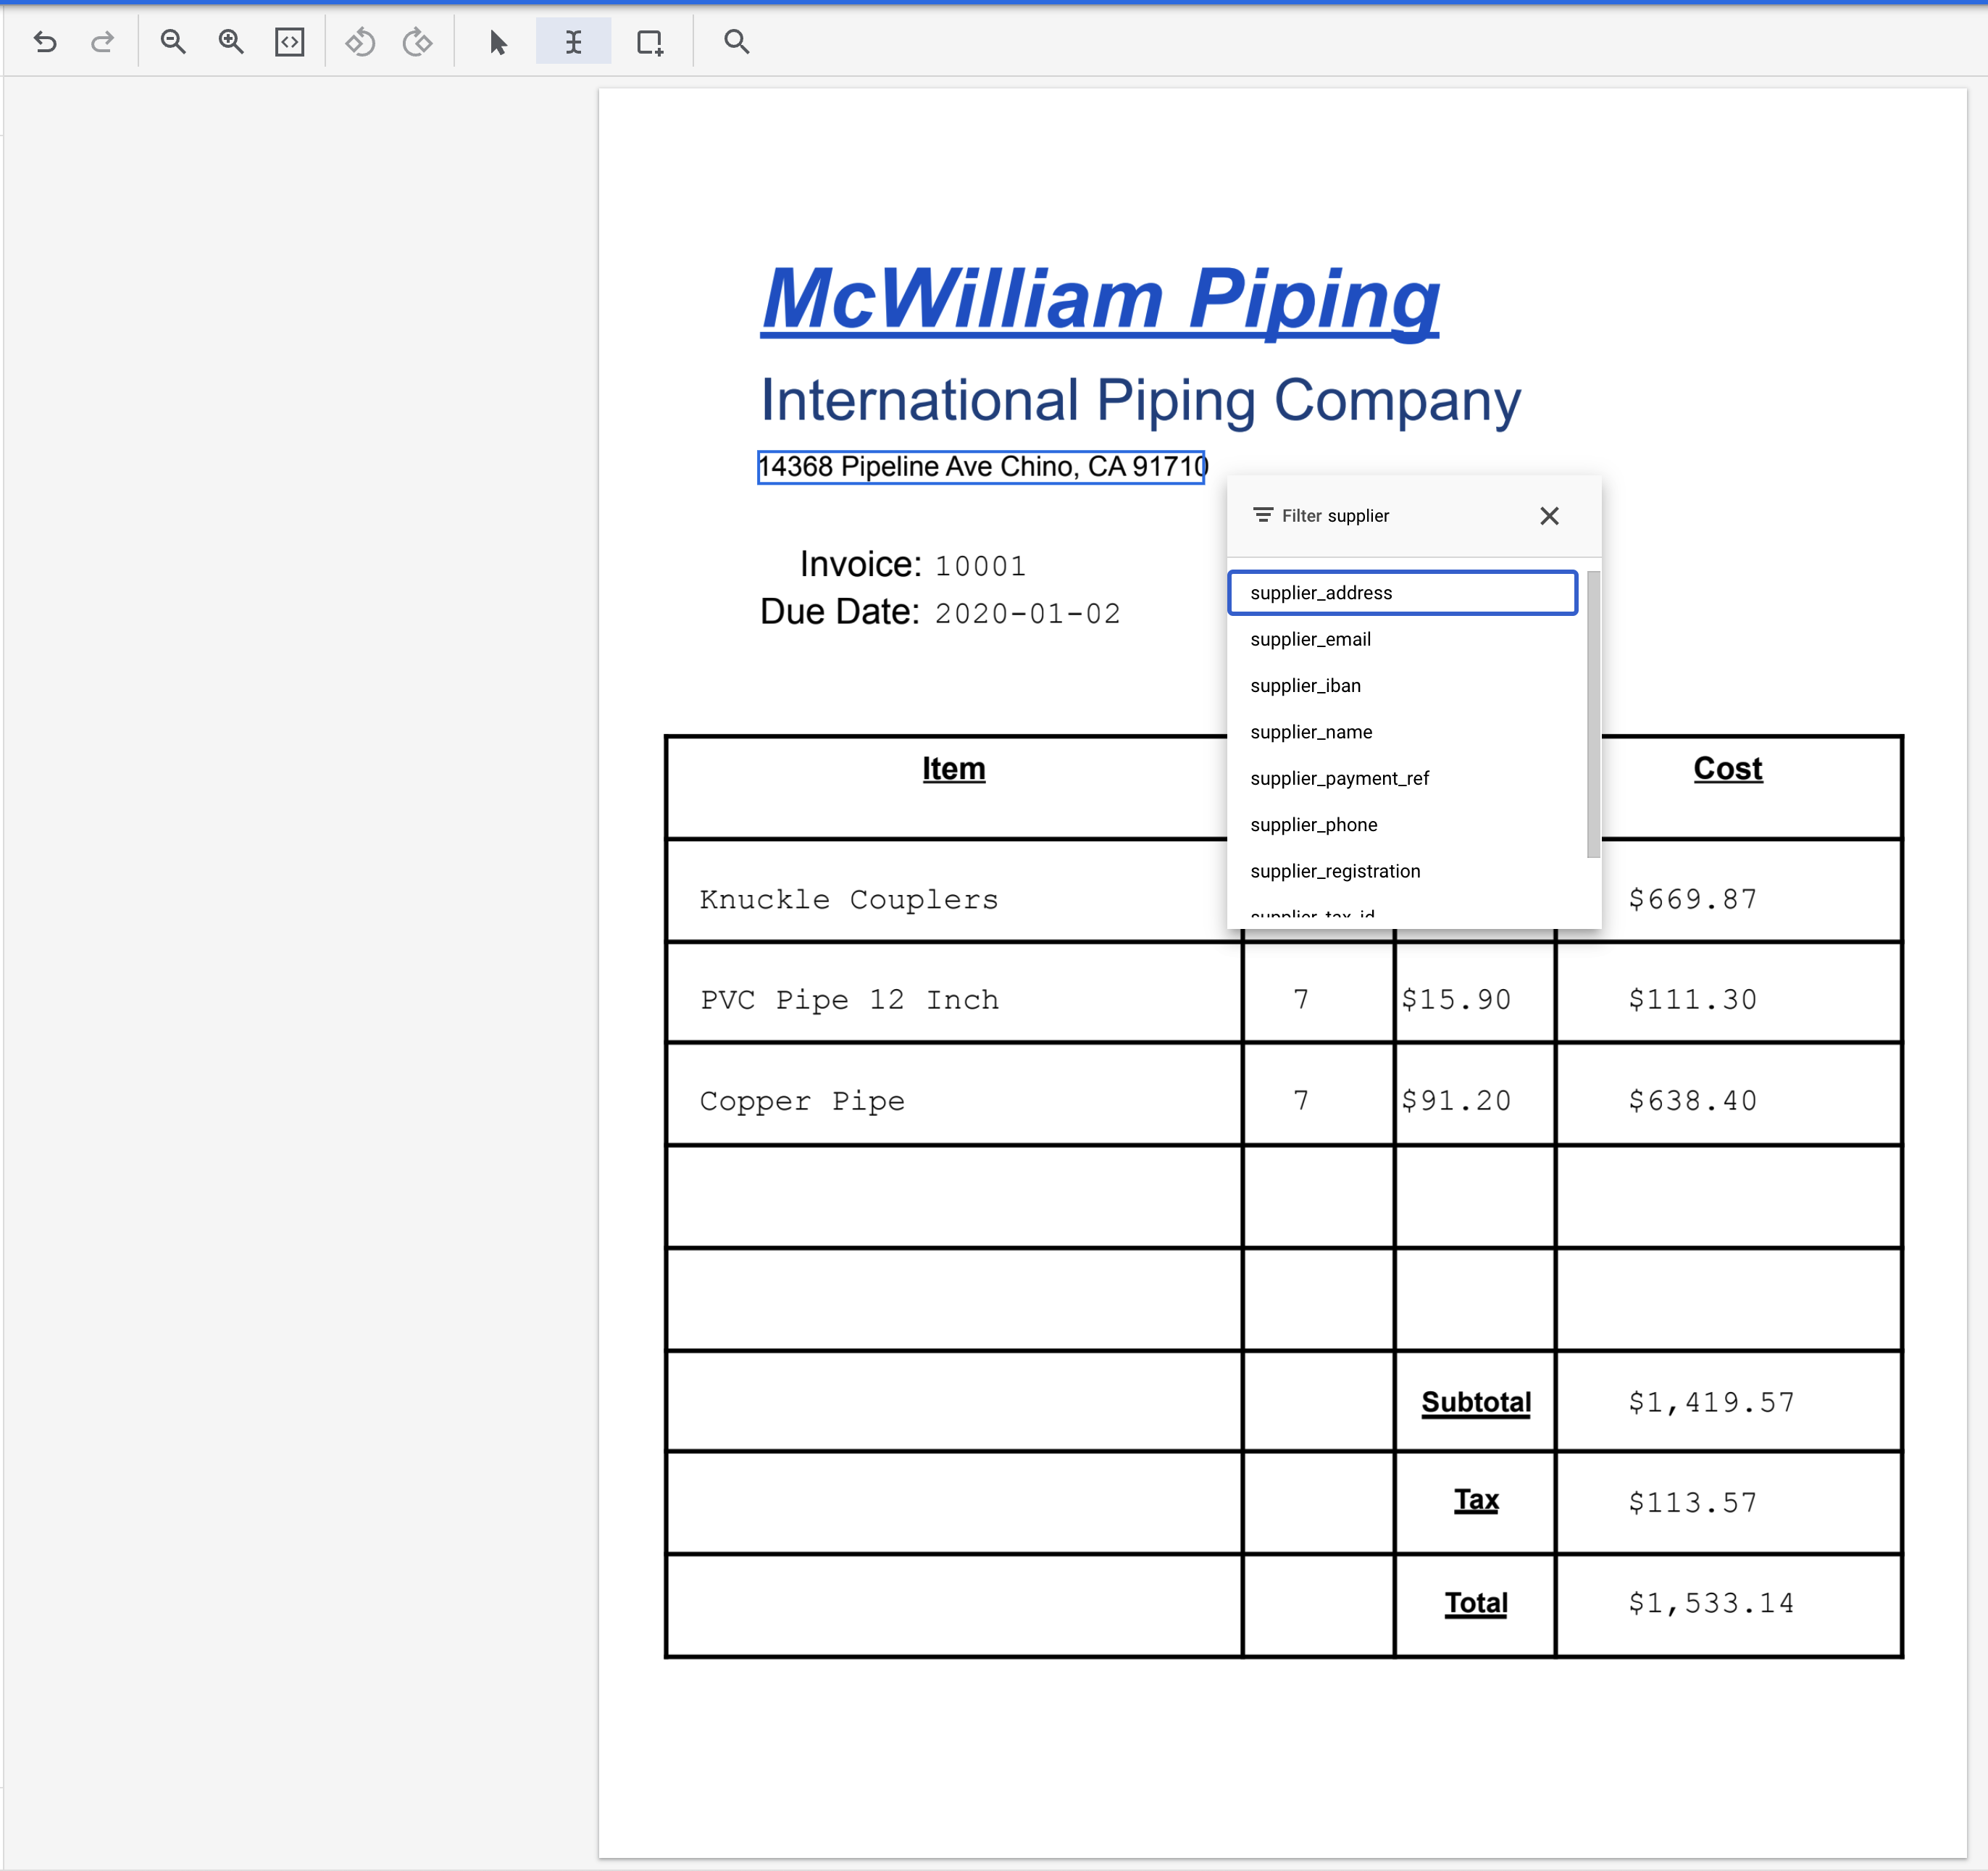
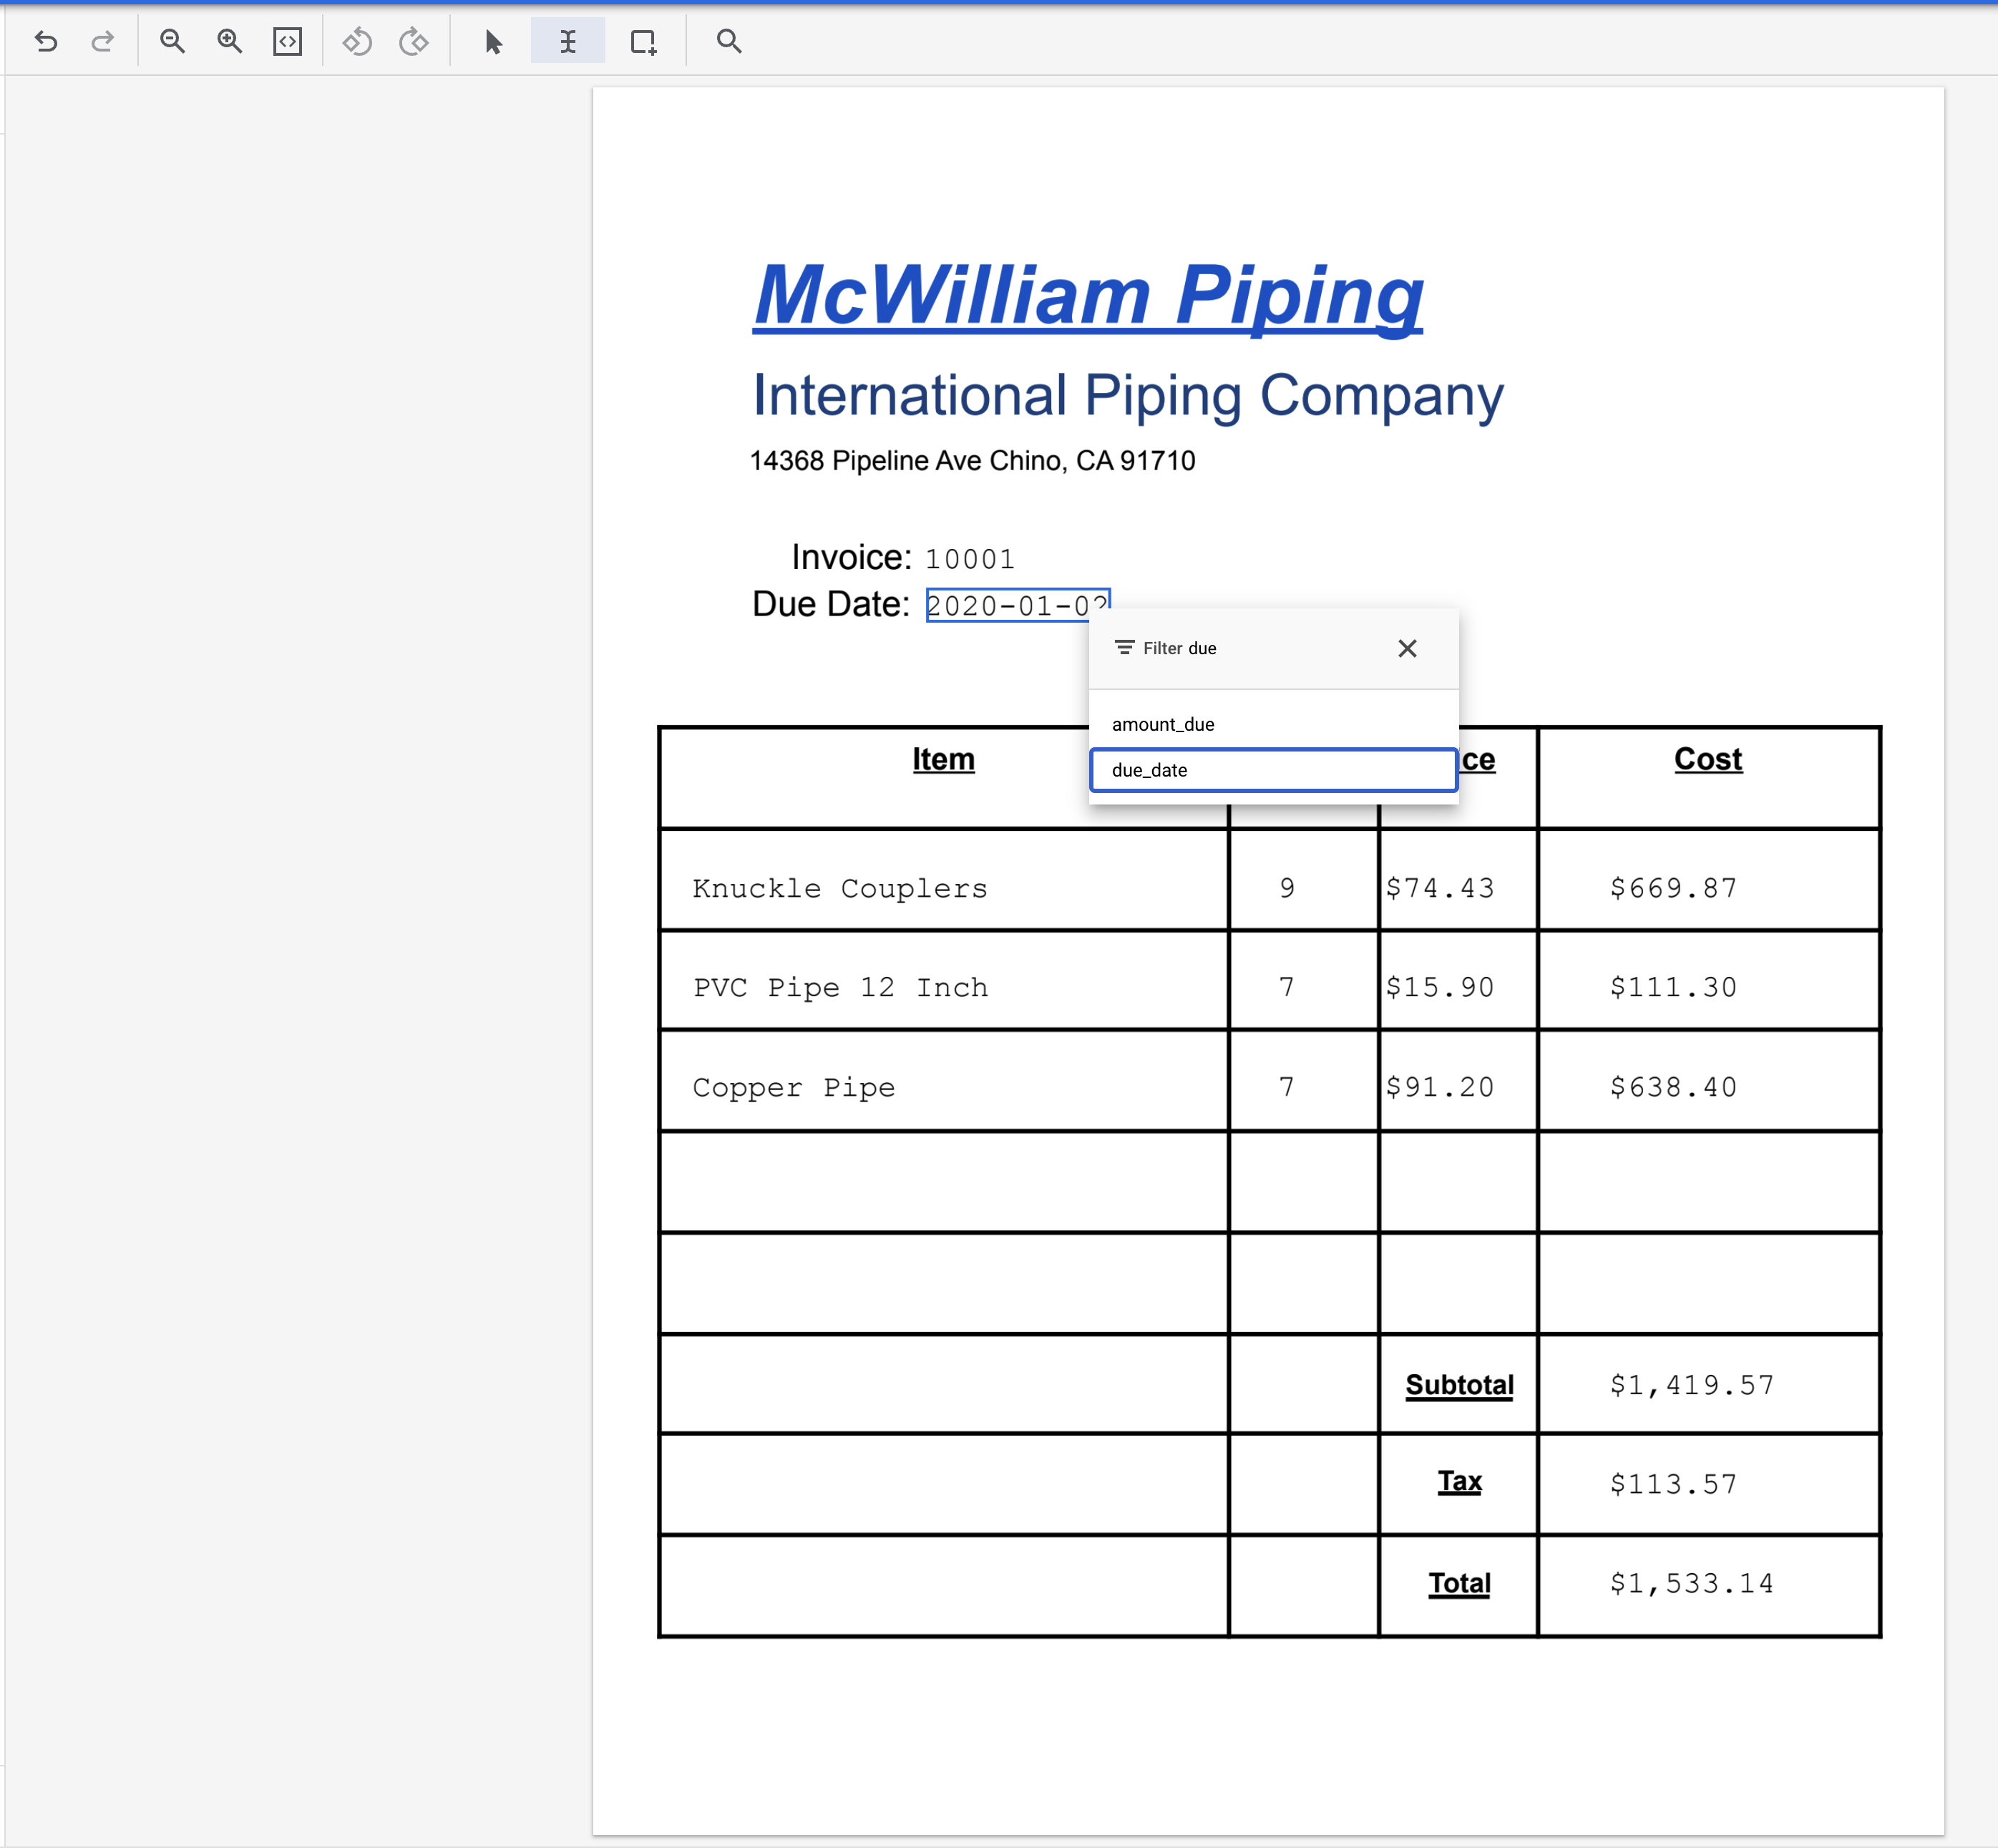
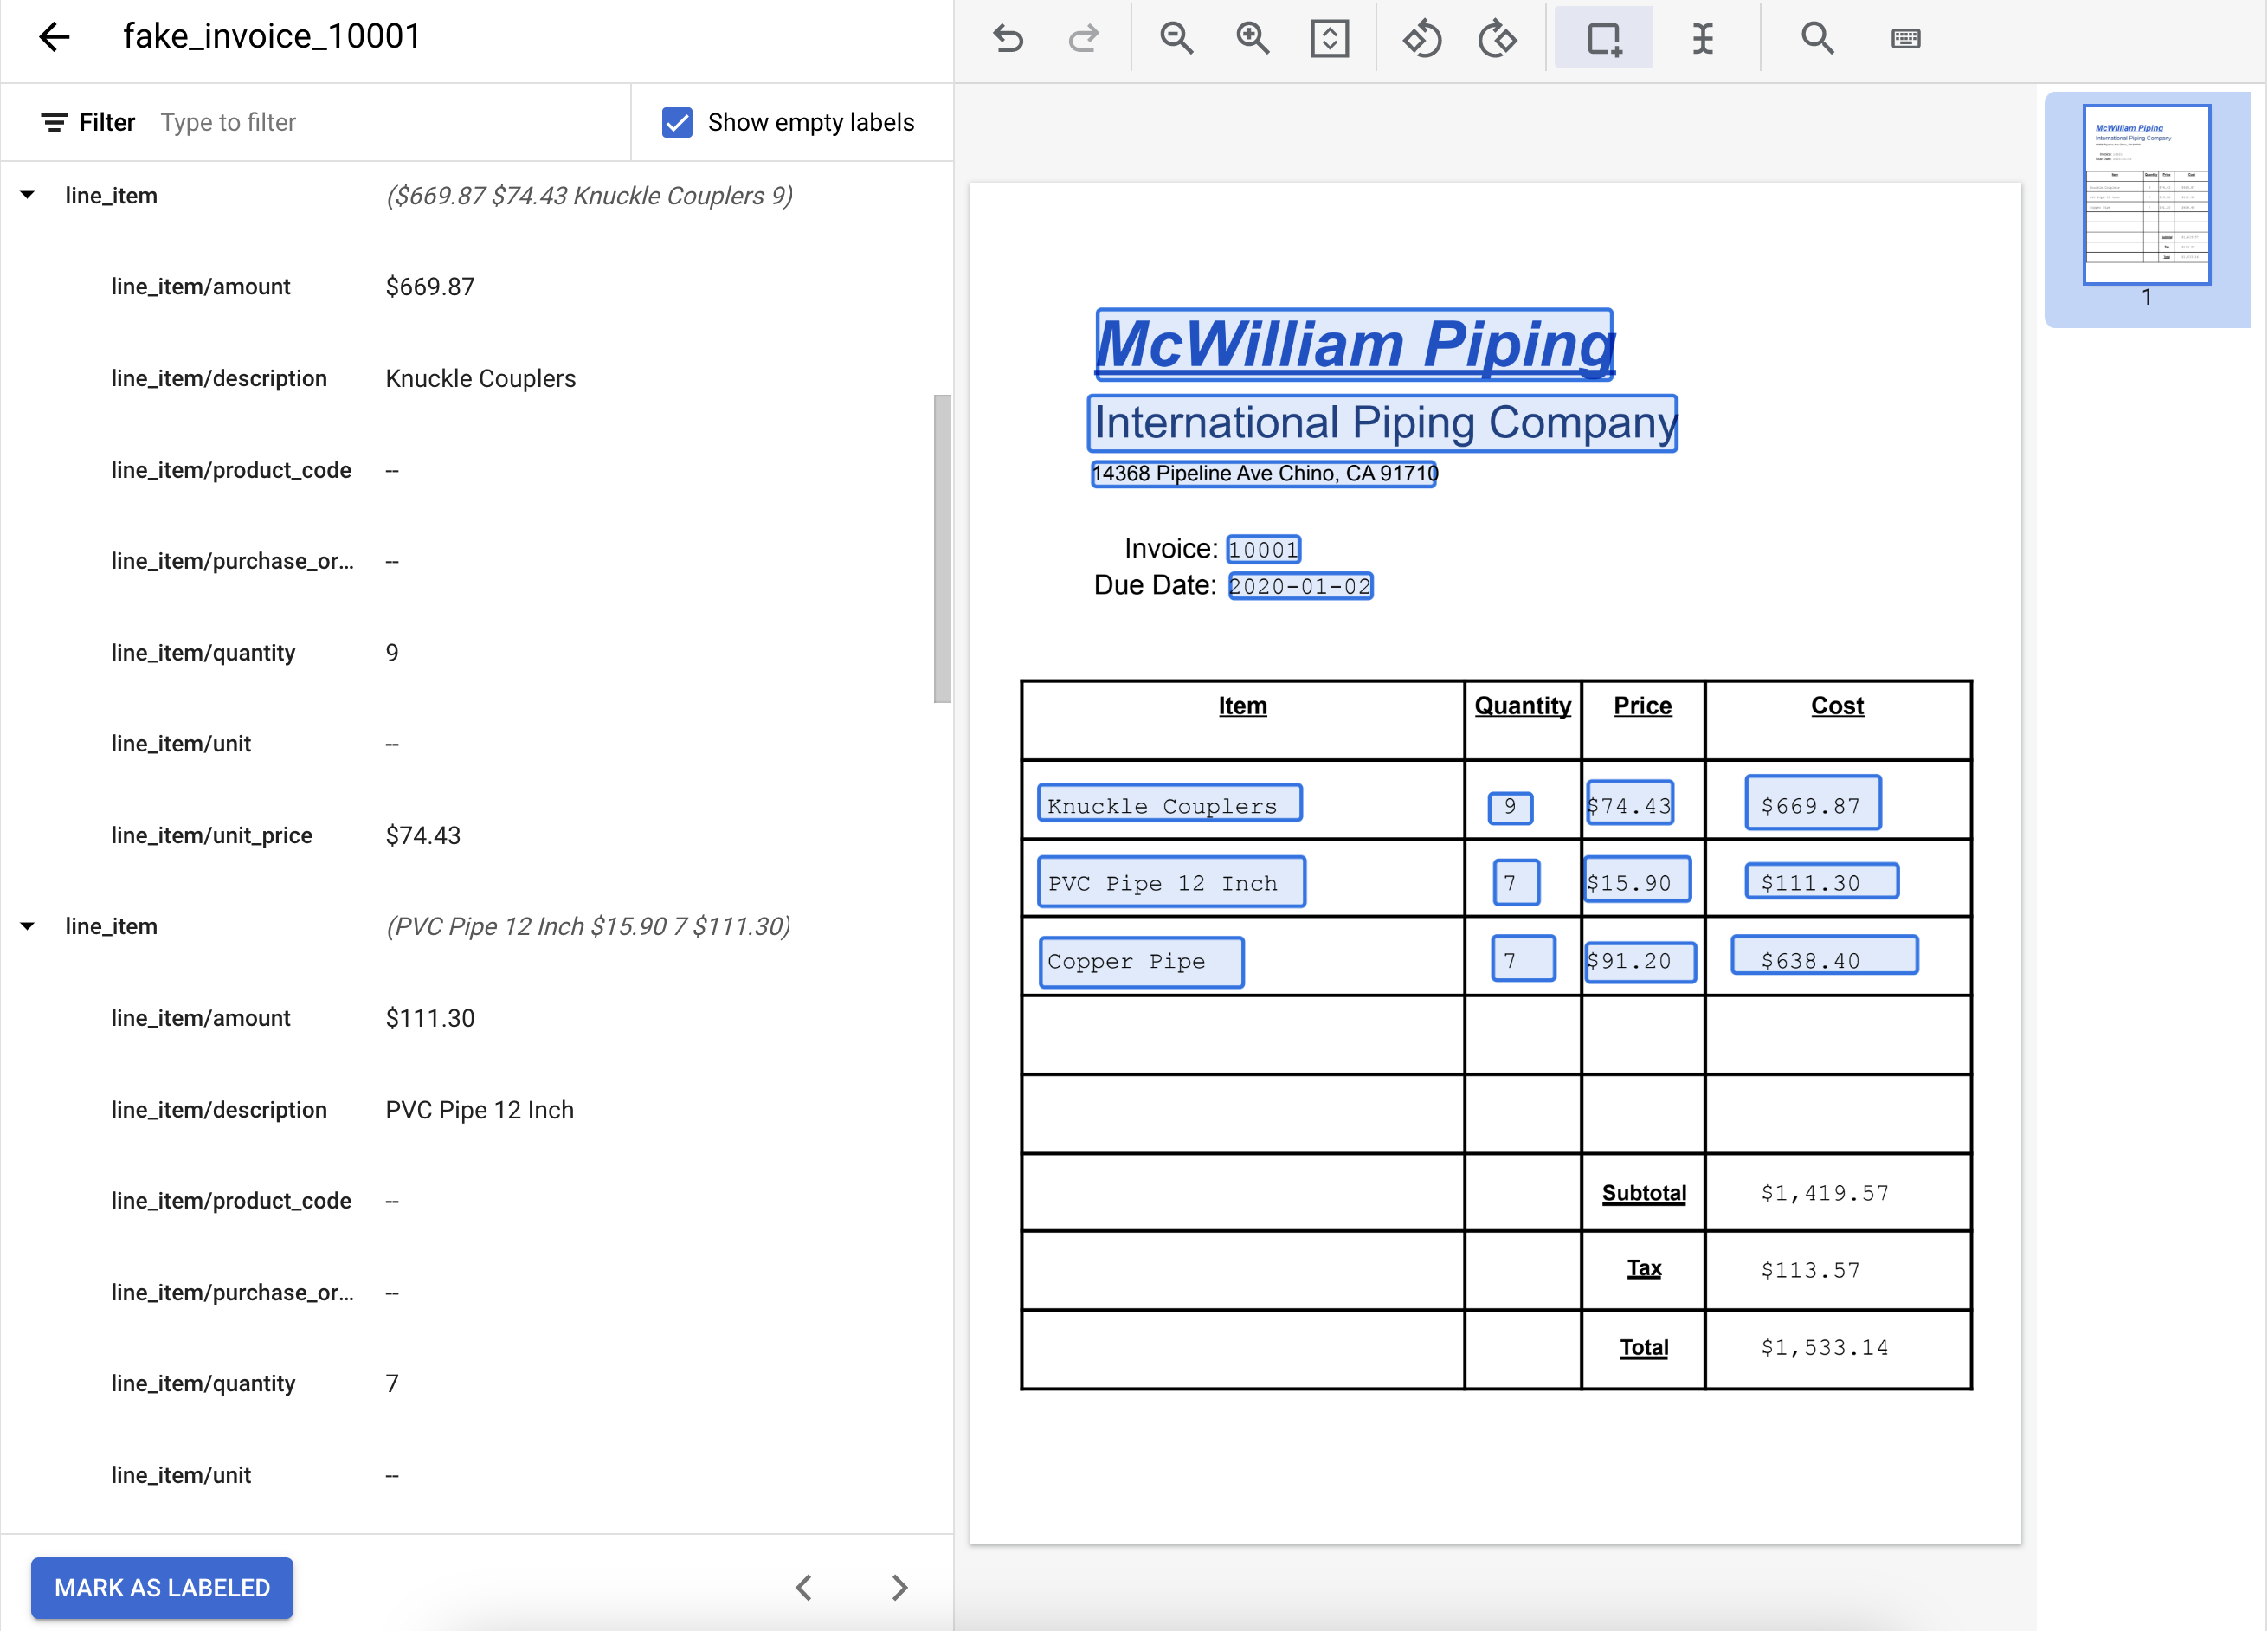
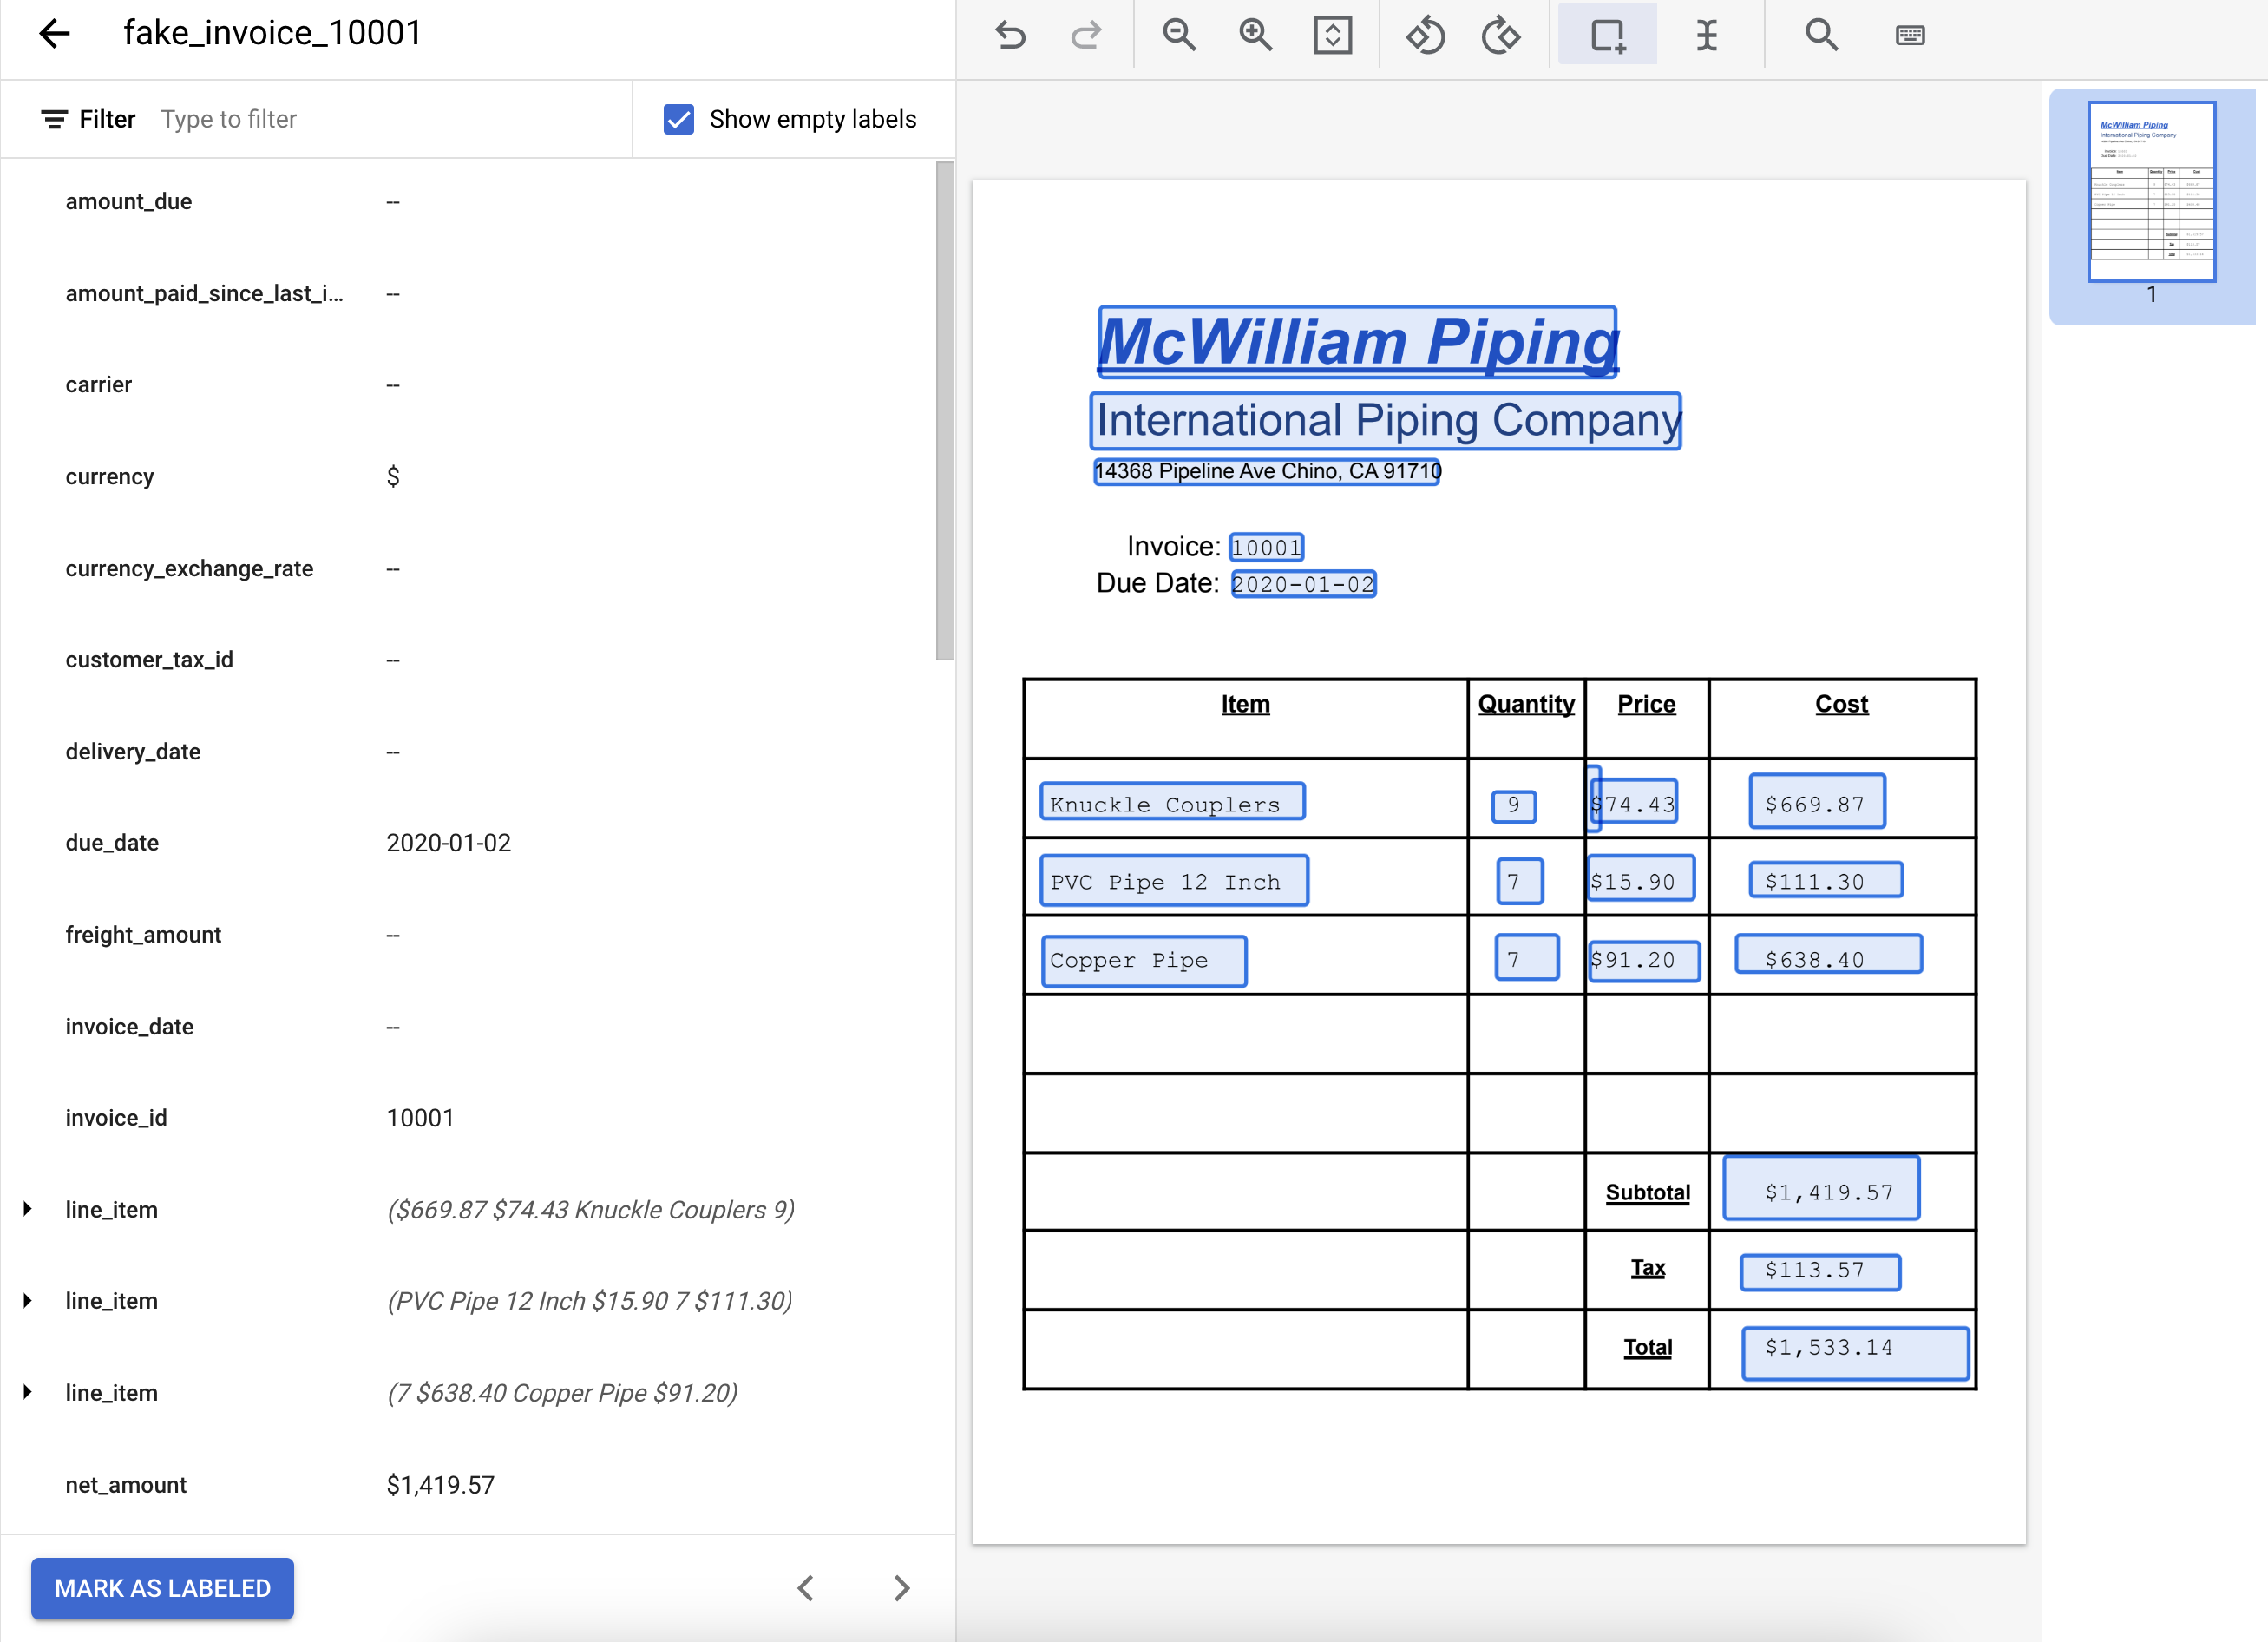
Next, you will identify text elements and labels for the entities you would like to extract. These labels will be used to train your model to parse this specific document structure and identify the correct types.
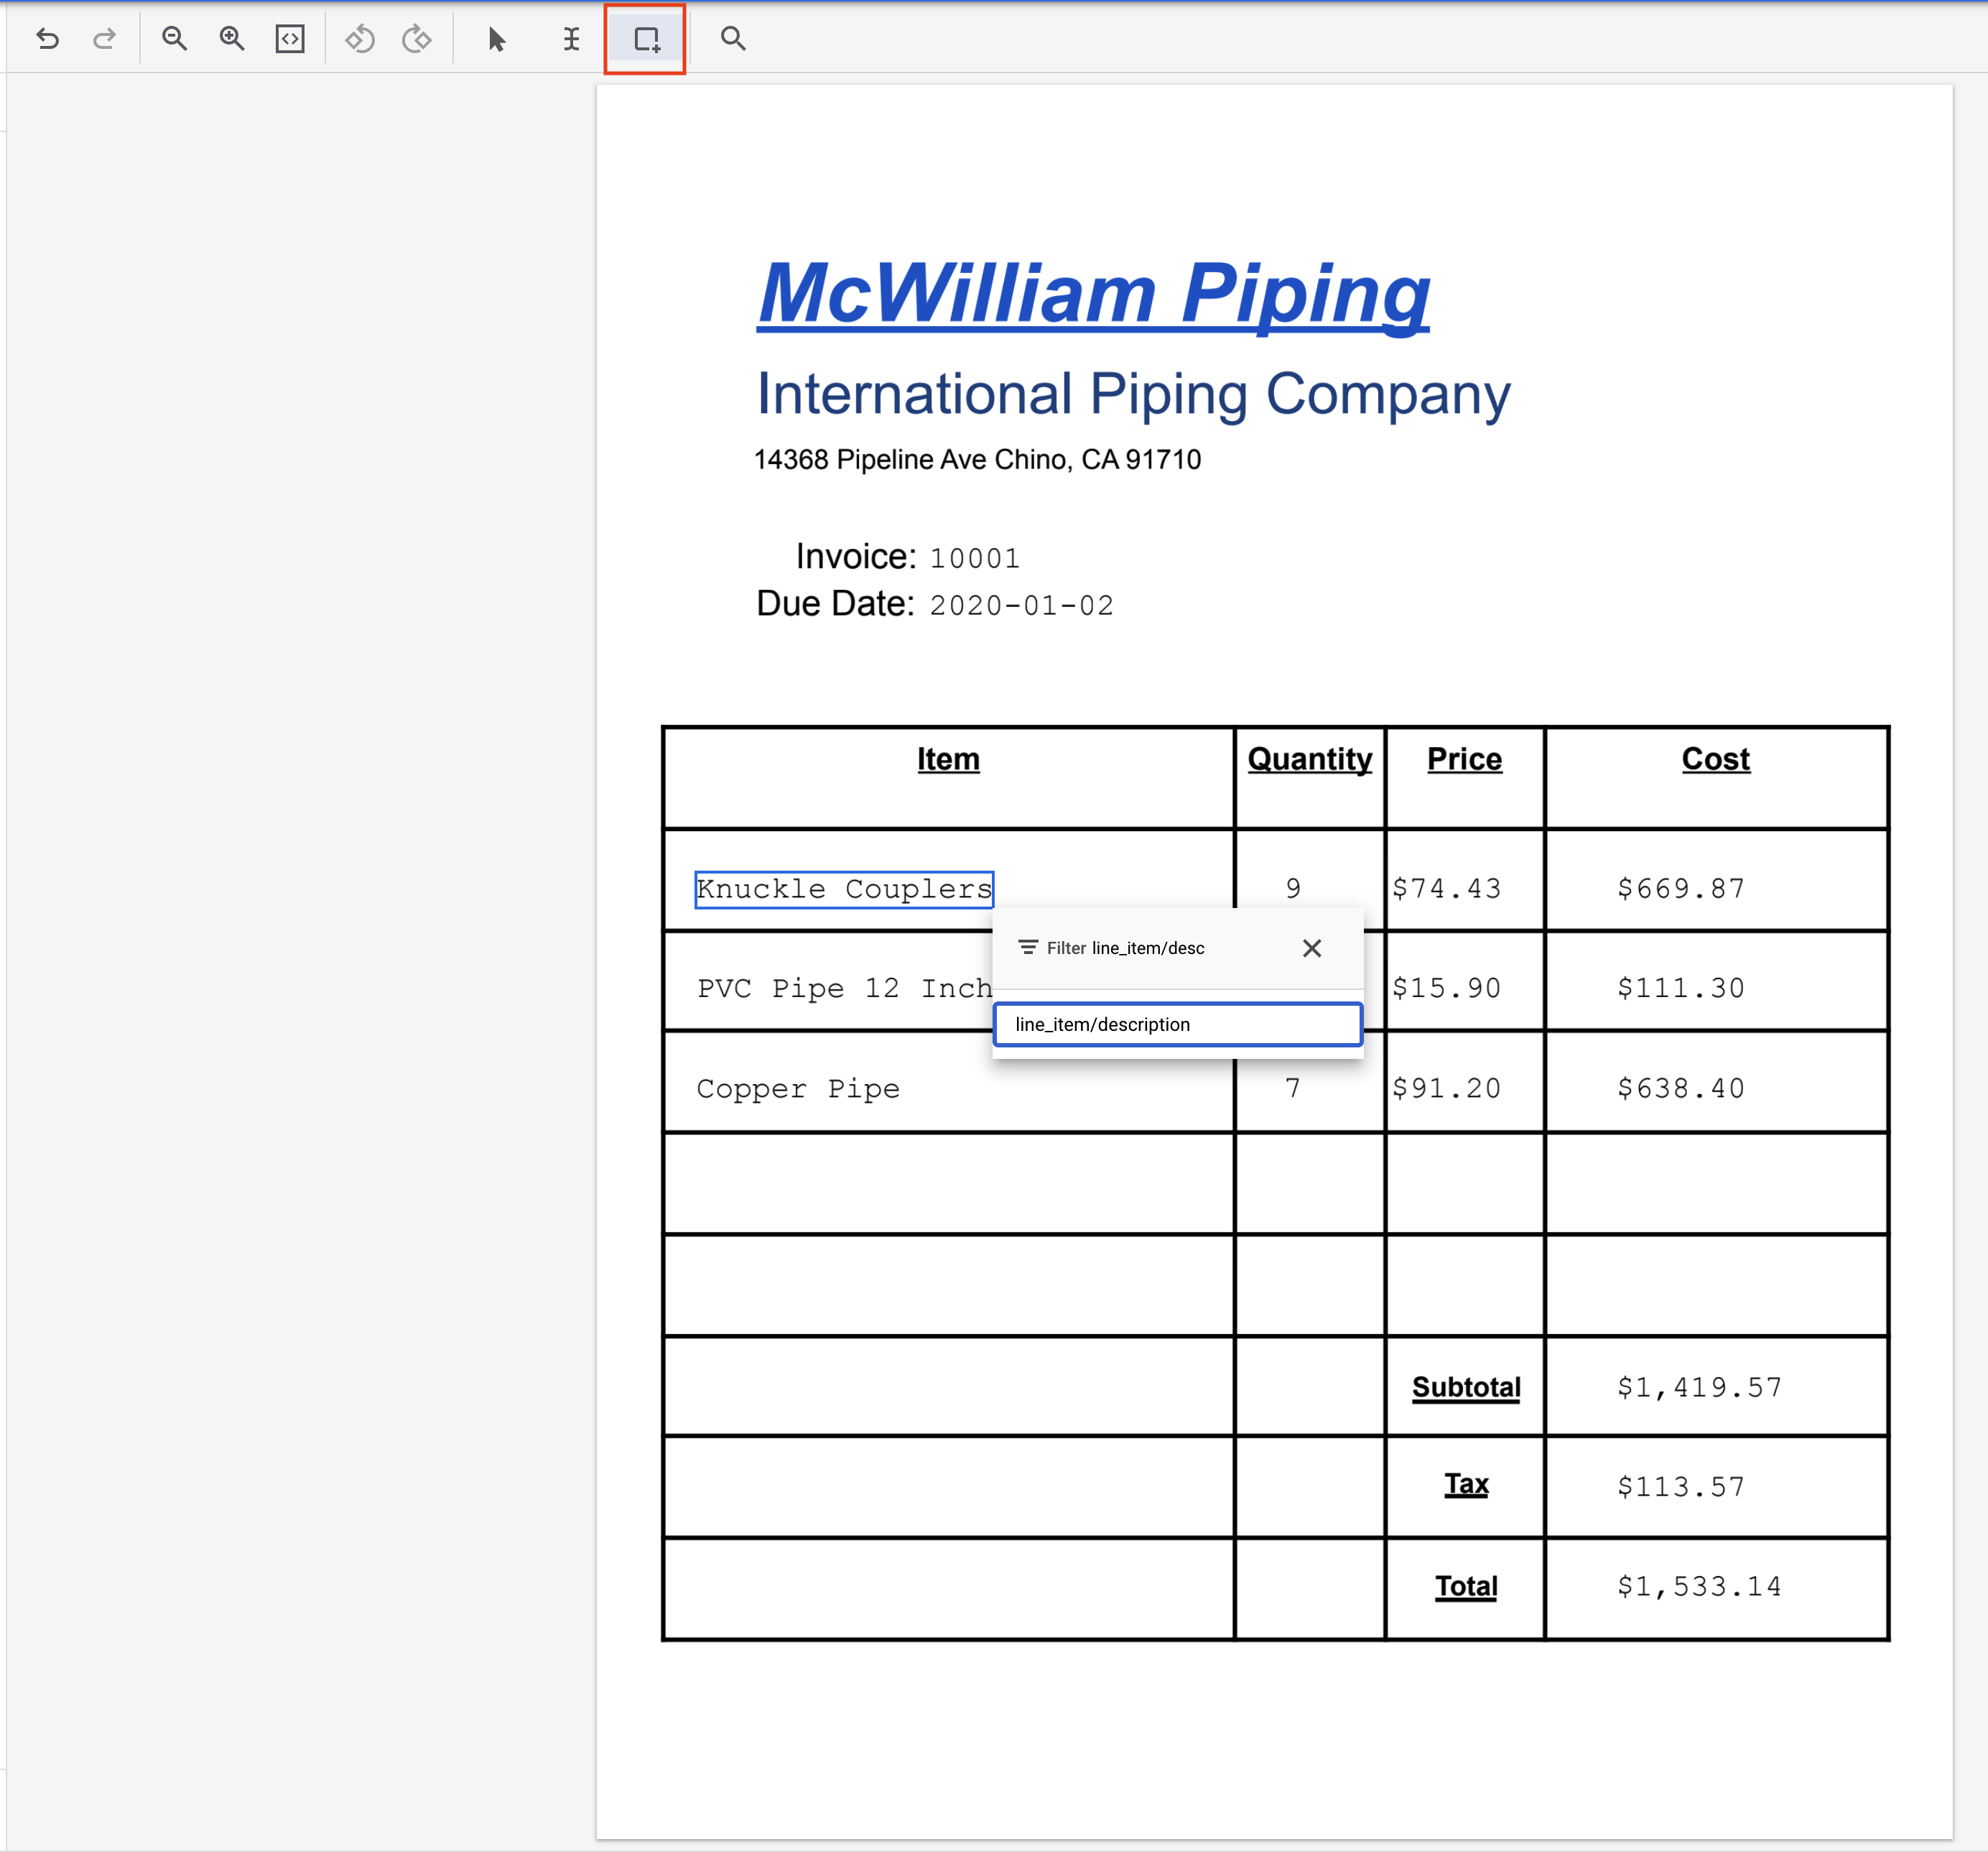
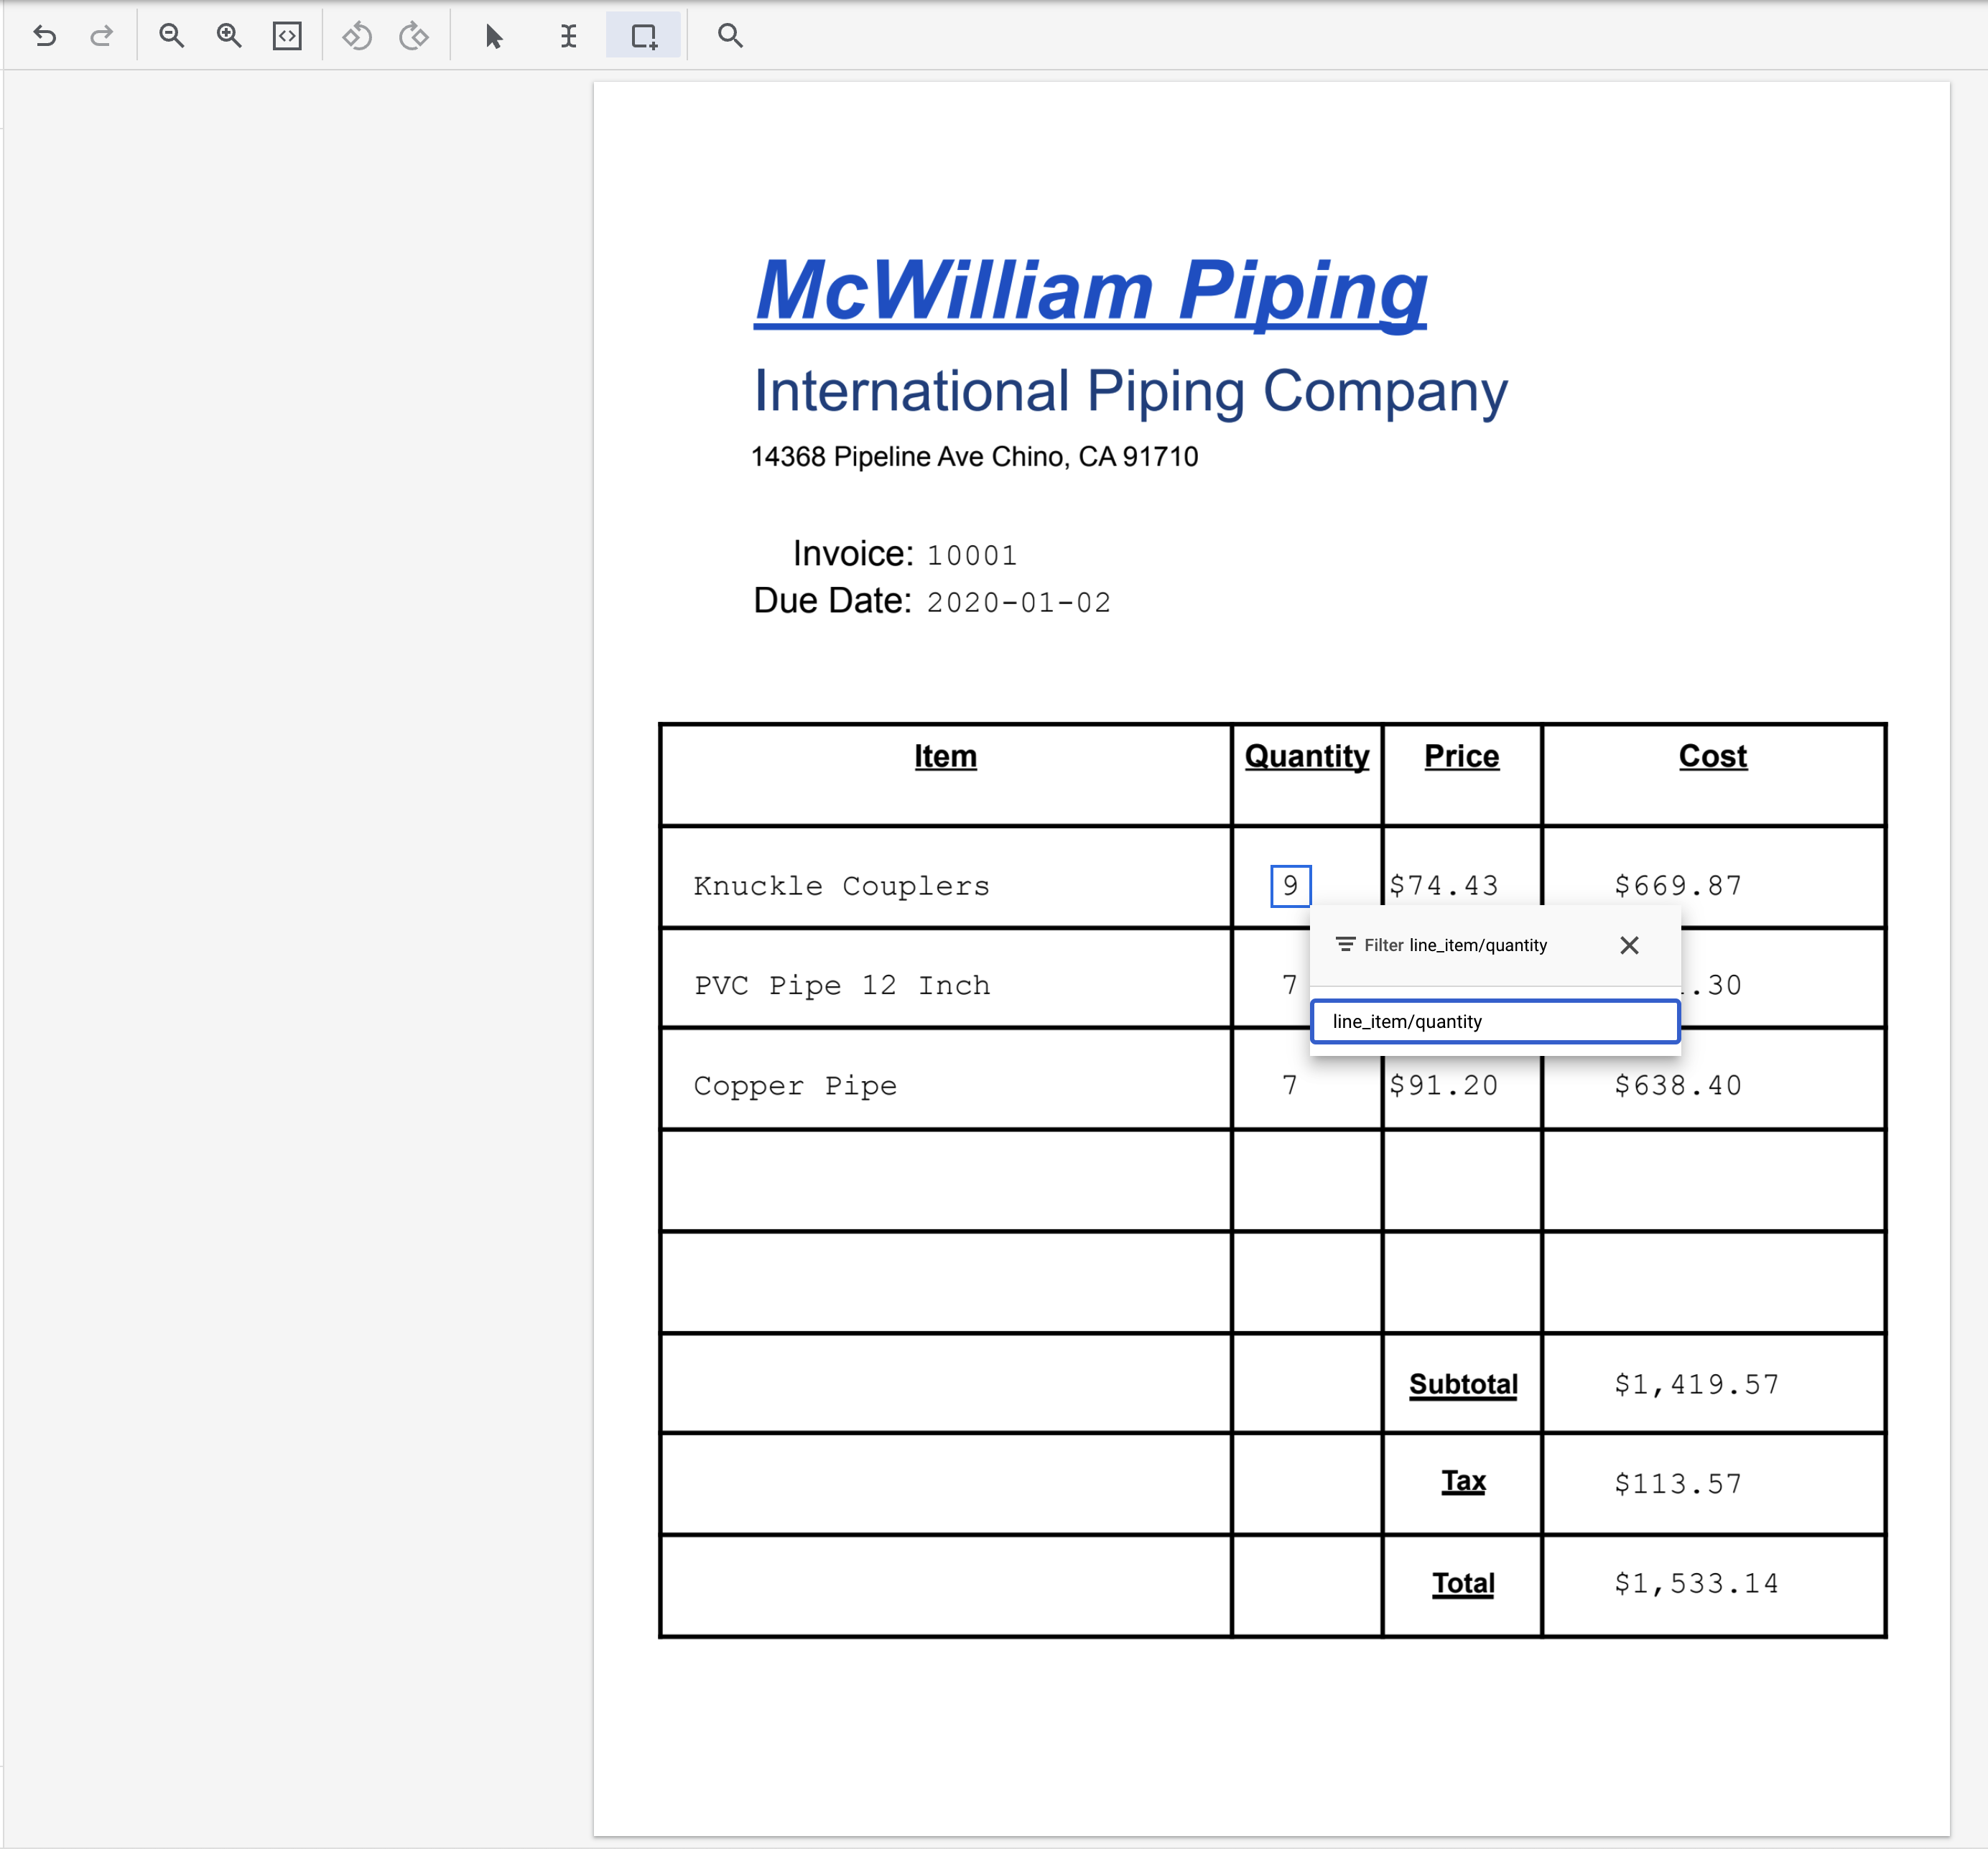
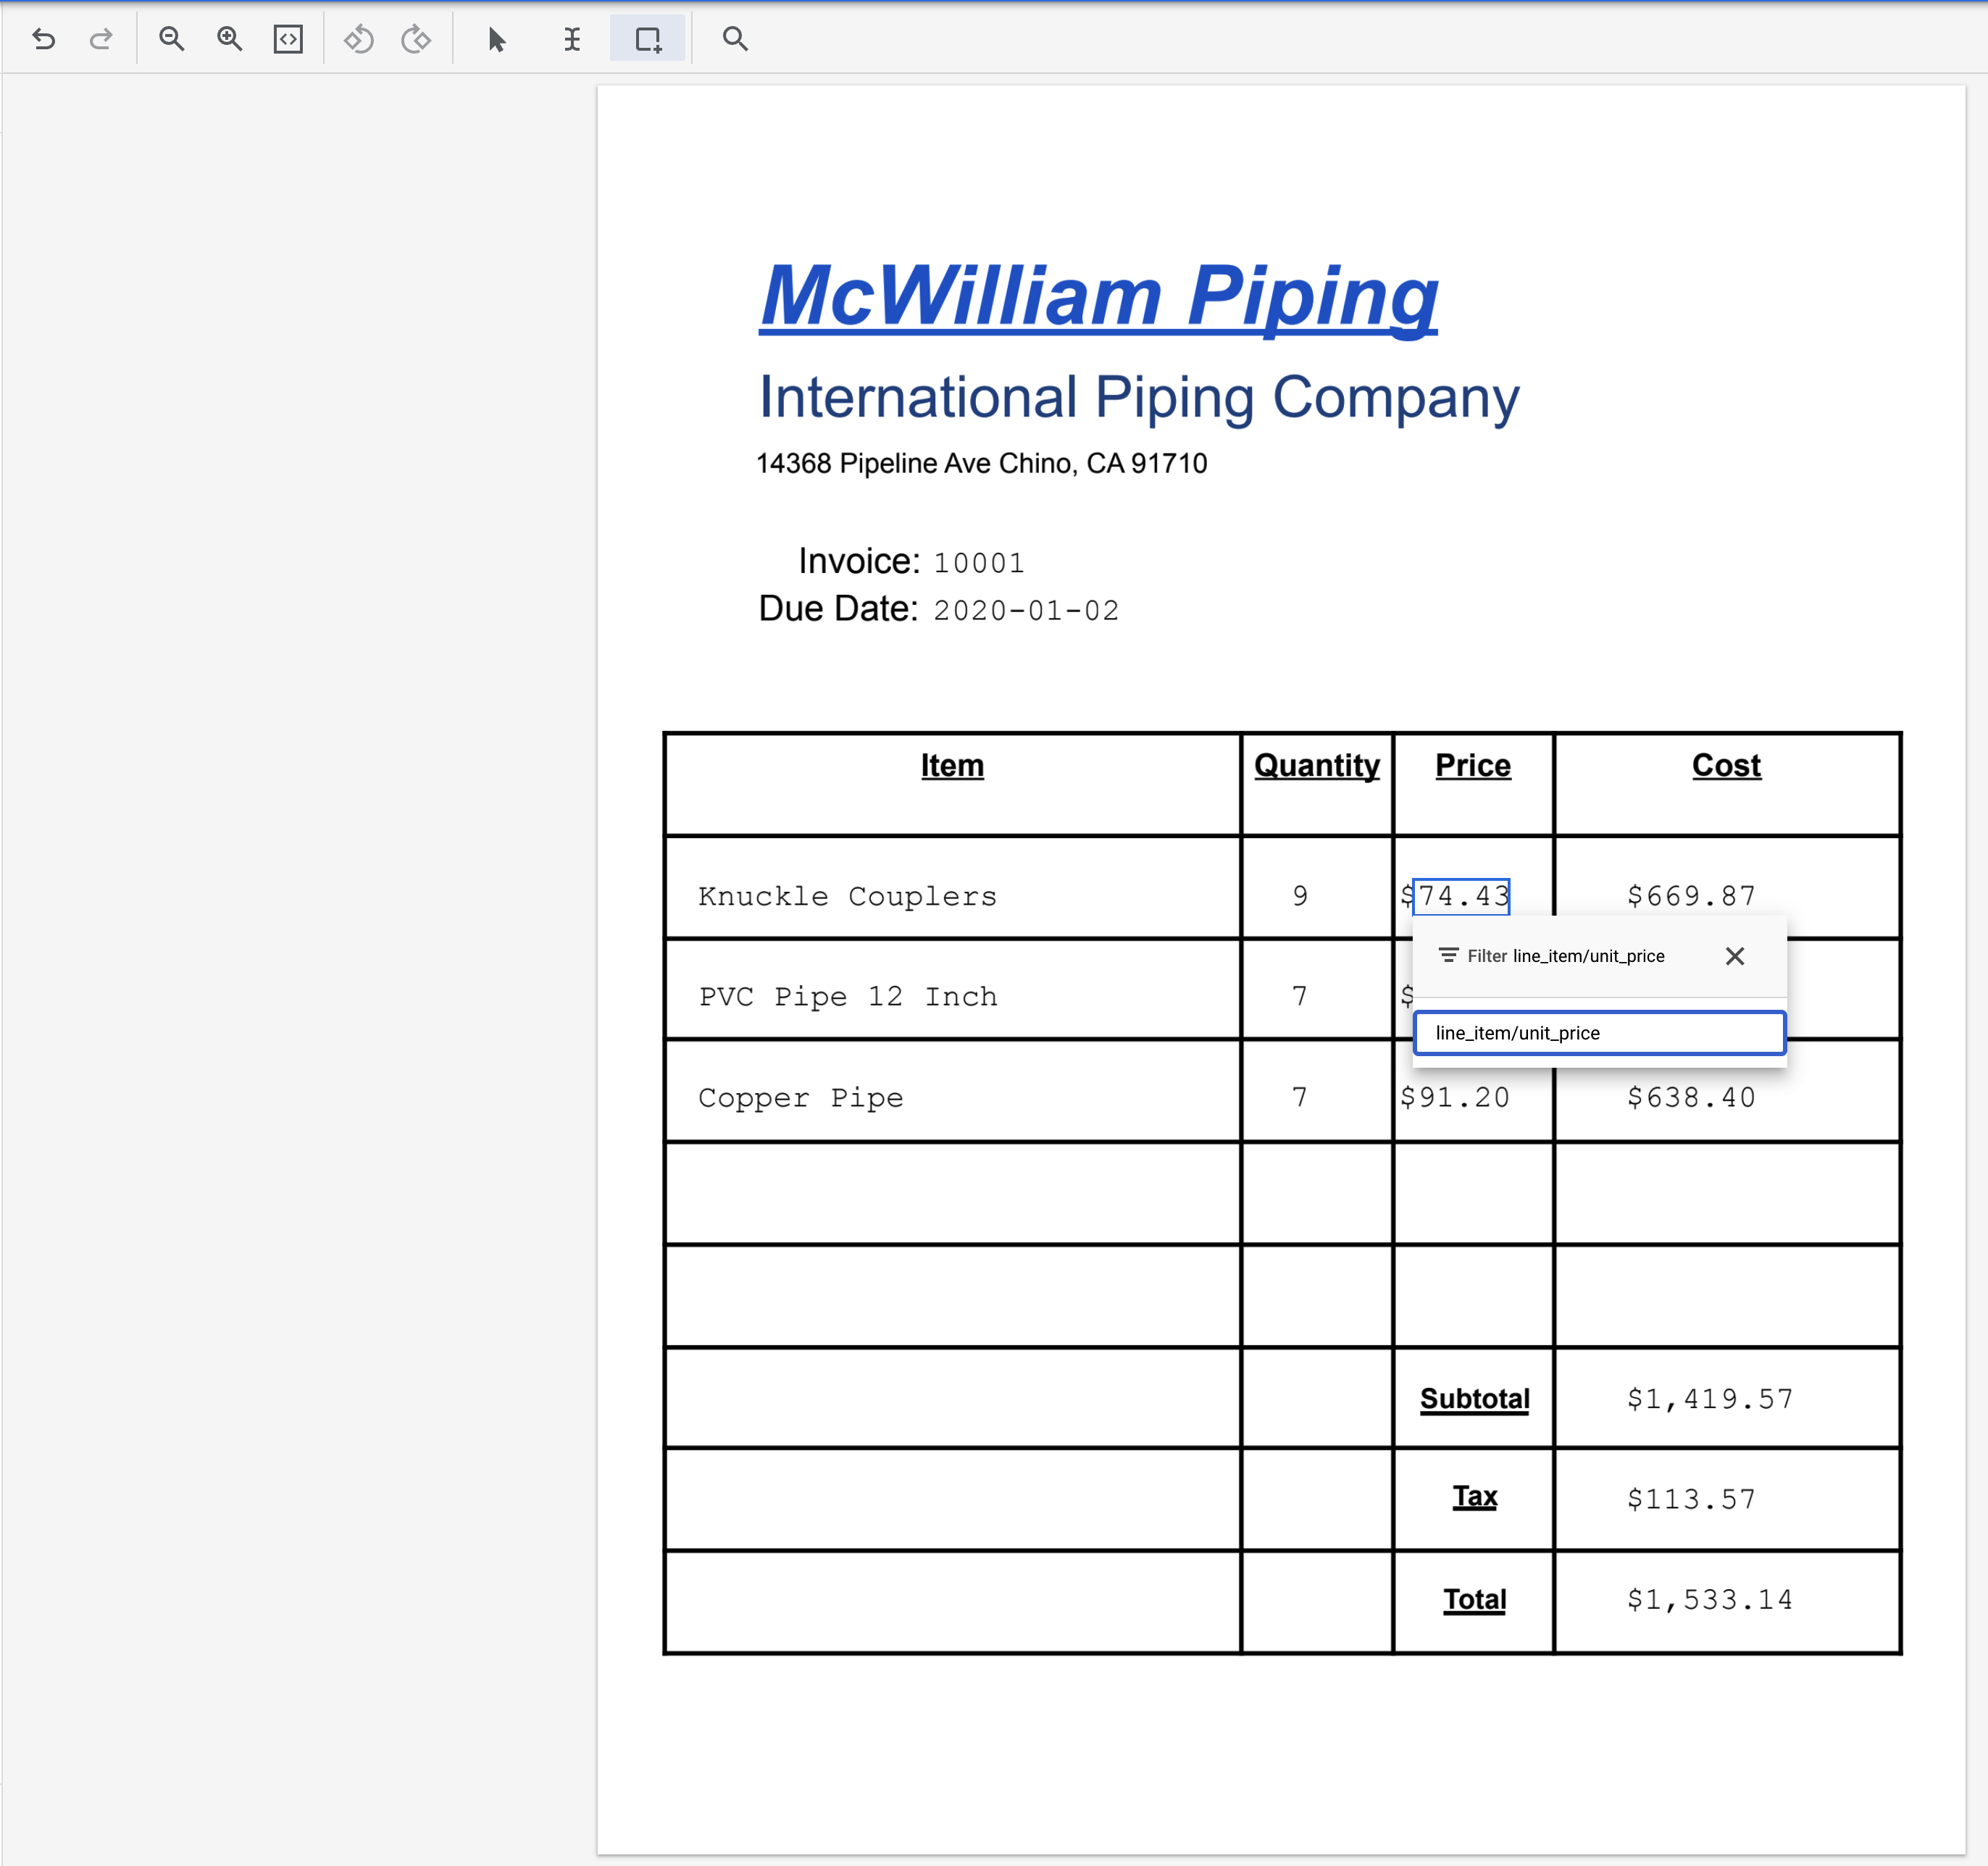
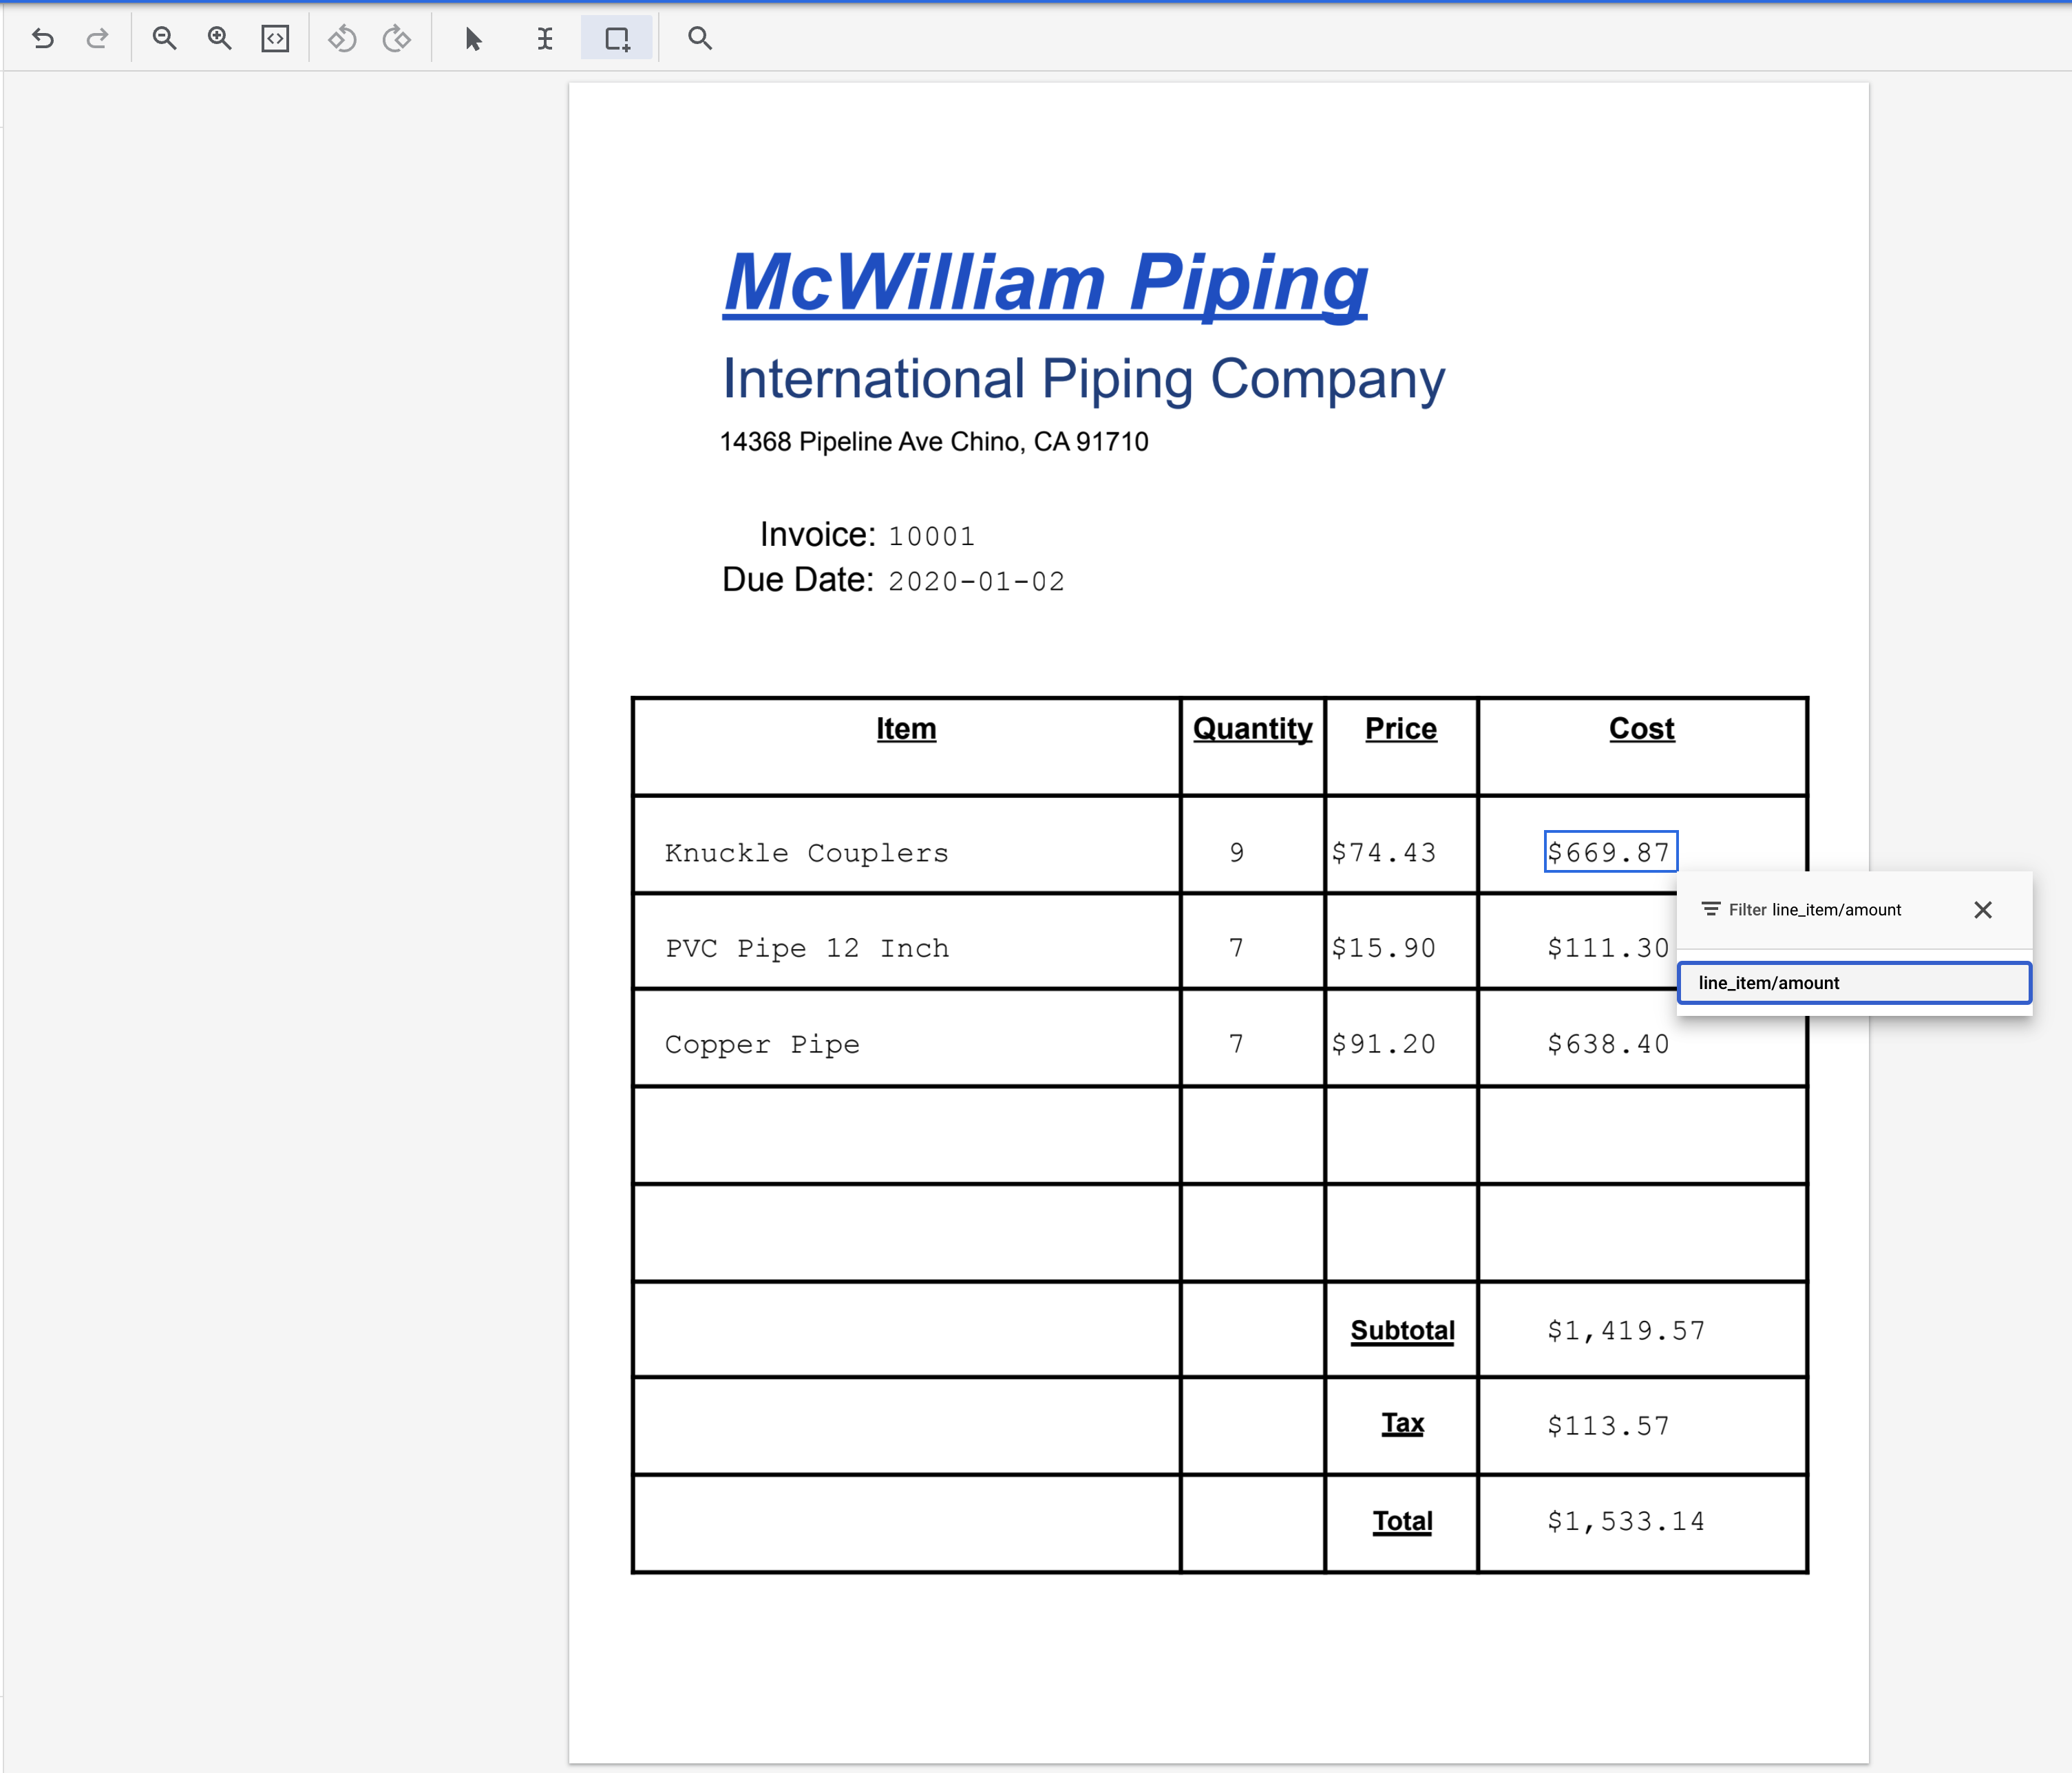
supplier_name. You can use the text filter to search for label names.supplier_address.invoice_id.due_date.line_item/description.line_item/quantity. Assign it to line_item (Knuckle Couplers).line_item/unit_price. Assign it to line_item (Knuckle Couplers).line_item/amount. Assign it to line_item (Knuckle Couplers).Knuckle Couplers line item on the left side menu, click on the Add more rows button.Use the Bounding Box tool to highlight the entire second row.
Repeat this for the third row. If needed, update the labels to match the first row's structure.
It should look like this when complete:
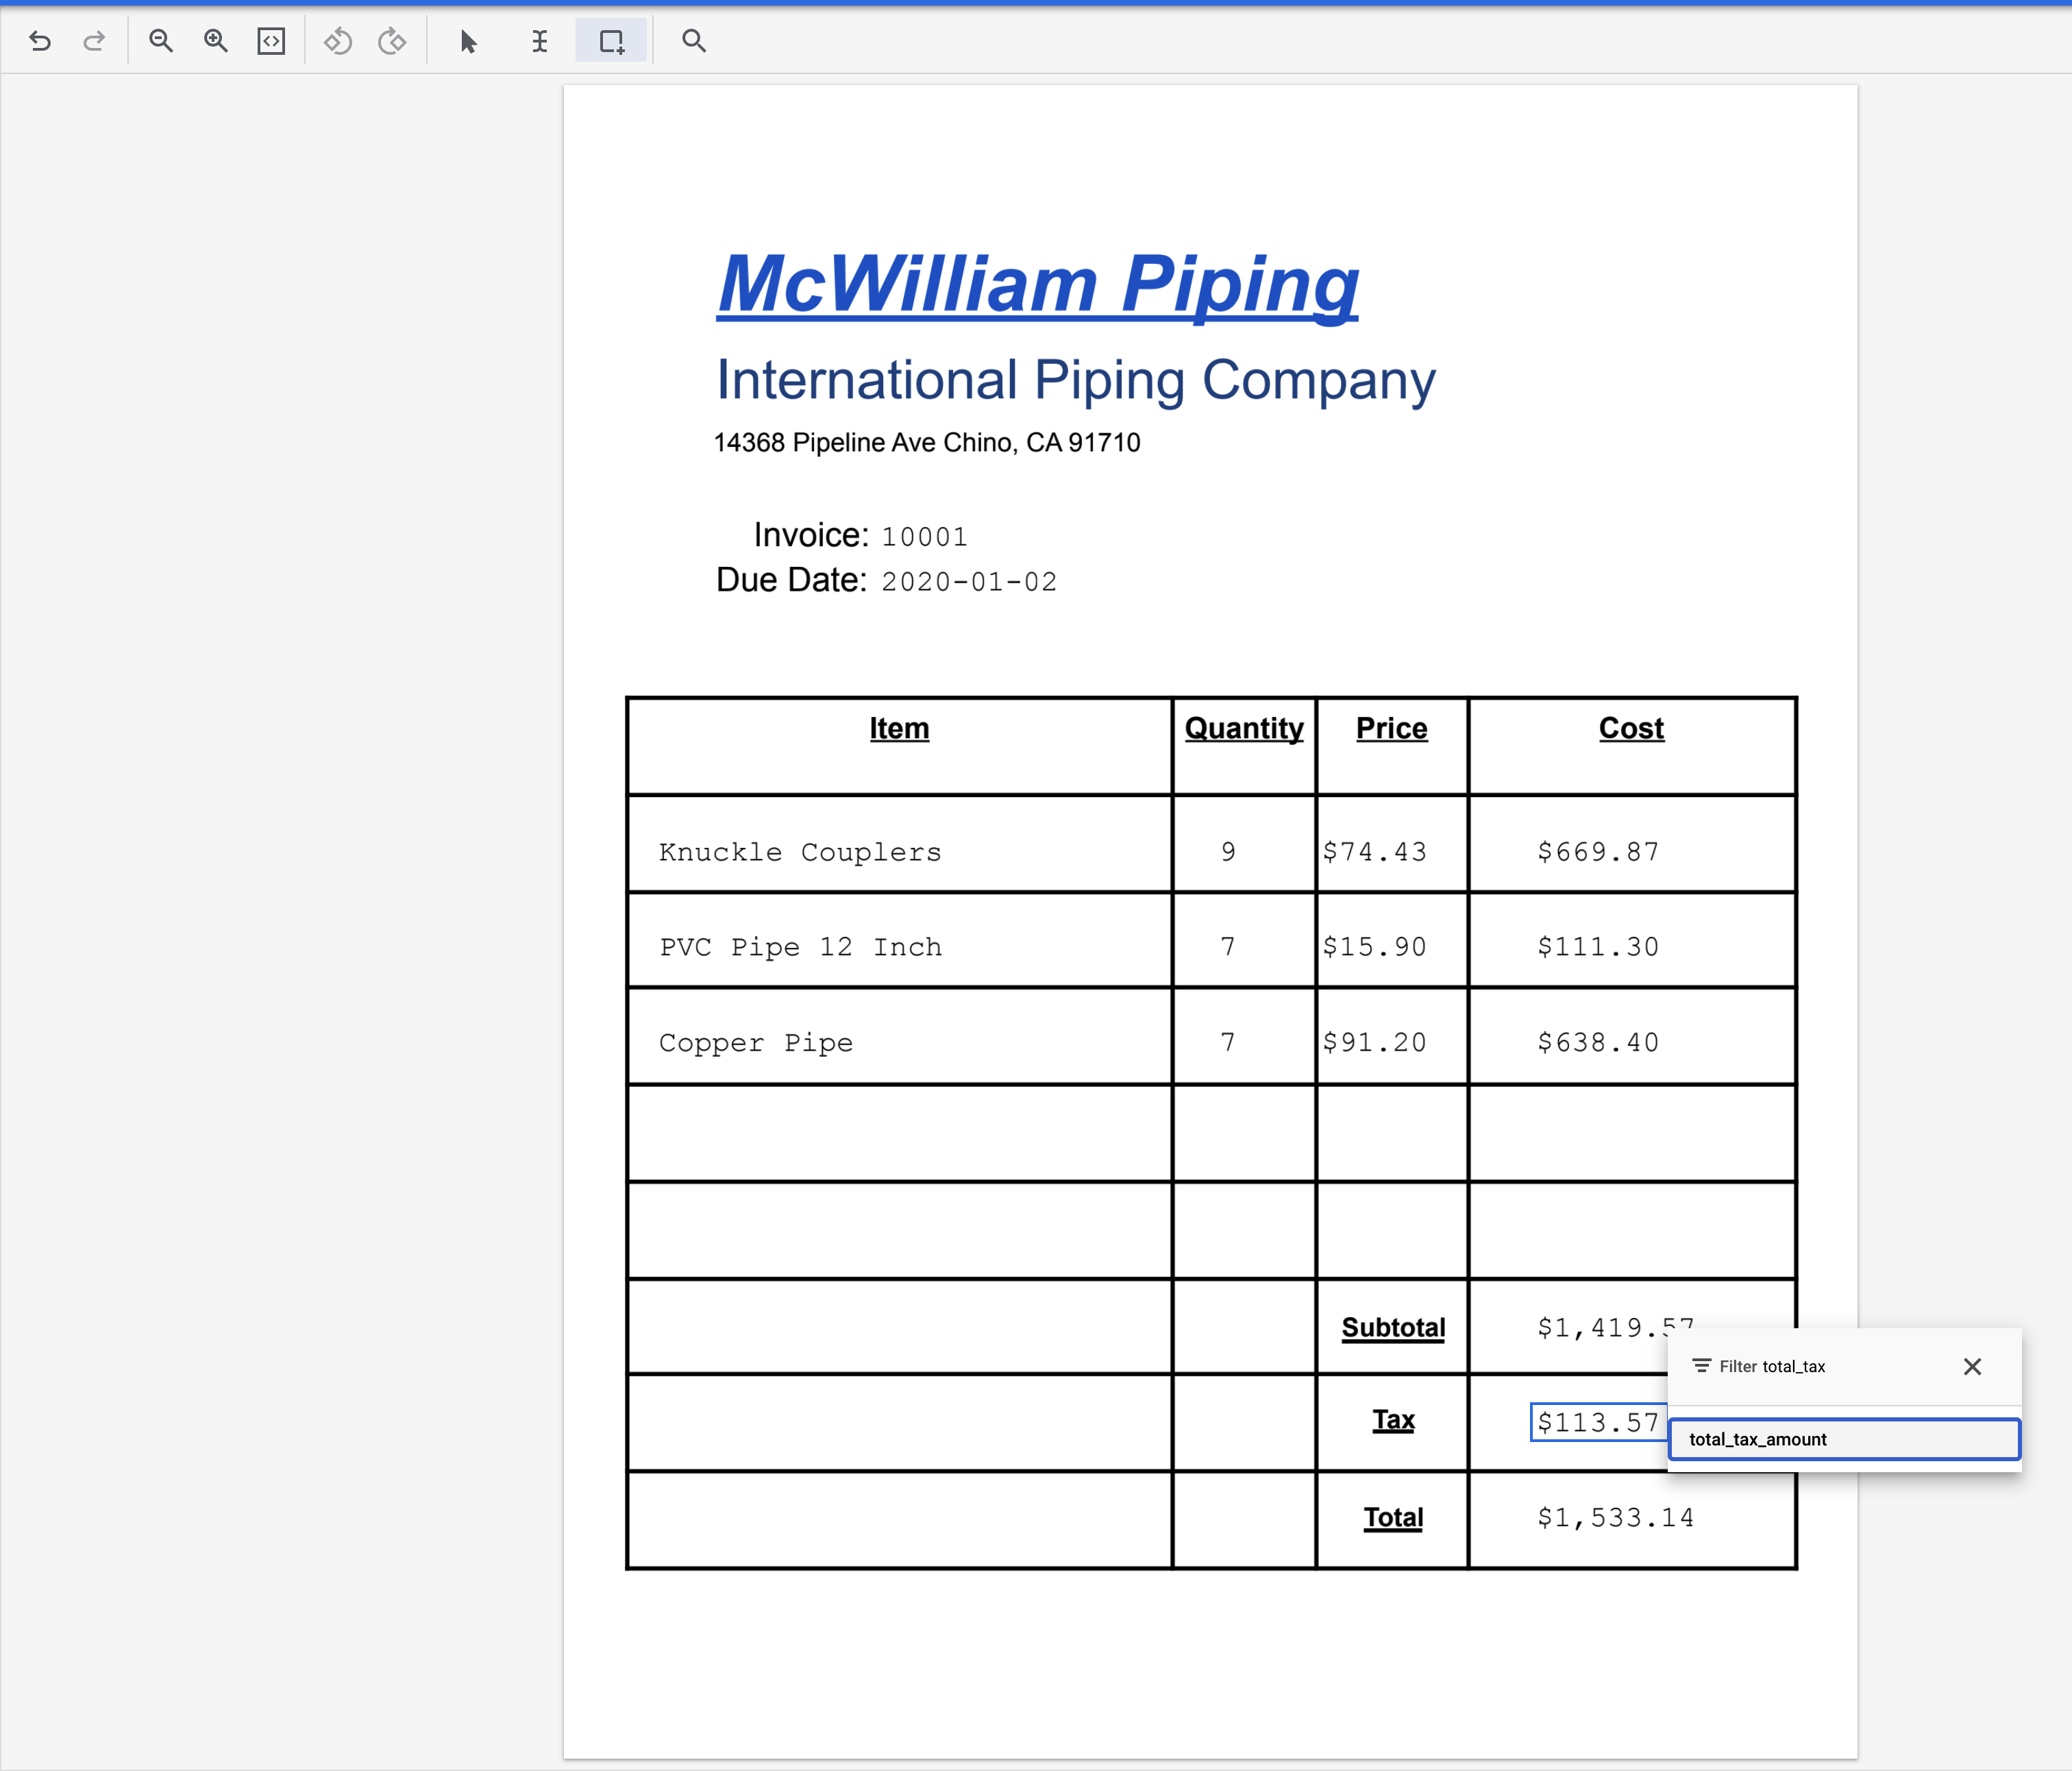
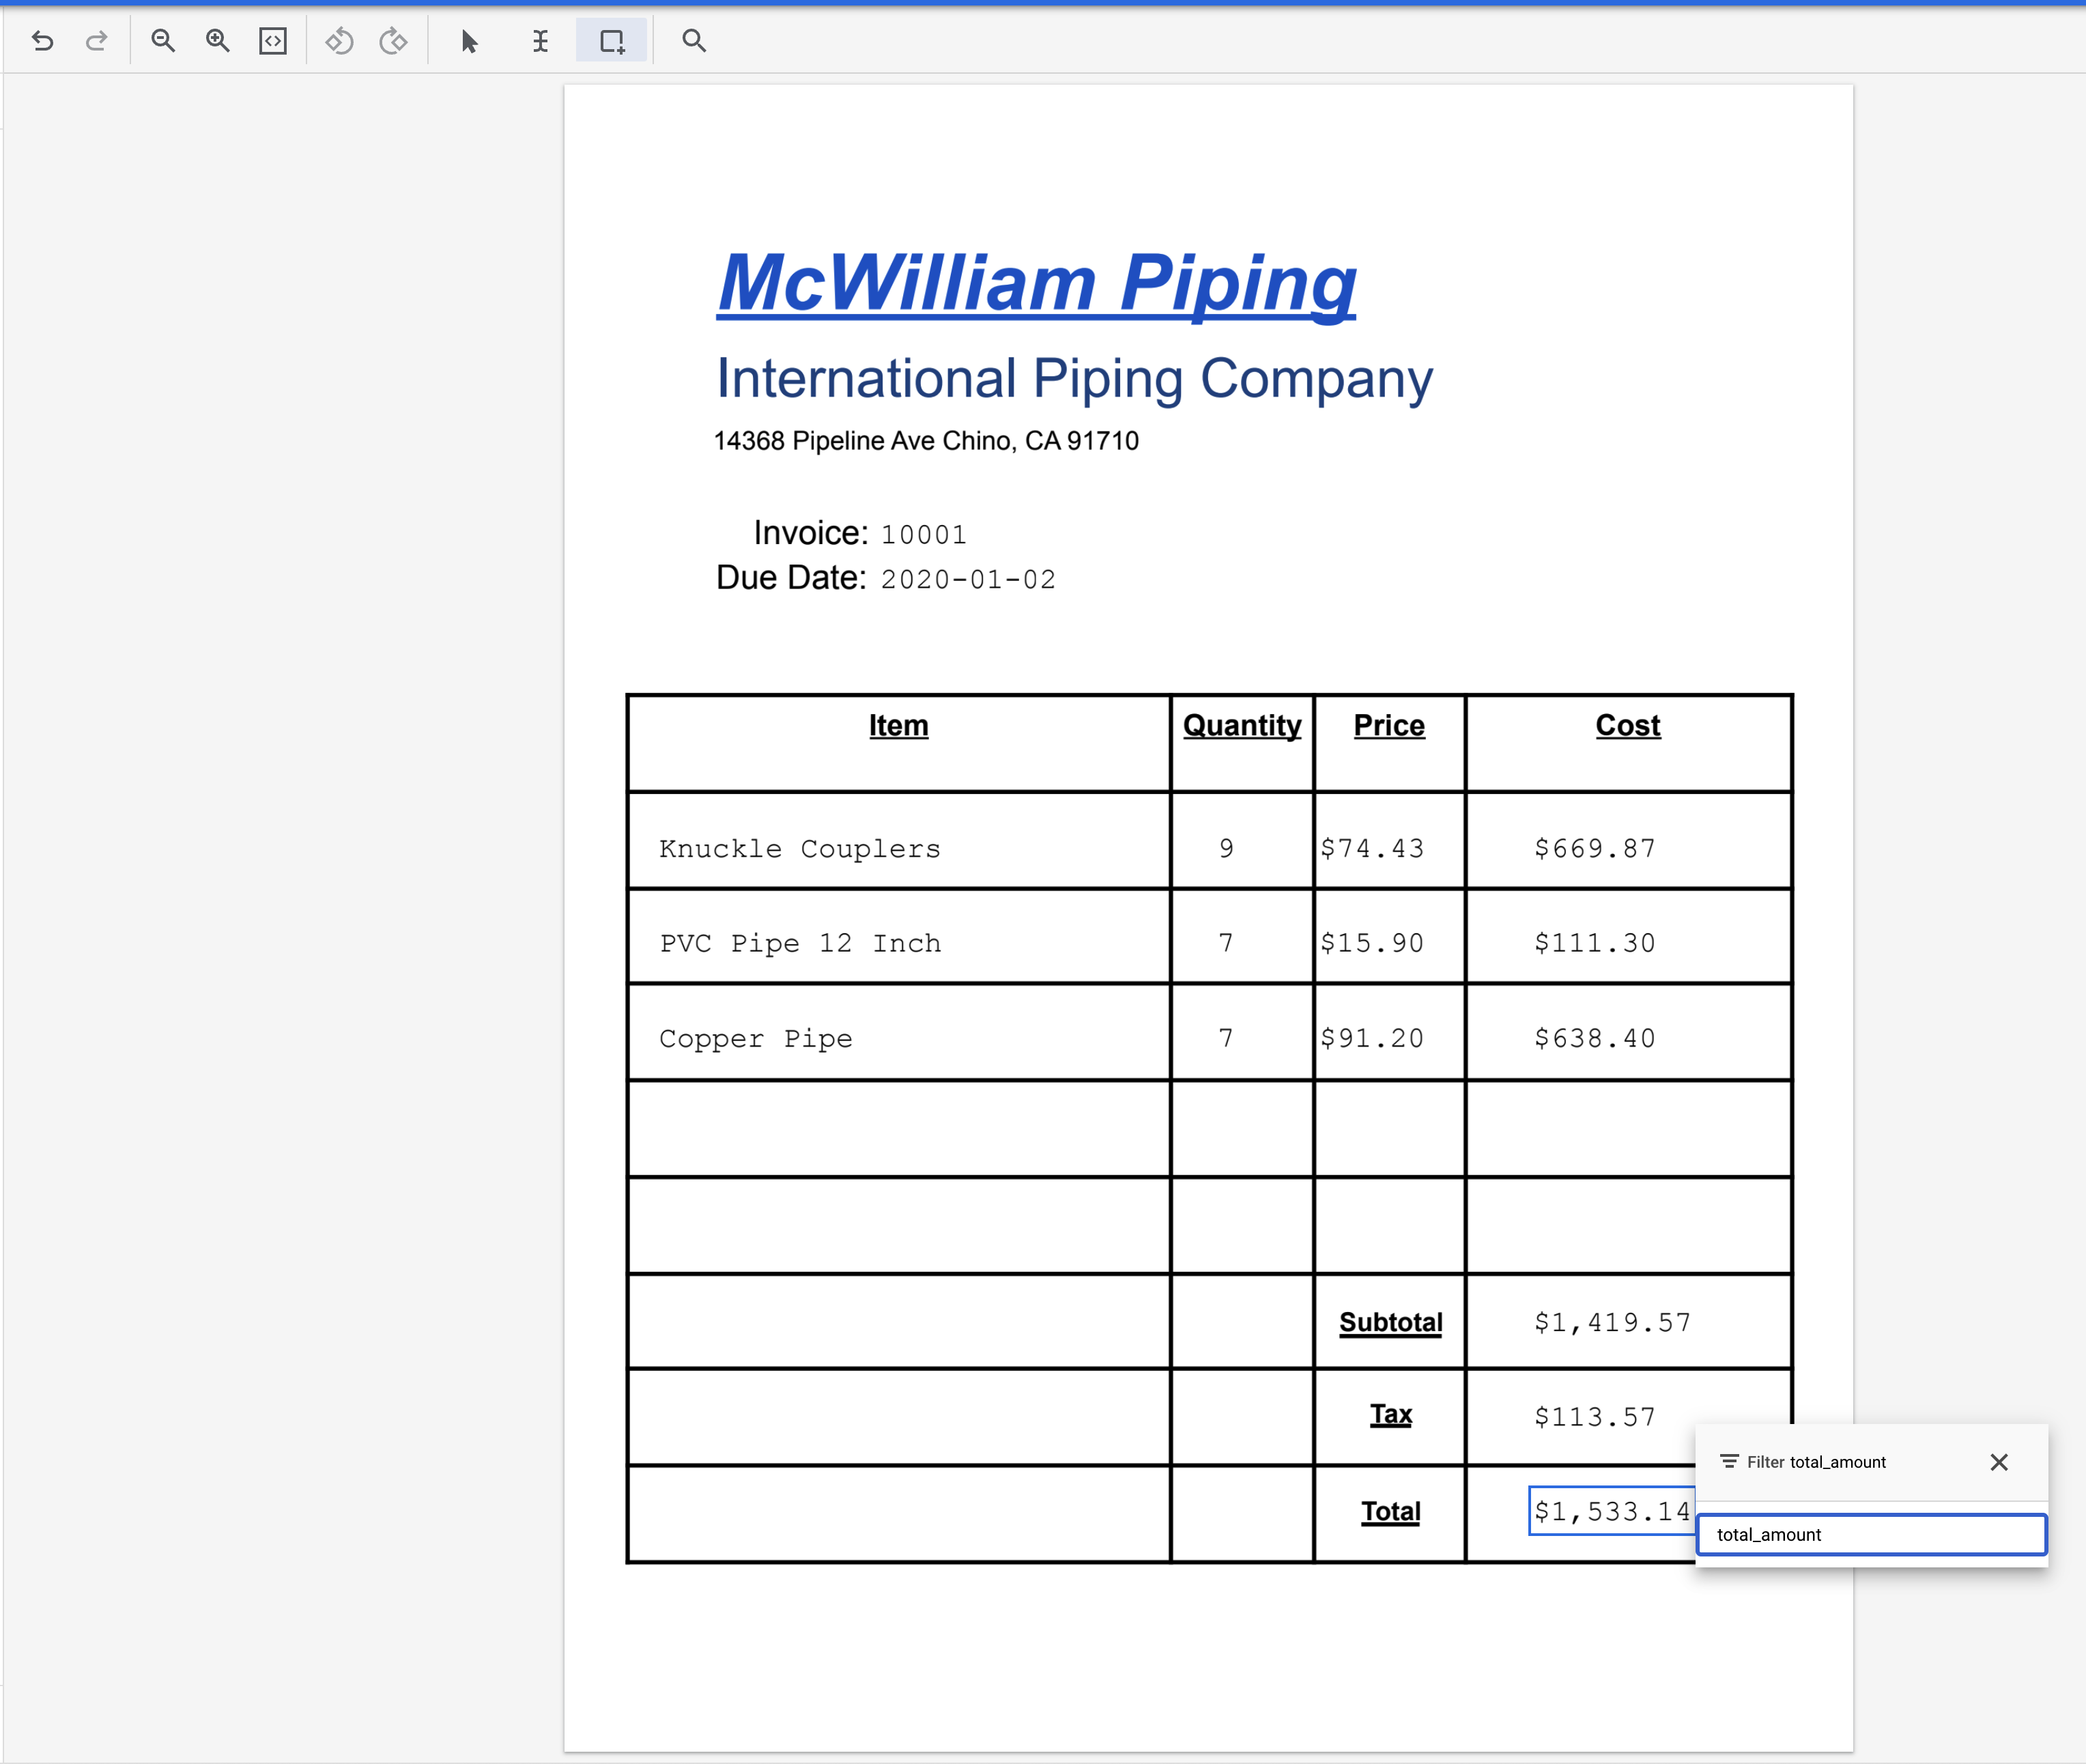
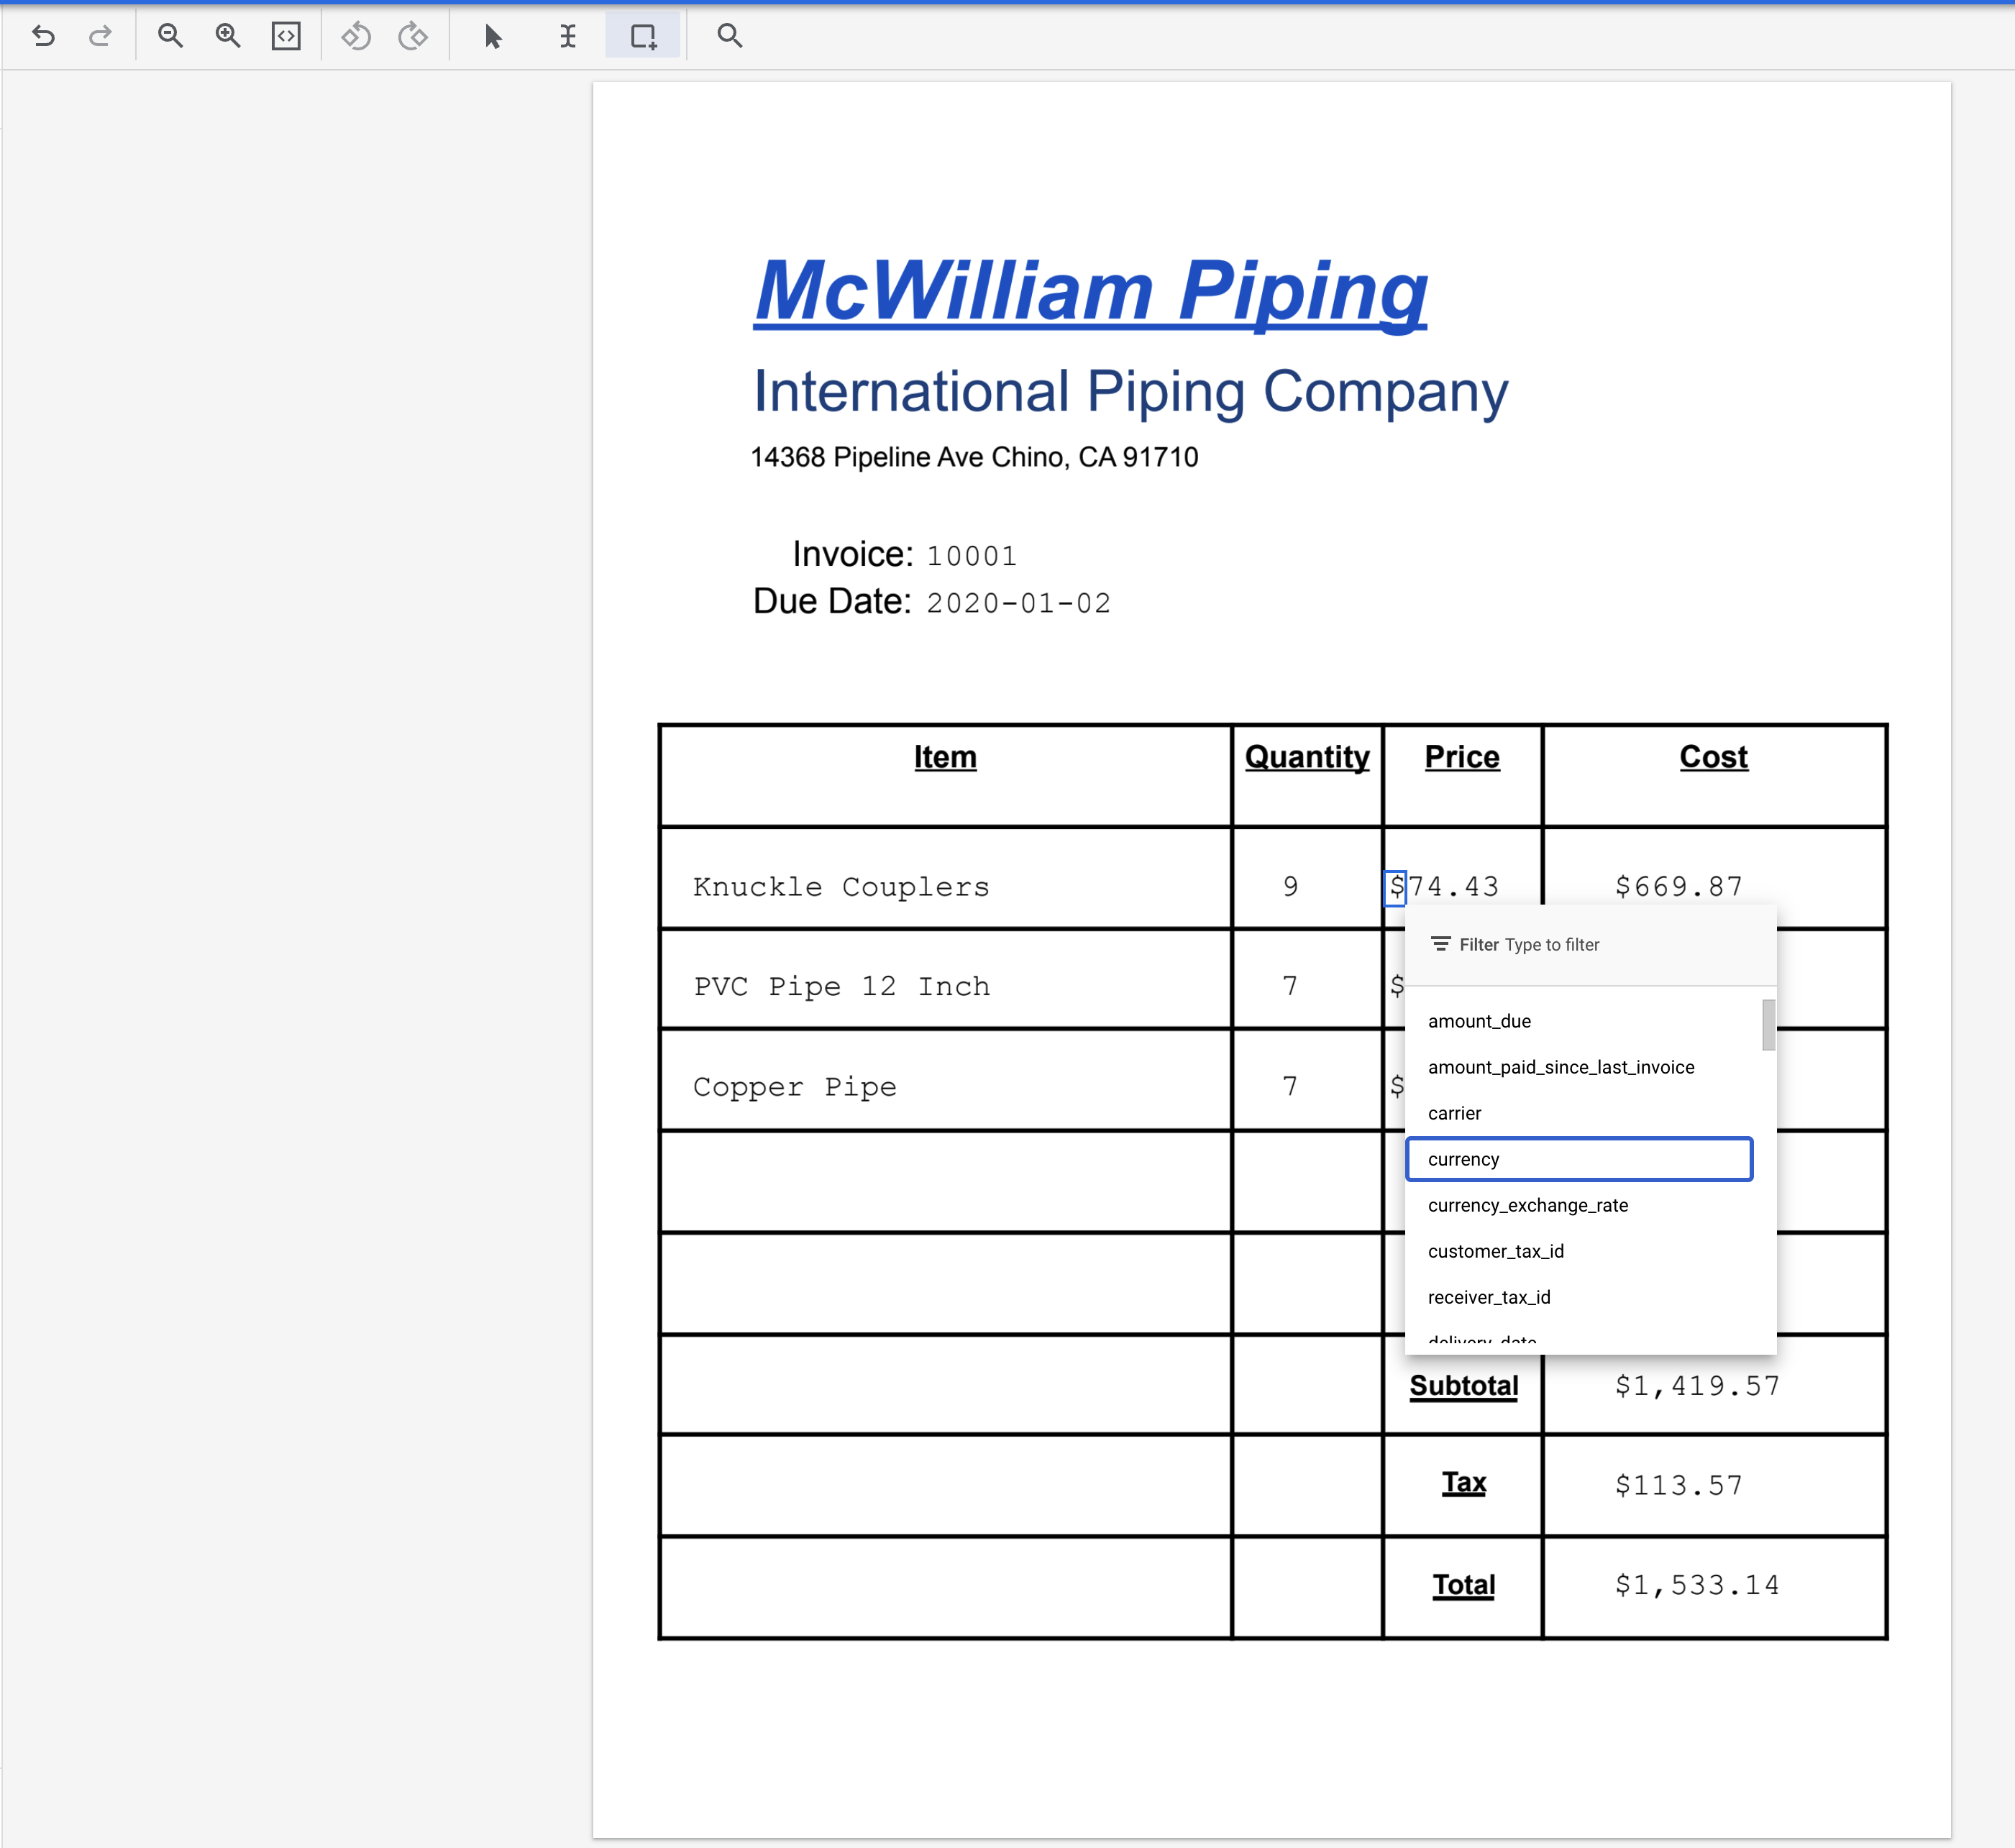
net_amount.total_tax_amount.total_amount.currency.| Label Name | Text |
|---|---|
supplier_name |
McWilliam Piping International Piping Company |
supplier_address |
14368 Pipeline Ave Chino, CA 91710 |
invoice_id |
10001 |
due_date |
2020-01-02 |
line_item/description |
Knuckle Couplers |
line_item/quantity |
9 |
line_item/unit_price |
74.43 |
line_item/amount |
669.87 |
line_item/description |
PVC Pipe 12 Inch |
line_item/quantity |
7 |
line_item/unit_price |
15.90 |
line_item/amount |
111.30 |
line_item/description |
Copper Pipe |
line_item/quantity |
7 |
line_item/unit_price |
91.20 |
line_item/amount |
638.40 |
net_amount |
1,419.57 |
total_tax_amount |
113.57 |
total_amount |
1,533.14 |
currency |
$ |
Click Check my progress to verify the objective.
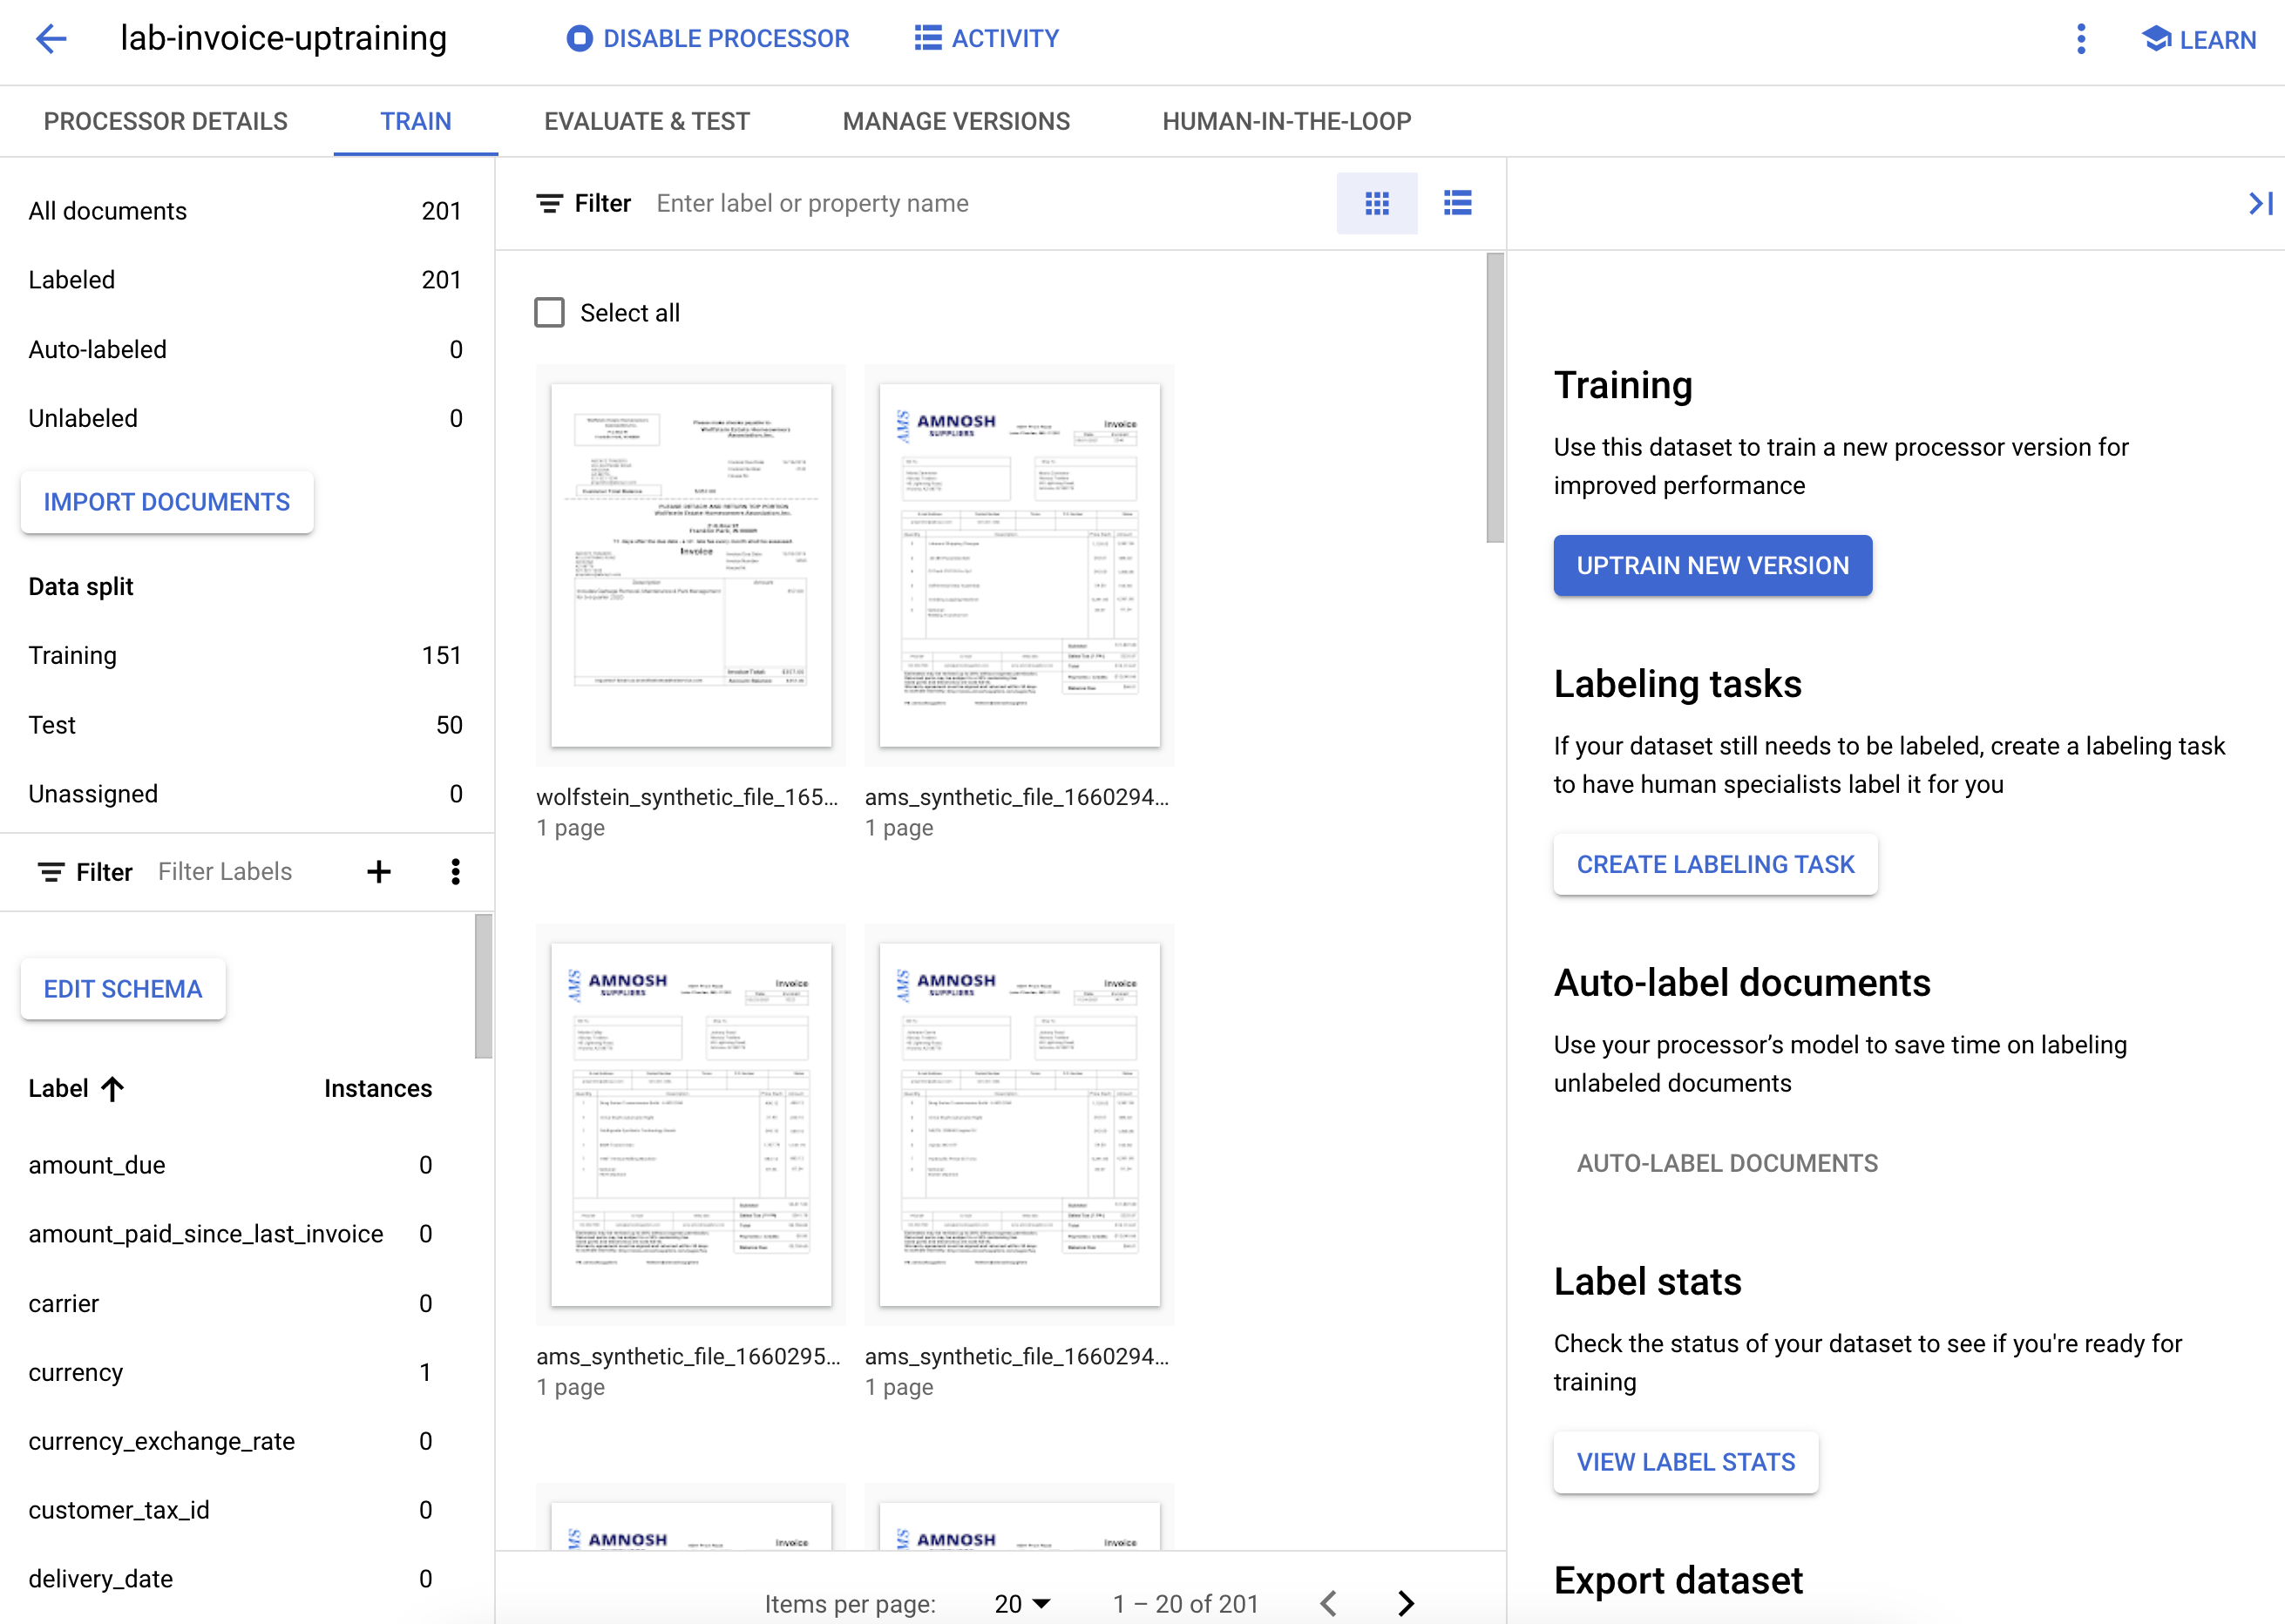
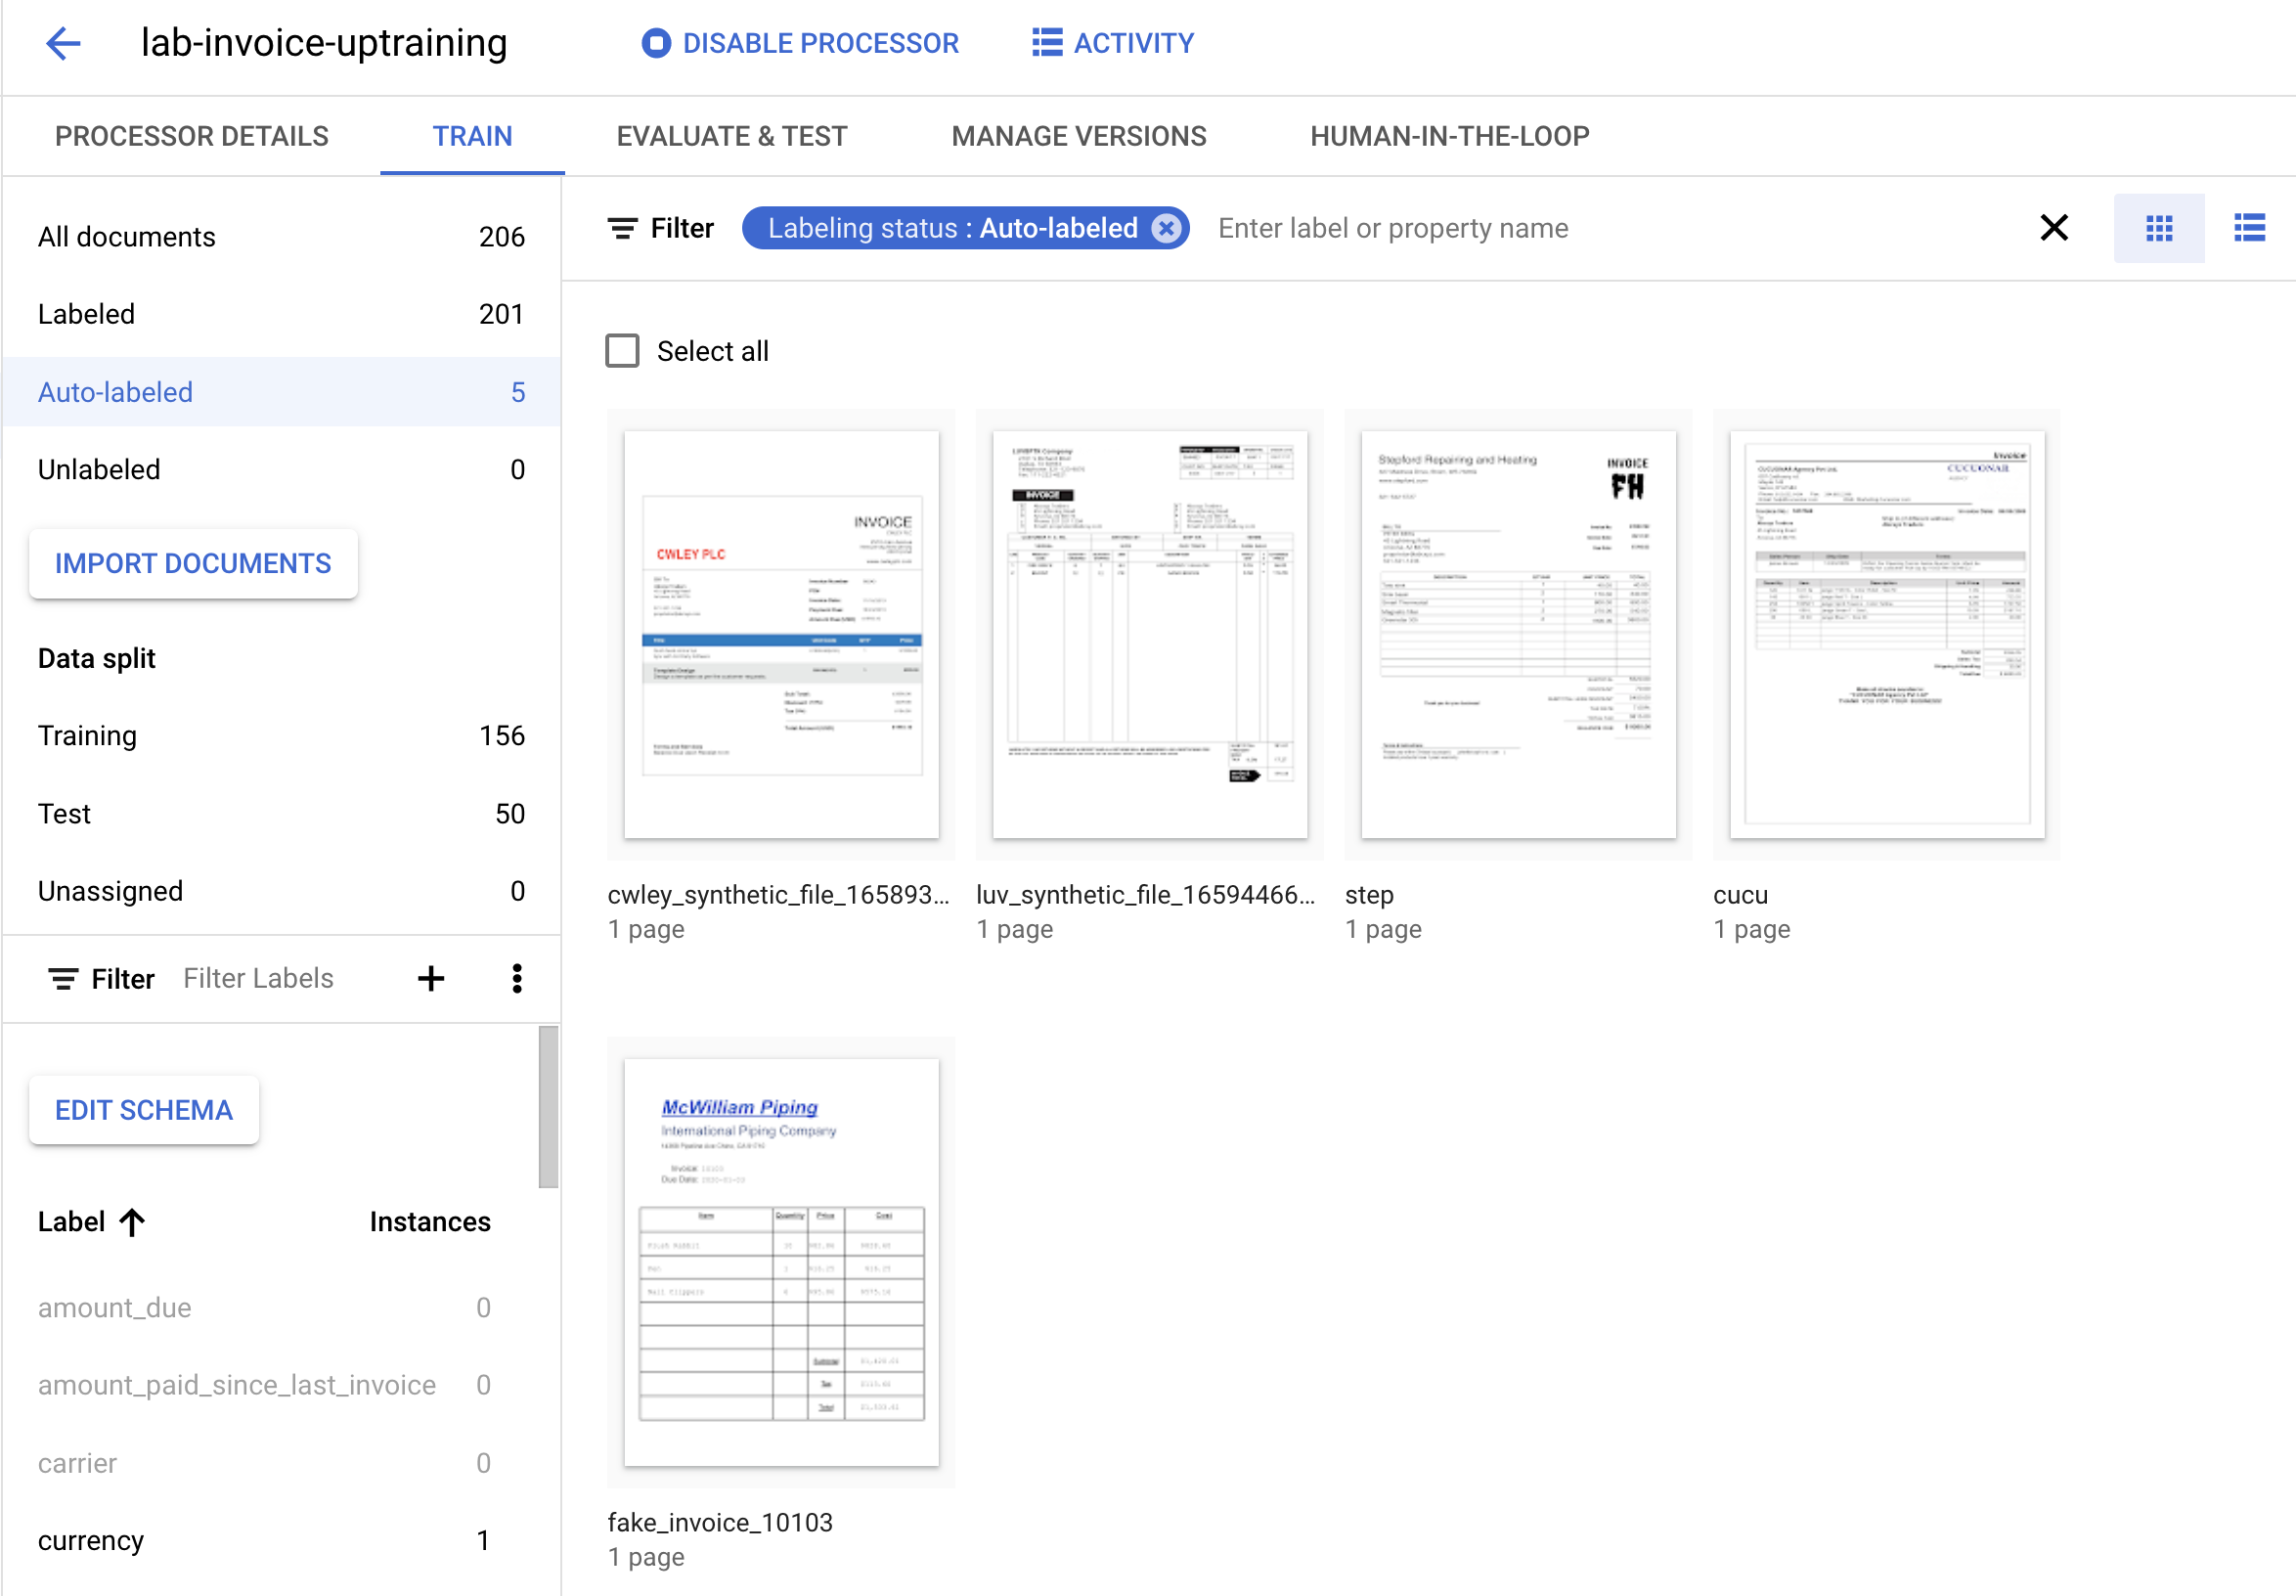
You should now be back at the Training page. Notice that the number of Labeled and Unlabeled documents have changed as well as the numbers of active labels.
Click Check my progress to verify the objective.
Document AI Uptraining requires a minimum of 10 documents in both the training and test sets, along with 10 instances of each label in each set. It's recommended to have at least 50 documents in each set with 50 instances of each label for best performance. More training data generally equates to higher accuracy.
It will take a long time to manually label 100 documents, so we have some pre-labeled documents that you can import for this lab. You can import pre-labeled document files in the Document.json format. These can be results from calling a processor and verifying the accuracy using Human in the Loop (HITL).
In the training management console, click on Import Documents.
Enter the following path in Source path. This bucket contains pre-labeled documents in the Document JSON format.
From the Data split list, select Auto-split. This automatically splits the documents to have 80% in the training set, and 20% in the test set. Leave Import with auto-labeling unchecked.
Click Import. The import might take several minutes to complete.
When the import is finished, you will find the documents on the Train tab.
Click Check my progress to verify the objective.
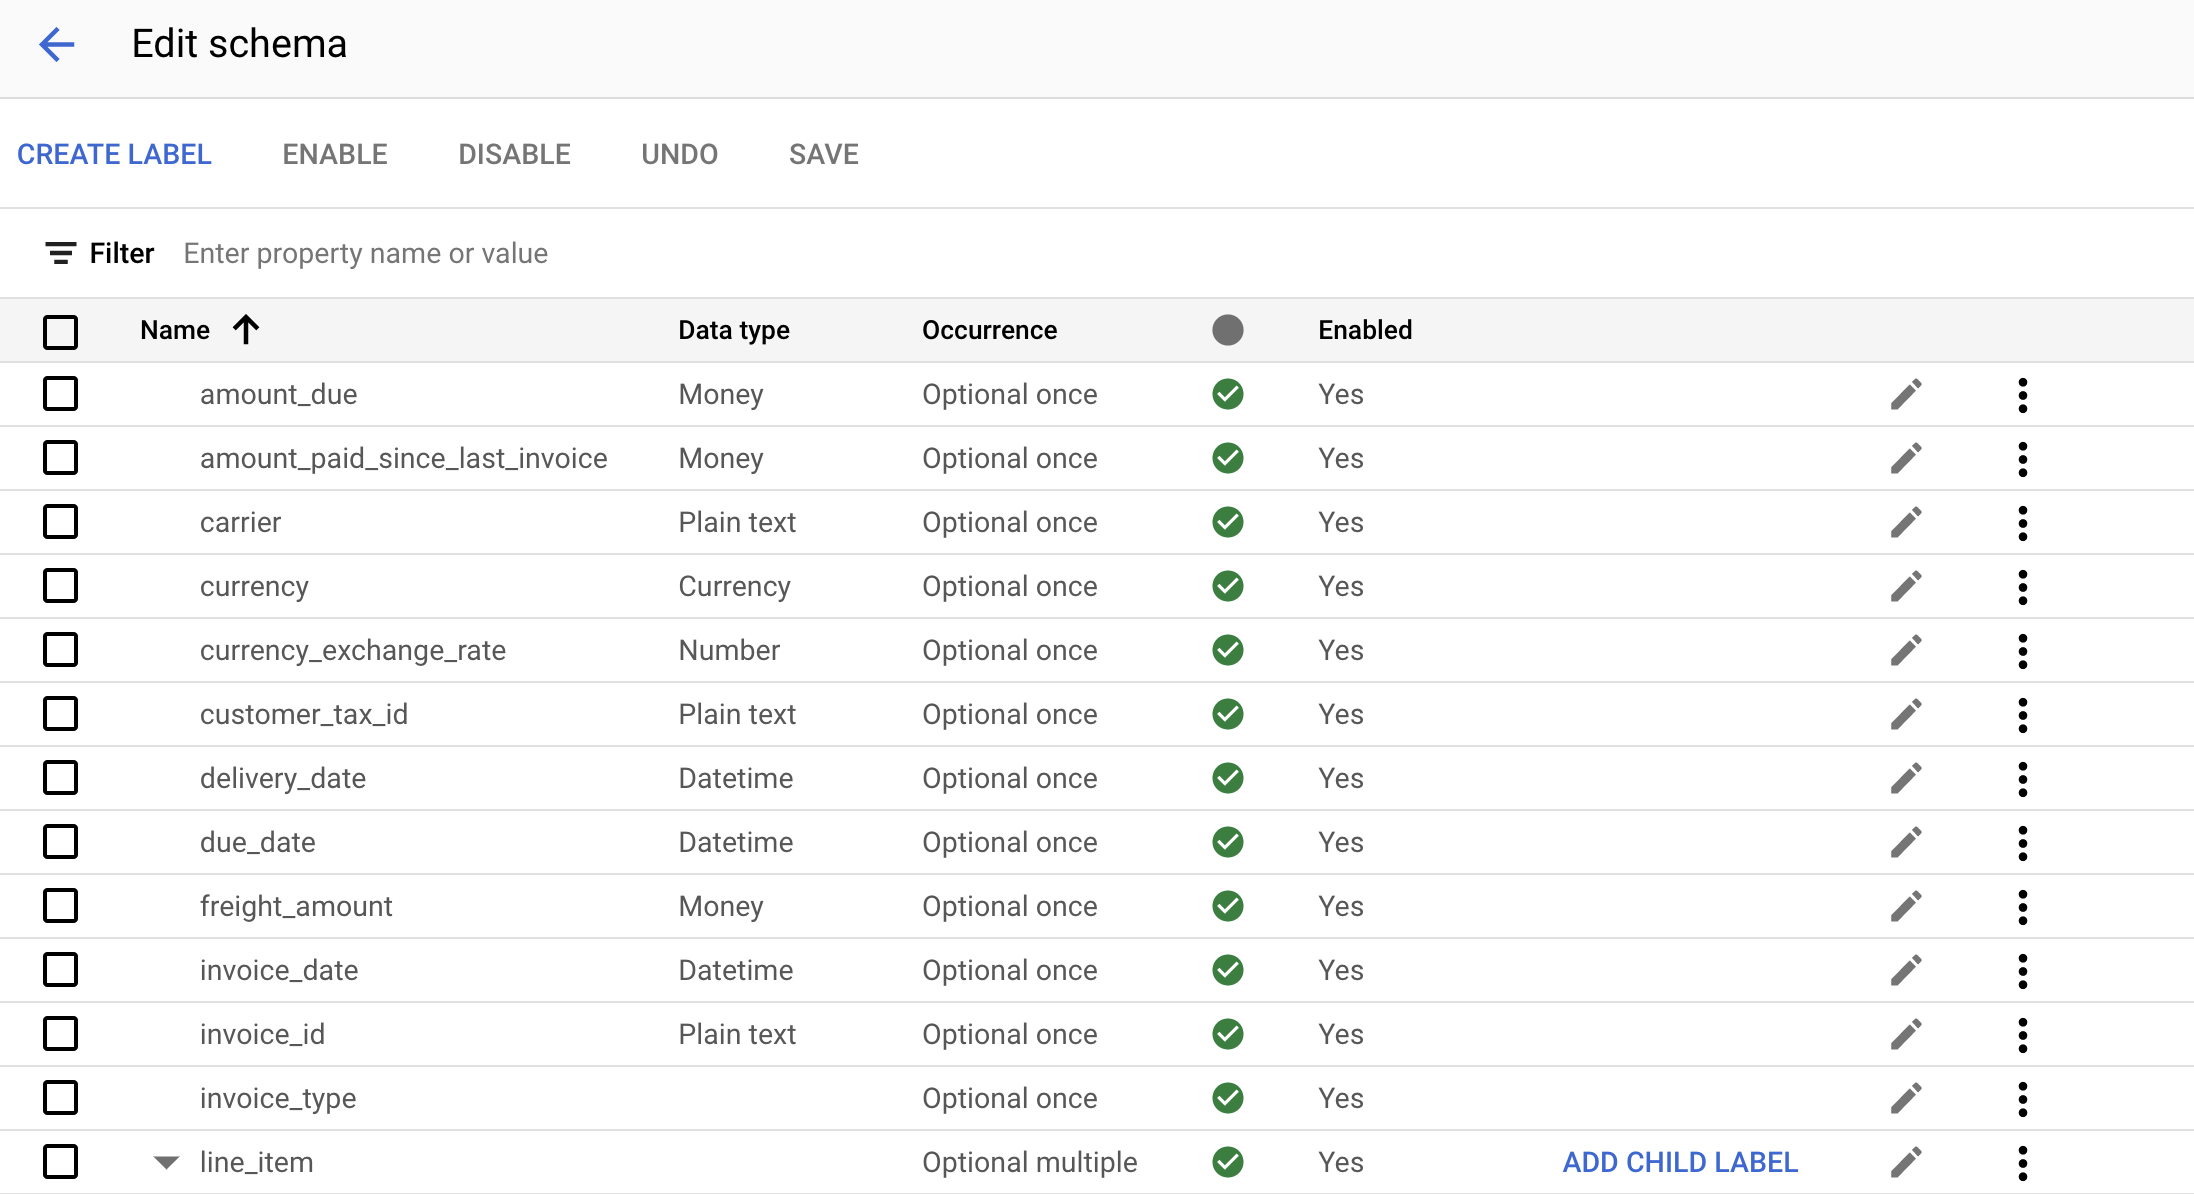
The sample documents we are using for this example do not contain every label supported by the Invoice Parser. We will need to mark the labels we are not using as inactive before training. You can also follow similar steps to add a custom label before Uptraining.
Click on Edit Schema on the left side menu.
You should now be in the Label Management console.
Use the Checkboxes and the Disable/Enable buttons to mark ONLY the following labels as Enabled.
invoice_dateline_item > amount
line_item > description
receiver_addressreceiver_namesupplier_addresssupplier_nametotal_amountClick Save when finished.
Notice that the labels with 0 instances have been marked as Inactive.
Click Check my progress to verify the objective.
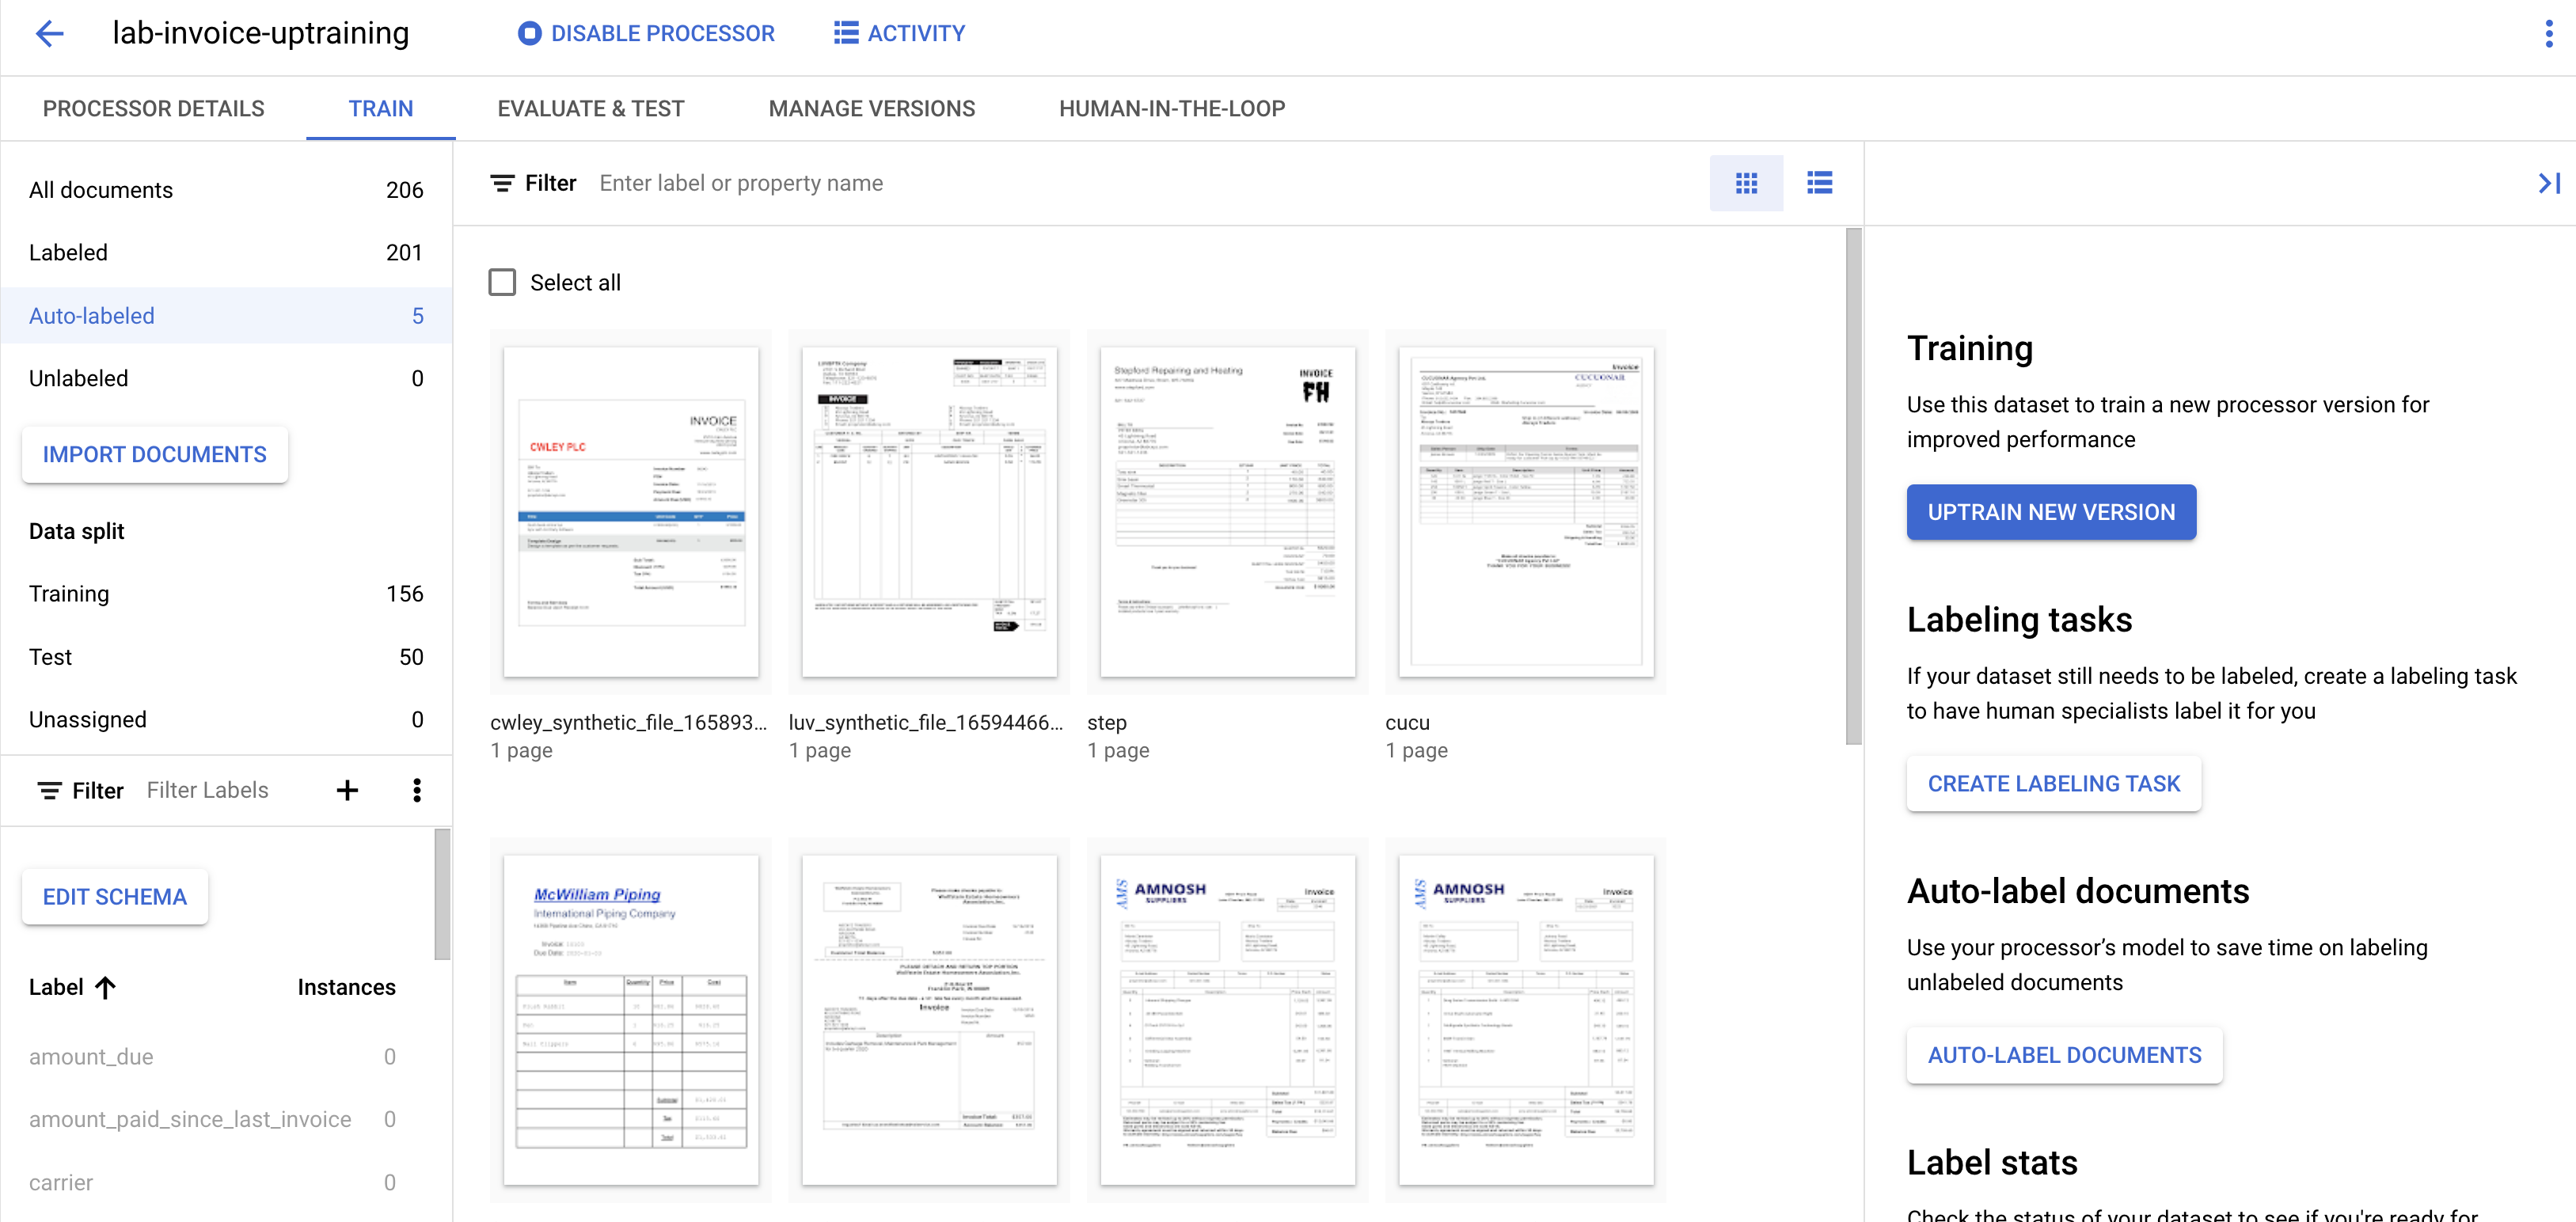
When importing unlabeled documents for a processor with an existing deployed processor version, you can use Auto-labeling to save time on labeling.
On the Train page, Click Import Documents.
Copy and paste the following storage path. This directory contains 5 unlabeled invoice PDFs. From the Data split dropdown list, select Training.
In the Auto-labeling section, select the Import with auto-labeling checkbox.
Select an existing processor version to label the documents.
pretrained-invoice-v1.4-2022-10-21
Click Import and wait for the documents to import. You can leave this page and return later.
Click the first document to enter the labeling console.
Verify the labels, bounding boxes, and values to ensure they are correct. Label any values that were omitted. Click Mark as labeled when finished with each document.
Repeat the label verification for each auto-labeled document, then return to the Train page to use the data for training.
Click Check my progress to verify the objective.
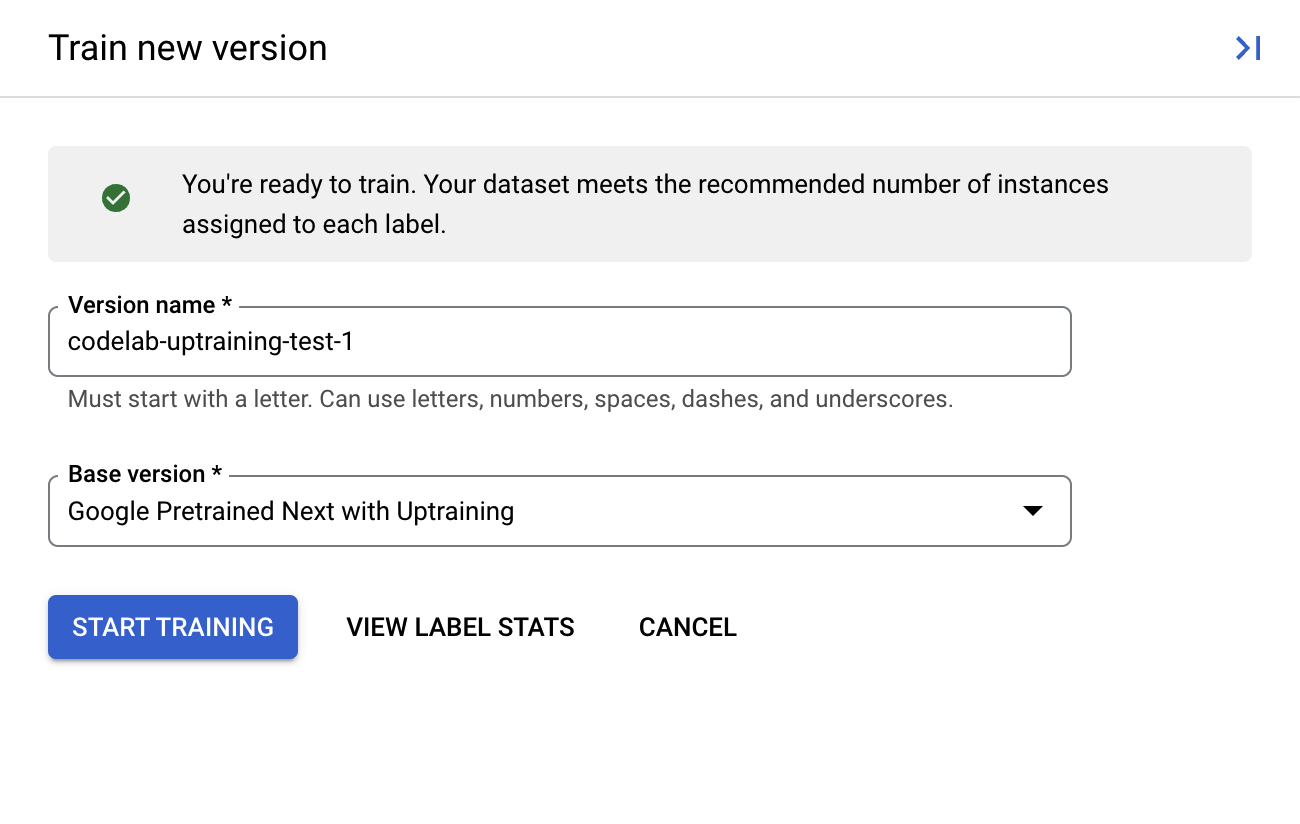
Now, you are ready to begin training your Invoice Parser.
lab-uptraining-test-1. The Base version is the model version this new version will be built from. If you're using a new processor, the only option should be Google Pretrained Next with Uptraining.Click on Start Training to begin the Uptraining process. You should be redirected to the Dataset management page. You can view the training status on the right side. Training will take a few hours to complete.
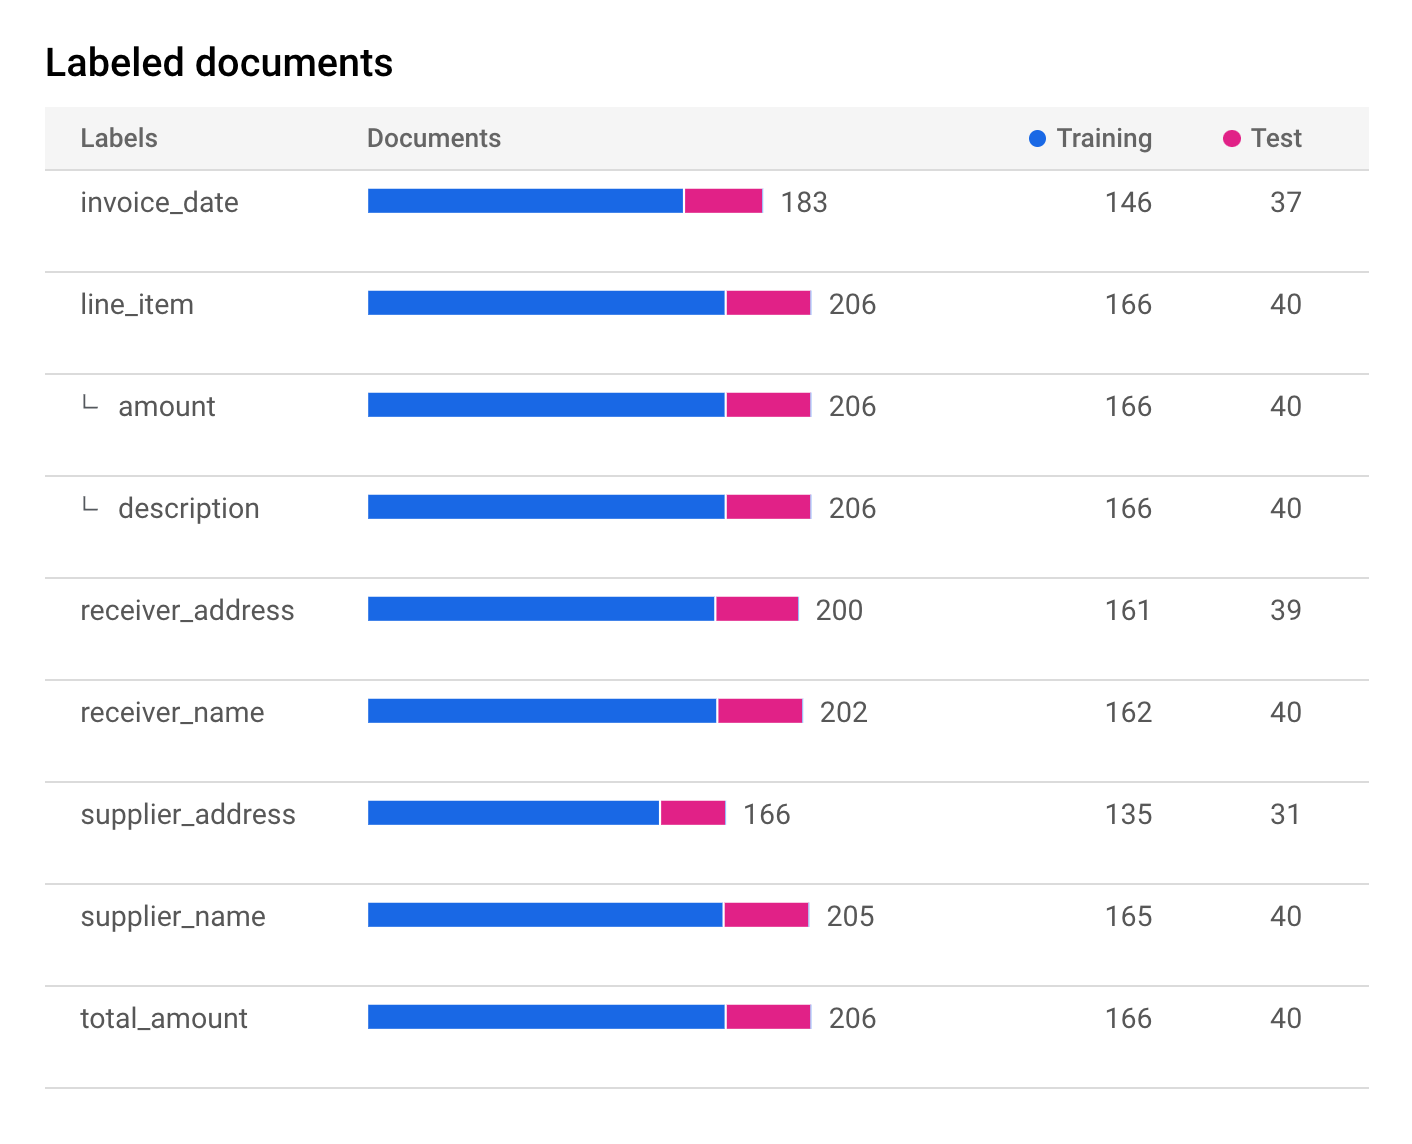
(Optional) You can also select View Label Stats to see metrics about the labels in your dataset.
Click Check my progress to verify the objective.
Great! You have now started training your first uptraining job for Document AI. Since the training job will take around an hour, the lab will end here. If you are interested in learning more about testing the model version and evaluation, you can check out the following documentation guide.
Congratulations, you've successfully used Document AI to uptrain an Invoice Parser. You can now use this processor to parse invoices just as you would for any Specialized Processor. You can refer to the Specialized Processors Codelab to review how to handle the processing response.
Check out the following resources to learn more about Document AI and the Python Client Library:
...helps you make the most of Google Cloud technologies. Our classes include technical skills and best practices to help you get up to speed quickly and continue your learning journey. We offer fundamental to advanced level training, with on-demand, live, and virtual options to suit your busy schedule. Certifications help you validate and prove your skill and expertise in Google Cloud technologies.
Manual Last Updated: April 24, 2024
Lab Last Tested: April 24, 2024
Copyright 2025 Google LLC. All rights reserved. Google and the Google logo are trademarks of Google LLC. All other company and product names may be trademarks of the respective companies with which they are associated.


此内容目前不可用
一旦可用,我们会通过电子邮件告知您

太好了!
一旦可用,我们会通过电子邮件告知您

一次一个实验
确认结束所有现有实验并开始此实验