Checkpoints
Create a Cloud SQL instance
/ 5
Create a database and configure a proxy on a Virtual Machine
/ 5
Implementing Cloud SQL (Azure)
You were recently hired by an IT enterprise which uses Google Cloud as its principle cloud service provider. As an SQL Database expert, you are tasked to research and adopt the SQL services offered by Google Cloud. Some of your main concerns are:
- Deployment
- Security
- App integration
- Connectivity methods
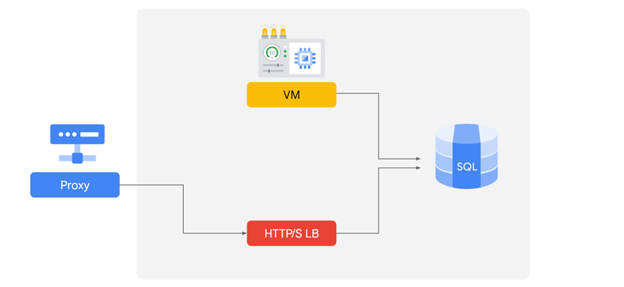
In Azure, you use the following:
- A proxy implementation to ensure secure connection to your database.
- An HTTP load balancer to maintain database availability of your application.
You can use a variety of methods to connect several applications that you have previously deployed, including the following methods:
- Connection strings
- Web app services integration
- Cloud SQL using private IP addresses.
Now you will explore how you can use Cloud SQL features to build and connect a security-aware database to an application.
Overview
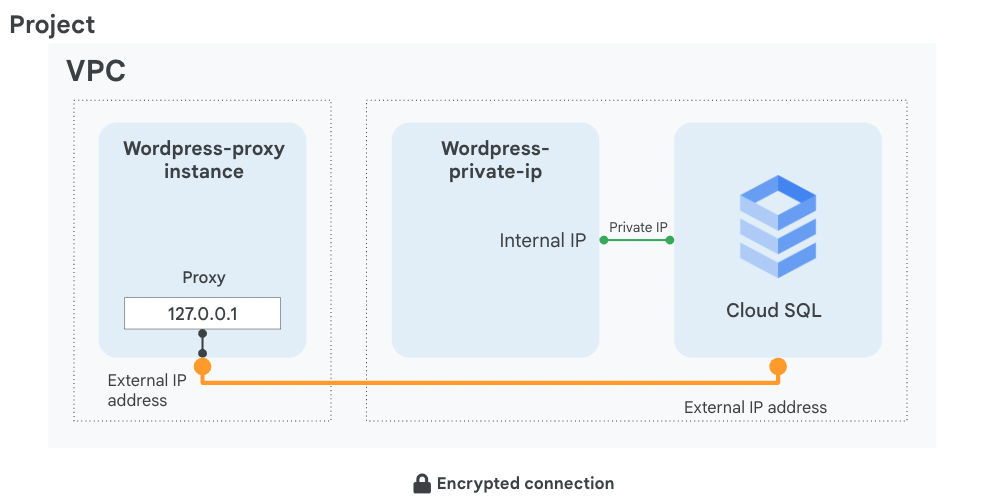
In this lab, you configure a Cloud SQL server and learn how to connect an application to it via a proxy over an external connection. You also configure a connection over a Private IP link that offers performance and security benefits. The app we chose to demonstrate in this lab is Wordpress, but the information and best practices are applicable to any application that needs SQL Server.
By the end of this lab, you will have 2 working instances of the Wordpress frontend connected over 2 different connection types to their SQL instance backend, as shown in this diagram:
Objectives
In this lab, you learn how to perform the following tasks:
- Create a Cloud SQL database
- Configure a virtual machine to run a proxy
- Create a connection between an application and Cloud SQL
- Connect an application to Cloud SQL using Private IP address
Setup
For each lab, you get a new Google Cloud project and set of resources for a fixed time at no cost.
-
Sign in to Qwiklabs using an incognito window.
-
Note the lab's access time (for example,
1:15:00), and make sure you can finish within that time.
There is no pause feature. You can restart if needed, but you have to start at the beginning. -
When ready, click Start lab.
-
Note your lab credentials (Username and Password). You will use them to sign in to the Google Cloud Console.
-
Click Open Google Console.
-
Click Use another account and copy/paste credentials for this lab into the prompts.
If you use other credentials, you'll receive errors or incur charges. -
Accept the terms and skip the recovery resource page.
Task 1. Create a Cloud SQL database
In this task, you configure a SQL server according to Google Cloud best practices and create a Private IP connection.
- On the Navigation menu (
), click SQL.
- Click Create instance.
- Click Choose MySQL.
- Specify the following, and leave the remaining settings as their defaults:
| Property | Value |
|---|---|
| Instance ID | wordpress-db |
| Root password | type a password |
| Cloud SQL edition | Enterprise |
| Database Version | MySQL 5.7 |
| Region | |
| Zone | Any |
-
Expand Show configuration options.
-
Expand the Machine type section.
-
Provision the right amount of vCPU and memory. To choose a Machine Type, click the dropdown menu, and then explore your options.
Note: A few points to consider:
-
For this lab, select Dedicated core from the dropdown menu, and then select 1 vCPU, 3.75 GB.
-
Next, expand the Storage section and then choose Storage type and Storage capacity.
Note: A few points to consider:
- Click each of the capacity options to see how it affects the throughput. Reset the option to 10GB.
-
Expand the Connections section.
-
Select Private IP.
-
In the Network dropdown, select default.
-
Click the Set up Connection button that appears.
-
In the panel to the right, click Enable API, click Use an automatically allocated IP range, click Continue, and then click Create Connection.
-
Click Create Instance at the bottom of the page to create the database instance.
Click Check my progress to verify the objective.
Task 2. Configure a proxy on a virtual machine
When your application does not reside in the same VPC connected network and region as your Cloud SQL instance, use a proxy to secure its external connection.
In order to configure the proxy, you need the Cloud SQL instance connection name.
-
On the Navigation menu (
-
Click SSH next to wordpress-proxy.
-
Download the Cloud SQL Proxy and make it executable:
In order to start the proxy, you need the connection name of the Cloud SQL instance. Keep your SSH window open and return to the Cloud Console.
-
On the Navigation menu (
-
Click on the wordpress-db instance and wait for a green checkmark next to its name, which indicates that it is operational (this could take a couple of minutes).
-
Note the Instance connection name; it will be used later and referred to as [SQL_CONNECTION_NAME].
-
In addition, for the application to work, you need to create a table. Click Databases.
-
Click Create database, type wordpress, which is the name the application expects, and then click Create.
-
Return to the SSH window and save the connection name in an environment variable, replacing [SQL_CONNECTION_NAME] with the unique name you copied in a previous step:
- To verify that the environment variable is set, run:
The connection name should be printed out.
- To activate the proxy connection to your Cloud SQL database and send the process to the background, run the following command:
The expected output is:
- Press ENTER.
Click Check my progress to verify the objective.
Task 3. Connect an application to the Cloud SQL instance
In this task, you will connect a sample application to the Cloud SQL instance.
- Configure the Wordpress application. To find the external IP address of your virtual machine, query its metadata:
-
Go to the wordpress-proxy external IP address in your browser and configure the Wordpress application.
-
Click Let's Go.
-
Specify the following, replacing [ROOT_PASSWORD] with the password you configured upon machine creation, and leave the remaining settings as their defaults:
| Property | Value |
|---|---|
| Database Name | wordpress |
| Username | root |
| Password | [ROOT_PASSWORD] |
| Database Host | 127.0.0.1 |
-
Click Submit.
-
When a connection has been made, click Run the installation to instantiate Wordpress and its database in your Cloud SQL. This might take a few moments to complete.
-
Populate your demo site's information with random information and click Install Wordpress. You won't have to remember or use these details.
- When a 'Success!' window appears, remove the text after the IP address in your web browser's address bar and press ENTER.
You'll be presented with a working Wordpress Blog!
Task 4. Connect to Cloud SQL via internal IP
If you can host your application in the same region and VPC connected network as your Cloud SQL, you can leverage a more secure and performant configuration using Private IP.
By using Private IP, you will increase performance by reducing latency and minimize the attack surface of your Cloud SQL instance because you can communicate with it exclusively over internal IPs.
- In the Cloud Console, on the Navigation menu (
- Click wordpress-db.
- Note the Private IP address of the Cloud SQL server; it will be referred to as [SQL_PRIVATE_IP].
- On the Navigation menu, click Compute Engine.
-
Copy the external IP address of wordpress-private-ip, paste it in a browser window, and press ENTER.
-
Click Let's Go.
-
Specify the following, and leave the remaining settings as their defaults:
| Property | Value |
|---|---|
| Database Name | wordpress |
| Username | root |
| Password | type the [ROOT_PASSWORD] configured when the Cloud SQL instance was created |
| Database Host | [SQL_PRIVATE_IP] |
- Click Submit.
-
Click Run the installation.
An 'Already Installed!' window is displayed, which means that your application is connected to the Cloud SQL server over private IP. -
In your web browser's address bar, remove the text after the IP address and press ENTER.
You'll be presented with a working Wordpress Blog!
Task 5. Review
In this lab, you created a Cloud SQL database and configured it to use both an external connection over a secure proxy and a Private IP address, which is more secure and performant. Remember that you can only connect via Private IP if the application and the Cloud SQL server are collocated in the same region and are part of the same VPC network. If your application is hosted in another region, VPC, or even project, use a proxy to secure its connection over the external connection.
Now that you have a deeper understanding of creating and configuring a database in Cloud SQL, let’s take a look into some of the similarities and differences between Google Cloud SQL and Azure SQL.
Similarities:
- Azure and Google Cloud manage the infrastructure of the databases to include the instances, backups, updates, and failover.
- Both Cloud SQL and Azure SQL deploy a proxy to securely receive connections outside your VPC.
- Both services create a connection using a connection string.
- Both services can use an internal IP to directly connect an application and a SQL server instance if they are collocated within the same region and are part of the same VPC network, by using only internal IP addresses you can improve security because no public connections are allowed this way.
Differences:
- The specifications for creating a SQL Server are conceived differently between Google Cloud and Azure. In Azure, you choose between categories, DTUs, and defined storage. In Google Cloud, you directly specify the number of CPUs and storage needed.
- In Google Cloud you have a built-in database authentication (user-password) and you can implement Cloud SQL Auth proxy and Cloud SQL connector libraries to provide access based on IAM. While in Azure, you can use policies to define how requests are going to be admitted. You can also use either a Redirect method (by default) or a Proxy Connection Policy to process the request. Azure Active Directory Authentication is also supported.
- In Cloud Cloud you connect to the instance by using Cloud SQL with two main options:
- Cloud SQL Auth Proxy: A secure tunnel without the need for an authorized network or SSL; authentication and authorization is through Identity and Access Management (IAM) and OAuth 2.0
- Private IP: A private connection between your VPC network and the underlying Google service producer's VPC network
End your lab
When you have completed your lab, click End Lab. Google Cloud Skills Boost removes the resources you’ve used and cleans the account for you.
You will be given an opportunity to rate the lab experience. Select the applicable number of stars, type a comment, and then click Submit.
The number of stars indicates the following:
- 1 star = Very dissatisfied
- 2 stars = Dissatisfied
- 3 stars = Neutral
- 4 stars = Satisfied
- 5 stars = Very satisfied
You can close the dialog box if you don't want to provide feedback.
For feedback, suggestions, or corrections, please use the Support tab.
Copyright 2022 Google LLC All rights reserved. Google and the Google logo are trademarks of Google LLC. All other company and product names may be trademarks of the respective companies with which they are associated.