GSP466

Overview
Google Calendar is an online, integrated calendar designed for teams. You can quickly schedule meetings and events and assign tasks to support upcoming activities, so you always know what’s next. It’s easy to share your schedule with others and create multiple calendars that you and your team can use together.
What you'll do
In this lab you step through the following in Calendar:
- Schedule events
- Create tasks
- Share and view calendars
- Customize your calendar
Note: Switching from a different calendar program? you may also want to see Differences between Google Calendar and Outlook Calendar or Switching to Google Calendar from HCL Notes.
Requirements
- An internet browser. Chrome browser is recommended.
- Average time to complete is 10 minutes, but you will have 30 minutes to explore.
- Once you start this lab, you cannot pause and return later.
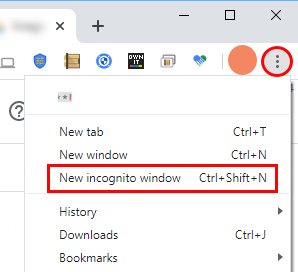
Note: If you are using a Pixelbook, run this lab in an Incognito window.
To do this:
In the Chrome browser, click on the three dots ( ) next to your user picture, then select New incognito window.
Task 1. Open Calendar
- Click Open Google Calendar in the left pane of this lab.
In the Sign in dialog, notice that your User Email is prefilled in the Email or phone field.
-
Click Next
-
Copy and paste your Password from the left pane of this lab to the Enter your password field, and then click Next.
Calendar opens.
- Click to close any informational pop-ups.
Task 2. Schedule events
Create an event
- Do one of the following in Calendar to create an event:
- Click an empty time slot in the calendar grid and click Event.
- Click Create in the upper left corner and select Event from the dropdown.
- Add an event title, date, time and then click Save.
Invite guests
-
In Calendar, click your event you just created. When the event opens, click Edit event ( ).
).
-
In the Guests section on the right, enter the email address of who you want to invite in the Add guests field. For this lab, invite yourself. Add your own personal email here, then click Save and click back to editing.
Note:
When using Calendar outside of this lab, if you have a contact list or organization directory, matching names and addresses appear as you enter text.
Tip: You can also add a Google Groups mailing list address to invite a large group of people at once. For more information about inviting a large group, see Manage large events in Calendar.
- (Optional) To mark a guest’s attendance as optional, hover over the guest icon and click Mark optional.
Reserve a room and resources
For information on how to book a room and additional resources for the meeting, see Add rooms, location, or conferencing.
Add event details, video conferencing, and attachments
-
At top of the screen, choose a Time zone for the Event start time.
-
Click Does not repeat and select Daily from the dropdown menu.
-
In the Find a time tab, see when the invitees are free for this meeting. For this lab, you see only your student calendar because your invitees are outside of the Google Cloud Skills Boost domain.
-
In the Event Details tab:
- Add a meeting location.
- Notice the default Notification setting for 10 minutes before the event. Set the Notification for 15 minutes before the event.
- (Optional) Click Add notification to add a second notification before the event.
- Add an event description and (optionally) attach a file from your local computer for the invitees.
Save and update events
When you’re finished filling in the details of the event, save it and send the invitations.
Save your event
-
Click Save at the top, then Send to notify guests by email.
-
Click Invite all Guests to notify the invitees outside of your organization.
You just created an event!
Click Check my progress to verify the objective.
Create an event.
Update an existing event
Things change. No problem - just update the event.
- In the Calendar grid, click an event > Edit event ().
- Make at least one change to your event, invite more guests, change the meeting location, or add attachments, and click Save. In Edit recurring event dialog opens and click OK then click send.
Note: You can only edit events you've created or those where the event organizer has given you edit permission.
Respond to events
When you are invited to an event, the event appears on your calendar. If you're using Gmail, you respond to the invitation by clicking RSVP in the email invite.
Note:
Due to the lab environment, you can't respond to an invitation in this lab. For more information about responding to an event invitation, see Respond to events.
Check guest attendance
You can track attendance for your event - see who’s accepted, declined, and who’s proposed a new meeting time.
Check attendance
- In your Calendar grid, click the event.
Next to each guest, you can see their response.
Delete and restore events
Delete an event
- Click an event in your calendar to open the meeting dialog.
- At the top of the dialog, click Delete event (
 ).
).
If the event you're deleting is recurring, click This event when the Delete recurring event dialog opens and then click OK.
- Click Send.
Restore an event you deleted by mistake, or permanently remove deleted events
- To find your deleted event, click Settings menu
 > Trash.
- Check the box next to the event and click Restore icon
 .
.
Note: To permanently delete the event, check the box next to the event and click Delete. To delete all events in your trash, at the top right, click Empty trash.
Note: Deleted events remain in a calendar's trash for approximately 30 days.
Task 3. Create tasks
To remember something on your to-do list, add a personal task.
View tasks
- Go to Calendar.
- At the bottom left, under My calendars, make sure the Tasks box is checked.
Create a personal task
- In your Calendar grid, click a time slot and click Task.
- Add a title, choose a date and time, and set it to Daily.
- Click Save.
Note: The tasks you create in Google Keep also show up in Calendar.
Change a personal task
-
Click the task you just created, and then click Edit task .
-
Update the details and click Save.
-
For Save repeating task, select This task and click OK.
-
(Optional) Edit one of two overlapping tasks.
- Make another task in the same time slot.
- To choose one task to edit, click the task block, hover over the task, and click Edit task ().
Complete or remove a personal task
- To remove a task from your calendar, mark it as done, delete it, or hide all tasks.
Mark a task done or delete it
- Click the task and then click Mark completed or Delete task ().
Hide all tasks
- On the left under My calendars, uncheck the Tasks box.
Task 4. Share and view calendars
Share your calendar with coworkers, family, and friends so they can easily see when you’re available. Others can share their calendars so you can do the same.
Share your calendar
Choose whether to share your calendar publicly or only with your organization
- At the top of Calendar, click Settings menu () > Settings.
- On the left, select your calendar and then click Access permissions for events and check Make available to public box to share your calendar. If warning box appears click OK.
Let someone see your calendar in a web browser
Get a HTML link to your calendar to share with people.
- Click Get shareable link > Copy Link, then you can share that link with your colleague.
- (Optional) Paste the link to an email account you have access to (your personal email) then send the email. Click on the link in the message to see the event.
Share your calendar and specify access
When you share your calendar with someone, you decide how they see events and if they can make changes.
- You're still in Settings menu () > Settings.
- On the left, select your calendar and then click Access permissions for events.
- Scroll down to the Share with specific people or groups section, click Add people and groups.
- In the Share with specific people dialog that opens:
- Add an email address of someone you want to share your calendar with.
- Set the permission.
- Click Send to notify that person and provide the calendar link.
Note: Add a calendar
In this lab, you won't add a coworker's calendar to your calendar. For information on how to add a team member's calendar, see Share and view calendars.
Create a shared calendar
Create shared calendars to track group activities, such as project schedules, or coworker vacations.
Create a shared calendar
- Click Settings menu () > Settings, and then on the left, click Add calendar > Create new calendar.
- Name the calendar, add a description, and select your time zone.
- Click Create Calendar.
Your new calendar appears in the calendar list.
- Click the new calendar, then click Share with specific people or groups, click Add people and groups and add people you want this calendar shared with.
You'll be able to choose whether this person can See all event details or See only free/busy (hide details).
Click Check my progress to verify the objective.
Create a shared calendar.
Import and export events and calendars
Import or export event information to or from your calendar.
-
Go back to the main Calendar page.
-
In the left pane, in the My calendars section, hover over your calendar (Student) then click Options (three vertical dots) > Settings and sharing.
-
Select Import & export on the top left.
Export your calendars
- Click Export and then click Save.
A ZIP file downloads to your computer. If you open the ZIP file on your computer, you see individual ICS files for each of your calendars.
- To import the files back into Calendar, take the individual ICS files out of the ZIP file and import them one at a time.
Import calendar or event information
- In the Import & export section, click Import.
- To add information, click Select file from your computer, select the file you exported (probably to your download folder) in the last section, and click Open.
- Click Import. The imported event or events will appear in your calendar.
For information about importing calendars, see Learn more about importing events to Calendar.
Delete a calendar
- Click Settings menu () > Settings and select the shared calendar you created.
- In the right pane, scroll to the bottom. In the Remove calendar section, click Delete and click Permanently delete.
Note: To unsubscribe from calendars that are read-only, click Unsubscribe in the Remove calendar section.
Add out-of-office dates to your calendar
If you're out of the office, update your calendar so coworkers know you're away from work.
- Go back to your calendar grid, then click the first day that you're away from work.
Note: You can click on any time slot for that day to update the out of office information.
- Click Out of office.
- Name this
Vacation
- Select a time period. For multiple days, be sure you check All day.
- (Optional) Check Automatically decline meetings, and leave a message in the Message section.
- In the Visibility section, choose Public.
- Click Save and then Save & Decline.
Any new and existing meetings during this time will be automatically declined. (Your recurring events you set up earlier have been crossed out.)
Click Check my progress to verify the objective.
Add out-of-office dates to your calendar.
Task 5. Customize your calendar
Manage event notifications
Decide how you want to manage your incoming event notifications.
Manage event notifications
- Click Settings menu () > Settings.
- On the left under General, click Notification settings.
- On the right, in the Notification settings section, select Desktop notification from the Notifications dropdown, and check Play notification sounds.
- On the left, select your calendar (Student) and click Other notifications to manage email notification for different types of events.
- Next to each option, click the Down arrow and select whether you want E-mail (notification) or None (no notification).
Set event-specific notifications
- Click an event you already created, and then click Edit event ().
- Next to Notifications, leave 10 minutes before the meeting.
- Click Add notification to add a second notification.
- Click the down arrow and select Email from the dropdown. Set the time to 1 hour before the meeting.
- Click Save. If this is a recurring event, select This and following events, and click OK.
Click Check my progress to verify the objective.
Manage event notifications.
Choose your calendar view
Choose how many days you see at a time in your calendar view.
Choose your calendar view
-
At the top right in the view switcher box, click the Down arrow.
- Select Month selected.
- Uncheck Show weekends. (If required)
-
Look at your calendar to see the change.
-
(Optional) Experiment changing other options using the view switcher box.
Manage your calendar view settings
- Click Settings menu () > Settings.
- On the left under General, click View options.
- Check the following boxes, uncheck all others:
- Show declined events
- Show week numbers
- Click Start week on and select Monday.
- Go to the Set custom view field and click the Down arrow to choose 5 days for your calendar view.
- Look at your calendar to see the changes.
Change your calendar's look
Changing the way your calendar appears can be helpful when you have several calendars layered on the same screen.
Change your calendar’s appearance and color set
-
Click Settings menu () > Appearance.
-
Click Color set > Modern and then click Classic to see the difference.
-
Click Information density > Compact to see the difference.
-
Click DONE.
Change your calendars’ color set:
- On the left, hover over your calendar name and click three vertical dots > select the color you want from the palette.
Change an event’s color
-
Right-click an event and select a new color.
-
(Optional) Experiment with the different settings to find the combination you like best.
Congratulations!
You explored Google Calendar to schedule and update meetings and events, create multiple calendars, share your calendar, and manage how your how your calendar looks.
Next steps / Learn more
Google Cloud training and certification
...helps you make the most of Google Cloud technologies. Our classes include technical skills and best practices to help you get up to speed quickly and continue your learning journey. We offer fundamental to advanced level training, with on-demand, live, and virtual options to suit your busy schedule. Certifications help you validate and prove your skill and expertise in Google Cloud technologies.
Manual Last Updated January 27, 2025
Lab Last Tested January 27, 2025
Copyright 2025 Google LLC. All rights reserved. Google and the Google logo are trademarks of Google LLC. All other company and product names may be trademarks of the respective companies with which they are associated.


