


Before you begin
- Labs create a Google Cloud project and resources for a fixed time
- Labs have a time limit and no pause feature. If you end the lab, you'll have to restart from the beginning.
- On the top left of your screen, click Start lab to begin
Create a GKE cluster
/ 20
Enable Managed Prometheus on the GKE cluster
/ 20
Deploy an application onto the GKE cluster
/ 20
Create a logs-based metric and alerting policy
/ 10
Update and re-deploy your app
/ 10
Containerize your code and deploy it onto the cluster
/ 20
In a challenge lab you’re given a scenario and a set of tasks. Instead of following step-by-step instructions, you will use the skills learned from the labs in the course to figure out how to complete the tasks on your own! An automated scoring system (shown on this page) will provide feedback on whether you have completed your tasks correctly.
When you take a challenge lab, you will not be taught new Google Cloud concepts. You are expected to extend your learned skills, like changing default values and reading and researching error messages to fix your own mistakes.
To score 100% you must successfully complete all tasks within the time period!
This lab is recommended for students who have enrolled in the Manage Kubernetes in Google Cloud skill badge. Are you ready for the challenge?
Read these instructions. Labs are timed and you cannot pause them. The timer, which starts when you click Start Lab, shows how long Google Cloud resources are made available to you.
This hands-on lab lets you do the lab activities in a real cloud environment, not in a simulation or demo environment. It does so by giving you new, temporary credentials you use to sign in and access Google Cloud for the duration of the lab.
To complete this lab, you need:
You were onboarded at Cymbal Shops just a few months ago. You have spent a lot of time working with containers in Docker and Artifact Registry and have learned the ropes of managing new and existing deployments on GKE. You've had practice updating manifests as well as scaling, monitoring, and debugging applications running on your clusters.
Your team would like you to start managing their Kubernetes deployments to ensure smooth rollouts and application updates to their new e-commerce website. Before you switch to this new role, the development team would like you to demonstrate your new skills. As part of this demonstration, they have a list of tasks they would like to see you do in an allotted period of time in a sandbox environment.
As part of the sandbox environment, your developers have created an Artifact Registry repository named
spls/gsp510/hello-app bucket later in the lab.
Your tasks will include the following:
The new Cymbal Shops e-commerce website will run natively on GKE and the team would like to see your experience working and setting up clusters. In this section, you will need to create a Kubernetes cluster based on a set of configurations provided to run your demo applications on.
| Setting | Value |
|---|---|
| Zone | |
| Release channel | Regular |
| Cluster version |
1.27.8 or newer
|
| Cluster autoscaler | Enabled |
| Number of nodes | 3 |
| Minimum nodes | 2 |
| Maximum nodes | 6 |
Click Check my progress to verify the objective.
As part of the e-commerce website strategy, Cymbal Shops would like to start using Managed Prometheus for metrics and monitoring on the cluster to ensure a good experience for their customers. In this section, you will enable Managed Prometheus on the cluster for metric monitoring and create a namespace to deploy a sample Prometheus application and pod monitoring on.
Enable the Prometheus managed collection on the GKE cluster.
Create a namespace on the cluster named
Download a sample Prometheus app:
Update the <todo> sections (lines 35-38) with the following configuration.
nilebox/prometheus-example-app:latest
prometheus-test
metrics
Deploy the application onto the
Download the pod-monitoring.yaml file:
Update the <todo> sections (lines 18-24) with the following configuration:
prometheus-test
prometheus-test
prometheus-test
Apply the pod monitoring resource onto the
Click Check my progress to verify the objective.
The development team at Cymbal Shops will be consistently releasing new application code to the cluster that you will have to successfully deploy into production. In this section, you will deploy a Kubernetes manifest onto the cluster and inspect the issue.
Create a deployment onto the helloweb-deployment.yaml manifest file. It is located in the hello-app/manifests folder.
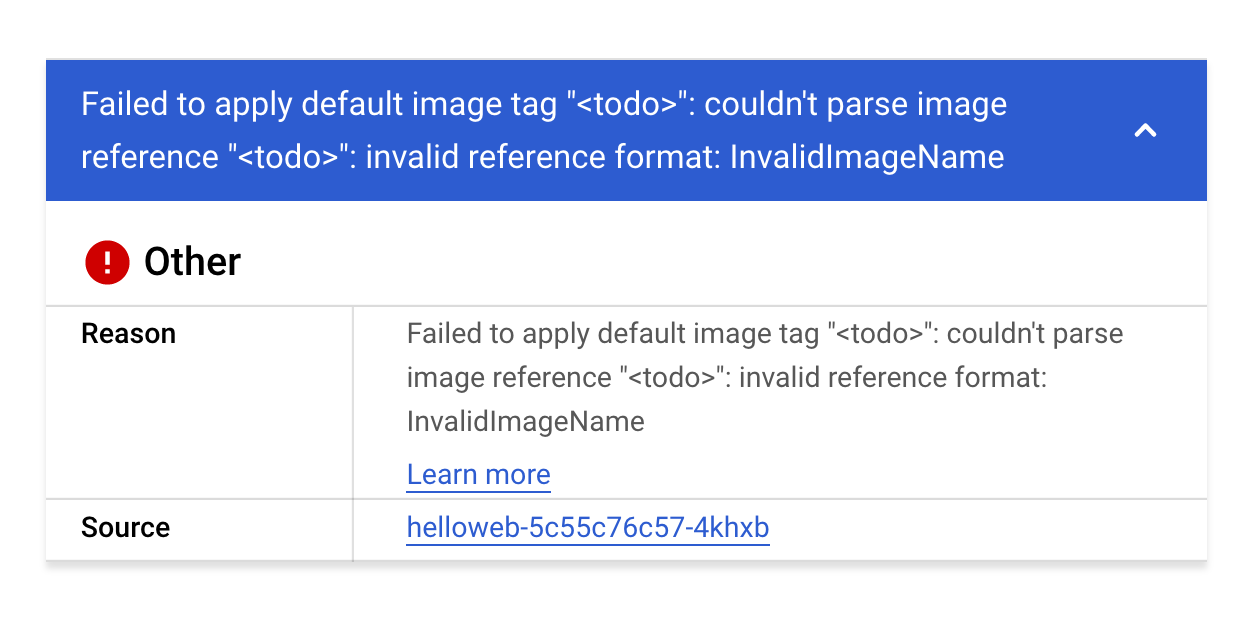
Verify you have created the deployment, and navigate to the helloweb deployment details page. You should see the following error:
This error seems to stem from an invalid image name in the manifest that you just deployed. Before you fix the image name, you will create a logs-based metric and alerting policy so that your team can be notified if this happens again in the future.
Click Check my progress to verify the objective.
Cymbal Shops would like to set up some logs based metrics and alerting policies to aggregate the number of errors and warnings in their Kubernetes pods and set up an alerting mechanism for their clusters when a certain amount of errors are above a specific threshold. In this section, you will demonstrate your knowledge on building these metrics and alerting policies for the team.
If the query is correct, upon running you should see the following errors show up in the logs:
pod-image-errors.10 min
Count
Sum
Threshold
Any time series violates
Above threshold
0
Pod Error Alert
Click Check my progress to verify the objective.
The development team would like to see you demonstrate your knowledge on deleting and updating deployments on the cluster in case of an error. In this section, you will update a Kubernetes manifest with a correct image reference, delete a deployment, and deploy the updated application onto the cluster.
Replace the <todo> in the image section in the helloweb-deployment.yaml deployment manifest with the following image:
us-docker.pkg.dev/google-samples/containers/gke/hello-app:1.0Delete the helloweb deployment from your cluster.
Deploy the updated helloweb-deployment.yaml manifest onto your cluster on the
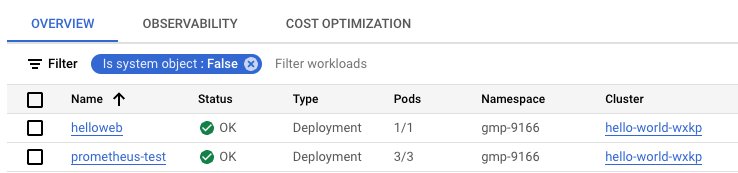
You should verify that it has deployed correctly with no errors. Your Kubernetes Workloads page should resemble the following:
Click Check my progress to verify the objective.
Lastly, as part of the Cymbal Shops e-commerce strategy, the application team will be providing you code that you will need to containerize and store in a registry, and then update the cluster with the newest version of that code.
In this section, you will containerize your application code, update an image in Artifact Registry, and set that to the image on your cluster. Your team has a repository in Artifact Registry named hello-app sample app in Docker. You will update the code for the build locally, then push a new version to the repository.
In the hello-app directory, update the main.go file to use Version: 2.0.0 on line 49.
Use the hello-app/Dockerfile to create a Docker image with the v2 tag.
Push the newly built Docker image to your repository in Artifact Registry using the v2 tag.
Set the image on your helloweb deployment to reflect the v2 image you pushed to Artifact Registry.
Expose the helloweb deployment to a LoadBalancer service named
Navigate to the external load balancer IP address of the
Click Check my progress to verify the objective.
Congratulations! In this lab you verified your skills on creating a GKE cluster based on a set of configurations and enabling the Prometheus managed collection. You also troubleshooted errors on a cluster and created a logs-based metric and alerting policy, and then updated Kubernetes manifests to fix the issue. Lastly, you containerized your application code and pushed a new build to a repository in Artifact Registry using Docker, updated your cluster to reflect the new image, and exposed a service on the cluster. You are ready to start managing Kubernetes in your own environments!
This self-paced lab is part of the Manage Kubernetes in Google Cloud skill badge quest. Completing this skill badge quest earns you the badge above, to recognize your achievement. Share your badge on your resume and social platforms, and announce your accomplishment using #GoogleCloudBadge.
This skill badge quest is part of Google's Cloud Hybrid and Multi-Cloud Cloud Architect learning path. If you have already completed the other skill badge quests in this learning path, search the Google Cloud Skills Boost catalog for 20+ other skill badge quests in which you can enroll.
...helps you make the most of Google Cloud technologies. Our classes include technical skills and best practices to help you get up to speed quickly and continue your learning journey. We offer fundamental to advanced level training, with on-demand, live, and virtual options to suit your busy schedule. Certifications help you validate and prove your skill and expertise in Google Cloud technologies.
Manual Last Updated Aug 11, 2023
Lab Last Tested Aug 11, 2023
Copyright 2025 Google LLC. All rights reserved. Google and the Google logo are trademarks of Google LLC. All other company and product names may be trademarks of the respective companies with which they are associated.


This content is not currently available
We will notify you via email when it becomes available

Great!
We will contact you via email if it becomes available

One lab at a time
Confirm to end all existing labs and start this one