Cloud Run functions is the latest version of Google Cloud Run functions, Google Cloud's Functions-as-a-Service offering. This version comes with an advanced feature set and is powered by Cloud Run and Eventarc, giving you more advanced control over performance and scalability, and more control around the functions runtime and triggers from over 90+ event sources.
In this lab, you create Cloud Run functions that respond to HTTP requests, and event-driven functions that are triggered by Cloud Storage events. You will also deploy multiple revisions of a Cloud Run function and explore new settings.
What's New?
This new version of Cloud Run functions provides an enhanced FaaS experience powered by Cloud Run, Cloud Build, Artifact Registry, and Eventarc.
Longer request processing: Run your Cloud Run functions longer than the 5-minute default, making it easier to run longer request workloads such as processing large streams of data from Cloud Storage or BigQuery. For HTTP functions, this is up to 60 minutes. For event-driven functions, this is up to 10 minutes.
Larger instances: Take advantage of up to 16 GB of RAM and 4 vCPUs on Cloud Run functions allowing larger in-memory, compute-intensive, and more parallel workloads.
Concurrency: Process up to 1000 concurrent requests with a single function instance, minimizing cold starts and improving latency when scaling.
Minimum instances: Provide for pre-warmed instances to cut your cold starts and make sure the bootstrap time of your application does not affect application performance.
Traffic splitting: Support multiple versions of your functions, split traffic between different versions and roll your function back to a prior version.
Objectives
In this lab, you:
Write a function that responds to HTTP requests, and deploy the function using Google Cloud console.
Write a function that responds to Cloud Storage events, and deploy the function from your local Cloud Shell environment.
Write unit tests for your function and test your function locally.
Deploy multiple revisions of a Cloud Run function using the Google Cloud console.
Test the latest revision of your function and verify it works as expected.
Setup
For each lab, you get a new Google Cloud project and set of resources for a fixed time at no cost.
Sign in to Qwiklabs using an incognito window.
Note the lab's access time (for example, 1:15:00), and make sure you can finish within that time.
There is no pause feature. You can restart if needed, but you have to start at the beginning.
When ready, click Start lab.
Note your lab credentials (Username and Password). You will use them to sign in to the Google Cloud Console.
Click Open Google Console.
Click Use another account and copy/paste credentials for this lab into the prompts.
If you use other credentials, you'll receive errors or incur charges.
Accept the terms and skip the recovery resource page.
Activate Google Cloud Shell
Google Cloud Shell is a virtual machine that is loaded with development tools. It offers a persistent 5GB home directory and runs on the Google Cloud.
Google Cloud Shell provides command-line access to your Google Cloud resources.
In Cloud console, on the top right toolbar, click the Open Cloud Shell button.
Click Continue.
It takes a few moments to provision and connect to the environment. When you are connected, you are already authenticated, and the project is set to your PROJECT_ID. For example:
gcloud is the command-line tool for Google Cloud. It comes pre-installed on Cloud Shell and supports tab-completion.
You can list the active account name with this command:
For the first function, you create an authenticated Node.js function that responds to HTTP requests to convert a temperature value from Fahrenheit to Celsius, and respond with the converted temperature value.
Create the function
To access Cloud Run functions, on the Navigation menu (), click Cloud Run functions.
Note: If Cloud Run functions is not listed in the navigation menu, click View All Products. Scroll to the section on Serverless, click the pin next to Cloud Run functions, and then click Cloud Run functions.
You are redirected to Cloud Run in the console.
Click Write a Function.
For Service name, type temperature-converter.
For Region, select the region.
For Authentication, select Require authentication.
Scroll to the bottom and expand Container(s), Volumes, Networking, Security.
Under Revision scaling, for Maximum number of instances, enter 1.
Leave the remaining settings as their defaults, and click Create.
Our function will be implemented in Node.js. In the Source tab, click on the edit icon next to Base image, select the latest version of the Node.js language runtime, and click Save.
For Function entry point, type convertTemp.
In the Inline Editor, replace any existing sample code with the following code in the index.js file:
const functions = require('@google-cloud/functions-framework');
functions.http('convertTemp', (req, res) => {
var dirn = req.query.convert;
var ctemp = (req.query.temp - 32) * 5/9;
var target_unit = 'Celsius';
if (req.query.temp === undefined) {
res.status(400);
res.send('Temperature value not supplied in request.');
}
if (dirn === undefined)
dirn = process.env.TEMP_CONVERT_TO;
if (dirn === 'ctof') {
ctemp = (req.query.temp * 9/5) + 32;
target_unit = 'Fahrenheit';
}
res.send(`Temperature in ${target_unit} is: ${ctemp.toFixed(2)}.`);
});
This is a simple HTTP function in Node.js that converts a temperature value in Fahrenheit or Celsius passed in the request and responds with the converted value.
Functions framework is an open source FaaS (function as a service) framework and library that lets you write lightweight functions that run in different environments that include Cloud Run functions, your local development machine, and Cloud Run.
You should see the following message as a response:
Temperature in Fahrenheit is: 70.00.
Click Check my progress to verify the objective.
Create an HTTP function
Task 3. Create a Cloud Storage function
In this task, you create an event-driven function in Node.js that responds to events from a Cloud Storage bucket.
Setup
To use Cloud Storage triggers with Cloud Run functions, the Cloud Storage service agent must have the Pub/Sub Publisher (roles/pubsub.publisher) IAM role on your project.
Cloud Storage functions are based on Pub/Sub notifications from Cloud Storage, and support the finalize, delete, archive, and metadata update event types.
Set up an environment variable for the Cloud Storage agent's service account:
SERVICE_ACCOUNT=$(gcloud storage service-agent)
Grant the Pub/Sub publisher role to the Cloud Storage service agent on your project. A service agent is a Google-managed service account that allows the service to access your resources.
To trigger the function in a later task, you will upload a file to Cloud Storage. Copy this file that contains sample temperature data to your Cloud Shell environment:
In this subtask, you develop a function locally in Cloud Shell. Create a directory and navigate to it:
mkdir ~/temp-data-checker && cd $_
Create the index.js and package.json files for your Node.js function:
touch index.js && touch package.json
In the Cloud Shell toolbar, click Open Editor.
You can switch between Cloud Shell and the code editor using Open Editor and Open Terminal, or click Open in new window to leave the editor open in a separate tab.
In the editor Explorer, expand the temp-data-checker folder.
Add the following code to the temp-data-checker/index.js file:
const functions = require('@google-cloud/functions-framework');
// Register a CloudEvent callback with the Functions Framework that will
// be triggered by Cloud Storage events.
functions.cloudEvent('checkTempData', cloudEvent => {
console.log(`Event ID: ${cloudEvent.id}`);
console.log(`Event Type: ${cloudEvent.type}`);
const file = cloudEvent.data;
console.log(`Bucket: ${file.bucket}`);
console.log(`File: ${file.name}`);
console.log(`Created: ${file.timeCreated}`);
});
The function uses `console.log` statements to log messages to stdout. Cloud Run functions includes simple runtime logging by default. Log messages are picked up and parsed by Cloud Run functions and sent to Cloud Logging, where they can be viewed in the Cloud console.
To specify dependencies and other package information for your Node.js function, add the following content to the temp-data-checker/package.json file:
Run the following command. You should see information from the received CloudEvent in the logs:
gcloud functions logs read temperature-data-checker \
--region $REGION --gen2 --limit=100 --format "value(log)"
Note: It may take a minute for the logs to generate.
You should see output similar to the following:
Created: 2024-08-28T13:18:34.980Z
File: average-temps.csv
Bucket: gcf-temperature-data-cf-project
Event Type: google.cloud.storage.object.v1.finalized
Event ID: 5834307012388233
The Cloud Storage function created in this lab extracts metadata about the bucket and resource that was created. To extract and process the data with downstream services, use the Cloud Storage client libraries for your language runtime.
Click Check my progress to verify the objective.
Create a Cloud Storage function
Task 4. Local development and testing
Cloud Run functions supports several methods of running your functions outside of Cloud Run functions itself. This is useful during iterative development, pre-deployment testing in local environments, data locality compliance, and multi-cloud deployments.
In this task, you modify an existing HTTP function, develop unit and integration tests, and test the function locally before deploying the function to Cloud Run functions.
Download the function source code
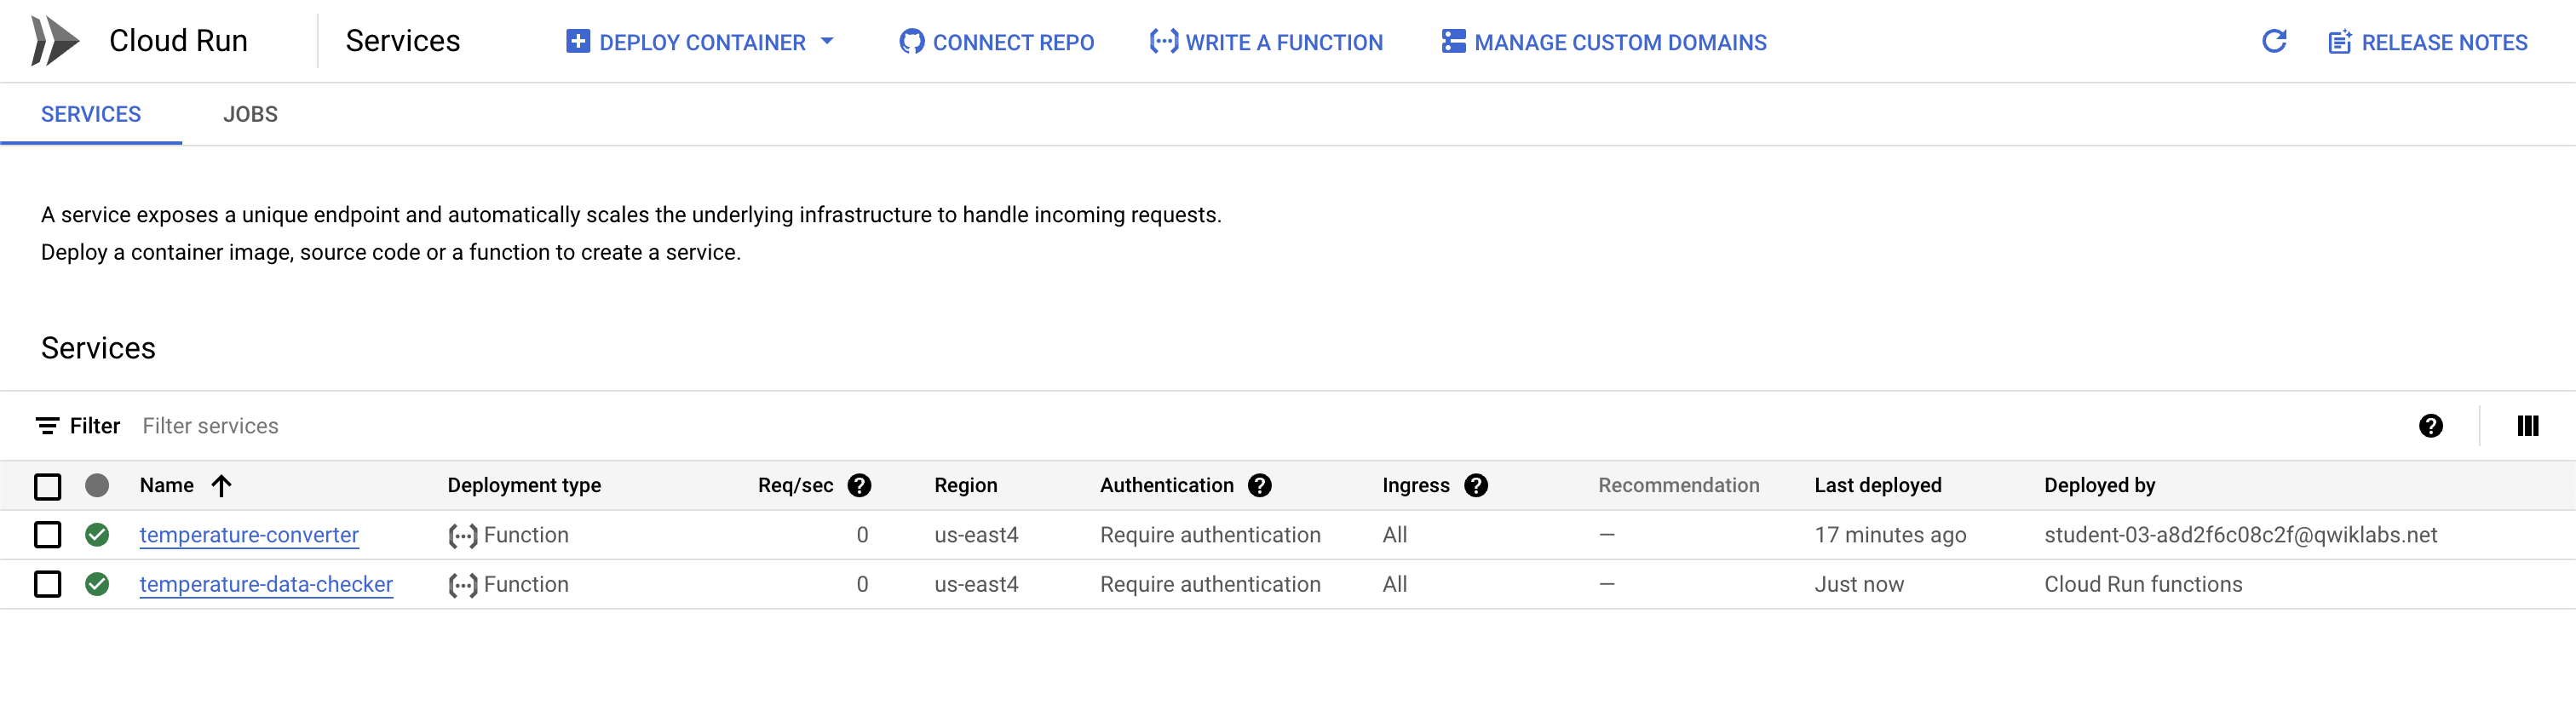
To access Cloud Run functions, in the Navigation menu (), click Cloud Run.
To view the details of the temperature-converter function, select it's name.
To view the function source code, click the SOURCE tab.
Click Download ZIP, and save the zip file in a folder on your computer renaming it to function-source.zip.
In the Cloud Shell toolbar, click the More menu (), and select Upload.
In the Upload dialog, click Choose Files.
Select the zip file from the folder that you downloaded previously, click Open, and then click Upload in the dialog.
After the file is uploaded, in Cloud Shell, run the following command:
mkdir ~/temp-data-converter && cd $_
Extract the contents of the .zip file:
unzip ../function-source.zip
Add unit tests to the function code
Let's first add some unit tests to the temperature-convert function.
Create a directory that will contain all the function tests, and the unit test source file:
mkdir tests && touch tests/unit.http.test.js
In the Cloud Shell toolbar, click Open Editor.
In the editor, add the following code to the temp-data-converter/tests/unit.http.test.js file. The test code creates a mock that wraps HTTP requests and responses and uses Sinon stubs to interpret the responses received from the function.
const {getFunction} = require('@google-cloud/functions-framework/testing');
describe('functions_convert_temperature_http', () => {
// Sinon is a testing framework that is used to create mocks for Node.js applications written in Express.
// Express is Node.js web application framework used to implement HTTP functions.
const sinon = require('sinon');
const assert = require('assert');
require('../');
const getMocks = () => {
const req = {body: {}, query: {}};
return {
req: req,
res: {
send: sinon.stub().returnsThis(),
status: sinon.stub().returnsThis()
},
};
};
let envOrig;
before(() => {
envOrig = JSON.stringify(process.env);
});
after(() => {
process.env = JSON.parse(envOrig);
});
it('convertTemp: should convert a Fahrenheit temp value by default', () => {
const mocks = getMocks();
mocks.req.query = {temp: 70};
const convertTemp = getFunction('convertTemp');
convertTemp(mocks.req, mocks.res);
assert.strictEqual(mocks.res.send.calledOnceWith('Temperature in Celsius is: 21.11.'), true);
});
it('convertTemp: should convert a Celsius temp value', () => {
const mocks = getMocks();
mocks.req.query = {temp: 21.11, convert: 'ctof'};
const convertTemp = getFunction('convertTemp');
convertTemp(mocks.req, mocks.res);
assert.strictEqual(mocks.res.send.calledOnceWith('Temperature in Fahrenheit is: 70.00.'), true);
});
it('convertTemp: should convert a Celsius temp value by default', () => {
process.env.TEMP_CONVERT_TO = 'ctof';
const mocks = getMocks();
mocks.req.query = {temp: 21.11};
const convertTemp = getFunction('convertTemp');
convertTemp(mocks.req, mocks.res);
assert.strictEqual(mocks.res.send.calledOnceWith('Temperature in Fahrenheit is: 70.00.'), true);
});
it('convertTemp: should return an error message', () => {
const mocks = getMocks();
const convertTemp = getFunction('convertTemp');
convertTemp(mocks.req, mocks.res);
assert.strictEqual(mocks.res.status.calledOnce, true);
assert.strictEqual(mocks.res.status.firstCall.args[0], 400);
});
});
Note: We have four unit tests, of which three are positive tests that expect a certain temperature value in the response from the function.
The fourth test is a negative test that expects the function to return a response status code of 400 (Bad Request), since there is no temperature value passed in the request object.
In the temp-data-converter/package.json file, update the dependencies for your Node.js function to include the scripts, and devDependencies sections:
In the Cloud Shell terminal window, run the following command to first install the function's dependencies:
npm install
This commands runs the Node package manager that downloads any dependencies defined in the package.json file.
Execute the unit test:
npm test
From the command output, verify that all of the tests passed.
> temperature-converter@0.0.1 test
> npm -- run unit-test
> temperature-converter@0.0.1 unit-test
> mocha tests/unit*test.js --timeout=6000 --exit
functions_convert_temperature_http
✔ convertTemp: should convert a Fahrenheit temp value by default
✔ convertTemp: should convert a Celsius temp value
✔ convertTemp: should convert a Celsius temp value by default
✔ convertTemp: should return an error message
4 passing (10ms)
Mocha is a JavaScript test framework that runs on Node.js an enables asynchronous testing in a simple, flexible manner.You should also consider implementing unit, integration, and system tests for your HTTP and event-driven Cloud Run functions. To learn more about implementing pre-deployment testing, see the links in the Learn More section at the end of this lab.
Task 5. Create function revisions
Cloud Run functions supports multiple revisions of a function, enabling you to split traffic between different revisions or roll your function back to a prior revision.
Each time you deploy or redeploy a function, a new revision of the underlying Cloud Run service is automatically created. Revisions are immutable and cannot be modified once they are created. To make changes to a function, you must redeploy it.
In this task, you deploy the HTTP function that you created in the previous task with an environment variable, and use the Google Cloud console to manage traffic between two revisions of the function.
Redeploy the function
In the Google Cloud console, navigate to the Function details page of the temperature-converter function.
Click Edit and deploy new revision.
In the Container tab, select the Variables and secrets tab.
To add an environment variable, in the Environment variables section, click Add Variable.
For Name 1, type TEMP_CONVERT_TO
To provide a value for the environment variable, for Value 1, type ctof
Click Deploy.
Wait for the deploy process to complete. After the process is completed, you will have two revisions of the function displayed.
By default, the latest deployed revision receives 100% of traffic to the function. This revision is deployed with an environment variable that instructs the function to convert all temperature values from Celsius to Fahrenheit by default.
Test the latest function revision
In Cloud Shell, to test the function, run the following curl command with the temp query parameter value in Celsius:
You should see the following response message from the function:
Temperature in Fahrenheit is: 70.00.
Click Check my progress to verify the objective.
Create function revisions
Congratulations!
In this lab, you deployed Cloud Run functions that responded to HTTP requests and Cloud Storage Events. You implemented pre-deployment testing with unit tests for an HTTP function and executed them to verify positive and negative scenarios when calling the function. You also deployed multiple revisions of a function and tested the latest revision to verify the function behavior.
Next Steps / Learn More
For more information about Cloud Run functions, view the documentation:
Copyright 2025 Google LLC All rights reserved. Google and the Google logo are trademarks of Google LLC. All other company and product names may be trademarks of the respective companies with which they are associated.
Les ateliers créent un projet Google Cloud et des ressources pour une durée déterminée.
Les ateliers doivent être effectués dans le délai imparti et ne peuvent pas être mis en pause. Si vous quittez l'atelier, vous devrez le recommencer depuis le début.
En haut à gauche de l'écran, cliquez sur Démarrer l'atelier pour commencer.
Utilisez la navigation privée
Copiez le nom d'utilisateur et le mot de passe fournis pour l'atelier
Cliquez sur Ouvrir la console en navigation privée
Connectez-vous à la console
Connectez-vous à l'aide des identifiants qui vous ont été attribués pour l'atelier. L'utilisation d'autres identifiants peut entraîner des erreurs ou des frais.
Acceptez les conditions d'utilisation et ignorez la page concernant les ressources de récupération des données.
Ne cliquez pas sur Terminer l'atelier, à moins que vous n'ayez terminé l'atelier ou que vous ne vouliez le recommencer, car cela effacera votre travail et supprimera le projet.
Ce contenu n'est pas disponible pour le moment
Nous vous préviendrons par e-mail lorsqu'il sera disponible
Parfait !
Nous vous contacterons par e-mail s'il devient disponible
Un atelier à la fois
Confirmez pour mettre fin à tous les ateliers existants et démarrer celui-ci
Utilisez la navigation privée pour effectuer l'atelier
Ouvrez une fenêtre de navigateur en mode navigation privée pour effectuer cet atelier. Vous éviterez ainsi les conflits entre votre compte personnel et le compte temporaire de participant, qui pourraient entraîner des frais supplémentaires facturés sur votre compte personnel.
In this lab, you will develop and deploy HTTP and event-driven Cloud Run functions.
Durée :
0 min de configuration
·
Accessible pendant 45 min
·
Terminé après 45 min


 ), click Cloud Run functions.
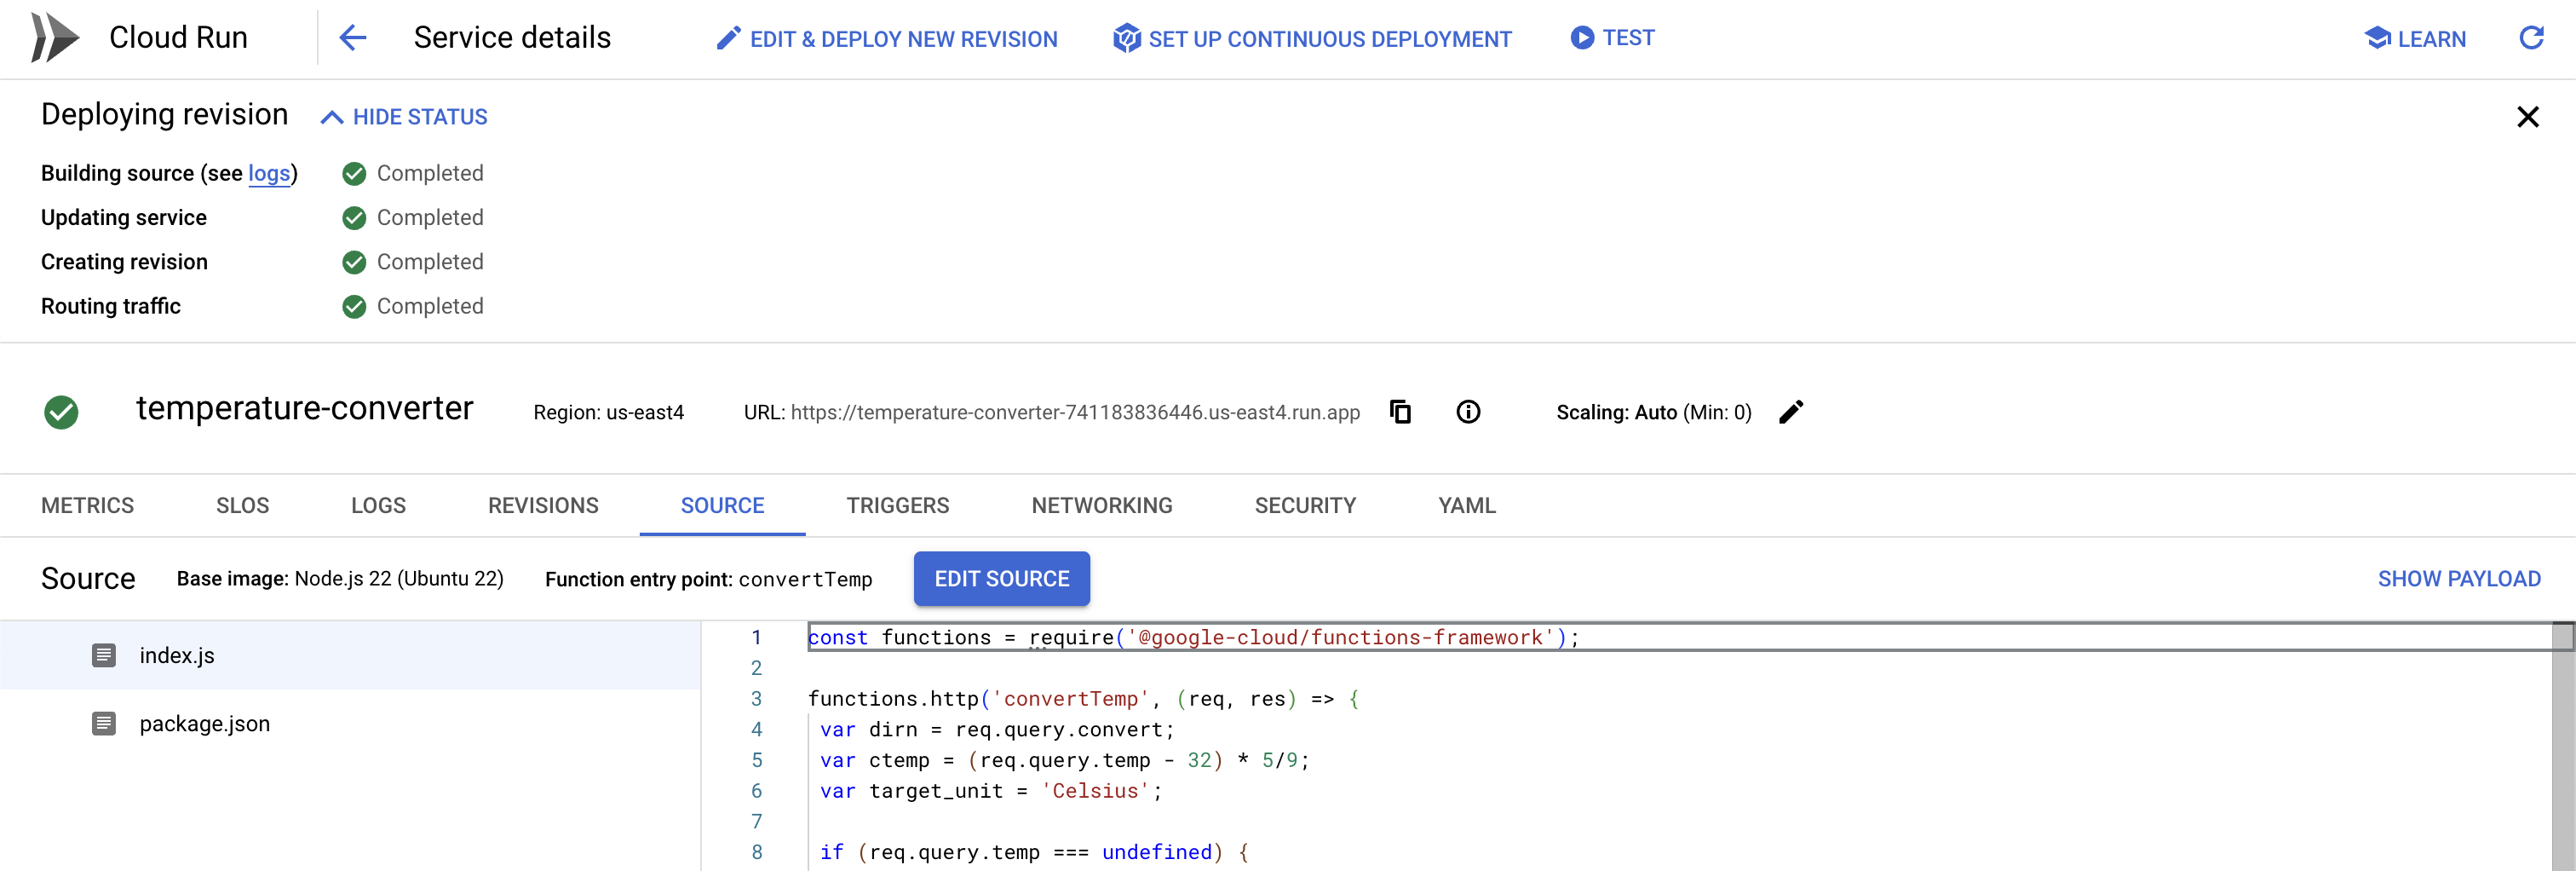
 ), and select Upload.


