

准备工作
- 实验会创建一个 Google Cloud 项目和一些资源,供您使用限定的一段时间
- 实验有时间限制,并且没有暂停功能。如果您中途结束实验,则必须重新开始。
- 在屏幕左上角,点击开始实验即可开始
Safely enable applications with App-ID
/ 50
Autoscale the VM-Series
/ 50
This lab was developed with our partner, Palo Alto Networks. Your personal information may be shared with Palo Alto Networks, the lab sponsor, if you have opted in to receive product updates, announcements, and offers in your Account Profile.
In this lab, you will deploy and scale VM-Series ML-NGFW to secure a hub and spoke architecture in Google Cloud. VM-Series enables enterprises to secure their applications, users, and data deployed across Google Cloud and other virtualization environments.
In this lab, you will perform the following tasks:
Read these instructions. Labs are timed and you cannot pause them. The timer, which starts when you click Start Lab, shows how long Google Cloud resources are made available to you.
This hands-on lab lets you do the lab activities in a real cloud environment, not in a simulation or demo environment. It does so by giving you new, temporary credentials you use to sign in and access Google Cloud for the duration of the lab.
To complete this lab, you need:
Click the Start Lab button. If you need to pay for the lab, a dialog opens for you to select your payment method. On the left is the Lab Details pane with the following:
Click Open Google Cloud console (or right-click and select Open Link in Incognito Window if you are running the Chrome browser).
The lab spins up resources, and then opens another tab that shows the Sign in page.
Tip: Arrange the tabs in separate windows, side-by-side.
If necessary, copy the Username below and paste it into the Sign in dialog.
You can also find the Username in the Lab Details pane.
Click Next.
Copy the Password below and paste it into the Welcome dialog.
You can also find the Password in the Lab Details pane.
Click Next.
Click through the subsequent pages:
After a few moments, the Google Cloud console opens in this tab.

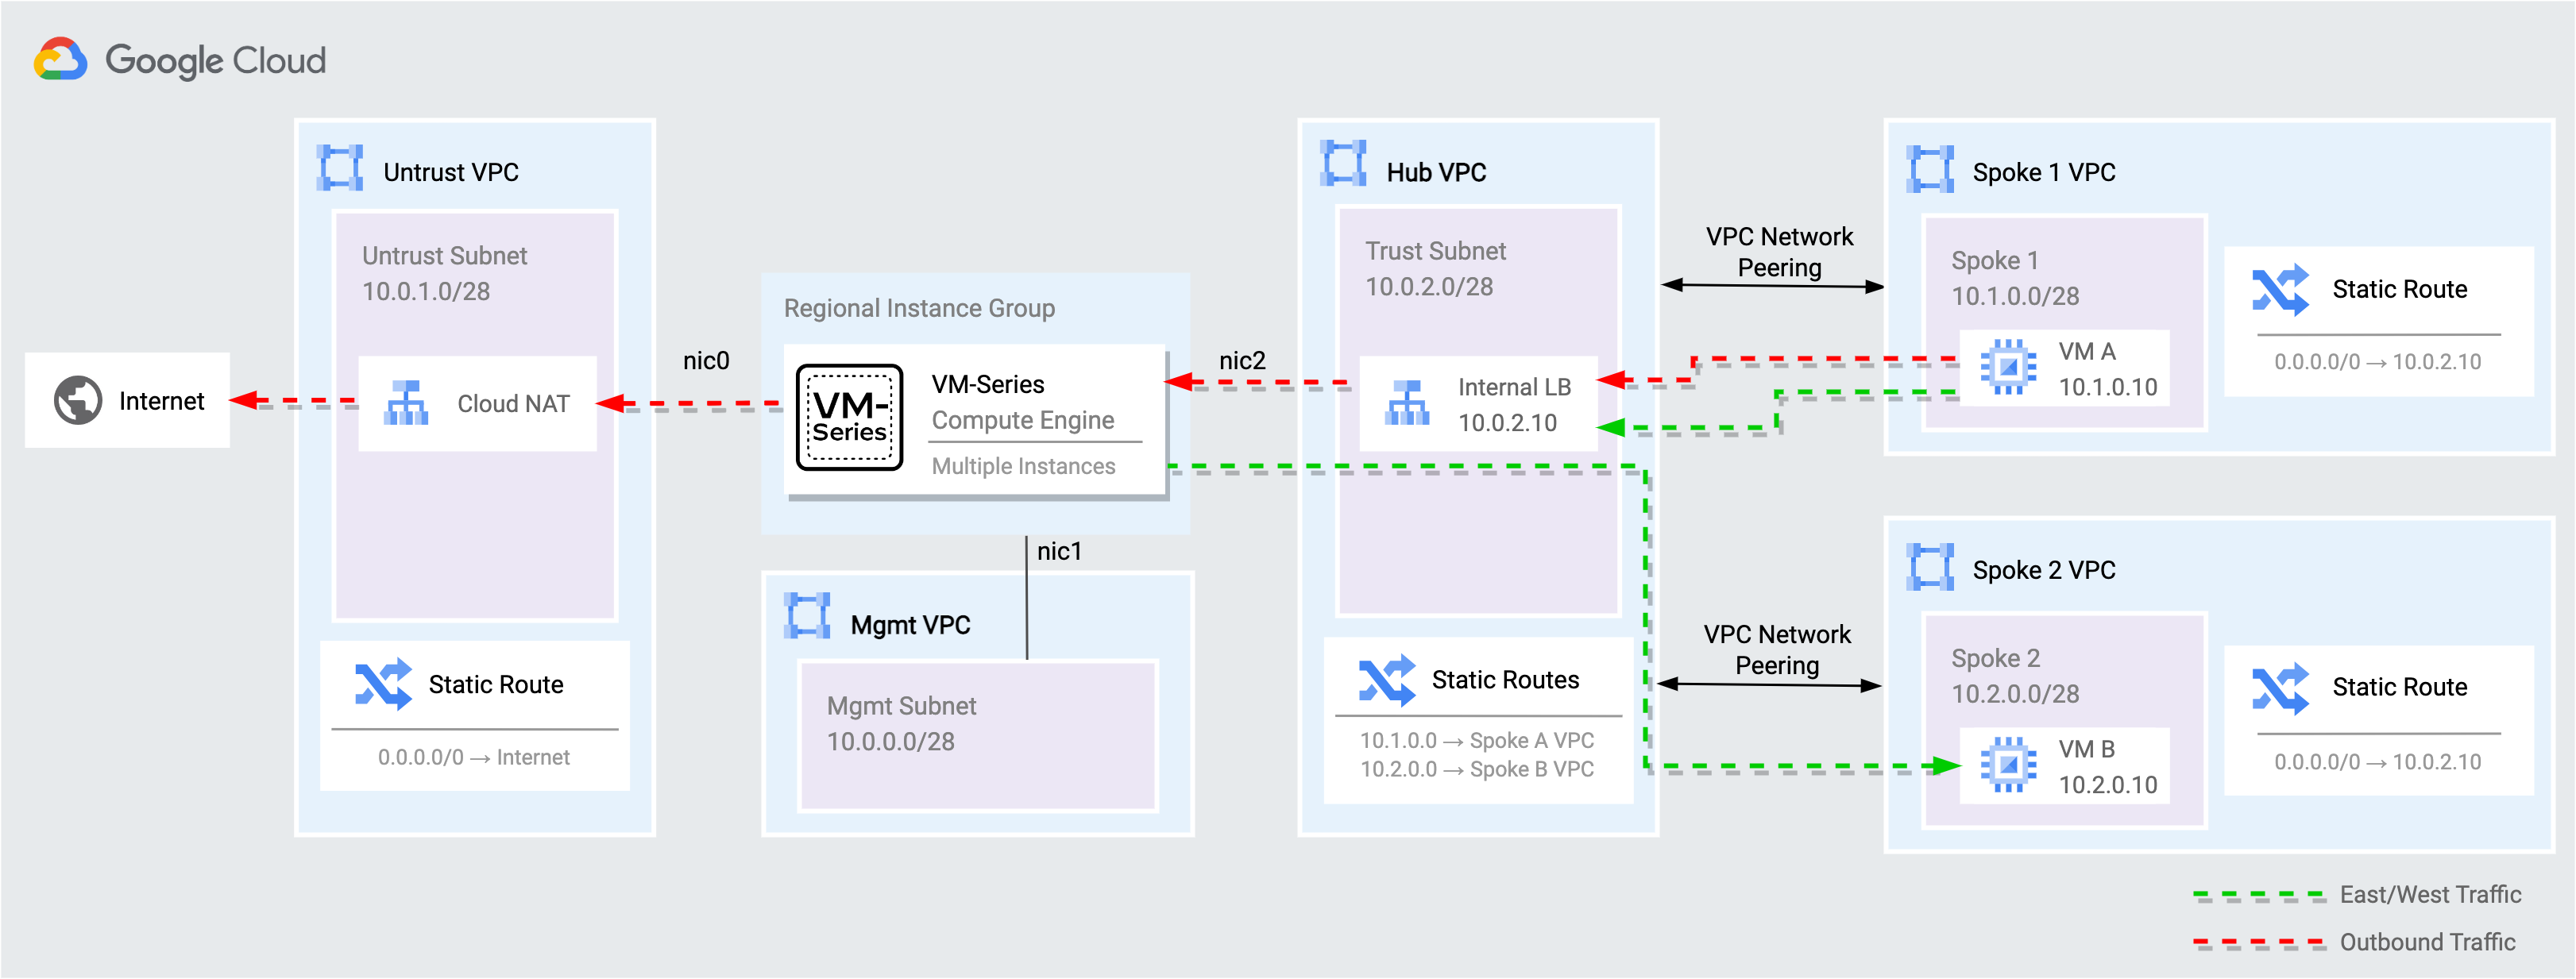
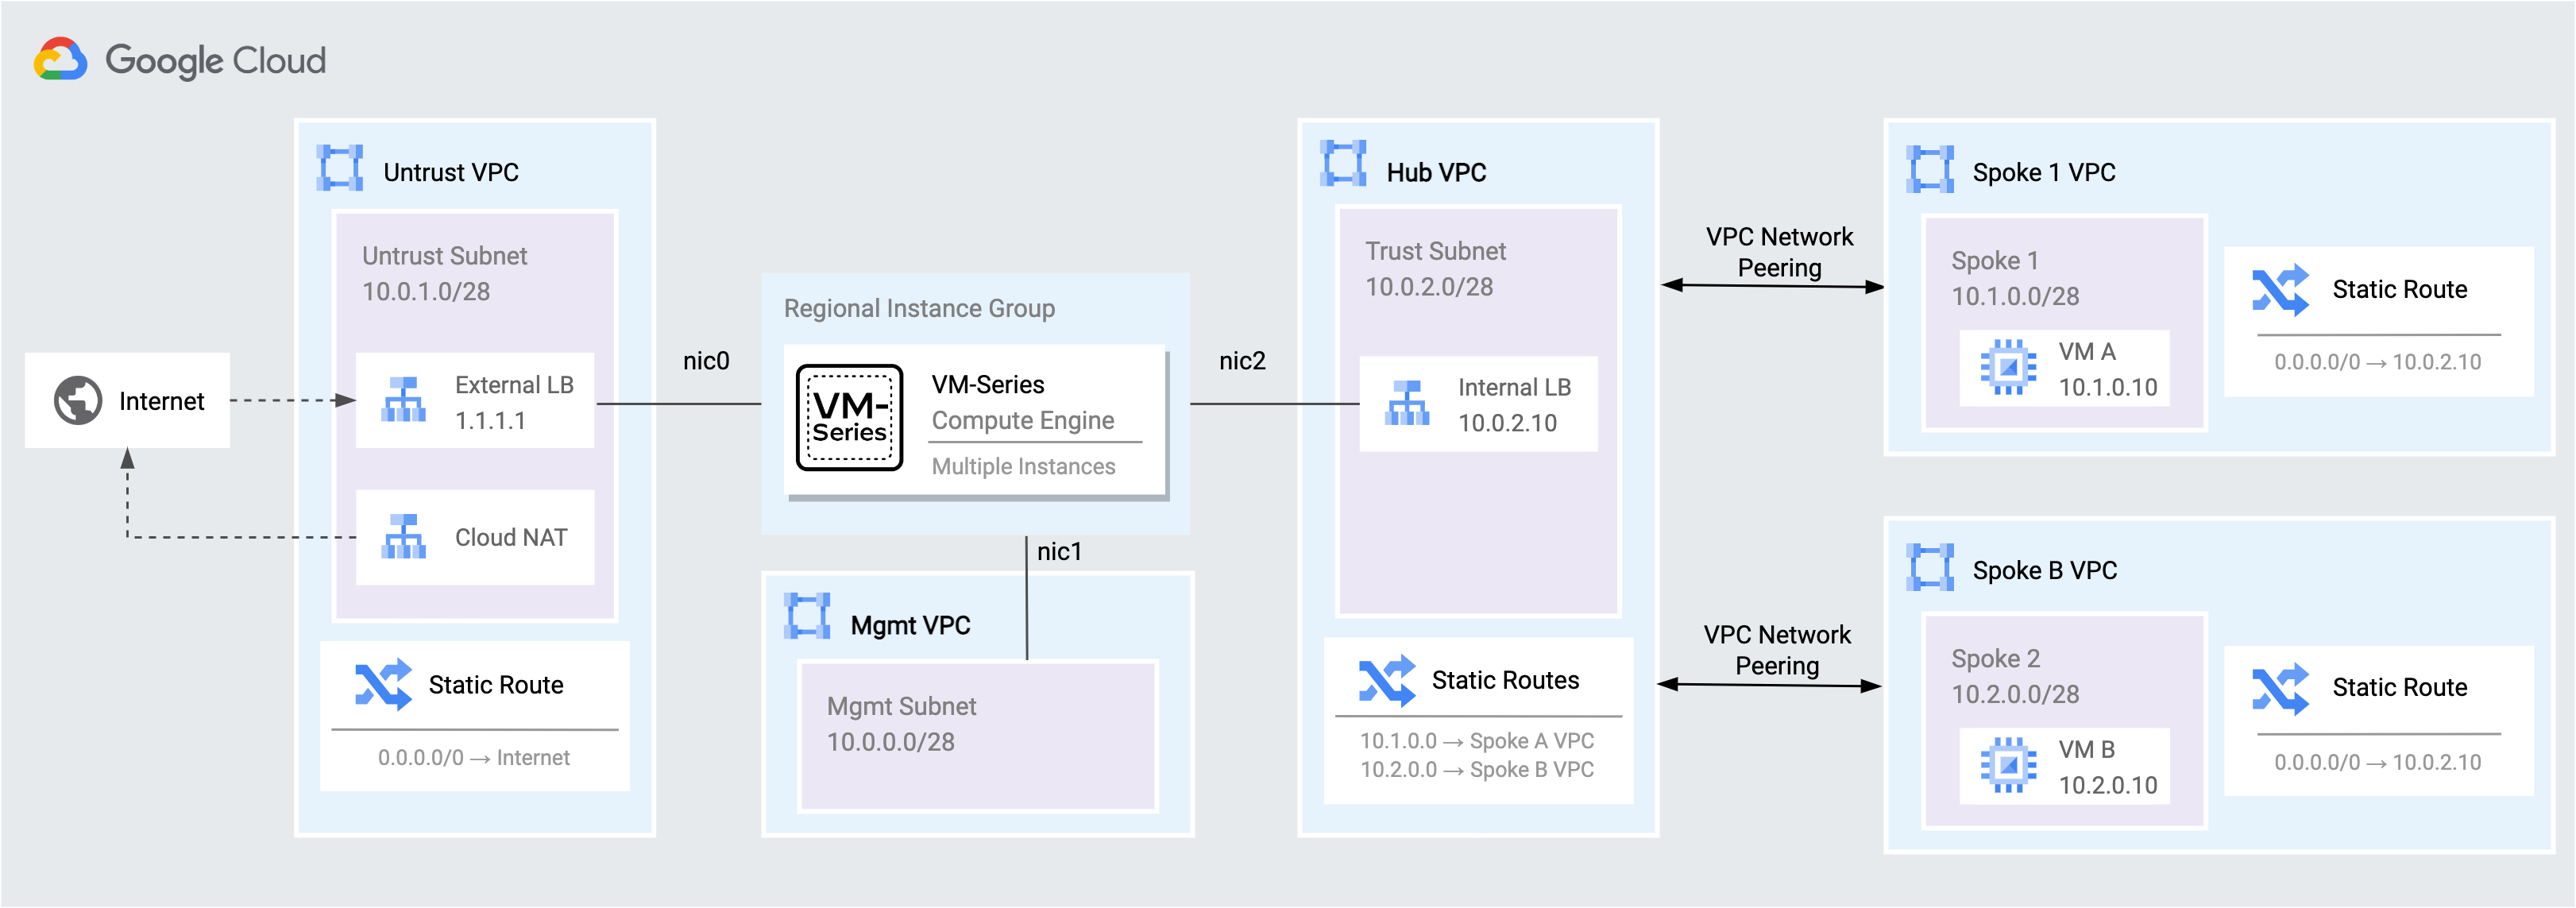
In this task, take a moment to review the diagram of the lab environment. VM-Series firewalls are deployed within a regional managed instance group to secure north/south and east/west traffic for two spoke VPC networks.
| Flow | Description |
|---|---|
| Internet to workload | Traffic from the internet to applications in the spoke networks are distributed by the External TCP/UDP Load Balancer to the VM-Series untrust interfaces (NIC0). The VM-Series inspects the traffic and forwards permissible traffic through its trust interface (NIC2) to the application in the spoke network. |
| Workload to internet | Traffic from the spoke networks destined to the internet is routed to the Internal TCP/UDP Load Balancer in the hub VPC. The VM-Series inspects the traffic and forwards permissible traffic through its untrust interface (NIC0) to the internet. |
| Workload to workload | Traffic between spoke networks is routed to the Internal TCP/UDP Load Balancer in the hub VPC. The VM-Series inspects and forwards the traffic through the trust interface (NIC2) into the hub network which routes permissible traffic to the destination spoke network. |
In this task, protect a VPC network from internet bound threats by using App-ID™ and Threat Prevention™ on the VM-Series firewall.
Internet inbound traffic is distributed by an external TCP/UDP load balancer to the VM-Series untrust interfaces. The VM-Series inspects and translates the traffic to VM A in the spoke 1 VPC.
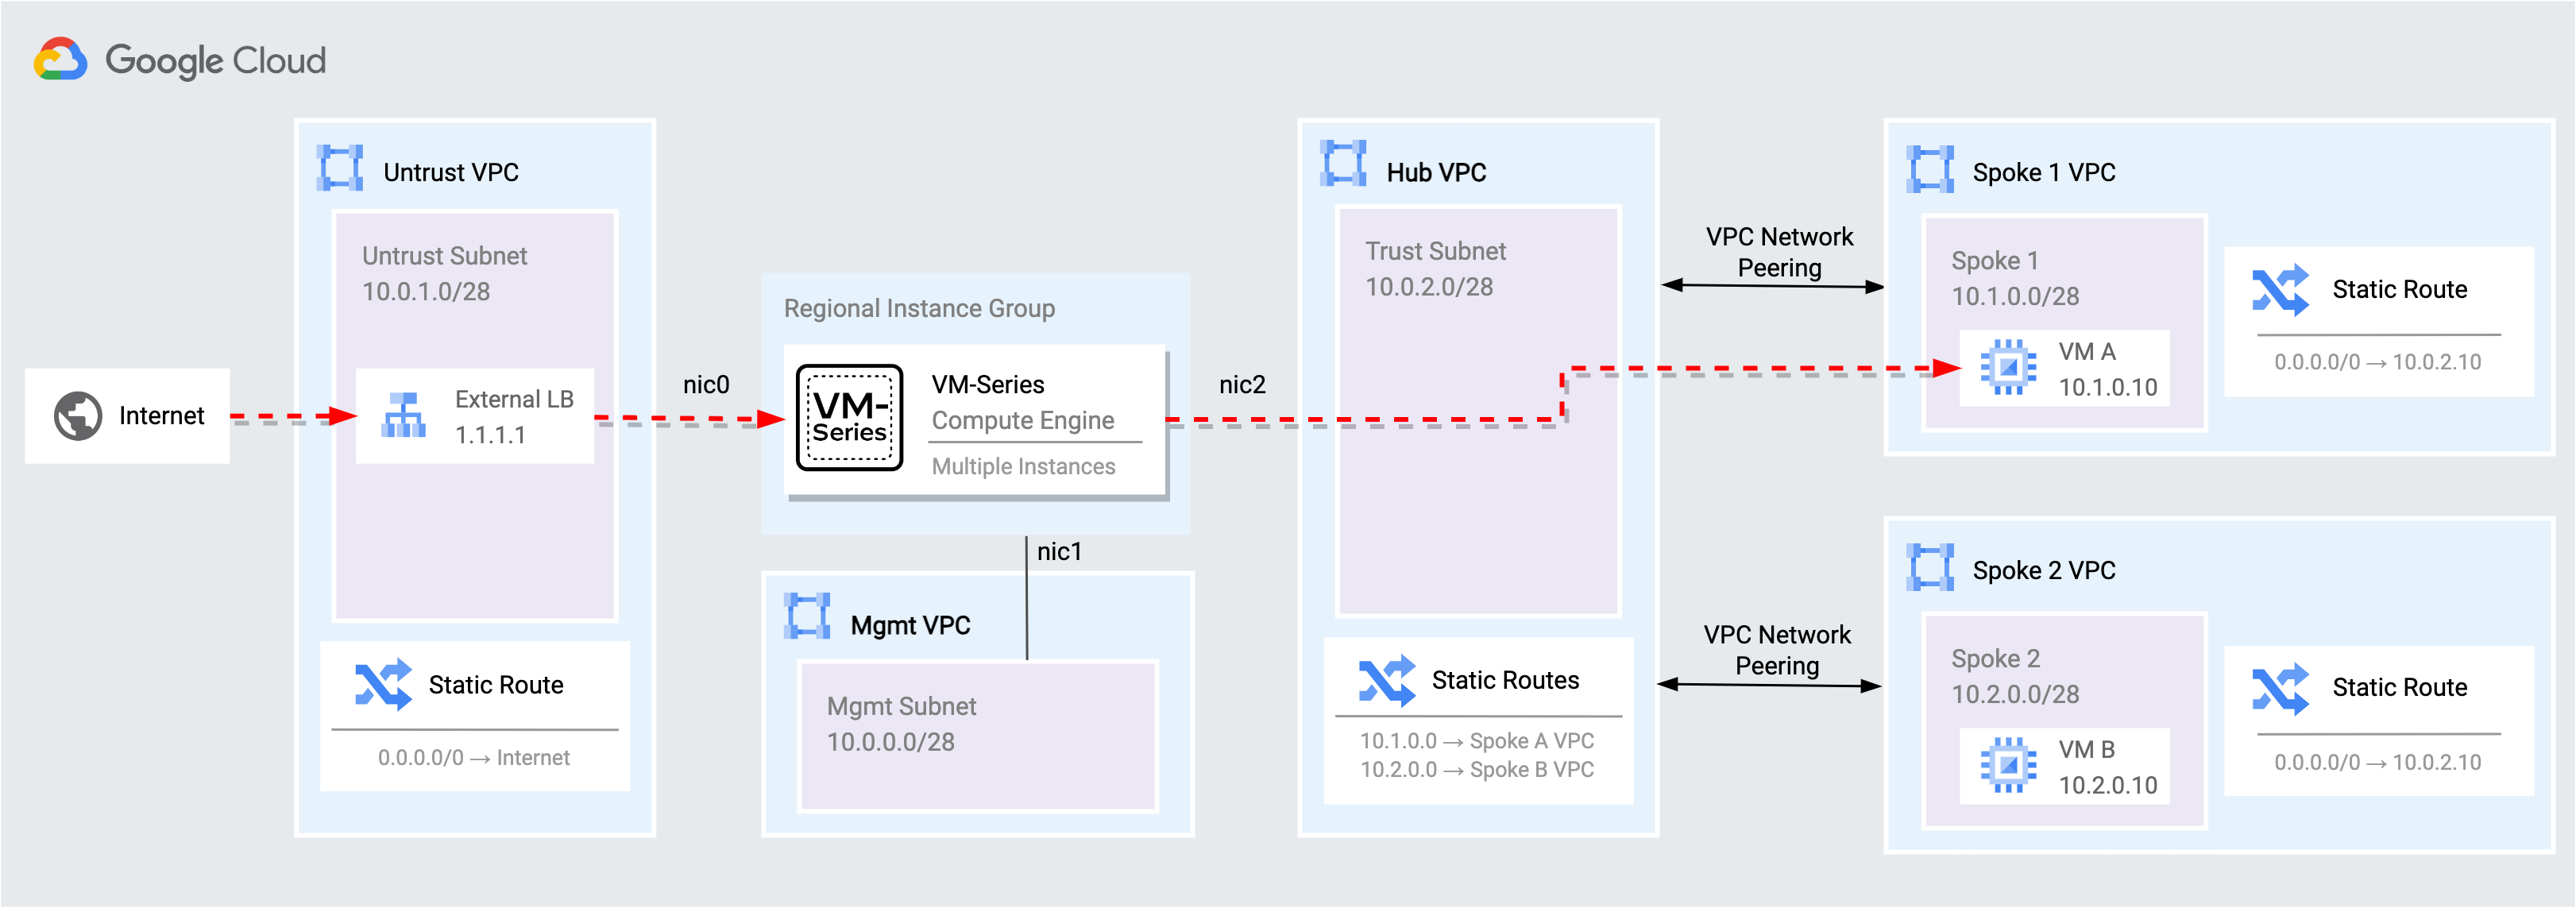
Access the web service on VM A through the external load balancer and VM-Series firewall.
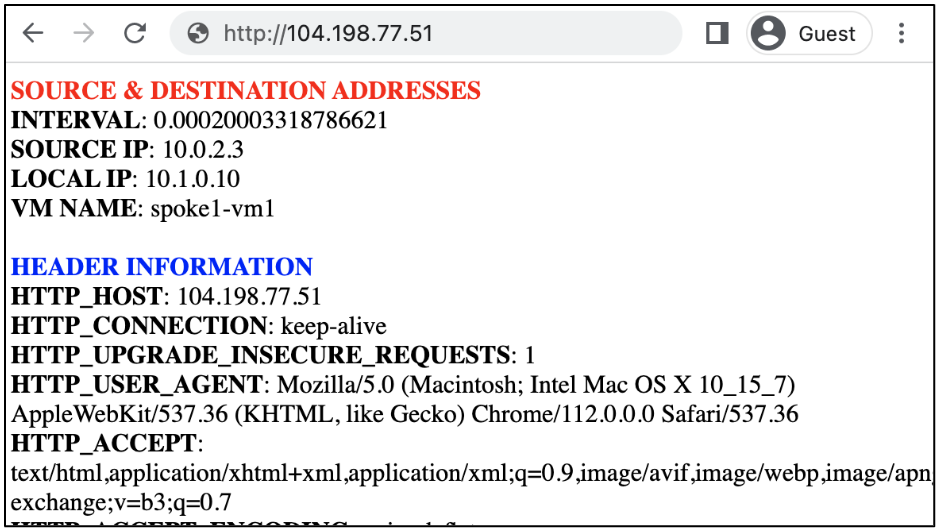
web-browsing traffic from the internet to VM A.
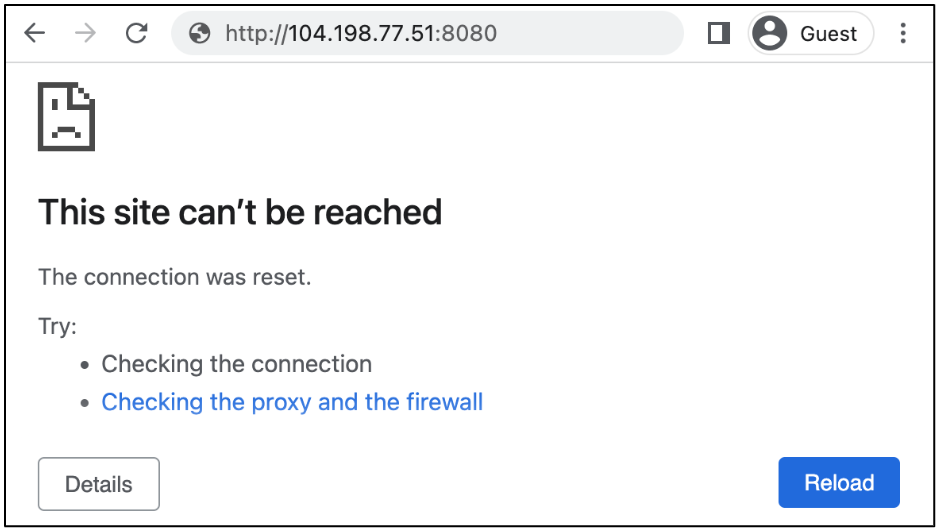
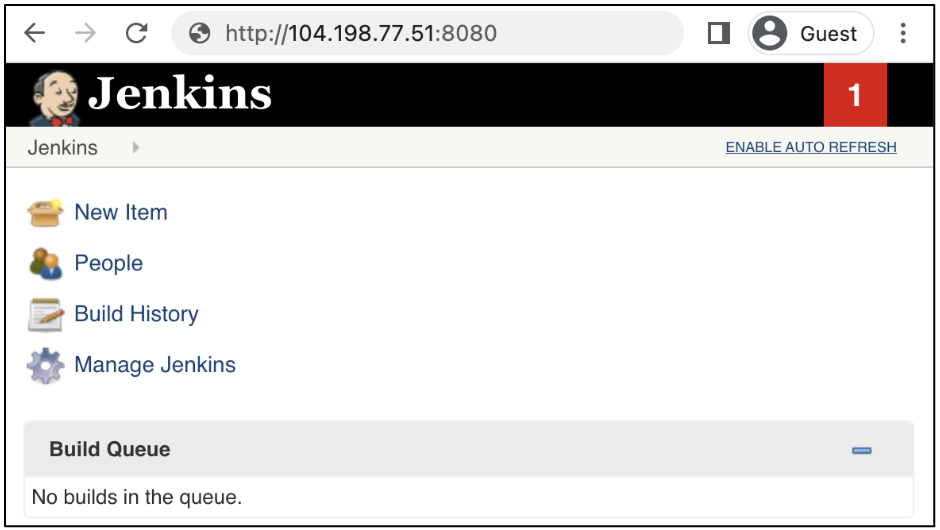
Access the Jenkins service on VM A by appending :8080 to the external load balancer URL.
 >
>
Access the VM-Series UI through the external address attached to its MGT interface.
Click Activate Cloud Shell at the top of the Google Cloud console.

In Cloud Shell, retrieve the EXTERNAL_IP attached to the VM-Series MGT interface.
In a separate browser tab, log into the VM-Series the EXTERNAL_IP (use https).
| Key | Value |
|---|---|
| Username | |
| Password |
Palo Alto Networks App-ID™ enables you to see applications on your network and learn their behavioral characteristics with their relative risk. You can use App-ID™ to enable Jenkins traffic through the VM-Series security policies.
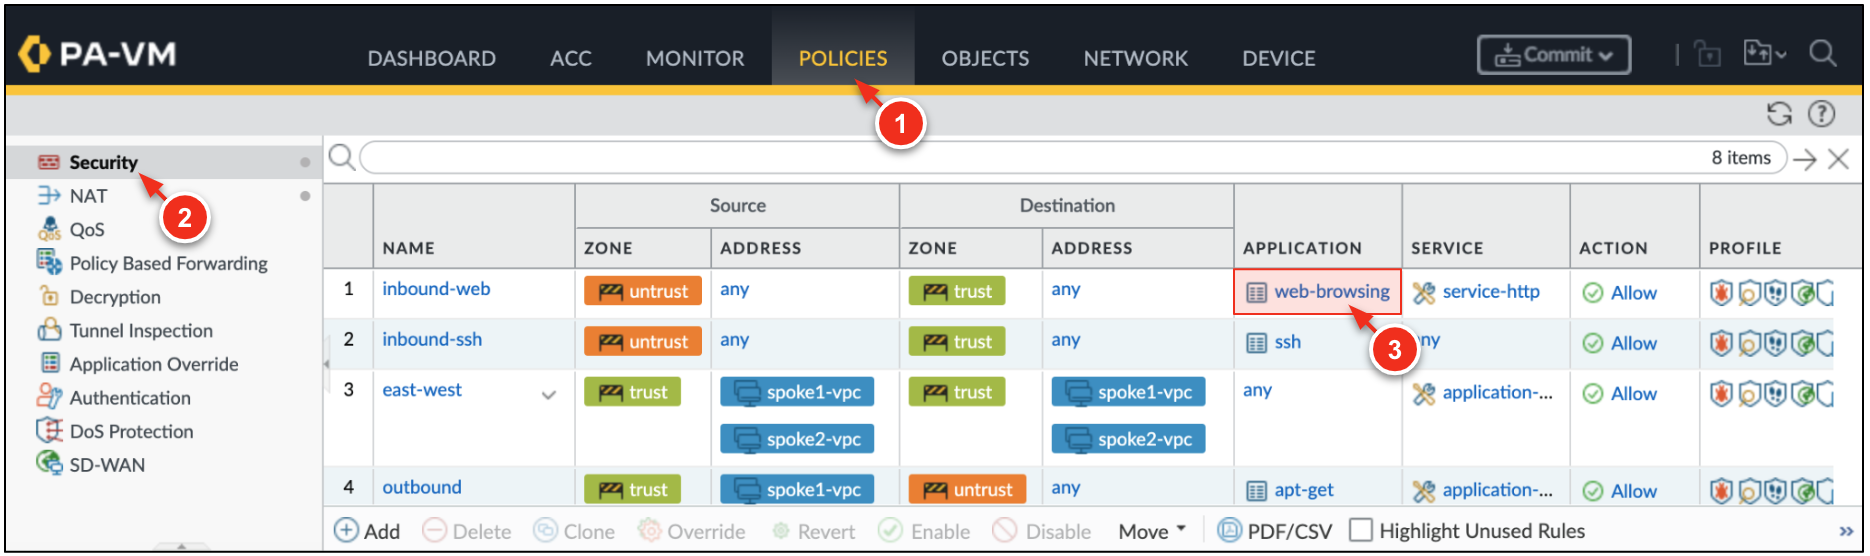
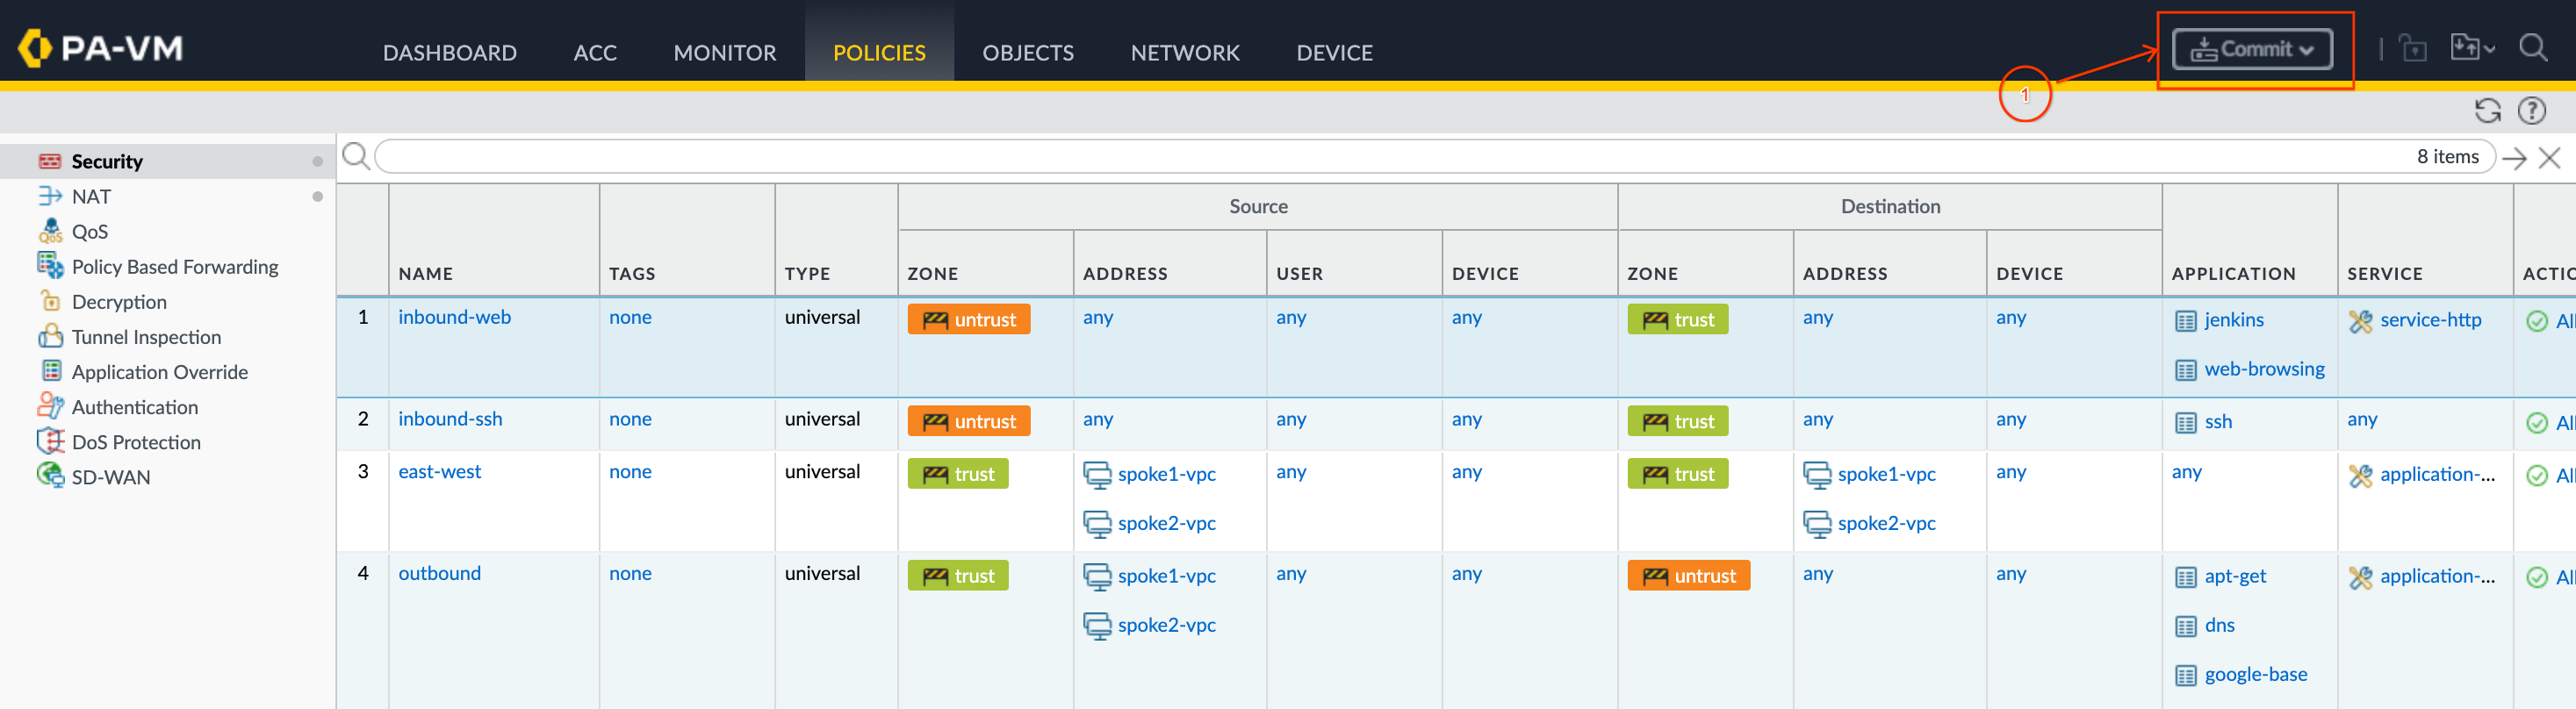
On the VM-Series, go to Policies → Security. Click the allowed applications column within the inbound-web security policy.
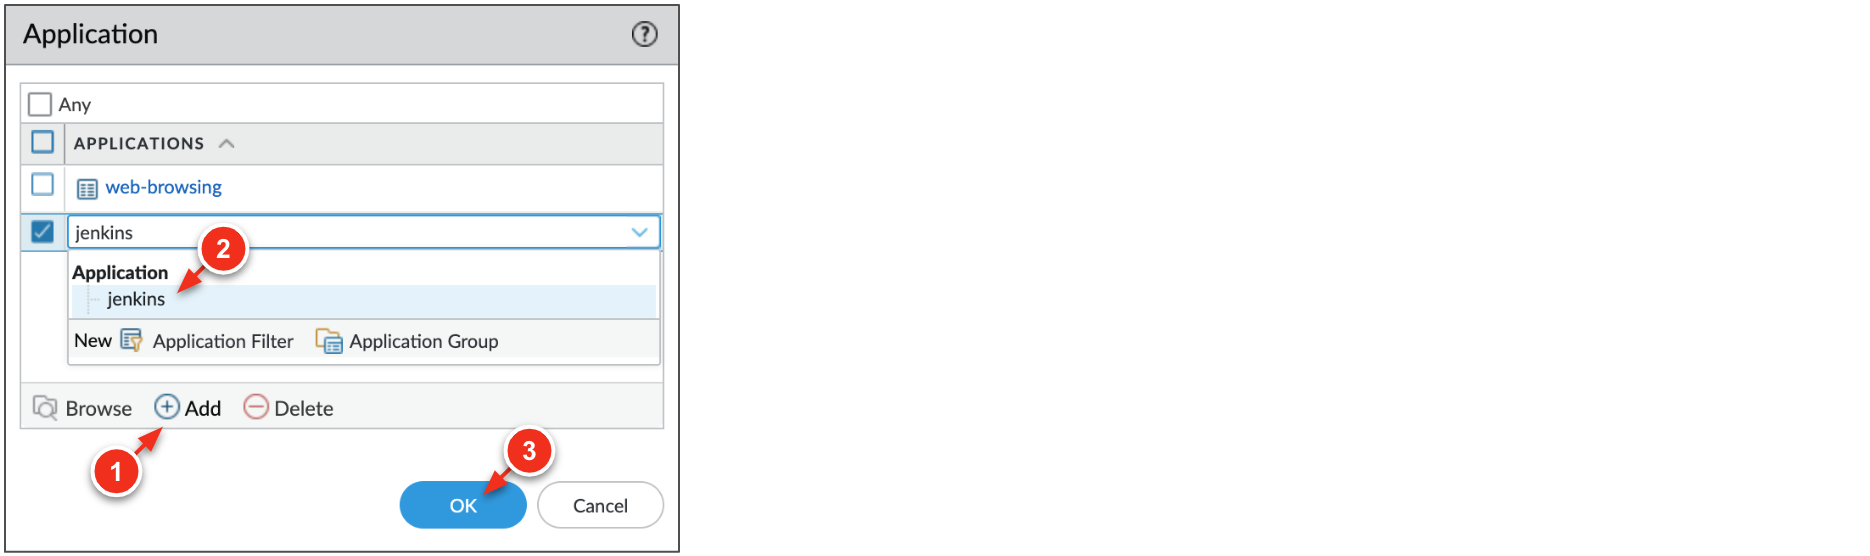
Click ADD and search for jenkins. Click OK.
Click Commit → Commit to apply the changes to the VM-Series configuration.
Once the commit completes, access the Jenkins service again.
jenkins application within the VM-Series security policies.
On the VM-Series, go to Monitor → Traffic. Enter the query below to filter for jenkins traffic.
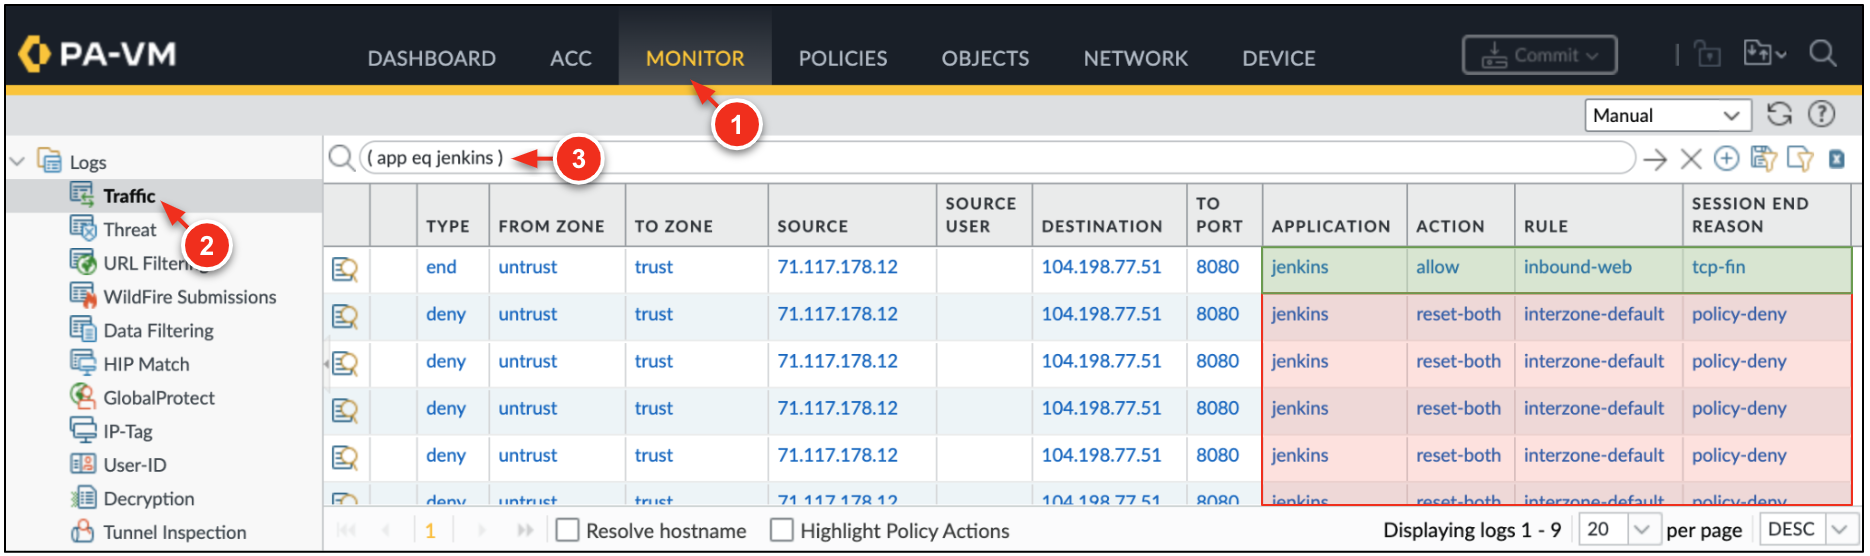
jenkins application was denied before the jenkins application was added to the inbound-web security policy.
The VM-Series secures outbound internet traffic from the spoke networks and east-west traffic traversing between spoke networks. All egress traffic from the spoke networks is routed to an internal TCP/UDP load balancer that distributes traffic to the VM-Series trust interfaces for inspection.
In Cloud Shell, SSH to VM B in the spoke2 network.
jenkins example in the previous step, the SSH session is distributed by the external load balancer. The VM-Series inspects and translates the traffic to VM B
From VM B, attempt to download a pseudo malicious file from the internet.
eicar file is considered safe and is used to test threat prevention capabilities.
Generate pseudo malicious traffic from VM B to VM A.
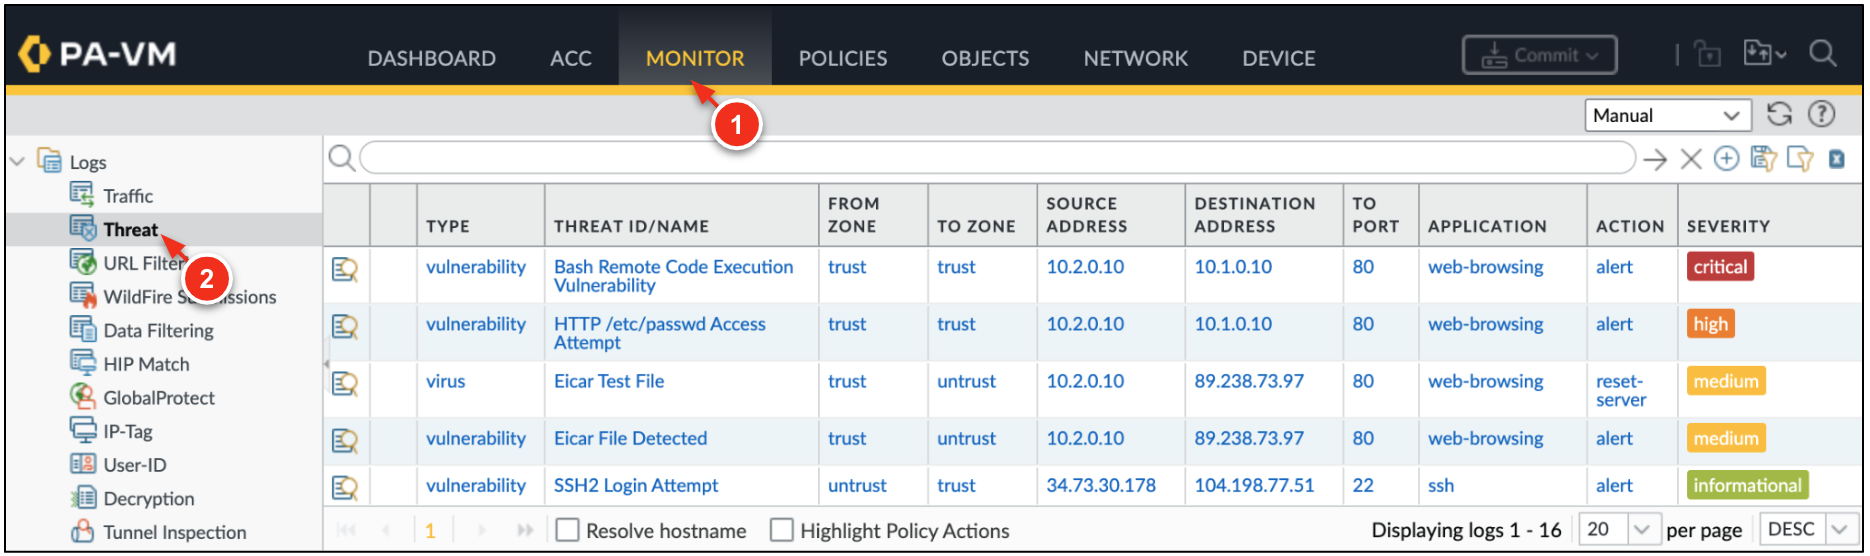
On the VM-Series, go to Monitor → Threat to view the threat logs.
Click Check my progress to verify the objective.
Autoscaling enables you to scale the VM-Series protecting your cloud assets while providing high availability through cross-zone redundancy.
The VM-Series firewall publishes native PAN-OS™ metrics to Google Cloud Monitoring. Each metric can be set as an autoscaling parameter within the managed instance group.
The lab creates a custom Cloud Monitoring dashboard that displays several of the VM-Series metrics.
In Google Cloud, select Monitoring → Dashboards. Select the dashboard VM-Series Metrics.
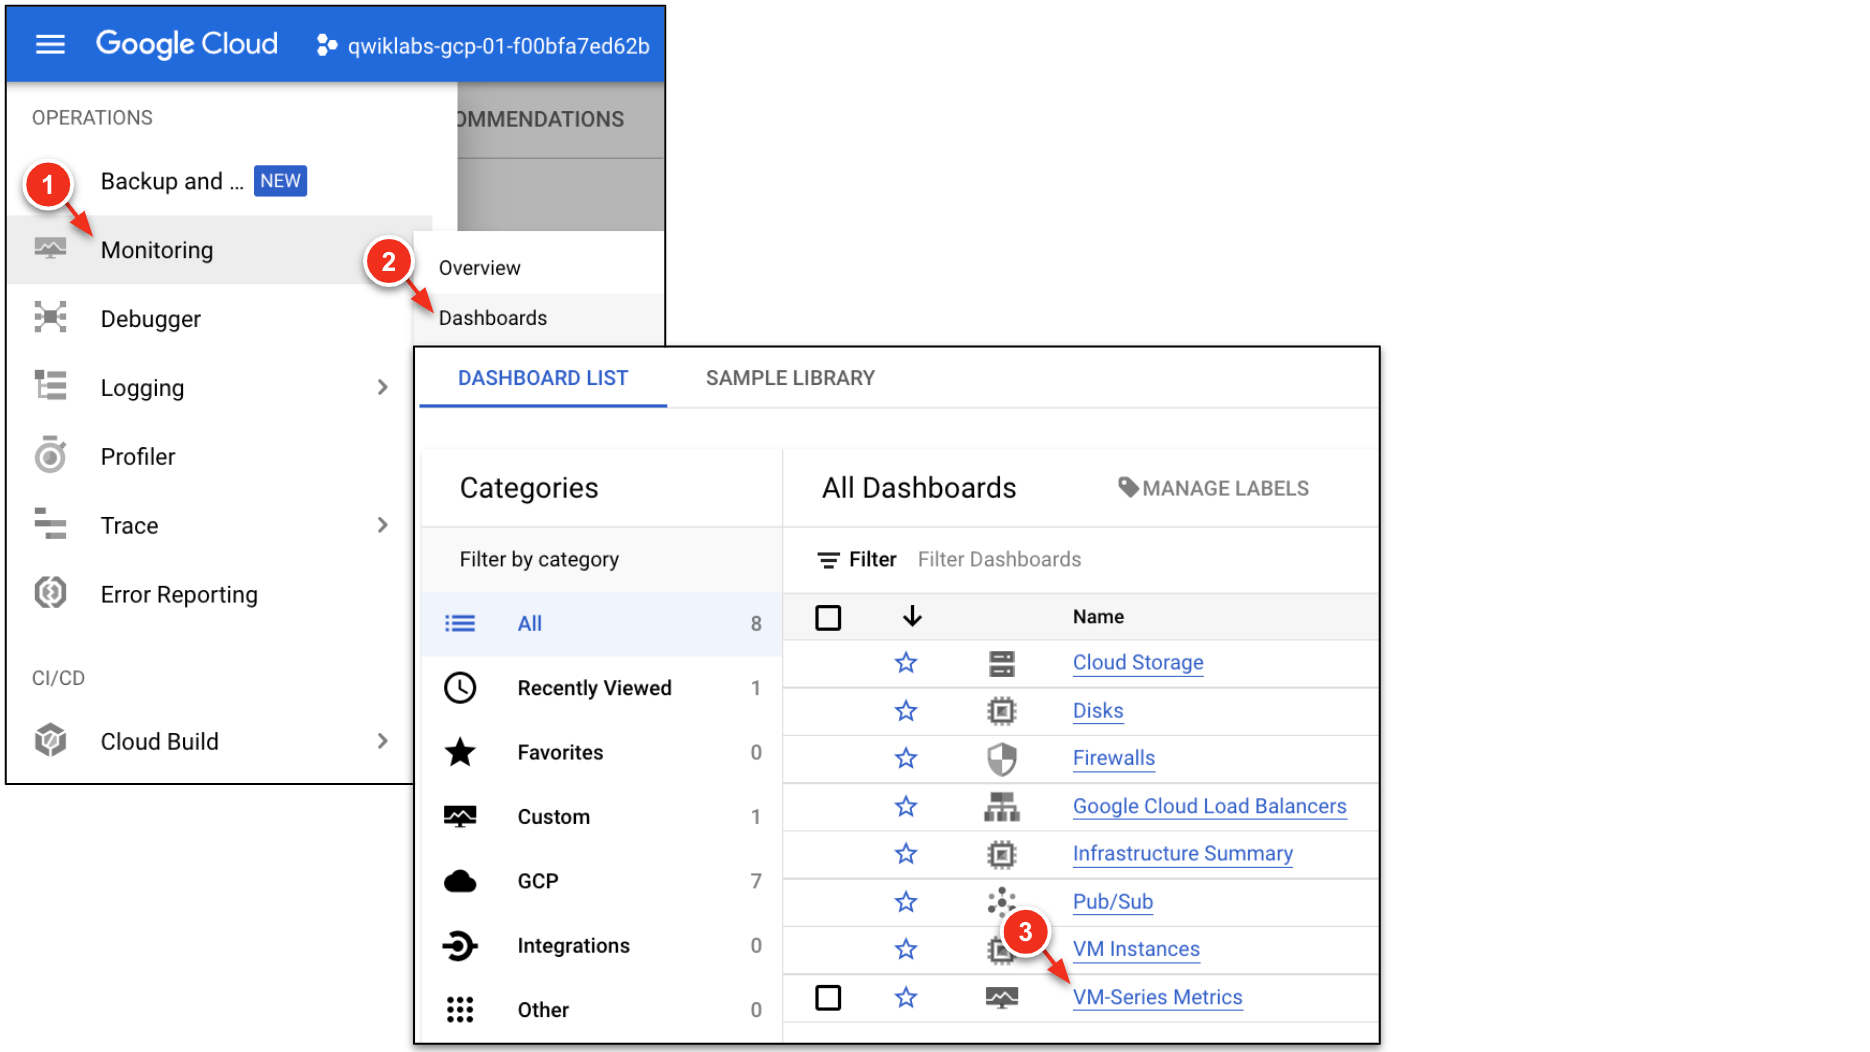
The dashboard displays various PAN-OS metrics from the VM-Series instance group.
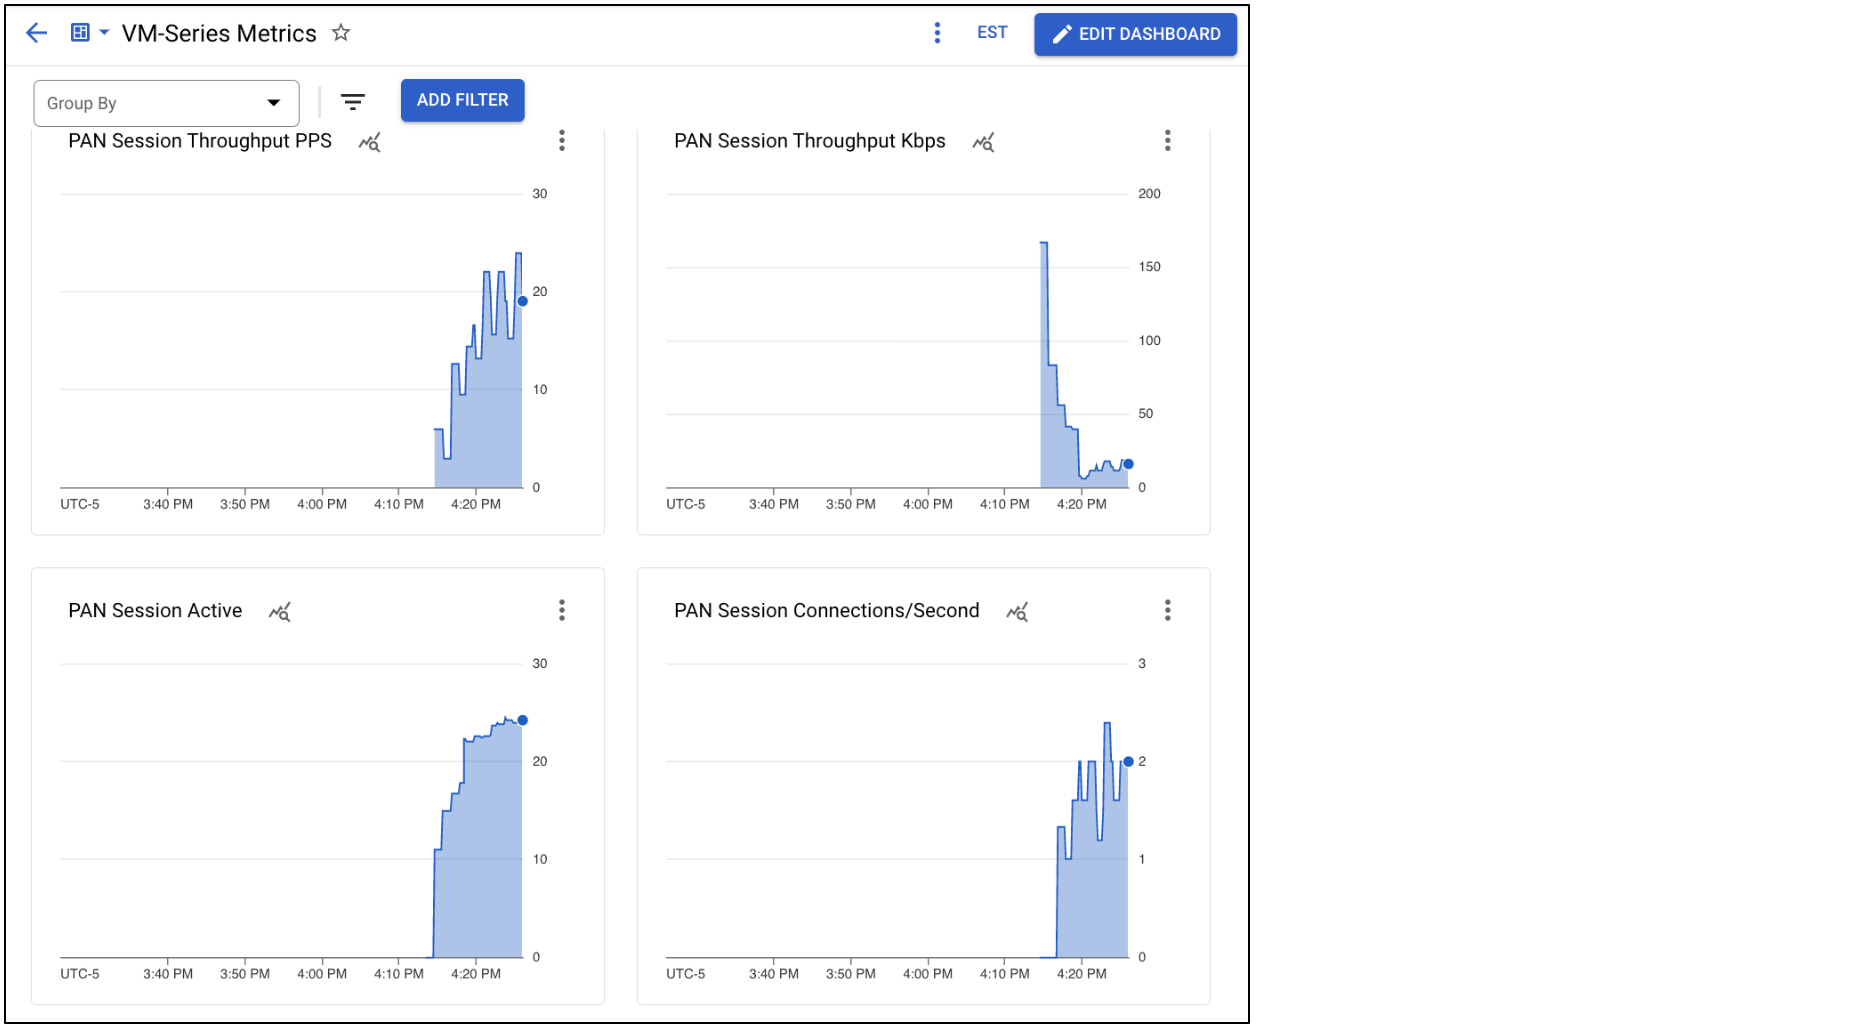
Dataplane CPU utilization exceeds 90% for more than 5 minutes.
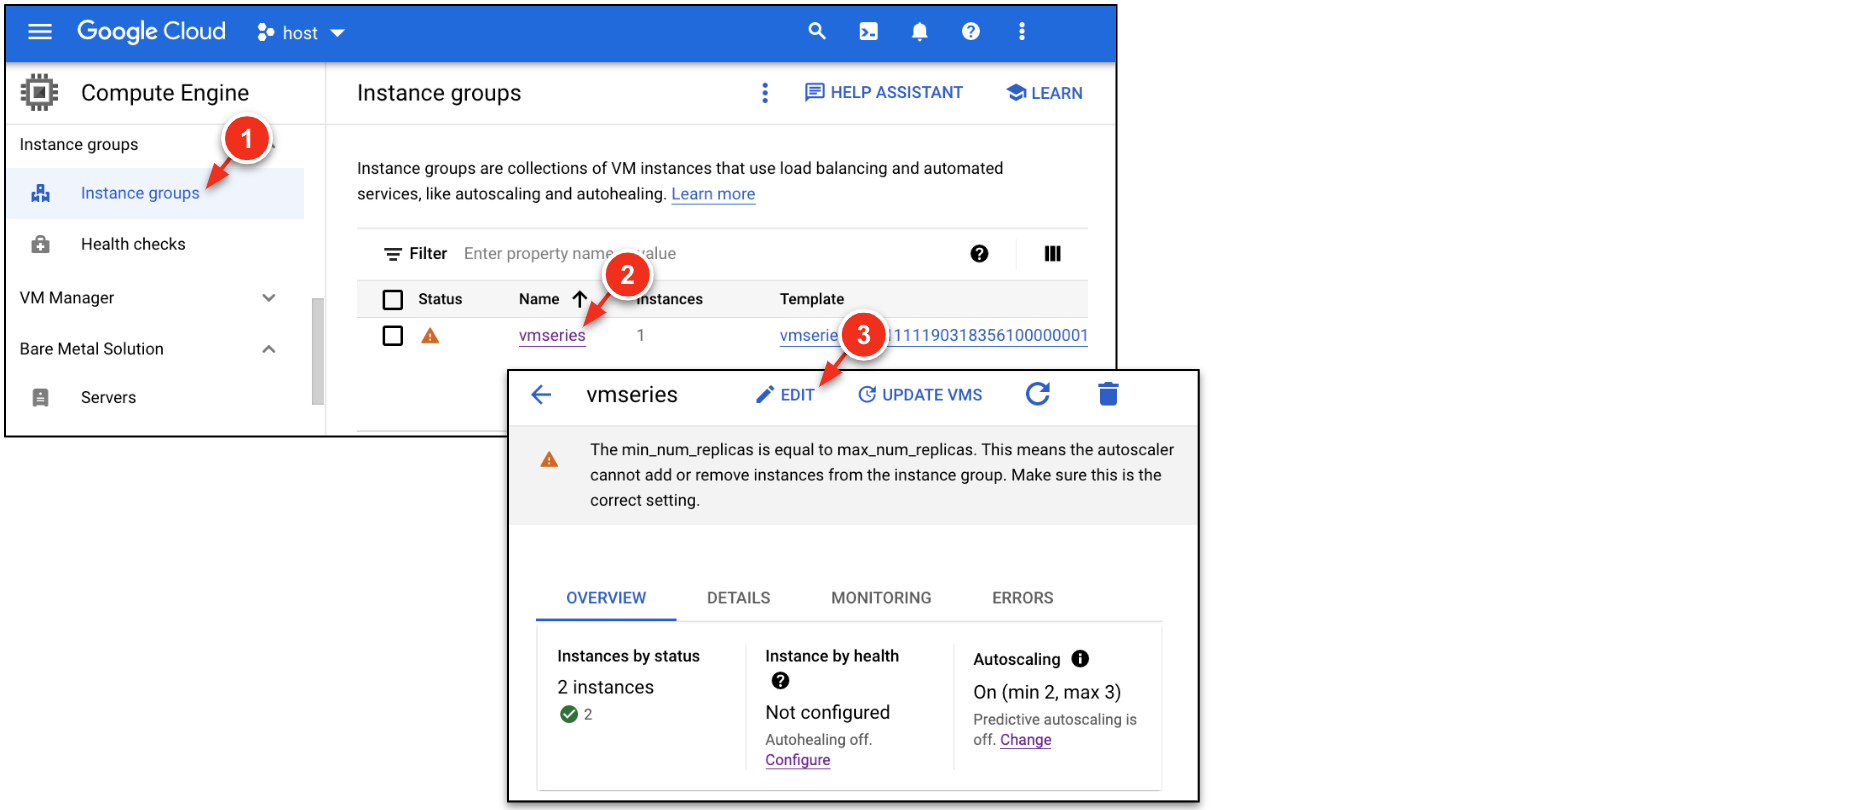
The managed instance group created within the lab sets the minimum and the maximum number of VM-Series replicas to 1. Here, modify the minimum and the maximum number of replicas to manually increase the number of running firewalls.
In Google Cloud, go to Compute Engine → Instance Groups → vmseries. Click EDIT.
In the Autoscaling section, modify the min and max number of instances:
| Key | Value |
|---|---|
| Minimum number of instances | 2 |
| Maximum number of instances | 3 |
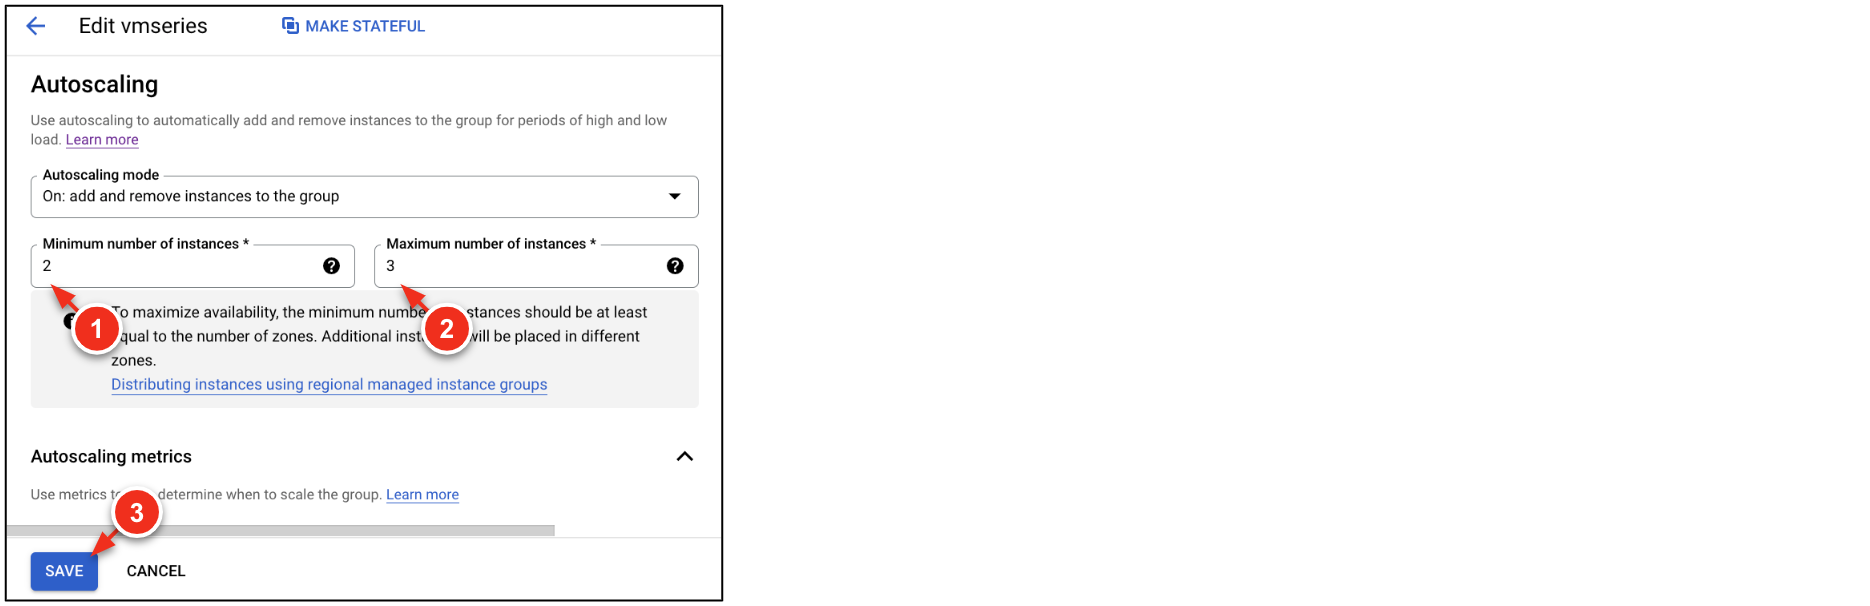
Click Save.
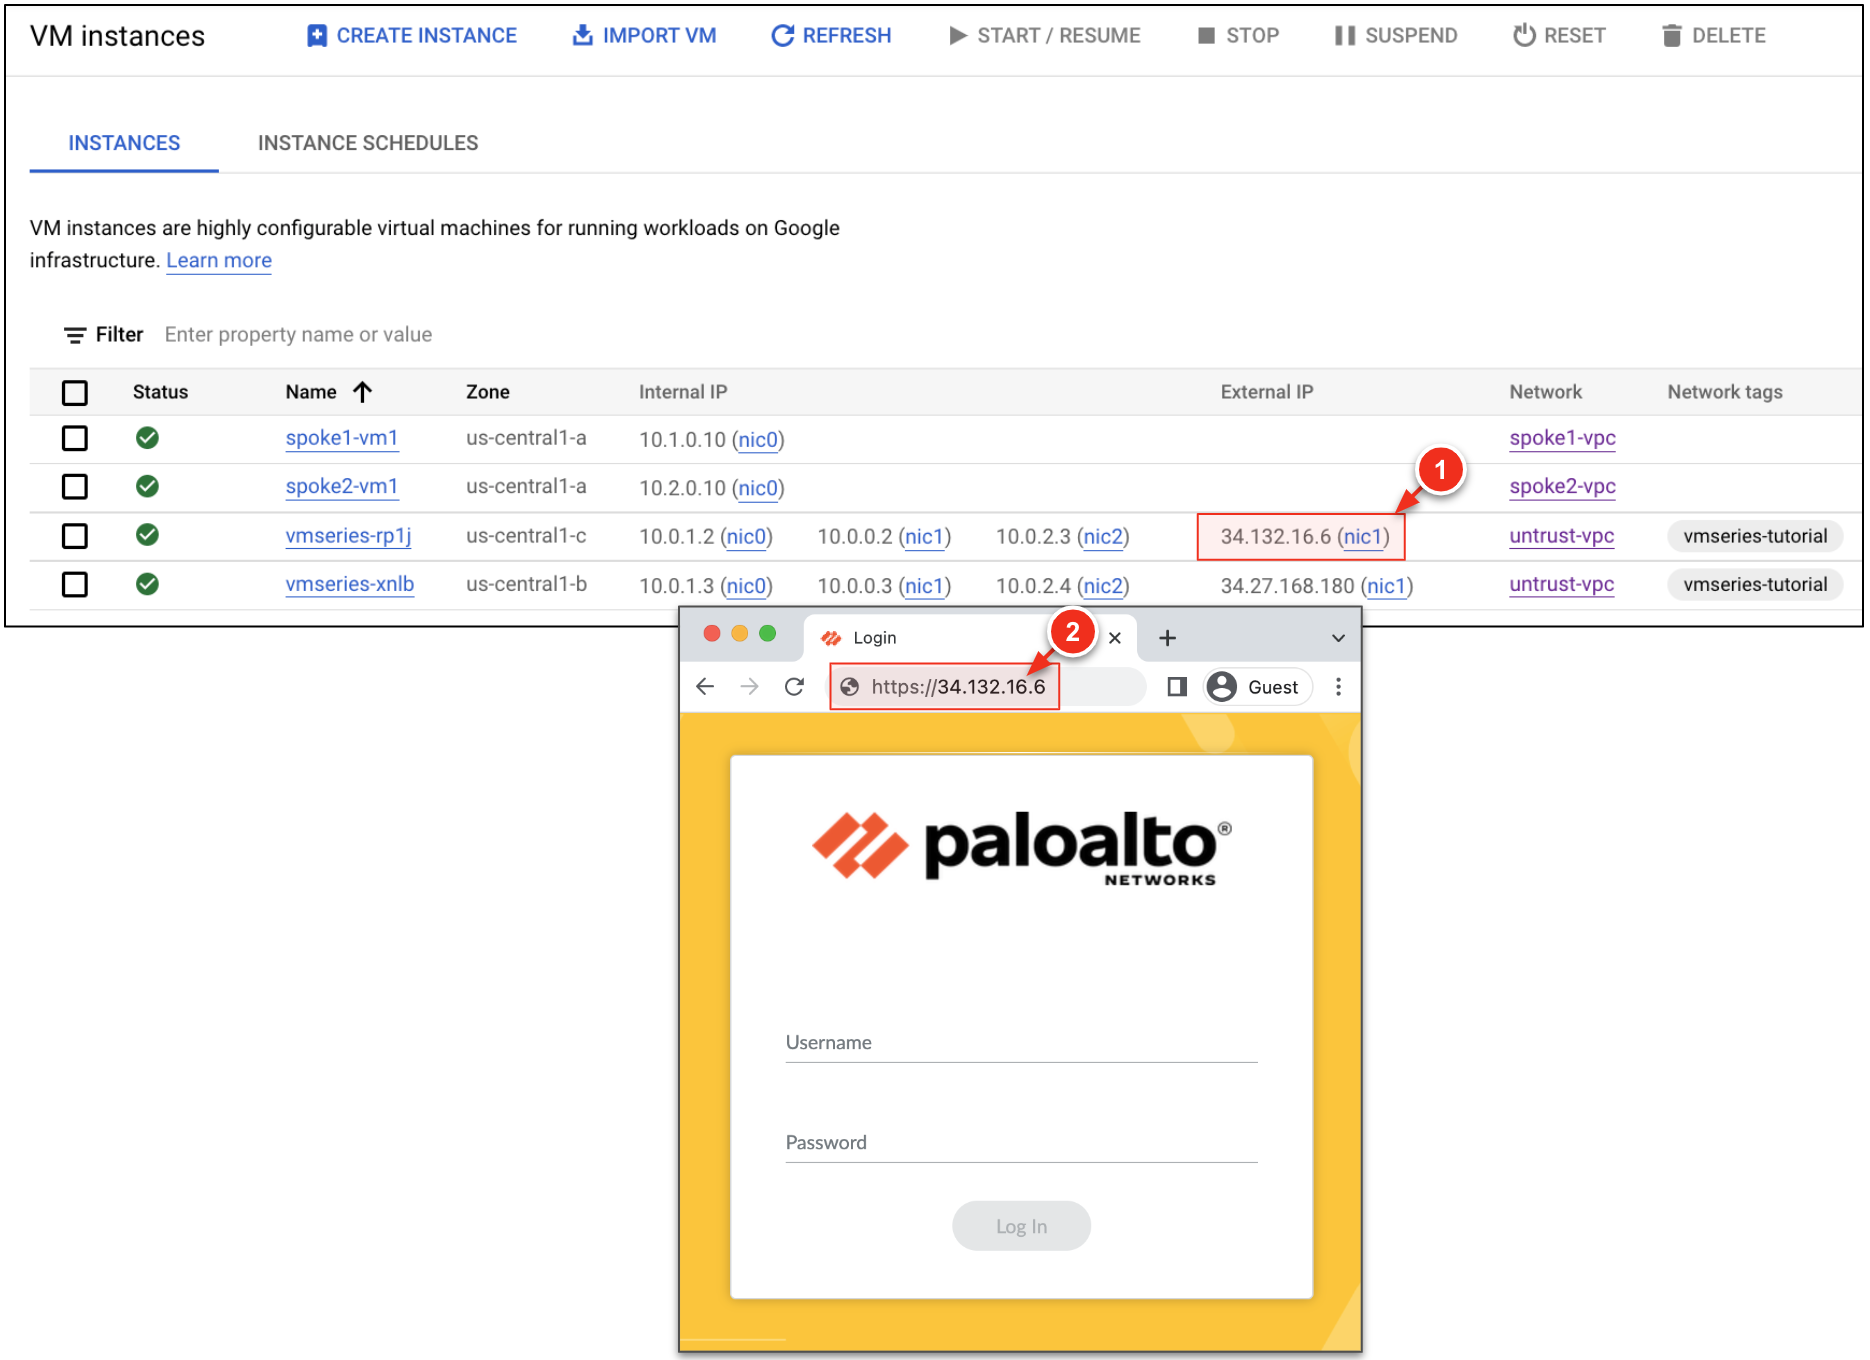
Go to Compute Engine → VM instances. A new firewall should now be deployed.
Copy the public IP attached to NIC1 on the new firewall and paste it into a browser tab (use https).
| Key | Value |
|---|---|
| Username | |
| Password |
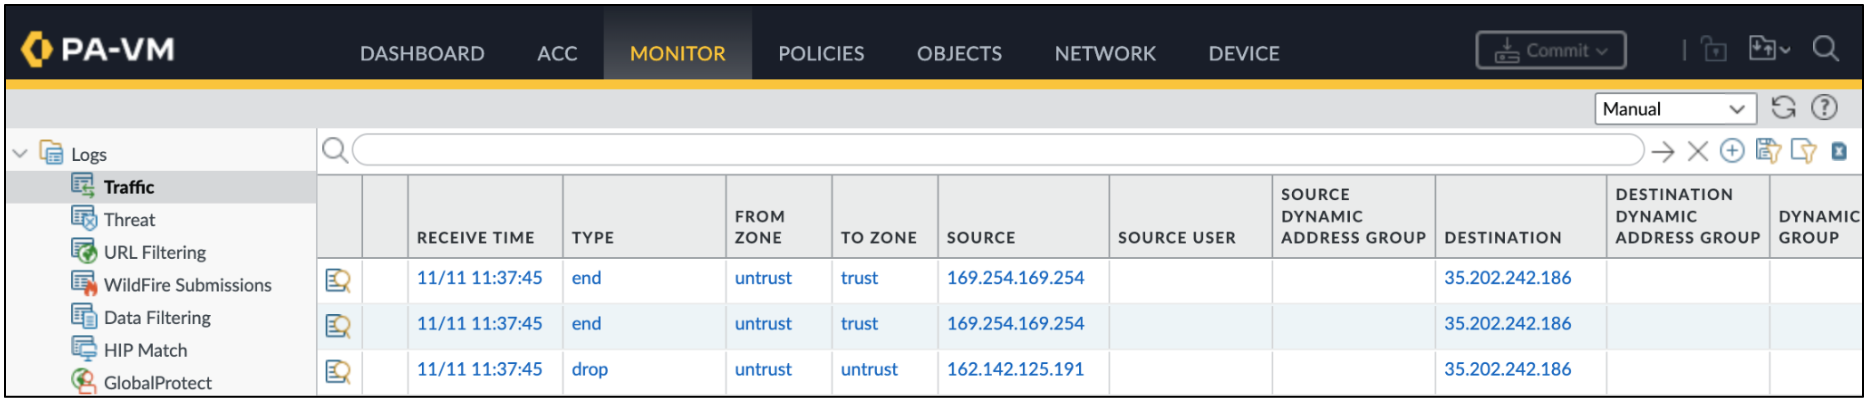
On the scaled VM-Series, navigate to Monitor → Traffic. The traffic logs should be populated demonstrating the scaled VM-Series is now processing traffic.
Click Check my progress to verify the objective.
Congratulations! You have completed the lab. You have learned about the fundamental networking concepts that enable you to deploy and scale Palo Alto Networks VM-Series next generation firewall in Google Cloud.
Please click the following links for additional information:
...helps you make the most of Google Cloud technologies. Our classes include technical skills and best practices to help you get up to speed quickly and continue your learning journey. We offer fundamental to advanced level training, with on-demand, live, and virtual options to suit your busy schedule. Certifications help you validate and prove your skill and expertise in Google Cloud technologies.
Manual Last Updated: November 5, 2024
Lab Last Tested: November 5, 2024
Copyright 2025 Google LLC. All rights reserved. Google and the Google logo are trademarks of Google LLC. All other company and product names may be trademarks of the respective companies with which they are associated.


此内容目前不可用
一旦可用,我们会通过电子邮件告知您

太好了!
一旦可用,我们会通过电子邮件告知您

一次一个实验
确认结束所有现有实验并开始此实验