Exploring and Creating an Ecommerce Analytics Pipeline with Cloud Dataprep v1.5
- Overview
- Setup and requirements
- Task 1. Create an empty BigQuery dataset
- Task 2. Open Cloud Dataprep
- Task 3. Connect BigQuery data to Cloud Dataprep
- Task 4. Explore ecommerce data fields with a UI
- Task 5. Clean the data
- Task 6. Enrich the data
- Task 7. Run Cloud Dataprep job to load BigQuery
- Congratulations!
- End your lab
Overview
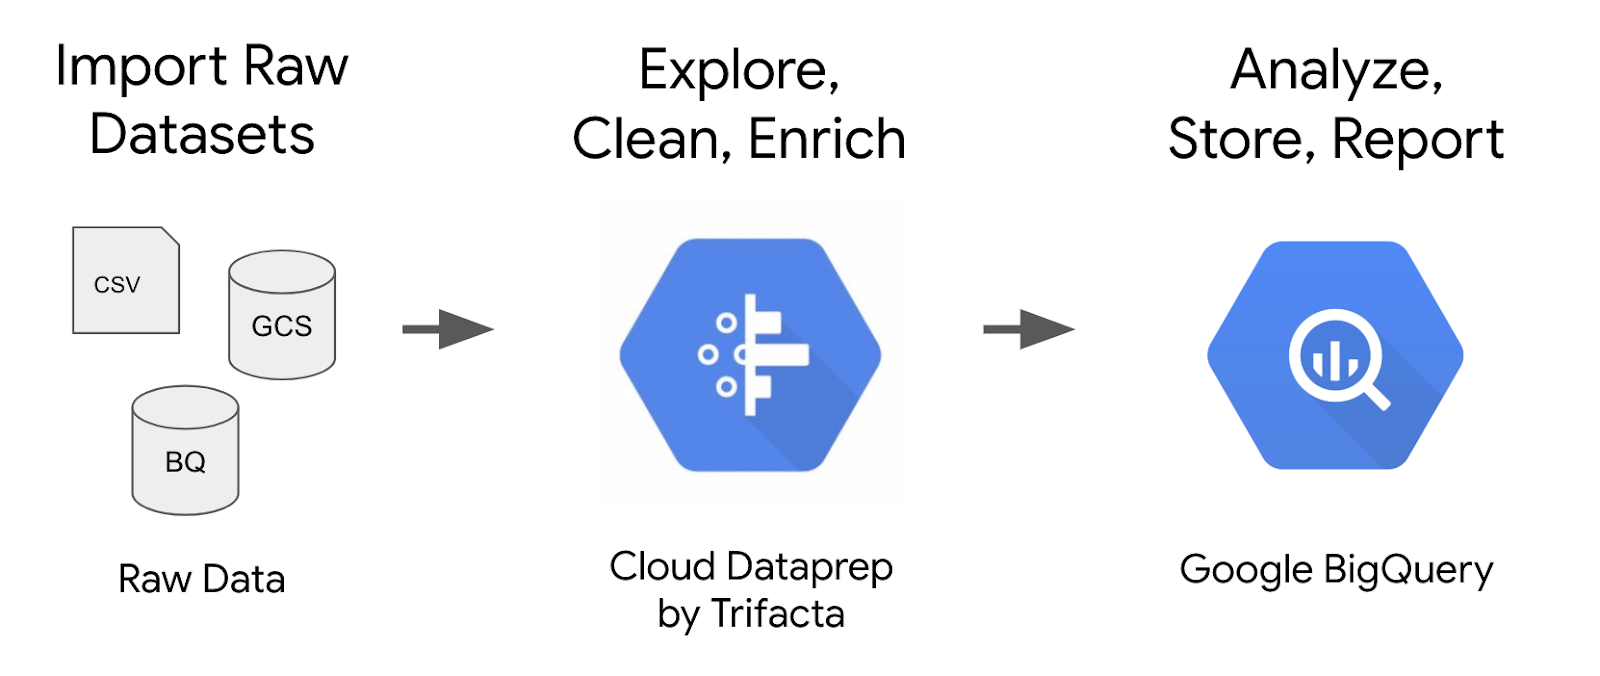
Cloud Dataprep by Trifacta is an intelligent data service for visually exploring, cleaning, and preparing structured and unstructured data for analysis. In this lab we will explore the Cloud Dataprep UI to build an ecommerce transformation pipeline that will run at a scheduled interval and output results back into BigQuery.
The dataset we will be using is an ecommerce dataset that has millions of Google Analytics records for the Google Merchandise Store loaded into BigQuery. We've made a copy of that dataset for this lab and will be exploring the available fields and rows for insights.
Objectives
In this lab, you learn how to perform these tasks:
- Connect BigQuery datasets to Cloud Dataprep
- Explore dataset quality with Cloud Dataprep
- Create a data transformation pipeline with Cloud Dataprep
- Schedule transformation jobs outputs to BigQuery
What you’ll need
- A Google Cloud Platform project
- The Google Chrome browser. Cloud Dataprep supports only the Chrome browser.
Setup and requirements
For each lab, you get a new Google Cloud project and set of resources for a fixed time at no cost.
-
Sign in to Qwiklabs using an incognito window.
-
Note the lab's access time (for example,
1:15:00), and make sure you can finish within that time.
There is no pause feature. You can restart if needed, but you have to start at the beginning. -
When ready, click Start lab.
-
Note your lab credentials (Username and Password). You will use them to sign in to the Google Cloud Console.
-
Click Open Google Console.
-
Click Use another account and copy/paste credentials for this lab into the prompts.
If you use other credentials, you'll receive errors or incur charges. -
Accept the terms and skip the recovery resource page.
Check project permissions
Before you begin your work on Google Cloud, you need to ensure that your project has the correct permissions within Identity and Access Management (IAM).
-
In the Google Cloud console, on the Navigation menu (
), select IAM & Admin > IAM.
-
Confirm that the default compute Service Account
{project-number}-compute@developer.gserviceaccount.comis present and has theeditorrole assigned. The account prefix is the project number, which you can find on Navigation menu > Cloud Overview > Dashboard.
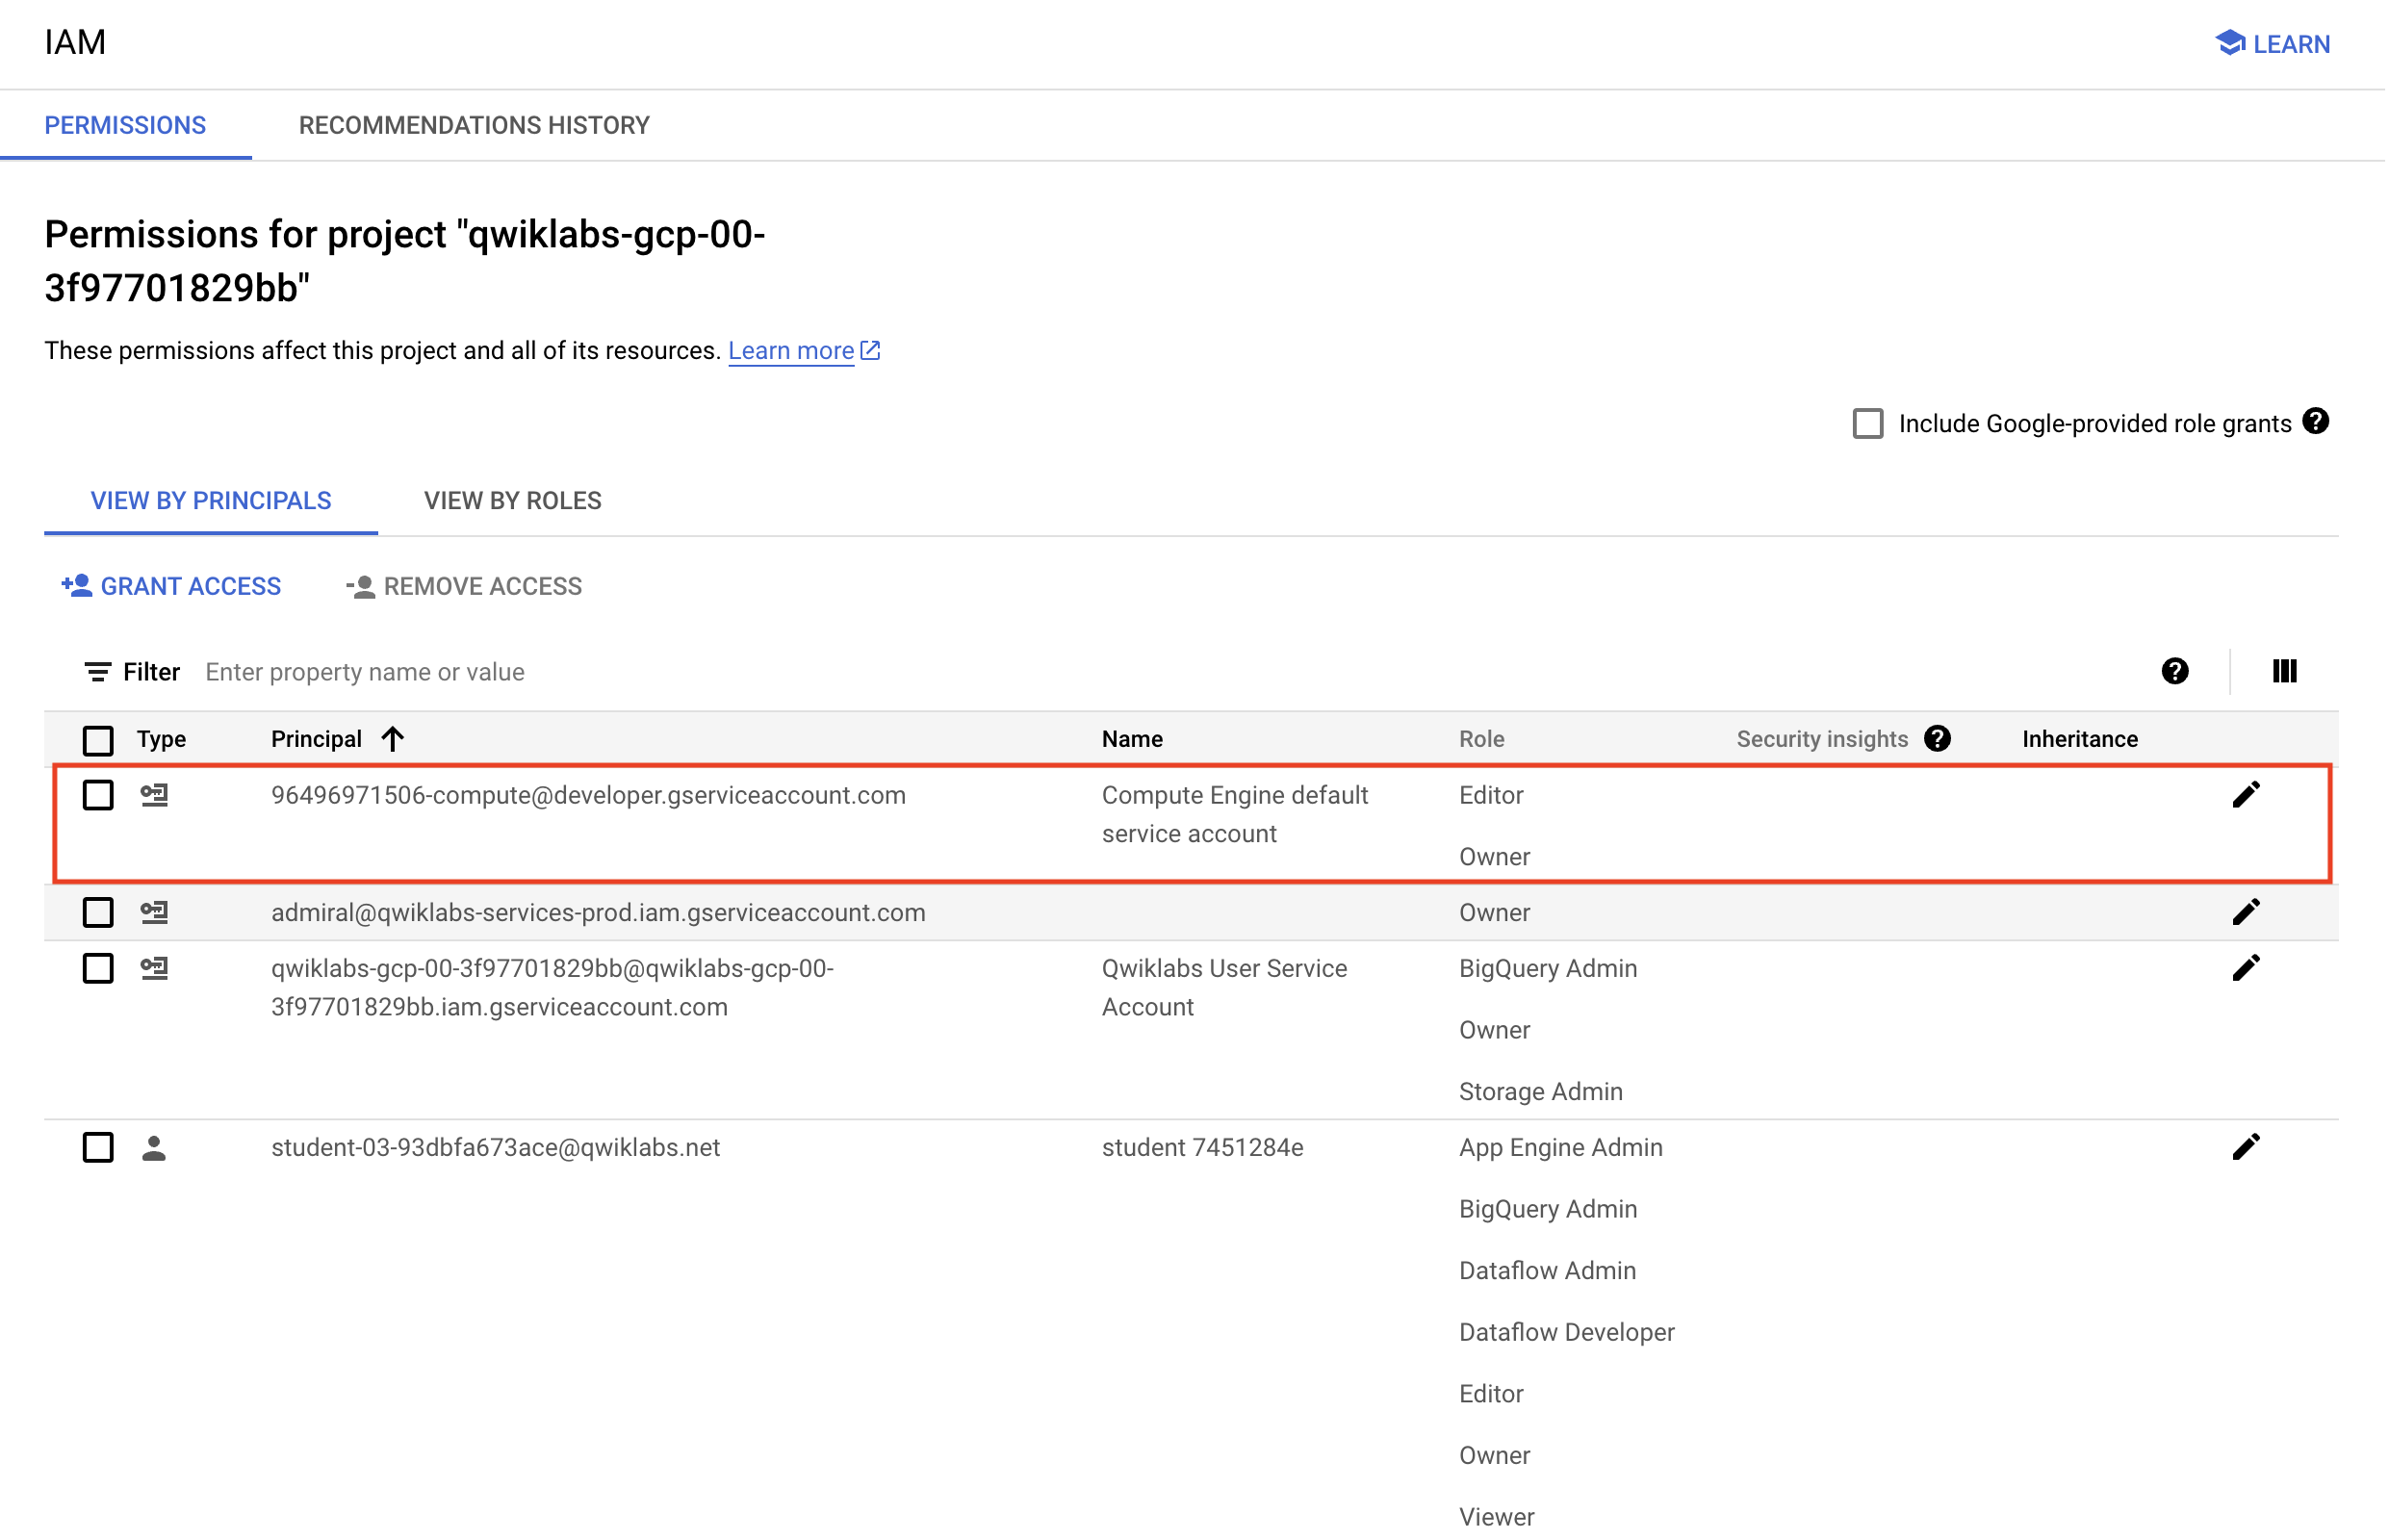
editor role, follow the steps below to assign the required role.- In the Google Cloud console, on the Navigation menu, click Cloud Overview > Dashboard.
- Copy the project number (e.g.
729328892908). - On the Navigation menu, select IAM & Admin > IAM.
- At the top of the roles table, below View by Principals, click Grant Access.
- For New principals, type:
- Replace
{project-number}with your project number. - For Role, select Project (or Basic) > Editor.
- Click Save.
Open BigQuery Console
- In the Google Cloud Console, select Navigation menu > BigQuery.
The Welcome to BigQuery in the Cloud Console message box opens. This message box provides a link to the quickstart guide and lists UI updates.
- Click Done.
Although this lab is largely focused on Cloud Dataprep, you need BigQuery as an endpoint for dataset ingestion to the pipeline and as a destination for the output when the pipeline is completed.
Task 1. Create an empty BigQuery dataset
In this task, you create a new BigQuery dataset to receive the output table of your new pipeline.
-
In the left pane, click View actions (
) next to your project ID and select Create dataset.
-
In the Create dataset dialog:
- For Dataset ID, type ecommerce.
- Leave the other values at their defaults.
-
Click Create dataset.
-
Copy and paste this SQL query into the Query editor text field:
- Click Run.
This query copies over a subset of the public raw ecommerce dataset to your own project dataset for you to explore and clean in Cloud Dataprep.
- Confirm that the new raw data table exists in your project.
Task 2. Open Cloud Dataprep
In this task, you accept the terms of service for Google and Trifacta, and then you allow Trifacta to access your project data.
- Run the following command in the Cloud Shell to create a required Service Account which will allow you to successsfully access Dataprep.
-
In the GCP console, make sure that your lab’s project is selected.
-
In the Navigation menu (
-
Select the Terms of Service for Google and Trifacta, and then click Accept.
-
In the Share account information with Trifacta dialog, select the checkbox, and then click Agree and Continue.
-
To allow Trifacta to access your project data, click Allow. This authorization process might take a few minutes.
-
In the Sign in with Google window appears, select your Qwiklab account and then click Allow. Click Accept if required after checking the checkbox.
-
To use the default location for the storage bucket, click Continue.
The homepage of Cloud Dataprep opens. If required, click Home.
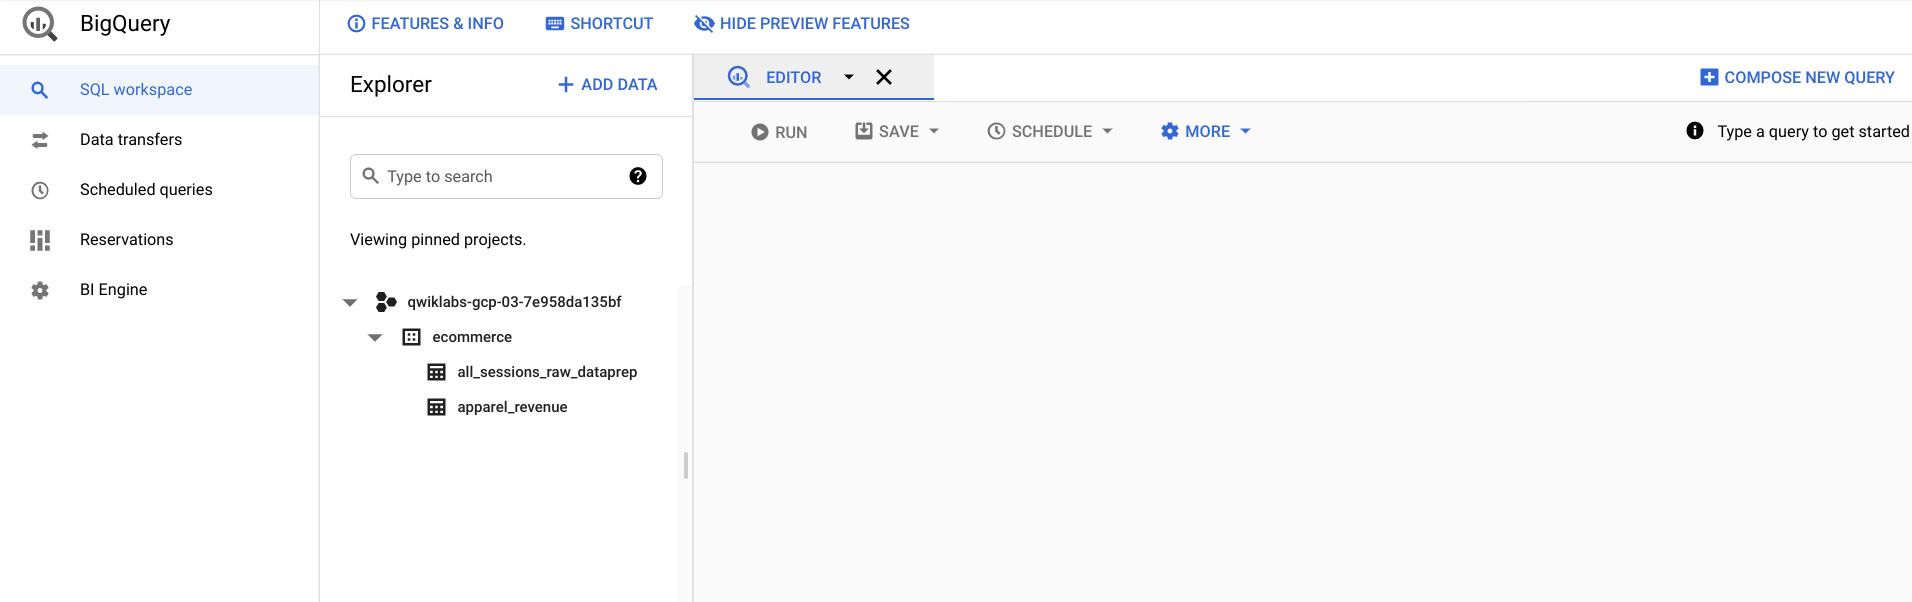
Task 3. Connect BigQuery data to Cloud Dataprep
In this task, you connect Cloud Dataprep to your BigQuery data source.
On the Cloud Dataprep page:
-
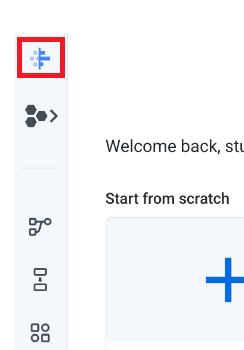
Click Create a new flow.
-
Click Untitled Flow on the top of the page.
-
In the Rename dialog, specify these details:
- For Flow Name, type Ecommerce Analytics Pipeline
- For Flow Description, type Revenue reporting table for Apparel
-
Click Ok.
-
Click (+) icon to add a dataset.
-
In the Add datasets to flow dialog, click Import datasets from bottom-left corner.
-
In the left pane, click BigQuery.
-
When your ecommerce dataset is loaded, click on it.
-
To create a dataset, click Create dataset (
).
-
Click Import & Add to Flow.
The data source automatically updates.
Task 4. Explore ecommerce data fields with a UI
In this task, you load and explore a sample of the dataset within Cloud Dataprep.
-
Click Edit Recipe in the right panel.
-
Click Don't show me any helpers in The Transformer dialog if required.
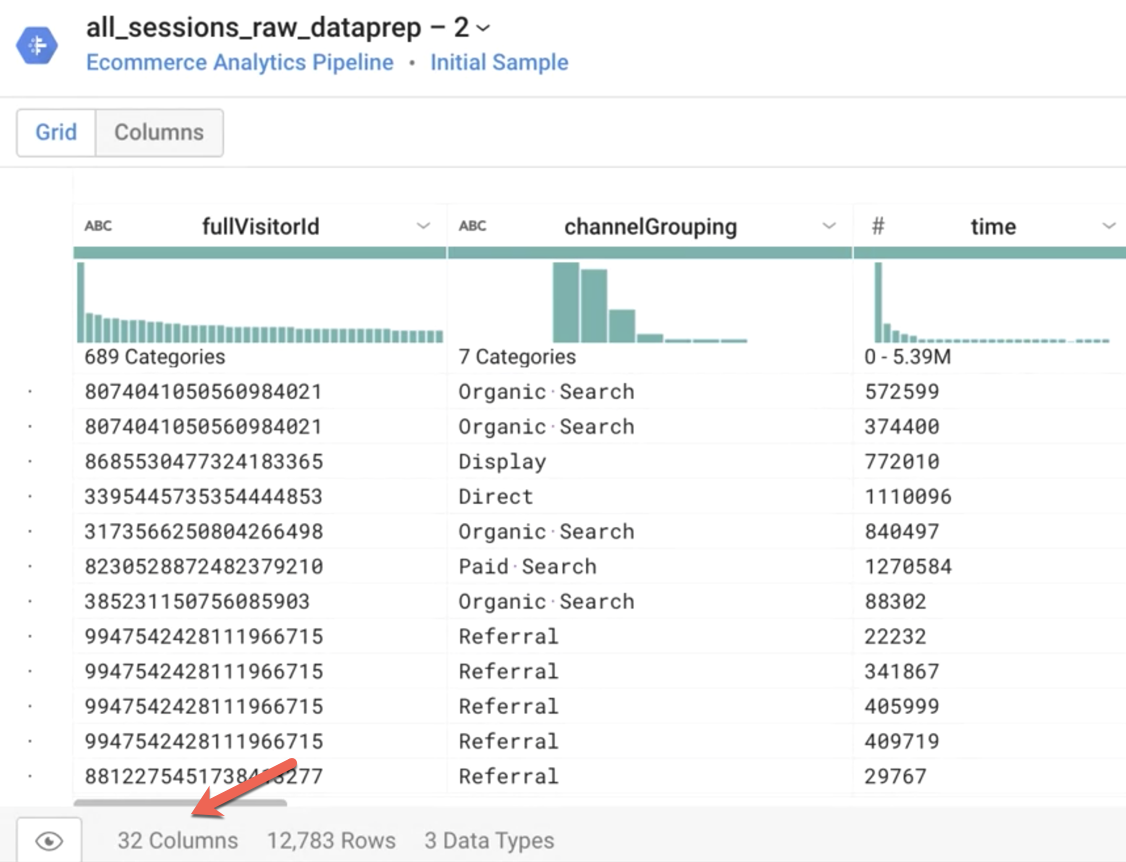
Cloud Dataprep loads a sample of your dataset into the Transformer view. This process might take a few minutes.
Answer the questions:
- Cloud Dataprep will load a sample of the source dataset for speed of exploration.
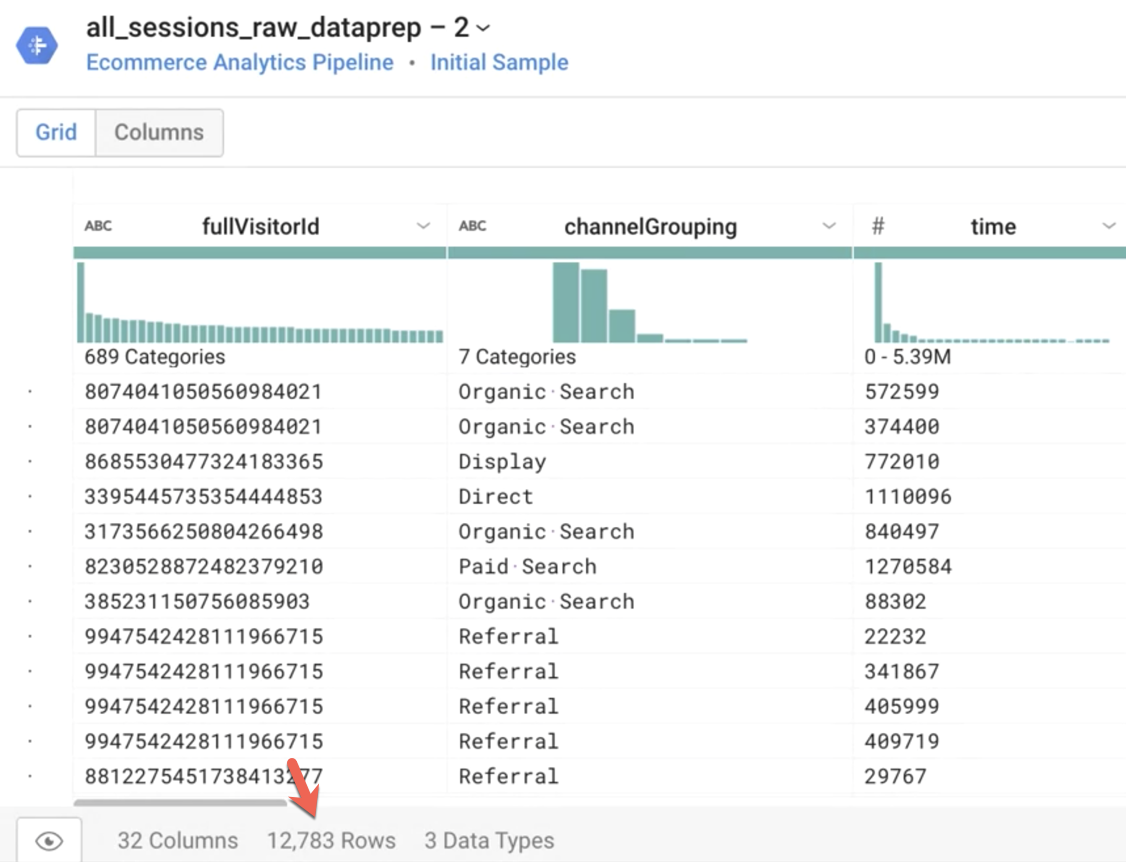
Answer: About 12 thousands rows
- What is the most common value in the channelGrouping column?

Answer: Referral
- What are the top three countries that sessions originate from?
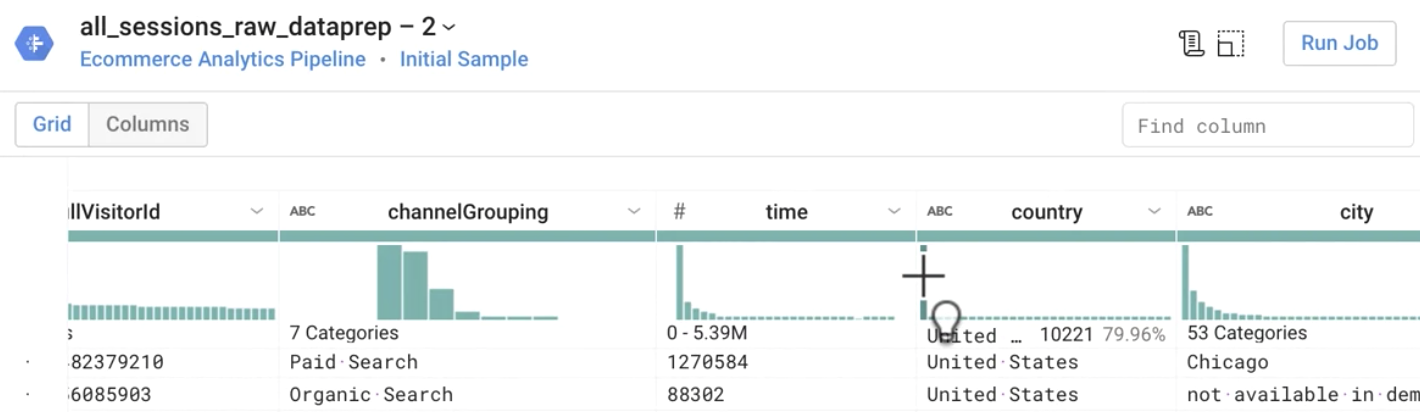
Answer: US, India, United Kingdom
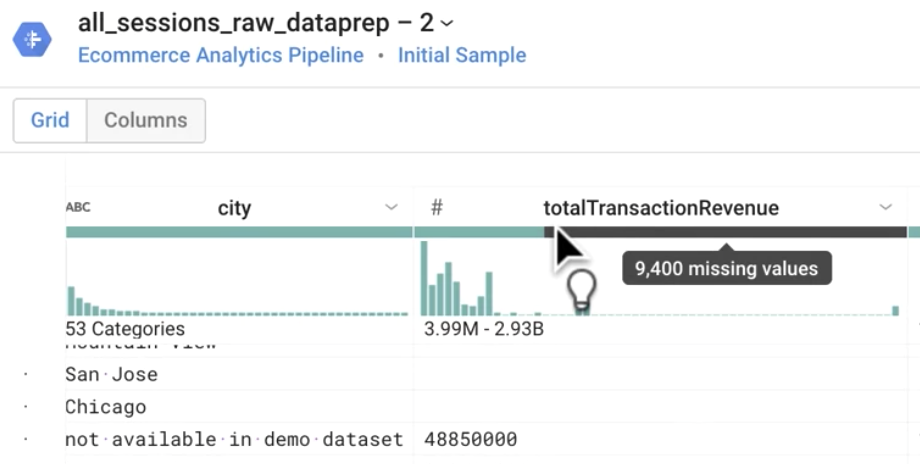
-
What does the gray bar under totalTransactionRevenue represent?
Answer:Missing values -
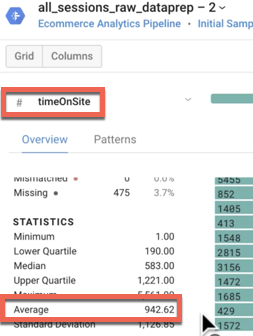
What is the average timeOnSite in seconds, average pageviews, and average sessionQualityDim for the data sample? (Hint: Use Column Details.)
Answers:Average Time On Site: 942 seconds (or 15.7 minutes)Average Pageviews: 20.44 pages
Average Session Quality Dimension: 38.36

-
Looking at the histogram for sessionQualityDim, are the data values evenly distributed?
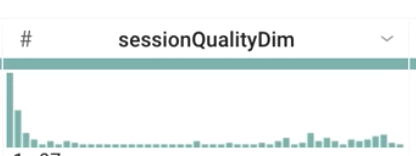
Answer: No, they are skewed to lower values (low quality sessions), which is expected.
- What is the date range for the dataset sample?
Answer: 8/1/2017 (one day of data)
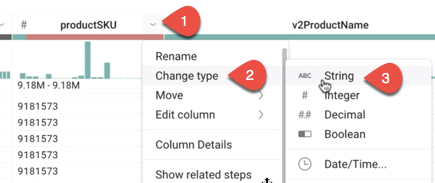
- Why is there a red bar under the productSKU column?
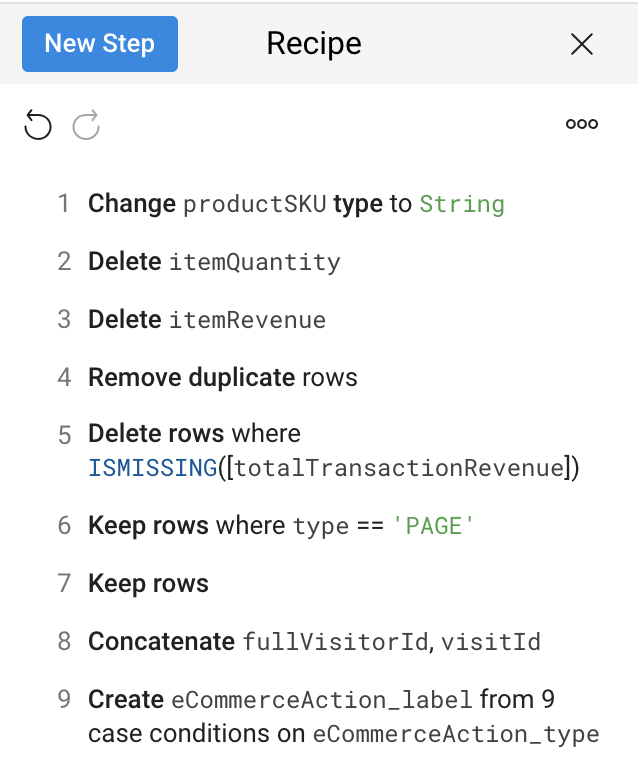
Answer: The red bar indicates mismatched values. Cloud Dataprep automatically identified the productSKU column type as an integer. Cloud Dataprep also detected some non-integer values and therefore flagged those as mismatched. In fact, the productSKU is not always an integer (for example, a correct value might be “GGOEGOCD078399”). So in this case, Cloud Dataprep incorrectly identified the column type: it should be a string, not an integer. You fix that in the next step.
String then you can't see the red bar.-
To convert the productSKU column type to a string data type, open the menu to the right of the productSKU column by clicking
, then click Change type > String.
-
Looking at v2ProductName, what are the most popular products?
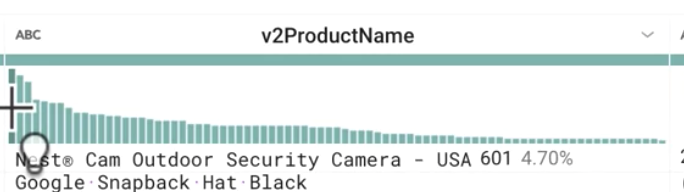
Answer: Nest products
-
Looking at v2ProductCategory, what are some of the most popular products? How many categories were sampled?
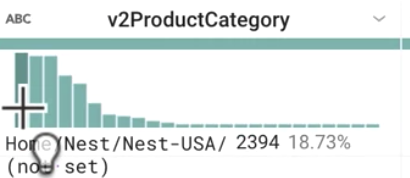
Answer: Nest, (not set), and Apparel are the most popular out of approximately 25 categories.
- True or False: The most common productVariant is COLOR.
Answer: False. It’s (not set) because most products do not have variants (80%+)
- What are the two categories of type?
Answer: PAGE and EVENT
- What is the average productQuantity?
Answer: 3.45 (your answer may vary)
- How many distinct SKUs are in the dataset?
Answer: Over 600+
- What are some of the most popular product names by row count? The most popular categories?
Answer:
Cam Outdoor Security Camera - USA
Cam Indoor Security Camera - USA
Learning Thermostat 3rd Gen-USA - Stainless Steel
- What is the dominant currency code for transactions?
Answer: USD (United States Dollar)
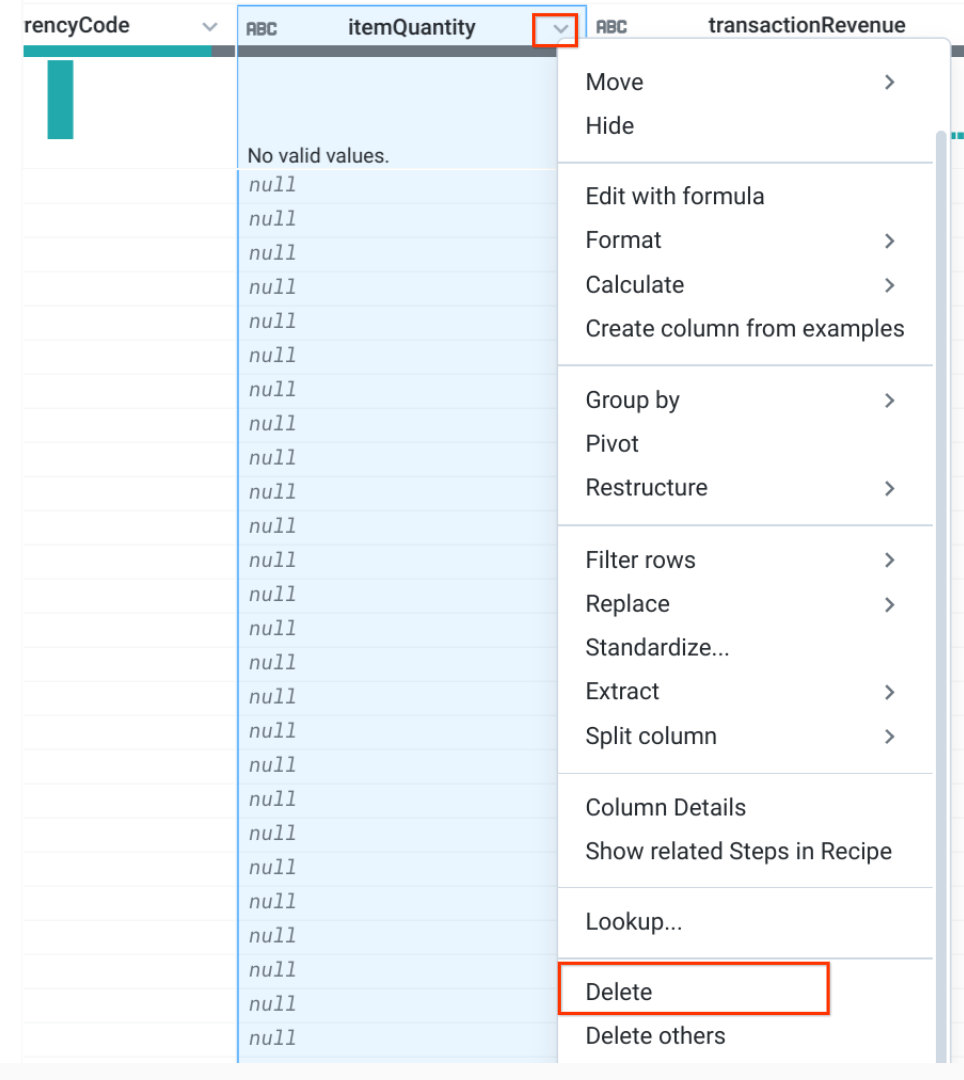
- Are there valid values for itemQuantity or itemRevenue?
Answer: No, they are all NULL values.
-
What percentage of transaction IDs have a valid value? What does this represent for our ecommerce dataset?
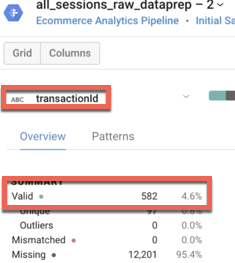
Answer: About 4.6% of transaction IDs have a valid value, which represents the average conversion rate of the website (4.6% of visitors transact).
- How many eCommerceAction_type are there, and what is the most popular eCommerceAction_step?
Answers:
Six types have data in our sample.
0 or NULL is the most popular.
Task 5. Clean the data
In this task, you clean the data by deleting unused columns, eliminating duplicates, creating calculated fields, and filtering the rows. Deleting columns is common for when fields are depreciated in the schema or have all NULL values.
Delete unused columns
-
Select the unwanted column, and then click Delete. Do this for the following columns which have all NULL values:
-
itemRevenue
-
itemQuantity
Deduplicate rows
Your team has informed you there may be duplicate session values included in the source dataset. Let’s remove these with a new deduplicate step.
-
Click Recipe (
) in the top right and select New Step.
-
In the Transformation search box, type deduplicate and select Remove duplicate rows.
-
Click Add.
-
Review the recipe created so far:

Filter out sessions without revenue
Your team has asked you to create a table of all user sessions that bought at least one item from the website. Filter out user sessions with NULL revenue.
-
Under the totalTransactionRevenue column, click the missing values bar.
-
In the Suggestions panel, click Delete rows with missing values, and then click Add (as shown).
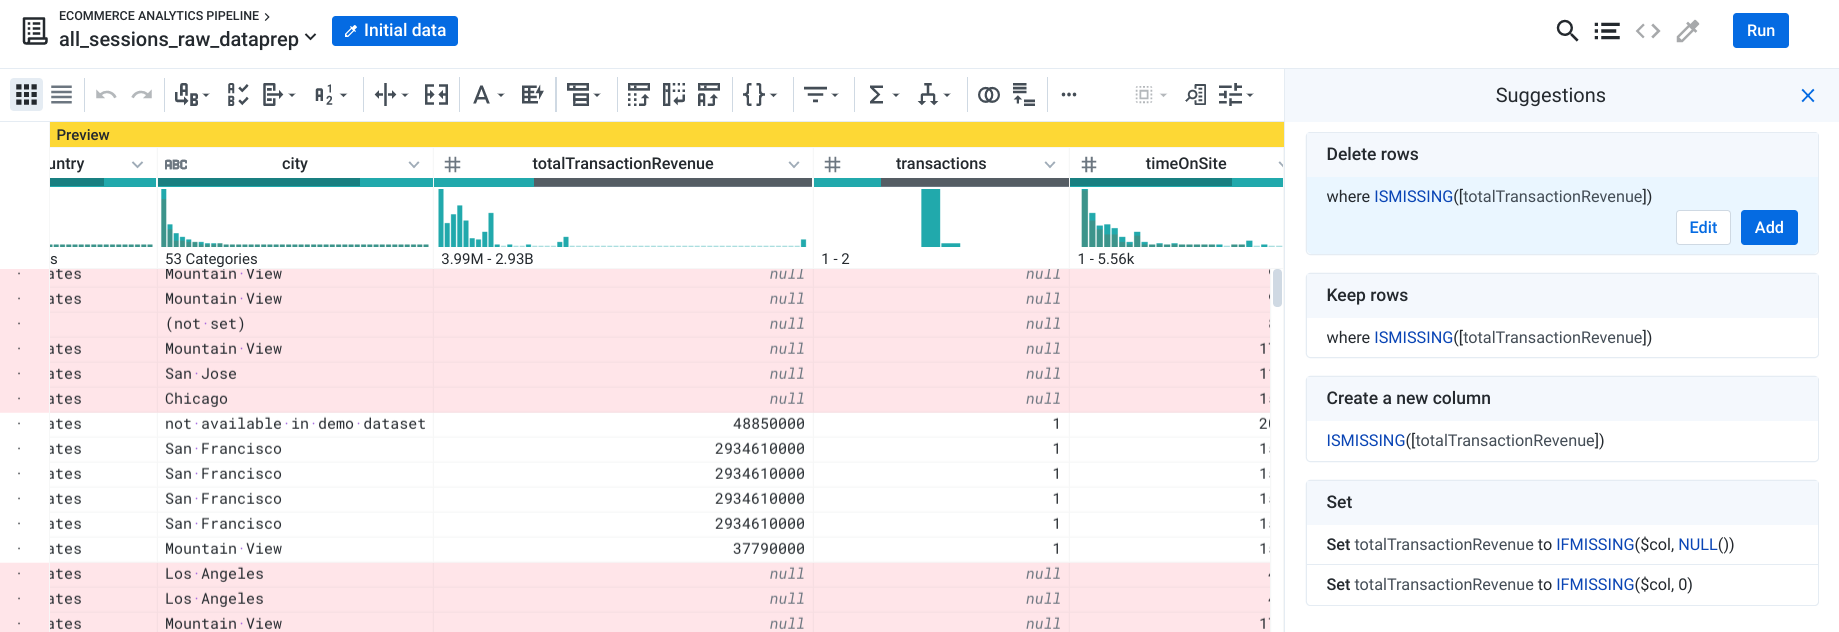
This step filters your dataset to only include transactions with revenue (where totalTransactionRevenue is NULL).
Filter out sessions for just Type = ‘PAGE’
The dataset contains both views of website Pages and triggered Events like “viewed product categories” or “added to cart”. To avoid double counting session pageviews, add a filter to only include pageview-related events.
-
In the type column, click the bar for PAGE.
-
In the Suggestions panel, click Keep rows where type is PAGE, and then click Add.
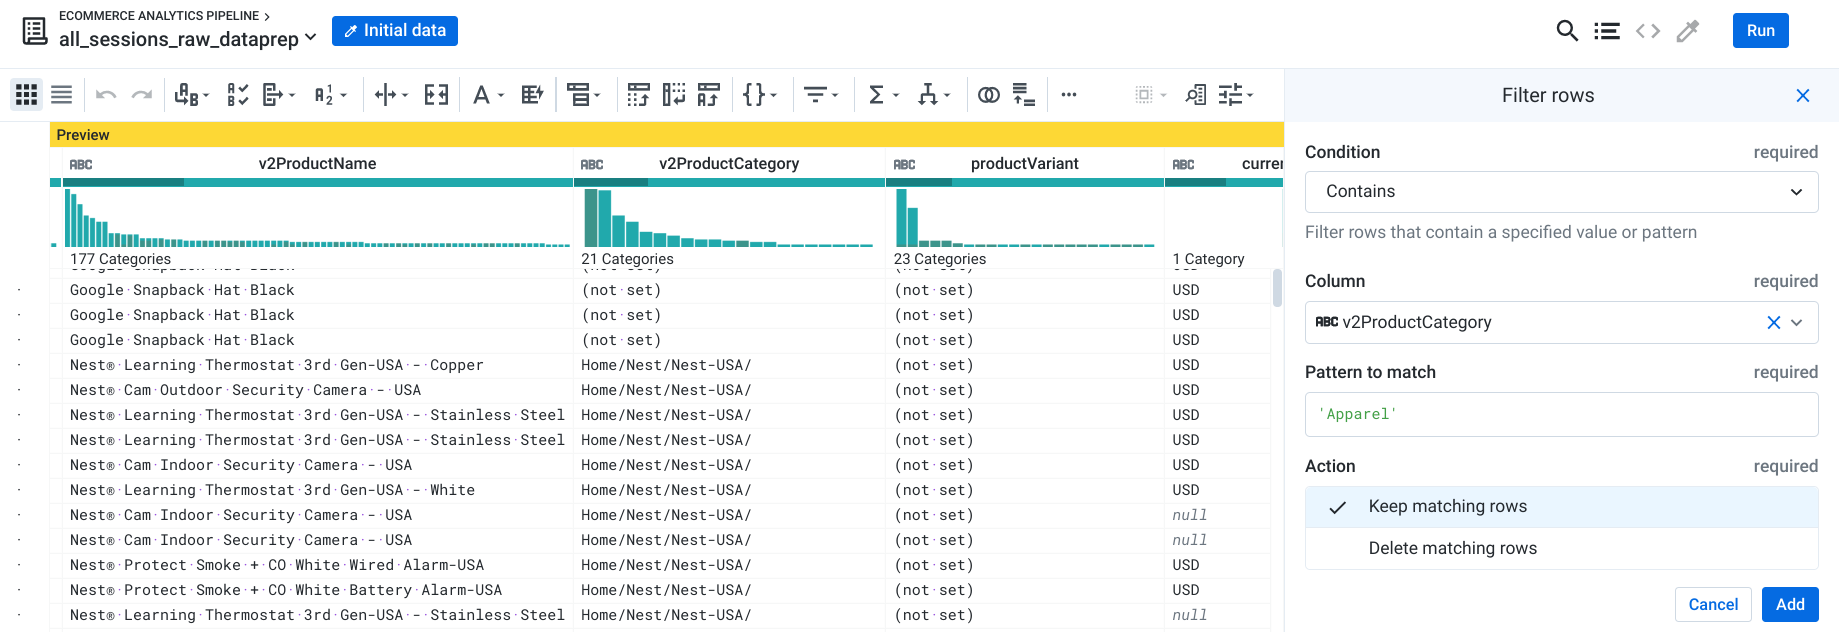
Filter for apparel products
Your team has now asked you to further filter your output to only include transactions in the Apparel category (apparel includes items like T-Shirts and other clothing items)
-
Next to the v2ProductCategory column, click the drop down icon.
-
Select Filter rows > On column values.
-
Select Contains.
-
In Pattern to match type 'Apparel' (case sensitive) and then click Add.
Task 6. Enrich the data
To learn about the schema used in this lab, refer to [UA] BigQuery Export schema. Search this article for visitId and read the description to determine if it is unique across all user sessions or just the user.
VisitId = An identifier for this session. This is part of the value usually stored as the _utmb cookie. This is only unique to the user. For a completely unique ID, you should use a combination of fullVisitorId and visitId.
visitId is not unique across all users.
In this task, you add a new concatenated column to create a unique session ID field. Then you will enrich your ecommerce label data with a case statement.
Create a new column for a unique session ID
As you discovered, the dataset has no single column for a unique visitor session. Create a unique ID for each session by concatenating the fullVisitorID and visitId fields.
-
Click on New Step.
-
For Search transformation, type concat, and then select Merge columns.
-
For Columns, select fullVisitorId and visitId.
-
For the New column name, type unique_session_id, and leave the other inputs as their default values and click Add.
Create a case statement for the ecommerce action type
The eCommerceAction_type field is an integer that maps to actual ecommerce actions performed in that session like 3 = “Add to Cart” or 5 = “Check out.” Create a calculated column that maps to the integer value.
-
Click on New Step.
-
In the Transformation panel, type case, and then select Conditional column.
-
Select Case on single column from the drop-down.
-
For Column to evaluate, specify eCommerceAction_type.
-
Next to Cases (X), click Add 8 times for a total of 9 cases.
-
For each Case, specify the following mapping values (including the quotes):
| Value to compare | New value |
|---|---|
| 1 | 'Click through of product lists' |
| 2 | 'Product detail views' |
| 3 | 'Add product(s) to cart' |
| 4 | 'Remove product(s) from cart' |
| 5 | 'Check out' |
| 6 | 'Completed purchase' |
| 7 | 'Refund of purchase' |
| 8 | 'Checkout options' |
| 0 | 'Unknown' |
Leave the other fields at their default values.
-
For New column name, type eCommerceAction_label, and then click Add.
-
Review the Recipe and compare it to this example:
Task 7. Run Cloud Dataprep job to load BigQuery
When you are satisfied with the flow, it’s time to execute the transformation recipe against your source dataset. To do that, you execute and monitor a Cloud Dataprep job (which starts and runs a Cloud Dataflow job).
-
From the Transformer page, in the upper right, click Run.
-
In the Publishing Actions section, hover over on
Create-CSVthen click Edit. -
Select BigQuery in the left panel and go into your ecommerce dataset, and then click Create a new table.
-
Name the output table apparel_revenue and select Drop the table every run in the right panel.
-
Click Update.
-
Click Run.
-
Click Job history in the left panel to monitor your Cloud Dataprep job.
-
Wait 1 - 2 minutes for your job to run
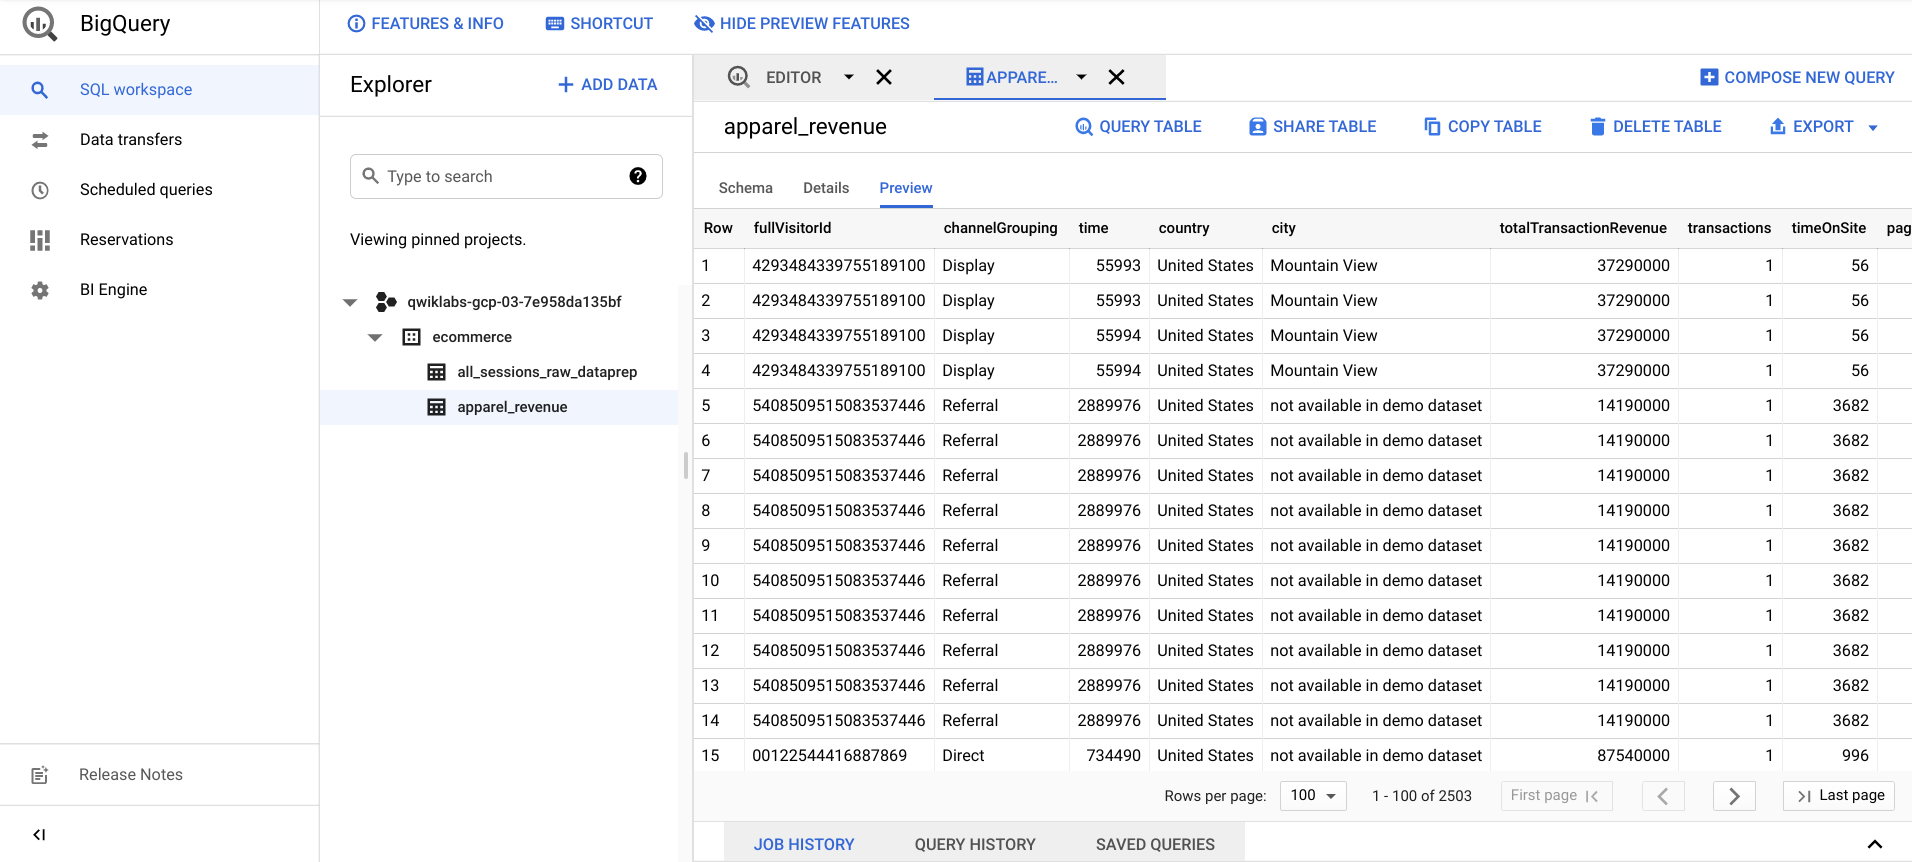
After your Cloud Dataprep job finishes, refresh your BigQuery page and confirm that the output table apparel_revenue exists.
Select apparel_revenue > Preview and ensure you have revenue transaction data for Apparel products.
Congratulations!
You’ve successfully explored your ecommerce dataset and created a recurring data transformation pipeline with Cloud Dataprep.
Already have a Google Analytics account and want to query your own datasets in BigQuery? Follow this Set up BigQuery Export guide.
End your lab
When you have completed your lab, click End Lab. Google Cloud Skills Boost removes the resources you’ve used and cleans the account for you.
You will be given an opportunity to rate the lab experience. Select the applicable number of stars, type a comment, and then click Submit.
The number of stars indicates the following:
- 1 star = Very dissatisfied
- 2 stars = Dissatisfied
- 3 stars = Neutral
- 4 stars = Satisfied
- 5 stars = Very satisfied
You can close the dialog box if you don't want to provide feedback.
For feedback, suggestions, or corrections, please use the Support tab.
Copyright 2022 Google LLC All rights reserved. Google and the Google logo are trademarks of Google LLC. All other company and product names may be trademarks of the respective companies with which they are associated.