Checkpoints
Create the VPC network
/ 20
Set up the test application
/ 10
Set up the Cloud load balancer component- instance group
/ 20
Set up the Cloud load balancer component- health check
/ 30
Create the Cloud Armor security policy
/ 20
Cloud Armor Preconfigured WAF Rules
GSP879

Overview
Google Cloud Armor is Google's enterprise edge network security solution providing DDOS protection, WAF rule enforcement, and adaptive manageability at scale.
Cloud Armor has extended the preconfigured WAF rule sets to mitigate against the OWASP Top 10 web application security vulnerabilities. The rule sets are based on the OWASP Modsecurity core rule set version 3.0.2 to protect against some of the most common web application security risks including local file inclusion (lfi), remote file inclusion (rfi), remote code execution (rce), and many more.
In this lab, you learn how to mitigate some of the common vulnerabilities by using Google Cloud Armor WAF rules.
What you'll learn
In this lab, you learn how to:
- Set up an Instance Group and a Global Load Balancer to support a service
- Configure Cloud Armor security policies with preconfigured WAF rules to protect against lfi, rce, scanners, protocol attacks, and session fixation
- Validate that Cloud Armor mitigated an attack by observing logs
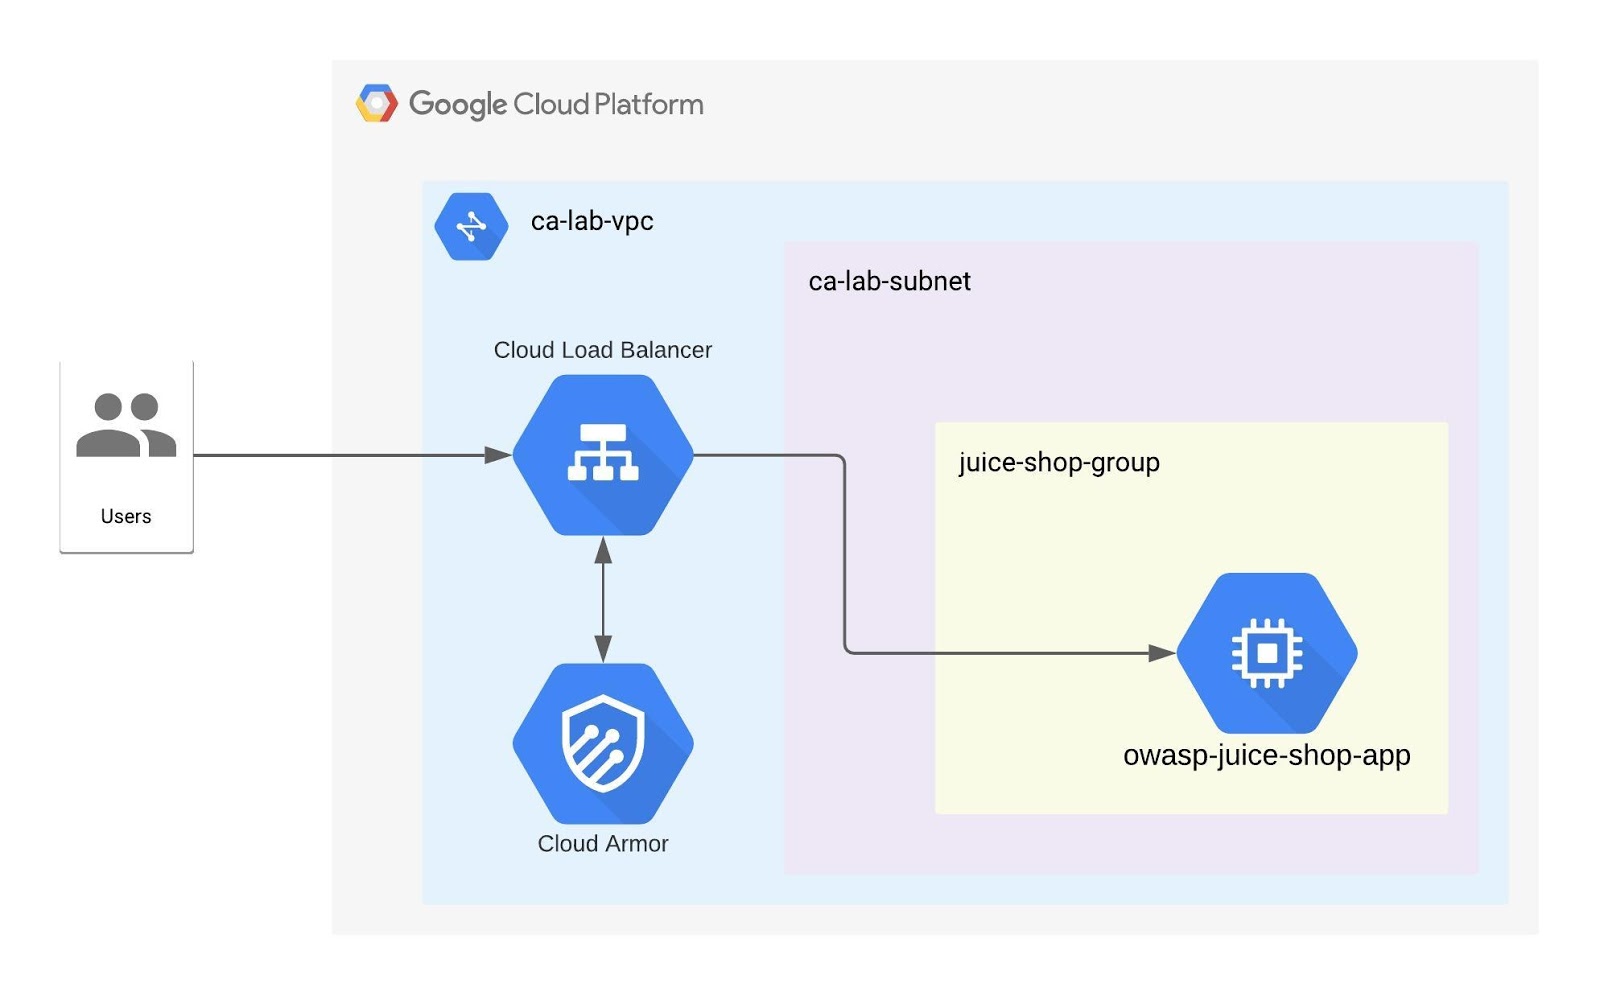
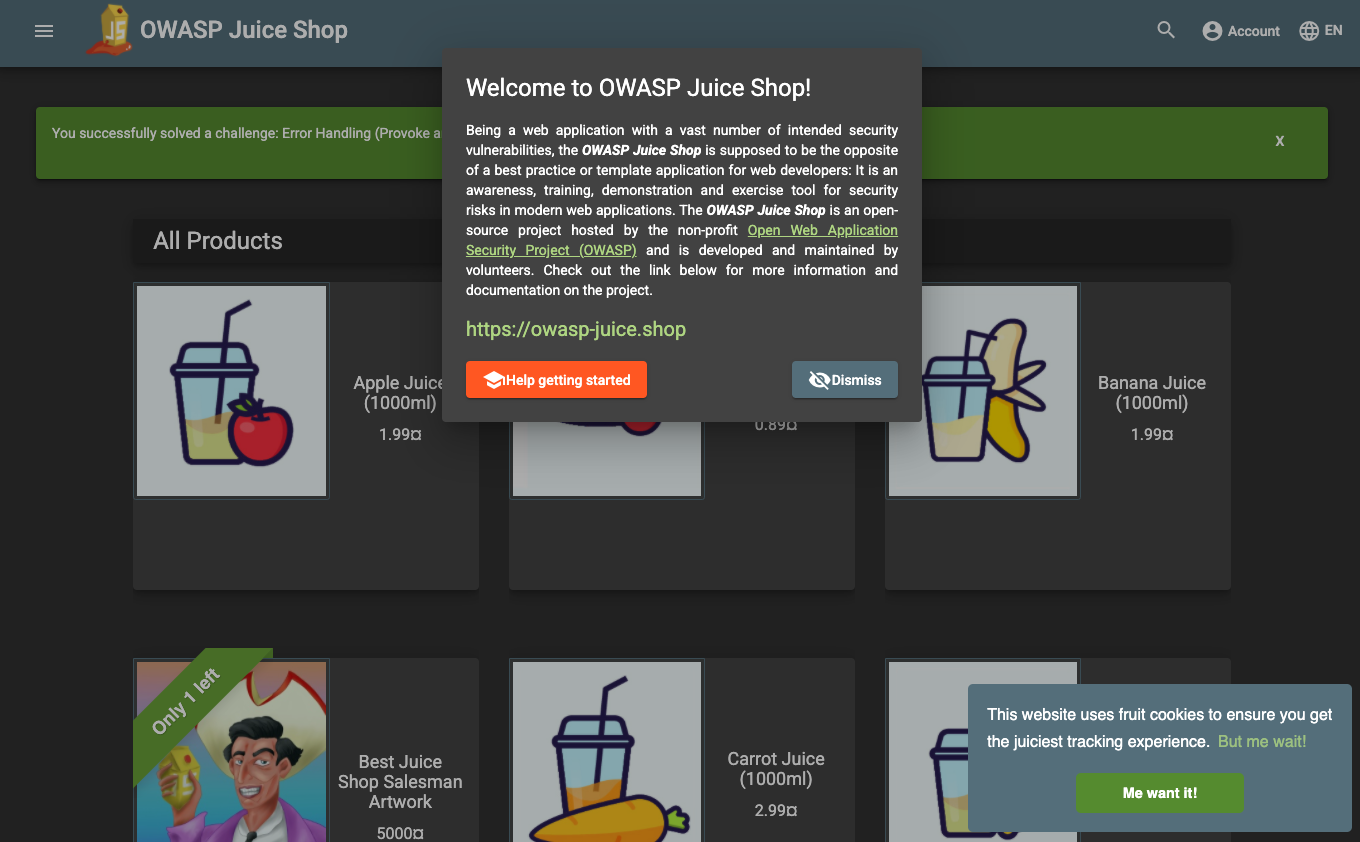
The OWASP Juice Shop application is useful for security training and awareness, because it contains instances of each of the OWASP Top 10 security vulnerabilities—by design. An attacker can exploit it for testing purposes. In this lab, you use it to demonstrate some application attacks followed by protecting the application with Cloud Armor WAF rules. The application is fronted by a Google Cloud Load Balancer, onto which the Cloud Armor security policy and rules are be applied. It is served on the public internet thus reachable from almost anywhere and protected using Cloud Armor and VPC firewall rules.
Setup and requirements
Before you click the Start Lab button
Read these instructions. Labs are timed and you cannot pause them. The timer, which starts when you click Start Lab, shows how long Google Cloud resources will be made available to you.
This hands-on lab lets you do the lab activities yourself in a real cloud environment, not in a simulation or demo environment. It does so by giving you new, temporary credentials that you use to sign in and access Google Cloud for the duration of the lab.
To complete this lab, you need:
- Access to a standard internet browser (Chrome browser recommended).
- Time to complete the lab---remember, once you start, you cannot pause a lab.
How to start your lab and sign in to the Google Cloud console
-
Click the Start Lab button. If you need to pay for the lab, a pop-up opens for you to select your payment method. On the left is the Lab Details panel with the following:
- The Open Google Cloud console button
- Time remaining
- The temporary credentials that you must use for this lab
- Other information, if needed, to step through this lab
-
Click Open Google Cloud console (or right-click and select Open Link in Incognito Window if you are running the Chrome browser).
The lab spins up resources, and then opens another tab that shows the Sign in page.
Tip: Arrange the tabs in separate windows, side-by-side.
Note: If you see the Choose an account dialog, click Use Another Account. -
If necessary, copy the Username below and paste it into the Sign in dialog.
{{{user_0.username | "Username"}}} You can also find the Username in the Lab Details panel.
-
Click Next.
-
Copy the Password below and paste it into the Welcome dialog.
{{{user_0.password | "Password"}}} You can also find the Password in the Lab Details panel.
-
Click Next.
Important: You must use the credentials the lab provides you. Do not use your Google Cloud account credentials. Note: Using your own Google Cloud account for this lab may incur extra charges. -
Click through the subsequent pages:
- Accept the terms and conditions.
- Do not add recovery options or two-factor authentication (because this is a temporary account).
- Do not sign up for free trials.
After a few moments, the Google Cloud console opens in this tab.

Activate Cloud Shell
Cloud Shell is a virtual machine that is loaded with development tools. It offers a persistent 5GB home directory and runs on the Google Cloud. Cloud Shell provides command-line access to your Google Cloud resources.
- Click Activate Cloud Shell
at the top of the Google Cloud console.
When you are connected, you are already authenticated, and the project is set to your Project_ID,
gcloud is the command-line tool for Google Cloud. It comes pre-installed on Cloud Shell and supports tab-completion.
- (Optional) You can list the active account name with this command:
- Click Authorize.
Output:
- (Optional) You can list the project ID with this command:
Output:
gcloud, in Google Cloud, refer to the gcloud CLI overview guide.
Before you begin
- In Cloud Shell, set up your project ID:
Task 1. Create the VPC network
- In Cloud Shell, enter the following command to create a VPC network:
Create a subnet
- In Cloud Shell, enter the following command to create a subnet:
Create VPC firewall rules
After creating the VPC and subnet, set up a few firewall rules.
- The first firewall rule named
allow-js-siteallows all IPs to access the external IP of the test application's website on port3000. - The second firewall rule named
allow-health-checkallows health-checks from source IP of the load balancers.
- In Cloud Shell, enter the following command to create a firewall rule to allow all IPs to access the application:
Output:
- In Cloud Shell, enter the following command to create firewall rule to allow health-checks from the Google health-check ranges:
Output:
Click Check my progress to verify the objective.
Task 2. Set up the test application
Create the test application, in this case, the OWASP Juice Shop web server.
When you create the compute instance, you use a container image to ensure the server has the appropriate services. You deploy this server in the
Create the OWASP Juice Shop application
- Use the open source well-known OWASP Juice Shop application to serve as the vulnerable application. You can also use this application to do OWASP security challenges through the OWASP website.
Output:
Click Check my progress to verify the objective.
Set up the Cloud load balancer component: instance group
- In Cloud Shell, enter the following command to create the unmanaged instance group:
Output:
- Add the Juice Shop Google Compute Engine (GCE) instance to the unmanaged instance group:
Output:
- Set the named port to that of the Juice Shop application:
Output:
Click Check my progress to verify the objective.
Set up the Cloud load balancer component: health check
Now that you've created the unmanaged instance group, create a health check, backend service, URL map, target proxy, and forwarding rule.
- In Cloud Shell, enter the following command to create the health-check for the Juice Shop service port:
Output:
Set up the Cloud load balancer component: backend service
- In Cloud Shell, enter the following command to create the backend service parameters:
Output:
- Add the Juice Shop instance group to the backend service:
Output:
Set up the Cloud load balancer component: URL map
- In Cloud Shell, enter the following command to create the URL map to send incoming requests to the backend:
Output:
Set up the Cloud load balancer component: target proxy
- In Cloud Shell, enter the following command to create the Target Proxy to route incoming requests the URL map:
Output:
Set up the Cloud load balancer component: forwarding rule
- In Cloud Shell, enter the following command to create the forwarding rule for the Load Balancer:
Output:
Verify the Juice Shop service is online
- From Cloud Shell:
Output:
Wait a few minutes before continuing on, else you may retrieve a HTTP/1.1 404 Not Found response.
- From Cloud Shell:
Output:
You can also go to the browser to view the Juice Shop!
You're now ready to explore the Juice Shop vulnerabilities and protect against them with Cloud Armor WAF rule sets.
Click Check my progress to verify the objective.
Task 3. Demonstrate known vulnerabilities
In this lab, you demonstrate the states before and after Cloud Armor WAF rules are propagated in condensed steps.
Observe an LFI vulnerability: path traversal
Local File Inclusion is the process of observing files present on the server by exploiting lack of input validation in the request to potentially expose sensitive data. The following shows a path traversal is possible. In your browser or with curl, observe an existing path served by the application.
- From Cloud Shell:
Output:
Observe that path traversal works too.
- From Cloud Shell:
Output:
Observe an RCE vulnerability
Remote Code Execution includes various UNIX and Windows command injection scenarios allowing attackers to execute OS commands usually restricted to privileged users. The following shows a simple ls command execution passed in.
- From Cloud Shell:
Output:
Remove the curl flags to observe the full output.
Observe a well-known scanner's access
Both commercial and open source scan applications for various purposes, including to find vulnerabilities. These tools use well-known User-Agent and other Headers. Observe curl works with a well-known User-Agent Header.
- In Cloud Shell:
Output:
Observe a protocol attack: HTTP splitting
Some web applications use input from the user to generate the headers in the responses. If the application doesn't properly filter the input, an attacker can potentially poison the input parameter with the sequence %0d%0a (the CRLF sequence that is used to separate different lines).
The response could then be interpreted as two responses by anything that happens to parse it, like an intermediary proxy server, potentially serving false content in subsequent requests. Insert the sequence %0d%0a into the input parameter, which can lead to serving a misleading page.
- From Cloud Shell:
Output:
Observe session fixation
- In Cloud Shell:
Output:
Task 4. Define Cloud Armor WAF rules
- List the preconfigured WAF rules, using the following command in Cloud Shell:
- Create the Cloud Armor security policy using the following command in Cloud Shell:
- In Cloud Shell, update the security policy default rule.
- Since the default rule is configured with action deny, you must allow access from your IP. Please find your public IP (curl, ipmonkey, whatismyip, etc):
- Add the first rule to allow access from your IP (INSERT YOUR IP BELOW):
- In Cloud Shell, update the security policy to block LFI attacks.
Apply the OWASP ModSecurity Core Rule Set that prevents path traversal for local file inclusions.
- In Cloud Shell, update the security policy to block Remote Code Execution (rce).
Per the OWASP ModSecurity Core Rule Set, apply rules that look for rce, including command injection. Typical OS commands are detected and blocked.
- Update the security policy to block security scanners.
Apply the OWASP ModSecurity Core Rule Set to block well-known security scanners, scripting HTTP clients, and web crawlers.
- In Cloud Shell, update the security policy to block protocol attacks.
Per the OWASP ModSecurity Core Rule Set, apply rules that look for Carriage Return (CR) %0d and Linefeed (LF)%0a characters and other types of protocol attacks like HTTP Request Smuggling.
- Update the security policy to block session fixation.
Per the OWASP ModSecurity Core Rule Set, apply the following rules using Cloud Shell:
- Attach the security policy to the backend service:
Rules may take some time to propagate (but not more than 10 mins).
- Once sufficient time has passed, test the vulnerabilities previously demonstrated to confirm Cloud Armor WAF rule enforcement in the next step.
Click Check my progress to verify the objective.
Observe Cloud Armor protection with OWASP ModSecurity Core Rule Set
- In Cloud Shell, confirm the LFI vulnerability is mitigated:
Output:
- In Cloud Shell, confirm the RCE attack is mitigated:
Output:
- In Cloud Shell, confirm well-known scanner detection.
Output:
- In Cloud Shell, confirm a protocol attack is mitigated.
Per the OWASP ModSecurity Core Rule Set ver.3.0.2, the protocol attack is mitigated by:
Output:
- In Cloud Shell, confirm session fixation attempts are blocked:
Output:
Task 5. Review Cloud Armor Security rules
Now that you've created the security policy, look at what rules have been configured.
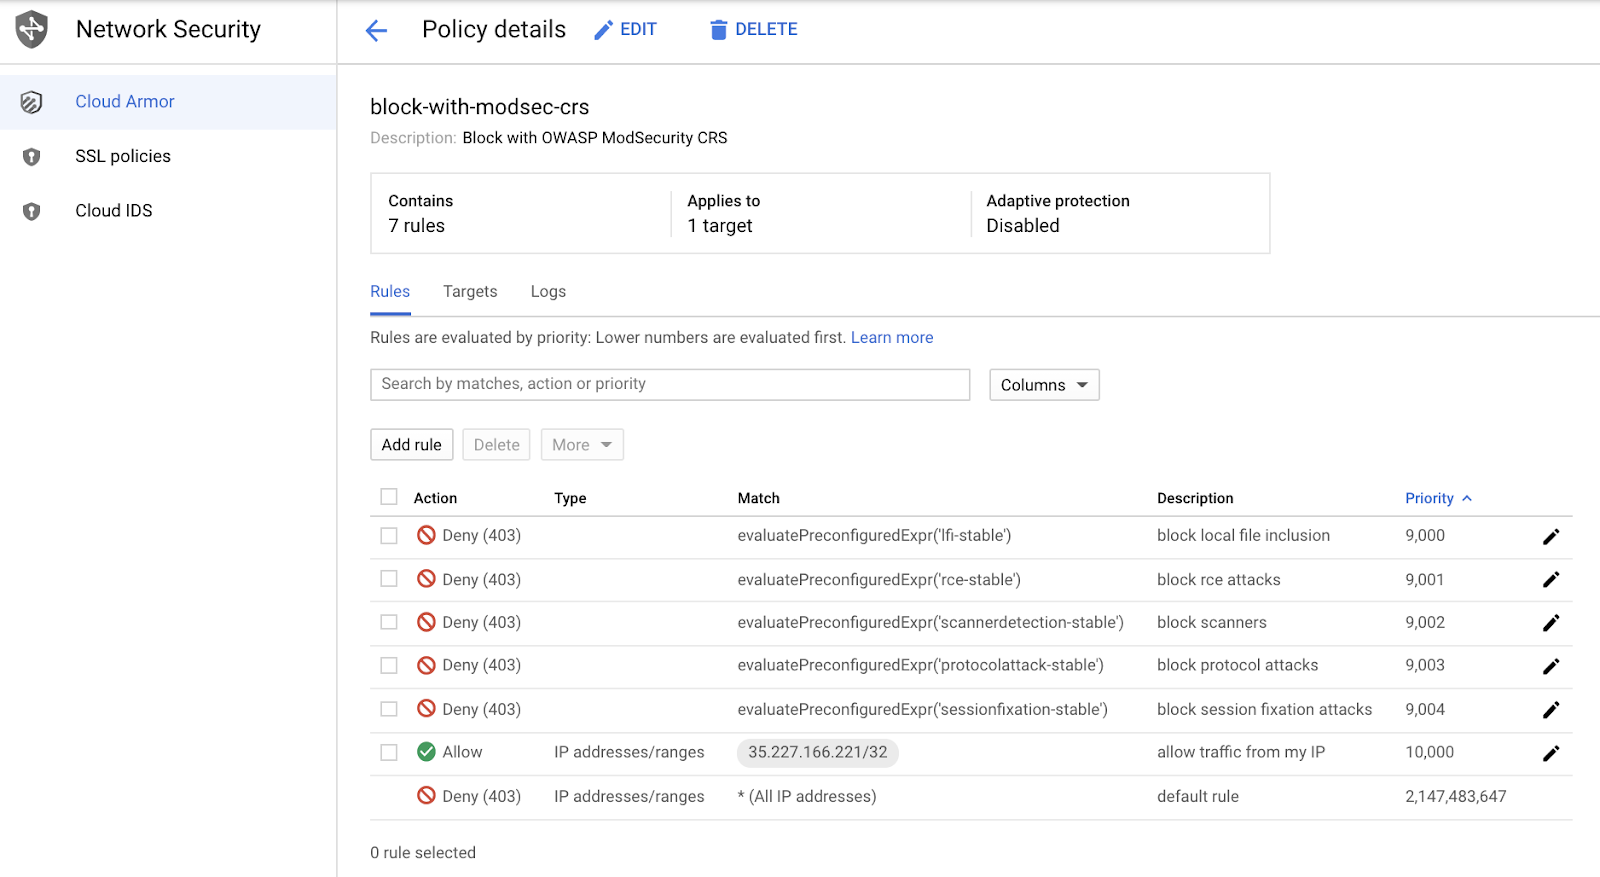
Rules are evaluated by priority: lower numbers are evaluated first and once triggered, processing does not continue for rules with higher priority values.
- Priority
9000- Block LFI (local file inclusion) - Priority
9001- Block RCE (remote code execution/command injection) - Priority
9002- Block Scanners Detected - Priority
9003- Block Protocol Attacks like HTTP splitting and HTTP smuggling - Priority
9004- Block Session Fixation Attacks - Priority
10000- Allow your IP to access the Website - Priority
Default- Deny.
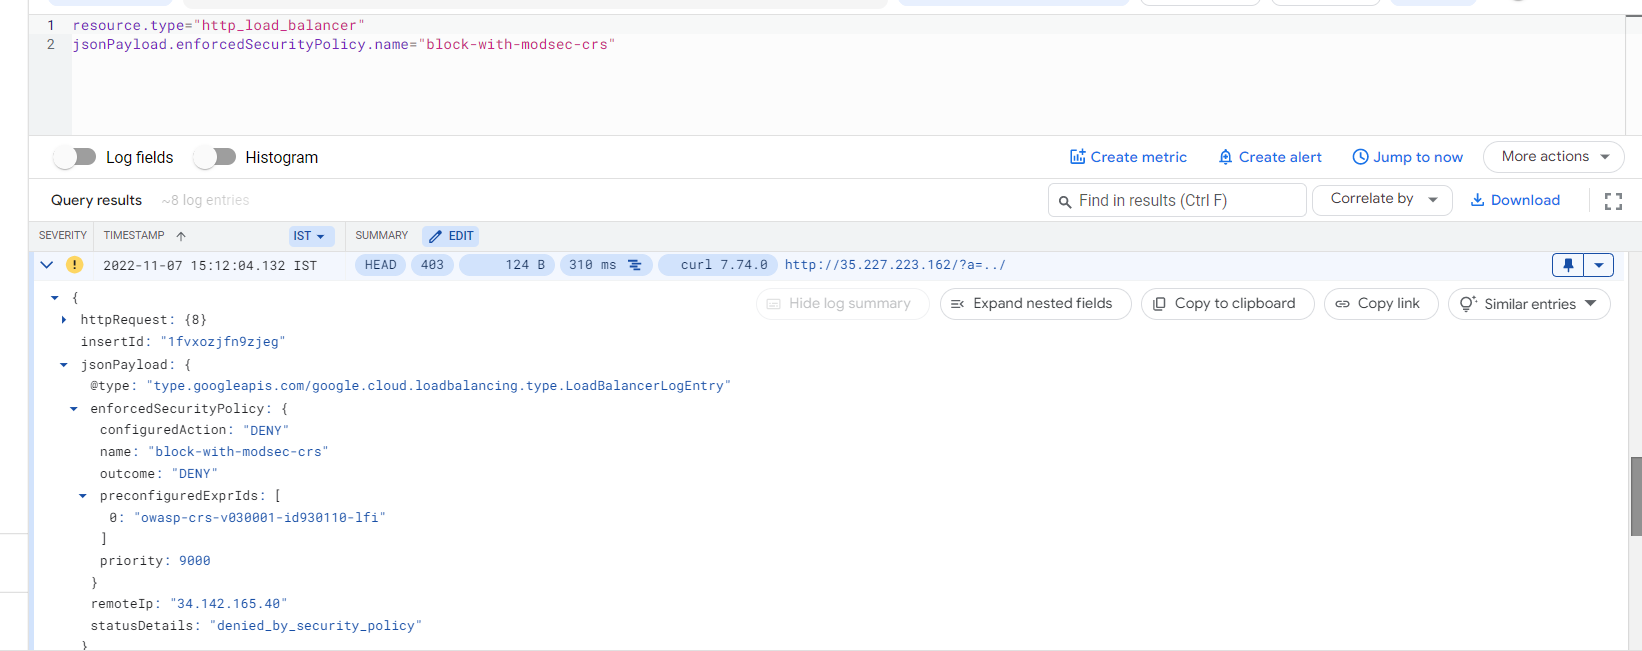
Task 6. Observe Cloud Armor security policy logs
From the Cloud Armor console page, view details of the security policy and click the Logs tab followed by the View policy logs link to be directed to the Cloud Logging page. It automatically filters based on the security policy of interest, for example, resource.type:(http_load_balancer) AND jsonPayload.enforcedSecurityPolicy.name:
It automatically filters based on the security policy of interest, for example, resource.type:(http_load_balancer) AND jsonPayload.enforcedSecurityPolicy.name:(
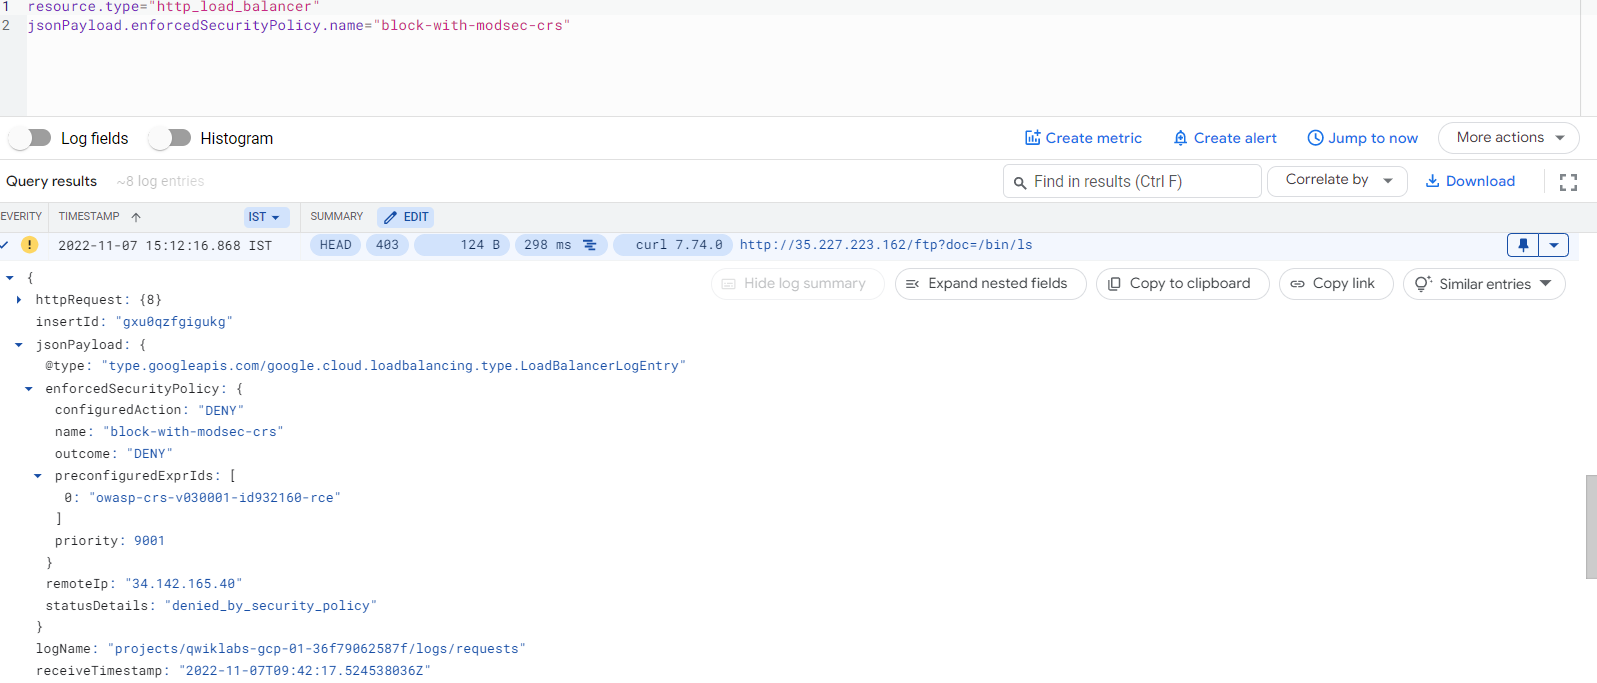
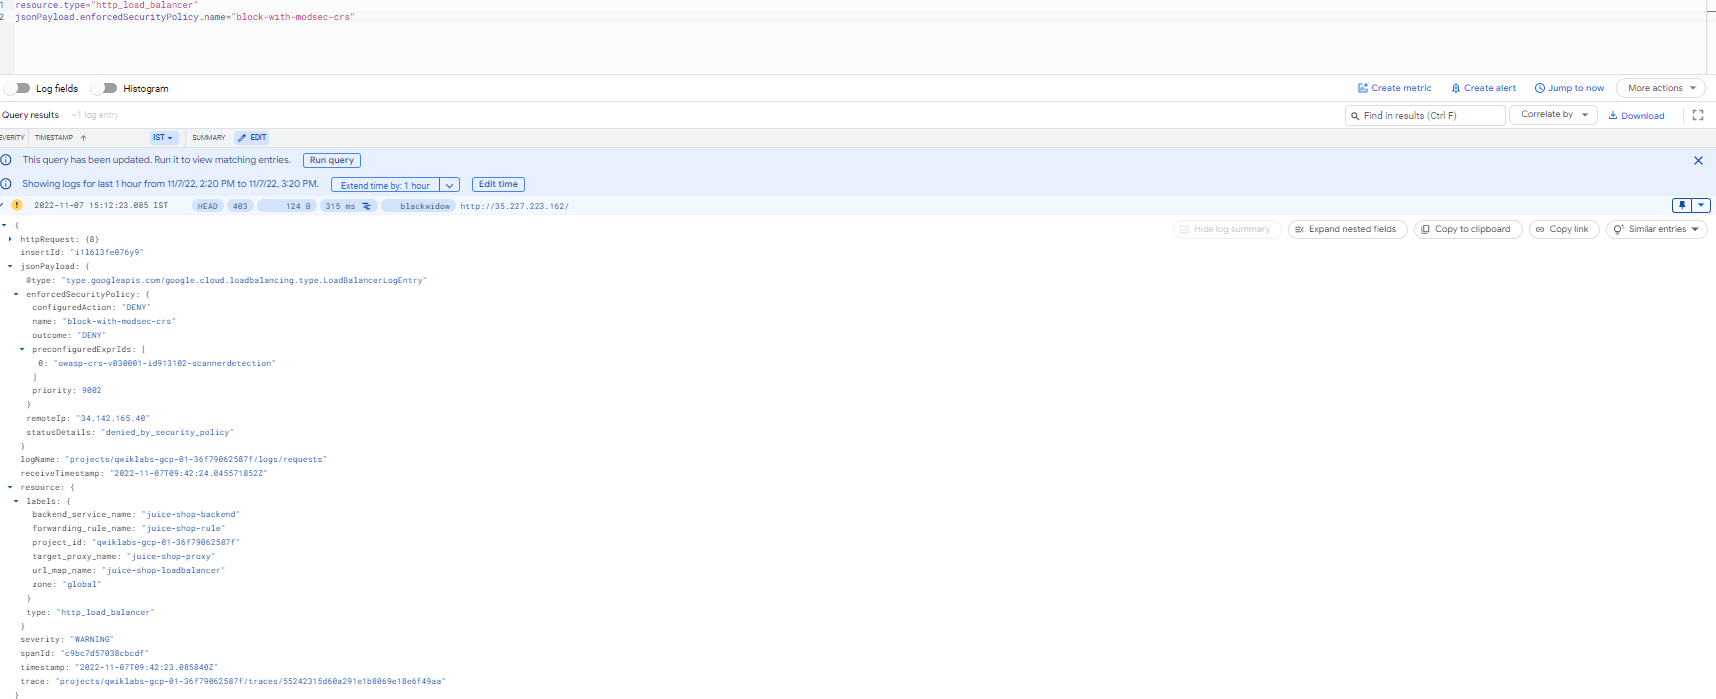
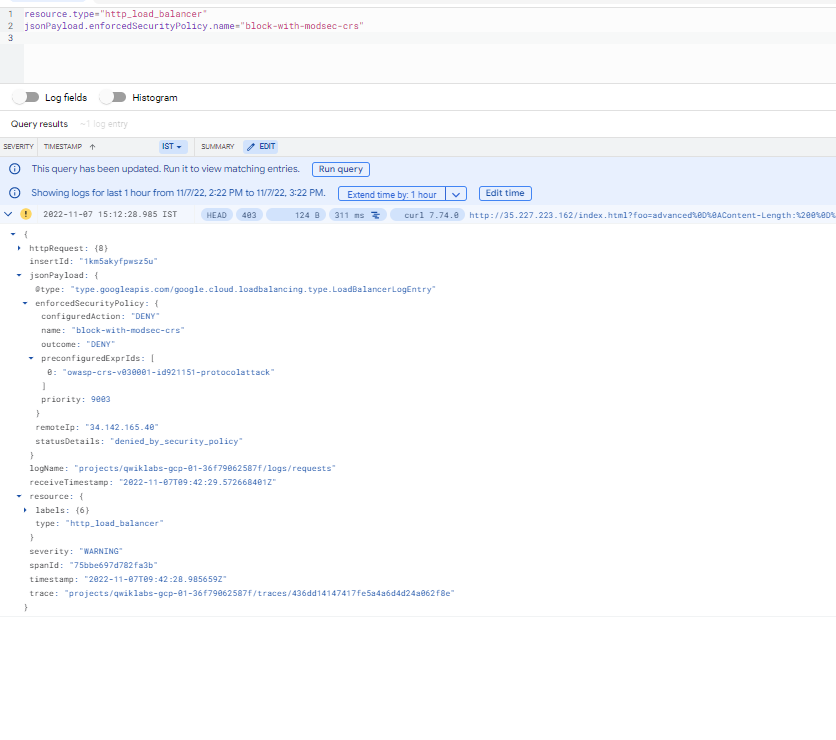
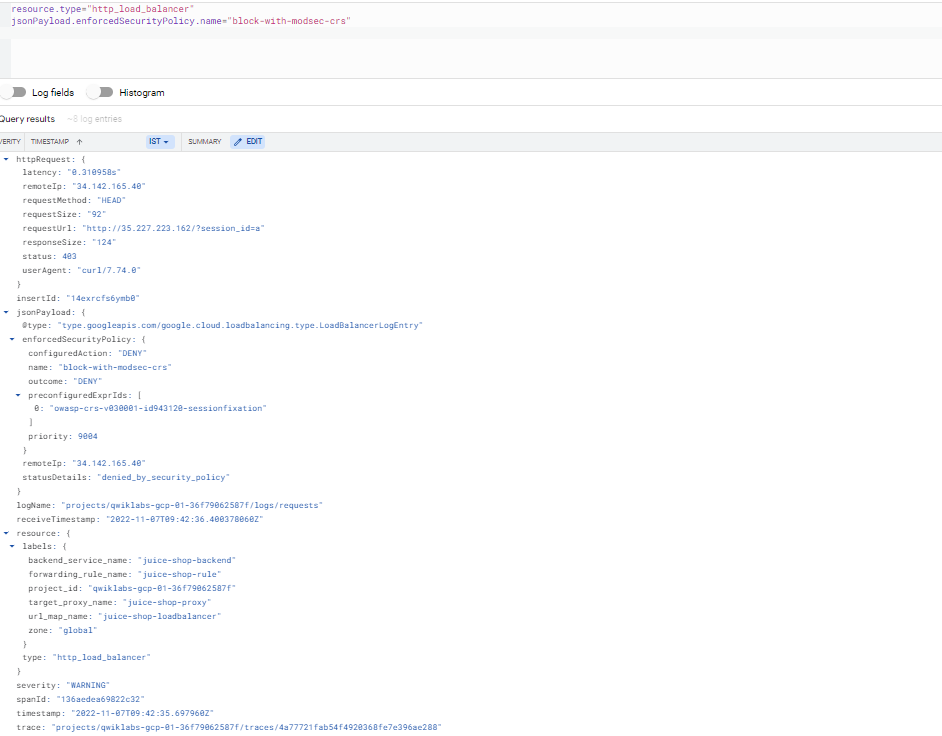
- Observe the 403 error response codes and expand the log details to observe the enforced security policy's name, matched field value, and further down the preconfigured expression IDs (or the signature id).
The following screenshots show examples of the logs for the enforced security policies configured in this lab.
LFI log
RCE log
Scanner detection log
Protocol attack log
Session fixation log
Congratulations!
You've successfully mitigated some of the common vulnerabilities by using Google Cloud Armor WAF rules.
Manual Last Updated October 19, 2023
Lab Last Tested October 19, 2023
Copyright 2024 Google LLC All rights reserved. Google and the Google logo are trademarks of Google LLC. All other company and product names may be trademarks of the respective companies with which they are associated.