Checkpoints
Import sample stock trade data to the database
/ 100
Deploy a Modern Web App connected to a Cloud Spanner Instance
- GSP1051
- Overview
- Objectives
- Setup and requirements
- Task 1. Enable required Google Cloud APIs
- Task 2. Download and inspect the application code
- Task 3. Build and deploy the backend component
- Task 4. Import sample stock trade data to the database
- Task 5. Build and deploy the frontend component
- Task 6. Perform operations in the OmegaTrade Application
- Congratulations!
GSP1051

Overview
Cloud Spanner is Google’s fully managed, horizontally scalable relational database service. Customers in financial services, gaming, retail and many other industries trust it to run their most demanding workloads, where consistency and availability at scale are critical.
In this lab you build and deploy a Node.js application connected to a Cloud Spanner instance. The Node.js application is a stock price visualization tool named OmegaTrade. The OmegaTrade application stores stock prices in Cloud Spanner and renders visualizations using Google Charts.
The backend service uses the Node.js Express framework and connects to Cloud Spanner with default connection pooling, session, and timeout capabilities.
Objectives
In this lab, you will deploy a Modern Web App connected to a Cloud Spanner instance.
- Configure the Project Environment
- Download and inspect the application code
- Deploy Backend application component
- Import sample stock trade data to the database
- Deploy Frontend application component
- Perform operations in the OmegaTrade Application
Setup and requirements
Before you click the Start Lab button
Read these instructions. Labs are timed and you cannot pause them. The timer, which starts when you click Start Lab, shows how long Google Cloud resources will be made available to you.
This hands-on lab lets you do the lab activities yourself in a real cloud environment, not in a simulation or demo environment. It does so by giving you new, temporary credentials that you use to sign in and access Google Cloud for the duration of the lab.
To complete this lab, you need:
- Access to a standard internet browser (Chrome browser recommended).
- Time to complete the lab---remember, once you start, you cannot pause a lab.
How to start your lab and sign in to the Google Cloud console
-
Click the Start Lab button. If you need to pay for the lab, a pop-up opens for you to select your payment method. On the left is the Lab Details panel with the following:
- The Open Google Cloud console button
- Time remaining
- The temporary credentials that you must use for this lab
- Other information, if needed, to step through this lab
-
Click Open Google Cloud console (or right-click and select Open Link in Incognito Window if you are running the Chrome browser).
The lab spins up resources, and then opens another tab that shows the Sign in page.
Tip: Arrange the tabs in separate windows, side-by-side.
Note: If you see the Choose an account dialog, click Use Another Account. -
If necessary, copy the Username below and paste it into the Sign in dialog.
{{{user_0.username | "Username"}}} You can also find the Username in the Lab Details panel.
-
Click Next.
-
Copy the Password below and paste it into the Welcome dialog.
{{{user_0.password | "Password"}}} You can also find the Password in the Lab Details panel.
-
Click Next.
Important: You must use the credentials the lab provides you. Do not use your Google Cloud account credentials. Note: Using your own Google Cloud account for this lab may incur extra charges. -
Click through the subsequent pages:
- Accept the terms and conditions.
- Do not add recovery options or two-factor authentication (because this is a temporary account).
- Do not sign up for free trials.
After a few moments, the Google Cloud console opens in this tab.

Activate Cloud Shell
Cloud Shell is a virtual machine that is loaded with development tools. It offers a persistent 5GB home directory and runs on the Google Cloud. Cloud Shell provides command-line access to your Google Cloud resources.
- Click Activate Cloud Shell
at the top of the Google Cloud console.
When you are connected, you are already authenticated, and the project is set to your Project_ID,
gcloud is the command-line tool for Google Cloud. It comes pre-installed on Cloud Shell and supports tab-completion.
- (Optional) You can list the active account name with this command:
- Click Authorize.
Output:
- (Optional) You can list the project ID with this command:
Output:
gcloud, in Google Cloud, refer to the gcloud CLI overview guide.
Cloud Spanner instance
In order to allow you to move more quickly through this lab the Cloud Spanner instance, database, and tables required for the OmegaTrade application were automatically created for you.
Here are some details for your reference:
| Item | Name | Details |
|---|---|---|
| Cloud Spanner Instance | omegatrade-instance | This is the project-level instance |
| Cloud Spanner Database | omegatrade-db | This is the instance specific database |
| Table | Users | Contains user acccounts |
| Table | Companies | Contains company name and stock symbol |
| Table | CompanyStocks | Contains stock values |
| Table | Simulations | Tracks the state of each simulation |
Task 1. Enable required Google Cloud APIs
First enable the Google Cloud APIs for Cloud Spanner, Container Registry, and Cloud Run.
- In the Cloud Shell enter the following commands:
Task 2. Download and inspect the application code
- Download the code repository for use in this lab. In the Cloud Shell enter the following:
- Navigate to the folder containing the application code.
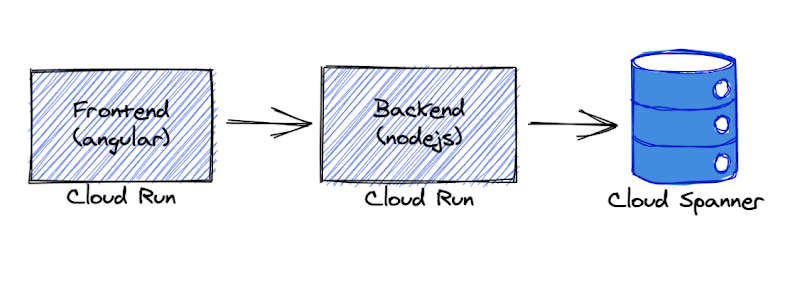
- The code is divided primarily into two parts, backend and frontend. The application architecture is depicted in the diagram below:
-
The application relies on a deployment-specific file named .env to successfuly communicate with the Cloud Spanner instance. You will create this file in the next task.
-
With respect to the backend, some of the bindings and interactions with the Cloud Spanner tables are managed by Node.js models - three of these company.model.js, simulation.model.js, and user.model.js - reside in the models folder. Issue the following command to navigate to the models folder:
- Issue the following command to inspect the company.model.js file. This file contains database operations to interact with the companies table.
Press the spacebar to advance through the file until its end. If you wish to close the file early, type q to close the more command.
- Some of the frontend interactions with these models and other structures in the Node.js backend occur through Angular components located in the components folder. Issue the following command to navigate to the components folder:
-
For instance, the company component contains the base application code to manage and update company information.
-
Issue the following command to inspect the manage-company.component.ts TypeScript configuration file. This file contains methods for deleting or editing a company, among other actions.
Press the spacebar to advance through the file until its end. If you wish to close the file early, type q to close the more command.
Task 3. Build and deploy the backend component
- Navigate to the folder containing the code required to build and deploy the backend.
- Create the .env file. As mentioned earlier, this file contains project specific infromation so that the application's backend component can communicate with the Cloud Spanner instance.
In the cloud shell enter the following command to invoke the Nano text editor and create a new .env file.
Paste the code block listed below.
Press Ctrl+X to exit Nano, Y to confirm the update, and press Enter to save your changes.
- Before you proceed further you must install updated components for npm so that the backend can be properly compiled. npm is a package manager for JavaScript. npm is the default package manager for the JavaScript runtime environment Node.js.
- Next build the backend application using a reference dockerfile that exists in the repository folder.
- Prior to pushing the new application package, run the following command to set configuration permissions in the Cloud Shell.
Enter 'y' when prompted if you want to continue.
- Push the newly created application package to the Container Repository for your Qwiklabs project.
- Finally deploy the backend application using Cloud Run. Cloud Run is a serverless deployment framework which abstracts away infrastructure management and scales up or down automatically almost instantaneously depending on traffic.
- Copy the URL provided at the end of the deployment. Preserve the URL in notepad, a text file, or other readily accessible location. This URL will be supplied to the frontend application to ensure the user interface can properly communicate with the Cloud Spanner database via the backend.
The backend Service URL will appear in the following format:
Task 4. Import sample stock trade data to the database
- To import sample company and stock data, run the following command in the current (main backend) folder.
- You will receive confirmation that the tables were loaded succesfully.
- Click Check my progress to verify the objective.
Task 5. Build and deploy the frontend component
- Navigate to the directory containing the frontend code. Specifically navigate to the environments folder to update the configuration file to point to your backend component.
- In the cloud shell enter the following command to invoke the Nano text editor and open the environment.ts file.
- Carefully delete the string http://localhost:3000 and replace it with your backend URL.
Press Ctrl+X to exit Nano, Y to confirm the update, and press Enter to save your changes.
Your updated environment.ts file should apppear like the example below.
- Navigate to the main frontend folder.
- Install updated components for npm so that the frontend can be properly compiled.
- Next build the frontend application using a reference dockerfile that exists in the repository folder. The frontend build may take 5 to 10 minutes to complete.
- Push the newly created application package to the Container Repository for your Qwiklabs project.
- Finally deploy the frontend application using Cloud Run.
- The frontend Service URL will appear in the following format. You may click the URL directly to open it or copy the URL and paste it into a new tab.
Task 6. Perform operations in the OmegaTrade Application
-
On the application launch page click the sign up link.
-
Use the following details to create a new account for a ficitious company named Spanner1.
| Item | Value |
|---|---|
| Business email | admin@spanner1.com |
| Full Name | Spanner1 Admin |
| Password | Spanner1 |
| Confirm your Password | Spanner1 |
-
Your account will be created and you will be logged in.
-
To examine the OmegaTrade application, navigate to the Dashboard and choose Foobar Inc from the selector to see the stock performance chart for Foobar Inc. You will see a range of simulated stock prices over time for Foobar Inc.
-
Navigate to Manage Company and add Spanner1 as a new company.
-
Click Add Company on the right side of the page. On the pop-up window, input the following values:
| Item | Value |
|---|---|
| Company Name | Spanner1 |
| Short Code | SPN |
Then click Save.
-
Spanner1 is now in the list of companies.
-
Navigate to the Dashboard and select Spanner1 if it is not already selected. You will see that no simulation exists for Spanner1. Click the link entitled here to generate a simiulation.
-
Under Simulate Data, provide the following details:
| Item | Value |
|---|---|
| Select Company | Spanner1 |
| Select Interval | 5 |
| Number of Records | 50 |
Then click Simulate.
-
Navigate to the Dashboard which will immediately update the chart for Spanner1 as the simulation progresses. It will take between 3 and 6 minutes for the simulation to complete.
-
The OmegaTrade application also allows you to modify existing company information. On the Manage Company tab click the pencil icon under Action for Acme Corp.
-
Update the company name to Coyote Inc. Notice that the Short Code cannot be updated in the user interface. Click Update to close and accept the change.
-
The update to the company name is immediate. Navigate to the Dashboard and you will see that Acme Corp no longer apppears and Coyote Inc has taken its place.
-
Occasionally data changes are required that exceed the capabilites of the application code. As an empowered user you have the ability to update data used in the OmegaTrade application by making direct changes in the Cloud Spanner database.
-
On the Cloud Console Navigation menu (
), under Databases click Spanner.
-
Accept any acknowledgement or information window that may appear.
-
Click on the omegatrade-instance name and then omegatrade-db under Databases. From the list of tables on the bottom of the page, click companies.
-
Click Data on the left side pane to see the table contents.
-
You will update the name of the Bar Industries entity.
-
Click on the checkbox for the Bar Industries row. Then click Edit from the choices listed above the table rows.
-
You are taken to the Spanner Studio. Click on + New SQL Editor Tab. Enter the following query to update the value for companyName from Bar Industries to Consolidated Enterprises Inc.
-
Click Run to process the update.
-
Return to the application page, refresh your browser, and navigate to Dashboard tab. You will see that Bar Industries no longer apppears and Consolidated Enterprises Inc has taken its place.
Congratulations!
You have now deployed a Node.js application connected to a Cloud Spanner instance and performed basic operations against the database using the application as well as editing data directly in the database.
Finish your quest
This self-paced lab is part of the Create and Manage Cloud Spanner Databases quest. A quest is a series of related labs that form a learning path. Completing this quest earns you a badge to recognize your achievement. You can make your badge (or badges) public and link to them in your online resume or social media account. Enroll in this quest and get immediate completion credit if you have successfully completed this lab. Search for other available quests in the Cloud Skills Boost catalog.
Manual Last Updated September 20, 2023
Lab Last Tested September 20, 2023
Copyright 2024 Google LLC All rights reserved. Google and the Google logo are trademarks of Google LLC. All other company and product names may be trademarks of the respective companies with which they are associated.