Puntos de control
Load Data into Portfolio, Category, and Product Tables
/ 30
Load Data into Campaigns Table
/ 20
Add column to Category Table
/ 20
Add secondary index to Category table
/ 30
Cloud Spanner - Defining Schemas and Understanding Query Plans
GSP1050

Overview
Cloud Spanner is Google’s fully managed, horizontally scalable relational database service. Customers in financial services, gaming, retail and many other industries trust it to run their most demanding workloads, where consistency and availability at scale are critical.
In this lab, you review schema related features of Cloud Spanner and apply those to a Banking Operations database. You also review the methods and rules by which Cloud Spanner creates query plans.
What you'll do
In this lab, you learn to modify schema related attributes of a Cloud Spanner instance.
- Load data into tables
- Use pre-defined Python client library code to load data
- Query data with client libraries
- Make updates to the database schema
- Add a Secondary Index
- Examine Query plans
Setup and requirements
Before you click the Start Lab button
Read these instructions. Labs are timed and you cannot pause them. The timer, which starts when you click Start Lab, shows how long Google Cloud resources will be made available to you.
This hands-on lab lets you do the lab activities yourself in a real cloud environment, not in a simulation or demo environment. It does so by giving you new, temporary credentials that you use to sign in and access Google Cloud for the duration of the lab.
To complete this lab, you need:
- Access to a standard internet browser (Chrome browser recommended).
- Time to complete the lab---remember, once you start, you cannot pause a lab.
How to start your lab and sign in to the Google Cloud console
-
Click the Start Lab button. If you need to pay for the lab, a pop-up opens for you to select your payment method. On the left is the Lab Details panel with the following:
- The Open Google Cloud console button
- Time remaining
- The temporary credentials that you must use for this lab
- Other information, if needed, to step through this lab
-
Click Open Google Cloud console (or right-click and select Open Link in Incognito Window if you are running the Chrome browser).
The lab spins up resources, and then opens another tab that shows the Sign in page.
Tip: Arrange the tabs in separate windows, side-by-side.
Note: If you see the Choose an account dialog, click Use Another Account. -
If necessary, copy the Username below and paste it into the Sign in dialog.
{{{user_0.username | "Username"}}} You can also find the Username in the Lab Details panel.
-
Click Next.
-
Copy the Password below and paste it into the Welcome dialog.
{{{user_0.password | "Password"}}} You can also find the Password in the Lab Details panel.
-
Click Next.
Important: You must use the credentials the lab provides you. Do not use your Google Cloud account credentials. Note: Using your own Google Cloud account for this lab may incur extra charges. -
Click through the subsequent pages:
- Accept the terms and conditions.
- Do not add recovery options or two-factor authentication (because this is a temporary account).
- Do not sign up for free trials.
After a few moments, the Google Cloud console opens in this tab.

Activate Cloud Shell
Cloud Shell is a virtual machine that is loaded with development tools. It offers a persistent 5GB home directory and runs on the Google Cloud. Cloud Shell provides command-line access to your Google Cloud resources.
- Click Activate Cloud Shell
at the top of the Google Cloud console.
When you are connected, you are already authenticated, and the project is set to your Project_ID,
gcloud is the command-line tool for Google Cloud. It comes pre-installed on Cloud Shell and supports tab-completion.
- (Optional) You can list the active account name with this command:
- Click Authorize.
Output:
- (Optional) You can list the project ID with this command:
Output:
gcloud, in Google Cloud, refer to the gcloud CLI overview guide.
Cloud Spanner instance
In order to allow you to move more quickly through this lab a Cloud Spanner instance, database, and tables were automatically created for you.
Here are some details for your reference:
| Item | Name | Details |
|---|---|---|
| Cloud Spanner Instance | banking-ops-instance | This is the project-level instance |
| Cloud Spanner Database | banking-ops-db | This is the instance specific database |
| Table | Portfolio | Contains top-level bank offerings |
| Table | Category | Contains second-tier bank offering groupings |
| Table | Product | Contains specific line-item bank offerings |
| Table | Campaigns | Contains details on marketing initiatives |
Task 1. Load data into tables
The banking-ops-db was created with empty tables. Follow the steps below to load data into three of the tables (Portfolio, Category, and Product).
-
From the Cloud Console, open the navigation menu (
), under Databases click Spanner.
-
The instance name is banking-ops-instance, click on the name to explore the databases.
-
The associated database is named banking-ops-db. Click on the name, scroll down to Tables, and you will see there are four tables already in place.
-
On the left pane of the Console, click Spanner Studio. Then click the + New SQL Editor Tab button in the right frame.
-
This takes you to the Query page. Paste the insert statements below as a single block to load the Portfolio table. Spanner will execute each in succession. Click Run:
-
The lower page of the screen shows the results of inserting the data one row at a time. A green checkmark also appears on each row of inserted data. The Portfolio table now has three rows.
-
Click Clear Query in the top portion of the page.
-
Paste the insert statements below as a single block to load the Category table. Click Run:
-
The lower page of the screen shows the results of inserting the data one row at a time. A green checkmark also appears on each row of inserted data. The Category table now has four rows.
-
Click Clear Query in the top portion of the page.
-
Paste the insert statements below as a single block to load the Product table. Click Run:
-
The lower page of the screen shows the results of inserting the data one row at a time. A green checkmark also appears on each row of inserted data. The Product table now has nine rows.
-
Click Check my progress to verify the objective.
Task 2. Use pre-built Python client library code to load data
You will be using the client libraries written in Python for the next several steps.
- Open the Cloud Shell and paste the commands below to create and change into a new directory to hold the required files.
- Next download two files. One is used to setup the environment. The other is the lab code.
- Create an isolated Python environment and install dependencies for the Cloud Spanner client.
- The snippets.py is a consolidated file with multiple Cloud Spanner DDL, DML, and DCL functions that you are going to use as a helper during this lab. Execute snippets.py using the insert_data argument to populate the Campaigns table.
- Click Check my progress to verify the objective.
Task 3. Query data with client libraries
The query_data() function in snippets.py can be used to query your database. In this case you use it to confirm the data loaded into the Campaigns table. You will not change any code, the section is shown here for your reference.
- Execute snippets.py using the query_data argument to query the Campaigns table.
The result should look like the following
Task 4. Updating the database schema
As part of your DBA responsibilities you are required to add a new column called MarketingBudget to the Category table. Adding a new column to an existing table requires an update to your database schema. Cloud Spanner supports schema updates to a database while the database continues to serve traffic. Schema updates do not require taking the database offline and they do not lock entire tables or columns; you can continue reading and writing data to the database during the schema update.
Adding a column using Python
The update_ddl() method of the Database class is used to modify the schema.
Use the add_column() function in snippets.py which implements that method. You will not change any code, the section is shown here for your reference.
- Execute snippets.py using the add_column argument.
- Click Check my progress to verify the objective.
Other options to add a column to an existing table include the following:
Issuing a DDL command via the gcloud CLI.
The code sample below completes the same task you just executed via Python.
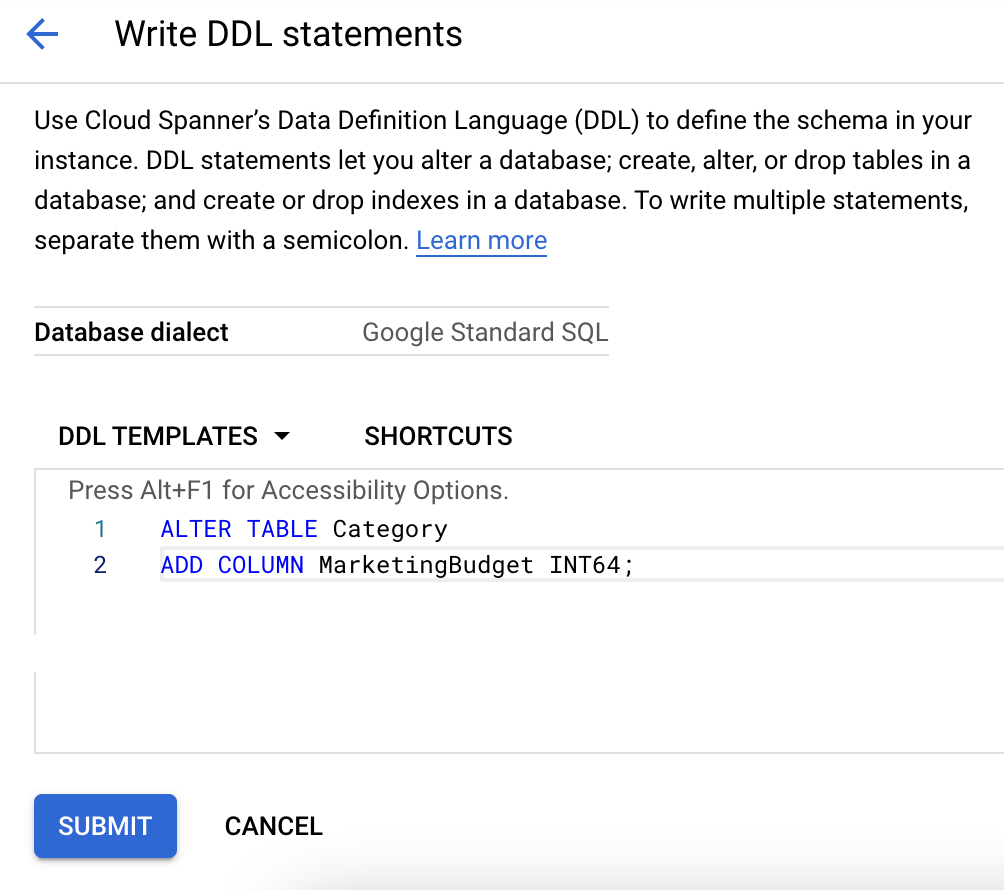
Issuing a DDL command in the Cloud Console.
- Click the table name in the Database listing.
- Click Write DDL in the top right corner of the page.
- Paste the appropriate DDL in the DDL Templates box.
- Click Submit.
Write data to the new column
The following code writes data to the new column. It sets MarketingBudget to 100000 for the row with a CategoryId of 1 and a PortfolioId of 1 and to 500000 for the row with a CategoryId of 3 and a PortfolioId of 2. You will not change any code, the section is shown here for your reference.
- Execute snippets.py using the update_data argument.
- Query the table again to see the update. Execute snippets.py using the query_data_with_new_column argument.
The result should be:
Task 5. Add a Secondary Index
Suppose you wanted to fetch all rows of Categories that have CategoryNames values in a certain range. You could read all values from the CategoryName column using a SQL statement or a read call, and then discard the rows that don't meet the criteria, but doing this full table scan is expensive, especially for tables with a lot of rows. Instead you can speed up the retrieval of rows when searching by non-primary key columns by creating a secondary index on the table.
Adding a secondary index to an existing table requires a schema update. Like other schema updates, Cloud Spanner supports adding an index while the database continues to serve traffic. Cloud Spanner populates the index with data (also known as a "backfill") under the hood. Backfills might take several minutes to complete, but you don't have to take the database offline or avoid writing to certain tables or columns during this process.
Add a secondary index using the Python client library
Use the add_index() method to create a secondary index. You will not change any code, the section is shown here for your reference.
- Execute snippets.py using the add_index argument.
- Click Check my progress to verify the objective.
Read using the index
To read using the index, invoke a variation of the read() method with an index included. You will not change any code, the section is shown here for your reference.
- Execute snippets.py using the read_data_with_index argument.
The result should look like this:
Add an index with a STORING clause
You might have noticed that the read example above did not include reading the MarketingBudget column. This is because Cloud Spanner's read interface does not support the ability to join an index with a data table to look up values that are not stored in the index.
To bypass this restriction, create an alternate definition of the CategoryByCategoryName index that stores a copy of MarketingBudget in the index.
Use the update_ddl() method of the Database class to add an index with a STORING clause. You will not change any code, the section is shown here for your reference.
- Execute snippets.py using the add_storing_index argument.
Now you can execute a read that fetches the CategoryId, CategoryName, and MarketingBudget columns while using the CategoryByCategoryName2 index. You will not change any code, the section is shown here for your reference.
- Execute snippets.py using the read_data_with_storing_index argument.
The result should be
Task 6. Examine Query plans
In this section, you will explore Cloud Spanner Query Plans.
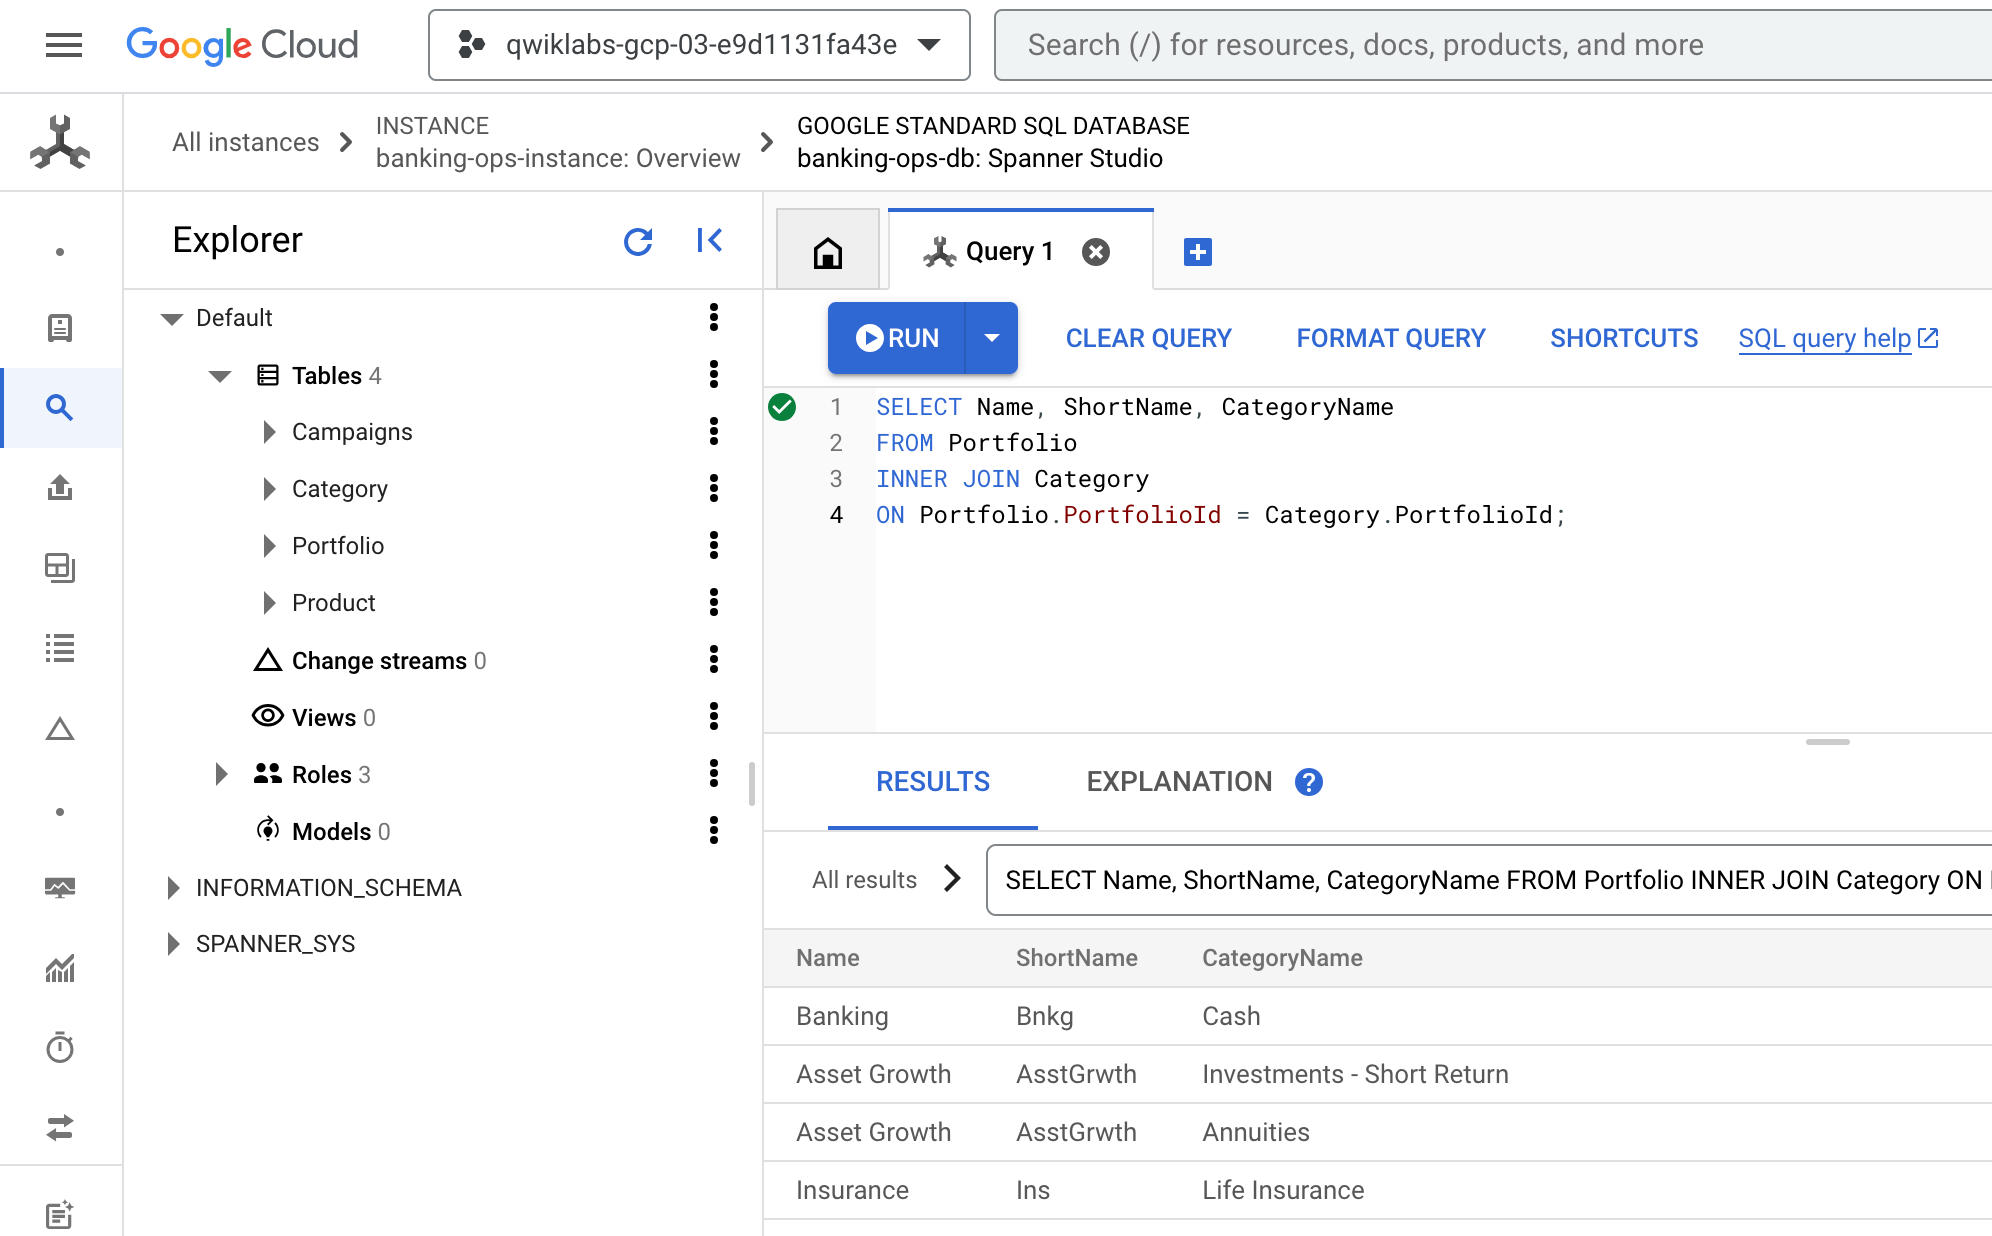
- Return to the Cloud Console, it should still be on the Query tab of Spanner Studio. Clear any existing query, paste, and Run the following query:
- The result should look like this:
Life of a query
A SQL query in Cloud Spanner is first compiled into an execution plan, then it is sent to an initial root server for execution. The root server is chosen so as to minimize the number of hops to reach the data being queried. The root server then:
- Initiates remote execution of subplans (if necessary)
- Waits for results from the remote executions
- Handles any remaining local execution steps such as aggregating results
- Returns results for the query
Remote servers that receive a subplan act as the "root" server for their subplan, following the same model as the top-most root server. The result is a tree of remote executions. Conceptually, query execution flows from top to bottom, and query results are returned from bottom to top. The following diagram shows this pattern:

Aggregate Query
Now take look at the query plan for an aggregated query.
- On the Query tab of Spanner Studio, clear the existing query, paste, and Run the following query.
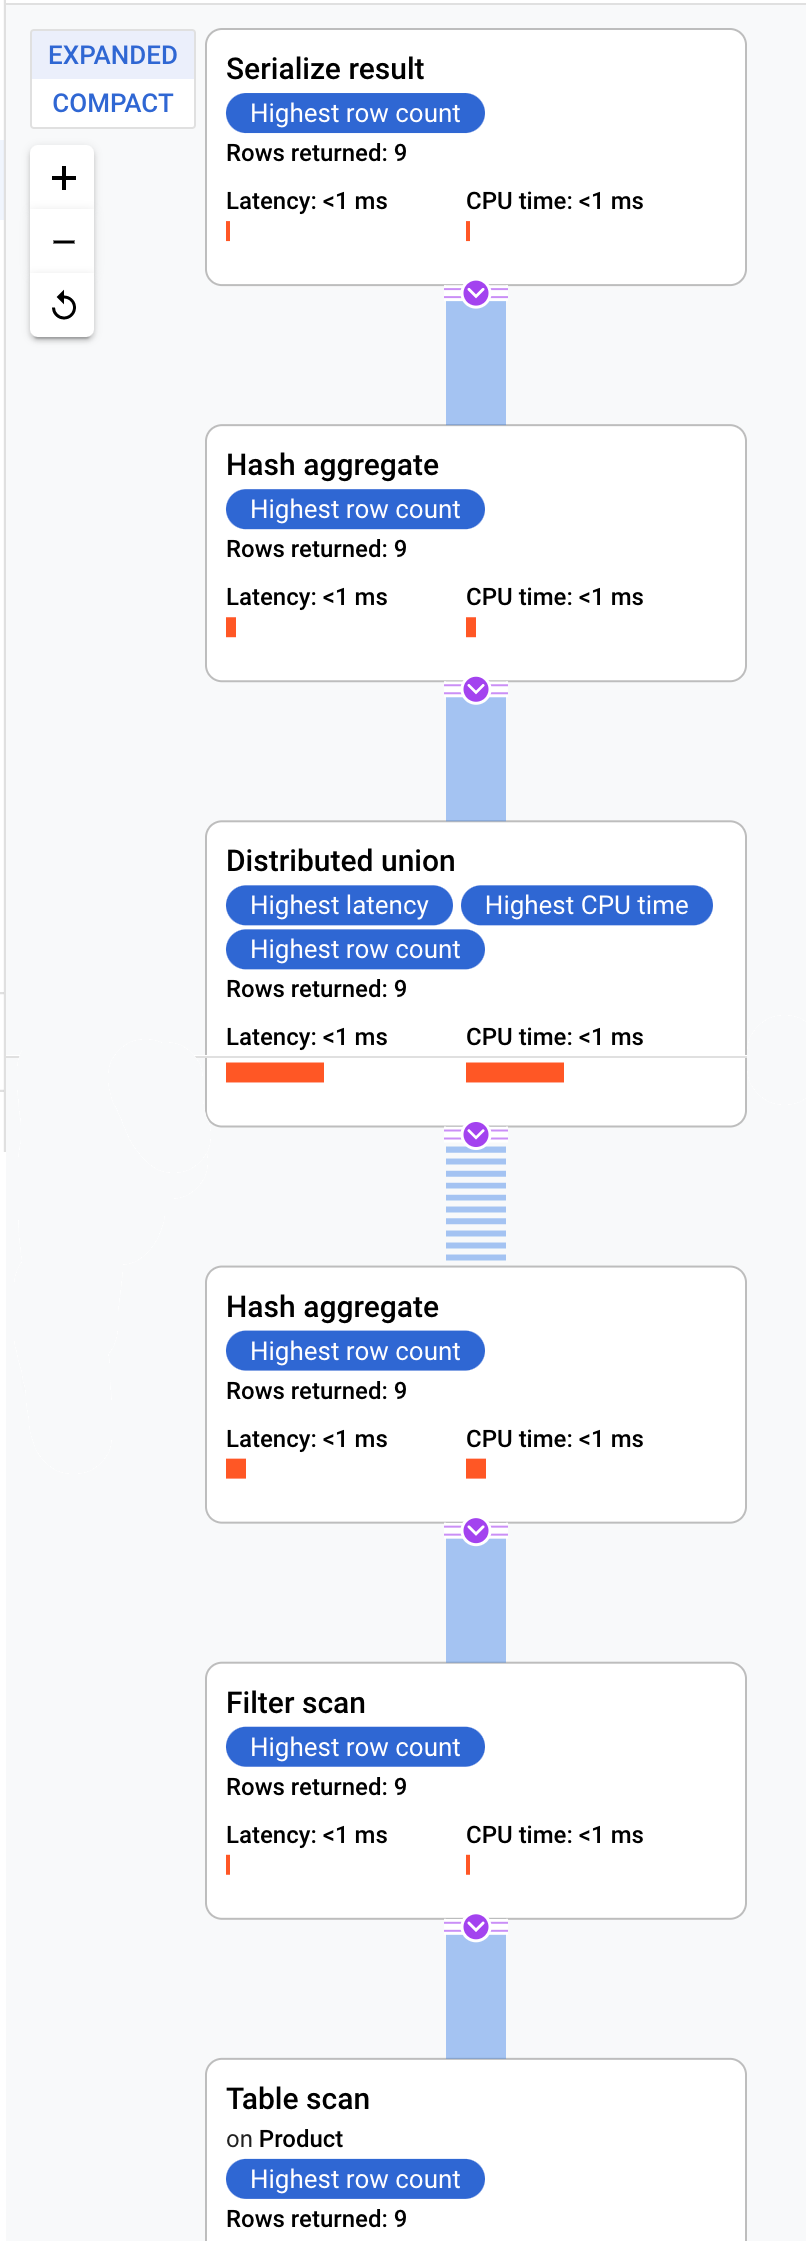
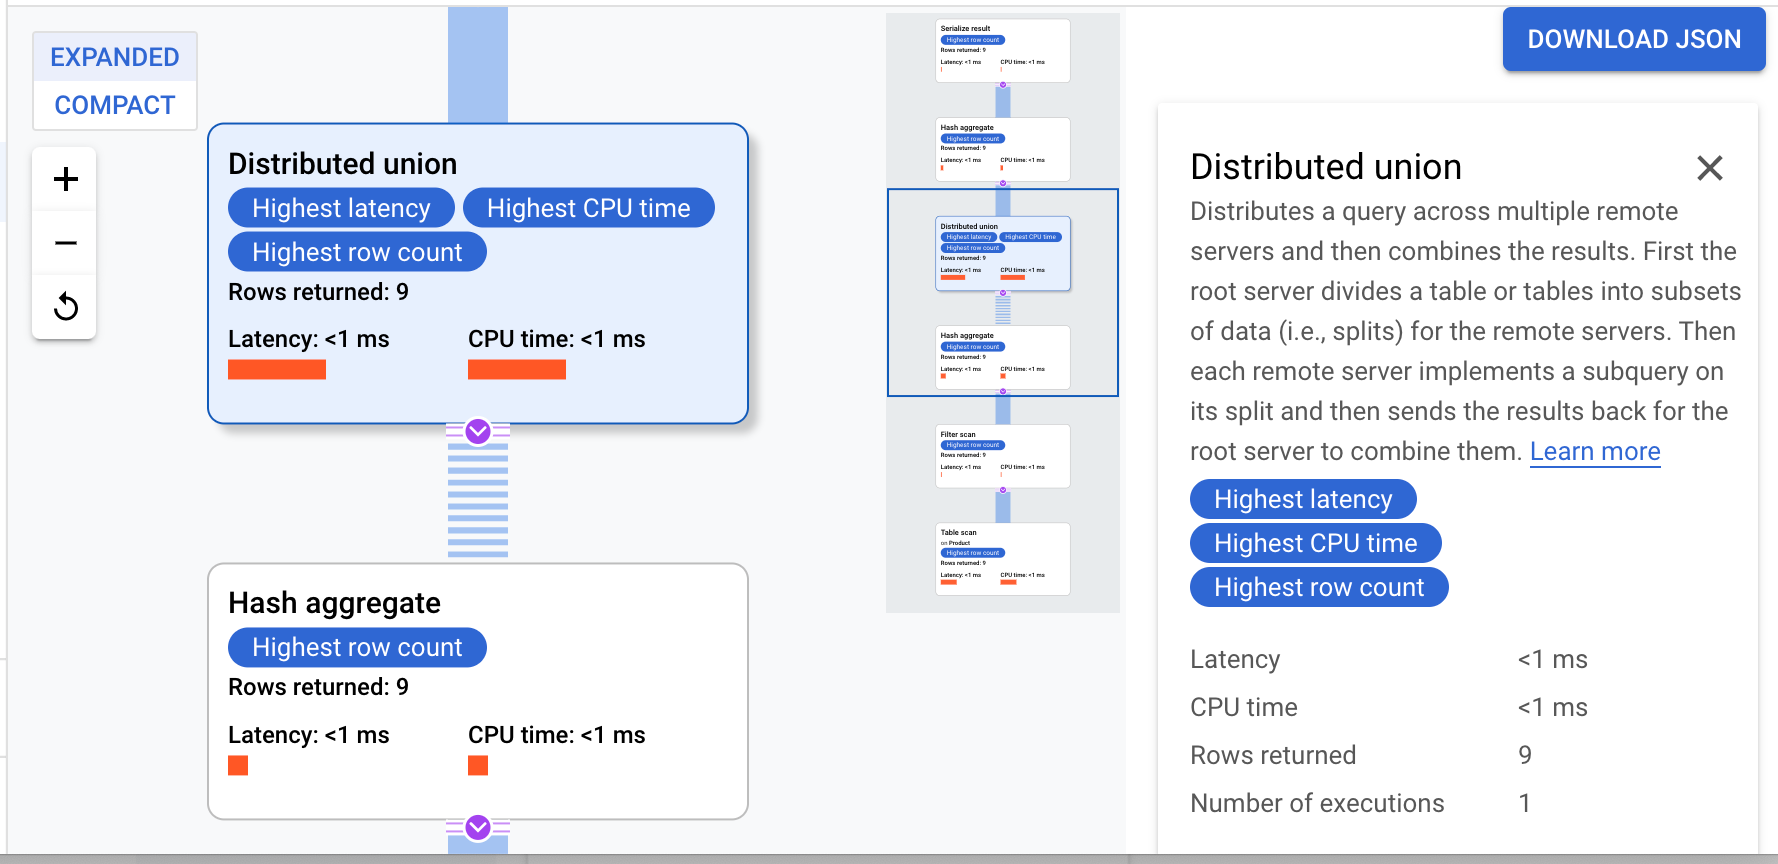
- Once the query completes click on the Explanation tab below the query body to examine the query plan.
Cloud Spanner sends the execution plan to a root server that coordinates the query execution and performs the remote distribution of subplans.
This execution plan starts with a serialization which orders all values returned. Then the plan completes an initial hash aggregate operator to preliminarily calculate results. Then a distributed union is executed which distributes subplans to remote servers whose splits satisfy ProductId < 100. The distributed union sends results to a final hash aggregate operator. The aggregate operator performs the COUNT aggregation by ProductId and returns results to a serialize result operator. Finally a scan is conducted to order the results to be returned.
The result should look like this:
Co-located join queries
Interleaved tables are physically stored with their rows of related tables co-located. A join between interleaved tables is known as a co-located join. Co-located joins can offer performance benefits over joins that require indexes or back joins.
- On the Query tab of Spanner Studio, clear the existing query, paste, and Run the following query.
- Once the query completes click on the Explanation tab below the query body to examine the query plan.
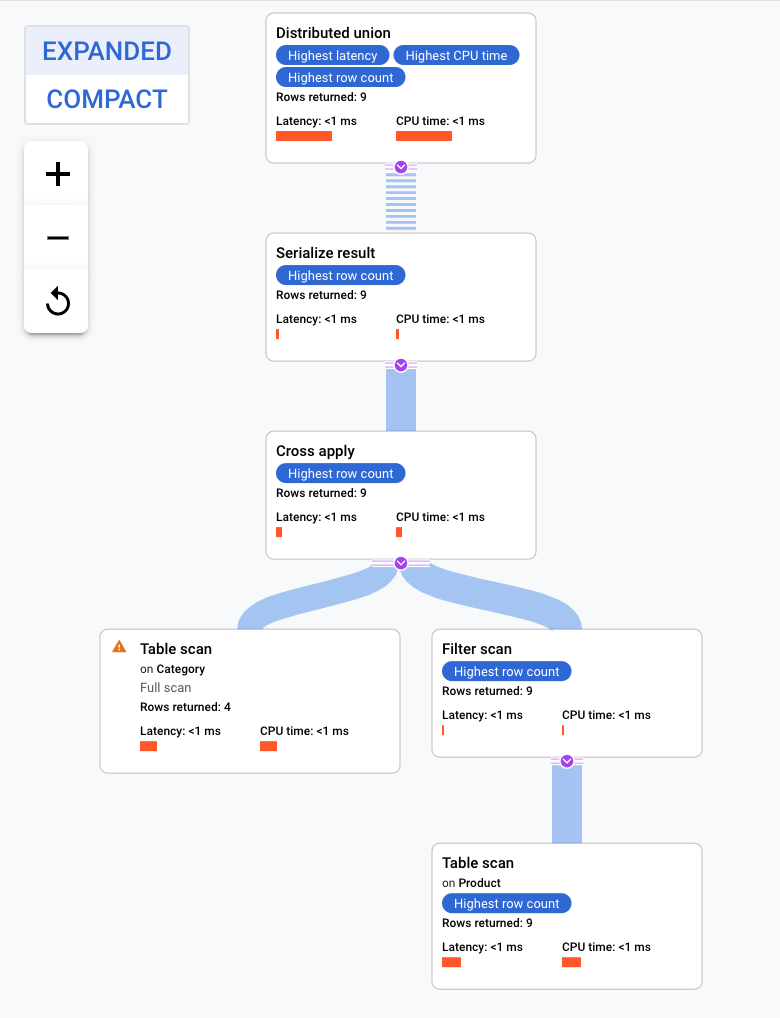
This execution plan starts with a distributed union, which distributes subplans to remote servers that have splits of the table Category. Because Product is an interleaved table of Category, each remote server is able to execute the entire subplan on each remote server without requiring a join to a different server.
The subplans contain a cross apply. Each cross apply performs a table scan on table Category to retrieve PortfolioId, CategoryId, and CategoryName. The cross apply then maps output from the table scan to output from an index scan on index CategoryByCategoryName, subject to a filter of the PortfolioId in the index matching the PortfolioId from the table scan output. Each cross apply sends its results to a serialize result operator which serializes the CategoryName and ProductName data and returns results to the local distributed unions. The distributed union aggregates results from the local distributed unions and returns them as the query result.
Congratulations!
You now have now a solid understanding of schema related features of Cloud Spanner as well as the methods by which Spanner creates query plans.
Google Cloud training and certification
...helps you make the most of Google Cloud technologies. Our classes include technical skills and best practices to help you get up to speed quickly and continue your learning journey. We offer fundamental to advanced level training, with on-demand, live, and virtual options to suit your busy schedule. Certifications help you validate and prove your skill and expertise in Google Cloud technologies.
Manual Last Updated April 25, 2024
Lab Last Tested August 31, 2023
Copyright 2024 Google LLC All rights reserved. Google and the Google logo are trademarks of Google LLC. All other company and product names may be trademarks of the respective companies with which they are associated.