

Before you begin
- Labs create a Google Cloud project and resources for a fixed time
- Labs have a time limit and no pause feature. If you end the lab, you'll have to restart from the beginning.
- On the top left of your screen, click Start lab to begin
Enable Google Cloud services
/ 5
Create a Vertex AI Workbench instance
/ 10
Copy the notebook from a Cloud Storage bucket
/ 10
Create a Cloud Storage Bucket
/ 5
Create training script
/ 20
Train the Model on Vertex AI
/ 20
Deploy the model
/ 20
Endpoint queried successfully
/ 10
In a challenge lab you’re given a scenario and a set of tasks. Instead of following step-by-step instructions, you will use the skills learned from the labs in the course to figure out how to complete the tasks on your own! An automated scoring system (shown on this page) will provide feedback on whether you have completed your tasks correctly.
When you take a challenge lab, you will not be taught new Google Cloud concepts. You are expected to extend your learned skills, like changing default values and reading and researching error messages to fix your own mistakes.
To score 100% you must successfully complete all tasks within the time period!
This lab is recommended for students who have enrolled in the Get Started with TensorFlow on Google Cloud skill badge course. Are you ready for the challenge?
Read these instructions. Labs are timed and you cannot pause them. The timer, which starts when you click Start Lab, shows how long Google Cloud resources are made available to you.
This hands-on lab lets you do the lab activities in a real cloud environment, not in a simulation or demo environment. It does so by giving you new, temporary credentials you use to sign in and access Google Cloud for the duration of the lab.
To complete this lab, you need:
Click the Start Lab button. If you need to pay for the lab, a dialog opens for you to select your payment method. On the left is the Lab Details pane with the following:
Click Open Google Cloud console (or right-click and select Open Link in Incognito Window if you are running the Chrome browser).
The lab spins up resources, and then opens another tab that shows the Sign in page.
Tip: Arrange the tabs in separate windows, side-by-side.
If necessary, copy the Username below and paste it into the Sign in dialog.
You can also find the Username in the Lab Details pane.
Click Next.
Copy the Password below and paste it into the Welcome dialog.
You can also find the Password in the Lab Details pane.
Click Next.
Click through the subsequent pages:
After a few moments, the Google Cloud console opens in this tab.

Cloud Shell is a virtual machine that is loaded with development tools. It offers a persistent 5GB home directory and runs on the Google Cloud. Cloud Shell provides command-line access to your Google Cloud resources.
Click Activate Cloud Shell 
Click through the following windows:
When you are connected, you are already authenticated, and the project is set to your Project_ID,
gcloud is the command-line tool for Google Cloud. It comes pre-installed on Cloud Shell and supports tab-completion.
Output:
Output:
gcloud, in Google Cloud, refer to the gcloud CLI overview guide.
gcloud to enable the services used in the labThis will allow access to running model training, deployment, and explanation jobs with Vertex AI.
Click Check my progress to verify the objective.
You were recently hired as a Machine Learning Engineer for an Optical Character Recognition app development team. Your manager has tasked you with building a machine learning model to recognize Hiragana alphabets. The challenge: your business requirements are that you have just 6 weeks to produce a model that achieves greater than 90% accuracy to improve upon an existing bootstrapped solution. Furthermore, after doing some exploratory analysis in your startup's data warehouse, you found that you only have a small dataset of 60k images of alphabets to build a higher-performing solution.
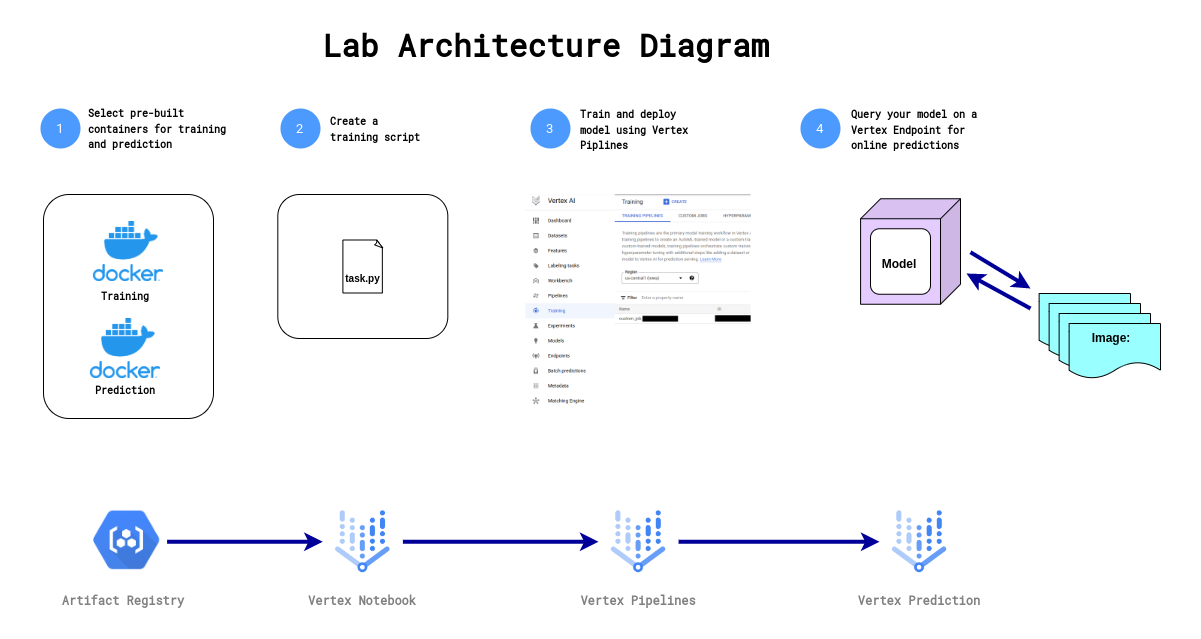
To build and deploy a high-performance machine learning model with limited data quickly, you will walk through training and deploying a CNN classifier for online predictions on Google Cloud's Vertex AI platform. Vertex AI is Google Cloud's next-generation machine learning development platform where you can leverage the latest ML pre-built components to significantly enhance your development productivity, scale your workflow and decision-making with your data, and accelerate time to value.
First, you will progress through a typical experimentation workflow where you will write a script that trains your custom CNN model using tf.keras classification layers. You will then send the model code to a custom training job and run the custom training job using pre-built Docker containers provided by Vertex AI to run training and prediction. Lastly, you will deploy the model to an endpoint so that you can use your model for predictions.
Navigate to Vertex AI > Workbench.
Configure the Instance:
cnn-challenge.This will take a few minutes to create the instance. A green checkmark will appear next to its name when it's ready.
Click Check my progress to verify the objective.
In your notebook, click the terminal.
Copy the below path in terminal.
Click Check my progress to verify the objective.
cnn-challenge-lab.ipynb.PROJECT_ID and GCS_BUCKET variables.Click Check my progress to verify the objective.
In this section, you will complete the training script task.py using TensorFlow.
Fill out the #TODO section to add the last layer for the model creation.
Fill out the #TODO section to save your model. You should save it to the AIP_MODEL_DIR environment variable.
Click Check my progress to verify the objective.
#TODO section to create a custom training job on vertex ai. You can find the documentation here.script_path, container_uri, and model_serving_container_image_uri parameters.
#TODO section and run the custom training job function you defined above. You can find the documentation here.args and machine_type parameters.
Click Check my progress to verify the objective.
#TODO section deploy the model to an endpoint. You can find the documentation here.traffic_split, machine_type, min_replica_count and max_replica_count parameters.
Click Check my progress to verify the objective.
#TODO section to generate online predictions using your Vertex Endpoint. You can find the documentation here.You created a workflow that trains and deploys a model on Google Cloud using Vertex AI. First, you wrote a script to build, train, and evaluate a Convolutional Neural Network for image classification in a Vertex Notebook. You then used your script to train the model using a custom training job on Google Cloud's Vertex AI. Lastly, you deployed your model container to a Vertex Endpoint that you queried for online predictions.
...helps you make the most of Google Cloud technologies. Our classes include technical skills and best practices to help you get up to speed quickly and continue your learning journey. We offer fundamental to advanced level training, with on-demand, live, and virtual options to suit your busy schedule. Certifications help you validate and prove your skill and expertise in Google Cloud technologies.
Copyright 2025 Google LLC. All rights reserved. Google and the Google logo are trademarks of Google LLC. All other company and product names may be trademarks of the respective companies with which they are associated.


This content is not currently available
We will notify you via email when it becomes available

Great!
We will contact you via email if it becomes available

One lab at a time
Confirm to end all existing labs and start this one