GSP1077

Overview
Cloud Build is a service that executes your builds on Google Cloud. It can import source code, execute builds, and more.
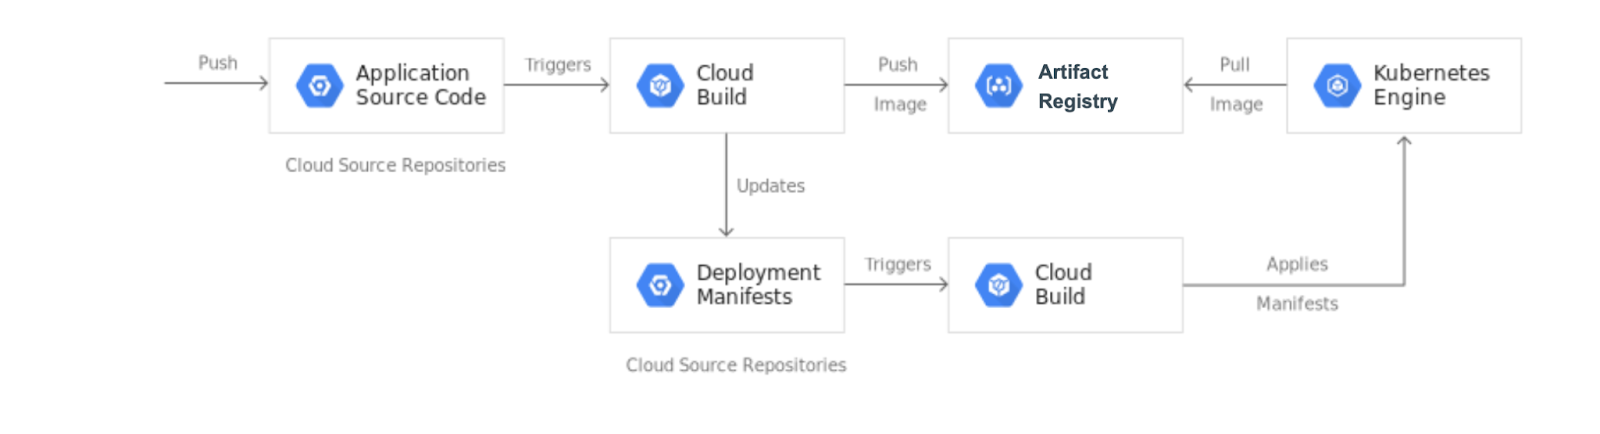
In this lab, you create a continuous integration and continuous deployment (CI/CD) pipeline that automatically builds a container image from committed code, stores the image in Artifact Registry, updates a Kubernetes manifest in a Git repository, and deploys the application to Google Kubernetes Engine using that manifest.
For this lab you create 2 Git repositories:
-
app: contains the application source code
-
env: contains the Kubernetes deployment manifests
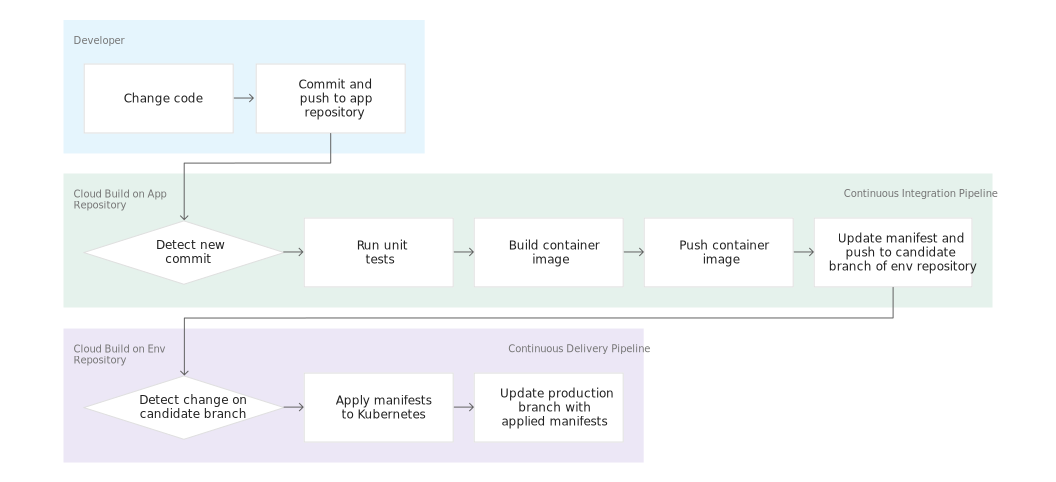
When you push a change to the app repository, the Cloud Build pipeline runs tests, builds a container image, and pushes the change to Artifact Registry. After pushing the image, Cloud Build updates the deployment manifest and pushes it to the env repository. This triggers another Cloud Build pipeline that applies the manifest to the GKE cluster and, if successful, stores the manifest in another branch of the env repository.
The app and env repositories are kept separate because they have different lifecycles and uses. The app repository is dedicated to a specific application, and is used mostly by actual humans. The env repository may be shared by several applications and is used by automated systems (such as Cloud Build). The env repository can have several branches, each mapping to a specific environment and reference a specific container image; the app repository does not.
When you finish this lab, your system can easily:
- Distinguish between failed and successful deployments by looking at the Cloud Build history.
- Access the manifest currently used by looking at the production branch of the
env repository.
- Rollback to any previous version by re-executing the corresponding Cloud Build build.
Objectives
In this lab, you learn how to perform the following:
- Create Kubernetes Engine clusters.
- Create GitHub repositories.
- Trigger Cloud Build from GitHub repositories.
- Automate tests and publish a deployable container image via Cloud Build.
- Manage resources deployed in a Kubernetes Engine cluster via Cloud Build.
Setup and requirements
Before you click the Start Lab button
Read these instructions. Labs are timed and you cannot pause them. The timer, which starts when you click Start Lab, shows how long Google Cloud resources are made available to you.
This hands-on lab lets you do the lab activities in a real cloud environment, not in a simulation or demo environment. It does so by giving you new, temporary credentials you use to sign in and access Google Cloud for the duration of the lab.
To complete this lab, you need:
- Access to a standard internet browser (Chrome browser recommended).
Note: Use an Incognito (recommended) or private browser window to run this lab. This prevents conflicts between your personal account and the student account, which may cause extra charges incurred to your personal account.
- Time to complete the lab—remember, once you start, you cannot pause a lab.
Note: Use only the student account for this lab. If you use a different Google Cloud account, you may incur charges to that account.
How to start your lab and sign in to the Google Cloud console
-
Click the Start Lab button. If you need to pay for the lab, a dialog opens for you to select your payment method.
On the left is the Lab Details pane with the following:
- The Open Google Cloud console button
- Time remaining
- The temporary credentials that you must use for this lab
- Other information, if needed, to step through this lab
-
Click Open Google Cloud console (or right-click and select Open Link in Incognito Window if you are running the Chrome browser).
The lab spins up resources, and then opens another tab that shows the Sign in page.
Tip: Arrange the tabs in separate windows, side-by-side.
Note: If you see the Choose an account dialog, click Use Another Account.
-
If necessary, copy the Username below and paste it into the Sign in dialog.
{{{user_0.username | "Username"}}}
You can also find the Username in the Lab Details pane.
-
Click Next.
-
Copy the Password below and paste it into the Welcome dialog.
{{{user_0.password | "Password"}}}
You can also find the Password in the Lab Details pane.
-
Click Next.
Important: You must use the credentials the lab provides you. Do not use your Google Cloud account credentials.
Note: Using your own Google Cloud account for this lab may incur extra charges.
-
Click through the subsequent pages:
- Accept the terms and conditions.
- Do not add recovery options or two-factor authentication (because this is a temporary account).
- Do not sign up for free trials.
After a few moments, the Google Cloud console opens in this tab.
Note: To access Google Cloud products and services, click the Navigation menu or type the service or product name in the Search field.

Activate Cloud Shell
Cloud Shell is a virtual machine that is loaded with development tools. It offers a persistent 5GB home directory and runs on the Google Cloud. Cloud Shell provides command-line access to your Google Cloud resources.
-
Click Activate Cloud Shell  at the top of the Google Cloud console.
-
Click through the following windows:
- Continue through the Cloud Shell information window.
- Authorize Cloud Shell to use your credentials to make Google Cloud API calls.
When you are connected, you are already authenticated, and the project is set to your Project_ID, . The output contains a line that declares the Project_ID for this session:
Your Cloud Platform project in this session is set to {{{project_0.project_id | "PROJECT_ID"}}}
gcloud is the command-line tool for Google Cloud. It comes pre-installed on Cloud Shell and supports tab-completion.
- (Optional) You can list the active account name with this command:
gcloud auth list
- Click Authorize.
Output:
ACTIVE: *
ACCOUNT: {{{user_0.username | "ACCOUNT"}}}
To set the active account, run:
$ gcloud config set account `ACCOUNT`
- (Optional) You can list the project ID with this command:
gcloud config list project
Output:
[core]
project = {{{project_0.project_id | "PROJECT_ID"}}}
Note: For full documentation of gcloud, in Google Cloud, refer to the gcloud CLI overview guide.
Task 1. Initialize your lab
In this task, you set up your environment:
- Import your project ID and project number as variables
- Enable the APIs for GKE, Cloud Build, Secret Manager, and Artifact Analysis
- Create an Artifact Registry Docker repository
- Create a GKE cluster to deploy the sample application of this lab
- In Cloud Shell, run the following command to set your project ID and project number. Save them as
PROJECT_ID and PROJECT_NUMBER variables:
export PROJECT_ID=$(gcloud config get-value project)
export PROJECT_NUMBER=$(gcloud projects describe $PROJECT_ID --format='value(projectNumber)')
export REGION={{{ project_0.default_region }}}
gcloud config set compute/region $REGION
Next, you prepare your Google Cloud Project for use by enabling the required APIs, initializing the git configuration in Cloud Shell, and downloading the sample code used later in the lab.
- Run the following command to enable the APIs for GKE, Cloud Build, Secret Manager and Artifact Analysis:
gcloud services enable container.googleapis.com \
cloudbuild.googleapis.com \
secretmanager.googleapis.com \
containeranalysis.googleapis.com
- Create an Artifact Registry Docker repository named
my-repository in the region to store your container images:
gcloud artifacts repositories create my-repository \
--repository-format=docker \
--location=$REGION
- Create a GKE cluster to deploy the sample application of this lab:
gcloud container clusters create hello-cloudbuild --num-nodes 1 --region $REGION
- Run the following command to configure Git and GitHub in Cloud Shell:
curl -sS https://webi.sh/gh | sh
gh auth login
gh api user -q ".login"
GITHUB_USERNAME=$(gh api user -q ".login")
git config --global user.name "${GITHUB_USERNAME}"
git config --global user.email "${USER_EMAIL}"
echo ${GITHUB_USERNAME}
echo ${USER_EMAIL}
Press ENTER to accept the default options. Read the instructions in the CLI tool to GitHub Login with a web browser. If you have logged in successfully, it shows your GitHub username.
Click Check my progress to verify the objective.
Enable services, create an artifact registry and the GKE cluster
Task 2. Create the Git repositories in GitHub repositories
GitHub is a platform where you can store, share, and work together with others to write code. Git is a version control system. When you upload files to GitHub, you store them in a "Git repository." This means that when you make changes (or "commits") to your files in GitHub, Git automatically starts to track and manage your changes. For more detail, refer to About GitHub and Git.
In this task, you create the two Git repositories (hello-cloudbuild-app and hello-cloudbuild-env) and initialize hello-cloudbuild-app with some sample code.
- In Cloud Shell, run the following commands to create the two Git repositories:
gh repo create hello-cloudbuild-app --private
gh repo create hello-cloudbuild-env --private
- Download the sample code from Cloud Storage:
cd ~
mkdir hello-cloudbuild-app
gcloud storage cp -r gs://spls/gsp1077/gke-gitops-tutorial-cloudbuild/* hello-cloudbuild-app
- Configure the GitHub repository as a remote:
cd ~/hello-cloudbuild-app
export REGION={{{project_0.default_region | "REGION"}}}
sed -i "s/us-central1/$REGION/g" cloudbuild.yaml
sed -i "s/us-central1/$REGION/g" cloudbuild-delivery.yaml
sed -i "s/us-central1/$REGION/g" cloudbuild-trigger-cd.yaml
sed -i "s/us-central1/$REGION/g" kubernetes.yaml.tpl
PROJECT_ID=$(gcloud config get-value project)
git init
git config credential.helper gcloud.sh
git remote add google https://github.com/${GITHUB_USERNAME}/hello-cloudbuild-app
git branch -m master
git add . && git commit -m "initial commit"
The code you just cloned contains a simple "Hello World" application:
from flask import Flask
app = Flask('hello-cloudbuild')
@app.route('/')
def hello():
return "Hello World!\n"
if __name__ == '__main__':
app.run(host = '0.0.0.0', port = 8080)
Task 3. Create a container image with Cloud Build
In this task, with an existing Dockerfile, you use Cloud Build to create and store a container image.
The code you previously cloned contains the Docker file:
FROM python:3.7-slim
RUN pip install flask
WORKDIR /app
COPY app.py /app/app.py
ENTRYPOINT ["python"]
CMD ["/app/app.py"]
With this Dockerfile, you can use Cloud Build to create a container image and store it in Artifact Registry.
- In Cloud Shell, create a Cloud Build build based on the latest commit with the following command:
cd ~/hello-cloudbuild-app
COMMIT_ID="$(git rev-parse --short=7 HEAD)"
gcloud builds submit --tag="${REGION}-docker.pkg.dev/${PROJECT_ID}/my-repository/hello-cloudbuild:${COMMIT_ID}" .
Cloud Build streams the logs generated by the creation of the container image to your terminal when you execute the command.
- After the build finishes, in the Google title bar, enter Artifact Registry in the Search field, and then click Artifact Registry in the search results. Verify that your new container image is indeed available in Artifact Registry. Click my-repository to see the
hello-cloudbuild image in the Image list.
Click Check my progress to verify the objective.
Create the container image with Cloud Build
Task 4. Create the Continuous Integration (CI) pipeline
In this task, you configure Cloud Build to automatically run a small unit test, build the container image, and then push it to Artifact Registry. Pushing a new commit to GitHub repositories triggers this pipeline automatically.
The cloudbuild.yaml file, already included in the code, is the pipeline's configuration.
-
In the console title bar, enter Cloud Build triggers in the Search field, and then click Triggers, Cloud Build in the search results.
-
Click Create Trigger.
-
For Name, type hello-cloudbuild. Set Region to .
-
Set Event to Push to a branch.
-
Under Source, for Repository, click Connect new repository.
a. Select GitHub (Cloud Build GitHub App). Click Continue.
b. Authenticate to your source repository with your username and password.
c. If you get the pop up "The GitHub App is not installed on any of your repositories", follow these steps.
i. Click **Install Google Cloud Build**. Install the Cloud Build GitHub App in your personal account. Permit the installation using your GitHub account.
ii. Under **Repository access**. Choose **Only select repositories**. Click the **Select the repositories** menu and select `${GITHUB_USERNAME}/hello-cloudbuild-app` and `${GITHUB_USERNAME}/hello-cloudbuild-env`.
iii. Click **Install**.
d. Select ${GITHUB_USERNAME}/hello-cloudbuild-app for Repository. Click OK.
e. Accept I understand that GitHub content for the selected repositories....
f. Click Connect.
-
If the Cloud Build GitHub App is already installed in your account, you get the option to Edit Repositories on GitHub.
a. Under Repository access choose Only select repositories. Click the Select repositories menu and select the repository **$${GITHUB_USERNAME}/hello-cloudbuild-app** and **$${GITHUB_USERNAME}/hello-cloudbuild-env**.
b. Click Save.
-
On the Trigger page, from the Repository list, click ${GITHUB_USERNAME}/hello-cloudbuild-app.
-
For Branch type .* (any branch).
-
In the Configuration section, set Type to Cloud Build configuration file.
-
In the Location field, type cloudbuild.yaml after the /.
-
Set Service account to the Compute Engine default service account.
-
Click Create.
When the trigger is created, return to the Cloud Shell. You now need to push the application code to GitHub repositories to trigger the CI pipeline in Cloud Build.
- To start this trigger, run the following command:
cd ~/hello-cloudbuild-app
git add .
git commit -m "Type Any Commit Message here"
git push google master
-
In the left pane, click Dashboard.
-
You should see a build running or having recently finished. You can click the build to follow its execution and examine its logs.
Click Check my progress to verify the objective.
Create the Continuous Integration (CI) Pipeline
Task 5. Accessing GitHub from a build via SSH keys
In this step use the Secret Manager with Cloud Build to access private GitHub repositories.
Create a SSH key
-
In Cloud Shell, change to the home directory.
cd ~
-
Create a new directory named workingdir and navigate to it:
mkdir workingdir
cd workingdir
-
Create a new GitHub SSH key, replace [your-github-email] with your personal GitHub email address:
ssh-keygen -t rsa -b 4096 -N '' -f id_github -C [your-github-email]
This step creates two files, id_github and id_github.pub.
- In the Cloud Shell action bar, click More (
 ) and then Download > Toggle file browser and select the
 dropdown and workingdir folder to download the id_github file on your local machine.
Store the private SSH key in Secret Manager
-
In the console title bar, enter Secret Manager, and then click Secret Manager in the search results.
-
Click Create Secret.
-
Set Name to ssh_key_secret.
-
Set Secret value to Upload and upload your id_github file.
-
Leave other settings at their defaults.
-
Click Create secret.
This uploads your id_github file to Secret Manager.
Add the public SSH key to your private repository's deploy keys
-
Login to your personal GitHub account
-
In the top right corner, click your profile photo, then click Your profile.
-
On your profile page, click Repositories, then click the hello-cloudbuild-env repository.
-
From your repository, click Settings.
-
In the left pane, click Deploy Keys, then click Add deploy key.
-
Provide the title SSH_KEY, paste your public SSH key from workingdir/id_github.pub from Cloud Shell.
-
Select Allow write access so this key has write access to the repository. A deploy key with write access lets a deployment push to the repository.
-
Click Add key.
-
Delete the SSH key from your disk:
rm id_github*
Grant the service account permission to access Secret Manager
Enter the following command to give the service account access to Secret Manager:
gcloud projects add-iam-policy-binding ${PROJECT_NUMBER} \
--member=serviceAccount:${PROJECT_NUMBER}-compute@developer.gserviceaccount.com \
--role=roles/secretmanager.secretAccessor
Click Check my progress to verify the objective.
Accessing GitHub from a build via SSH keys
Task 6. Create the test environment and CD pipeline
You can also use Cloud Build for the continuous delivery pipeline. The pipeline runs each time a commit is pushed to the candidate branch of the hello-cloudbuild-env repository. The pipeline applies the new version of the manifest to the Kubernetes cluster and, if successful, copies the manifest over to the production branch. This process has the following properties:
- The candidate branch is a history of the deployment attempts.
- The production branch is a history of the successful deployments.
- You have a view of successful and failed deployments in Cloud Build.
- You can rollback to any previous deployment by re-executing the corresponding build in Cloud Build. A rollback also updates the production branch to truthfully reflect the history of deployments.
Next, you modify the continuous integration pipeline to update the candidate branch of the hello-cloudbuild-env repository, triggering the continuous delivery pipeline.
Grant Cloud Build access to GKE
To deploy the application in your Kubernetes cluster, Cloud Build needs the Kubernetes Engine Developer Identity and the Access Management role.
- In Cloud Shell, execute the following command:
cd ~
PROJECT_NUMBER="$(gcloud projects describe ${PROJECT_ID} --format='get(projectNumber)')"
gcloud projects add-iam-policy-binding ${PROJECT_NUMBER} \
--member=serviceAccount:${PROJECT_NUMBER}@cloudbuild.gserviceaccount.com \
--role=roles/container.developer
You need to initialize the hello-cloudbuild-env repository with two branches (production and candidate) and a Cloud Build configuration file describing the deployment process.
The first step is to clone the hello-cloudbuild-env repository and create the production branch, which is still empty.
- In Cloud Shell, download the sample code from Cloud Storage:
mkdir hello-cloudbuild-env
gcloud storage cp -r gs://spls/gsp1077/gke-gitops-tutorial-cloudbuild/* hello-cloudbuild-env
cd hello-cloudbuild-env
export REGION={{{project_0.default_region | "REGION"}}}
sed -i "s/us-central1/$REGION/g" cloudbuild.yaml
sed -i "s/us-central1/$REGION/g" cloudbuild-delivery.yaml
sed -i "s/us-central1/$REGION/g" cloudbuild-trigger-cd.yaml
sed -i "s/us-central1/$REGION/g" kubernetes.yaml.tpl
- For Cloud Build to connect to GitHub, you must add the public SSH key to the
known_hosts file in Cloud Build's build environment. In your hello-cloudbuild-env directory, create a file named known_hosts.github, add the public SSH key to this file, and provide the necessary permission to the file:
cd ~/hello-cloudbuild-env
ssh-keyscan -t rsa github.com > known_hosts.github
chmod +x known_hosts.github
git init
git config credential.helper gcloud.sh
git remote add google https://github.com/${GITHUB_USERNAME}/hello-cloudbuild-env
git branch -m master
git add . && git commit -m "initial commit"
git push google master
cd ~/hello-cloudbuild-env
git checkout -b production
- Next, replace the
cloudbuild.yaml file available in the hello-cloudbuild-env repository and commit the change:
cd ~/hello-cloudbuild-env
- Replace the
cloudbuild.yaml in the hello-cloudbuild-env repository with the code below. Replace {GITHUB-USERNAME} with your personal GitHub username:
# Copyright 2018 Google LLC
#
# Licensed under the Apache License, Version 2.0 (the "License");
# you may not use this file except in compliance with the License.
# You may obtain a copy of the License at
#
# https://www.apache.org/licenses/LICENSE-2.0
#
# Unless required by applicable law or agreed to in writing, software
# distributed under the License is distributed on an "AS IS" BASIS,
# WITHOUT WARRANTIES OR CONDITIONS OF ANY KIND, either express or implied.
# See the License for the specific language governing permissions and
# limitations under the License.
# [START cloudbuild-delivery]
steps:
# This step deploys the new version of our container image
# in the hello-cloudbuild Kubernetes Engine cluster.
- name: 'gcr.io/cloud-builders/kubectl'
id: Deploy
args:
- 'apply'
- '-f'
- 'kubernetes.yaml'
env:
- 'CLOUDSDK_COMPUTE_REGION={{{ project_0.default_region }}}'
- 'CLOUDSDK_CONTAINER_CLUSTER=hello-cloudbuild'
# Access the id_github file from Secret Manager, and setup SSH
- name: 'gcr.io/cloud-builders/git'
secretEnv: ['SSH_KEY']
entrypoint: 'bash'
args:
- -c
- |
echo "$$SSH_KEY" >> /root/.ssh/id_rsa
chmod 400 /root/.ssh/id_rsa
cp known_hosts.github /root/.ssh/known_hosts
volumes:
- name: 'ssh'
path: /root/.ssh
# Clone the repository
- name: 'gcr.io/cloud-builders/git'
args:
- clone
- --recurse-submodules
- git@github.com:${GITHUB-USERNAME}/hello-cloudbuild-env.git
volumes:
- name: ssh
path: /root/.ssh
# This step copies the applied manifest to the production branch
# The COMMIT_SHA variable is automatically
# replaced by Cloud Build.
- name: 'gcr.io/cloud-builders/gcloud'
id: Copy to production branch
entrypoint: /bin/sh
args:
- '-c'
- |
set -x && \
cd hello-cloudbuild-env && \
git config user.email $(gcloud auth list --filter=status:ACTIVE --format='value(account)')
sed "s/GOOGLE_CLOUD_PROJECT/${PROJECT_ID}/g" kubernetes.yaml.tpl | \
git fetch origin production && \
# Switch to the production branch and copy the kubernetes.yaml file from the candidate branch
git checkout production && \
git checkout $COMMIT_SHA kubernetes.yaml && \
# Commit the kubernetes.yaml file with a descriptive commit message
git commit -m "Manifest from commit $COMMIT_SHA
$(git log --format=%B -n 1 $COMMIT_SHA)" && \
# Push the changes back to Cloud Source Repository
git push origin production
volumes:
- name: ssh
path: /root/.ssh
availableSecrets:
secretManager:
- versionName: projects/${PROJECT_NUMBER}/secrets/ssh_key_secret/versions/1
env: 'SSH_KEY'
# [END cloudbuild-delivery]
options:
logging: CLOUD_LOGGING_ONLY
git add .
git commit -m "Create cloudbuild.yaml for deployment"
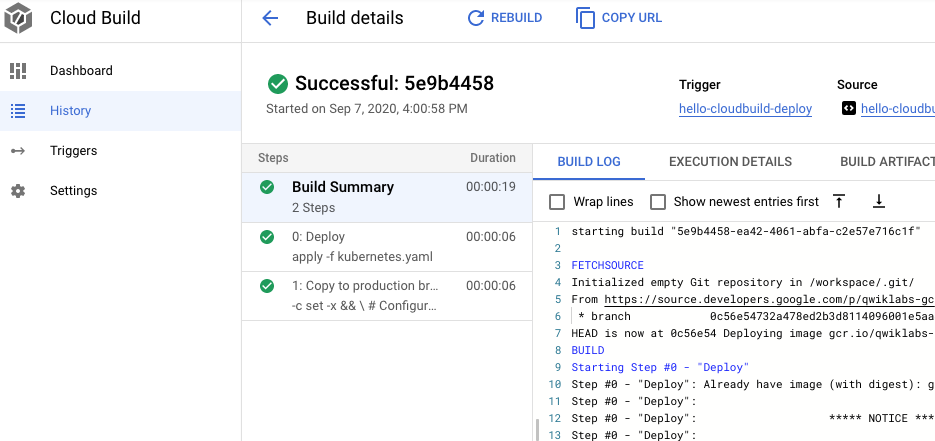
The cloudbuild.yaml file describes the deployment process to be run in Cloud Build. It has two steps:
- Cloud Build applies the manifest to the GKE cluster.
- If successful, Cloud Build copies the manifest on the production branch.
- Create a candidate branch and push both branches for them to be available in GitHub Repositories:
git checkout -b candidate
git push google production
git push google candidate
Create the trigger for the continuous delivery pipeline
-
In the console title bar, enter Cloud Build Triggers, and then click Triggers, Cloud Build.
-
Click Create Trigger.
-
Set Name to hello-cloudbuild-deploy. Set Region to .
-
Under Event, select Push to a branch.
-
Under Source, for Repository click Connect new repository.
a. Select GitHub (Cloud Build GitHub App). Click Continue.
b. Authenticate to your source repository with your GitHub username and password.
c. Select ${GITHUB_USERNAME}/hello-cloudbuild-env repository. Click OK.
d. Select I understand that GitHub content for the selected repositories..
e. Click Connect.
-
Under Repository select ${GITHUB_USERNAME}/hello-cloudbuild-env.
-
Under Source, select ^candidate$ as your Branch.
-
Under Build configuration, select Cloud Build configuration file.
-
In the Cloud Build configuration file location field, type cloudbuild.yaml after the /.
-
Set Service account to the Compute Engine default service account.
-
Click Create.
-
In your hello-cloudbuild-app directory, create a file named known_hosts.github, add the public SSH key to this file and provide the necessary permission to the file:
cd ~/hello-cloudbuild-app
ssh-keyscan -t rsa github.com > known_hosts.github
chmod +x known_hosts.github
git add .
git commit -m "Adding known_host file."
git push google master
Modify the continuous integration pipeline to trigger the continuous delivery pipeline
Next, add some steps to the continuous integration pipeline that generated a new version of the Kubernetes manifest and push it to the hello-cloudbuild-env repository to trigger the continuous delivery pipeline.
- Copy the extended version of the
cloudbuild.yaml file for the app repository:
cd ~/hello-cloudbuild-app
The cloudbuild.yaml file adds the steps that generate the new Kubernetes manifest and trigger the continuous delivery pipeline.
Configure the build
- Replace the
cloudbuild.yaml in the hello-cloudbuild-app repository with the code below. Replace ${GITHUB-USERNAME} with your GitHub username.
# Copyright 2018 Google LLC
#
# Licensed under the Apache License, Version 2.0 (the "License");
# you may not use this file except in compliance with the License.
# You may obtain a copy of the License at
#
# https://www.apache.org/licenses/LICENSE-2.0
#
# Unless required by applicable law or agreed to in writing, software
# distributed under the License is distributed on an "AS IS" BASIS,
# WITHOUT WARRANTIES OR CONDITIONS OF ANY KIND, either express or implied.
# See the License for the specific language governing permissions and
# limitations under the License.
# [START cloudbuild]
steps:
# This step runs the unit tests on the app
- name: 'python:3.7-slim'
id: Test
entrypoint: /bin/sh
args:
- -c
- 'pip install flask && python test_app.py -v'
# This step builds the container image.
- name: 'gcr.io/cloud-builders/docker'
id: Build
args:
- 'build'
- '-t'
- '{{{ project_0.default_region }}}-docker.pkg.dev/$PROJECT_ID/my-repository/hello-cloudbuild:$SHORT_SHA'
- '.'
# This step pushes the image to Artifact Registry
# The PROJECT_ID and SHORT_SHA variables are automatically
# replaced by Cloud Build.
- name: 'gcr.io/cloud-builders/docker'
id: Push
args:
- 'push'
- '{{{ project_0.default_region }}}-docker.pkg.dev/$PROJECT_ID/my-repository/hello-cloudbuild:$SHORT_SHA'
# [END cloudbuild]
# Access the id_github file from Secret Manager, and setup SSH
- name: 'gcr.io/cloud-builders/git'
secretEnv: ['SSH_KEY']
entrypoint: 'bash'
args:
- -c
- |
echo "$$SSH_KEY" >> /root/.ssh/id_rsa
chmod 400 /root/.ssh/id_rsa
cp known_hosts.github /root/.ssh/known_hosts
volumes:
- name: 'ssh'
path: /root/.ssh
# Clone the repository
- name: 'gcr.io/cloud-builders/git'
args:
- clone
- --recurse-submodules
- git@github.com:${GITHUB-USERNAME}/hello-cloudbuild-env.git
volumes:
- name: ssh
path: /root/.ssh
# [START cloudbuild-trigger-cd]
# This step clones the hello-cloudbuild-env repository
- name: 'gcr.io/cloud-builders/gcloud'
id: Change directory
entrypoint: /bin/sh
args:
- '-c'
- |
cd hello-cloudbuild-env && \
git checkout candidate && \
git config user.email $(gcloud auth list --filter=status:ACTIVE --format='value(account)')
volumes:
- name: ssh
path: /root/.ssh
# This step generates the new manifest
- name: 'gcr.io/cloud-builders/gcloud'
id: Generate manifest
entrypoint: /bin/sh
args:
- '-c'
- |
sed "s/GOOGLE_CLOUD_PROJECT/${PROJECT_ID}/g" kubernetes.yaml.tpl | \
sed "s/COMMIT_SHA/${SHORT_SHA}/g" > hello-cloudbuild-env/kubernetes.yaml
volumes:
- name: ssh
path: /root/.ssh
# This step pushes the manifest back to hello-cloudbuild-env
- name: 'gcr.io/cloud-builders/gcloud'
id: Push manifest
entrypoint: /bin/sh
args:
- '-c'
- |
set -x && \
cd hello-cloudbuild-env && \
git add kubernetes.yaml && \
git commit -m "Deploying image {{{ project_0.default_region }}}-docker.pkg.dev/$PROJECT_ID/my-repository/hello-cloudbuild:${SHORT_SHA}
Built from commit ${COMMIT_SHA} of repository hello-cloudbuild-app
Author: $(git log --format='%an <%ae>' -n 1 HEAD)" && \
git push origin candidate
volumes:
- name: ssh
path: /root/.ssh
availableSecrets:
secretManager:
- versionName: projects/${PROJECT_NUMBER}/secrets/ssh_key_secret/versions/1
env: 'SSH_KEY'
# [END cloudbuild-trigger-cd]
options:
logging: CLOUD_LOGGING_ONLY
Note: This pipeline uses a simple sed to render the manifest template. In reality, you benefit from using a dedicated tool such as kustomize or skaffold as they allow more control over manifest template rendering.
- Commit the modifications and push them to GitHub Repositories:
cd ~/hello-cloudbuild-app
git add cloudbuild.yaml
git commit -m "Trigger CD pipeline"
git push google master
This triggers the continuous integration pipeline in Cloud Build.
Click Check my progress to verify the objective.
Create the Test Environment and CD Pipeline
Task 7. Review Cloud Build pipeline
In this task, you review the Cloud Build pipeline in the console.
- In the console, still in the Cloud Build page, click Dashboard in the left pane.
- Click the hello-cloudbuild-app trigger to follow its execution and examine its logs. The last step of this pipeline pushes the new manifest to the
hello-cloudbuild-env repository, which triggers the continuous delivery pipeline.
- Return to the main Dashboard.
- You should see a build either running or recently finished for the
hello-cloudbuild-env repository.
You can click on the build to follow its execution and examine its logs.
Task 8. Test the complete pipeline
You've now configured the complete CI/CD pipeline. In this task you perform an end to end test.
- In the console, in the Navigation menu (
 ), click Kubernetes Engine > Gateways, Services & Ingress > Services.
There should be a single service called hello-cloudbuild in the list. It has been created by the continuous delivery build that just ran.
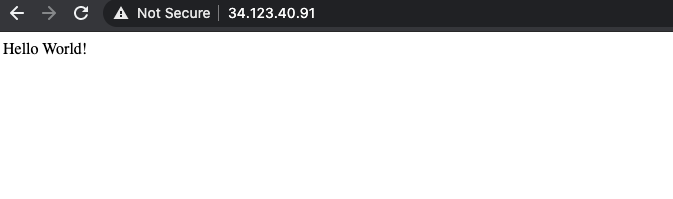
- Click on the endpoint for the hello-cloudbuild service. You should see "Hello World!". If there is no endpoint, or if you see a load balancer error, you may have to wait a few minutes for the load balancer to completely initialize. If needed, click Refresh to update the page.
- In Cloud Shell, replace "Hello World" with "Hello Cloud Build", both in the application and in the unit test:
cd ~/hello-cloudbuild-app
sed -i 's/Hello World/Hello Cloud Build/g' app.py
sed -i 's/Hello World/Hello Cloud Build/g' test_app.py
- Commit and push the change to GitHub repositories:
git add app.py test_app.py
git commit -m "Hello Cloud Build"
git push google master
- This triggers the full CI/CD pipeline.
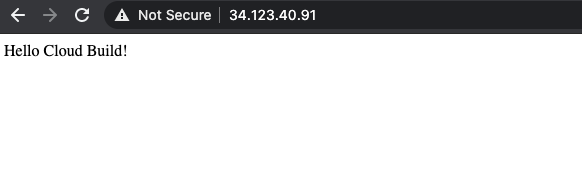
After a few minutes, reload the application in your browser. You should now see "Hello Cloud Build!".
Task 9. Test the rollback
In this task, you rollback to the version of the application that said "Hello World!".
- In the console title bar, type Cloud Build Dashboard in the Search field, and then click
Cloud Build in the search results. Be sure Dashboard is selected in the left pane.
- Click the View all link under Build History for the
hello-cloudbuild-env repository.
- Click on the second most recent build available.
- Click Rebuild.
When the build is finished, reload the application in your browser. You should now see "Hello World!" again.
Congratulations!
Now you can use Cloud Build to create and rollback continuous integration pipelines with GKE on Google Cloud!
Google Cloud training and certification
...helps you make the most of Google Cloud technologies. Our classes include technical skills and best practices to help you get up to speed quickly and continue your learning journey. We offer fundamental to advanced level training, with on-demand, live, and virtual options to suit your busy schedule. Certifications help you validate and prove your skill and expertise in Google Cloud technologies.
Manual Last Updated February 19, 2025
Lab Last Tested February 19, 2025
Copyright 2025 Google LLC. All rights reserved. Google and the Google logo are trademarks of Google LLC. All other company and product names may be trademarks of the respective companies with which they are associated.


