GSP1077

概览
Cloud Build 是一项服务,可以在 Google Cloud 上执行您的构建任务。它可以完成导入源代码、执行构建等任务。
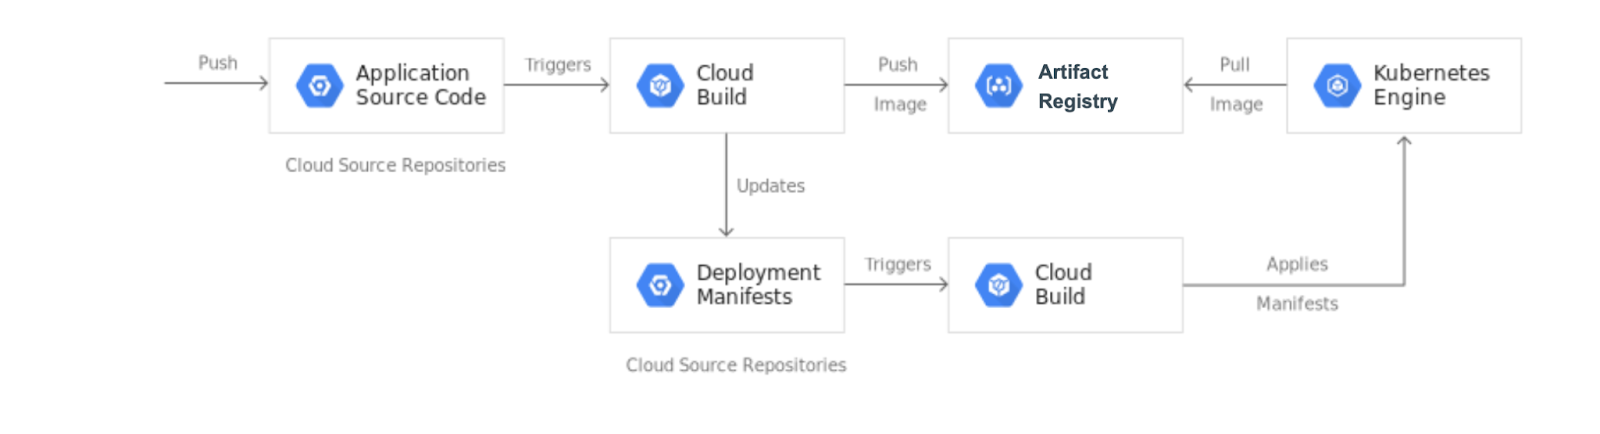
在本实验中,您将创建一个持续集成和持续部署 (CI/CD) 流水线。该流水线可以根据提交的代码自动构建容器映像,将映像存储在 Artifact Registry 中,更新 Git 代码库中的 Kubernetes 清单,并使用该清单将应用部署到 Google Kubernetes Engine。
为完成本实验,您将创建 2 个 Git 代码库:
-
app:包含应用的源代码
-
env:包含 Kubernetes 部署清单
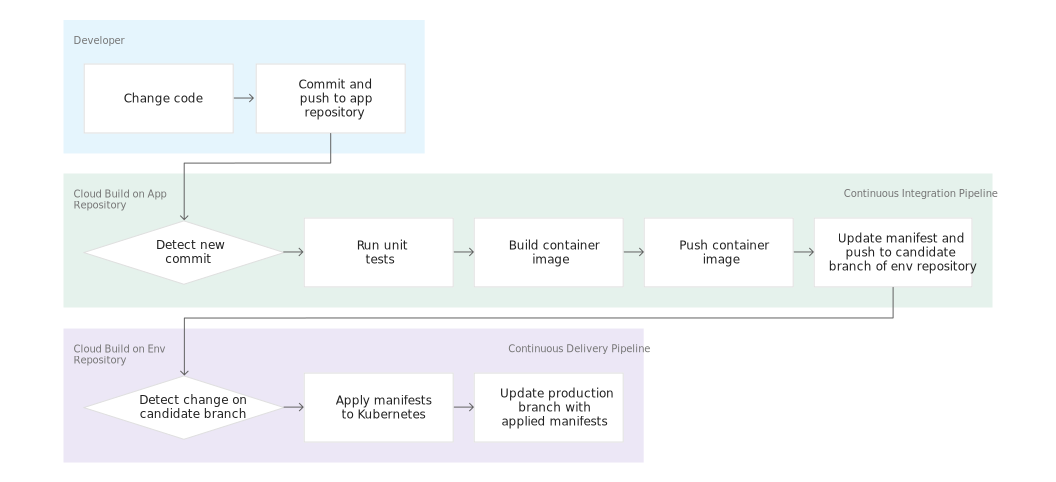
当您将更改推送到 app 代码库时,Cloud Build 流水线会运行测试、构建容器映像,并将映像推送到 Artifact Registry。推送映像后,Cloud Build 会更新部署清单,并将清单推送到 env 代码库。这会触发另一个 Cloud Build 流水线,该流水线将清单应用于 GKE 集群,如果成功,会将清单存储在 env 代码库的另一个分支中。
分别设立 app 代码库和 env 代码库,是因为两者的生命周期和用途不同。app 代码库专用于特定应用,主要由真人使用。env 代码库可能由多个应用共享,供自动化系统(例如 Cloud Build)使用。env 代码库可以有多个分支,每个分支映射到特定环境并引用特定的容器映像;app 代码库则不会如此。
完成本实验后,您的系统将能够轻松实现以下操作:
- 查看 Cloud Build 历史记录,区分失败和成功的部署。
- 查看
env 代码库的生产分支,访问当前使用的清单。
- 重新执行相应的 Cloud Build 构建作业,回滚到以前的任何版本。
目标
在本实验中,您将学习如何执行以下任务:
- 创建 Kubernetes Engine 集群
- 创建 GitHub 代码库。
- 从 GitHub 代码库触发 Cloud Build。
- 通过 Cloud Build 进行自动测试并发布可部署的容器映像。
- 通过 Cloud Build 管理部署在 Kubernetes Engine 集群中的资源。
设置和要求
点击“开始实验”按钮前的注意事项
请阅读以下说明。实验是计时的,并且您无法暂停实验。计时器在您点击开始实验后即开始计时,显示 Google Cloud 资源可供您使用多长时间。
此实操实验可让您在真实的云环境中开展实验活动,免受模拟或演示环境的局限。为此,我们会向您提供新的临时凭据,您可以在该实验的规定时间内通过此凭据登录和访问 Google Cloud。
为完成此实验,您需要:
- 能够使用标准的互联网浏览器(建议使用 Chrome 浏览器)。
注意:请使用无痕模式(推荐)或无痕浏览器窗口运行此实验。这可以避免您的个人账号与学生账号之间发生冲突,这种冲突可能导致您的个人账号产生额外费用。
注意:请仅使用学生账号完成本实验。如果您使用其他 Google Cloud 账号,则可能会向该账号收取费用。
如何开始实验并登录 Google Cloud 控制台
-
点击开始实验按钮。如果该实验需要付费,系统会打开一个对话框供您选择支付方式。左侧是“实验详细信息”窗格,其中包含以下各项:
- “打开 Google Cloud 控制台”按钮
- 剩余时间
- 进行该实验时必须使用的临时凭据
- 帮助您逐步完成本实验所需的其他信息(如果需要)
-
点击打开 Google Cloud 控制台(如果您使用的是 Chrome 浏览器,请右键点击并选择在无痕式窗口中打开链接)。
该实验会启动资源并打开另一个标签页,显示“登录”页面。
提示:将这些标签页安排在不同的窗口中,并排显示。
注意:如果您看见选择账号对话框,请点击使用其他账号。
-
如有必要,请复制下方的用户名,然后将其粘贴到登录对话框中。
{{{user_0.username | "<用户名>"}}}
您也可以在“实验详细信息”窗格中找到“用户名”。
-
点击下一步。
-
复制下面的密码,然后将其粘贴到欢迎对话框中。
{{{user_0.password | "<密码>"}}}
您也可以在“实验详细信息”窗格中找到“密码”。
-
点击下一步。
重要提示:您必须使用实验提供的凭据。请勿使用您的 Google Cloud 账号凭据。
注意:在本实验中使用您自己的 Google Cloud 账号可能会产生额外费用。
-
继续在后续页面中点击以完成相应操作:
- 接受条款及条件。
- 由于这是临时账号,请勿添加账号恢复选项或双重验证。
- 请勿注册免费试用。
片刻之后,系统会在此标签页中打开 Google Cloud 控制台。
注意:如需访问 Google Cloud 产品和服务,请点击导航菜单,或在搜索字段中输入服务或产品的名称。

激活 Cloud Shell
Cloud Shell 是一种装有开发者工具的虚拟机。它提供了一个永久性的 5GB 主目录,并且在 Google Cloud 上运行。Cloud Shell 提供可用于访问您的 Google Cloud 资源的命令行工具。
-
点击 Google Cloud 控制台顶部的激活 Cloud Shell  。
。
-
在弹出的窗口中执行以下操作:
- 继续完成 Cloud Shell 信息窗口中的设置。
- 授权 Cloud Shell 使用您的凭据进行 Google Cloud API 调用。
如果您连接成功,即表示您已通过身份验证,且项目 ID 会被设为您的 Project_ID 。输出内容中有一行说明了此会话的 Project_ID:
Your Cloud Platform project in this session is set to {{{project_0.project_id | "PROJECT_ID"}}}
gcloud 是 Google Cloud 的命令行工具。它已预先安装在 Cloud Shell 上,且支持 Tab 自动补全功能。
- (可选)您可以通过此命令列出活跃账号名称:
gcloud auth list
- 点击授权。
输出:
ACTIVE: *
ACCOUNT: {{{user_0.username | "ACCOUNT"}}}
To set the active account, run:
$ gcloud config set account `ACCOUNT`
- (可选)您可以通过此命令列出项目 ID:
gcloud config list project
输出:
[core]
project = {{{project_0.project_id | "PROJECT_ID"}}}
注意:如需查看在 Google Cloud 中使用 gcloud 的完整文档,请参阅 gcloud CLI 概览指南。
任务 1. 对实验进行初始化
在此任务中,您将设置自己的环境:
- 将项目 ID 和项目编号作为变量导入
- 启用 GKE、Cloud Build、Secret Manager 和 Artifact Analysis 的 API
- 创建 Artifact Registry Docker 代码库
- 创建一个 GKE 集群,用于部署本实验的示例应用
- 在 Cloud Shell 中,运行以下命令来设置项目 ID 和项目编号。将这两者保存为
PROJECT_ID 和 PROJECT_NUMBER 变量:
export PROJECT_ID=$(gcloud config get-value project)
export PROJECT_NUMBER=$(gcloud projects describe $PROJECT_ID --format='value(projectNumber)')
export REGION={{{ project_0.default_region }}}
gcloud config set compute/region $REGION
接下来,进行以下操作来准备要用的 Google Cloud 项目:启用所需的 API、在 Cloud Shell 中对 Git 配置进行初始化,并下载稍后在实验中使用的示例代码。
- 运行以下命令,为 GKE、Cloud Build、Secret Manager 和 Artifact Analysis 启用 API:
gcloud services enable container.googleapis.com \
cloudbuild.googleapis.com \
sourcerepo.googleapis.com \
containeranalysis.googleapis.com
- 在 区域创建名为
my-repository 的 Artifact Registry Docker 仓库,用于存储容器映像。
gcloud artifacts repositories create my-repository \
--repository-format=docker \
--location=$REGION
- 创建一个 GKE 集群,用于部署本实验的示例应用:
gcloud container clusters create hello-cloudbuild --num-nodes 1 --region $REGION
- 在 Cloud Shell 中运行以下命令,配置 Git 和 GitHub:
curl -sS https://webi.sh/gh | sh
gh auth login
gh api user -q ".login"
GITHUB_USERNAME=$(gh api user -q ".login")
git config --global user.name "${GITHUB_USERNAME}"
git config --global user.email "${USER_EMAIL}"
echo ${GITHUB_USERNAME}
echo ${USER_EMAIL}
按 Enter 键接受默认选项。 阅读 CLI 工具中的说明,使用网络浏览器登录 GitHub。如果您已成功登录,此命令会显示您的 GitHub 用户名。
点击检查我的进度,验证已完成以下目标:
启用服务,创建 Artifact Registry 和 GKE 集群
任务 2. 在 GitHub 代码库中创建 Git 代码库
GitHub 是一个平台,您可以在其中存储、共享代码,并与他人协作编写代码。Git 是一个版本控制系统。将文件上传到 GitHub 时,您会将它们存储在一个“Git 代码库”中。这意味着,当您在 GitHub 中对文件进行更改(或“提交”)时,Git 会自动开始跟踪和管理您的更改。如需了解详情,请参阅关于 GitHub 和 Git。
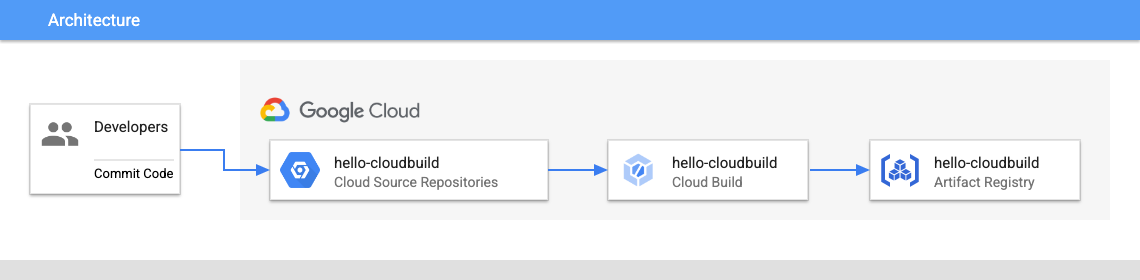
在此任务中,您将创建两个 Git 代码库(hello-cloudbuild-app 和 hello-cloudbuild-env),并使用一些示例代码对 hello-cloudbuild-app 进行初始化。
- 在 Cloud Shell 中,运行以下命令创建这两个 Git 代码库:
gh repo create hello-cloudbuild-app --private
gh repo create hello-cloudbuild-env --private
- 从 Cloud Storage 下载示例代码:
cd ~
mkdir hello-cloudbuild-app
gcloud storage cp -r gs://spls/gsp1077/gke-gitops-tutorial-cloudbuild/* hello-cloudbuild-app
- 将 GitHub 代码库配置为远程代码库:
cd ~/hello-cloudbuild-app
export REGION={{{project_0.default_region | "REGION"}}}
sed -i "s/us-central1/$REGION/g" cloudbuild.yaml
sed -i "s/us-central1/$REGION/g" cloudbuild-delivery.yaml
sed -i "s/us-central1/$REGION/g" cloudbuild-trigger-cd.yaml
sed -i "s/us-central1/$REGION/g" kubernetes.yaml.tpl
PROJECT_ID=$(gcloud config get-value project)
git init
git config credential.helper gcloud.sh
git remote add google https://github.com/${GITHUB_USERNAME}/hello-cloudbuild-app
git branch -m master
git add . && git commit -m "initial commit"
您刚刚克隆的代码包含一个简单的“Hello World”应用。
from flask import Flask
app = Flask('hello-cloudbuild')
@app.route('/')
def hello():
return "Hello World!\n"
if __name__ == '__main__':
app.run(host = '0.0.0.0', port = 8080)
任务 3. 使用 Cloud Build 创建容器映像
在此任务中,您将使用现有的 Dockerfile,通过 Cloud Build 创建并存储一个容器映像。
您之前克隆的代码包含以下 Docker 文件:
FROM python:3.7-slim
RUN pip install flask
WORKDIR /app
COPY app.py /app/app.py
ENTRYPOINT ["python"]
CMD ["/app/app.py"]
有了此 Dockerfile,您便可使用 Cloud Build 来创建一个容器映像,并将其存储在 Artifact Registry 中。
- 在 Cloud Shell 中,使用以下命令基于最近的提交创建一个 Cloud Build 构建作业:
cd ~/hello-cloudbuild-app
COMMIT_ID="$(git rev-parse --short=7 HEAD)"
gcloud builds submit --tag="${REGION}-docker.pkg.dev/${PROJECT_ID}/my-repository/hello-cloudbuild:${COMMIT_ID}" .
您执行此命令时,Cloud Build 会将创建容器映像过程生成的日志流式传输到终端。
- 构建完成后,在 Google Cloud 控制台标题栏的搜索字段中输入 Artifact Registry,然后点击搜索结果中的 Artifact Registry。验证您的新容器映像确实在 Artifact Registry 中可用。点击 my-repository,在映像列表中查看
hello-cloudbuild 映像。
点击检查我的进度,验证已完成以下目标:
使用 Cloud Build 创建容器映像
任务 4. 创建持续集成 (CI) 流水线
在此任务中,您将对 Cloud Build 进行配置,使其自动运行小型单元测试、构建容器映像然后将映像推送到 Artifact Registry。将新的提交推送到 GitHub 代码库会自动触发该流水线。
已包含在代码中的 cloudbuild.yaml 文件是该流水线的配置。
-
在控制台标题栏的搜索字段中,输入 Cloud Build 触发器,然后点击搜索结果中的 Cloud Build 触发器。
-
点击创建触发器。
-
在名称部分,输入 hello-cloudbuild。将区域设置为 。
-
将事件设置为推送到分支。
-
在来源下的代码库部分,点击连接新代码库。
a. 选择 GitHub(Cloud Build GitHub 应用)。点击继续。
b. 使用您的用户名和密码向您的源代码库进行身份验证。
c. 如果您看到弹出式窗口“未针对您的任何代码库安装 GitHub 应用”,请按照以下步骤操作。
i. 点击**安装 Google Cloud Build**。在您的个人账号中安装 Cloud Build GitHub 应用。您需要使用自己的 GitHub 账号来授权安装操作。
ii. 在 **代码库访问权限**下,选择 **仅选择代码库**。点击 **选择代码库** 菜单,然后选择“${GITHUB_USERNAME}/hello-cloudbuild-app”和“${GITHUB_USERNAME}/hello-cloudbuild-env”。
iii. 点击 **安装**。
d. 为代码库选择 ${GITHUB_USERNAME}/hello-cloudbuild-app。点击 OK(确定)。
e. 接受我了解系统会将所选代码库的 GitHub 内容…。
f. 点击连接。
-
如果 Cloud Build GitHub 应用已安装在您的账号中,您将获得在 GitHub 上修改代码库的选项。
a. 在 Repository access 下,选择 Only select repositories。点击选择代码库菜单,然后选择代码库 **$${GITHUB_USERNAME}/hello-cloudbuild-app** 和 **$${GITHUB_USERNAME}/hello-cloudbuild-env**。
b. 点击保存。
-
在“触发器”页面上,从代码库列表中点击 ${GITHUB_USERNAME}/hello-cloudbuild-app。
-
对于分支,输入 .*(任何分支)。
-
在配置部分,将类型设置为 Cloud Build 配置文件。
-
在位置字段中,在 / 后输入 cloudbuild.yaml。
-
将服务账号设置为 Compute Engine 默认服务账号。
-
点击创建。
创建触发器之后,返回 Cloud Shell。现在,您需要将应用代码推送到 Cloud Source Repositories,以在 Cloud Build 中触发 CI 流水线。
- 若要开始触发,运行以下命令:
cd ~/hello-cloudbuild-app
git add .
git commit -m "Type Any Commit Message here"
git push google master
-
在左侧窗格中,点击信息中心。
-
您应该会看到正在运行或最近完成的构建。您可以点击构建作业以跟踪其执行情况并检查其日志。
点击检查我的进度,验证已完成以下目标:
创建持续集成 (CI) 流水线
任务 5. 通过 SSH 密钥从构建访问 GitHub
在此步骤中,将 Secret Manager 与 Cloud Build 搭配使用,以访问私有 GitHub 代码库。
创建 SSH 密钥
-
在 Cloud Shell 中,切换到主目录。
cd ~
-
创建名为 workingdir 的新目录,并导航到此目录:
mkdir workingdir
cd workingdir
-
创建新的 GitHub SSH 密钥,将 [your-github-email] 替换为您的个人 GitHub 电子邮件地址:
ssh-keygen -t rsa -b 4096 -N '' -f id_github -C [your-github-email]
此步骤会创建两个文件:id_github 和 id_github.pub。
- 在 Cloud Shell 操作栏中,依次点击更多 (
 ) 和下载 > 切换文件浏览器,然后选择
 dropdown 和 workingdir 文件夹,将 id_github 文件下载到本地机器上。
将 SSH 私钥存储在 Secret Manager 中
-
在控制台标题栏中,输入 Secret Manager,然后点击搜索结果中的 Secret Manager。
-
点击创建密钥。
-
将名称设置为 ssh_key_secret。
-
将密钥值设置为上传,然后上传 id_github 文件。
-
将其他设置保留为默认值。
-
点击创建密钥。
此操作会将您的 id_github 文件上传到 Secret Manager。
将 SSH 公钥添加到您的私有代码库的部署密钥
-
登录您的个人 GitHub 账号
-
在右上角,点击您的个人资料照片,然后点击您的个人资料。
-
在个人资料页面上,点击代码库,然后点击 hello-cloudbuild-env 代码库。
-
在代码库中,点击设置。
-
在左侧窗格中,点击部署密钥,然后点击添加部署密钥。
-
提供标题 SSH_KEY,然后从 Cloud Shell 中粘贴 workingdir/id_github.pub 中的 SSH 公钥。
-
选择允许写入权限,以便此密钥拥有对代码库的写入权限。拥有写入权限的部署密钥允许将部署推送到代码库。
-
点击添加密钥。
-
从磁盘中删除 SSH 密钥:
rm id_github*
授予服务账号访问 Secret Manager 的权限
输入以下命令,为服务账号授予 Secret Manager 的访问权限:
gcloud projects add-iam-policy-binding ${PROJECT_NUMBER} \
--member=serviceAccount:${PROJECT_NUMBER}-compute@developer.gserviceaccount.com \
--role=roles/secretmanager.secretAccessor
点击检查我的进度,验证已完成以下目标:
通过 SSH 密钥从构建访问 GitHub
任务 6.
创建测试环境和 CD 流水线
您还可以使用 Cloud Build 构建持续交付流水线。每次将提交推送到 hello-cloudbuild-env 代码库的候选分支,该流水线都会运行。该流水线会将新版本的清单应用于 Kubernetes 集群,如果成功,则将清单复制到生产分支。此过程具有以下属性:
- 候选分支是部署尝试的历史记录。
- 生产分支是成功部署的历史记录。
- 您可以在 Cloud Build 中查看成功和失败的部署。
- 您可以在 Cloud Build 中重新执行相应的构建作业,回滚到任何先前的部署。回滚还会更新生产分支,以真实反映部署的历史记录。
接下来,您将修改此持续集成流水线,以更新 hello-cloudbuild-env 代码库的候选分支,从而触发持续交付流水线。
为 Cloud Build 授予 GKE 的访问权限
为了在 Kubernetes 集群中部署应用,Cloud Build 需要 Kubernetes Engine Developer 这一 Identity and Access Management 角色。
- 在 Cloud Shell 中,执行以下命令:
PROJECT_NUMBER="$(gcloud projects describe ${PROJECT_ID} --format='get(projectNumber)')"
gcloud projects add-iam-policy-binding ${PROJECT_NUMBER} \
--member=serviceAccount:${PROJECT_NUMBER}@cloudbuild.gserviceaccount.com \
--role=roles/container.developer
您需要使用生产分支和候选分支以及描述部署过程的 Cloud Build 配置文件对 hello-cloudbuild-env 代码库进行初始化。
第一步是克隆 hello-cloudbuild-env 代码库并创建生产分支,该分支目前还是空的。
- 在 Cloud Shell 中,从 Cloud Storage 下载示例代码:
mkdir hello-cloudbuild-env
gcloud storage cp -r gs://spls/gsp1077/gke-gitops-tutorial-cloudbuild/* hello-cloudbuild-env
cd hello-cloudbuild-env
export REGION={{{project_0.default_region | "REGION"}}}
sed -i "s/us-central1/$REGION/g" cloudbuild.yaml
sed -i "s/us-central1/$REGION/g" cloudbuild-delivery.yaml
sed -i "s/us-central1/$REGION/g" cloudbuild-trigger-cd.yaml
sed -i "s/us-central1/$REGION/g" kubernetes.yaml.tpl
- 为了让 Cloud Build 连接到 GitHub,您必须将 SSH 公钥添加到 Cloud Build 构建环境中的
known_hosts 文件。在 hello-cloudbuild-env 目录中,创建一个名为 known_hosts.github 的文件,将 SSH 公钥添加到此文件中,并为该文件提供必要的权限:
cd ~/hello-cloudbuild-env
ssh-keyscan -t rsa github.com > known_hosts.github
chmod +x known_hosts.github
git init
git config credential.helper gcloud.sh
git remote add google https://github.com/${GITHUB_USERNAME}/hello-cloudbuild-env
git branch -m master
git add . && git commit -m "initial commit"
git push google master
cd ~/hello-cloudbuild-env
git checkout -b production
- 接下来,替换
hello-cloudbuild-env 代码库中提供的 cloudbuild.yaml 文件,并提交更改:
cd ~/hello-cloudbuild-env
- 将
hello-cloudbuild-env 代码库中的 cloudbuild.yaml 替换为以下代码。将 {GITHUB-USERNAME} 替换为您的个人 GitHub 用户名:
# Copyright 2018 Google LLC
#
# Licensed under the Apache License, Version 2.0 (the "License");
# you may not use this file except in compliance with the License.
# You may obtain a copy of the License at
#
# https://www.apache.org/licenses/LICENSE-2.0
#
# Unless required by applicable law or agreed to in writing, software
# distributed under the License is distributed on an "AS IS" BASIS,
# WITHOUT WARRANTIES OR CONDITIONS OF ANY KIND, either express or implied.
# See the License for the specific language governing permissions and
# limitations under the License.
# [START cloudbuild-delivery]
steps:
# This step deploys the new version of our container image
# in the hello-cloudbuild Kubernetes Engine cluster.
- name: 'gcr.io/cloud-builders/kubectl'
id: Deploy
args:
- 'apply'
- '-f'
- 'kubernetes.yaml'
env:
- 'CLOUDSDK_COMPUTE_REGION={{{ project_0.default_region }}}'
- 'CLOUDSDK_CONTAINER_CLUSTER=hello-cloudbuild'
# Access the id_github file from Secret Manager, and setup SSH
- name: 'gcr.io/cloud-builders/git'
secretEnv: ['SSH_KEY']
entrypoint: 'bash'
args:
- -c
- |
echo "$$SSH_KEY" >> /root/.ssh/id_rsa
chmod 400 /root/.ssh/id_rsa
cp known_hosts.github /root/.ssh/known_hosts
volumes:
- name: 'ssh'
path: /root/.ssh
# Clone the repository
- name: 'gcr.io/cloud-builders/git'
args:
- clone
- --recurse-submodules
- git@github.com:${GITHUB-USERNAME}/hello-cloudbuild-env.git
volumes:
- name: ssh
path: /root/.ssh
# This step copies the applied manifest to the production branch
# The COMMIT_SHA variable is automatically
# replaced by Cloud Build.
- name: 'gcr.io/cloud-builders/gcloud'
id: Copy to production branch
entrypoint: /bin/sh
args:
- '-c'
- |
set -x && \
cd hello-cloudbuild-env && \
git config user.email $(gcloud auth list --filter=status:ACTIVE --format='value(account)')
sed "s/GOOGLE_CLOUD_PROJECT/${PROJECT_ID}/g" kubernetes.yaml.tpl | \
git fetch origin production && \
# Switch to the production branch and copy the kubernetes.yaml file from the candidate branch
git checkout production && \
git checkout $COMMIT_SHA kubernetes.yaml && \
# Commit the kubernetes.yaml file with a descriptive commit message
git commit -m "Manifest from commit $COMMIT_SHA
$(git log --format=%B -n 1 $COMMIT_SHA)" && \
# Push the changes back to Cloud Source Repository
git push origin production
volumes:
- name: ssh
path: /root/.ssh
availableSecrets:
secretManager:
- versionName: projects/${PROJECT_NUMBER}/secrets/ssh_key_secret/versions/1
env: 'SSH_KEY'
# [END cloudbuild-delivery]
options:
logging: CLOUD_LOGGING_ONLY
git add .
git commit -m "Create cloudbuild.yaml for deployment"
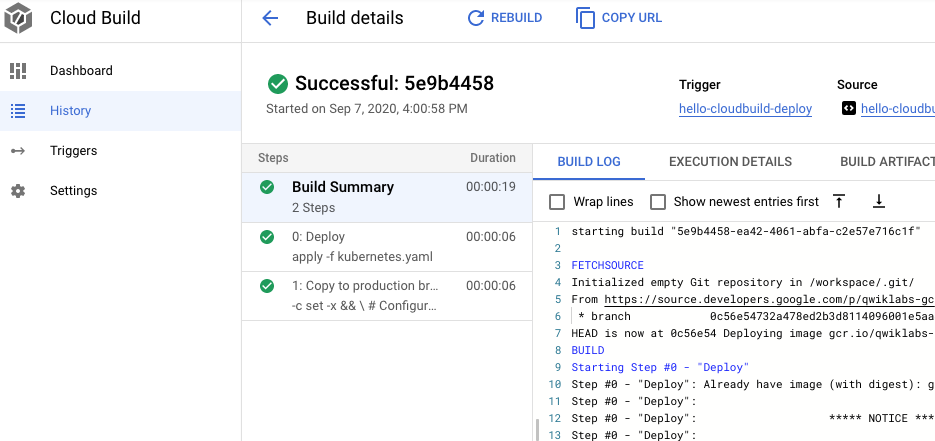
cloudbuild-delivery.yaml 文件描述将在 Cloud Build 中运行的部署过程。它有两个步骤:
- Cloud Build 在 GKE 集群上应用清单。
- 如果成功,Cloud Build 会在生产分支上复制清单。
- 创建候选分支并推送两个分支,使其在 GitHub 代码库中可用:
git checkout -b candidate
git push google production
git push google candidate
为持续交付流水线创建触发器
-
在控制台标题栏中,输入 Cloud Build 触发器,然后点击 Cloud Build 触发器。
-
点击创建触发器。
-
将名称设置为 hello-cloudbuild-deploy。将区域设置为 。
-
在事件下,选择推送到分支。
-
在来源下,点击代码库旁边的连接新代码库。
a. 选择 GitHub(Cloud Build GitHub 应用)。点击继续。
b. 使用您的 GitHub 用户名和密码向您的源代码库进行身份验证。
c. 选择 ${GITHUB_USERNAME}/hello-cloudbuild-env 代码库。点击 OK(确定)。
d. 选择我了解系统会将所选代码库的 GitHub 内容…。
e. 点击连接。
-
在代码库下,选择 ${GITHUB_USERNAME}/hello-cloudbuild-env。
-
在来源下,选择 ^candidate$ 作为您的分支。
-
在 构建配置下,选择 Cloud Build 配置文件。
-
在 Cloud Build 配置文件位置字段中,在 / 后输入 cloudbuild.yaml。
-
将服务账号设置为 Compute Engine 默认服务账号。
-
点击创建。
-
在 hello-cloudbuild-app 目录中,创建一个名为 known_hosts.github 的文件,将 SSH 公钥添加到此文件中,并为该文件提供必要的权限:
cd ~/hello-cloudbuild-app
ssh-keyscan -t rsa github.com > known_hosts.github
chmod +x known_hosts.github
git add .
git commit -m "Adding known_host file."
git push google master
修改持续集成流水线以触发持续交付流水线
接下来,向持续集成流水线添加一些步骤,生成新版本的 Kubernetes 清单并将其推送到 hello-cloudbuild-env 代码库,以触发持续交付流水线。
- 复制
app 代码库的 cloudbuild.yaml 文件的扩展版本:
cd ~/hello-cloudbuild-app
cloudbuild.yaml 文件添加了生成新的 Kubernetes 清单并触发持续交付流水线的步骤。
配置构建
- 将
hello-cloudbuild-app 代码库中的 cloudbuild.yaml 内容替换为以下代码。将 {GITHUB_USERNAME} 替换为您的 GitHub 用户名:
# Copyright 2018 Google LLC
#
# Licensed under the Apache License, Version 2.0 (the "License");
# you may not use this file except in compliance with the License.
# You may obtain a copy of the License at
#
# https://www.apache.org/licenses/LICENSE-2.0
#
# Unless required by applicable law or agreed to in writing, software
# distributed under the License is distributed on an "AS IS" BASIS,
# WITHOUT WARRANTIES OR CONDITIONS OF ANY KIND, either express or implied.
# See the License for the specific language governing permissions and
# limitations under the License.
# [START cloudbuild]
steps:
# This step runs the unit tests on the app
- name: 'python:3.7-slim'
id: Test
entrypoint: /bin/sh
args:
- -c
- 'pip install flask && python test_app.py -v'
# This step builds the container image.
- name: 'gcr.io/cloud-builders/docker'
id: Build
args:
- 'build'
- '-t'
- '{{{ project_0.default_region }}}-docker.pkg.dev/$PROJECT_ID/my-repository/hello-cloudbuild:$SHORT_SHA'
- '.'
# This step pushes the image to Artifact Registry
# The PROJECT_ID and SHORT_SHA variables are automatically
# replaced by Cloud Build.
- name: 'gcr.io/cloud-builders/docker'
id: Push
args:
- 'push'
- '{{{ project_0.default_region }}}-docker.pkg.dev/$PROJECT_ID/my-repository/hello-cloudbuild:$SHORT_SHA'
# [END cloudbuild]
# Access the id_github file from Secret Manager, and setup SSH
- name: 'gcr.io/cloud-builders/git'
secretEnv: ['SSH_KEY']
entrypoint: 'bash'
args:
- -c
- |
echo "$$SSH_KEY" >> /root/.ssh/id_rsa
chmod 400 /root/.ssh/id_rsa
cp known_hosts.github /root/.ssh/known_hosts
volumes:
- name: 'ssh'
path: /root/.ssh
# Clone the repository
- name: 'gcr.io/cloud-builders/git'
args:
- clone
- --recurse-submodules
- git@github.com:${GITHUB-USERNAME}/hello-cloudbuild-env.git
volumes:
- name: ssh
path: /root/.ssh
# [START cloudbuild-trigger-cd]
# This step clones the hello-cloudbuild-env repository
- name: 'gcr.io/cloud-builders/gcloud'
id: Change directory
entrypoint: /bin/sh
args:
- '-c'
- |
cd hello-cloudbuild-env && \
git checkout candidate && \
git config user.email $(gcloud auth list --filter=status:ACTIVE --format='value(account)')
volumes:
- name: ssh
path: /root/.ssh
# This step generates the new manifest
- name: 'gcr.io/cloud-builders/gcloud'
id: Generate manifest
entrypoint: /bin/sh
args:
- '-c'
- |
sed "s/GOOGLE_CLOUD_PROJECT/${PROJECT_ID}/g" kubernetes.yaml.tpl | \
sed "s/COMMIT_SHA/${SHORT_SHA}/g" > hello-cloudbuild-env/kubernetes.yaml
volumes:
- name: ssh
path: /root/.ssh
# This step pushes the manifest back to hello-cloudbuild-env
- name: 'gcr.io/cloud-builders/gcloud'
id: Push manifest
entrypoint: /bin/sh
args:
- '-c'
- |
set -x && \
cd hello-cloudbuild-env && \
git add kubernetes.yaml && \
git commit -m "Deploying image {{{ project_0.default_region }}}-docker.pkg.dev/$PROJECT_ID/my-repository/hello-cloudbuild:${SHORT_SHA}
Built from commit ${COMMIT_SHA} of repository hello-cloudbuild-app
Author: $(git log --format='%an <%ae>' -n 1 HEAD)" && \
git push origin candidate
volumes:
- name: ssh
path: /root/.ssh
availableSecrets:
secretManager:
- versionName: projects/${PROJECT_NUMBER}/secrets/ssh_key_secret/versions/1
env: 'SSH_KEY'
# [END cloudbuild-trigger-cd]
options:
logging: CLOUD_LOGGING_ONLY
注意: 此流水线使用简单的 sed 来呈现清单模板。实际工作中,开发者通常使用 Kustomize 或 Skaffold 等专用工具,以便更全面地控制清单模板的呈现方式。
- 提交修改并将其推送到 GitHub 代码库:
cd ~/hello-cloudbuild-app
git add cloudbuild.yaml
git commit -m "Trigger CD pipeline"
git push google master
这会触发 Cloud Build 中的持续集成流水线。
点击检查我的进度,验证已完成以下目标:
创建测试环境和 CD 流水线
任务 7. 审核 Cloud Build 流水线
在此任务中,您将在控制台中审核 Cloud Build 流水线。
- 在控制台的 Cloud Build 页面中,点击左侧窗格中的信息中心。
- 点击进入 hello-cloudbuild-app 触发器,以跟踪其执行情况并检查其日志。该流水线的最后一步将新清单推送到
hello-cloudbuild-env 代码库,触发持续交付流水线。
- 返回主信息中心。
- 您应该会看到
hello-cloudbuild-env 代码库的正在运行或最近完成的构建。
您可以点击该构建作业,以跟踪其执行情况并检查其日志。
任务 8. 测试完整的流水线
您现在配置了完整的 CI/CD 流水线。在此任务中,您将执行端到端测试。
- 在控制台的导航菜单 (
 ) 中,点击 Kubernetes Engine > 网关、服务和入站流量 > 服务。
列表中应该只有一个服务,名为 hello-cloudbuild。该服务是由刚刚运行的持续交付构建作业所创建。
- 点击 hello-cloudbuild 服务的端点。您应该会看到“Hello World!”。如果没有端点,或者如果您看到负载均衡器错误,则可能需要等待几分钟,以便负载均衡器完成初始化。如果需要,点击刷新以更新该页面。
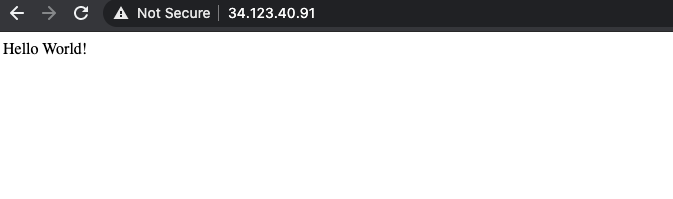
- 在 Cloud Shell 中,在应用和单元测试中将“Hello World”替换为“Hello Cloud Build”:
cd ~/hello-cloudbuild-app
sed -i 's/Hello World/Hello Cloud Build/g' app.py
sed -i 's/Hello World/Hello Cloud Build/g' test_app.py
- 提交更改,并将其推送到 GitHub 代码库:
git add app.py test_app.py
git commit -m "Hello Cloud Build"
git push google master
- 这会触发完整的 CI/CD 流水线。
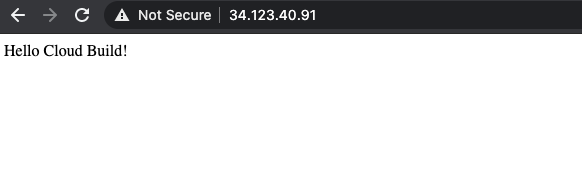
几分钟后,在浏览器中重新加载应用。您现在应该会看到“Hello Cloud Build!”。
任务 9. 测试回滚
在此任务中,您将回滚到显示“Hello World!”的应用版本。
- 在控制台标题栏的搜索字段中,输入 Cloud Build 信息中心,然后点击搜索结果中的
Cloud Build。确保在左侧窗格中选择了信息中心。
- 在
hello-cloudbuild-env 代码库的构建记录下点击查看全部链接。
- 点击所列出的第二新的构建作业。
- 点击重建。
完成构建作业后,在浏览器中重新加载应用。您现在应该会再次看到“Hello World!”。
恭喜!
现在,您可以使用 Cloud Build 在 GKE on Google Cloud 中创建和回滚持续集成流水线了。
Google Cloud 培训和认证
…可帮助您充分利用 Google Cloud 技术。我们的课程会讲解各项技能与最佳实践,可帮助您迅速上手使用并继续学习更深入的知识。我们提供从基础到高级的全方位培训,并有点播、直播和虚拟三种方式选择,让您可以按照自己的日程安排学习时间。各项认证可以帮助您核实并证明您在 Google Cloud 技术方面的技能与专业知识。
上次更新手册的时间:2025 年 2 月 19 日
上次测试实验的时间:2025 年 2 月 19 日
版权所有 2025 Google LLC 保留所有权利。Google 和 Google 徽标是 Google LLC 的商标。其他所有公司名和产品名可能是其各自相关公司的商标。


