Checkpoints
Create a Template for Unstructured Data
/ 30
Create a Template for Structured Data
/ 30
Create a DLP Inspection Job Trigger
/ 40
Creating a De-identified Copy of Data in Cloud Storage
GSP1073

Overview
Cloud Data Loss Prevention (Cloud DLP) is a fully managed service designed to help discover, classify, and protect sensitive information. In this lab, you create and run a Cloud DLP job using the De-identify (DeID) Findings Action to create a redacted and de-identified copy of some data in Cloud Storage. You also learn how to create a de-identification template to define how to redact the data.
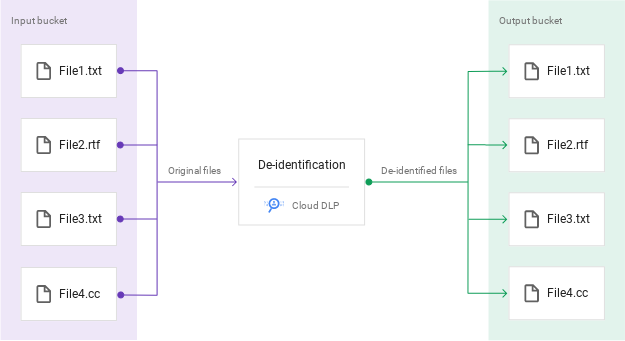
As part of the setup process of this lab, an "input" Cloud Storage bucket with sample folders and files, as well as an "output" Cloud Storage bucket for the redacted data have been created for you.
Objectives
In this lab, you:
- Create a Cloud DLP de-identification template for structured and unstructured data
- Configure a Cloud DLP Inspection Job Trigger with De-identify Findings Action enabled
- Create a Cloud DLP Inspection Job
- View results of the inspection job and view new de-identified files in Cloud Storage
Setup and requirements
Before you click the Start Lab button
Read these instructions. Labs are timed and you cannot pause them. The timer, which starts when you click Start Lab, shows how long Google Cloud resources will be made available to you.
This hands-on lab lets you do the lab activities yourself in a real cloud environment, not in a simulation or demo environment. It does so by giving you new, temporary credentials that you use to sign in and access Google Cloud for the duration of the lab.
To complete this lab, you need:
- Access to a standard internet browser (Chrome browser recommended).
- Time to complete the lab---remember, once you start, you cannot pause a lab.
How to start your lab and sign in to the Google Cloud console
-
Click the Start Lab button. If you need to pay for the lab, a pop-up opens for you to select your payment method. On the left is the Lab Details panel with the following:
- The Open Google Cloud console button
- Time remaining
- The temporary credentials that you must use for this lab
- Other information, if needed, to step through this lab
-
Click Open Google Cloud console (or right-click and select Open Link in Incognito Window if you are running the Chrome browser).
The lab spins up resources, and then opens another tab that shows the Sign in page.
Tip: Arrange the tabs in separate windows, side-by-side.
Note: If you see the Choose an account dialog, click Use Another Account. -
If necessary, copy the Username below and paste it into the Sign in dialog.
{{{user_0.username | "Username"}}} You can also find the Username in the Lab Details panel.
-
Click Next.
-
Copy the Password below and paste it into the Welcome dialog.
{{{user_0.password | "Password"}}} You can also find the Password in the Lab Details panel.
-
Click Next.
Important: You must use the credentials the lab provides you. Do not use your Google Cloud account credentials. Note: Using your own Google Cloud account for this lab may incur extra charges. -
Click through the subsequent pages:
- Accept the terms and conditions.
- Do not add recovery options or two-factor authentication (because this is a temporary account).
- Do not sign up for free trials.
After a few moments, the Google Cloud console opens in this tab.

Task 1. Create de-identify templates
Create a template for unstructured data
In this section, you configure and create a de-identify template for unstructured data.
-
In the Google Cloud console, in the Navigation menu (
), click Security > Data Loss Prevention.
-
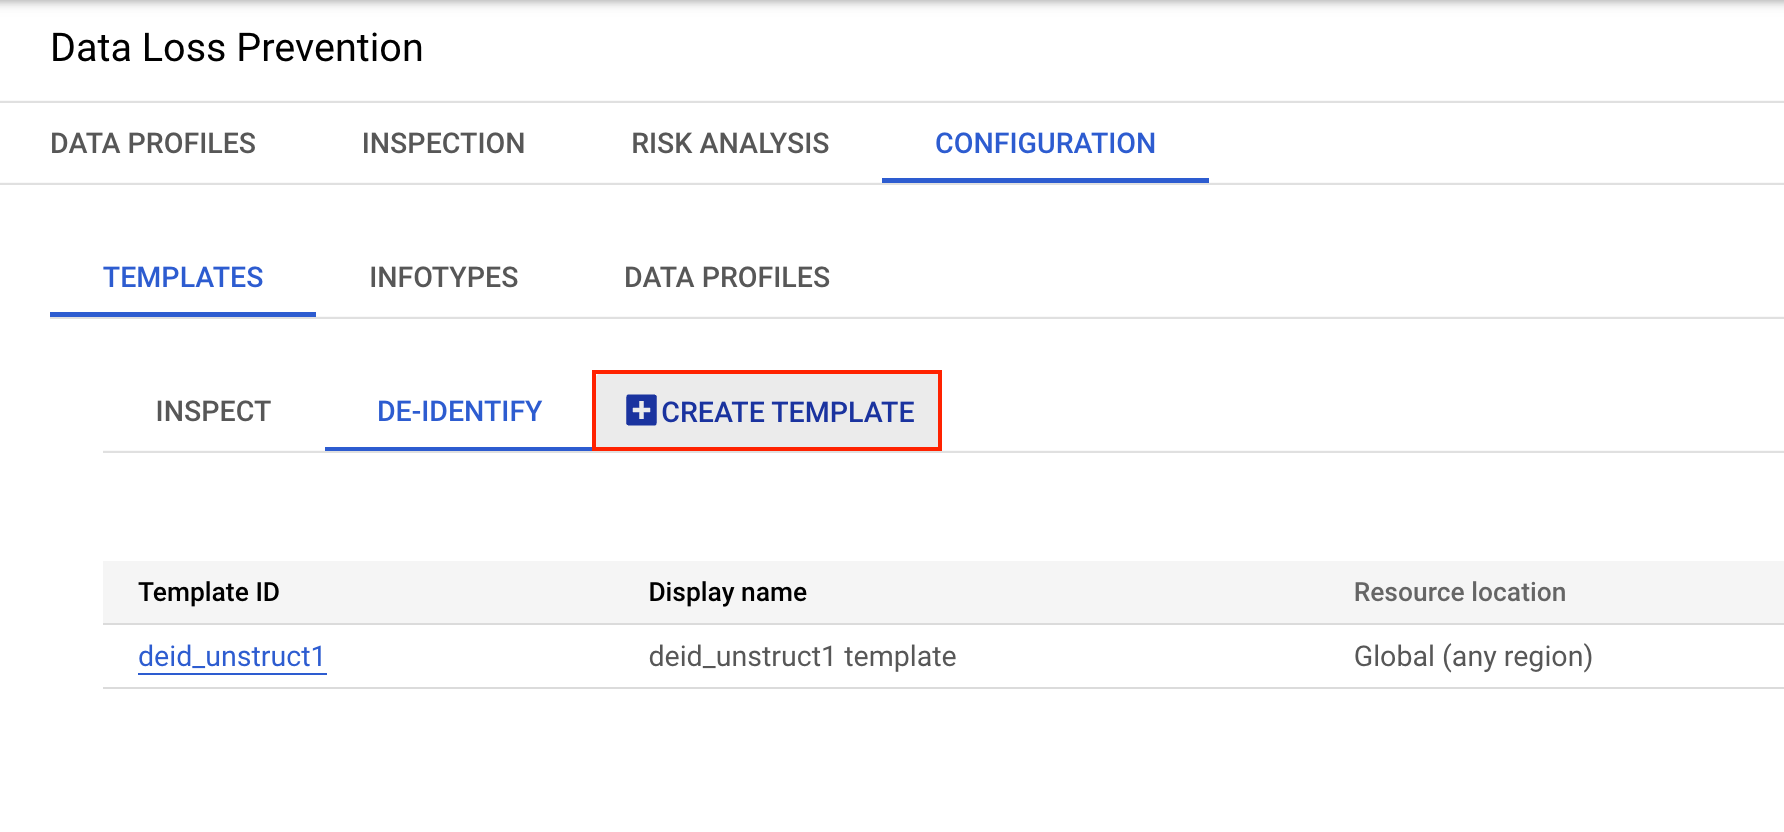
Click the Configuration tab.
-
In the Configuration > Templates section, click Create Template.
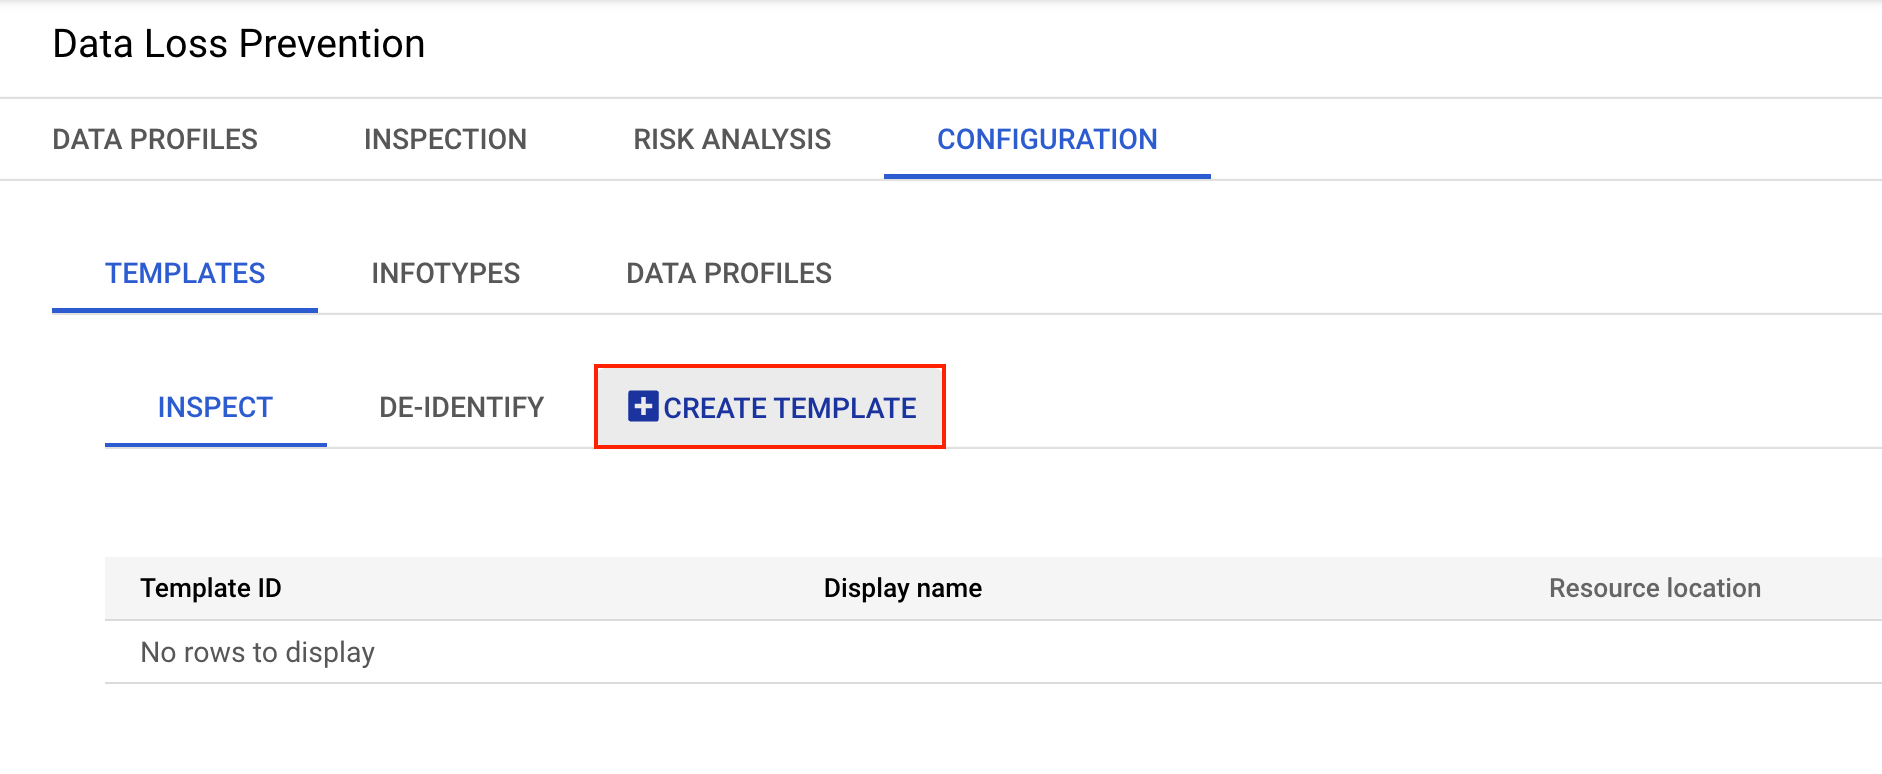
-
On the Create Template page, define the following options:
- For Template type, select De-identify (remove sensitive data).
- Fo Data transformation type select InfoType
- For Template ID, enter
deid_unstruct1 - For Display name, enter
deid_unstruct1 template - For Description, leave the field empty.
- For Resource location, use the default setting Global (any region).
-
Click Continue.
-
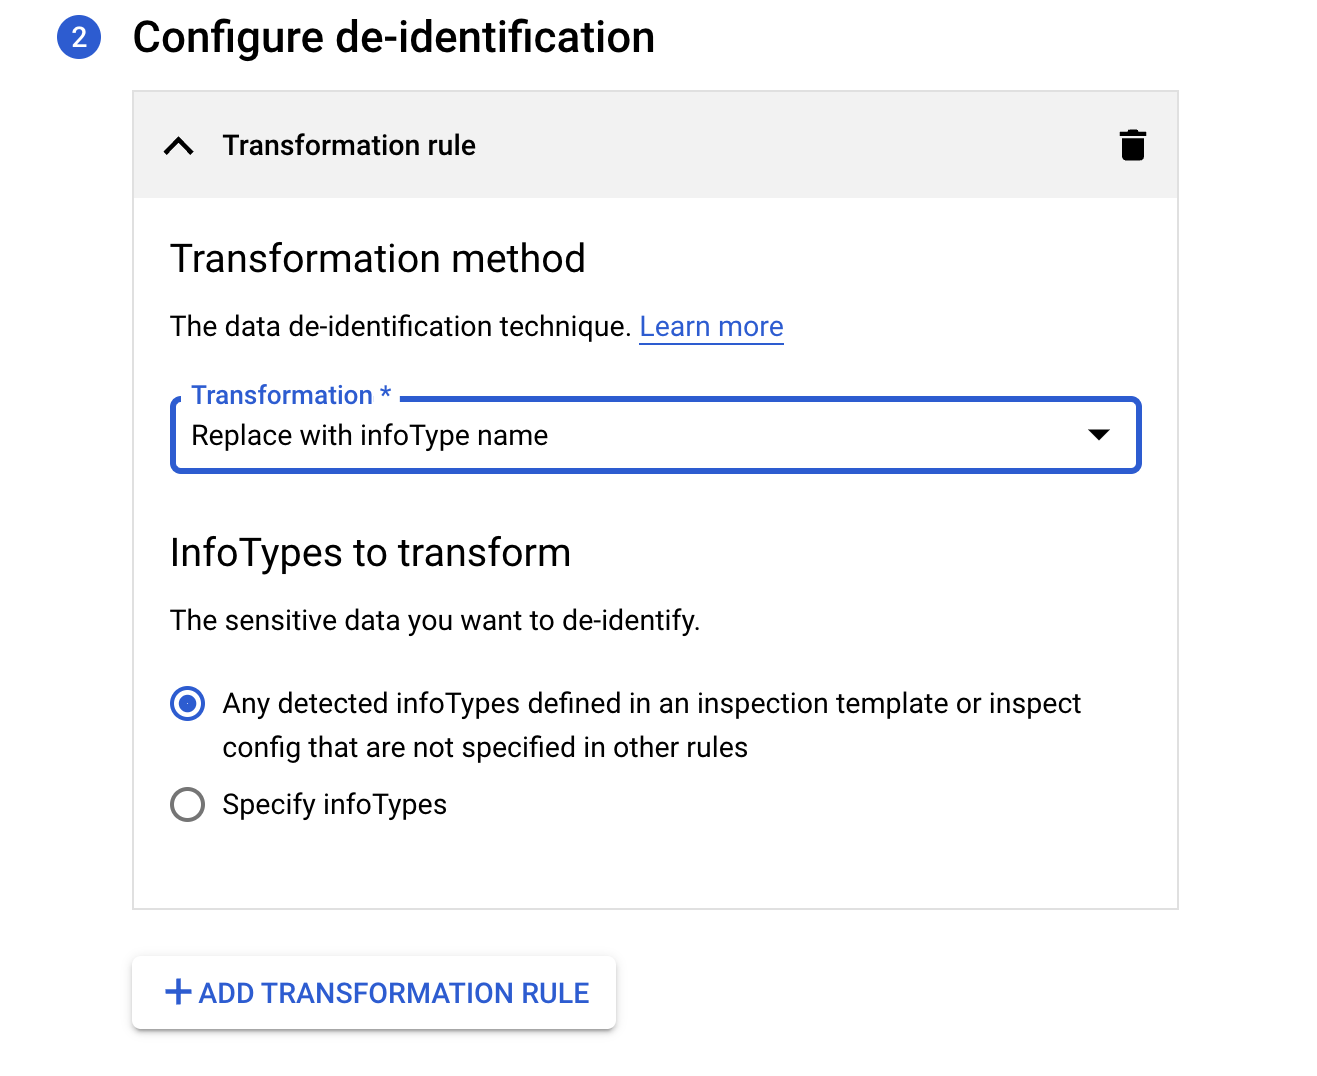
For the Transformation Rule select Replace with infoType name.
-
For InfoTypes to transform select Any detected infoTypes defined in an inspection template or inspect config that are not specified in other rules.
- Click Create.
Click Check my progress to verify the objective.
Create a template for structured data
In this section, you configure and create a de-identify template for structured data.
-
In the Google Cloud console, navigate back to the Data Loss Prevention page.
-
Click the Configuration tab.
-
In the Configuration > Templates section, click Create Template.
-
On the Create Template page, define the following options:
- For Template type, select De-identify (remove sensitive data).
- Fo Data transformation type select Record
- For Template ID, enter
deid_struct1 - For Display name, enter
deid_struct1 template - For Description, leave the field empty.
- For Resource location, use the default setting Global (any region).
-
Click Continue.
-
For the Transformation Rule add the following field names:
ssnccnemailvinidagent_iduser_id.
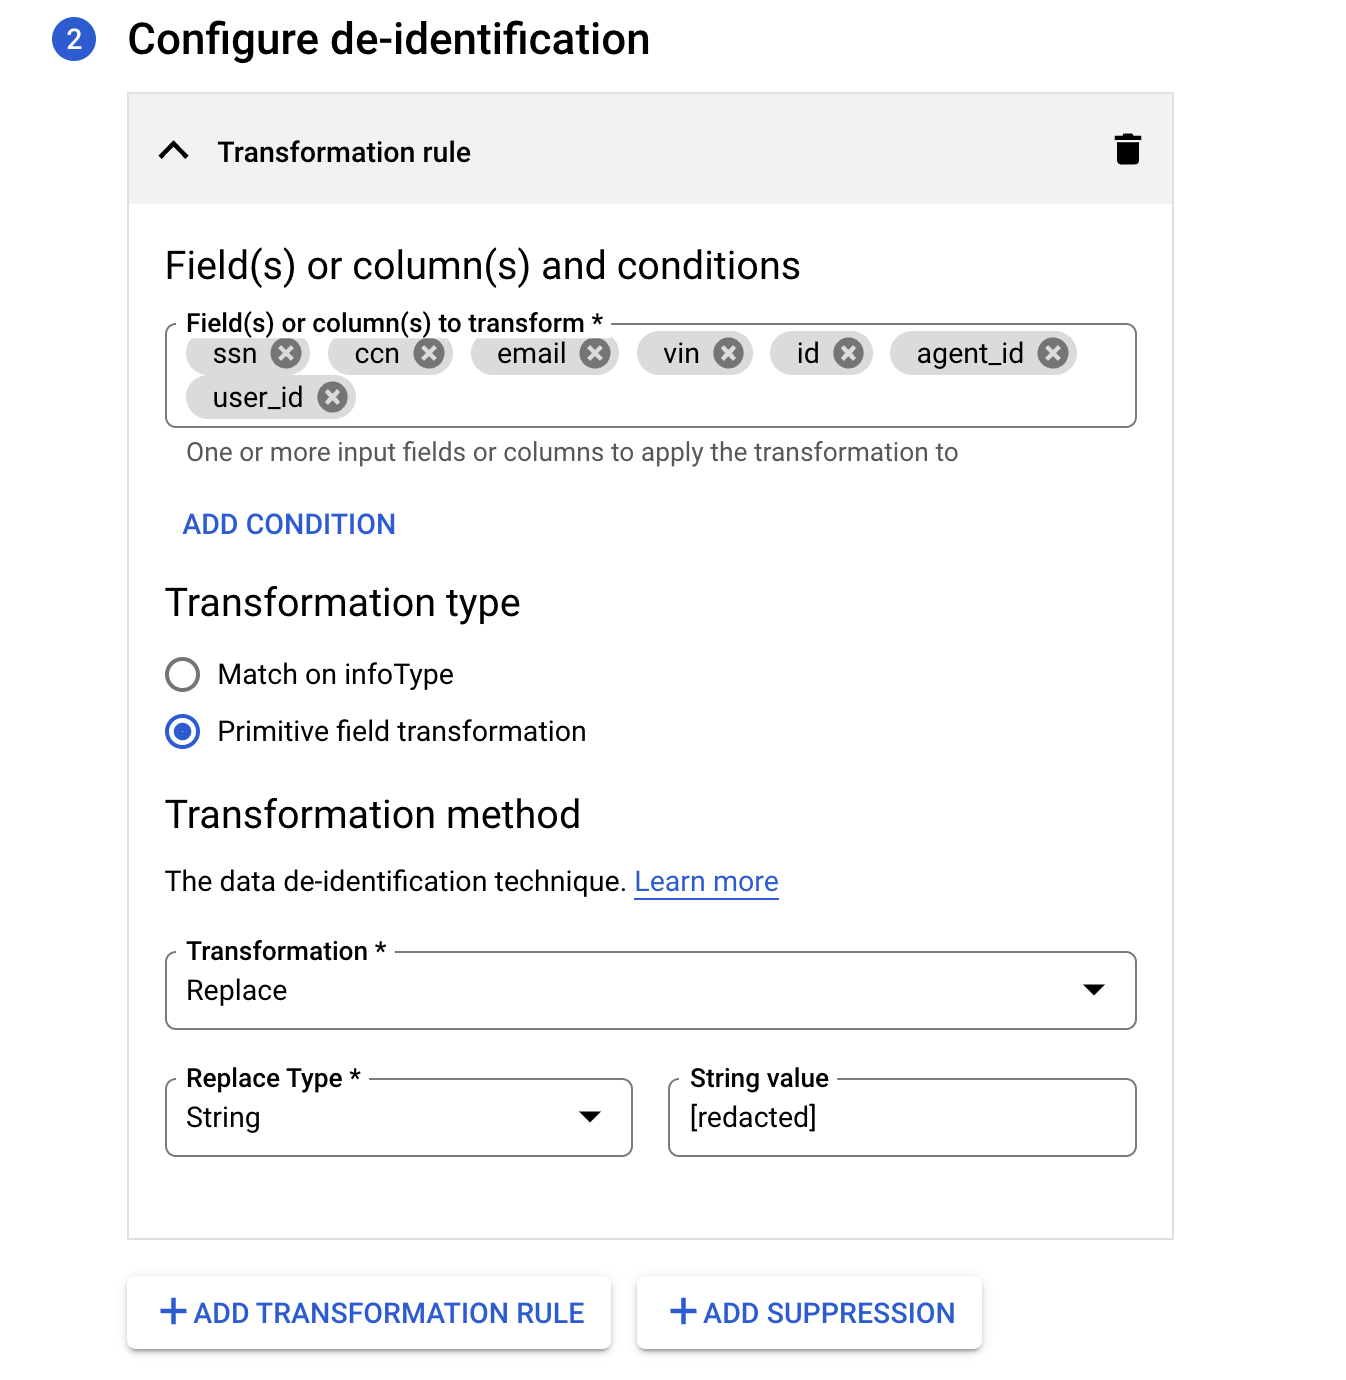
-
For the Transformation type select Primitive field transformation.
-
For Transformation method select Replace. This replaces the contents of every cell for fields that match any in the list you provided.
-
Click + Add Transformation Rule.
-
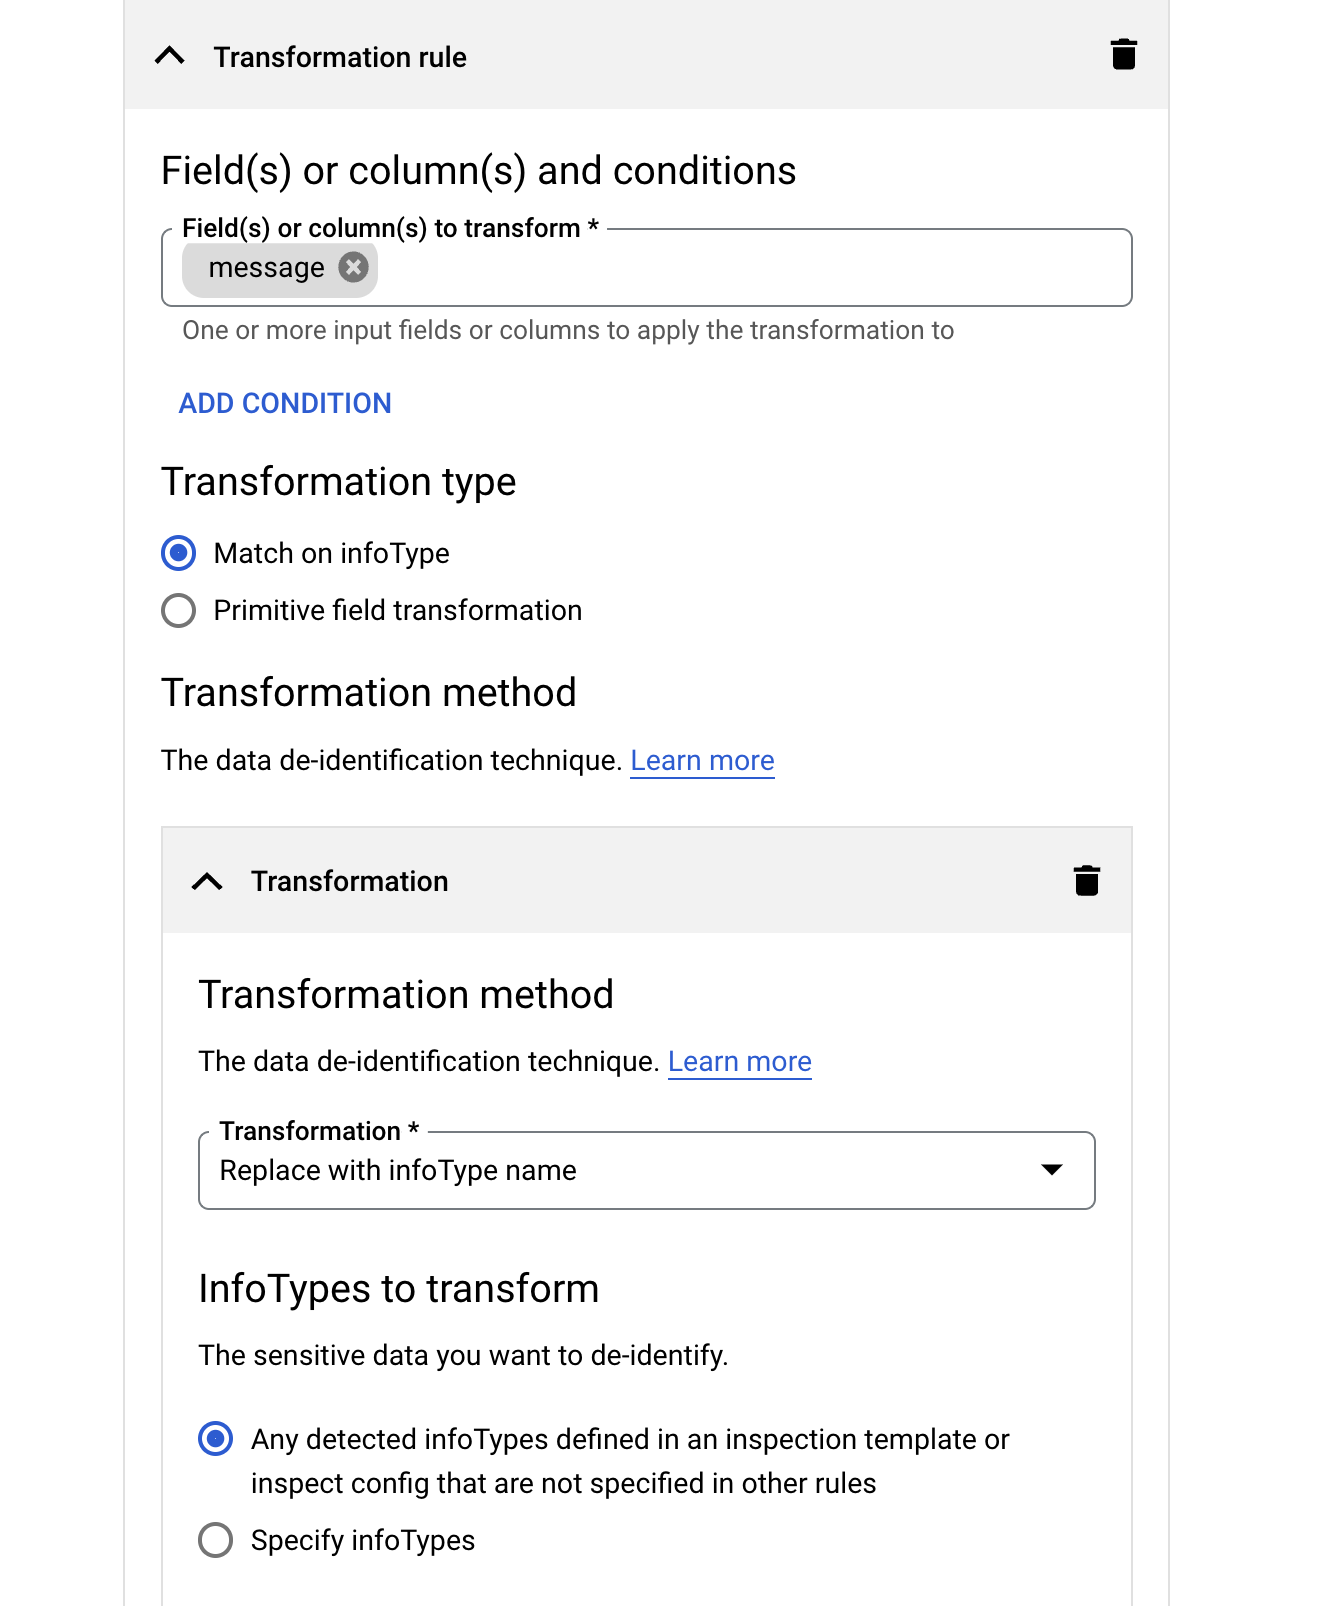
For this new rule add the field:
message. -
For the Transformation type select Match on infoType and click Add Transformation.
-
For the Transformation Method select Replace with infoType name.
-
For InfoTypes to transform select Any detected infoTypes defined in an inspection template or inspect config that are not specified in other rules. This applies infoType inspection and redaction to any files with a field called
message.
- Click Create.
Click Check my progress to verify the objective.
Task 2. Create a DLP inspection job trigger
-
In the Google Cloud console, navigate back to the Data Loss Prevention page.
-
Click the Inspection tab.
-
Click Create Job and Job Triggers.
-
To configure input data, do the following:
- In the Name section, define the following options:
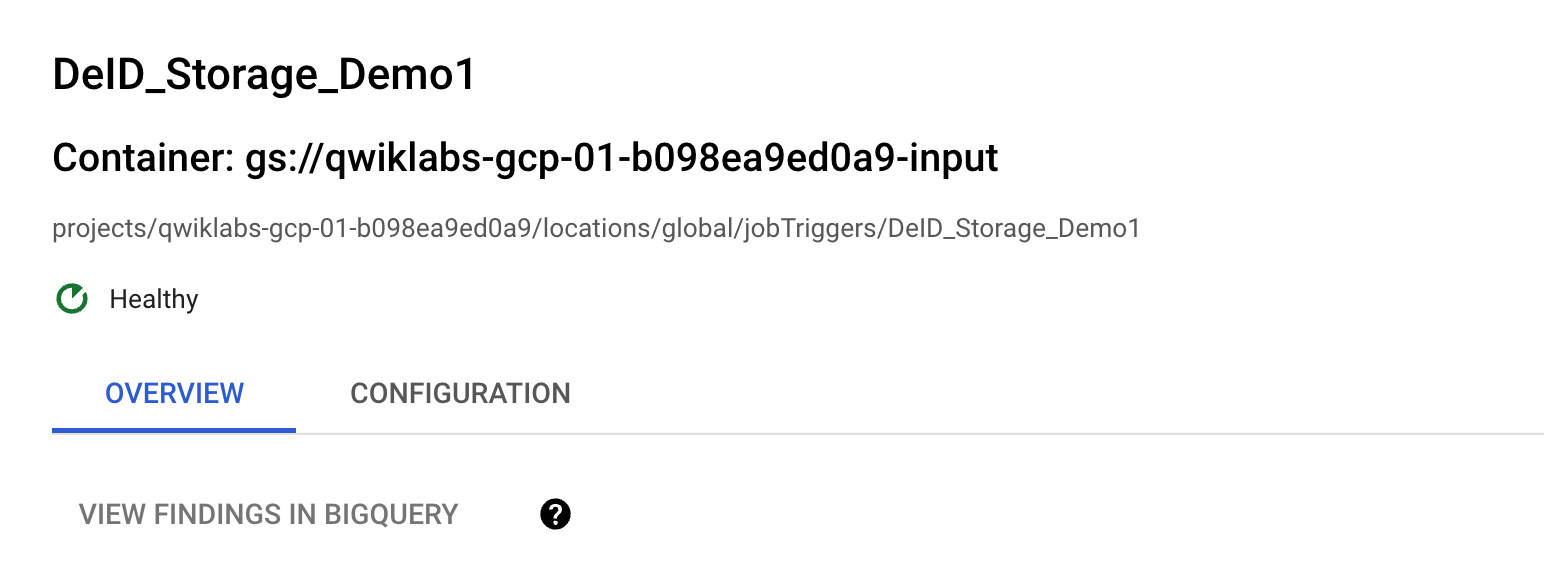
- For Job ID, enter
DeID_Storage_Demo1. - Keep Resource location set to Global (any region).
- For Job ID, enter
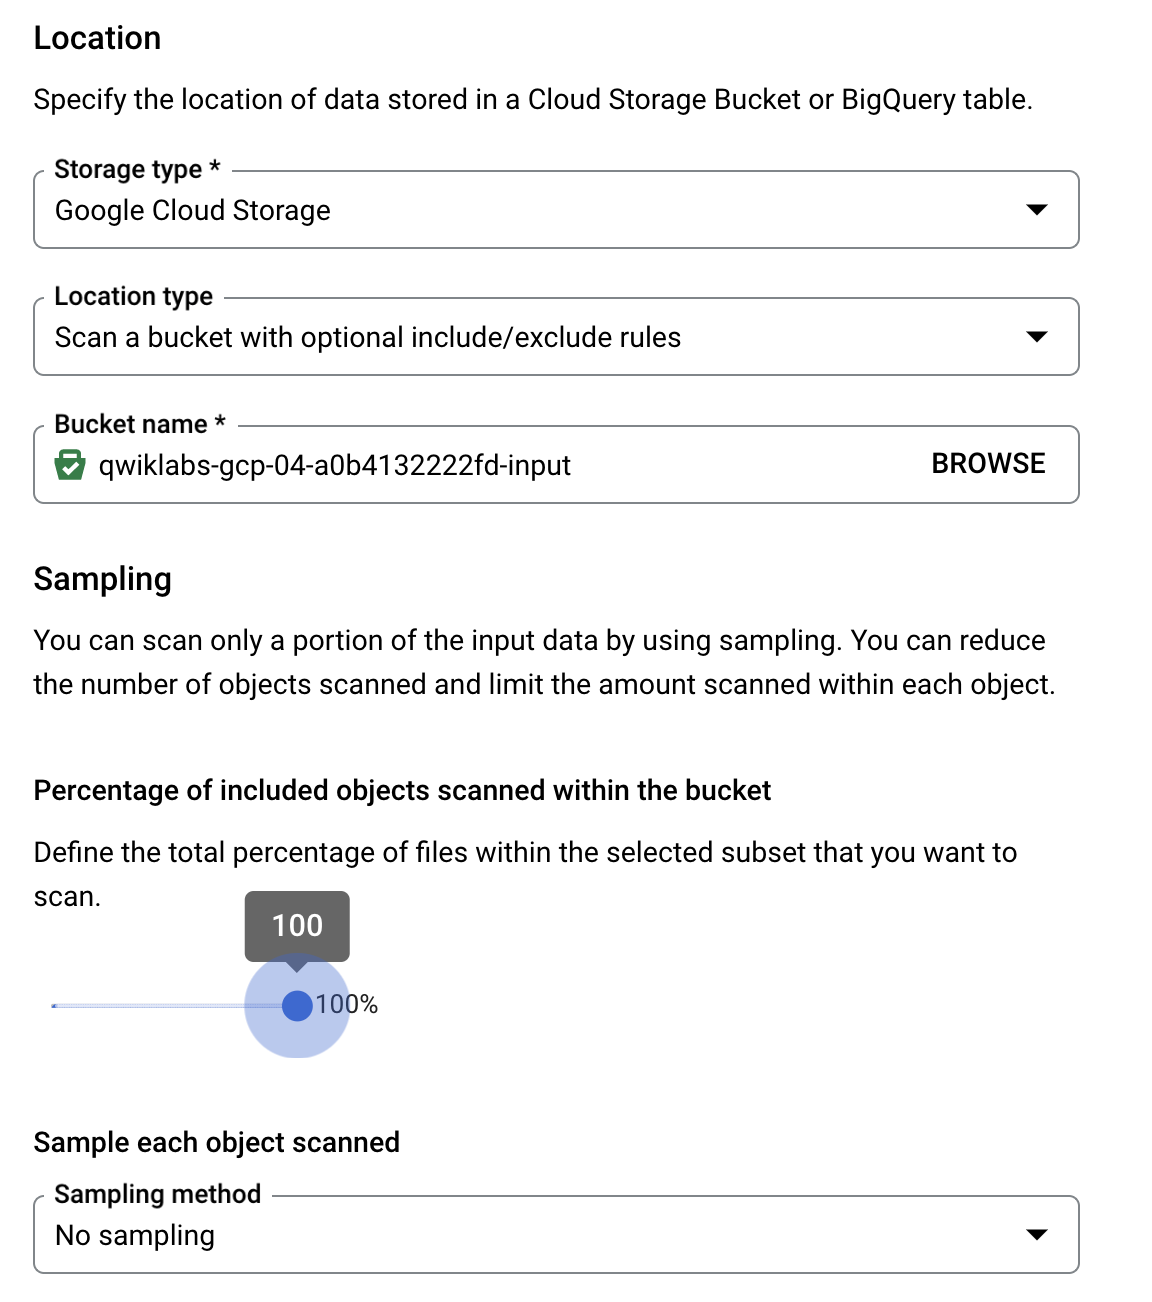
- In the Storage type list, select Google Cloud Storage, and then define the following options:
- For the Location Type select Scan a bucket with optional include/exclude rules.
- For the URL enter:
- Set “Percentage of included objects scanned within the bucket” to 100% and select No Sampling
- In the Name section, define the following options:
-
Leave the rest of the fields as default and click Continue.
-
Under Configure detection, leave all fields as default and click Continue.
-
Under Add Actions, toggle to enable Make a de-identify copy.
-
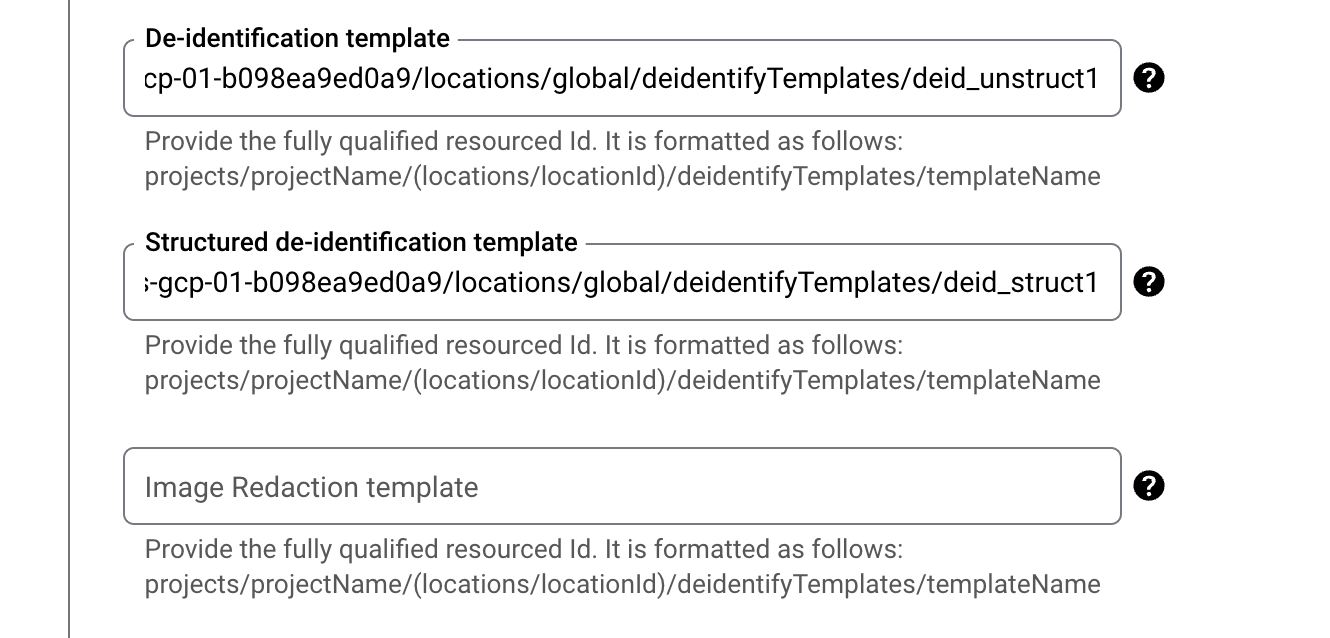
Enter the two templates that you created above in the respective boxes:
projects//locations/global/deidentifyTemplates/deid_unstruct1 projects//locations/global/deidentifyTemplates/deid_struct1
- For the Cloud Storage output location specify:
This specifies to write the redacted output to the second bucket that was created for you.
-
Click Continue.
-
For Schedule, select Create a trigger to run the job on a periodic schedule and select Weekly.
-
Click Continue.
-
Scroll down and click Create > Confirm Create.
-
You should now have a job under Inspection > Job Triggers.
Click Check my progress to verify the objective.
Task 3. Run DLP Inspection and review results
-
In the Google Cloud console, navigate back to the Data Loss Prevention page.
-
Click the Inspection tab.
-
Under Job Triggers you should see the job trigger that you created.
-
Select this job trigger.
-
Click Run Now.
-
This creates and runs a new job instance.
-
Select the job instance from the section below triggered jobs.
-
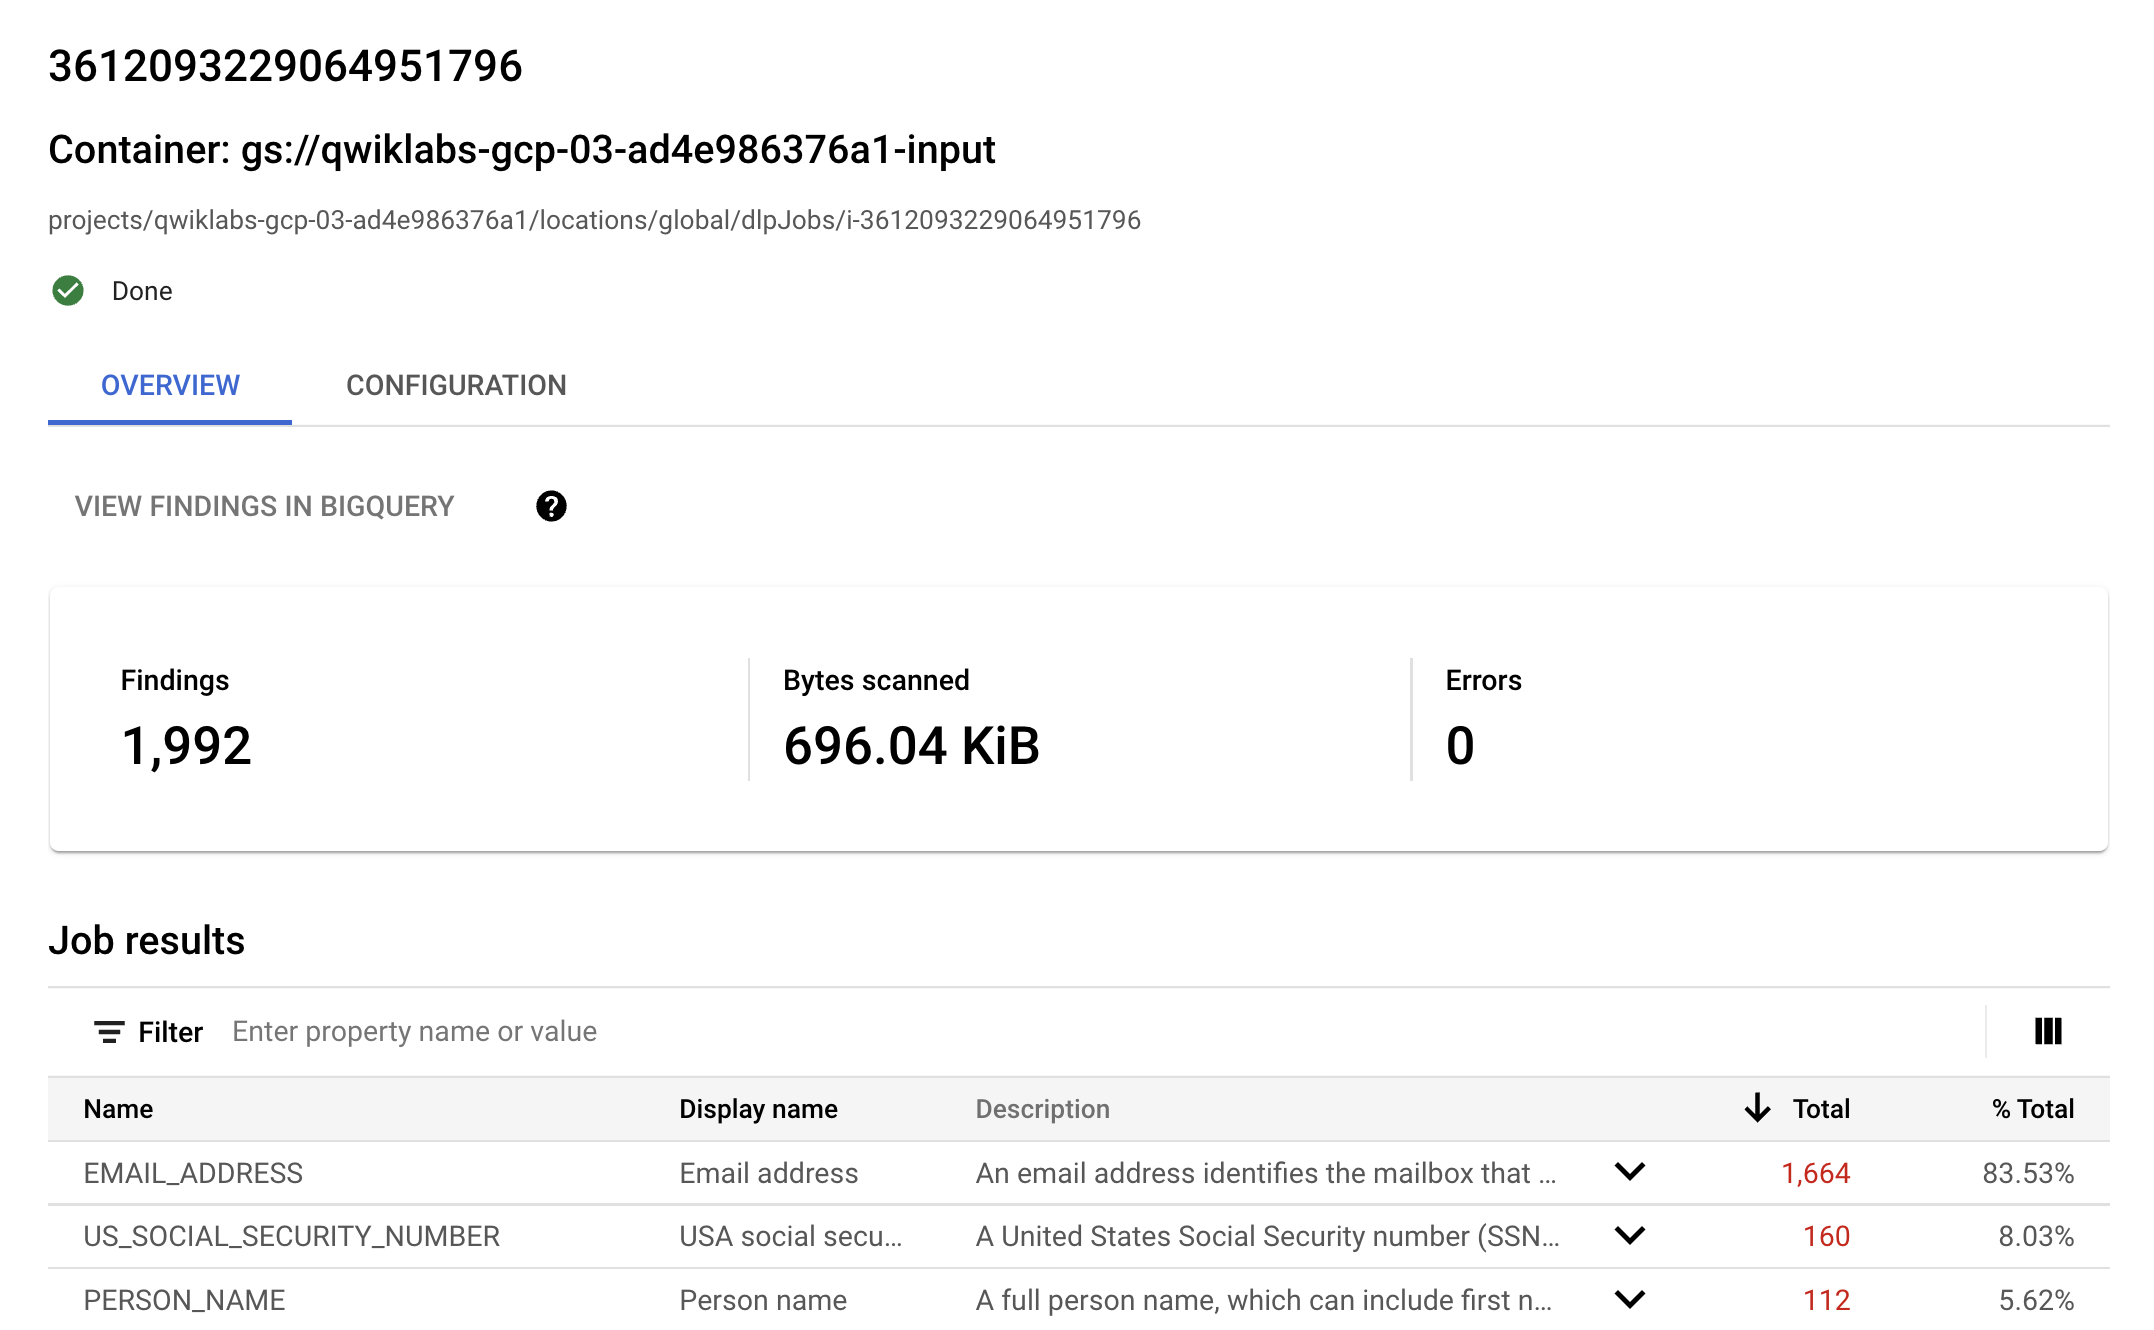
Monitor the job and wait for it to say Done.
-
Once Done, review the results on this page to see what was found in the bucket.
Great! You should see your findings populated and an overview of your job results at the bottom.
View de-identified output
-
On the job results page, click on Configuration.
-
Scroll down to the section Output bucket for de-identified Cloud Storage Data.
-
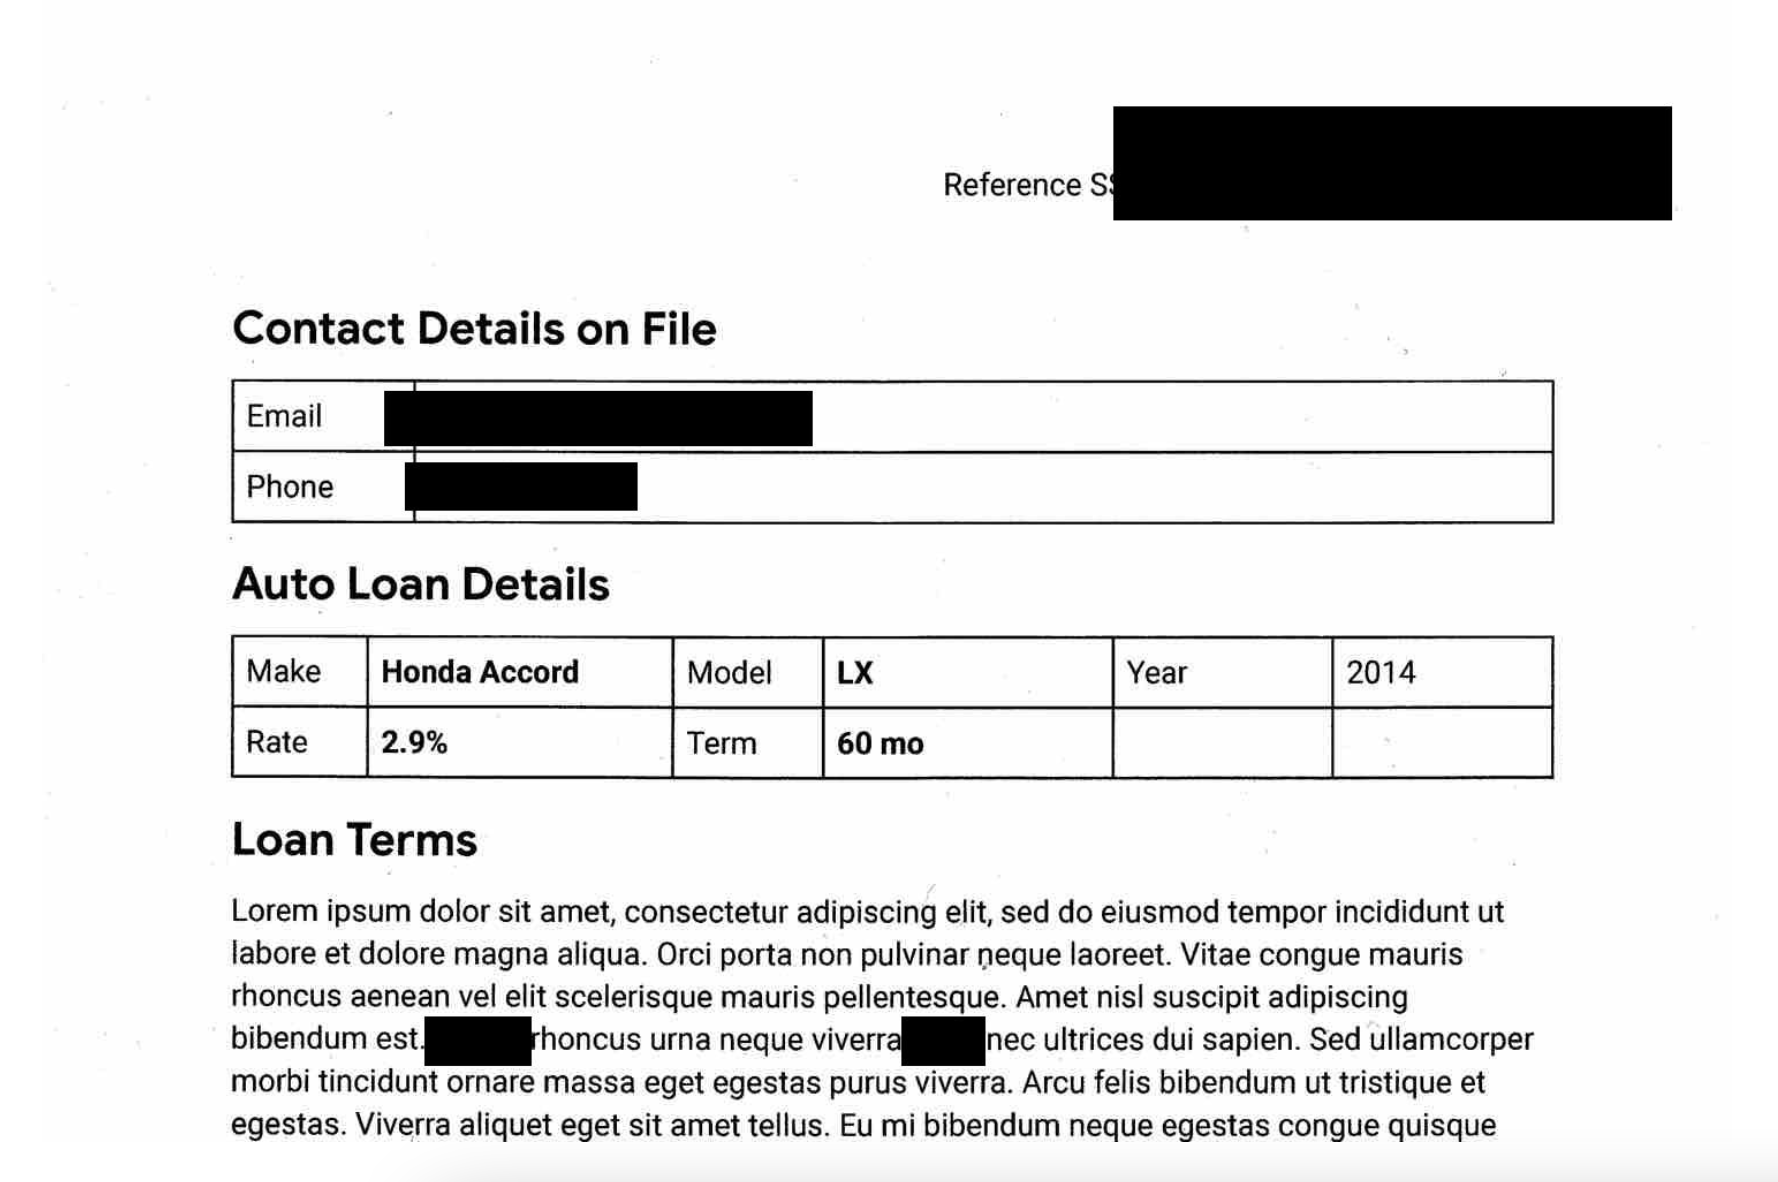
Click on the bucket link to be taken to that Cloud Storage Bucket.
-
Explore the various folders and files to see what has been redacted. For example click on one of the image in the image folder should show something like:
For further exploration, you can try the following:
- Change the settings in the de-identification templates to try out different ways to de-identify and transform data. See the transformation reference here. You can also try turning on different tokenization or pseudonymization methods using Cloud KMS.
- Try editing the DLP Job Trigger and adjusting what kind of data is being inspected for and then run another job by clicking “Run Now” from the triggers page. For example, if you turn off
PERSON_NAMEdetection, the names should no longer be redacted.
Congratulations!
Congratulations, in this lab you created Cloud DLP de-identification templates for structured and unstructured data, configured a Job Trigger with De-identify Findings Action enabled, created an Inspection Job, and viewed the results of the inspection job.
Next steps / Learn more
Be sure to check out the following documentation for more practice with Cloud DLP:
- Cloud DLP Documentation
- The Google Cloud blog post that discusses protecting sensitive data using Cloud DLP.
Google Cloud training and certification
...helps you make the most of Google Cloud technologies. Our classes include technical skills and best practices to help you get up to speed quickly and continue your learning journey. We offer fundamental to advanced level training, with on-demand, live, and virtual options to suit your busy schedule. Certifications help you validate and prove your skill and expertise in Google Cloud technologies.
Manual Last Updated May 25, 2023
Lab Last Tested May 25, 2023
Copyright 2024 Google LLC All rights reserved. Google and the Google logo are trademarks of Google LLC. All other company and product names may be trademarks of the respective companies with which they are associated.