Checkpoints
Enable the APIs
/ 25
Inspect strings and files
/ 25
De-identification
/ 25
Redact strings and images
/ 25
Redacting Sensitive Data with Cloud Data Loss Prevention
GSP864

Overview
Cloud Data Loss Prevention (Cloud DLP) is a fully managed service designed to help discover, classify, and protect sensitive information.
You use the DLP API to classify data in a variety of ways, including data type, sensitivity level, and catagories.
The DLP API protects sensitive data in a variety of ways, including:
- Redaction: redact sensitive data from a document or file.
- Masking: mask sensitive data with a placeholder, such as *.
- Tokenization: replace sensitive data with a unique identifier.
- Encryption: encrypt sensitive data.
In this lab, you learn the basic capabilities of the Cloud DLP API and try out various ways to use the API to protect data.
What you'll learn
In this lab, you use Cloud DLP to do the following:
- Inspect strings and files for matching info types
- Learn about de-identification techniques and de-identify data
- Redact info types in strings and images
Setup and requirements
Before you click the Start Lab button
Read these instructions. Labs are timed and you cannot pause them. The timer, which starts when you click Start Lab, shows how long Google Cloud resources will be made available to you.
This hands-on lab lets you do the lab activities yourself in a real cloud environment, not in a simulation or demo environment. It does so by giving you new, temporary credentials that you use to sign in and access Google Cloud for the duration of the lab.
To complete this lab, you need:
- Access to a standard internet browser (Chrome browser recommended).
- Time to complete the lab---remember, once you start, you cannot pause a lab.
How to start your lab and sign in to the Google Cloud console
-
Click the Start Lab button. If you need to pay for the lab, a pop-up opens for you to select your payment method. On the left is the Lab Details panel with the following:
- The Open Google Cloud console button
- Time remaining
- The temporary credentials that you must use for this lab
- Other information, if needed, to step through this lab
-
Click Open Google Cloud console (or right-click and select Open Link in Incognito Window if you are running the Chrome browser).
The lab spins up resources, and then opens another tab that shows the Sign in page.
Tip: Arrange the tabs in separate windows, side-by-side.
Note: If you see the Choose an account dialog, click Use Another Account. -
If necessary, copy the Username below and paste it into the Sign in dialog.
{{{user_0.username | "Username"}}} You can also find the Username in the Lab Details panel.
-
Click Next.
-
Copy the Password below and paste it into the Welcome dialog.
{{{user_0.password | "Password"}}} You can also find the Password in the Lab Details panel.
-
Click Next.
Important: You must use the credentials the lab provides you. Do not use your Google Cloud account credentials. Note: Using your own Google Cloud account for this lab may incur extra charges. -
Click through the subsequent pages:
- Accept the terms and conditions.
- Do not add recovery options or two-factor authentication (because this is a temporary account).
- Do not sign up for free trials.
After a few moments, the Google Cloud console opens in this tab.

Activate Cloud Shell
Cloud Shell is a virtual machine that is loaded with development tools. It offers a persistent 5GB home directory and runs on the Google Cloud. Cloud Shell provides command-line access to your Google Cloud resources.
- Click Activate Cloud Shell
at the top of the Google Cloud console.
When you are connected, you are already authenticated, and the project is set to your Project_ID,
gcloud is the command-line tool for Google Cloud. It comes pre-installed on Cloud Shell and supports tab-completion.
- (Optional) You can list the active account name with this command:
- Click Authorize.
Output:
- (Optional) You can list the project ID with this command:
Output:
gcloud, in Google Cloud, refer to the gcloud CLI overview guide.
Set the region
Set the region for your project:
Task 1. Clone the repo and enable APIs
- In Cloud Shell, run the following command to download the Cloud Data Loss Prevention Node.js Client repository:
- Once the project code is downloaded, change into the samples directory and install the required Node.js packages:
- Make sure you're using the correct project by setting it with the following
gcloudcommand:
Enable APIs
Here are the APIs needed to enable your project:
- Cloud Data Loss Prevention API - Provides methods for detection, risk analysis, and de-identification of privacy-sensitive fragments in text, images, and Google Cloud Platform storage repositories.
- Cloud Key Management Service (KMS) API - Google Cloud KMS allows encryption key management and performs cryptographic operations with those keys.
- Enable the required APIs with the following
gcloudcommand:
Click Check my progress to verify the objective.
Task 2. Inspect strings and files
The samples directory of the project downloaded in the preceding step contains several javascript files that make use of the different functionality of Cloud DLP. The file, inspectString.js, inspects a provided string for sensitive info types.
- Provide the string option and a sample string with some potentially sensitive information:
The output tells you the findings for each matched info type, which includes:
-
InfoType: the information type detected for that part of the string. Find a full list of possible info types here. By default,
inspectString.jsinspects only for info typesCREDIT_CARD_NUMBER,PHONE_NUMBER,PERSON_NAMEANDEMAIL_ADDRESS -
Likelihood: the results are categorized based on how likely they each represent a match. Likelihood can range from
VERY_UNLIKELYtoVERY_LIKELY.
Check the output using below command:
The findings for the request above are:
- Similarly, you can inspect files for info types. Run the following command to review the sample
accounts.txtfile:
The file includes the following text:
- Use the
inspectFile.jsfile to inspect the provided file for sensitive info types:
Check the output using below command:
The results:
Below is the asynchronous function that uses the API to inspect the string input:
The arguments provided for the parameters above are used to construct a request object. That request is then provided to the inspectContent function to get a response that results in the output:
Upload output to Cloud Storage
Run the following commands to upload the responses on Cloud Storage for activity tracking validation:
Click Check my progress to verify the objective.
Task 3. De-identification
Beyond inspecting and detecting sensitive data, Cloud DLP can perform de-identification. De-identification is the process of removing identifying information from data. The API detects sensitive data as defined by info types, then uses a de-identification transformation to mask, delete, or otherwise obscure the data.
- Run the following command to use
deidentifyWithMask.jsto try de-identification with a mask:
Check the output using below command:
With a mask, the API replaces the characters of the matching info type with a different character, * by default. Example output:
Notice that the email address in the string is obfuscated while the arbitrary order number is intact. (Custom info types are possible but out of scope of this lab).
Look at the function that uses the DLP API to de-identify with a mask. Once again, these arguments are used to construct a request object. This time it's provided to the deidentifyContent function:
Upload output to Cloud Storage
Run the following commands to upload the responses on Cloud Storage for activity tracking validation:
Click Check my progress to verify the objective.
Task 4. Redact strings and images
Another method of obfuscating sensitive information is redaction. Redaction replaces a match with the info type it's identified to match with.
- Use
redactText.jsto redact text from a sample input:
Check the output using below command:
The output replaces the sample credit card number with the info type CREDIT_CARD_NUMBER:
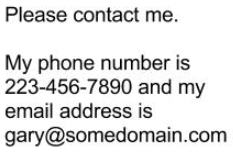
This is useful if you'd like to hide sensitive information but still identify the type of information that's being removed. The DLP API can similarly redact information from images that contain text. Take a look at a sample image (located in the samples/resources directory):
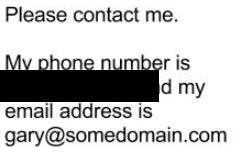
- To redact the phone number from the image above, run the following command:
As specified, a new image named redacted-phone.png is generated with the requested information blacked out. To verify, open the samples/redacted-phone.png file using Cloud Shell Code Editor:
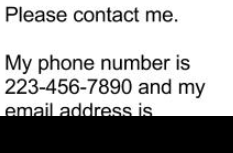
- Try it again to redact the email address from the image:
As specified, a new image named redacted-email.png is generated with the requested information blacked out. To verify, open the samples/redacted-email.png file in the Cloud Shell Code Editor:
Here is the function that is used to redact from a string:
And here is the request provided to the deidentifyContent function:
Similarly, here is the function for redacting an image:
And here is the request provided to the redactImage function:
Upload output to Cloud Storage
Run the following commands to upload the responses on Cloud Storage for activity tracking validation:
Click Check my progress to verify the objective.
Congratulations!
Cloud DLP is a powerful tool that provides access to a powerful sensitive data inspection, classification, and de-identification platform. You used Cloud DLP to inspect strings and files for multiple info types, and used the DLP API to redact data from a string and an image.
Next steps / Learn more
Be sure to check out the following documentation for more practice with Cloud Data Loss Prevention:
- Cloud DLP Documentation.
- The Google Cloud blog post that discusses protecting sensitive data using Cloud DLP.
Google Cloud training and certification
...helps you make the most of Google Cloud technologies. Our classes include technical skills and best practices to help you get up to speed quickly and continue your learning journey. We offer fundamental to advanced level training, with on-demand, live, and virtual options to suit your busy schedule. Certifications help you validate and prove your skill and expertise in Google Cloud technologies.
Manual Last Updated July 17, 2023
Lab Last Tested July 17, 2023
Copyright 2024 Google LLC All rights reserved. Google and the Google logo are trademarks of Google LLC. All other company and product names may be trademarks of the respective companies with which they are associated.