


Before you begin
- Labs create a Google Cloud project and resources for a fixed time
- Labs have a time limit and no pause feature. If you end the lab, you'll have to restart from the beginning.
- On the top left of your screen, click Start lab to begin
In this lab, you use Vertex AI to train and serve a machine learning model to predict loan risk with a tabular dataset.
You learn how to:
This Qwiklabs hands-on lab lets you do the lab activities yourself in a real cloud environment, not in a simulation or demo environment. It does so by giving you new, temporary credentials that you use to sign in and access Google Cloud for the duration of the lab.
To complete this lab, you need:
Click the Start Lab button. If you need to pay for the lab, a pop-up opens for you to select your payment method. On the left is a panel populated with the temporary credentials that you must use for this lab.
Copy the username, and then click Open Google Console. The lab spins up resources, and then opens another tab that shows the Choose an account page.
On the Choose an account page, click Use Another Account. The Sign in page opens.
Paste the username that you copied from the Connection Details panel. Then copy and paste the password.
After a few moments, the Cloud console opens in this tab.

This lab uses Vertex AI, the unified AI platform on Google Cloud to train and deploy a ML model. Vertex AI offers two options on one platform to build a ML model: a codeless solution with AutoML and a code-based solution with Custom Training using Vertex Workbench. You use AutoML in this lab.
In this lab you build a ML model to determine whether a particular customer will repay a loan.
The initial Vertex AI dashboard illustrates the major stages to train and deploy a ML model: prepare the training data, train the model, and get predictions. Later, the dashboard displays your recent activities, such as the recent datasets, models, predictions, endpoints, and notebook instances.
There are three options to import data in Vertex AI:
For convenience, the dataset is already uploaded to Cloud Storage.
For the data source, select Select CSV files from Cloud Storage.
For Import file path, enter:
To see the descriptive statistics for each column of your dataset, click Generate statistics .
Generating the statistics might take a few minutes, especially the first time.
When the statistics are ready, click each column name to display analytical charts.
With a dataset uploaded, you're ready to train a model to predict whether a customer will repay the loan.
The dataset is already named LoanRisk.
For Objective, select Classification.
You select classification instead of regression because you are predicting a distinct number (whether a customer will repay a loan: 0 for repay, 1 for default/not repay) instead of a continuous number.
Specify the name of the model and the target column.
Give the model a name, such as LoanRisk.
For Target column, select Default .
(Optional) Explore Advanced options to determine how to assign the training vs. testing data and specify the encryption.
Click Continue.
For Add features, click Continue.
Specify which columns you want to include in the training model. For example, ClientID might be irrelevant to predict loan risk.
Click the minus sign on the ClientID row to exclude it from the training model.
(Optional) Explore Advanced options to select different optimization objectives.
For more information about optimization objectives for tabular AutoML models, refer to the Optimization objectives for tabular AutoML models guide.
Click Continue.
For Budget, which represents the number of node hours for training, enter 1.
Training your AutoML model for 1 compute hour is typically a good start for understanding whether there is a relationship between the features and label you've selected. From there, you can modify your features and train for more time to improve model performance.
Leave early stopping Enabled.
Click Start training.
Depending on the data size and the training method, the training can take from a few minutes to a couple of hours. Normally you would receive an email from Google Cloud when the training job is complete. However, in the Qwiklabs environment, you will not receive an email.
Vertex AI provides many metrics to evaluate the model performance. You focus on three:
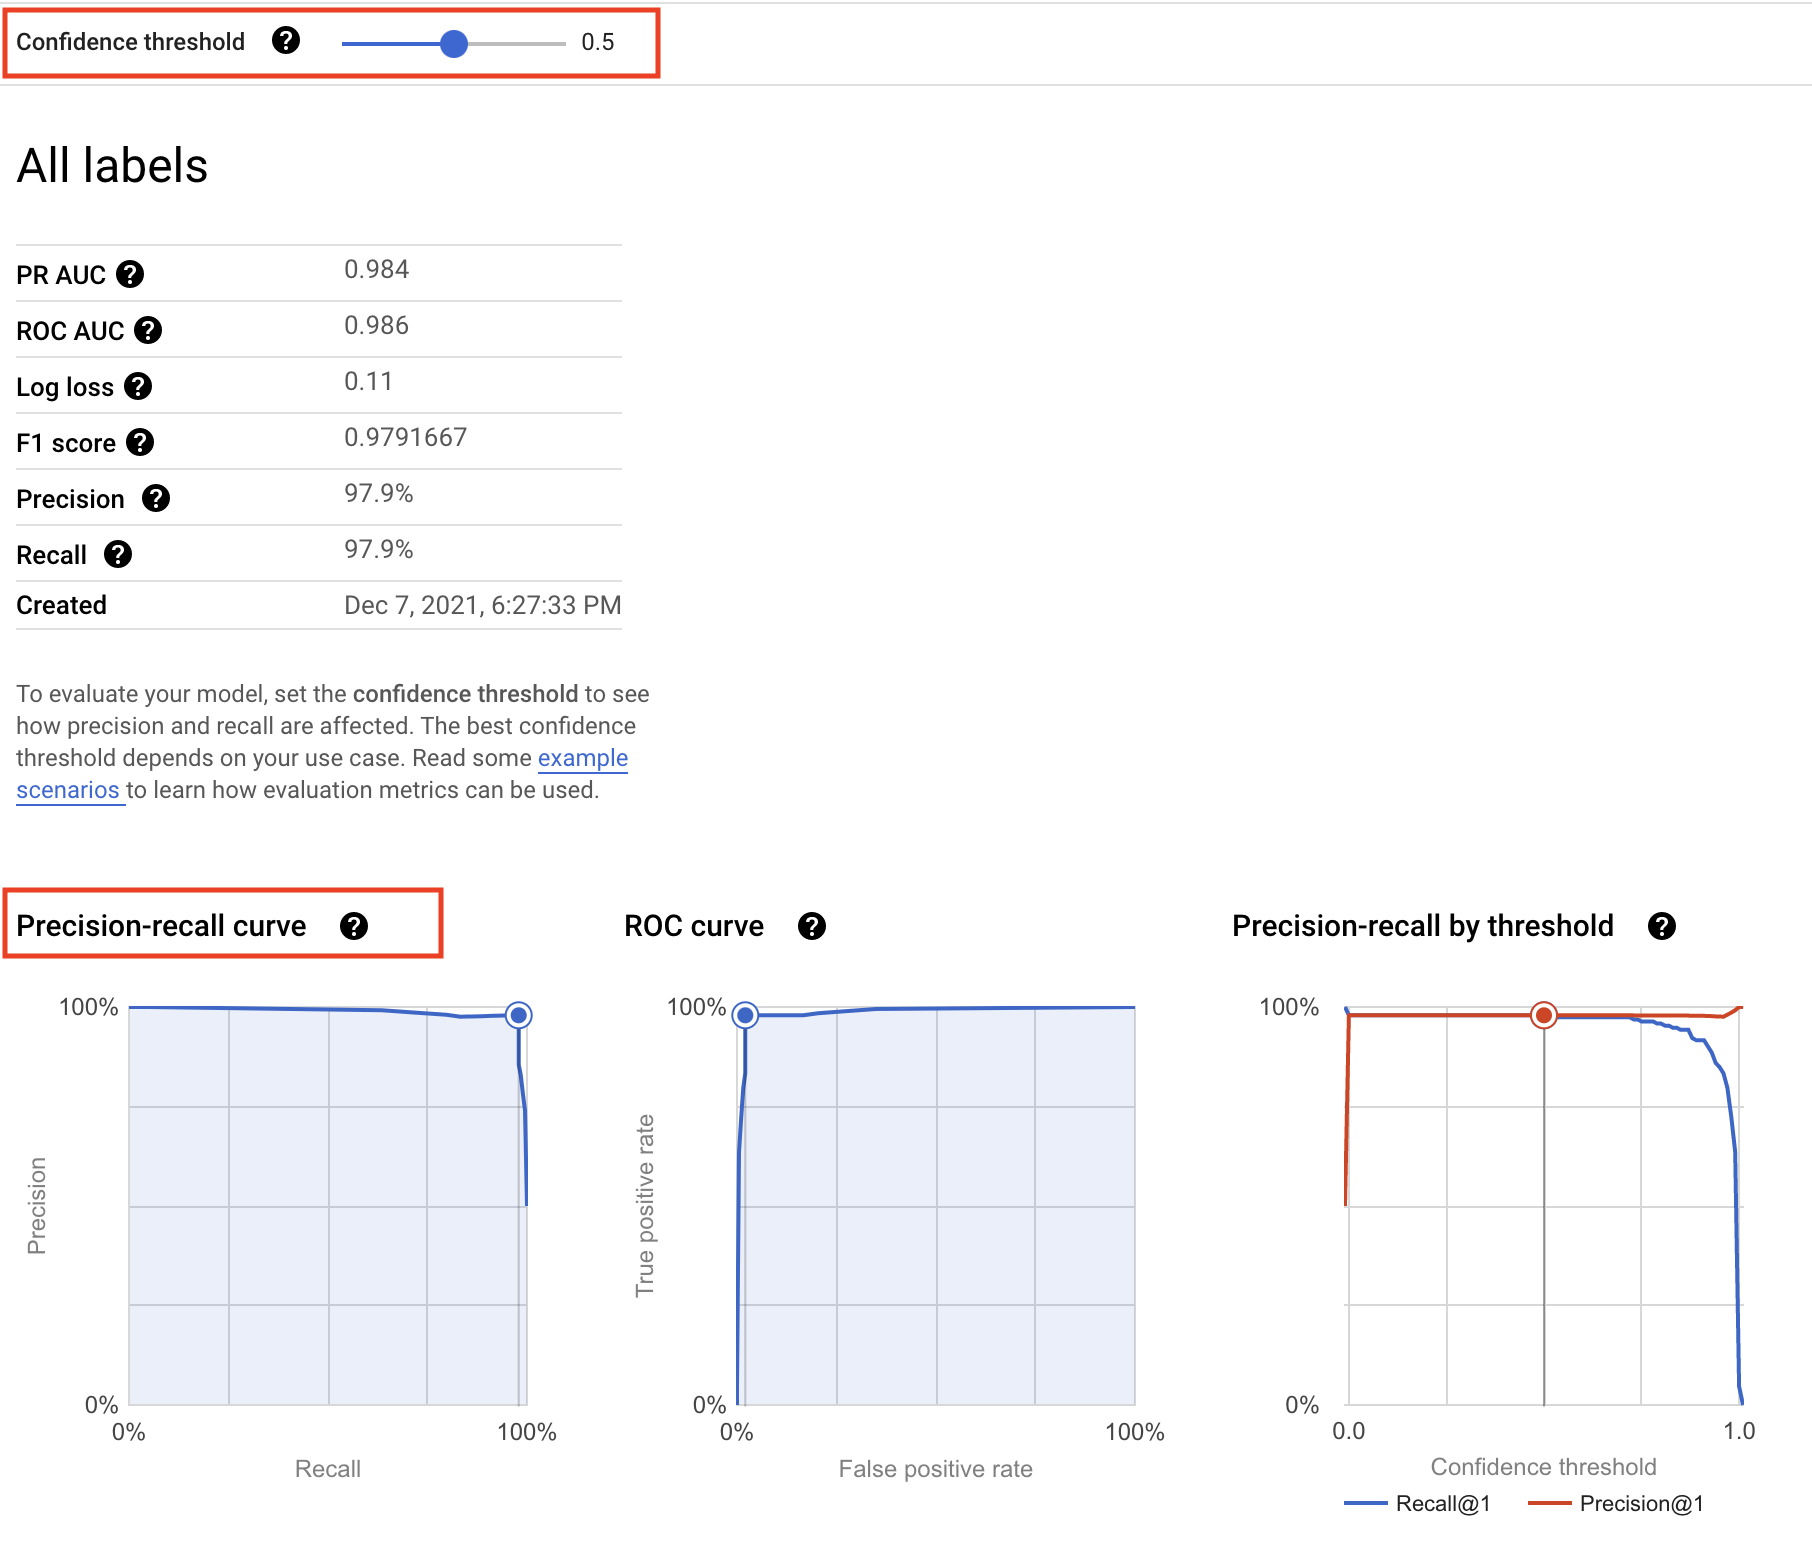
The confidence threshold determines how a ML model counts the positive cases. A higher threshold increases the precision, but decreases recall. A lower threshold decreases the precision, but increases recall.
You can manually adjust the threshold to observe its impact on precision and recall and find the best tradeoff point between the two to meet your business needs.
A confusion matrix tells you the percentage of examples from each class in your test set that your model predicted correctly.
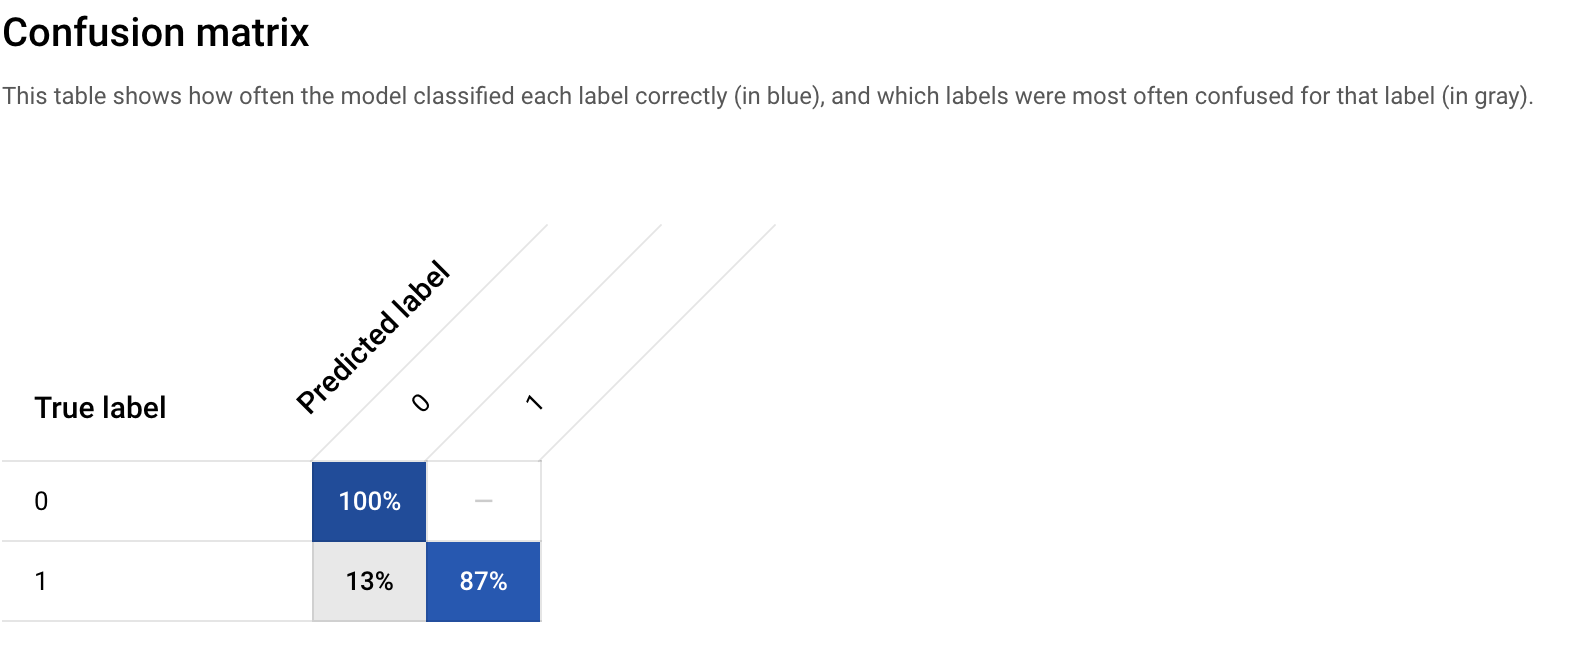
The confusion matrix shows that your initial model is able to predict 100% of the repay examples and 87% of the default examples in your test set correctly, which is not too bad.
You can improve the percentage by adding more examples (more data), engineering new features, and changing the training method, etc.
In Vertex AI, feature importance is displayed through a bar chart to illustrate how each feature contributes to a prediction. The longer the bar, or the larger the numerical value associated with a feature, the more important it is.
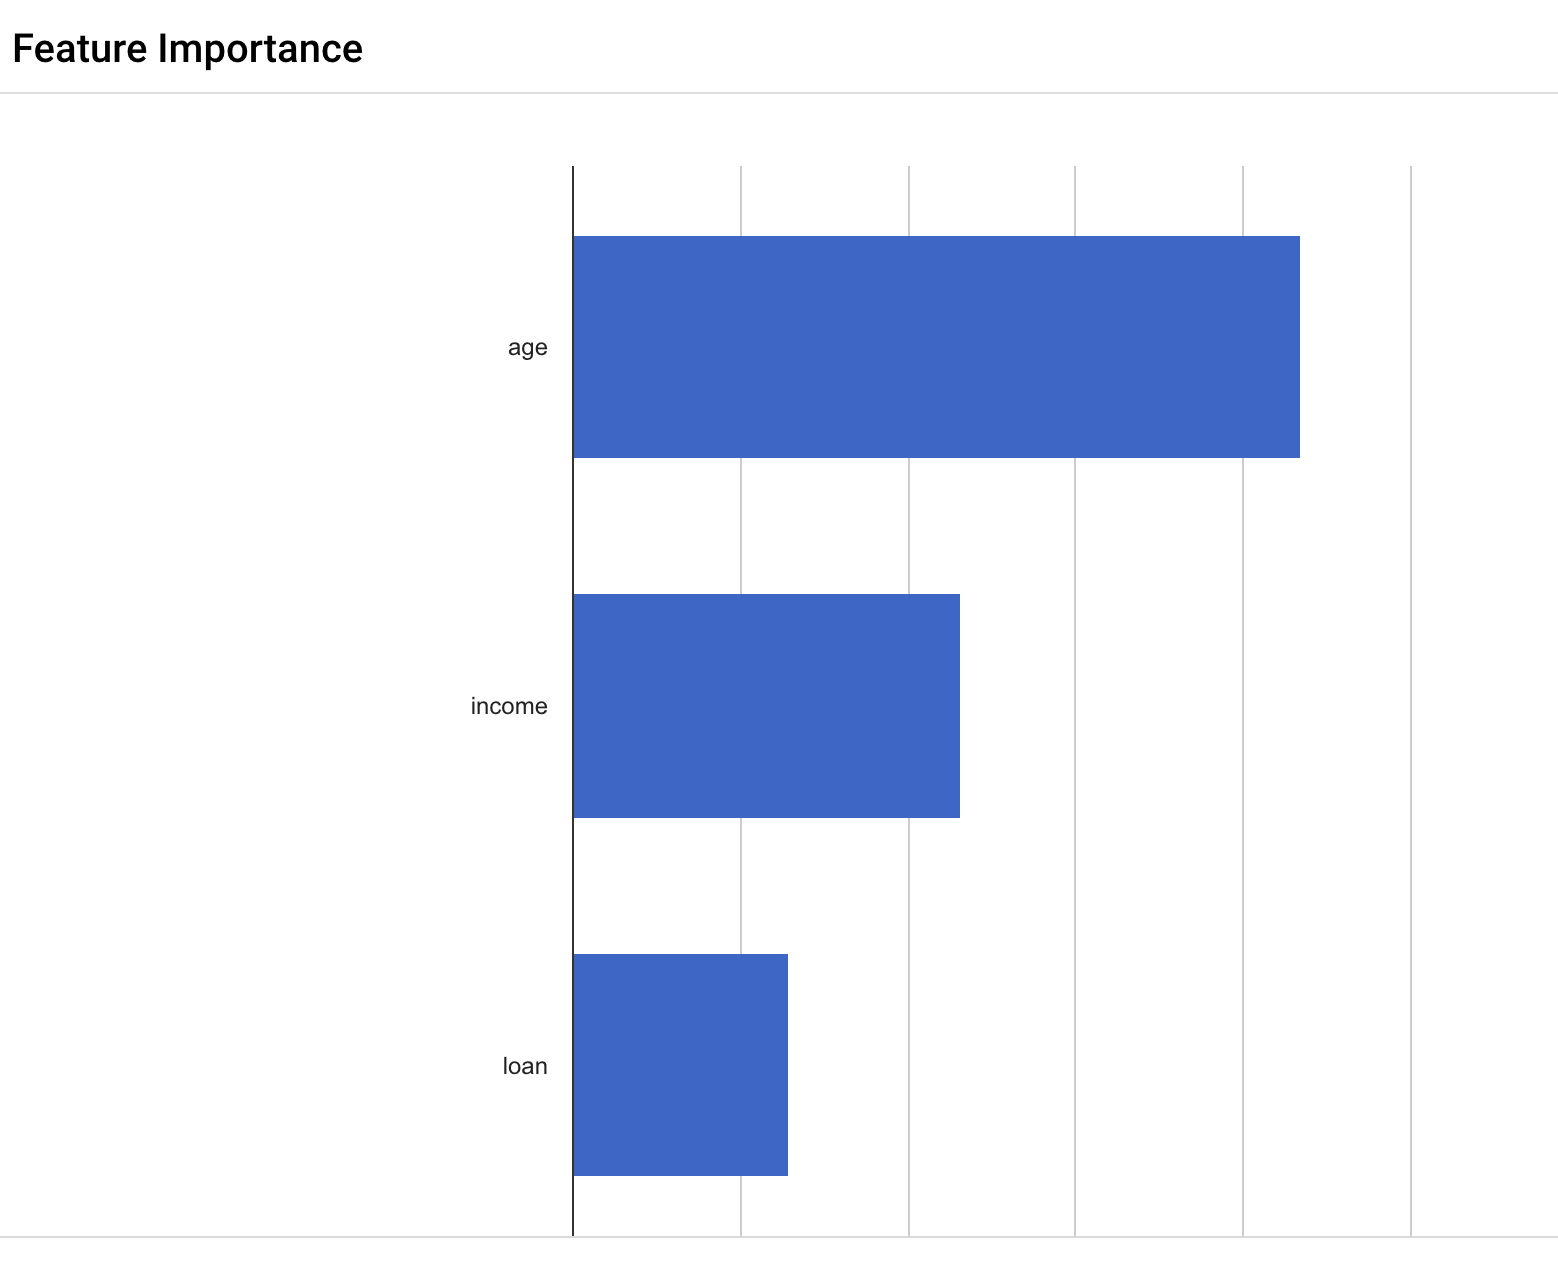
These feature importance values could be used to help you improve your model and have more confidence in its predictions. You might decide to remove the least important features next time you train a model or to combine two of the more significant features into a feature cross to see if this improves model performance.
Feature importance is just one example of Vertex AI’s comprehensive machine learning functionality called Explainable AI. Explainable AI is a set of tools and frameworks to help understand and interpret predictions made by machine learning models.
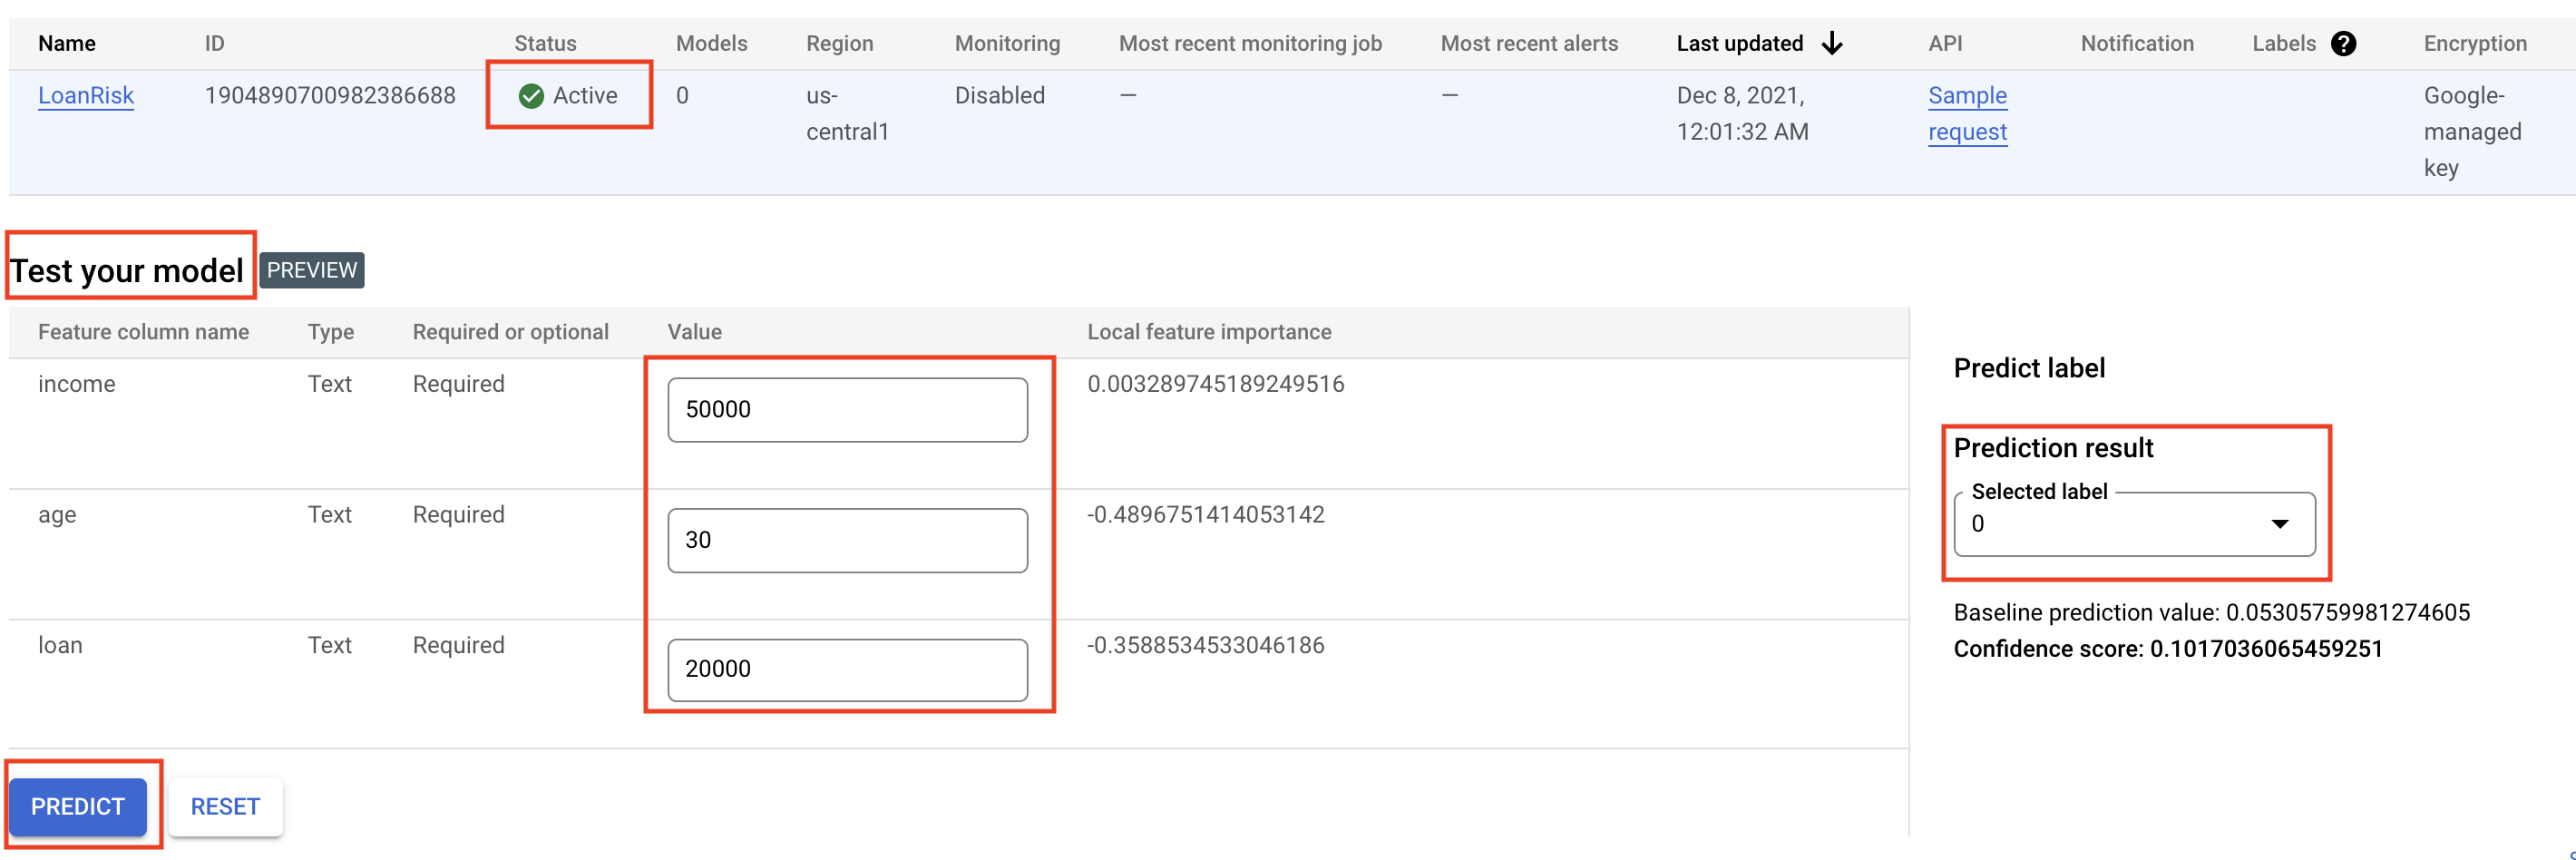
Now that you have a trained model, the next step is to create an endpoint in Vertex. A model resource in Vertex can have multiple endpoints associated with it, and you can split traffic between endpoints.
On your model page, click Deploy & test, and then click Deploy to Endpoint.
For Endpoint name, type LoanRisk
Click Continue.
Leave the traffic splitting settings as-is.
For Machine type, select e2-standard-8, 8 vCPUs, 32 GiB memory.
For Explainability Options, click Feature attribution.
Click Done.
Click Continue.
In Model monitoring, click Continue.
In Model objectives > Training data source, select Vertex AI dataset.
Select your dataset from the drop down menu.
In Target column, type Default
Leave the remaining settings as-is and click Deploy.
Your endpoint will take a few minutes to deploy. When it is completed, a green check mark will appear next to the name.
Now you're ready to get predictions on your deployed model.
In this section, use the AutoML-Gateway to work with an existing trained model.
| ENVIRONMENT VARIABLE | VALUE |
|---|---|
| Credit_Risk ENDPOINT | 1411183591831896064 |
| INPUT_DATA_FILE | INPUT-JSON |
To use the trained model, you will need to create some environment variables.
Open a Cloud Shell window.
Download the lab assets:
INPUT_DATA_FILE environment variable:PROJECT_NUMBER environment variable:AUTOML_SERVICE environment variable:The file INPUT-JSON is composed of the following values:
Expected Output:
If you use the Google Cloud console, the following image illustrates how the same action could be performed:
You can now use Vertex AI to:
To learn more about different parts of Vertex AI, refer to the Vertex AI documentation.
When you have completed your lab, click End Lab. Google Cloud Skills Boost removes the resources you’ve used and cleans the account for you.
You will be given an opportunity to rate the lab experience. Select the applicable number of stars, type a comment, and then click Submit.
The number of stars indicates the following:
You can close the dialog box if you don't want to provide feedback.
For feedback, suggestions, or corrections, please use the Support tab.
Copyright 2022 Google LLC All rights reserved. Google and the Google logo are trademarks of Google LLC. All other company and product names may be trademarks of the respective companies with which they are associated.


This content is not currently available
We will notify you via email when it becomes available

Great!
We will contact you via email if it becomes available

One lab at a time
Confirm to end all existing labs and start this one