In this exercise, you create a modern serverless continuous
integration/continuous delivery (CI/CD) pipeline to automate application
delivery to GKE and Anthos clusters.
The pipeline starts with a "hello world" Node.js code stored
in Cloud Source Repositories in a private Git repository. Commits that are made
to the master branch trigger a Cloud Build workflow, which
builds a new container image, pushes it to Artifact Registry, and triggers
Google Cloud Deploy as the CD part.
Google Cloud Deploy delivers the
application to the dev cluster, which, after testing, allows you to promote it
to a staging and production cluster. Additionally, you learn to implement
approvals to ensure that code only reaches production when the right
stakeholders approve the release.
Objectives
In this lab, you learn how to:
Create and use a repository in Cloud Source Repositories.
Set up continuous integration with Cloud Build workflows.
Configure continuous delivery pipelines with Google Cloud Deploy.
Setup and requirements
In this task, you use Qwiklabs and perform initialization steps for your lab.
For each lab, you get a new Google Cloud project and set of resources for a fixed time at no cost.
Sign in to Qwiklabs using an incognito window.
Note the lab's access time (for example, 1:15:00), and make sure you can finish within that time.
There is no pause feature. You can restart if needed, but you have to start at the beginning.
When ready, click Start lab.
Note your lab credentials (Username and Password). You will use them to sign in to the Google Cloud Console.
Click Open Google Console.
Click Use another account and copy/paste credentials for this lab into the prompts.
If you use other credentials, you'll receive errors or incur charges.
Accept the terms and skip the recovery resource page.
After you complete the initial sign-in steps, the project dashboard appears.
Click Select a project, highlight your GCP Project ID, and click
Open to select your project.
Activate Google Cloud Shell
Google Cloud Shell is a virtual machine that is loaded with development tools. It offers a persistent 5GB home directory and runs on the Google Cloud.
Google Cloud Shell provides command-line access to your Google Cloud resources.
In Cloud console, on the top right toolbar, click the Open Cloud Shell button.
Click Continue.
It takes a few moments to provision and connect to the environment. When you are connected, you are already authenticated, and the project is set to your PROJECT_ID. For example:
gcloud is the command-line tool for Google Cloud. It comes pre-installed on Cloud Shell and supports tab-completion.
You can list the active account name with this command:
[core]
project = qwiklabs-gcp-44776a13dea667a6
Note:
Full documentation of gcloud is available in the
gcloud CLI overview guide
.
Note:
The lab environment is partially configured, and the following objects were created:
A GKE cluster named dev-cluster.
A GKE cluster named staging-cluster.
A GKE cluster named prod-cluster.
Task 1. Create a basic Node.js application from the Google Cloud Console
Activate Cloud Shell.
If the tab under the Cloud Shell header does not list your project ID qwiklabs-gcp-[hex], press the down arrow to create a new Cloud Shell tab associated with the correct project.
The docker build command looks in the specified path (.) for a Dockerfile. If
it finds one, it follows the instructions to build a Docker image (in this case
adding the specified tag -t). docker push then uploads a copy of the image to
Artifact Registry.
In the Google Cloud Console, navigate to Artifact Registry and confirm that
the image was created and uploaded as expected.
Click Check my progress to verify the objective.
Create a basic Node.js application from the Google Cloud Console
Task 2. Configure your CI/CD pipeline with Cloud Build and Google Cloud Deploy
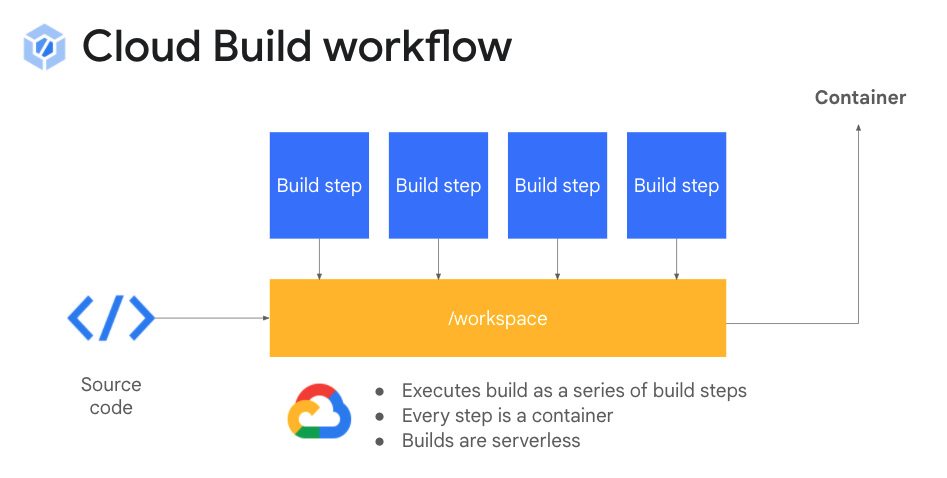
In the previous task, you took code from a Git repository, used
Docker to build an image, and pushed it to Artifact Registry. Cloud Build
allows you to create workflows of build steps similar to the kind you executed
manually. Google and the Cloud Build community have created several
builders, each usable by name.
In this task, you create a cloudbuild.yaml file to define the build workflow: build the image, push it to Artifact Registry, and finally push it to Google Cloud Deploy. From there, Google Cloud Deploy manages continuous delivery. You then test for correctness.
Create a cloudbuild.yaml file, which executes the same steps you just performed
manually:
The file name cloudbuild.yaml is the expected default, but you can give it a
custom name. At its most basic, the cloudbuild.yaml file lays out the
steps the Cloud Build worker should complete. The file can then be manually
passed to Cloud Build or automated as part of a trigger.
Create a clouddeploy.yaml file to specify the delivery pipeline containing
the target platforms where the helloworld file should be delivered; in this
case, the three existing GKE clusters: dev-cluster, staging-cluster, and
prod-cluster:
In the Google Cloud Console, navigate to Cloud Deploy and confirm that
the pipeline was created.
Click on helloworld-pipeline to open it and view the pipeline.
Use Cloud Build to execute the workflow:
gcloud builds submit --config cloudbuild.yaml
In the Google Cloud Console, navigate to Cloud Deploy, open the
pipeline you created earlier, and wait for the release to be
deployed to dev-cluster.
In the Google Cloud Console, navigate to
Kubernetes Engine > Gateways, Services & Ingress, click on Services tab and locate the hello-world-demo service, and click on the link with the public IP address to see the deployed application running
on dev-cluster.
Click Check my progress to verify the objective.
Configure your CI/CD pipeline with Cloud Build and Google Cloud Deploy
Task 3. Automate continuous integration using a Cloud Build trigger
For this task, you use a very simplified development process. You commit
changes to the Git repository local to Cloud Shell and push the changes to the
remote repository. When changes are pushed to Cloud Source Repositories master
branch, a Cloud Build trigger based on the cloudbuild.yaml file created earlier
is executed, which builds the image, pushes it to Artifact Registry, and
schedules a Google Cloud Deploy release.
In Cloud Shell, initialize and configure Git for use:
Push the code from your local Cloud Shell repository to the Google repository
helloworld master branch:
git push to-google master
In the Google Cloud Console, navigate to Source Repositories and
investigate your new repo.
The code is written locally and stored in a central repository, the build steps
are defined in a cloudbuild.yaml file, and the deployment steps are specified
in the clouddeploy.yaml file. The last step is to create a trigger to put it
all together.
In the Google Cloud Console, navigate to Cloud Build > Triggers.
Click on the CREATE TRIGGER button.
Enter the name HelloWorldJS.
Under Source, enter select the repository to be
helloworld (Cloud Source Repositories) and the branch to match ^master$.
Under Configuration, select Cloud Build configuration file, and
enter /cloudbuild.yaml as the Cloud Build configuration file location.
Under Service Account, select XXXXXXXXX-compute@developer.gserviceaccount.com. Please note the warning, in a production setting, declare a dedicated service account with limited IAM Permissions.
Click on CREATE to create the trigger.
When the trigger is ready, to test the trigger's logic, click RUN. If a
window pops up to select a branch, enter master and press RUN TRIGGER.
Navigate to Cloud Build > History and wait for the build workflow to
complete.
Navigate to Cloud Deploy and confirm that the new pipeline has been
triggered.
Test the process
Return to Cloud Shell and edit the
services code:
edit index.js
Make a change to the services returned message; for example, change World
to World 2.
Stage and commit the change to your local developers Git repository, and
then push the change to the repository:
Return to the Google Cloud Console and navigate to
Cloud Build > History.
When the trigger is finished executing, go to Cloud Deploy and wait
for the deployment to occur.
Re-load the application and confirm that the new message is displayed.
Click Check my progress to verify the objective.
Automate continuous integration using a Cloud Build trigger
Task 4. Promote and approve releases
You have been working out of dev-cluster, which is great for
developing and testing new features of your application. However, after those
features have been developed, you might want to expose them to an internal
audience in a staging environment for further testing and eventually deploy
them to a production environment.
In this task, you learn how to promote your application to other environments
and use approvals for stakeholders to approve a release.
In the Google Cloud Console, navigate to Cloud Deploy and open your
pipeline.
In the pipeline visualization area, click on the 3-dot menu in the dev
target box. Notice the following actions:
Promote release: Launches your application to the next target; in this
case, staging-cluster.
Re-deploy release: If an error occurs, you can try to redeploy
the current version to dev-cluster to fix any transient issues.
Roll back release: Discard the latest release and bring the previous
version of your application to the target cluster.
To deploy your application to staging, click Promote release.
Investigate the options in the pop-up window, and check the Manifest Diff
tab to check the differences with the previous version.
Click Promote.
After the application is deployed, to see the deployed application running
on staging-cluster, navigate to Kubernetes Engine > Gateways, Services & Ingress, click on Services tab.
Locate the hello-world-demo service
and click on the link with the public IP address.
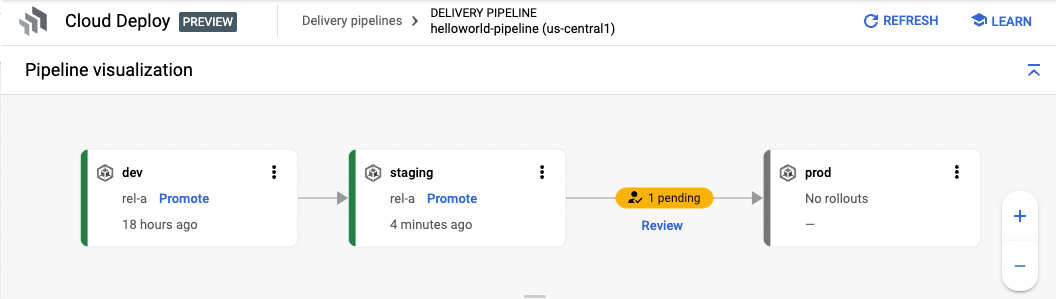
To promote the release from staging to production, return to
Cloud Deploy, open your pipeline, click Promote in the staging box, and
then in the dialog, click Promote again. Notice that this time the
promotion has been blocked by a review action that you specified earlier in the
clouddeploy.yaml.
In the visualization area between staging and production, click Review.
After reviewing the changes, click Approve.
Usually, approvals would be done by a different person or team.
Return to your Cloud Deploy pipeline visualization, and click on the
release that is deployed to prod-cluster.
Click again on the rollout to open a details window and open the
Render logs and Deployment logs. Here you can debug if there are any
issues in the deployment. Notice that the actual deployment also runs on a
Cloud Build runner.
After the rollout has finished, to see the deployed application running
on prod-cluster, navigate to Kubernetes Engine > Gateways, Services & Ingress, click on Services tab, locate to the hello-world-demo service, and click on the link with the public IP address.
Click Check my progress to verify the objective.
Promote and approve releases
Congratulations!
You have used Cloud Source Repositories, Cloud Build, and Google Cloud Deploy to automate the application delivery to GKE and Anthos clusters. You also learned how to promote and approve releases to staging and production clusters.
End your lab
When you have completed your lab, click End Lab. Google Cloud Skills Boost removes the resources you’ve used and cleans the account for you.
You will be given an opportunity to rate the lab experience. Select the applicable number of stars, type a comment, and then click Submit.
The number of stars indicates the following:
1 star = Very dissatisfied
2 stars = Dissatisfied
3 stars = Neutral
4 stars = Satisfied
5 stars = Very satisfied
You can close the dialog box if you don't want to provide feedback.
For feedback, suggestions, or corrections, please use the Support tab.
Copyright 2022 Google LLC All rights reserved. Google and the Google logo are trademarks of Google LLC. All other company and product names may be trademarks of the respective companies with which they are associated.
Les ateliers créent un projet Google Cloud et des ressources pour une durée déterminée.
Les ateliers doivent être effectués dans le délai imparti et ne peuvent pas être mis en pause. Si vous quittez l'atelier, vous devrez le recommencer depuis le début.
En haut à gauche de l'écran, cliquez sur Démarrer l'atelier pour commencer.
Utilisez la navigation privée
Copiez le nom d'utilisateur et le mot de passe fournis pour l'atelier
Cliquez sur Ouvrir la console en navigation privée
Connectez-vous à la console
Connectez-vous à l'aide des identifiants qui vous ont été attribués pour l'atelier. L'utilisation d'autres identifiants peut entraîner des erreurs ou des frais.
Acceptez les conditions d'utilisation et ignorez la page concernant les ressources de récupération des données.
Ne cliquez pas sur Terminer l'atelier, à moins que vous n'ayez terminé l'atelier ou que vous ne vouliez le recommencer, car cela effacera votre travail et supprimera le projet.
Ce contenu n'est pas disponible pour le moment
Nous vous préviendrons par e-mail lorsqu'il sera disponible
Parfait !
Nous vous contacterons par e-mail s'il devient disponible
Un atelier à la fois
Confirmez pour mettre fin à tous les ateliers existants et démarrer celui-ci
Utilisez la navigation privée pour effectuer l'atelier
Ouvrez une fenêtre de navigateur en mode navigation privée pour effectuer cet atelier. Vous éviterez ainsi les conflits entre votre compte personnel et le compte temporaire de participant, qui pourraient entraîner des frais supplémentaires facturés sur votre compte personnel.
Creating CI/CD pipelines for GKE Enterprise clusters
Durée :
14 min de configuration
·
Accessible pendant 90 min
·
Terminé après 90 min